
April 10, 2019 updated by
Leave a reply »
By default, Windows 10 enables a feature called Fast Startup (Hybrid Shutdown) that can shut down and boot up your PC much faster than Windows 7 or previous versions of Windows. When you shutdown Windows 10, you’re actually performing a partial hibernation.
If you prefer to have your PC completely shut down, you can either turn off Fast Startup feature or use the following methods to fully shutdown Windows 10.
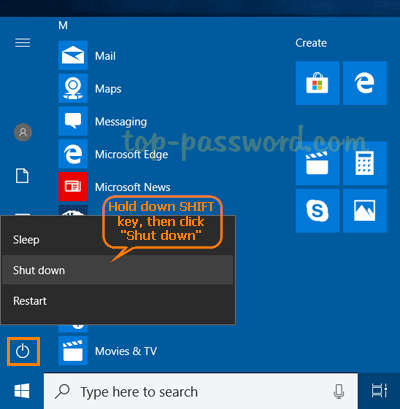
Method 1: Perform a Full Shutdown Using Shift Key
We’ve covered many different ways to shutdown Windows 10 in the past, but you might not realize that Windows 10 is just doing a hybird shutdown by default. If you would like to perform a full shutdown, simply hold down the SHIFT key on your keyboard and then click the “Shut down” option in the Start Menu, or on the sign-in screen.
Method 2: Perform a Full Shutdown Using Command Prompt
Just open an elevated Command Prompt or PowerShell window, type the following command and press Enter:
shutdown /s /f /t 0
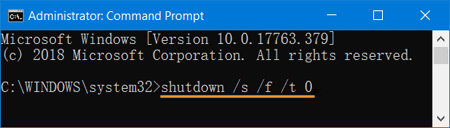
This will immediately close any open applications without prompting to save your work, and completely shut down your PC.
Conclusion
The Fast Startup feature can make your computer boot up faster, saving valuable seconds every time you turn on Windows 10. However, if your Windows 10 was installed on a speedy solid-state drive (SSD), Fast Startup don’t actually make any difference and a full shutdown is recommended.
- Previous Post: How to Change UAC Behavior for Standard Users in Windows 10
- Next Post: Windows 10: Hide or Unhide Folders / Files Using Command Prompt
How to Force Hard or Full Shutdown in Windows 11/10 to Reinitialize It
In the digital age, operating systems have transformed the way we interact with our devices. Windows 10 and 11 have brought about a host of enhancements aimed at improving user experience, making it intuitive and efficient. However, as with any software, users may encounter issues that necessitate a complete reset of the operating system. This article delves into the methods required for forcing a hard or full shutdown of Windows 10/11, reinitializing the system when it becomes unresponsive or fails to execute a standard shutdown.
Understanding Shutdown Types
Before we explore the methods to force a shutdown, it’s essential to understand the different types of shutdowns.
1. Standard Shutdown: This is the typical way to close Windows. It includes saving open applications, logging off users, and properly shutting down hardware.
2. Hard Shutdown: A hard shutdown involves cutting the power to your computer without following the standard procedure. This is usually done by pressing and holding the power button until the device powers off. While it’s effective, it can lead to potential data loss and corruption of system files if used frequently.
3. Full Shutdown: This often refers to a complete refresh of the system upon powering it back on, where Windows clears cache, closes all processes, and ends all task instances. This can often be achieved through various means, including Command Prompt, use of the power button, or through the settings menu.
Reasons for Performing a Hard Shutdown
-
System Hanging: Often your computer may become unresponsive due to software glitches.
-
Frozen Applications: Sometimes individual applications may freeze, causing the entire system to halt.
-
Slow Performance: Performance issues can lead to excessive lag, necessitating close-down.
-
Hardware Triggers: Peripheral devices may cause conflicts that lead to unresponsiveness.
-
Maintenance Purposes: Occasionally, a full shutdown is required for system updates or troubleshooting.
In any of the scenarios above, knowing how to correctly execute a shutdown can save you from potential headaches. Let’s explore the methods step-by-step.
Method 1: Using the Power Button
The simplest method for forceful shutdowns is through the power button. Here’s how to do it safely and effectively.
Steps to Use the Power Button
-
Locate the Power Button: This is typically marked with a power symbol (a circle with a vertical line).
-
Press and Hold: Press the power button and hold it down for about 5 to 10 seconds. This action sends a signal to the computer to cut all power.
-
Wait a Moment: After the system powers off, wait a few seconds before you turn it back on. This allows the system to fully reset.
-
Restart the Computer: Press the power button again to reinitialize the system.
Recommendations
While pressing the power button effectively forces a shutdown, use this method cautiously. Frequent hard shutdowns can lead to corrupted files and system errors. As a best practice, reserve this method for situations when the system is completely unresponsive.
Method 2: Using Keyboard Shortcuts
There are certain keyboard shortcuts available for quickly accessing the shutdown options, especially beneficial when navigating through a frozen system.
Steps to Force a Shutdown via Keyboard Shortcuts
-
Press Ctrl + Alt + Delete: This brings up the security options screen.
-
Click on the Power Icon: A power icon usually located at the bottom-right corner.
-
Choose Shutdown: If the screen is still responsive, clicking the shutdown option here can lead to a standard close. If not responsive…
-
Press Alt + F4: This can bring focus back and could allow you to select «Shut Down» from the dropdown menu.
Possible Alternatives
If your keyboard shortcuts don’t work due to an unresponsive system, you might need to take the hard shutdown route as mentioned earlier.
Method 3: Command Prompt
For advanced users, utilizing the Command Prompt is an effective way to initiate a shutdown process.
Steps to Execute a Shutdown Command
-
Open Command Prompt:
- Press Windows + R to open the Run dialog.
- Type ‘cmd’ and hit Enter.
-
Execute the Shutdown Command:
- Type
shutdown /s /f /t 0and press Enter. - Here,
/sstands for shutdown,/fforces running applications to close, and/tsets the timeout in seconds (0 for immediate).
- Type
-
Execution of Command: This command forces applications to close and reinitializes the system safely.
Note on Usage
Make sure to use this command when you know that your applications can handle a forced closure, as it can potentially lose unsaved work.
Method 4: Power Options
Though somewhat less known, the Windows operating system provides power options through the settings menu.
Steps to Access Power Options
-
Open Settings: Press Windows + I to open Settings.
-
Navigate to System: Click on the «System» option.
-
Select Power & Sleep: Located on the left sidebar.
-
Click Additional Power Settings: Under “Related Settings.”
-
Choose Choose what the power buttons do:
-
Select Shutdown Settings: There you can configure how the power button behaves, allowing you to customize how shutdown preferences are set.
Customizing Settings
This method will enable a user-friendly approach to shut down via power buttons, ensuring your data is not at risk due to forced closures.
Method 5: Using Task Manager
Task Manager offers a direct way to view running applications and processes. It can also initiate a shutdown process.
Steps to Kill Processes and Initiate Shutdown
-
Open Task Manager:
- Press Ctrl + Shift + Esc or right-click the taskbar and select “Task Manager.”
-
Go to the Processes Tab: This tab shows all running applications and processes.
-
Select an Unresponsive Application: Right-click on any application that’s not responding.
-
Choose End Task: This closes the application.
-
Shutdown or Restart: After closing unresponsive applications, you can then choose to shut down your system using the power options in the Task Manager window.
Leverage Task Manager for Maintenance
For those dealing with unresponsive applications often, familiarizing with Task Manager can be a tool for daily use, helping manage background processes effectively.
Additional Considerations and Precautions
Why Hard Shutdowns Should Be a Last Resort
While it’s easy and often necessary to perform a hard or full shutdown, users should exercise caution:
- Risk of Data Loss: Files active at the time of shutdown can be left incomplete.
- Corruption of System Files: Frequent hard shutdowns can lead to errors and malfunction.
- Monitor Hardware Health: Repeated forced shutdowns can also strain hardware, particularly your hard drive and memory.
Preventive Measures
- Regular Updates: Keep Windows updated to reduce instability.
- Sufficient RAM and Hard Disk Space: Ensure your system has adequate resources.
- Use Antivirus Software: Running checks can prevent glitches caused by malware.
Troubleshooting Post-Shutdown Issues
After Performing a Hard Shutdown
After a forced shutdown, it’s crucial to monitor system behavior:
-
Boot-Up Recovery: If Windows does not start normally, utilize recovery options such as Safe Mode.
-
Check for Disk Errors: Use the built-in Check Disk tool to scan and repair issues:
- Open Command Prompt as administrator.
- Type
chkdsk /fto scan and fix file system errors.
-
Monitor Performance: Continue to observe system operations for unusual behavior that may indicate underlying issues.
Keeping System Performance Optimal
Regular maintenance can prolong the lifespan of your device and improve performance:
-
Defragment Hard Drive: Regular defragmentation (for HDDs) can speed up performance.
-
Clear Temporary Files: Periodically removing temporary files can boost performance.
-
Backup Data: Ensure you regularly backup important files to prevent loss.
Conclusion
A forced hard or full shutdown in Windows 10/11 can be a lifesaver in situations of system unresponsiveness. It’s an invaluable tool in your arsenal for managing computer crises. However, it should always be seen as a method of last resort due to potential long-term consequences such as data loss and corruption. By understanding the various methods available—from using the power button, leveraging shortcuts, commanding the system via Command Prompt, to navigating power options—you empower yourself to handle frustrating situations more efficiently.
The key takeaway is to maintain regular backups to safeguard your vital data and be mindful of your hardware performance for ongoing health in your computing experience. Embracing these practices will not only help in dealing with unexpected shutdowns but also enhance the longevity and reliability of your Windows environment. Always strive for a balanced approach—mixing efficiency with care—and you’ll ensure a better relationship with your technology.
How to Fully Shutdown Windows 10
Shutting down your Windows 10 computer is straightforward if you know where to look. You can completely shut down your system by accessing the Start menu, selecting the Power button, and choosing «Shut down.» This will ensure that your PC turns off entirely, not just enters sleep or hibernate modes.
To fully shut down your Windows 10 computer, follow these easy steps. This guide will make sure your PC is entirely turned off, saving energy and keeping your machine in good health.
Step 1: Open the Start Menu
Click on the Windows icon at the bottom-left corner of your screen.
By opening the Start menu, you gain access to various options, including the Power button. This menu is your gateway to shutting down your computer.
Step 2: Click on the Power Button
In the Start menu, find and click the Power button, which looks like a circle with a vertical line through the top.
The Power button presents you with several choices, such as Sleep, Restart, and Shut Down. To fully power down your system, you’ll want to select Shut Down.
Step 3: Select «Shut Down»
Choose «Shut down» from the list of options.
Selecting «Shut down» will initiate the shutdown process, ensuring that your computer turns off entirely. You may see a message saying that Windows is shutting down.
Step 4: Wait for the Computer to Turn Off
Your screen will go dark, and the power indicator light on your computer will turn off.
Once the shutdown process begins, Windows will close all active applications and processes, ensuring everything is saved and nothing is lost.
Step 5: Confirm Shutdown
Ensure the power indicator light on your computer is off to verify the shutdown.
Confirming that the light is off guarantees that your computer is entirely shut down, preventing any power use or potential issues.
After completing these steps, your computer will be fully powered down, and you can safely unplug or move it if needed.
Tips for How to Fully Shutdown Windows 10
- Use Keyboard Shortcuts: Use Alt + F4 on your desktop to bring up the shutdown menu quickly.
- Check for Updates: Make sure there are no pending updates before shutting down, as these may delay the process.
- Close Applications: Close all open apps and save your work to avoid data loss.
- Disable Fast Startup: Fast Startup can sometimes cause Windows not to fully shut down. Disable it in the power settings if you encounter issues.
- Monitor Battery: If you’re using a laptop, ensure it’s connected to power or has enough battery life to complete the shutdown process.
Frequently Asked Questions
Why won’t my computer shut down?
Your computer might not shut down due to pending updates or background applications preventing the process. Ensure all updates are installed and all programs are closed.
Can I shut down my computer using the Command Prompt?
Yes, you can use the Command Prompt by typing «shutdown /s» and pressing Enter to initiate a shutdown.
Is it bad to force shut down my computer?
Forcing a shutdown by holding the power button can cause data loss or corruption. It’s best to follow the proper shutdown procedure.
What is the difference between shutdown and sleep mode?
Shutdown completely powers off your computer, while sleep mode puts it in a low-power state, keeping your session active.
How do I disable Fast Startup in Windows 10?
Go to Control Panel > Hardware and Sound > Power Options > Choose what the power buttons do > Change settings that are currently unavailable, then uncheck «Turn on fast startup.»
Summary
- Open the Start Menu.
- Click the Power Button.
- Select «Shut Down.»
- Wait for the Computer to Turn Off.
- Confirm Shutdown.
Conclusion
Knowing how to fully shut down Windows 10 is essential for maintaining your computer’s performance and longevity. Properly shutting down your system ensures that all processes are safely closed and that no data is lost. This simple yet effective procedure prevents potential issues that might arise from improper power-downs, such as data corruption or software problems.
If you’re new to this, don’t worry; practice makes perfect. Follow the steps outlined, and you’ll soon find it second nature. Remember to incorporate the tips provided to make the shutdown process even smoother. Shutting down may seem basic, but it’s a crucial part of keeping your computer running efficiently.
For those interested in learning more, feel free to explore additional resources or guides on Windows 10 maintenance. A well-maintained system runs better and lasts longer, making your daily tasks smoother and more enjoyable. Happy computing!
Matt Jacobs has been working as an IT consultant for small businesses since receiving his Master’s degree in 2003. While he still does some consulting work, his primary focus now is on creating technology support content for SupportYourTech.com.
His work can be found on many websites and focuses on topics such as Microsoft Office, Apple devices, Android devices, Photoshop, and more.
Full Clean Windows 10/11 Shutdown: A Comprehensive Guide
Windows 10 and 11 have become the backbone of modern computing, powering millions of devices worldwide. However, like any software, they can be prone to issues that may necessitate a full clean shutdown. This article will explore what a full clean shutdown means, how to execute it effectively, and the benefits it provides for your system’s health.
Understanding a Full Clean Shutdown
A full clean shutdown refers to the process of completely terminating all active processes, services, and applications on a Windows system, ensuring that no data is lost or corrupted. Unlike a regular shutdown, which may leave certain processes lingering or fail to correctly release resources, a full clean shutdown guarantees that all operations are closed properly.
Importance of Full Clean Shutdowns
- Data Integrity: It ensures that any unsaved changes in open applications are properly saved.
- Resource Management: Stops all running processes, freeing up system resources that may remain engaged even after a standard shutdown.
- System Performance: Regularly performing a full clean shutdown can improve overall system performance and reduce the likelihood of encountering errors upon startup.
- Troubleshooting: It can help clear temporary files and cached data that may be causing performance issues, allowing for a fresh start.
- Prevent Corruption: Helps prevent file system corruption that can occur if processes are terminated abruptly.
How to Perform a Full Clean Shutdown
Methods to Initiate a Full Clean Shutdown
There are several ways to execute a full clean shutdown in Windows 10 and 11. Below are the most effective methods:
Method 1: Using the Start Menu
- Save Your Work: Ensure all your documents and applications are saved and closed.
- Access the Start Menu: Click on the Windows icon in the taskbar or press the Windows key on your keyboard.
- Select the Power Button: Click on the power icon located typically at the bottom of the menu.
- Choose Shutdown: Hold down the ‘Shift’ key and select ‘Shut down.’ This forces Windows to close all applications cleanly.
Method 2: Command Prompt
A more technical method involves using the Command Prompt.
-
Open Command Prompt: Type
cmdin the search bar, right-click on “Command Prompt,” and select “Run as administrator.” -
Execute Shutdown Command: Enter the command:
shutdown /s /f /t 0/sspecifies shutdown./fforces running applications to close./t 0sets the timer to zero seconds.
-
Press Enter: This command initiates a full clean shutdown immediately.
Method 3: PowerShell
Similar to Command Prompt, PowerShell is another powerful utility for system management.
- Open PowerShell: Search for PowerShell in the Start Menu, right-click, and select “Run as Administrator.”
- Execute the Shutdown Command: Enter the same command as in Command Prompt:
Stop-Computer -Force - Press Enter: This will force a clean shutdown of your system.
Method 4: Keyboard Shortcut
- Press Ctrl + Alt + Delete: This will take you to a special screen with several options.
- Click on the Power Icon: Located in the lower right corner.
- Hold Shift and Select Shutdown: Again, this ensures that the shutdown process starts cleanly.
Method 5: Registry Editor (Advanced)
For those comfortable with advanced technical tasks:
- Open Run Dialog: Press
Windows + R. - Type ‘regedit’: Press Enter to open the Registry Editor.
- Navigate to the Key:
HKEY_LOCAL_MACHINESYSTEMCurrentControlSetControlPower - Modify the Setting: Look for «HibernateEnabled» and ensure it is set to 0. This disables hibernate and forces complete shutdowns.
Warning: Editing the Registry can have unforeseen consequences. Always back it up before making any changes.
Benefits of a Full Clean Shutdown
Enhanced Stability
A full clean shutdown prevents lingering processes that could lead to system instability when the device is booted back up. Applications that didn’t close properly can sometimes cause issues during boot, leading to failures or a slow startup process.
Extended Hardware Lifespan
Electronics benefit from being powered down regularly, preventing overheating and reducing wear on components. A clean shutdown allows all components to cool down completely.
Improved Boot Times
If you regularly perform full clean shutdowns, you may notice quicker boot times as the system has fewer processes to load into memory during startup.
Resetting System States
Certain issues can arise from software that hangs or becomes unresponsive. A full clean shutdown allows the system to reset its operational state, clearing temporary data and cached information that may have been causing problems.
Troubleshooting Common Issues
While performing a full clean shutdown is usually straightforward, users may occasionally encounter issues. Here are potential solutions to common problems:
If Shutdown is Not Initiating
- Close Applications Manually: Ensure all applications are closed before shutting down. Apps that refuse to close can hang the system.
- Check for Updates: Sometimes, pending updates can cause shutdown issues. Navigate to Settings > Update & Security > Windows Update and ensure your system is up to date.
Power Settings Adjustments
-
Adjust Power Options: Go to Control Panel > Hardware and Sound > Power Options. Check your settings here.
-
Turn Off Fast Startup: Fast startup can interfere with proper shutdowns. Disable it by going to Control Panel > Power Options > Choose what the power buttons do > Change settings that are currently unavailable > Uncheck «Turn on fast startup.»
Best Practices for Windows 10/11 Maintenance
Regular maintenance is crucial for keeping your system running smoothly. Here are some best practices:
Regular Shutdowns
Incorporate full clean shutdowns into your routine. Instead of leaving your computer in sleep mode, shut it down at the end of the day.
Disk Cleanup
Utilize the built-in Disk Cleanup tool to delete unnecessary files. Access this tool by searching for «Disk Cleanup» in the Start Menu and scheduling it regularly.
Run Antivirus Scans
To prevent malware and other unwanted software from interfering with processes, run regular scans using your antivirus solution.
Keep Your Software Updated
Always ensure that you install updates for both Windows and your applications. This increases security and stability within the system.
Conclusion
Performing a full clean shutdown on Windows 10 or 11 is an essential task that contributes to the overall health of your computer. By ensuring all processes and applications have properly closed, you safeguard your data, enhance system performance, and reduce potential errors during boot up. Understanding and adopting the various methods to execute this shutdown can prove beneficial in maintaining your system in optimal condition. With regular shutdowns and following best maintenance practices, you can prolong the life of your Windows device and ensure it operates smoothly for years to come.
In the fast-paced realm of technology, these small yet impactful habits can differentiate between a seamless user experience and a frustrating battle with performance issues. Embrace the power of full clean shutdowns and equip yourself with the knowledge to optimize your experience on Windows 10 and 11.
,
Windows 8 uses a new technology called Fast Start in order to start Windows quickly. When you perform a normal Windows 8 shutdown (using the Charms bar), the Fast Startup feature stores the kernel’s current session (hibernate) , so the next time you start your computer, the Operating System loads quickly. This means that your system is reinitialized fully only when required by the operating system (e.g. when a hardware change detected) and not if you want you to fully shutdown your system for several reasons, e.g. to extend your battery’s life or to boot from another media, etc.
How to perform a full Shutdown on Windows 10, 8.1 or 8.
In order to fully shutdown Windows 8, 8.1 or 10, you have the following options:
OPTION 1: Perform a FULL Shutdown by using the SHIFT key.
1. Click the Start key and then press the Power button.
2. Now press and hold down the SHIFT key and then click Shutdown.
OPTION 2: Perform a FULL Shutdown by using Command Prompt.
2. Open Command Prompt (cmd) with administrative privileges. To do that:
Right-click at the lower left corner on your screen and from the menu that appears, click the Command Prompt (admin) option.
3. Inside command prompt window, type the following command & press Enter:
shutdown /s /f /t 0

The above command makes Windows to shutdown completely. If you want to perform a system restart after fully shutting down Windows 8 (so Windows will be reinitialized upon boot) use the following command:
shutdown /r /f /t 0
Additional information: If you want your system to perform a full shutdown every time you press the Shutdown button from Charms bar, then you have to disable the Fast Startup Option from the control panel. For detailed instructions on how to do that read this article: How to disable Fast Startup in Windows 8 and 8.1
That’s it! Let me know if this guide has helped you by leaving your comment about your experience. Please like and share this guide to help others.
If this article was useful for you, please consider supporting us by making a donation. Even $1 can a make a huge difference for us in our effort to continue to help others while keeping this site free:
- Author
- Recent Posts
Konstantinos is the founder and administrator of Wintips.org. Since 1995 he works and provides IT support as a computer and network expert to individuals and large companies. He is specialized in solving problems related to Windows or other Microsoft products (Windows Server, Office, Microsoft 365, etc.).