
Многие пользователи обращают внимание, что в Windows 10 при просмотре любого изображения очень долго открывается новое встроенное современное (Metro) приложение Фотографии (Photos). Задержка при запуске приложения Photos может достигать 10-30 секунд или даже несколько минут. Если приложение “Фотографии” уже запущено, другие изображения открываются в нем мгновенно. Т.е. приложение Photos долго загружается именно при первом запуске.
В Windows 10 имеется также и классическое приложение “Средство просмотра фотографий” (Windows Photo Viewer), но оно отключено по умолчанию. Большинство пользователей просто включают старое приложение просмотра фото с помощью reg файла (см. статью Как вернуть Средство просмотра фотографий в Windows 10?).
Если вы все-же хотите использовать встроенное приложение Photos для просмотра изображений, вы можете улучшить его быстродействие с помощью следующих советов.
Проблема медленного первого запуска приложения Фотографии обычно заключается в его настройках по умолчании. При старте приложение Photos пытается выполнить синхронизацию изображения с вашим аккаунтом OneDrive, чтобы вам было удобно предоставить доступ к нему своим друзьям. Кроме того, по умолчанию в приложении включено аппаратное ускорение (не зависимо от того, поддерживает ли ваш компьютер этот режим или нет).
Таким образом для более быстрого запуска приложения Фотографии в Windows 10:
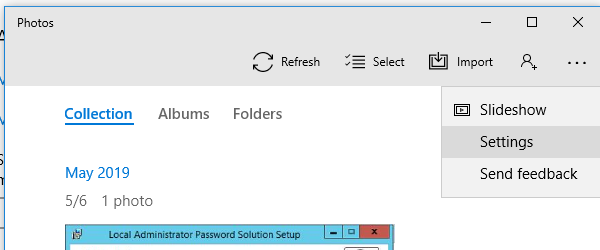
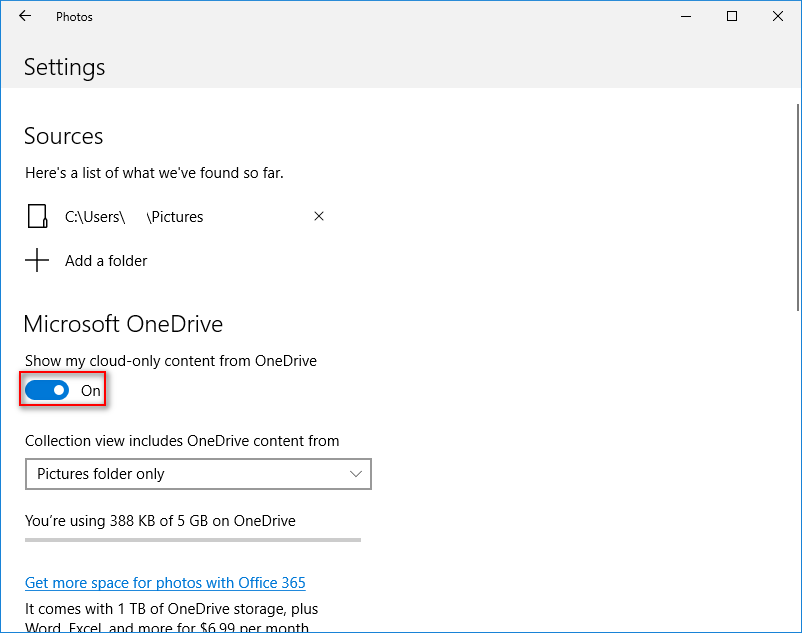
- Откройте его настройки (три точки в правом верхнем углу -> Settings);

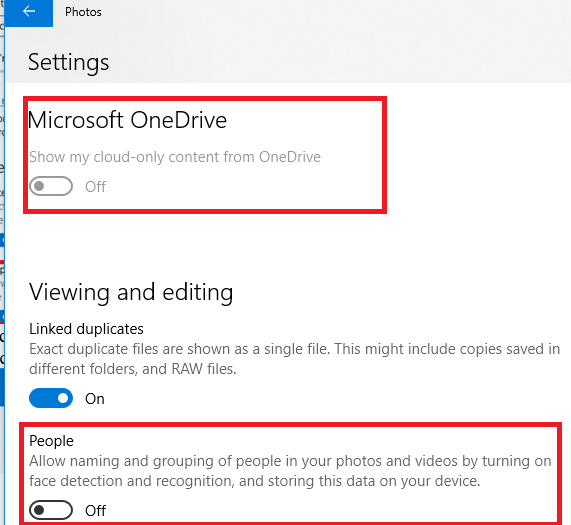
- В списке настроек приложения Photos отключите Microsoft OneDrive и People (off);
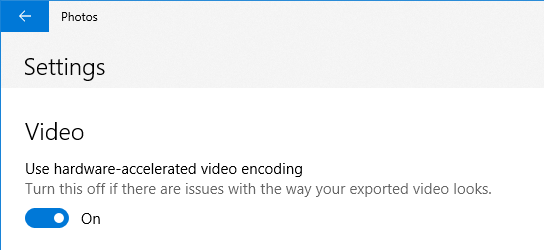
- В секции Video отключите аппаратное ускорение – “Use hardware –accelerated video encoding” = off.
Закройте приложение Фотографии и попробуйте запустить его еще раз. На этот раз оно должно загрузиться намного быстрее.
Если это не помогло, попробуйте сбросить конфигурацию и настройки приложения Фотографии:
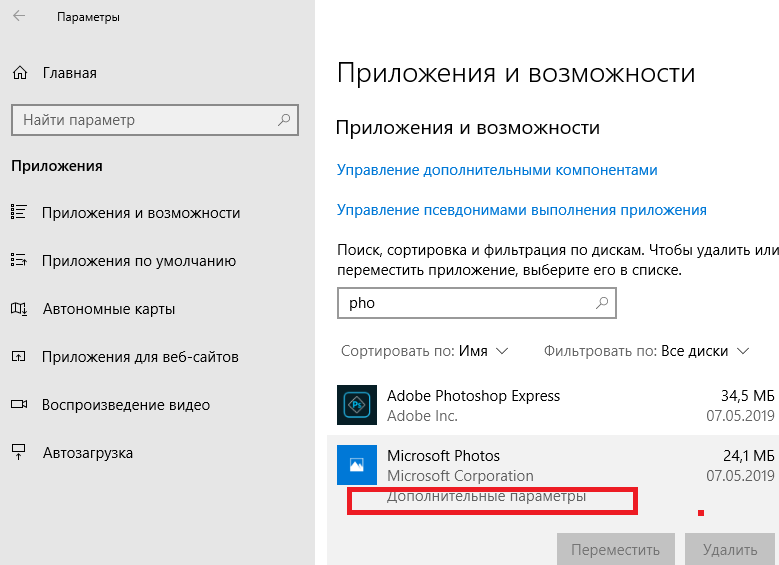
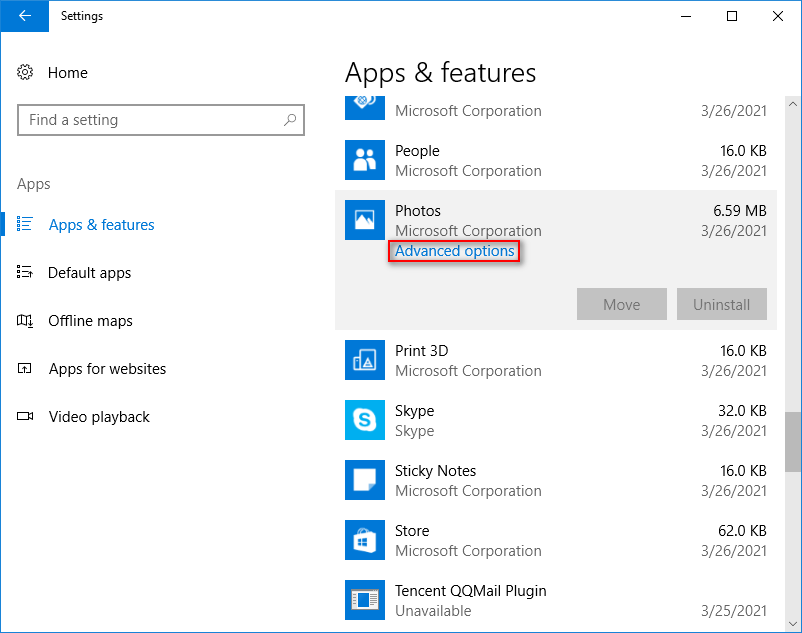
- Откройте меню Настройка -> Приложения -> Приложения и возможности (Settings -> Apps -> Apps & features);
- В списке приложений найдите Microsoft Photos и откройте его дополнительные параметры (Advanced options);
- На следующем экране нажмите на кнопку Сбросить (Reset). При этом будут сброшены все настройки и данные приложения.

Если сброс приложения не помог, вы можете попробовать удалить приложение Photos с помощью PowerShell:
Get-AppxPackage *Photos* | Remove-AppxPackage
После этого перейдите в Microsoft Store (https://www.microsoft.com/ru-ru/p/microsoft-photos/9wzdncrfjbh4) и установите приложение «Фотографии» (Microsoft Photos).

Вы можете восстановить удаленное приложение Photos командой:
Get-AppxPackage -allusers Microsoft.Windows.Photos | Foreach {Add-AppxPackage -DisableDevelopmentMode -Register “$($_.InstallLocation)\AppXManifest.xml”}
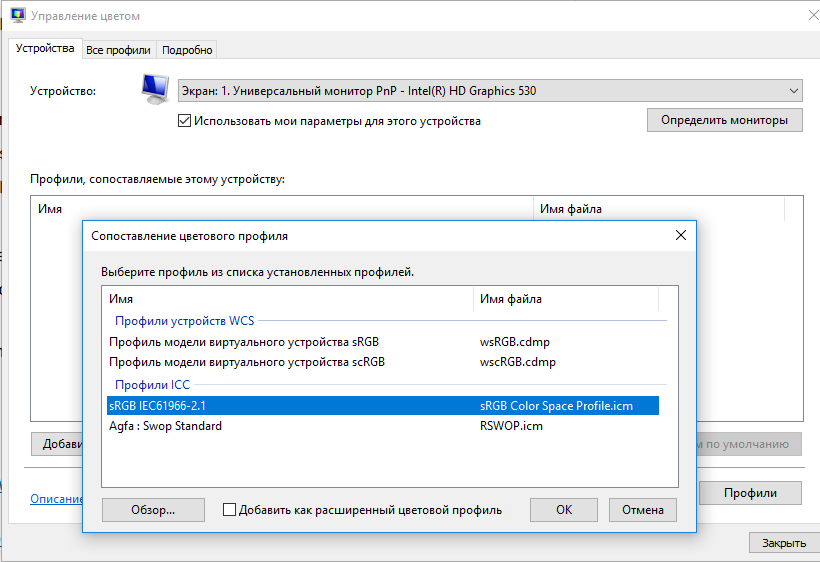
Если классический Photo Viewer в Windows 10 довольно довольно медленно пролистывает изображения, это может быть связано с загрузкой цветового профиля. Попробуйте использовать другой цветовой профиль для вашего монитора.
- Выполните команду
colorcpl.exe
; - На вкладке Устройства выберите ваш монитор и включите для него опцию «Использовать мои параметры для этого устройства«;
- Нажмите кнопку Добавить, добавьте профиль из списка «Профили ICC” (например sRGB IEC61966-2.1) и нажмите OK;
- Выберите новый профиль и нажмите кнопку «Сделать профилем по умолчанию«
- После этого фотографии должны листаться мгновенно.
Если вас не устраивает не приложение Photos, ни классическое средство просмотра фотографий Windows, вы можете установить и использовать альтернативное приложение для просмотра изображения в Windows 10, например просмотрщик IrfanView, FastStone Image Viewer или аналоги.
-
Home
-
News
- Solved: Windows 10 Photo Viewer Is Slow To Open Or Not Working
By Sarah |
Last Updated
When you’re trying to view a photo on Windows 10, you find it takes too long to open the Photos app or Windows Photo Viewer. What happens? Why is it running so slow? Is there any way to fix when you find Windows photos not opening? The following content provided by MiniTool Solution will cover these aspects.
Windows 10 Photo Viewer Slow
You may find your Windows 10 photo viewer slow when trying to open a picture using it. You wait for a very long time but failed finally (the picture file is not opening). What should you do? If your Windows 10 apps take forever to load or Photos not working Windows 10, please follow the methods mentioned in the next section to troubleshoot it.
Tip: This page focuses on telling you how to deal with Windows photo viewer slow on Windows 10. However, if you want to recover permanently deleted photos in Windows, please use MiniTool Power Data Recovery – a professional recovery tool worth a try.
MiniTool Power Data Recovery TrialClick to Download100%Clean & Safe
Windows Built-in Photo Viewer
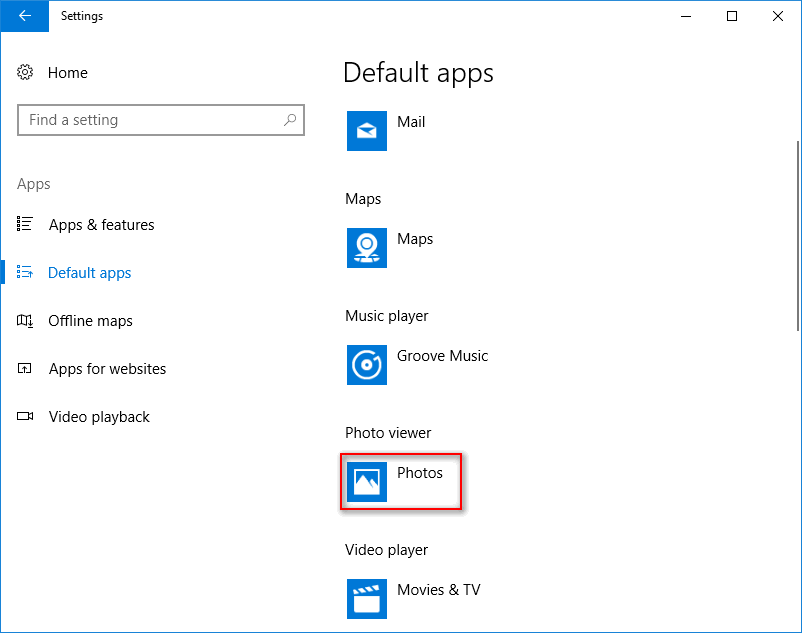
Windows Photos
It’s very easy to view a photo on Windows 10 since Microsoft provides all Windows 10 users with a built-in photo viewer called Photos. This app was set to gather photos from users’ PC, phone, and other devices and then put them together in one place. In this way, you can access your images, pictures, and photos more easily. The Photos app is automatically set as the default photo viewer for Windows 10 and it allows you to edit and enhance an image with easy steps. You can change the Windows 10 Photos settings manually to meet your demands.
Windows Photo Viewer
The Windows Photo Viewer is the default photo viewer in old Windows systems. Microsoft uses Photos to replace the Windows Photo Viewer in Windows 10 since the former is more advanced. If you’re a die-hard Windows Photo Viewer fan, you can bring the old photo viewer back manually.
[Solved] Windows Photo Viewer Can’t Open This Picture Error.
How to Fix Windows Photos Slow Issue
Programs taking a long time to open on Windows 10 is a common problem you may meet. When you find your Photos or Windows Photo Viewer app is slow to open/not working, please take measures immediately to fix the issue.
#1. Change Windows 10 Photos Settings
- Click on the three dots button in the upper right corner.
- Select Settings from the drop-down menu.
- Look for the Microsoft OneDrive option and toggle its switch to Off.
- Then turn Off the People option and Video option.
- Also, you should turn Off Linked duplicates under Viewing and editing.
- Close Photos app and restart.
However, what if you find the Windows 10 Photos not opening?
#2. Repair/Reset Photos App
- Press Windows + I.
- Click Apps.
- Scroll down in the right pane to find Photos or Microsoft Photos.
- Select it and click on the Advanced options link.
- Click on the Repair or Reset button and wait. Your app data will be deleted after resetting.
How To Factory Reset Windows 10: Full Guide.
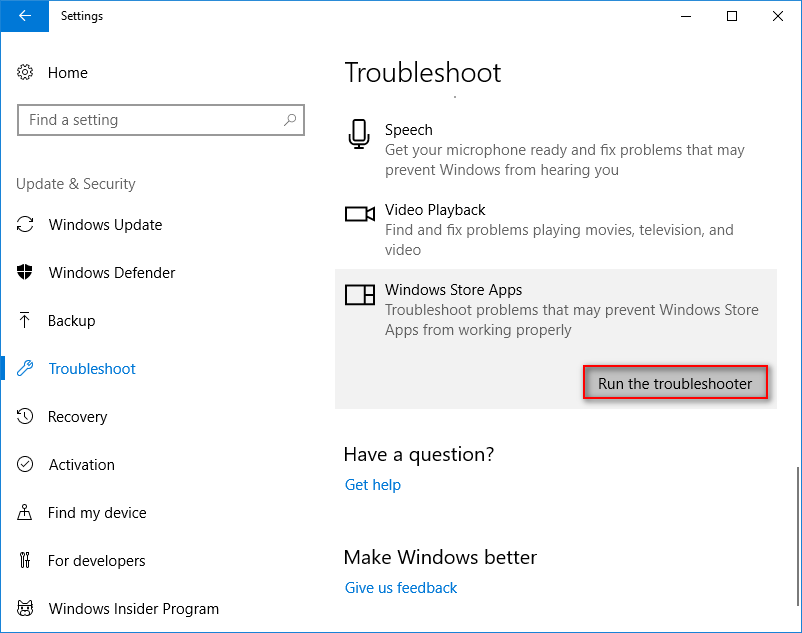
#3. Run the Troubleshooter
- Press Windows + I.
- Select Update & Security.
- Choose Troubleshoot.
- Navigate to Windows Store Apps under Find and fix other problems.
- Select it and click on the Run the troubleshooter button.
- Wait for the problems Detecting process to end and follow the suggestions.
You can also run the SFC command in the Command Prompt tool to check and repair corrupt files.
#4. Update Photos App and Windows
How to update Photos:
- Go to the Microsoft Store.
- Click on the three dots button.
- Select Downloads and updates.
- Wait and click on the Get updates button.
#5. Uninstall Photos
Another useful fix for Microsoft Photos app not working is uninstalling and then reinstalling it. Since Windows doesn’t let you uninstall Photos, you need to get help from PowerShell.
- Press Winnows + X. (What if WinX menu is not working?)
- Select Windows PowerShell (Admin).
- Type Get-AppxPackage -AllUsers and press Enter. Note the full package name of Microsoft.Windows.Photos.
- Type Get-AppxPackage * | Remove-AppxPackage and press Enter. * stands for the full package name.
After that, you should reinstall the Photos app from Microsoft Store to finish troubleshooting Windows 10 photo viewer slow.
About The Author
Position: Columnist
Sarah has been working as an editor at MiniTool since she graduated from university. Sarah aims at helping users with their computer problems such as disk errors and data loss. She feels a sense of accomplishment to see that users get their issues fixed relying on her articles. Besides, she likes to make friends and listen to music after work.
Did you notice the default Windows 10 picture viewer to open any image, takes extremely long to load after the black interface opens? You are not alone Number of users report Picture Opens Very Slow in Windows 10 Photo App after recent windows update. A few others while opening a photo either on desktop or in a folder it takes 30 seconds to one minute sometimes longer before view it, well open the image in another viewer or even in paint is way faster. Well If your Windows 10 Photos app is slow to open & takes a long time to load, or if it is or not working at all, then you can fix the problem by following the solutions below.
Contents
- 1 Windows 10 Photos app Slow to Open
- 1.1 Run Windows Store Apps Troubleshooter
- 1.2 Reset photos app windows 10
- 1.3 Update the Photos app
- 1.4 Re-register the photos app
- 1.5 Reinstall Windows 10 photos app
If you notice when you first time opens the photos app it’s open very slowly but If the Photos application is already running, other images open in it instantaneously. Here the quick solutions worked for me.
Disable online connectivity
- Open photos app and click settings,
- Here Disable the Microsoft OneDrive and People (off)
- Now Scroll down until you see “Video”, here Under “Use hardware –accelerated video encoding”, if the option is “on” turn it “off”
- That’s all close the app and try to open any image if this helps.
Run Windows Store Apps Troubleshooter
Run the build-in Microsoft store apps troubleshooter that automatically detect and fix problems related to Windows 10 apps.
- Type troubleshoot in Windows Start Search box and Click Troubleshoot
- Scroll down to the bottom and select Windows Store Apps
- Click Run the Troubleshooter and follow on-screen directions
- This will start to diagnose windows 10 app problems if found any the troubleshooter tries to fix them itself.
- Once done restart your PC and check if this helps fix the photos app problem.
Reset photos app windows 10
If running the store app troubleshooter didn’t fix the problem, you should try to reset the to its default settings following the steps below.
- Use Keyboard shortcut Windows + X and select Settings
- Now click Apps then Apps & Features
- Locate Photos by Scrolling Down and Click Advanced Options
- This will open a new window with the option to Reset the app,
- Click it and click yes when asking for confirmation, This will reinstall or revert the app to its default settings.
Update the Photos app
Now the next step you have to check is to update the photos app following the steps below.
- Open Microsoft Store from the start menu
- Click 3 horizontal dots on top right
- click on Downloads and Updates
- Now check if there is any update for this app If yes, update it.
Re-register the photos app
Here another effective solution must fix the photos app problems.
- Open Powershell as an administrator,
- Copy and paste the following command on the PowerShell window and press enter key to execute the same.
Get-AppXPackage | Foreach {Add-AppxPackage -DisableDevelopmentMode -Register “$($_.InstallLocation)\AppXManifest.xml”}
Once done restart your PC and check photos app open normally.
Reinstall Windows 10 photos app
Still need help lets to reinstall the app following the steps below.
Note: we recommend creating a system restore before performing the following steps.
- Right-click on Windows 10 start menu and select PowerShell (admin)
- This will open PowerShell with administrative privileges,
- Now Copy the below command and right-click in Powershell to paste it press enter key to remove the photos app.
get-appxpackage Microsoft.Windows.Photos | remove-appxpackage - Restart your PC and open PowerShell (admin) again,
- Next Use below Powershell command to install the photos app
Get-AppxPackage -allusers Microsoft.Windows.Photos | Foreach {Add-AppxPackage -DisableDevelopmentMode -Register “$($_.InstallLocation)\AppXManifest.xml”
Alternatively, you can search for Microsoft photos on the open Microsoft store to install the app from there.
Did these solutions help fix Windows 10 photos app problems? Let us know in the comments below.
Also read:
- How to install Kali Linux on Windows 10 subsystem (Step by step guide)
- 7 Tips To Maximize Battery Life on Windows 10 Laptops
- Difference between Standard user and Administrator accounts Windows 10
- Fix whea uncorrectable error 0x00000124 on Windows 10, 8.1 and 7
- How to Download and install iTunes for windows 10
Как использовать OAuth2 со Spring Security в Java
Javaican 14.05.2025
Протокол OAuth2 часто путают с механизмами аутентификации, хотя по сути это протокол авторизации. Представьте, что вместо передачи ключей от всего дома вашему другу, который пришёл полить цветы, вы. . .
Анализ текста на Python с NLTK и Spacy
AI_Generated 14.05.2025
NLTK, старожил в мире обработки естественного языка на Python, содержит богатейшую коллекцию алгоритмов и готовых моделей. Эта библиотека отлично подходит для образовательных целей и. . .
Реализация DI в PHP
Jason-Webb 13.05.2025
Когда я начинал писать свой первый крупный PHP-проект, моя архитектура напоминала запутаный клубок спагетти. Классы создавали другие классы внутри себя, зависимости жостко прописывались в коде, а о. . .
Обработка изображений в реальном времени на C# с OpenCV
stackOverflow 13.05.2025
Объединение библиотеки компьютерного зрения OpenCV с современным языком программирования C# создаёт симбиоз, который открывает доступ к впечатляющему набору возможностей. Ключевое преимущество этого. . .
POCO, ACE, Loki и другие продвинутые C++ библиотеки
NullReferenced 13.05.2025
В C++ разработки существует такое обилие библиотек, что порой кажется, будто ты заблудился в дремучем лесу. И среди этого многообразия POCO (Portable Components) – как маяк для тех, кто ищет. . .
Паттерны проектирования GoF на C#
UnmanagedCoder 13.05.2025
Вы наверняка сталкивались с ситуациями, когда код разрастается до неприличных размеров, а его поддержка становится настоящим испытанием. Именно в такие моменты на помощь приходят паттерны Gang of. . .
Создаем CLI приложение на Python с Prompt Toolkit
py-thonny 13.05.2025
Современные командные интерфейсы давно перестали быть черно-белыми текстовыми программами, которые многие помнят по старым операционным системам. CLI сегодня – это мощные, интуитивные и даже. . .
Конвейеры ETL с Apache Airflow и Python
AI_Generated 13.05.2025
ETL-конвейеры – это набор процессов, отвечающих за извлечение данных из различных источников (Extract), их преобразование в нужный формат (Transform) и загрузку в целевое хранилище (Load). . . .
Выполнение асинхронных задач в Python с asyncio
py-thonny 12.05.2025
Современный мир программирования похож на оживлённый мегаполис – тысячи процессов одновременно требуют внимания, ресурсов и времени. В этих джунглях операций возникают ситуации, когда программа. . .
Работа с gRPC сервисами на C#
UnmanagedCoder 12.05.2025
gRPC (Google Remote Procedure Call) — открытый высокопроизводительный RPC-фреймворк, изначально разработанный компанией Google. Он отличается от традиционых REST-сервисов как минимум тем, что. . .
Haven’t we all gone through the experience where you sat down to show your recent vacation pictures to your friends, and just as you click on the folder the thumbnails take ages to load on your Windows PC. That can turn out to be quite an exasperating affair, especially if you have to locate a few important photos quickly.

That issue is more rampant in systems carrying plenty of media files inside folders. In a normal scenario, Windows 10 keeps a cache of the thumbnail files for your files and folders. So, when you open a folder, the contents are ready for you to view.
With time, this cache slowly starts bloating as new files are added to the system. And that is one of the reasons that Windows File Explorer takes its own sweet time to display the thumbnails. Or, in the worst-case scenario, your system shows the incorrect previews of the files.
Thankfully, the changes are not permanent, and with the right solution, one can rectify this issue quickly. In this post, we will explore four different ways to speed up the thumbnail loading time in Windows 10.
If you are lucky, you’d need to do only one of the fixes for the issue to be rectified, while in others, you may need to try all the three.
1. Through Group Policy
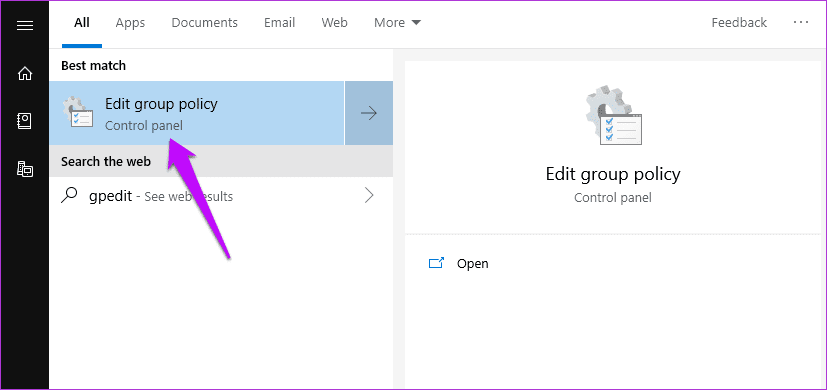
Step 1: Open Group Policy by typing Edit Group Policy (or gpedit.msc) in the Start menu. As you may already know, Windows Group Policy has a set of advanced local settings that you can tweak, provided you know your way around them.
Step 2: Once inside, navigate to User Configuration > Windows Components > File Explorer.

Step 3: Now, search for the ‘Turn off the caching of thumbnails…’ option. The chances are that this option will be either in the Not Configured state or disabled.
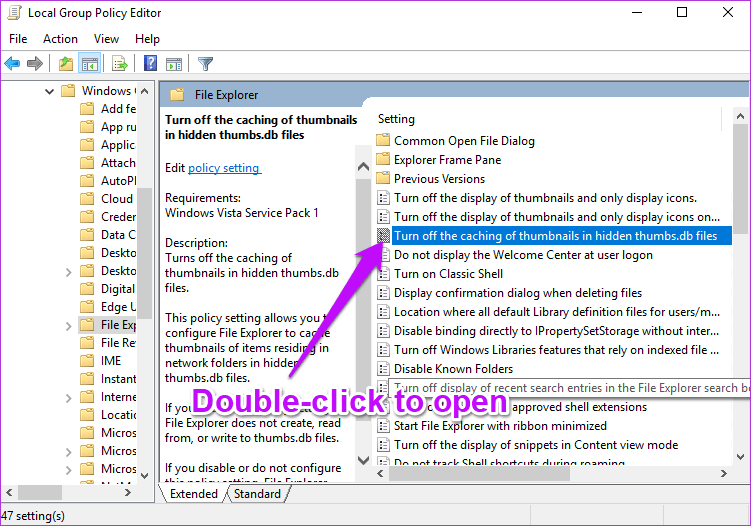
All you have to do is select Enabled and hit the Apply button.

Once you have applied the above, reboot your computer for the above changes to take effect.
2. Through the Control Panel Settings
Next, we have to make sure that your system is posed to show all the thumbnails of files and folders. To do so, follow the steps below.
Step 1: Open the Control Panel of your system and head over to System and Security > System, and click on the Advanced system settings.

Step 2: Select the Advanced tab and select Settings under Performance.

Here, you just have to make sure that the ‘Show thumbnails instead of icons’ option is enabled. If it’s not, check the box and hit OK.
3. Check the Registry Values
Last but not least, you may want to edit the Registry values. Quite obviously, your system has a ton of maintenance tools that runs automatically. And as you may have suspected, one of its jobs is to clean up the File Explorer’s cache regularly.
Just like your browser and your phone, clearing up the cache makes new space, which is good from the storage point of view. But at the same time, the File Explorer also has to reload the cache, which ends up consuming time.
Hence, if you’re really frustrated with the slow load time, you may want to tweak the values a little so that the Disk Cleanup job is not triggered for the thumbnail cache. Usually, the Disk Cleanup job (going by the name of SilentCleanup) picks up the autorun job with values 1. Naturally, if you change it to 0, it’ll cause the job to skip these keys.
To do so, open the Registry Editor by typing Regedit on the start menu.

Note: The Windows Registry contains all the settings and configurations used by your Windows system. Hence, it’s vital that you take a proper backup of the registry values
Next, navigate your way around to the following path,
HKLM\SOFTWARE\Microsoft\Windows\CurrentVersion\Explorer\VolumeCaches
Here you’ll see two values, Default and Autorun. All you have to do is set the Autorun’s DWORD value to 0.
Do so for the following path as well,
HKLM\SOFTWARE\WOW6432Node\Microsoft\Windows\CurrentVersion\Explorer\VolumeCaches\Thumbnail Cache
Once done, reboot the PC to make the changes take effect.
4. Change the Thumbnail Cache Size
You may also want to increase the cache size if you do have the habit of keeping all your pictures and images under a single folder. And as you might have guessed, the way is through the registry values.
Open the Registry, and navigate to the path below,
HKEY_LOCAL_MACHINE\SOFTWARE\Microsoft\Windows\CurrentVersion\Explore
Once done, right click on an empty space and select New. Next, select New > String value and add the term, Max Cached Icons.

Now add the value 4096 and hit the OK button. This tweak will create a 4MB cache file.

If you want a slightly bigger cache file, you can update this update the value to 8192 as well. By default, the icon cache size in Windows is around 500KB.
Explore Folders like a Pro
Waiting for the File Explorer to load the image and file previews can be an annoying affair. The frustration mounts all the more, especially when you have to to get work done soon. So which of these fixes worked for you? Do let us know in the comments section below.
Next up: Have a Windows 10 tablet? Get the most out of it by going through the tips and tricks below.
Was this helpful?
Thanks for your feedback!
The article above may contain affiliate links which help support Guiding Tech. The content remains unbiased and authentic and will never affect our editorial integrity.