
Updated on Apr 28, 2025
On Windows 10/8.1/8/7, there are typically four ways to format USB to FAT32, which has the greatest compatibility compared to other file systems. For small capacity flash drives, pen drives, or SD cards that range from 2GB-32GB, any of the four methods are workable. However, for USB flash drives, HDDs, or external hard drives that exceed 32GB, the applicable tools will be restricted to the third-party best USB format tools and the Windows Command Prompt.
For both average and advanced users, the four ways can help you. The first one can save your time as much as possible.
1. (lifewire-recommend) Third-party USB Format tool
2. Windows 10 Explorer Quick Format
3. Windows 10 Disk Management Format
4. Windows Command Prompt
Video Guide: How to Format to FAT32 in Windows 10 in 4 Ways
Can’t format to FAT32 in Windows 10 with all given disk formatting tools? Directly jump to the final part to get additional fixes for «Cannot Format to FAT32» in Windows 10.
About File Systems (FAT32 Format, FAT16, FAT12, NTFS)
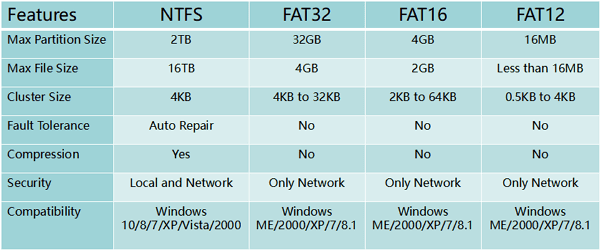
In computing, a file system controls how data is stored and retrieved. The common Windows file systems include FAT16, FAT32, and NTFS, etc. Users can convert their USB flash drives or external hard drives between different file systems. In the chart below, we have listed features of four common file systems, giving detailed information from max partition size to the compatibility of these file systems.
- Notice:
- Formatting a USB drive or external hard drive will remove all existing files on the device. Please make sure you have backed up files before formatting to avoid further data loss.
Solution 1. Format to FAT32 Using FAT32 Formatter Windows 10
USB requirements: none
A professional third-party Windows 10 FAT32 formatting tool can make the formatting process simple and secure. We recommend you try EaseUS Partition Master with its Format feature. Besides FAT32, it also supports format USB to NTFS, EXT2, EXT3, and ReFS.
Download this partition magic now, and follow the simple steps to freely format USB to FAT32 in Window 10.
lifewire.com: EaseUS Partition Master Free Edition is incredibly simple to use.
- Right-click the external drive or USB you intend to format and choose «Format».
- Set the Partition label, File system (NTFS/FAT32/EXT2/EXT3/EXT4/exFAT), and Cluster size if you intend to change. Then click «OK».
- Click «Yes» to continue.
- Click the «Execute 1 Task(s)» button and click «Apply» to format your selected external hard drive or USB stick.
You May Also Like:
How to Partition Hard Drive in Windows 10
With this FAT32 formatted, you can also repartition the volumes on your HDD/SSD, external storage devices. Follow to learn how to partition a hard drive on your own.
Solution 2. Format FAT32 Windows 10 via File Explorer
USB requirements: no more than 32GB. Otherwise, you can only choose to format USB to NTFS.
To format USB under 32GB to FAT32 in Windows 10 Explorer, follow the three steps:
Step 1. Connect USB or external hard drive to Windows 10 PC.
Step 2. Open File Explorer, locate and right-click on the USB drive, select «Format».
Step 3. Set the FAT32 as the target file system, tick «Quick Format» and click «Start» to start the formatting.
When the process completes, click «OK» to confirm. And now your USB is FAT32.
Read Also: Format A USB Drive That Doesn’t Show Up
Solution 3. Format USB/External Drive to FAT32 with Disk Management
USB requirements: Similar to the Explorer, your USB drive has to be under 32GB in order to format to FAT32 within the program
Follow the 3-step guide here to format to FAT32:
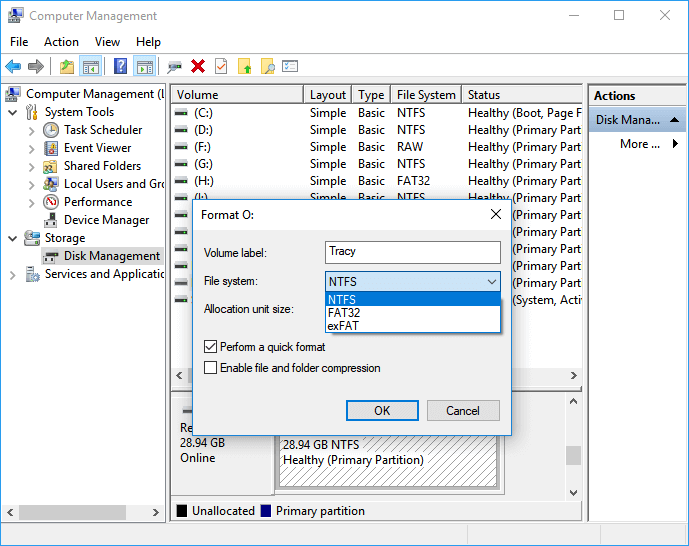
Step 1. In Windows 10, go to This PC > Manage > Disk Management.
Step 2. Locate and right-click on your USB flash drive or external hard drive, select «Format».
Step 3. Set the USB file system to FAT32, tick «Perform a quick format» and click «OK» to confirm.
Solution 4. Format to FAT32 Format Windows 10 Using Command Prompt
USB requirements: none
Some experienced users or administrators prefer to use command lines to execute some operations on Windows PC. It’s also an applicable way to format your flash drive or external hard drive to FAT32 in Windows 10.
Note: Be careful while using command lines on your PC to format USB drive. Any improper operations would cause serious issues.
There are two options for you to use Command Prompt, and if they do work on your issue, share this article to help more users.
Here are the details of how to use CMD, DiskPart, or PowerShell command lines formatting device:
Option 1. Use CMD — Command Prompt/Diskpart Format FAT32
Step 1. Type command prompt in Windows 10 search bar or right-click on «Windows icon» > select «Search», and type cmd.
Step 2. Right-click on «Command Prompt» and select «Run as Administrator».
Step 3. Check the USB label and type format /fs:FAT32 o: at the prompt and hit «Enter». (Replace O: with the drive letter of your USB drive.)
Windows 10 will begin formatting the USB flash drive or external hard drive into FAT32.
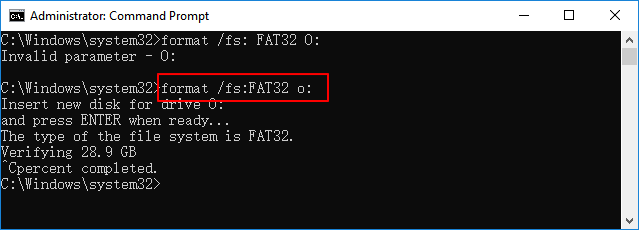
Step 4. Type exit when the process has completed.
Option 2. Use DiskPart
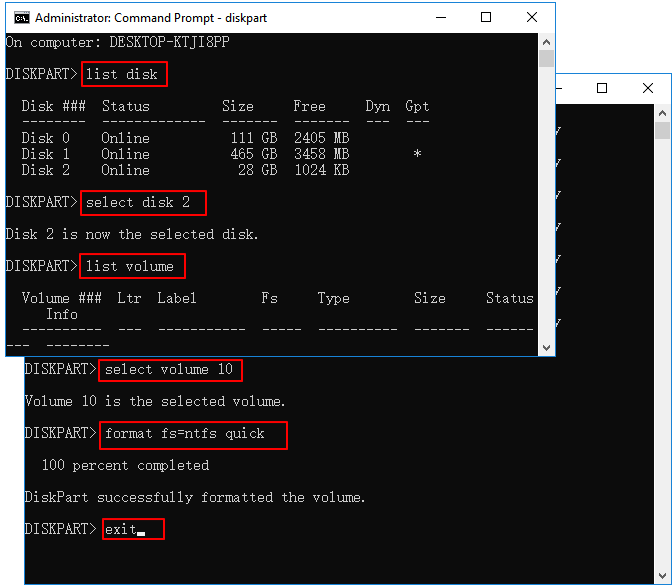
Step 1. Type diskpart in Windows search bar and hit Enter.
Step 2. Hit Enter each time when you type the below command lines to quick format hard drive:
- list disk
- select disk 2 (Replace 2 with your USB disk number)
- list volume
- select volume 10 (Replace 10 with the volume number of the USB drive that you want to format)
- format fs=fat32 quick
Step 3. Type exit and hit Enter to close the program when DiskPart reports it has successfully formatted the USB.
Video Tutorial You May Also Like:
Option 3. Use PowerShell
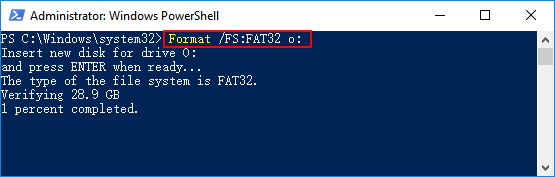
Step 1. Right-click on the Windows icon and select «Windows PowerShell Admin», click «Yes» to open it.
Step 2. Check the USB drive label, type Format /FS:FAT32 o: in PowerShell, and hit Enter.
Step 3.Type exit when the formatting process completes.
Video Guide: 4 Ways to Format to FAT32 in Windows 10
01:30 Method 1. Format the drive in File Explorer
02:13 Method 2. Format the drive in Disk Management
02:46 Method 3. Format the drive using DiskPart
03:49 Method 4. Apply EaseUS Partition Master to Format Drive
Additional Fixes for «Cannot Format to FAT32» in Windows 10
If you met a problem while formatting USB or Windows warns that Windows was unable to complete the format, don’t worry. In this part, you’ll learn why you can’t format to FAT32 in Windows 10 and how to resolve this issue effectively.
Reasons for Why You Can’t Format to FAT32
To find the right solution for your case, it’s important to find out the reason that is causing the FAT32 format option not available. Here are the main reasons:
- 1. File system error, bad sectors exist on USB/external hard drive
- 2. The USB drive contains 2 partitions or the partition need for formatting to FAT32 is not the first primary partition
- 3. The partition in USB or external hard drive is larger than 32GB
- 4. The USB drive or external hard drive is write-protected
So how to resolve these issues, switching your USB drive to FAT32? Follow the quick fixes to troubleshoot the problem of FAT32 format in Windows 10.
Fix 1. Check disk error, fix file system errors or bad sectors
To do so, both the third-party partition manager software — EaseUS Partition Master and Windows Disk Check will work.
Method 1. Use EaseUS Partition Master to check and fix disk error
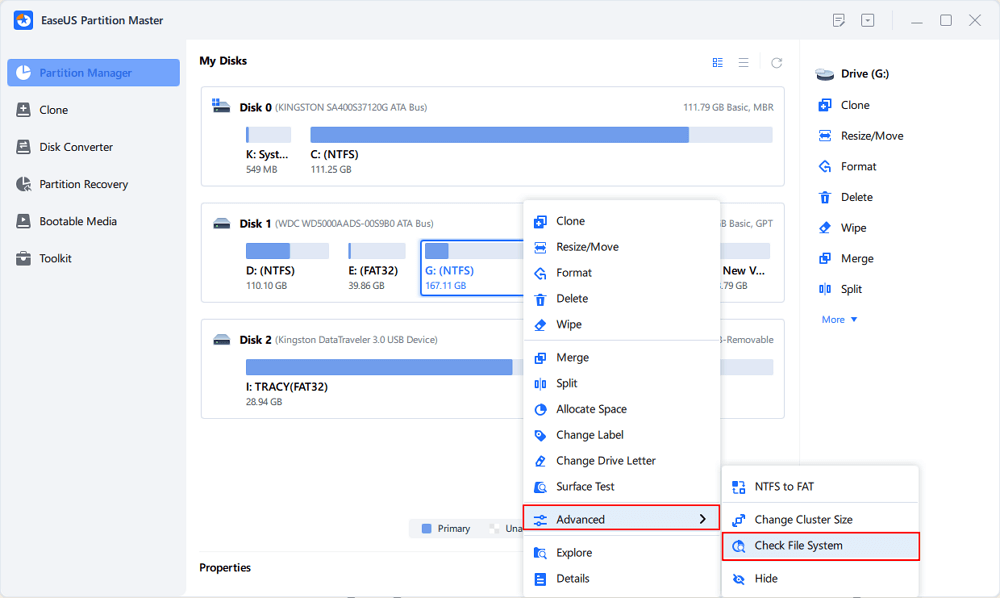
Step 1. Open EaseUS Partition Master on your computer. Then, locate the disk, right-click the partition you want to check, and choose «Advanced» > «Check File System».
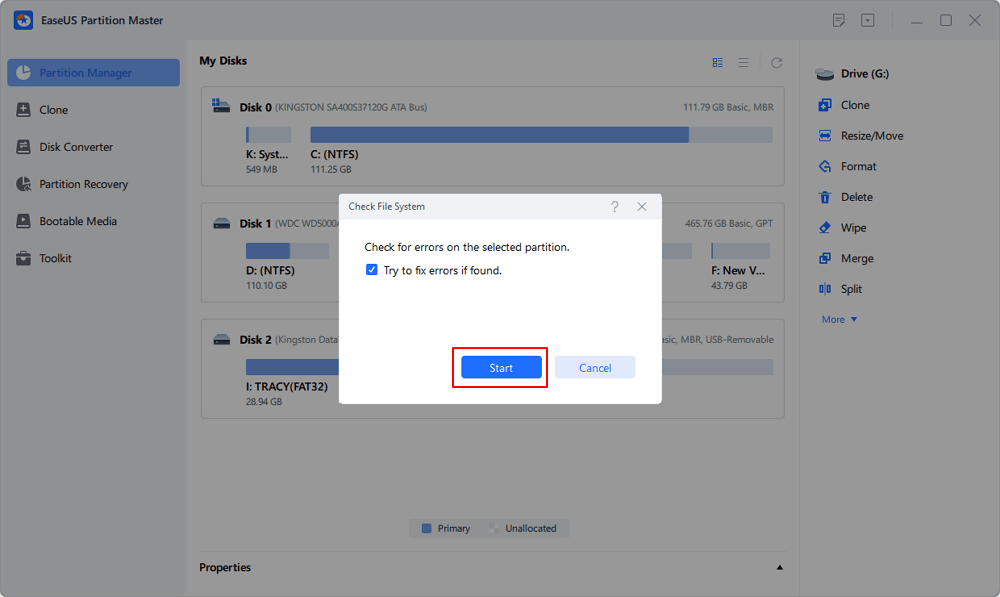
Step 2. In the Check File System window, keep the «Try to fix errors if found» option selected and click «Start».
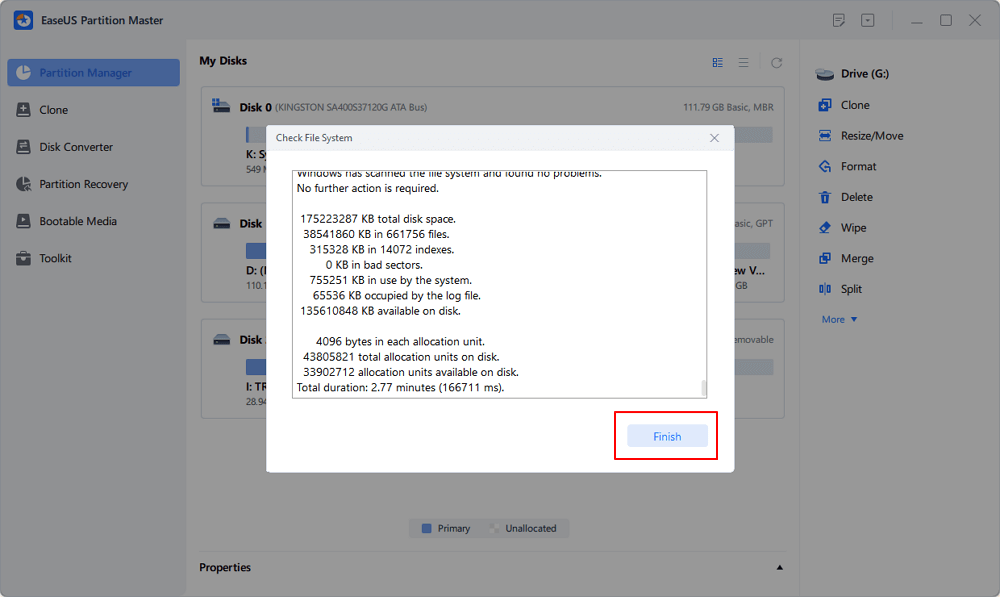
Step 3. The software will begin checking your partition file system on your disk. When it completes, click «Finish».
Method 2. Run Disk Check in Windows File Explorer
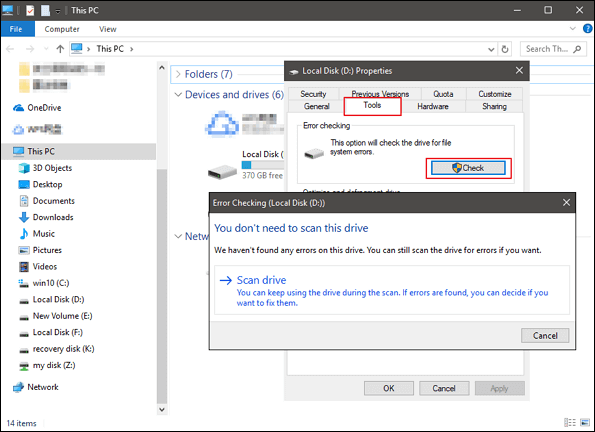
Step 1. Open File Explorer, locate and right-click the USB or external hard drive, and click «Properties».
Step 2. Go to «Tools» and click «Check» under Error-checking.
Step 3. Select «Scan and repair drive».
Or select and check both «Automatically fix file system errors» and «Scan for and attempt recovery of back sectors», then click «Start».
Fix 2. Delete all partitions and create a new FAT32 partition on USB drive
If your Windows system (version before Windows 8.1) or your USB drive doesn’t support creating two primary partitions, the computer won’t be able to recognize nor format the non-primary partition on the USB drive to FAT32.
The solution to this problem is to delete all existing partitions on USB and create a new FAT32 partition:
Step 1. Connect USB to PC and open Disk Management.
Step 2. Locate and right-click the primary partition on USB and select «Delete Volume», click «Yes» to confirm.
Step 3. Right-click on the logical partition on the USB drive, select «Delete Volume».
Step 4. Click «Yes» to confirm.
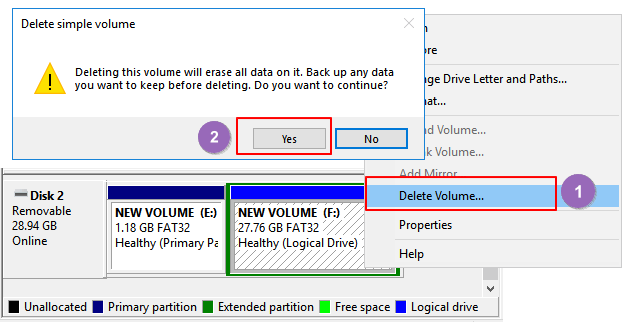
Step 5. The logical partition will become free space, right-click on it and select «Delete Partition», click «Yes» to confirm.
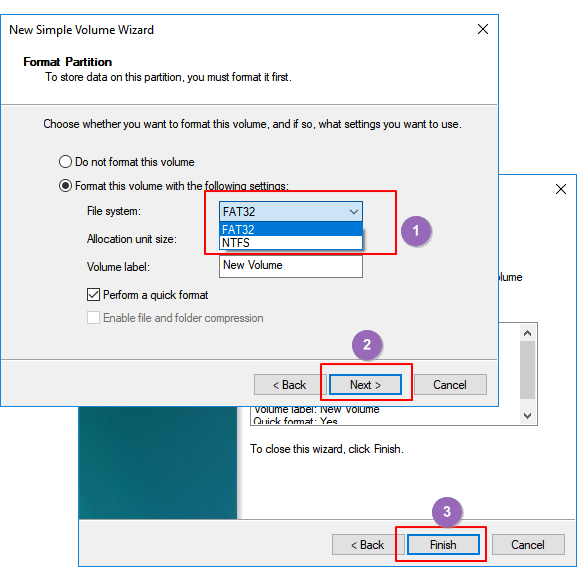
Step 6. When the USB becomes unallocated, right-click on the unallocated space and select «New Simple Volume» > «Next».
Step 7. Follow the on-screen instructions to specify volume size, drive letter, and set file system to FAT32, click «Next» > «Finish» to complete.
After this, you’ve successfully converted your USB or external hard drive to FAT32 and you don’t need to format this drive again.
Fix 3. Select NTFS as the file system or split USB larget partition to smaller FAT32 partitions
As shown in the chart at the beginning, the max size of the FAT32 partition is 32GB, which means you can only format devices smaller than 32GB into this file system.
In other words, when your USB drive partition is larger than 32GB, you can’t format it into FAT32. There are three solutions to this issue:
- Method 1. Apply EaseUS Partition Master to format USB to FAT32
Unlike Windows built-in tools, EaseUS Partition Master can simply format your USB drive even bigger than 32GB to FAT32 with ease. All you need is to go back to the partition manager to directly format your USB to FAT32 without any limitation.
- Method 2. Set NTFS as the file system of your USB drive
NTFS supports saving a single file that is larger than 4GB and supports creating a partition larger than 32GB.
If you only want to keep one partition on the USB drive, make full use of the drive space, the best choice is to set the NTFS as your USB drive.
Method 3. Divide USB partition into small ones (less than 32GB) with FAT32
The other way is to split the USB partition into small ones and format them into FAT32:
Pre-conditions: Windows system (versions after 8.1) and USB drive both support two or more partitions.
Step 1. Use Disk Management to delete the USB partition.
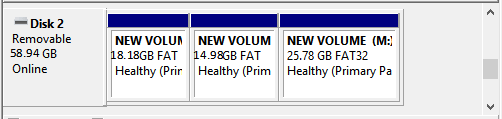
Step 2. Create two or more partitions smaller than 32GB with the FAT32 file system.
Fix 4. Remove USB write protection and format USB to FAT32
When the USB drive is write-protected or locked with a password, you can’t directly format it into FAT32. Here are the detailed steps to resolve this problem:
Step 1. Remove USB write protection and unlock USB
You can refer to this link to remove USB write protection on Windows 10/8/7. Or you can try to use EaseUS M Tool to simply remove the USB lock in 3 steps:
If you don’t consider yourself a pro-computer user and you’re not familiar with command-lines, don’t worry. There are graphical-based solutions to help you remove write-protection from your hard drives, USB drives, and even SD cards.
EaseUS CleanGenius is one of these tools that helps you fix aforementioned issues on your drives without knowing a thing about command-line.
Here’s an easy-to-follow guide on how to use this tool to get your issues sorted:
Step 1: DOWNLOAD and install EaseUS CleanGenius (free) on your computer.
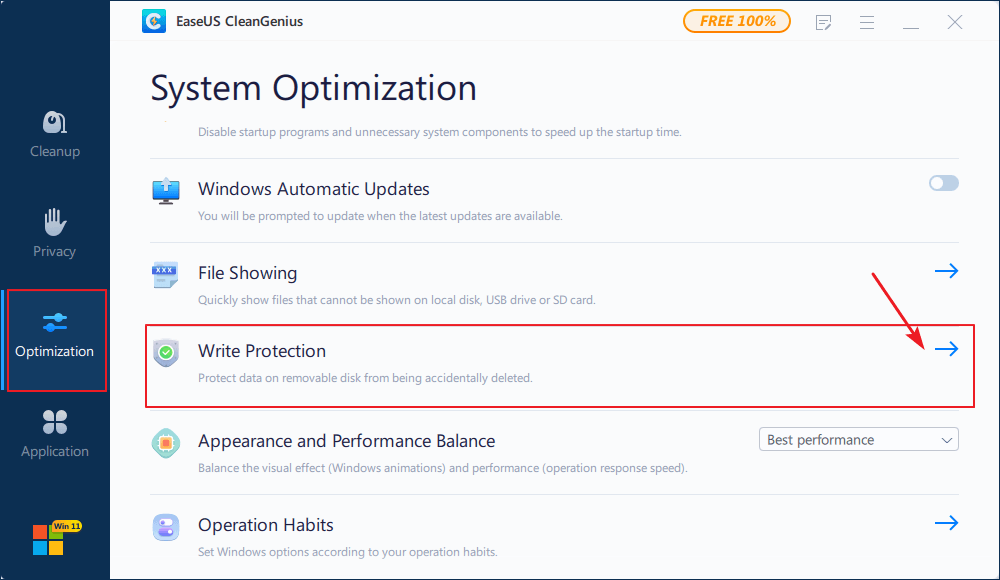
Step 2: Run EaseUS CleanGenius on your PC, select Optimization and choose the Write Protection mode.
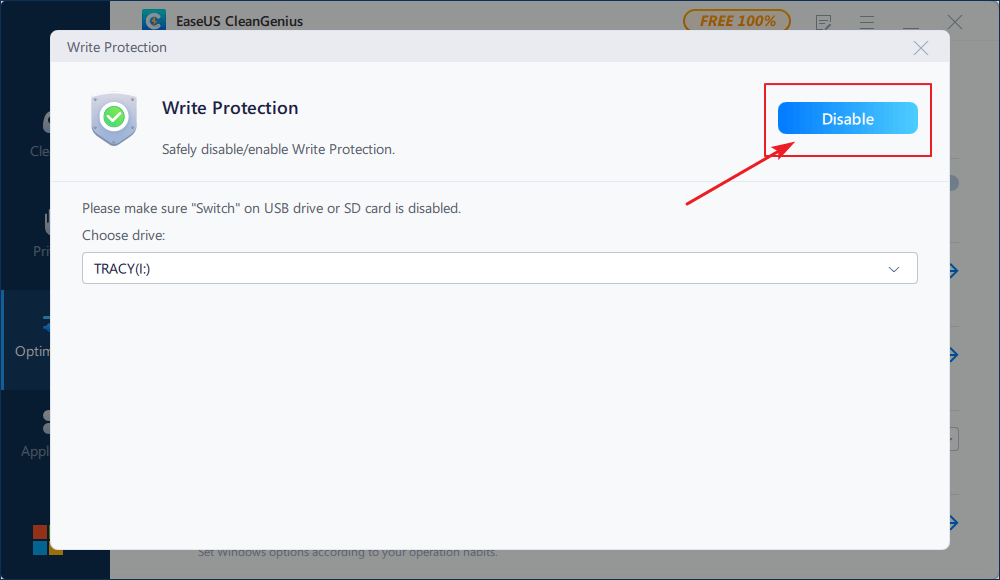
Step 3: Select the device that is write-protected and click Disable to remove the protection.
Step 2. Format USB to FAT32
After removing the USB write protection, you can apply any one of the above-provided solutions in Part 1 to format your USB drive to FAT32.
Final Word — Windows 10 Format FAT32
This page tells how to format a USB or external hard drive into FAT32 and resolve the issue of being unable to format USB to FAT32. It also includes helpful solutions in formatting devices bigger than 32GB into FAT32 without data loss.
If you want to convert devices into NTFS without formatting, refer to How to Convert FAT to NTFS for help.
1. How do I format a microSD card to FAT32? — Quora.com
The built-in tools, Windows Disk Management and File Explorer, are easy to use to format microSD card.
Use Disk Management: Right-click SD card and choose Format from the list. Change volume, file system, and unit size. Check Quick Format and click OK.
File Explorer: Right-click device and select Format…Choose file system label, and unit size. Confirm WARNING message and click OK.
2. How do I format a hard disk? — Quora.com
To save time and edit fast, we recommend a professional hard disk formatter — EaseUS Partition Master. If you are planning to format hard drive, run this software. Right-click the drive that needs to be formatted. Select format. It’s done!
3. Why can’t I format my USB drive to fat32?
Error happens due to USB error, USB size(larger than 32GB), and write-protected state.
Большинство смартфонов и планшетов позволяют подключать к ним флешки и даже внешние SSD диски объемом более 64 Гбайт, сделав ее дополнительным хранилищем информации для гаджета. Но эти носители должны использовать файловую систему FAT32, и вам нужно знать, как отформатировать 64 Гб в FAT32. В Windows 10 такая возможность по умолчанию не предусмотрена. Но мы сейчас расскажем, как это сделать без особых проблем.
Содержание
- Как отформатировать диск в FAT32
- Как форматировать через FAT32 в MacOS
- Как отформатировать флешку в FAT32 с помощью командной строки
Как отформатировать диск в FAT32
Как мы и сказали, операционная система Windows 10 не позволяет сделать это стандартными средствами (на скриншоте видно, что диск или флешку можно отформатировать лишь в NTFS). Но эту проблему легко решают всевозможные бесплатные утилиты. Например, достаточно популярная FAT32 Format, интерфейс которой отличается максимальной простотой.
- Скачайте приложение FAT32 Format с официального сайта разработчика. Для этого достаточно просто кликнуть по скриншоту окна программы.
- Подключите флешку или внешний накопитель к USB-разъему компьютера.
- Запустите приложение FAT32 Format и выберите нужную флешку в списке доступных, после чего нажмите кнопку «Start». Никакие дополнительные настройки, доступные в приложении, для этого менять не обязательно. По умолчанию будет выбрана и файловая система FAT32.
- Подтвердите форматирование флешки или диска и дождитесь завершения процедуры.

ridgecrop.co.uk
Внимание! Операция форматирования в FAT32 удалит все записанные на флешке или внешнем диске файлы. Убедитесь, что на ней отсутствуют нужные вам данные, а если они есть — скопируйте их на внутренний диск компьютера или другой носитель.
Как форматировать через FAT32 в MacOS
Владельцам компьютеров и ноутбуков Apple, работающих под управлением MacOS, немного проще. Возможность форматирования накопителя в FAT32 предусмотрена в самой операционной системе. Если же вы ищете внешний SSD, то вам наверняка пригодится наша подборка подобных устройств.
- Откройте Finder -> Приложения -> Дисковая утилита.
- Выберите нужный накопитель в списке доступных и нажмите «Стереть».
- Укажите файловую систему FAT32 и еще раз нажмите «Стереть», после чего дождитесь завершения процедуры и извлеките флешку.
Как отформатировать флешку в FAT32 с помощью командной строки
Да, графический инструмент, дающий возможность отформатировать флешку в FAT32 в Windows отсутствует, но у командной строки такого ограничения нет. И если вы думаете, как лучше форматировать флешку FAT32 или внешний накопитель без использования дополнительных программ, этот способ подойдет как нельзя лучше.
- Подключите накопитель к USB-разъему компьютера.
- Проверьте, какая буква присвоена подключенному накопителю. Для этого откройте «Проводник» и найдите название диска или флешки в левой части окна. Буква в скобках — это именно то, что нам нужно запомнить.
- Кликните левой кнопкой мыши по меню «Пуск» и начните вводить надпись «Командная строка».
- Нажмите на название «Командная строка» в результатах поиска правой кнопкой мыши и выберите «Запуск от имени Администратора».
- Введите команду format x: /fs:fat32 /q, где «x» — это буква диска или флешки, которую нужно отформатировать в FAT32. Кстати, управление выбором файловой системы здесь также предусмотрено. Для этого просто укажите нужную файловую систему после «fs:».
- Нажмите Enter и дождитесь завершения процедуры. В некоторых случаях до начала форматирования вам будет предложено ввести букву диска, под которой он будет отображаться в системе. Такое переименование может быть полезно.
Читайте также
- Буфер обмена на iPhone — как пользоваться
- Топ-4 способа отредактировать фото на iPhone без стороннего ПО
Applies ToGeneral
Аннотация
В данной статье описывается, как преобразовать жесткий диск, который использует таблицы размещения файлов (FAT или FAT16) файловой системы с помощью преобразования диска в файловую систему FAT32. Предупреждение: После преобразования жесткого диска в FAT32 не удается преобразовать обратно в исходную систему FAT. Кроме того эта процедура не работает, если на жестком диске имеются поврежденные сектора.
Дополнительная информация
Чтобы преобразовать диск в файловую систему FAT32, выполните следующие действия. Примечание: Перед преобразованием в файловую систему FAT32, удалите все служебные программы и средства, обеспечивающие защиту и шифрование основной загрузочной записи (MBR) или таблицы разделов (например, удаление Bootlock, входящих в состав Symantec Norton Your Eyes Only).
Способ 1
-
Нажмите кнопку Пуск, выберите пункт программы, Стандартные, Служебные, преобразование диска (FAT32)и нажмите кнопку Далее.
-
В списке диски выберите диск, который требуется преобразовать в файловую систему FAT32.
-
Нажмите кнопку Далее, а затем нажмите кнопку ОК.
-
Нажмите кнопку Далее, нажмите кнопку Далееи затем снова нажмите кнопку Далее .
-
После завершения преобразования нажмите кнопку Готово.
Способ 2
В командной строке введите cvt диск: /cvt32 и нажмите клавишу ВВОД, где диск — это диск, необходимо преобразовать файловую систему FAT32. Дополнительные сведения о файловой системе FAT32 см в следующей статье базы знаний Майкрософт:
154997 Описание файловой системы FAT32Примечание: Диск должен быть размером не менее 512 мегабайт (МБ), чтобы его можно было преобразовать в файловую систему FAT32.
Нужна дополнительная помощь?
Нужны дополнительные параметры?
Изучите преимущества подписки, просмотрите учебные курсы, узнайте, как защитить свое устройство и т. д.
If you need to format a USB flash drive, HDD, SDD, or some other form of storage to FAT32, you’ve come to the right place.
In this article we’ll go over what a file system is, the FAT32 standard, and several ways to format a storage device to FAT32 on Windows 10.
What’s a file system?
A file system is a standardized way of organizing data on a computer storage device like a flash drive or HDD.
A file system divides a storage device into virtual compartments, almost like a wall of post office boxes, and keeps track of all the information that gets stored in each box.
Some of the most common file system formats for portable storage devices are FAT32, NTFS, and ExFAT.
FAT32 compared to other formats
Of those three common formats, FAT32 is the oldest and most widely supported. Every major operating system will allow you to read and write from a USB flash drive that’s formatted to FAT32.
Meanwhile, macOS can only read NTFS drives, and you would need to install third-party software to write back to the drive.
However, though FAT32 is well supported, its maximum drive and file size is severely limited when compared to newer formats like NTFS and ExFAT:
| Max drive size | Max file size | Windows | macOS | Linux | |
| FAT32 | 32 GB (Windows), up to 16TB (Other OSs) | 4 GB | Read/Write | Read/Write | Read/Write |
| NTFS | 8 PB* | 16 EB** | Read/Write | Read | Read/Write |
| ExFAT | 128 PB* | 16 EB** | Read/Write | Read/Write | Read/Write |
* 1 petabyte is about 1 thousand terabytes
** 1 exabyte is about 1 million terabytes
Note that the maximum drive and file size of NTFS and ExFAT is so large that there’s basically no limit. (But it would be nice to have a 128 PB USB drive, wouldn’t it?)
On the other hand, FAT32’s max file size of 4 GB is almost nothing now that phones can record 4K videos. Also, it’s a little more difficult to format a drive larger than 32 GB to FAT32 on Windows 10.
These days, the only reason why you’d choose to format a drive to FAT32 is for compatibility. For example, if you need to boot up an old computer, maybe with a different operating system, and backup some of its files. But you’d need to be sure that none of those files are greater than 4 GB.
If you’re sure you want to go with FAT32, here’s how to format a storage drive on Windows 10.
Important note: Before you format a drive, make sure that you backup all of your important files. In fact, make two backups, and keep one on a remote service like Google Drive or Dropbox.
Formatting a drive will delete all of the data that’s currently on it.
How to use Windows File Explorer to format a USB drive to FAT32
A quick note about this method: it only works on USB flash drives that are less that 32 GB. If your USB drive is larger than 32 GB, check out one of the later methods.
With that out of the way, plug your USB drive into your computer and open Windows File Explorer.
Next, right-click on the drive on the left hand side of the File Explorer window and click «Format»:
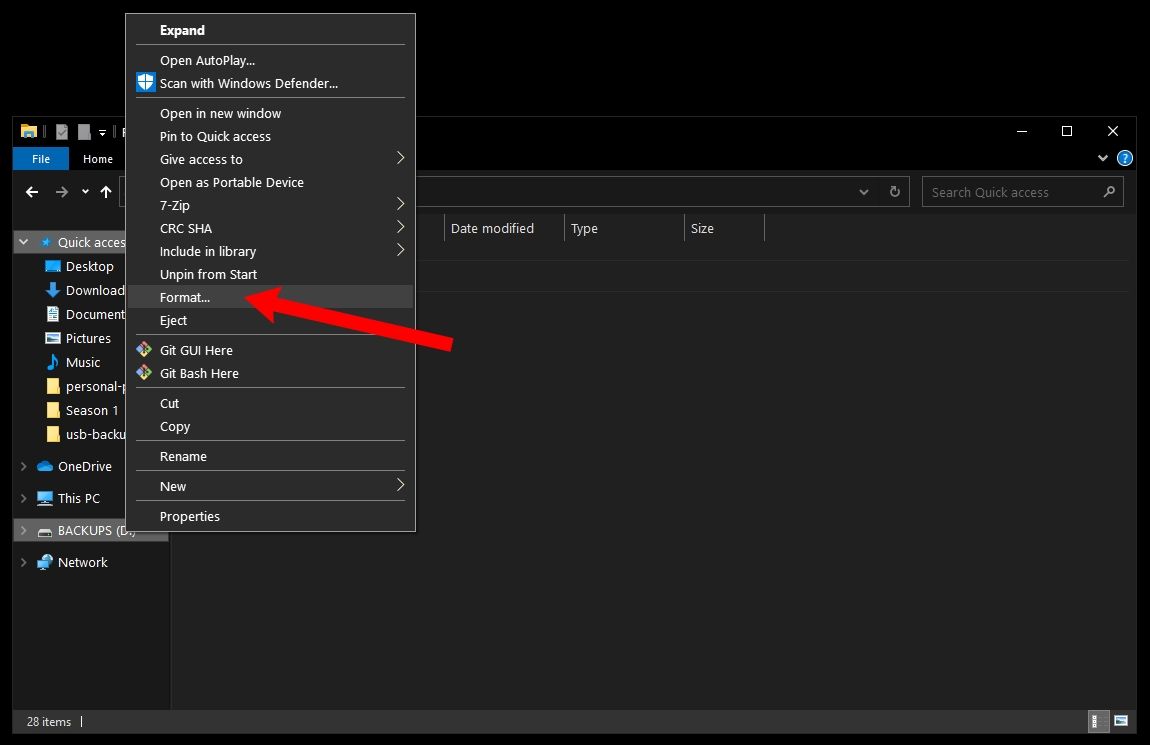
In the window that pops up, ensure that «FAT32» is selected. Also, feel free to rename the USB drive whatever you’d like:
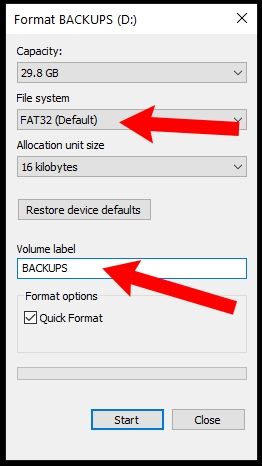
You can leave the rest of the options alone. Just click start to format your drive.
Once it’s done, your USB drive should be formatted to use the FAT32 file system.
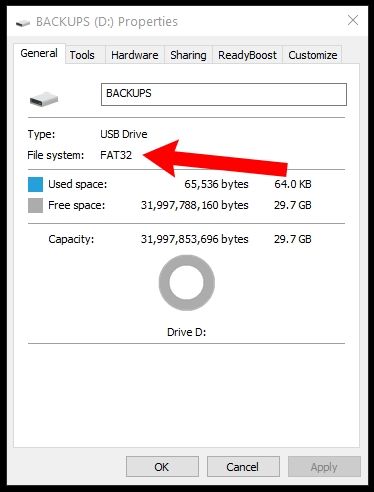
To double check this, open File Explorer, right click on your USB drive, and click «Properties».
A window will pop up and you should see that the file system is now FAT32:
If your USB drive is larger than 32 GB, you’ll need to use a third-party program like Rufus to format it.
There are lots of other programs that can format USB drives, but Rufus is really small and portable. This means you can stick Rufus right on a USB drive, plug it into any Windows computer, and format other drives on the go.
After you download Rufus, double click on the .exe file to start the application.
Make sure your USB drive is selected. Then, click the «Boot selection» dropdown and select «Non bootable»:

Next, click the «File system» dropdown and select «FAT32».
Also, feel free to change the name of your USB drive under «Volume label»:

Then, click the «Start» button to format your drive. After a few seconds it’ll be formatted to FAT32.
How to use PowerShell to format a USB drive to FAT32
While this method works with drives larger than 32 GB, it’s really slow – even formatting a 32 GB drive can take up to an hour depending on your computer.
But, if you aren’t able to use the previous two methods for some reason, this will work in a pinch.
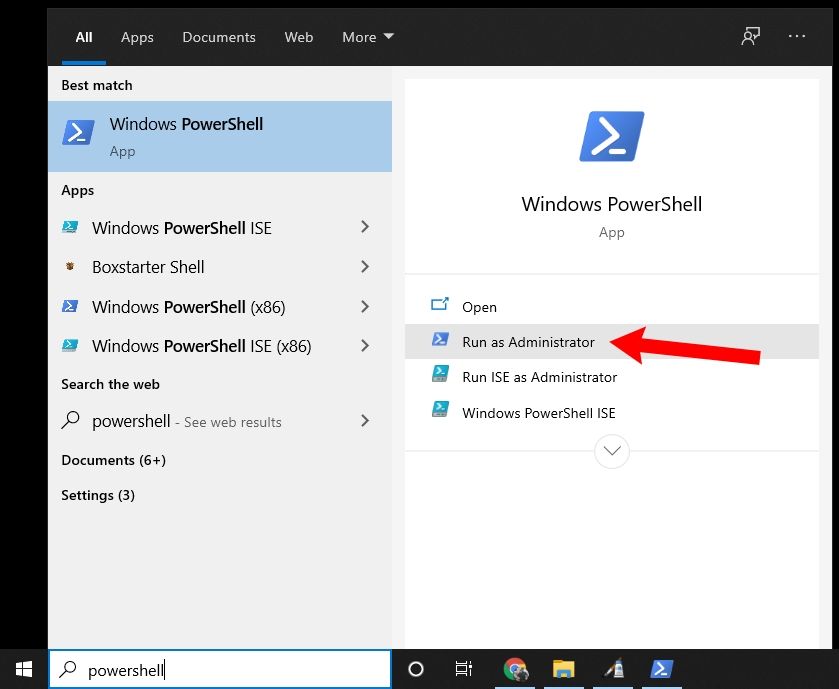
First, click on the Windows Search Bar and type in «powershell». Then, click «Run as administrator» to launch PowerShell with elevated privileges:
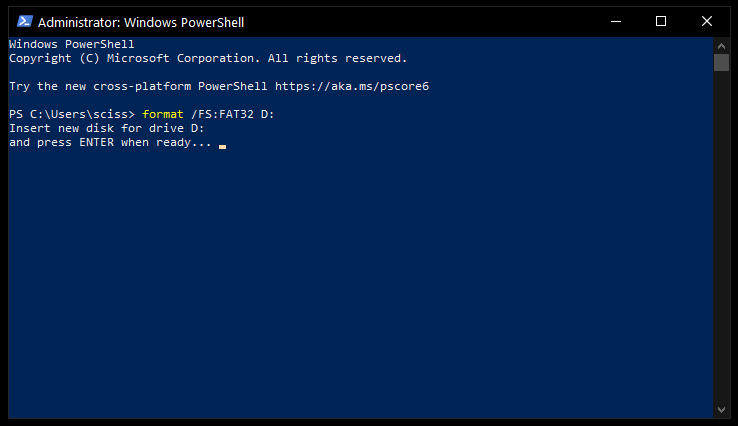
In the PowerShell terminal, enter the following command:
format /FS:FAT32 DRIVE_LETTER:
Use the File Explorer to double check your drive letter. My drive letter was D, so I entered format /FS:FAT32 D:.
Press Enter, make sure your USB drive is plugged in, and press the Enter key again to start the process:
Then go run some errands or something – it will take awhile.
Once the format command is finished, your drive should be formatted to FAT32.
In closing
Now you should be able to format a USB drive of any size to FAT32 on Windows 10. And with just a little modification, any of these methods can be used to format your drive to another file system like NTFS or ExFAT.
Now get out there and format all your USB drives. (But only after you backup everything important!)
Was this helpful? Is there a better method that you know of? Tweet at me and let me know how you format things on Windows 10.
Learn to code for free. freeCodeCamp’s open source curriculum has helped more than 40,000 people get jobs as developers. Get started
«I want to format a 2TB external hard drive as FAT32, so that I can use it on my TV box. I heard that 2TB is the max size that FAT32 can manage, and someone has successfully got around that. But I didn’t find how to actually do that? Can anyone share a step-by-step guide about formatting 2TB external hard drive to FAT32 file system?»
Why do you want to format external hard drive to FAT32 file system?
File system controls the way how files are stored, organized and indexed on a storage device. The hard drive in your computer or the USB drive may use file system like NTFS, exFAT, FAT32, EXT4, HFS+, etc. Each type of file system has its own merits and demerits.
FAT32 is known as its universal support and it is compatible with almost all operating system platforms. It is certain that you wish to make the best of external device to the best potential, for example, use it across platforms. The newly bought external hard drive is usually formatted as NTFS already, which can be used on Windows computers only rather than Mac or Linux.
How do I convert NTFS to FAT32 for my external hard drive? Formatting is the simplest solution. However, FAT32 is not a native option once the drive to be formatted is larger than 32GB. Don’t worry, it’s time to show you how to format an external hard drive to FAT32.
Disclaimer: Disk formatting will erase all data off the drive being formatted. Before proceeding formatting, please make sure your data is safely backed up in advance.
Method #1: Format external hard drive in Disk Management
Disk Management is a free tool integrated into Windows operating system. With it you can easily delete, create, format, shrink or extend volume.
Step 1. Right-click the «Start» menu and choose «Disk Management» from the appeared menu.
Step 2. Locate and right-click the partition you intend to format and click «Format».
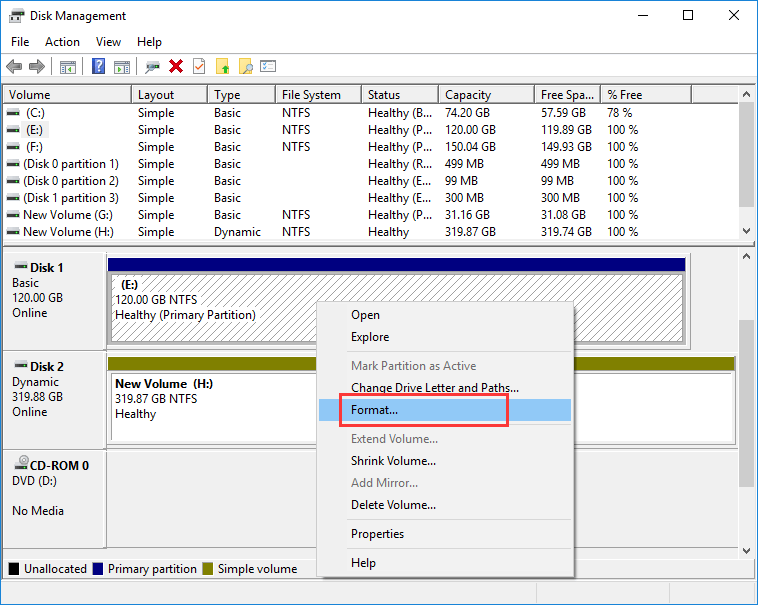
Step 3. Set volume label, file system, and allocation unit for the drive. Then click «OK».
Formatting is a simple task, so you can just leave these settings as default.
Step 4. Click «OK» to start the formatting.
Method #2: Format external hard drive using diskpart command
Step 1. Connect the external hard drive to be formatted and make sure it can be recognized properly.
Step 2. Type «Command Prompt» in searching box and click «Run as administrator». Click «Yes» when User Account Control asks for permission.
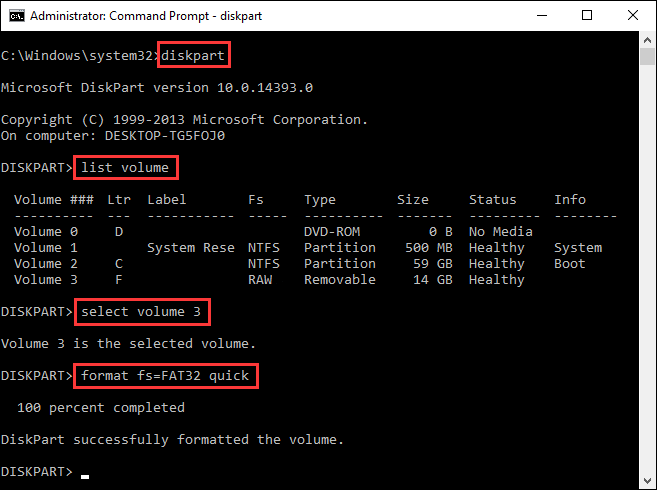
Step 3. Type diskpart in Command Prompt and press Enter key.
Step 4. Type the following commands and press Enter after each command.
List volume
Select volume #
Format fs=FAT32 quick
Method #3: Format external HDD greater 32GB with free disk partition manager software
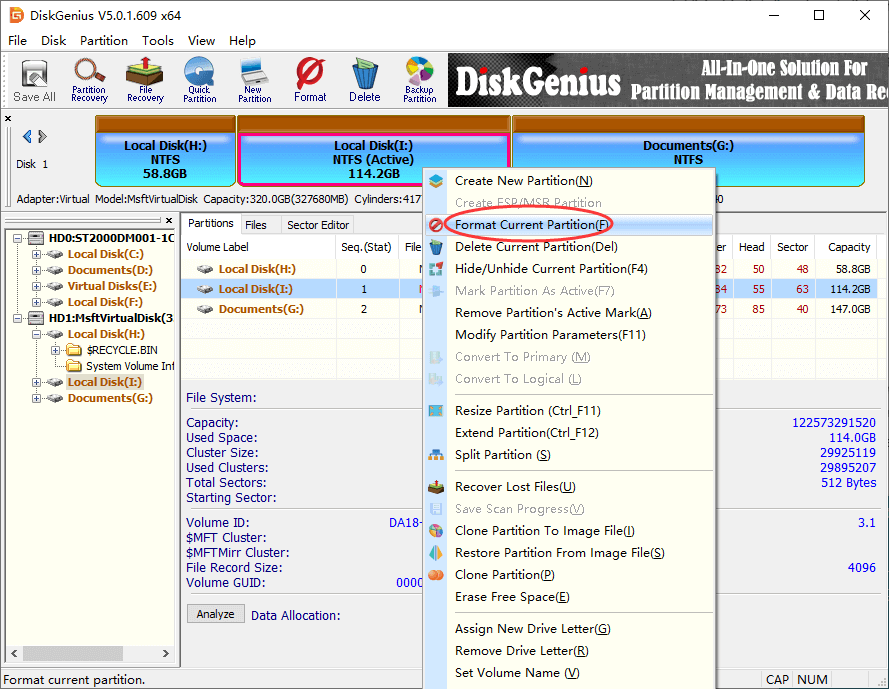
Windows File Explorer, Disk Management and Diskpart command are not able to format a partition to FAT32 when the size is larger than 32GB. For example, the FAT32 option won’t be listed in the drop-down menu, or diskpart command reports «Virtual Disk Service error: The volume size is too big» error. In cases like this, you’ll need a third-party and free HDD format tool – DiskGenius Free Edition.
DiskGenius Free Edition is a free partition manager that empowers you to format hard drive, external hard drive, SSD, SD card, or USB flash drive to FAT32 file system whatever the size of the drive. In addition to FAT32 file system, it also enables you to format a partition to exFAT, NTFS, EXT4, EXT3 and EXT2 format. The formatting process is quite straightforward:
Step 1. Launch DiskGenius Free Edition, right-click the partition you attempt to format and choose «Format Current Partition».
Step 2. Choose file system for the drive from the drop-down list, set cluster size, enter volume label in line with your needs. Then click «Format».
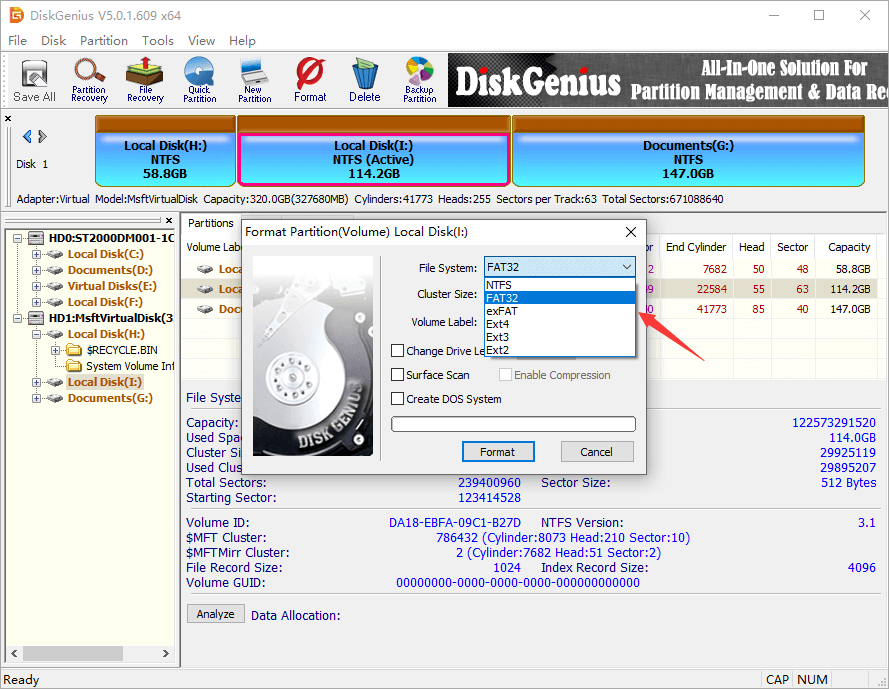
Step 3. A message box will pop up warning you that formatting will remove all data. Click «Yes» to continue.
Diskpart command VS. DiskGenius
DiskGenius is free partition manager software for Windows PCs and Windows Servers, it covers the advantages of Windows Disk Management and Diskpart command. It is able to format large partition whose size exceeds 32GB to FAT32, as well as format any drive to NTFS, exFAT, EXT4, EXT3, EXT2… Moreover, this third-party software is free of charge to users who want to clone HDD/SSD, migrate Windows OS, back up a partition or hard drive into an image file, fully erase hard drive data, resize/split/shrink partitions, check bad sectors, export directory tree to an HTML file, and so on.
Bonus tip: How to Fully wipe an external hard drive?
As we’ve discussed in previous tutorial, lost files are recoverable even though the external hard drive is formatted. A quick formatting does not full erase data. If you’re selling or giving away the external hard drive, someone can still restore lost data with a data recovery tool. To fully wipe the drive, you should make sure each sector on the drive is overwritten by zeros or random characters. Here is a quick guide to fully wipe an external hard drive with DiskGenius Free Edition.
Step 1. Install and run DiskGenius Free Edition on a Windows computer where the external hard drive is connected.
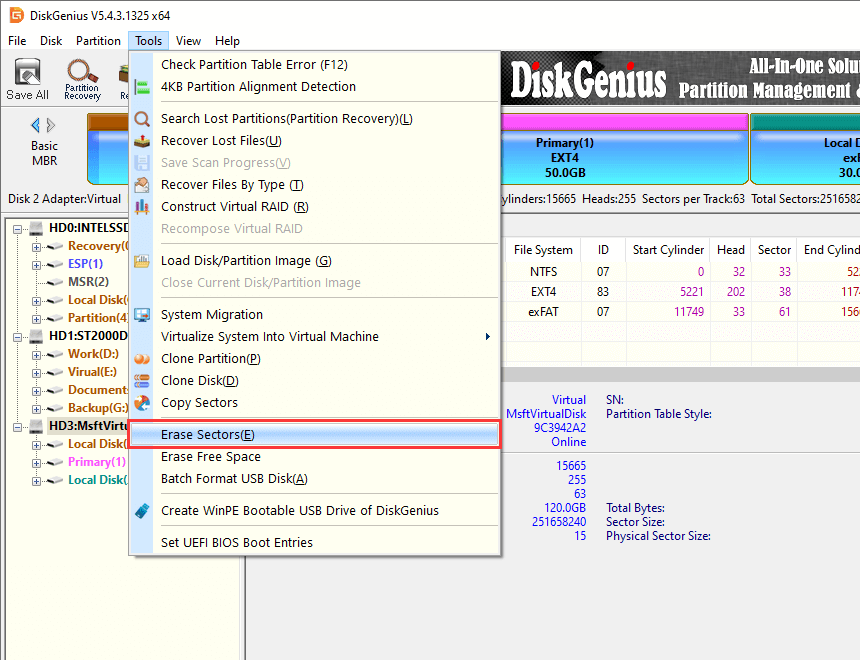
Step 2. Select the external HDD you want to fully erase data and click «Tools» – «Erase Sectors».
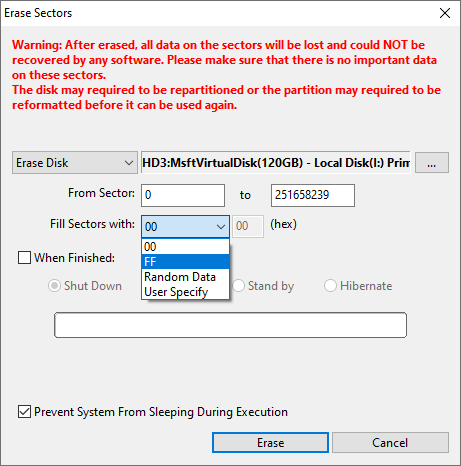
Step 3. Select the characters you want to use to fill the drive. Then click «Erase» button.
Frequently Asked Questions
1. Can any external hard drive be formatted to FAT32?
Yes, an external hard drive can be formatted to FAT32 format regardless of the brand or capacity. FAT32 is a reliable file system type for external disks, including USB flash drives, SD card, external hard drive, pen drive, thumb drive, etc. So you can format such disks to FAT32 as long as you are not going to store files over 4GB in size.
2. How do I format a 2TB hard drive to FAT32?
The «FAT32» won’t be available when you are attempting to format a 2TB partition in Windows File Explorer or Disk Management. Hence, the formatting task should be done with the help of third-party disk partition software such as DiskGenius Free Edition.
Step 1. Highlight the partition to be formatted and click «Format» button from the Toolbar.
Step 2. Choose FAT32 as the file system and click «OK» button.
3. How to convert NTFS to FAT32 for external hard drive?
Both NTFS and FAT32 are widely used file system on internal and external disks, and they can be converted to each other by way of formatting. So, when you want to convert NTFS to FAT32, exFAT, HFS+ for Mac or Linux, you can just format the external hard drive.
4. How to format hard drive to FAT32 using command prompt?
Diskpart is the command to be used to format hard drive to FAT32 file system, here are the steps of formatting HDD:
Step 1. Run Command Prompt as administrator.
Step 2. Type diskpart in Command Prompt and press Enter key.
Step 3. Type following commands to format HDD to FAT32:
List volume
Select volume # (replace # with the number of the drive you want to format)
Format fa=FAT32 quick
5. How do I format a 64GB USB to FAT32 in Windows 10?
For Windows File Explorer, Disk Management and diskpart command, FAT32 is the default file system for USB drive that is not larger than 32GB. The 64GB volume is too big for FAT32. So you need to use third-part partition manager software like DiskGenius to finish the formatting.
6. Why can’t I format my flash drive to FAT32?
There are two possible reasons why the flash drive cannot be formatted to FAT32:
- The flash drive is physically damaged, and Windows cannot complete the format.
- The flash drive you attempt to format is larger than 32GB.
7. How do I change NTFS to FAT32?
To change file system type from NTFS to FAT32, you just need to format the drive:
Step 1. Right-click the drive and choose «Format» option in Windows File Explorer.
Step 2. Select FAT32 as the file system and click «OK» button.
8. Is exFAT and FAT32 the same?
No, exFAT and FAT32 are two different file systems. FAT32 means FAT Allocation Table 32, exFAT stands for Extended File Allocation Table. exFAT can be used as the replacement form FAT32, and it supports files with 4GB per size.
In closing
Formatting HDD or external HDD to FAT32 can be done via methods presented above. FAT32 is one of the popular file systems that are cross-platform. If you want to use the external hard drive under different operating system environments like Mac, Windows, Linux, then formatting to FAT32 is good idea. Just make sure you’ve backed up files to a safe place before the formatting.
Related Articles
- How to Format 64GB and larger SD Card to FAT32 in Windows 11/10/8/7?
- How to Format SSD to FAT32 File System in Windows 11/10/8/7?
- How To Convert RAW to NTFS /FAT32 File System Without Losing Data?
- How to Convert (Format) NTFS to EXT4/3/2 in Windows 11/10/8/7? [FREE]