
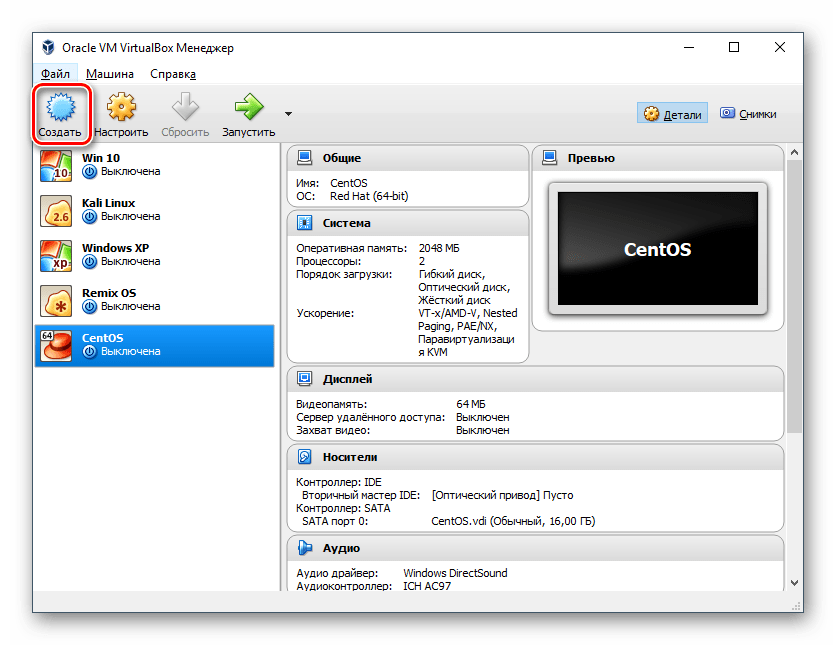
Все способы:
- Создание виртуальной машины
- Настройка параметров виртуальной машины
- Установка Windows 10 на VirtualBox
- Вопросы и ответы: 28
VirtualBox — программа, которая позволяет устанавливать операционные системы в изолированном режиме. На виртуальную машину можно инсталлировать и актуальную сейчас Windows 10, чтобы познакомиться с ней или поэкспериментировать. Нередко пользователи таким образом решают проверить совместимость «десятки» с программами, чтобы в дальнейшем совершить апгрейд своей основной операционной системы.
Создание виртуальной машины
Каждая ОС в ВиртуалБоксе устанавливается на отдельную машину. По сути, это виртуальный компьютер, который система принимает за обычное устройство, куда можно выполнить инсталляцию.
Чтобы создать виртуальную машину, выполните следующие шаги:
- На панели инструментов менеджера ВиртуалБокса кликните по кнопке «Создать».
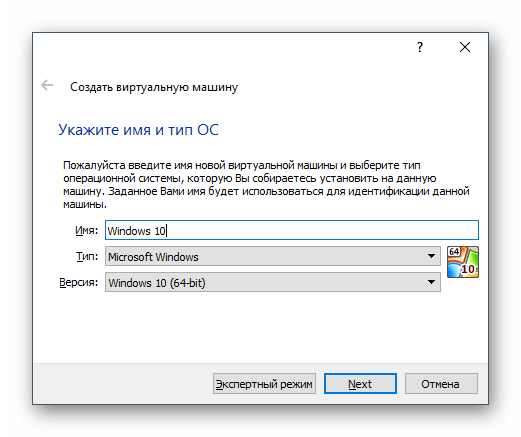
- В «Имя» пропишите «Windows 10», все остальные параметры самостоятельно изменятся, в соответствии с названием будущей ОС. По умолчанию будет создана машина с 64-битной разрядностью, но при желании вы можете сменить ее на 32-bit.
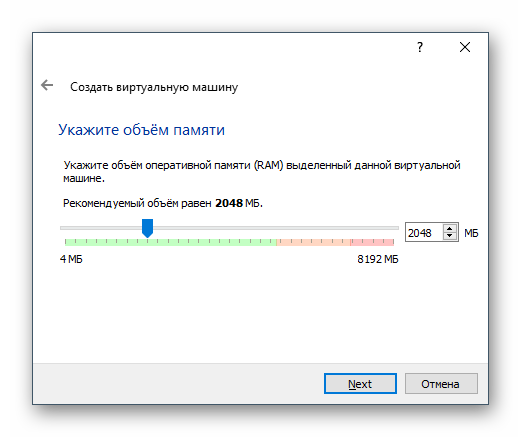
- Для этой операционной системы требуются немалые ресурсы, чем, например, для Linux. Поэтому оперативной памяти рекомендуется устанавливать минимум 2 ГБ. Если есть возможность, то выделите больший объем.

Эту и некоторые другие настройки при необходимости вы сможете изменить в дальнейшем, после создания виртуальной машины.
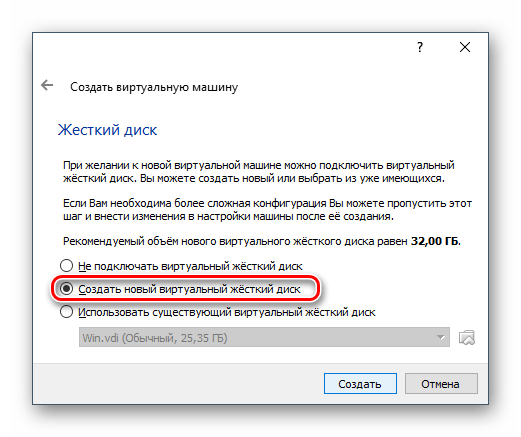
- Оставьте активной настройку, предлагающую создать новый виртуальный накопитель.
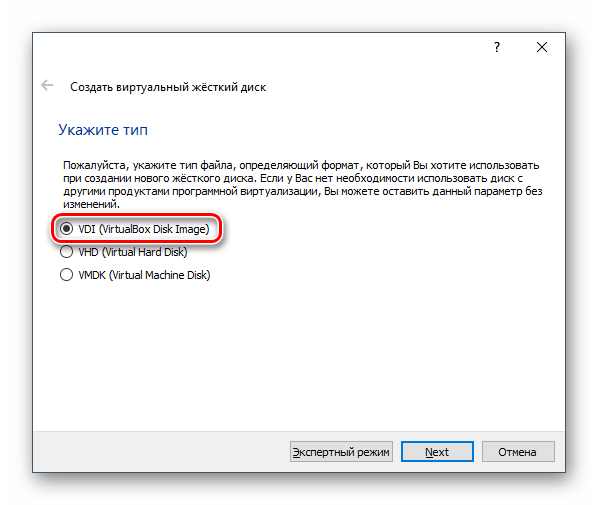
- Тип файла, определяющий формат, оставьте VDI.
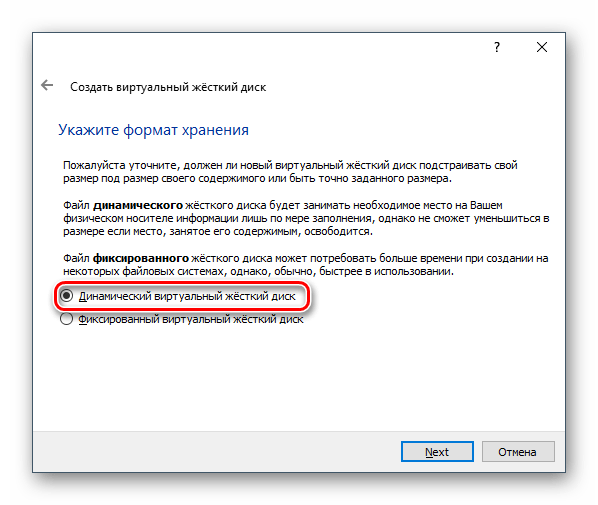
- Формат хранения лучше оставить «динамический», чтобы выделенное на виртуальный HDD место не расходовалось впустую.
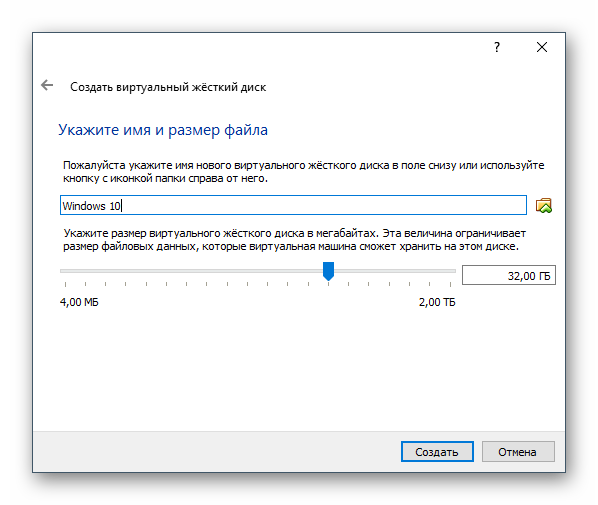
- При помощи регулятора задайте объем, который будет отведен под виртуальный винчестер.

Обратите внимание, что VirtualBox советует выделять минимум 32 ГБ.
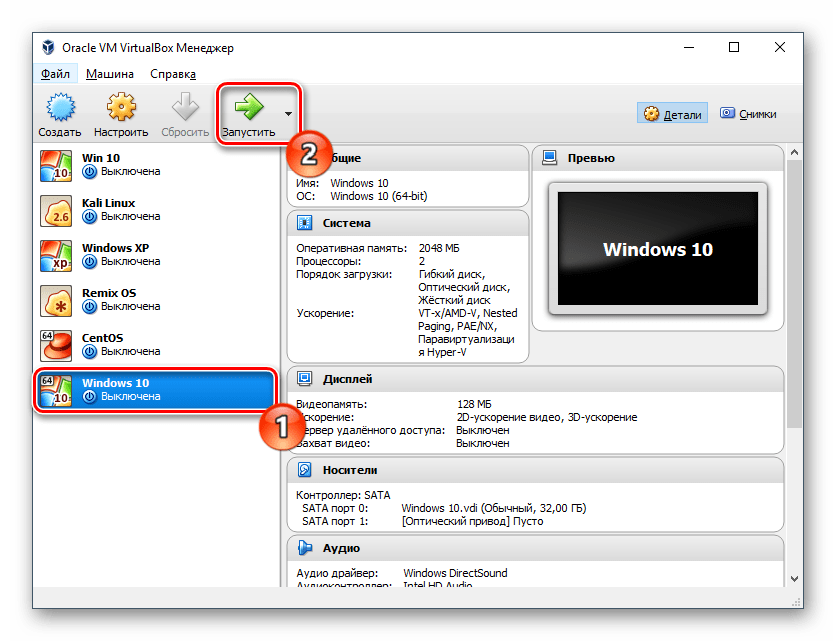
После этого шага будет создана виртуальная машина, и можно перейти к ее настройке.
Настройка параметров виртуальной машины
Новая виртуальная машина хоть и позволит установить Windows 10, но, скорее всего, система будет ощутимо тормозить. Поэтому заранее рекомендуем поменять некоторые параметры, чтобы повысить быстродействие.
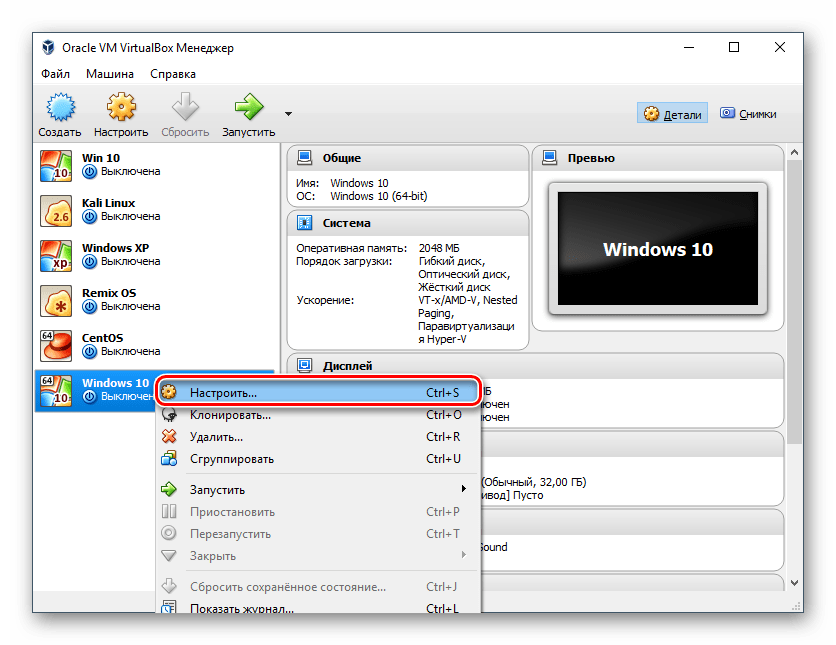
- Кликните правой кнопкой и выберите «Настроить».
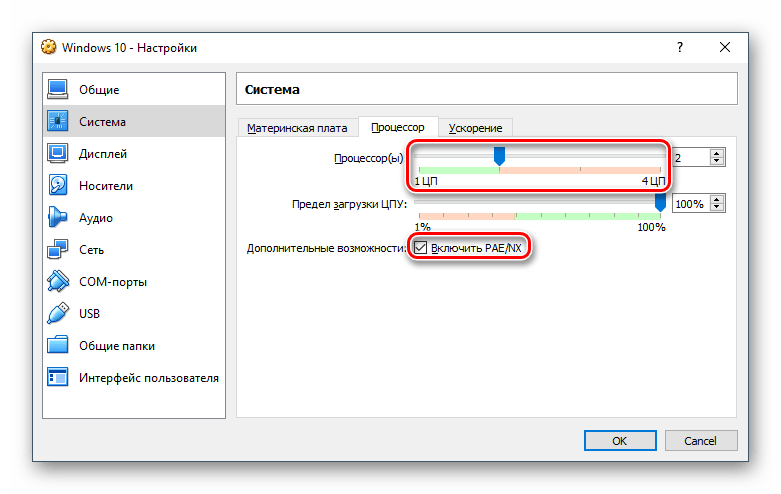
- Перейдите в раздел «Система» — «Процессор» и увеличьте количество процессоров. Рекомендуется установить значение 2. Также включите PAE/NX, установив галочку в соответствующем месте.
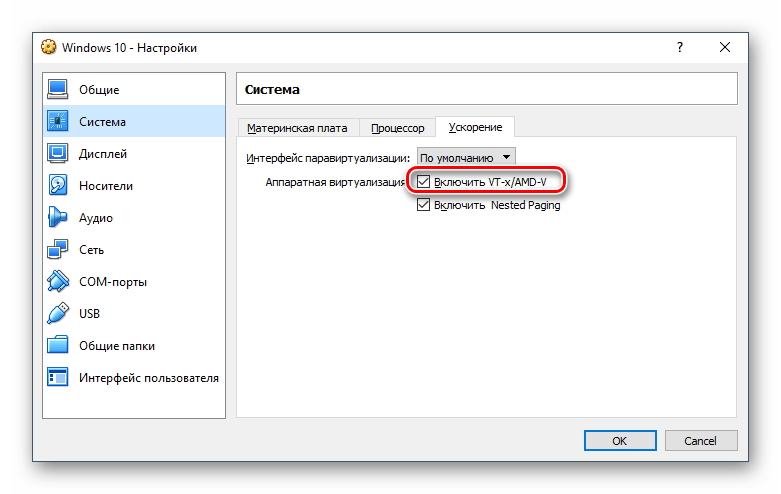
- Во вкладке «Система» — «Ускорение» задействуйте параметр «Включить VT-x/AMD-V».
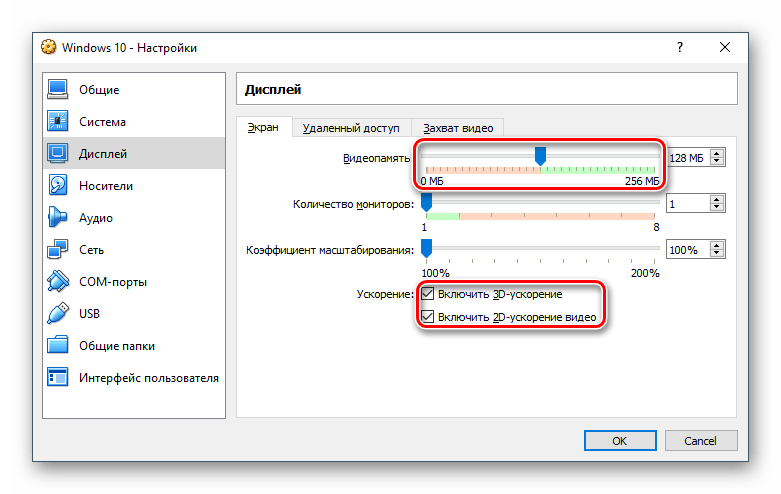
- На вкладке «Дисплей» объем видеопамяти лучше установить до наибольшего значения — 128 МБ.

Если вы планируете пользоваться 2D/3D ускорением, то установите галочки рядом с этими параметрами.
Обратите внимание, после активации 2D и 3D предельный объем доступной видеопамяти увеличится со 128 МБ до 256 МБ. Рекомендуется установить максимально возможное значение.
Другие настройки вы можете выполнить самостоятельно сейчас или в любое время, когда виртуальная машина находится в выключенном состоянии.
Установка Windows 10 на VirtualBox
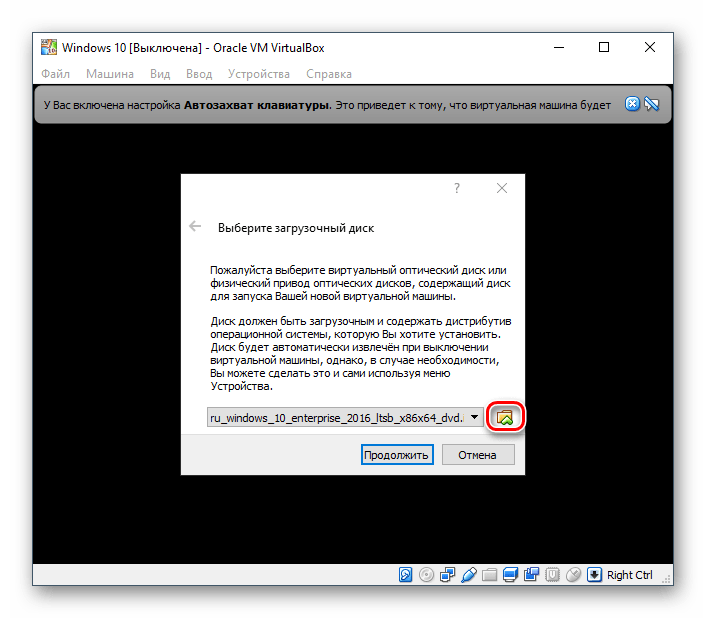
- Запустите виртуальную машину.
- Нажмите на пиктограмму с папкой и через Проводник выберете место, где сохранен образ с расширением ISO. После выбора нажмите кнопку «Продолжить».
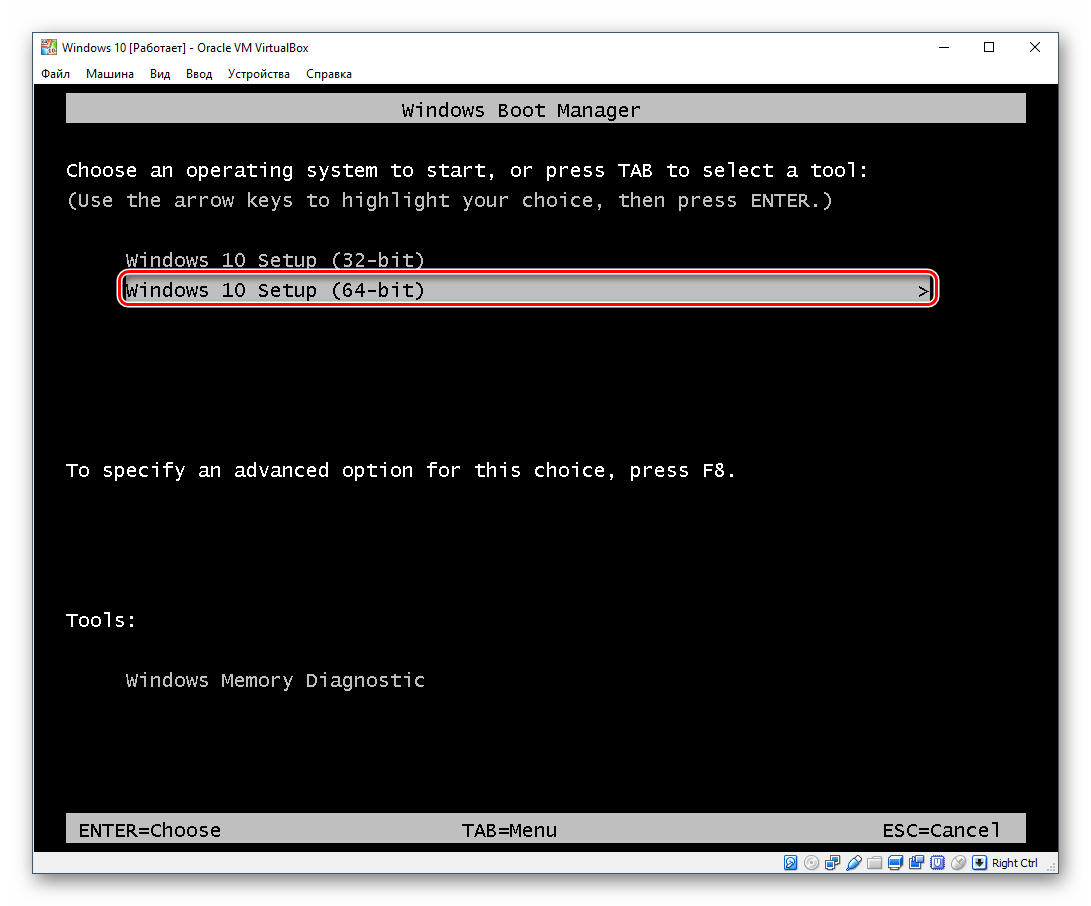
- Вы попадете в Windows Boot Manager, который предложит выбрать разрядность устанавливаемой системы. Выберите 64-bit, если создавали 64-битную виртуальную машину, и наоборот.
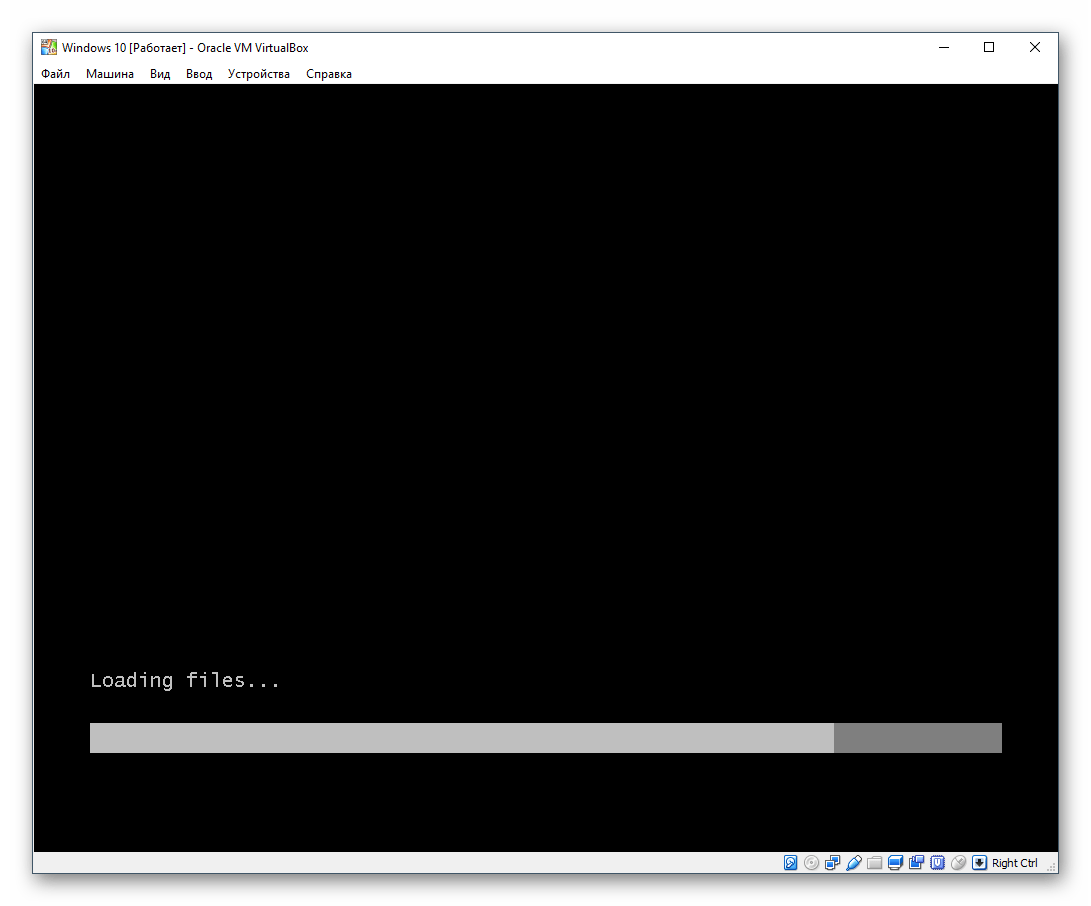
- Будут загружены установочные файлы.
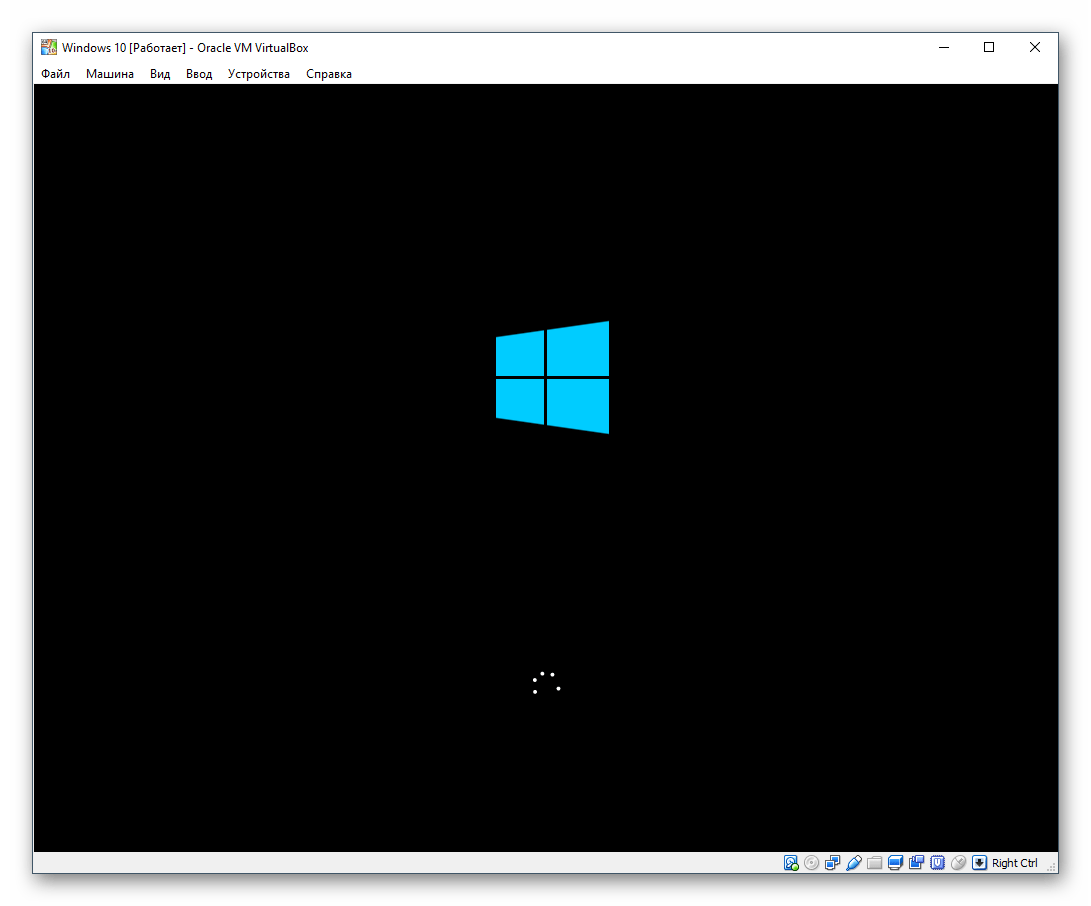
- Отобразится окно с логотипом Windows 10, подождите.
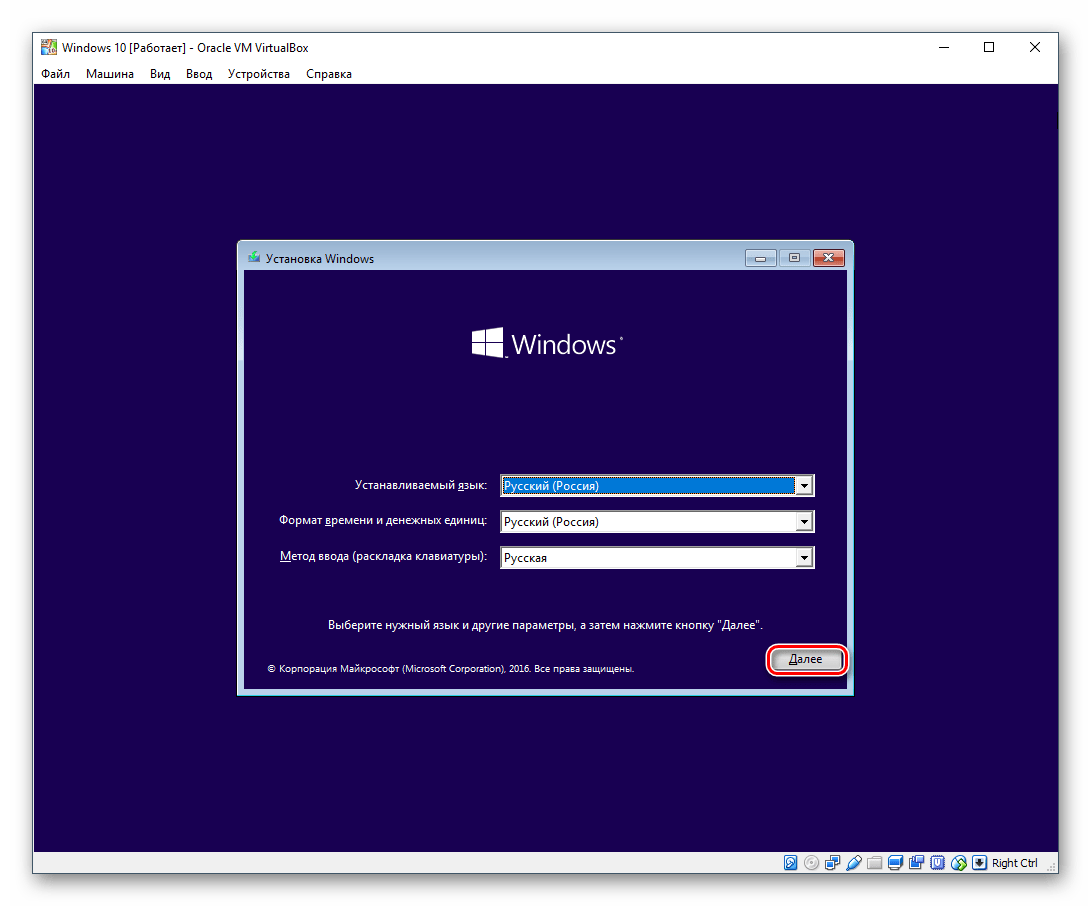
- Запустится установщик Виндовс, и на первом этапе предложит выбрать языки. Русский установлен по умолчанию, при необходимости можете сменить его.
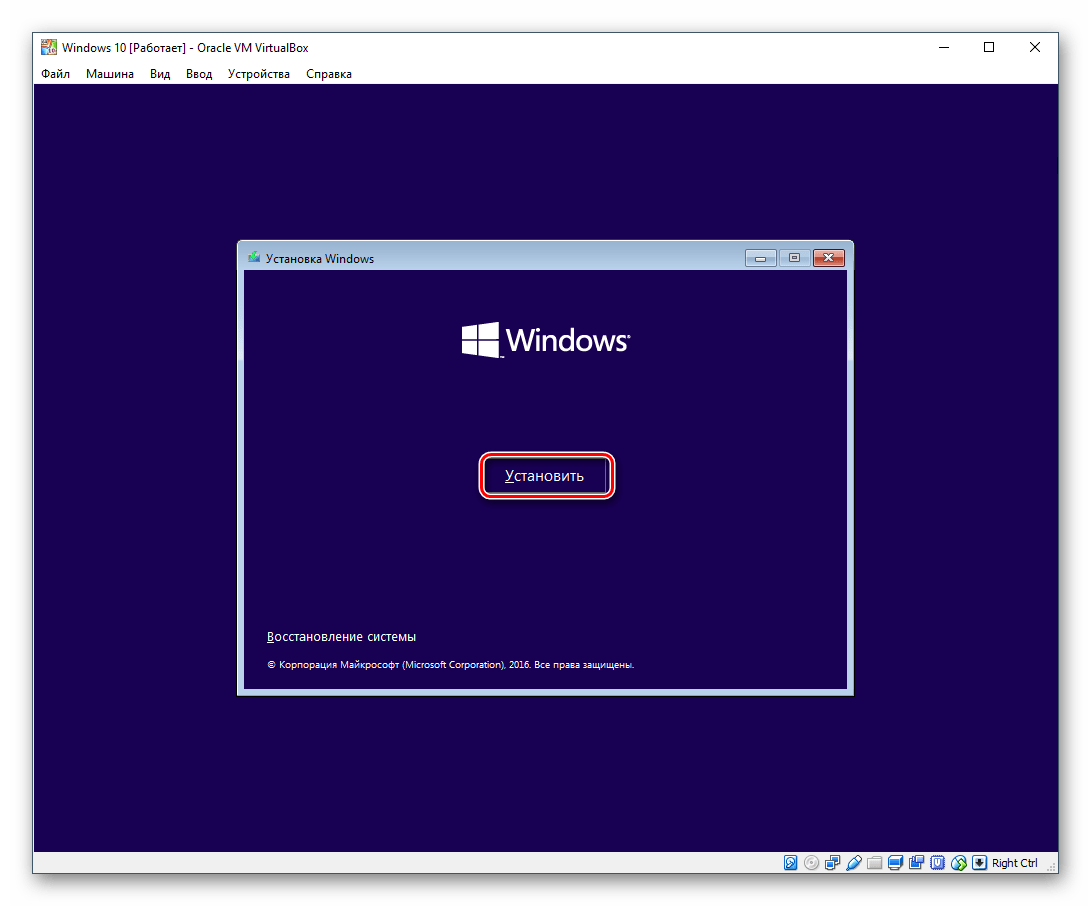
- Нажмите на кнопку «Установить», чтобы подтвердить свои действия.
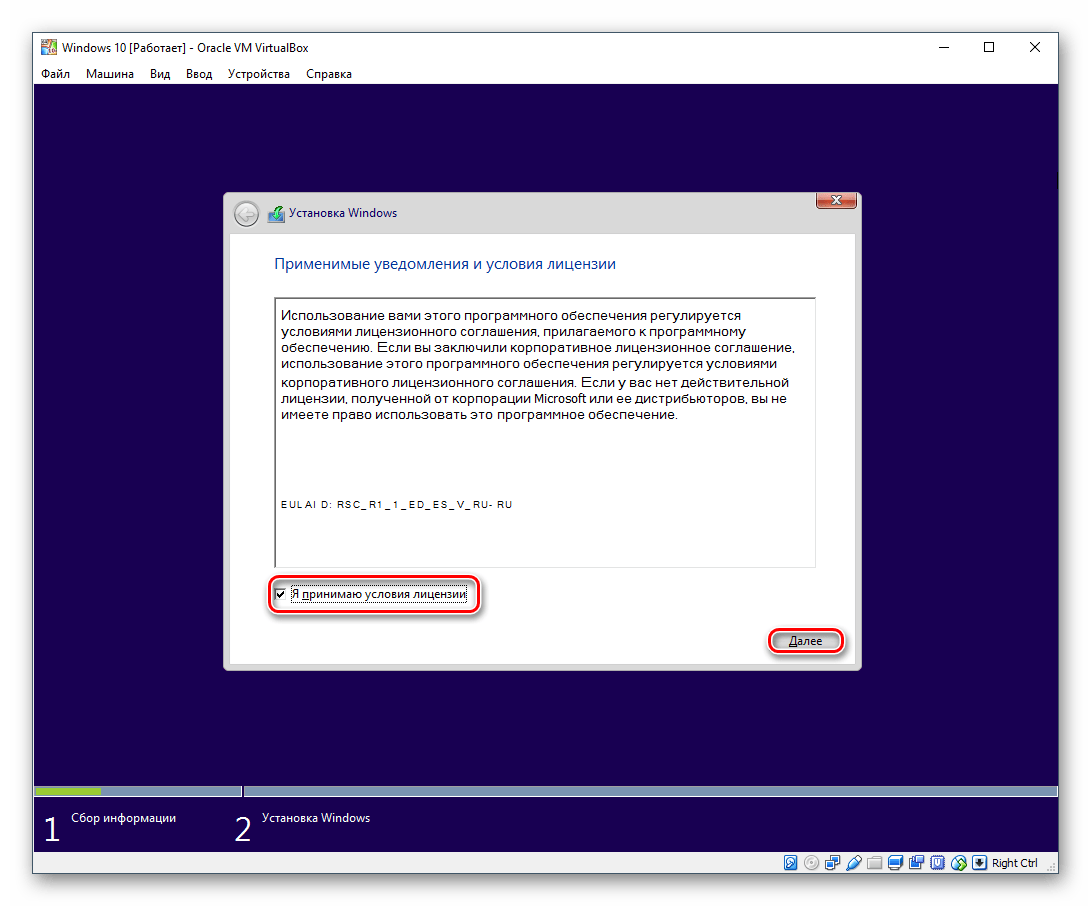
- Примите условия лицензионного соглашения, поставив галочку.
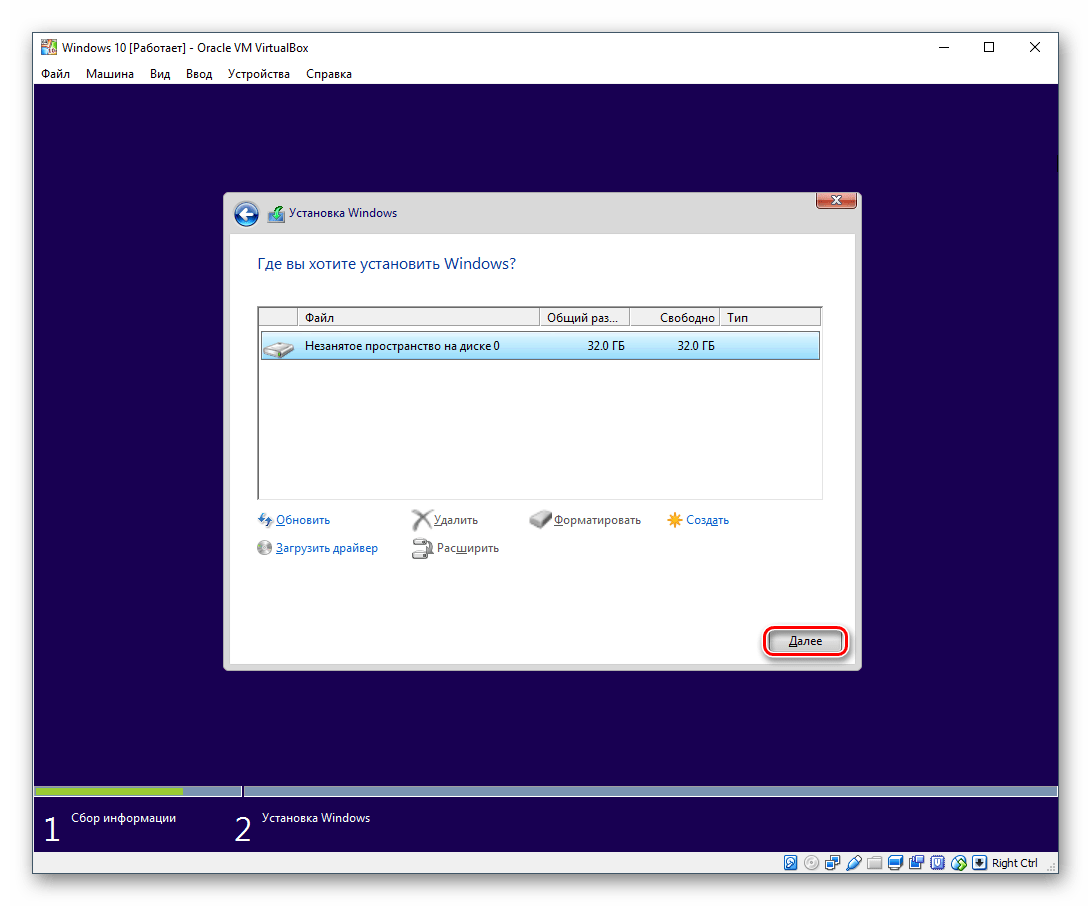
- В типе установки выберите «Выборочная: только установка Windows».
- Отобразится раздел, куда будет устанавливаться ОС. Если вы не собираетесь разбивать виртуальный HDD на разделы, то просто нажмите «Далее».
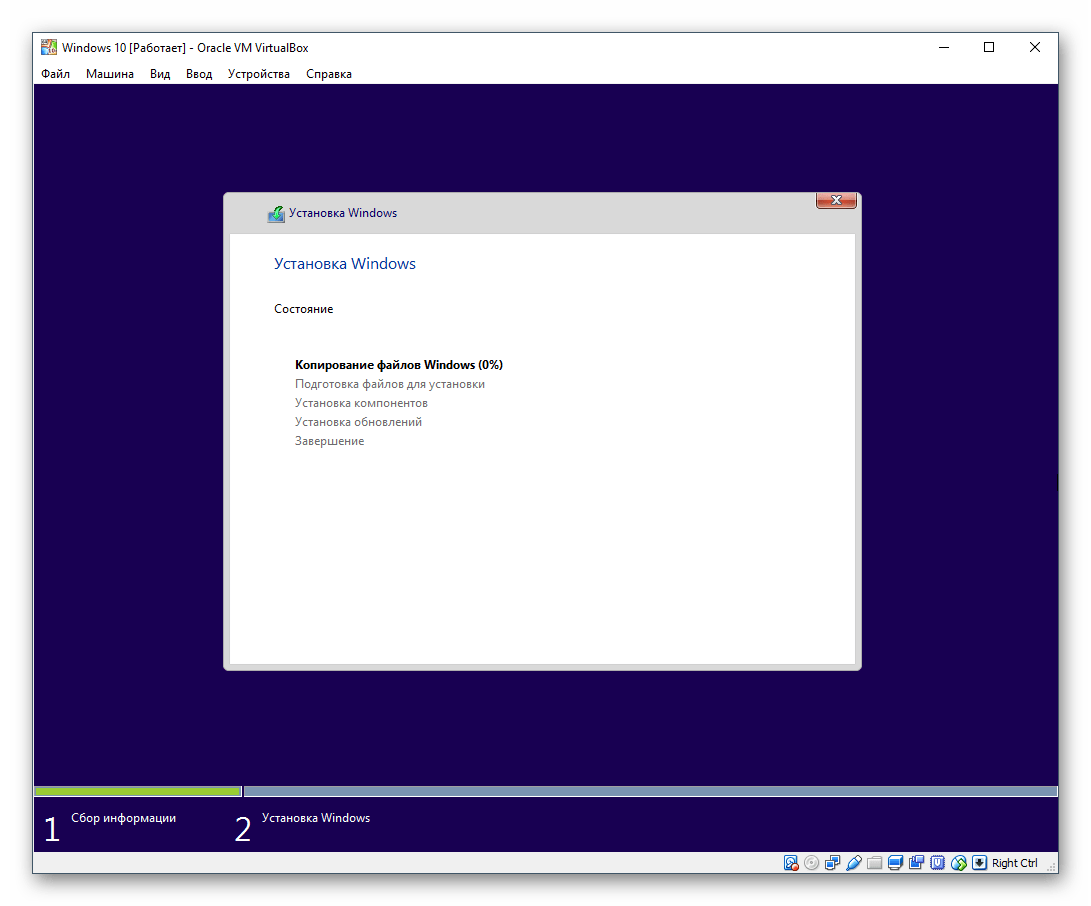
- Начнется установка в автоматическом режиме, и виртуальная машина будет несколько раз перезагружена.
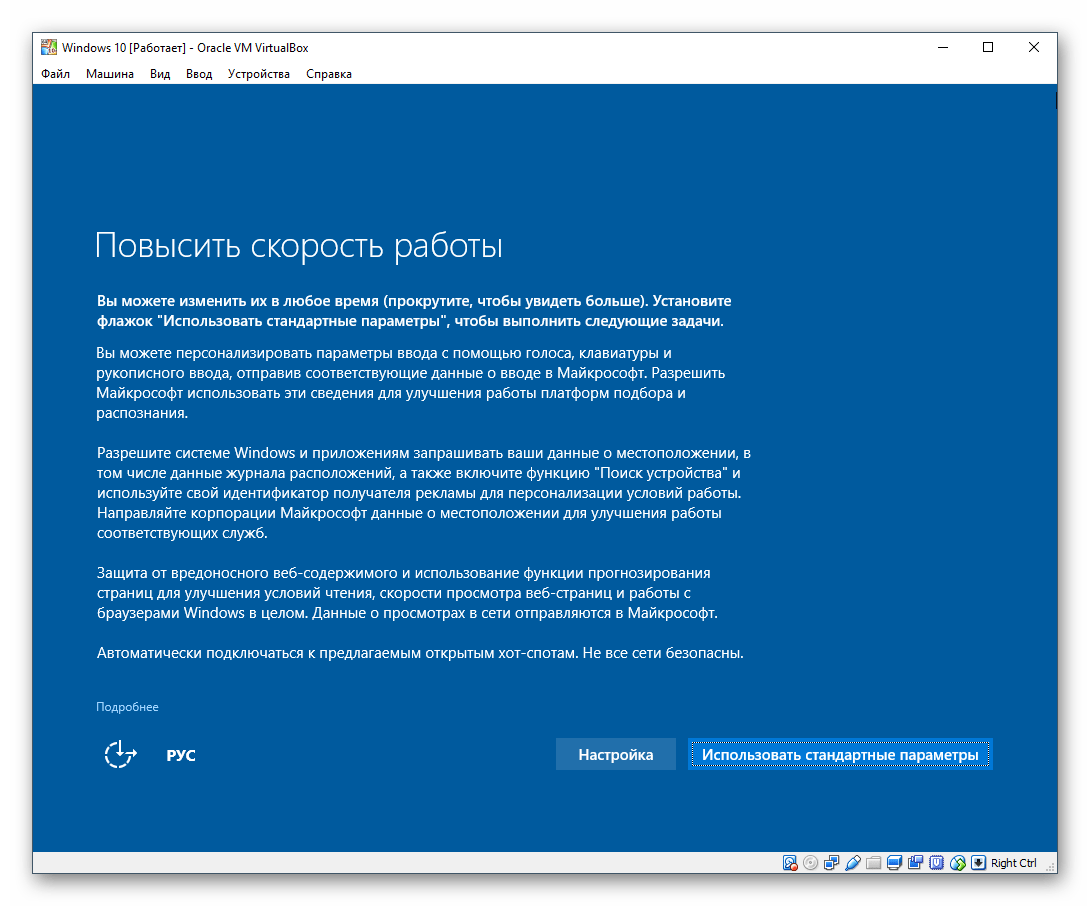
- Система запросит настройку некоторых параметров. В окне можете прочитать, что именно Windows 10 предлагает настроить.

Все это можно будет изменить после установки ОС. Выберите кнопку «Настройка», если планируете выполнить персонализацию сейчас, или нажмите на «Использовать стандартные параметры», чтобы перейти к следующему этапу.
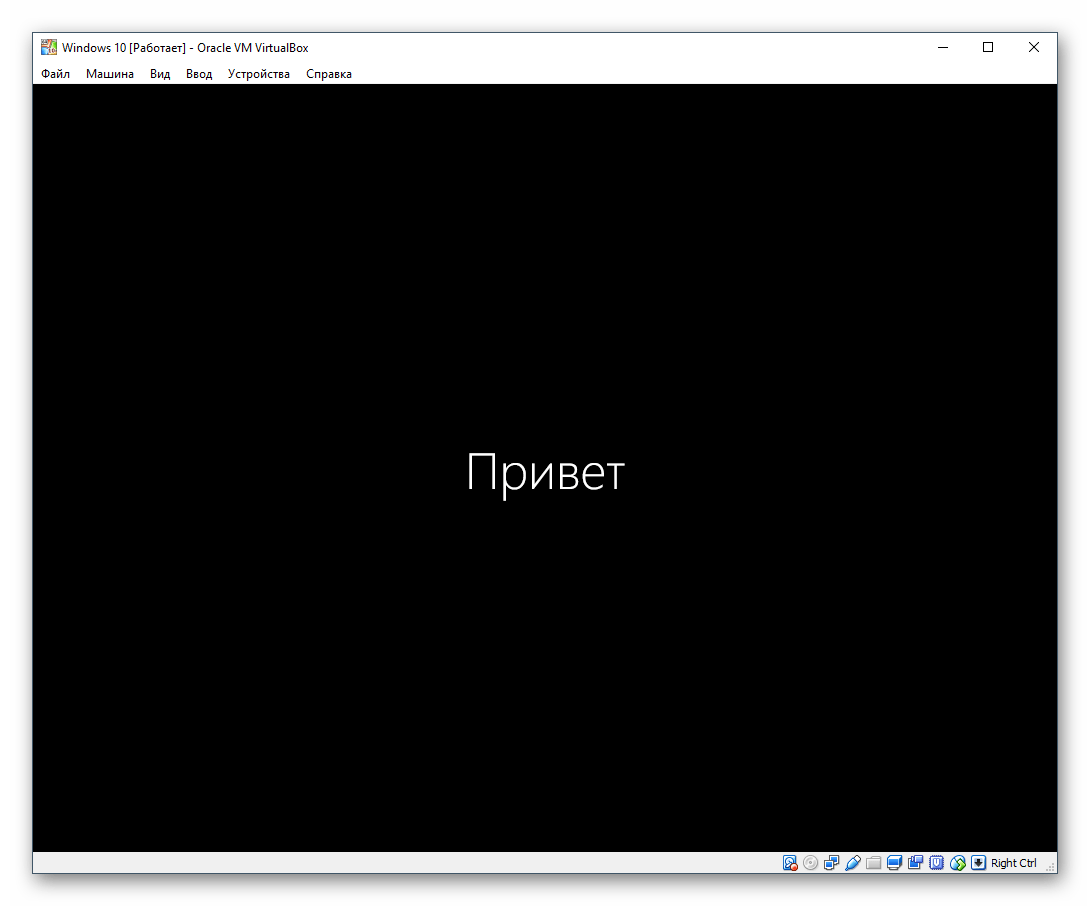
- После небольшого ожидания появится окно с приветствием.
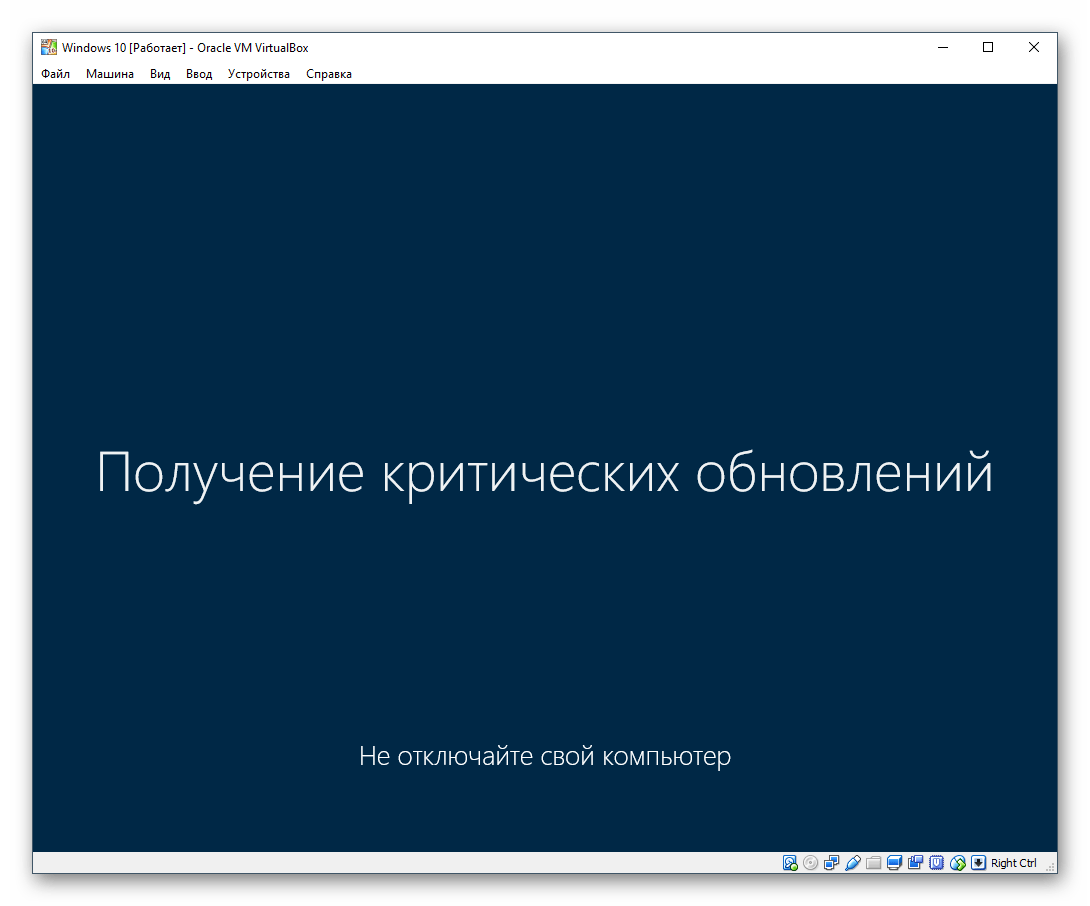
- Установщик начнет получать критические обновления.
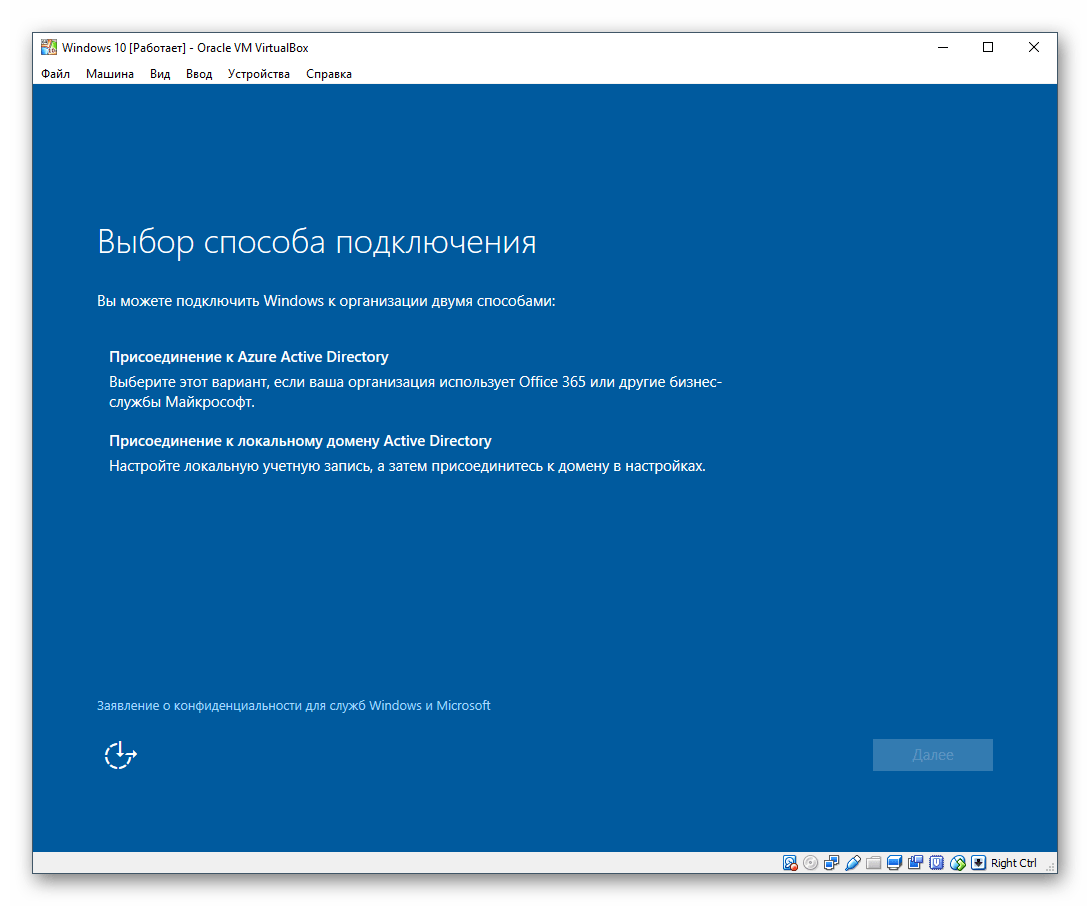
- Этап «Выбор способа подключения» настройте по усмотрению.
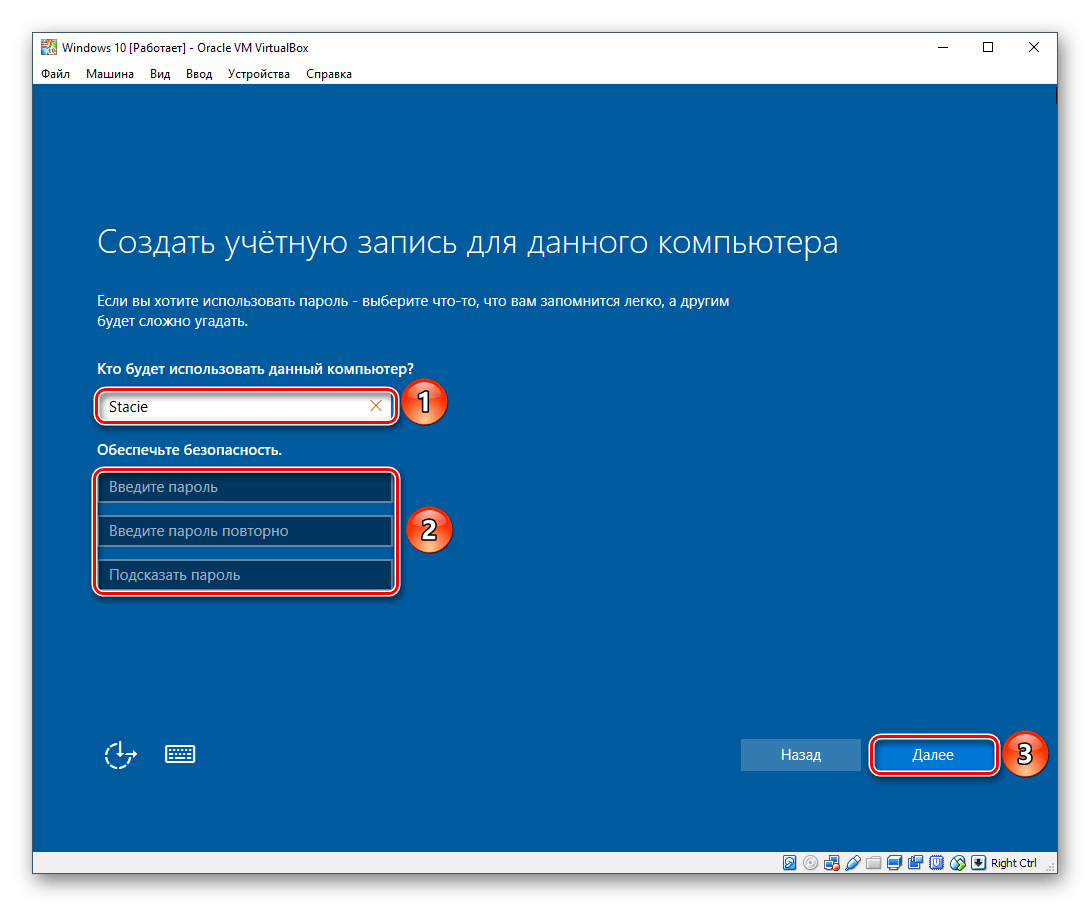
- Создайте учетную запись, введя имя пользователя и пароль. Устанавливать пароль необязательно.
- Начнется создание вашей учетной записи.

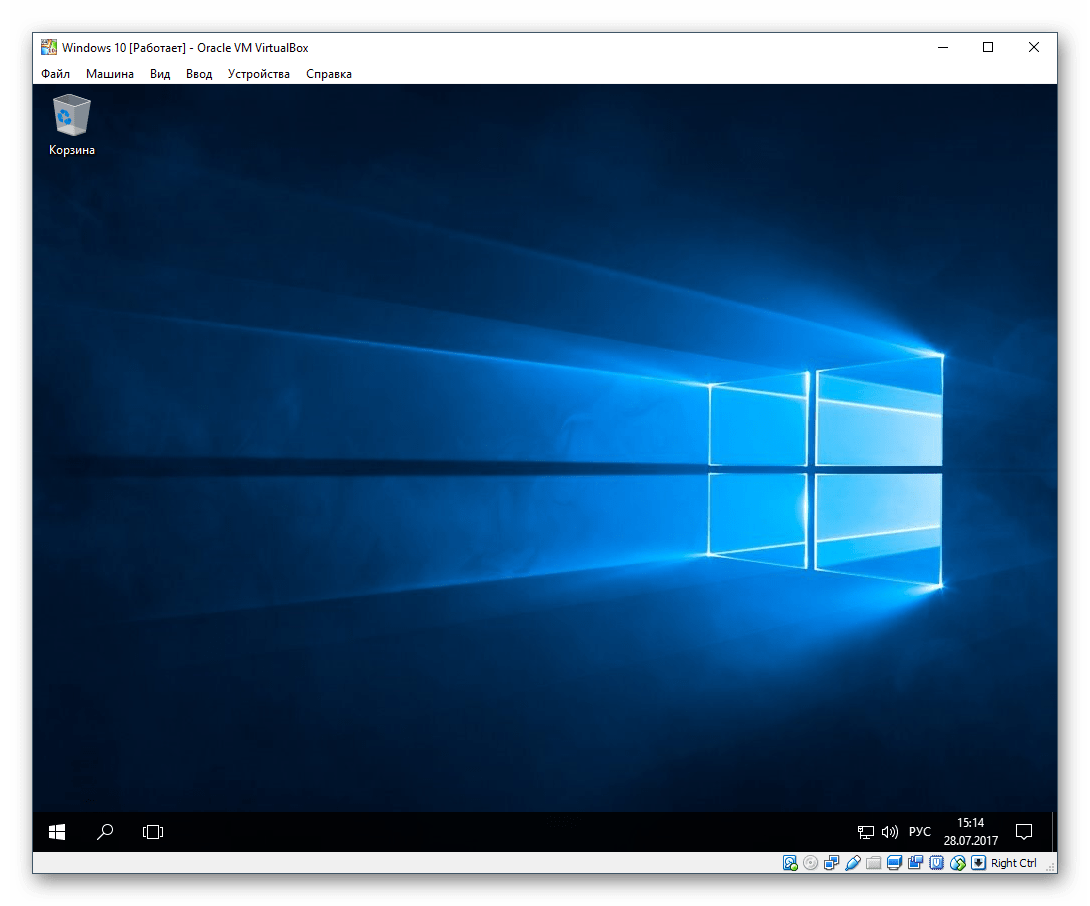
Загрузится рабочий стол, и установка будет считаться оконченной.
Теперь можно настраивать Виндовс и использовать ее по своему усмотрению. Все действия, совершаемые внутри этой системы, никак не повлияют на вашу основную ОС.
Наша группа в TelegramПолезные советы и помощь
The concept of Virtualization is quite interesting. With Virtualization, users are able to create a sandbox-like environment inside which they can install and use any OS they desire. Virtualization can do tasks that no other system can perform.
You don’t need to remove your RAM, use smaller storage, or something like that. Instead, you will use the Settings inside and change the specs for VM.
For creating a VM, VirtualBox is one of the most reliable ones. This application has friendly navigation and a straightforward interface with tons of powerful tools.
And what OS is better than Windows 10. You can use Windows 10 on VirtualBox while having low specs. However; for using Windows 10, you will need the ISO file of Windows 10.
As this ISO file of Windows 10 will be later used on VirtualBox for installation. And here you will use the links or methods given to download Windows 10 ISO for VirtualBox.
Related: Download Windows XP ISO for VirtualBox
Download Windows 10 ISO File for VirtualBox

To download Windows 10 for VirtualBox, here are all methods possibly there are. Before you continue to use any of them, you can also use the link below.
These are the links that can be used to install Windows on VB. Unlike other methods given, nor this ISO file is provided by a Microsoft server, nor is hosted by us. These are direct links from a third-party site that provides the ISO file of Windows.
Here you have noticed two download links. the links are to download Windows 10 ISO files in 32-bit and 64-bit.
- Windows 10 Technical Preview Download 32-Bit
- Windows 10 Technical Preview Download 64-Bit
Development Environment
This file is provided by Microsoft. Unlike other methods below, this is the direct one. You are going to use the direct link to download the file.
You will find the file in a zip file as inside there is the VM of Windows 10. Instead of an ISO file, you will find a VM of Windows 10, created by Microsoft to be used on VirtualBox.
Unlike ISO files, you will find it bigger in size. While ISO files are around 6-8 Gb in size, you will find Windows 10 VM of 20 GB in size.
Download Windows 10 VM (Enterprise) Evaluation
Media Creation Tool

Another method to download Windows 10 is to use Media Creation Tool. Use this link to download the Media Creation tool. Use the tool to download Windows 10 ISO files in x86 and x64.
Media Creation is a great way to download Windows. you can use it to download the ISO file only or to burn the ISO file on a USB.
If you don’t feel at ease with Media Creation then you are recommended to try the next method. As the next method will help you to download Windows 10 ISO file for VirtualBox for sure.
Download from Microsoft

For this method, you are going to visit the Microsoft page. Use the link to visit the Microsoft download page. Here you will find only the download button to download the Media Creation tool. Instead, you will change your browser to developer mode.

Then you will change the desktop mode to tablet or mobile mode by clicking on the phone icons.

Now a totally new page will appear on your screen.

Scroll down, then select the edition of your Windows 10. After selecting the edition, you are recommended to select the language of Windows 10.

Here you will see two different buttons to download Windows. there is a button to download Windows 10 x86 and x64. Click on the one that you want to download and the downloading process will begin.
Since the download size is around 5 GB in size, you are recommended to use third-party applications. Third-party application as IDM (internet download manager) will help you to download Windows faster.
Once downloaded then you can use it on your VirtualBox.
Install Windows 10 with ISO file on VirtualBox
Now that you have downloaded the ISO file, you are going to install it. Begin by running your VirtualBox, then create a new VM. Once the VM is created then you will select the ISO file of Windows and perform the installation.
If you find it challenging to install Windows 10 on VirtualBox then use this link for the installation.
Where to get Windows 10 ISO for VirtualBox?
To download Windows in ISO for VirtualBox, you can visit iTechscreen. Here you can download ISO and DMG files of different OS, Linux, and macOS for VirtualBox and VMware. If you can’t find the ISO file then you can contact us to get the links.
All the files here are safe and are hosted on a fast server. Use the links to download Windows ISO from the fast server for free.
How to put Windows 10 ISO into VirtualBox?
To use Windows 10 inside VirtualBox, you will need to create a VM (virtual machine) first. While creating the VM, there will a phase where you will be asked for an ISO file. You will find this phase as File location & Size. Here you will point the VM to the ISO file of Windows.
Later on, VM on VirtualBox will use the ISO file of Windows 10 for installation.
How do you attach the ISO file to Windows 10 in VirtualBox?
For using any ISO file on VirtualBox, you will be asked right at the beginning. If you are creating a new VM then you will be asked to attach your ISO file in File location & Size. By any chance, if you have already created a VM and have not attached your ISO file then you will need to go to VM Settings.
There you will find the Storage section. Select Storage and click on Empty. Now on the right side, you will find a dvd icon, click on it to select the ISO file of Windows. Browse and select ISO file of Windows then click on OK.
Related: Install Windows 10 on Virtual Machine on Ubuntu
Привет друзья! Если Вам пришла в голову отличная мысль протестировать новейшую операционную систему от Майкрософт Windows 10, то конечно Вам нужно установить её на виртуальную машину. Это намного безопаснее, чем Вы бы установили её себе второй системой на компьютер или ноутбук. Виртуальную машину для того и разработали, чтобы мы с Вами экспериментировали над неизведанным и в процессе этого совершенствовались, не боясь никаких последствий.
При возникновении каких-то проблем с Windows 10 Вы можете просто переустановить установленную на виртуальную машину «десятку» и абсолютно не переживать при этом за основную операционную систему. Правильнее даже не переустановить, а восстановить Win 10 из предварительно созданного бэкапа и как это сделать, мы тоже разберём.
Как установить Windows 10 на виртуальную машину VirtualBox
Итак решено, сегодня установим Windows 10 на виртуальную машину, для таких целей Вам без сомнений подойдёт VirtualBox. Простота и функциональность это то, что привлекает к ней начинающих и продвинутых пользователей и выгодно отличает её от других виртуальных машин Hyper-V, VMware Workstaion и Virtual PC!
Примечание: На нашем сайте есть статьи о VirtualBox, которые Вам могут пригодится
Если я уговорил Вас установить Windows 10 на виртуальную машину VirtualBox, то первое что нужно сделать, это скачать установщик VirtualBox.
Переходим на официальный сайт https://www.virtualbox.org/wiki/Downloads, выбираем последнюю на данный момент версию виртуальной машины, на момент написания статьи актуальной была версия VirtualBox 4.3.18 for Windows hosts x86/amd64.

После того, как инсталлятор скачался щёлкаем на нём правой мышью и выбираем «Запуск от имени администратора». VirtualBox очень просто инсталлируется на наш компьютер.

Запускаем виртуальную машину тоже от имени администратора, это очень важно.
Жмём на кнопку «Создать».

«Укажите имя и тип ОС» Если вы решили установить на виртуальную машину Windows 10 64-bit, выбирайте в списке Windows 8.1 64-bit. Если вы решили установить другую операционную систему Windows 10 32-bit, то выбираем в выпадающем списке Windows 8.1 32-bit и вводим произвольное имя виртуальной машины, например Windows 10, затем тип виртуальной машины Microsoft Windows, далее жмём Next.

Указываем объём памяти для виртуальной машины. Выделить мало оперативной памяти виртуальной машине нельзя, но и много не нужно, самый оптимальный размер это 2048 Мб или 2ГБ, думаю в Вашем компьютере не менее 4Гб оперативки.

Создаём виртуальный жёсткий диск. Создать новый виртуальный жёсткий диск. Создать.

Тип файла выберите VDIи жмём Next

Укажите формат хранения «Динамический виртуальный жёсткий диск» и пространство на вашем жестком диске под нужды виртуальной машины займётся не сразу, а по мере накопления файлов.

Укажите имя и размер файла. Можете указать 50 ГБ и для установки Windows 10 этого вполне хватит, но если Вы планируете серьёзно поработать с Windows 10, советую Вам указать объём не менее 120 Гб. Ещё нажмите на жёлтую папочку

и выберите раздел вашего винчестера для расположения виртуального диска, лучше выбрать не системный раздел,
я выберу диск D: и Сохранить.

Создать

Настройки VirtualBox для Windows 10
После создания виртуальной машины её необходимо настроить. Выделяем нашу виртуальную машину левой мышью и жмём «Настроить».

Система. Снимите галочку с пункта «Дискета». Выставим первым загрузочным устройством CD/DVD-ROM, ведь виртуальную машину мы будем загружать с установочного диска или образа Windows 10, вторым устройством оставляем Жёсткий диск. Отмечаем галочкой пункт Включить I/O APIC

«Процессор» оставляем как есть.

Система «Ускорение» Аппаратная виртуализация должна быть включена, отмечаем оба пункта галочками.

Дисплей. Видео. «Включить 3D-ускорение» и » Включить 2D-ускорение»

Носители
Если у Вас есть дисковод, то он будет доступен в виртуальной машине и если у вас есть диск с Windows, вы можете использовать его для установки операционной системы, поставьте галочку на Живой CD/DVD.
Также здесь присутствует виртуальный дисковод, подсоединим к нему образ с операционной системой Windows 10, которую мы скачали во вчерашней статье. В параметре «Носители» выбирайте «Привод» и «Выбрать образ оптического диска»

Откроется окно проводника, найдём и выберем в нём наш образ с Windows 10. где скачать его вполне легально, написано в нашей статье, ссылка выше.

ОК.

Сеть. Отмечаем галочкой «Включить сетевой адаптер». Тип подключения «Виртуальный адаптер Хоста».

Вот и все главные настройки виртуальной машины готовы.
Нажимаем кнопку Запустить.

и сразу у вас может выйти вот такая ошибка «Функции аппаратной виртуализации VT-x/AMD-V включены, но не функционируют».
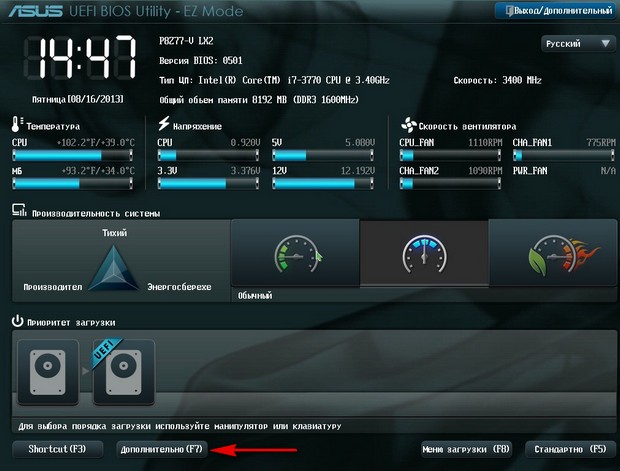
Чтобы избавиться от неё, идём в БИОС, выбираем вкладку «Дополнительно»

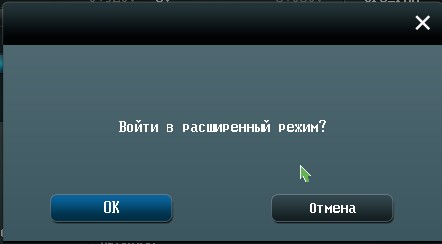
Войти в расширенный режим? ОК.
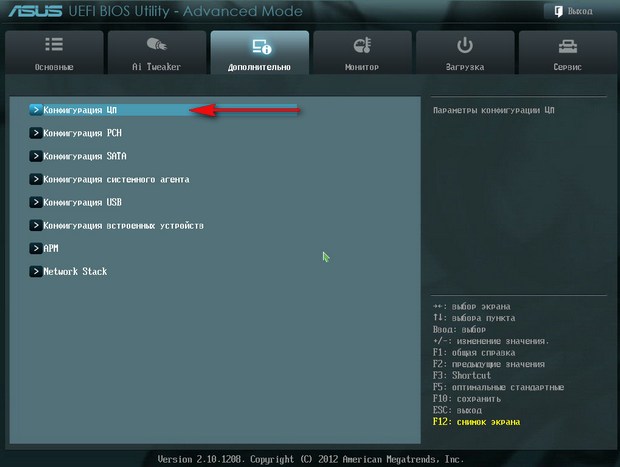
Переходим во вкладку «Дополнительно» Нажимаем «Конфигурация ЦП.

Выбираем опцию Intel Virtualization Technology и ставим её в положение Вкл(включено),
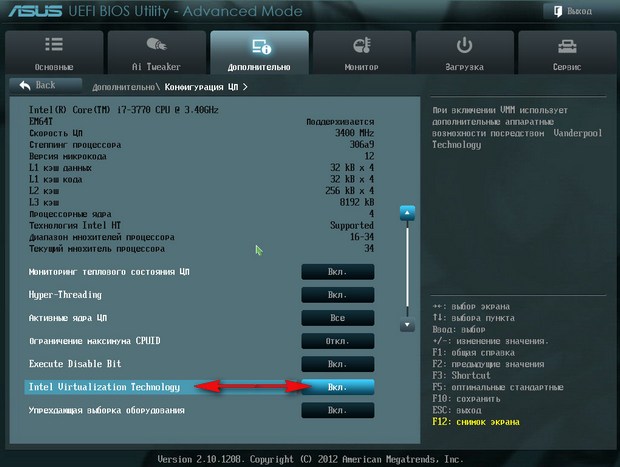

но это если у вас процессор от Intel. Если у вас процессор AMD, тогда ищем в БИОС опцию Secure Virtual Machinesи тоже ставим её в положение Вкл (включено). Далее сохраняем произведённые нами настройки, жмём клавишу F10.
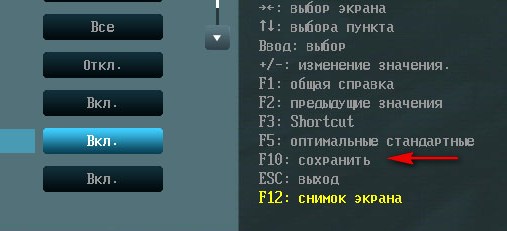
Сохранить конфигурацию и выполнить сброс? Да!
Опять запускаем нашу виртуальную машину
и если у Вас в настройках категории Система выставлен приоритетным для загрузки дисковод, то произойдет загрузка с образа Windows 10
Далее Вас ждёт обычный процесс установки Windows 10 описанный мной в статье Как скачать, установить и русифицировать Windows 10.
Some Linux users face a problem of the need to run Windows-specific utilities in Linux. The simplest and reliable way to do that is to use Windows in a virtual machine inside Linux. In this post, you will learn how to install Windows 10 in VirtualBox and make this Windows system completely functional including full-screen mode, shared clipboard, shared folder and other handy features that help integrate Virtual environment and your main system.
Content
- Install VirtualBox
- Create a Virtual Machine for Windows 10
- Configuring VirtualBox for Windows 10 installation
- Download Windows 10 ISO
- Install Windows 10 in VirtualBox
- VirtualBox mouse pointer Capture
- Windows 10 installation
- Fix the screen resolution for Windows 10 in VirtualBox
- Install VirtualBox Guest Additions
- Test full-screen mode
- Enable Shared Folder
- Enable Shared Clipboard
- Enable files drag and drop
VirtualBox is an application developed and maintained by Oracle that allows you to install operating systems in a virtual environment inside other operating systems. Thanks to VirtualBox we can install several operating systems, including Windows 10, in our main Linux system. VirtualBox is very intuitive to use but some tips are required to make an installed system fully functional.
Install VirtualBox on your system
VirtualBox is a very popular application in Linux. So, it is available in most of the official repositories of the most used Linux distributions. You should be able to find it in your Software Center.
However, it is possible that the version in the repositories is a bit out of date. If you want to download the latest version or if you are using Windows or macOS, then you can download it from the VirtualBox website.
Create a new Virtual Machine for Windows 10
To install Windows 10 in VirtualBox it is necessary to create a virtual machine. Click on the New button. You can also do it with the keyboard shortcut CTRL + N.
In the opened window, you have to type the name of a new virtual machine. If you type the name Windows 10, VirtualBox will complete the rest of the fields. However, if it does not detect everything correctly, you can modify some of the fields. Then click on the Next button:

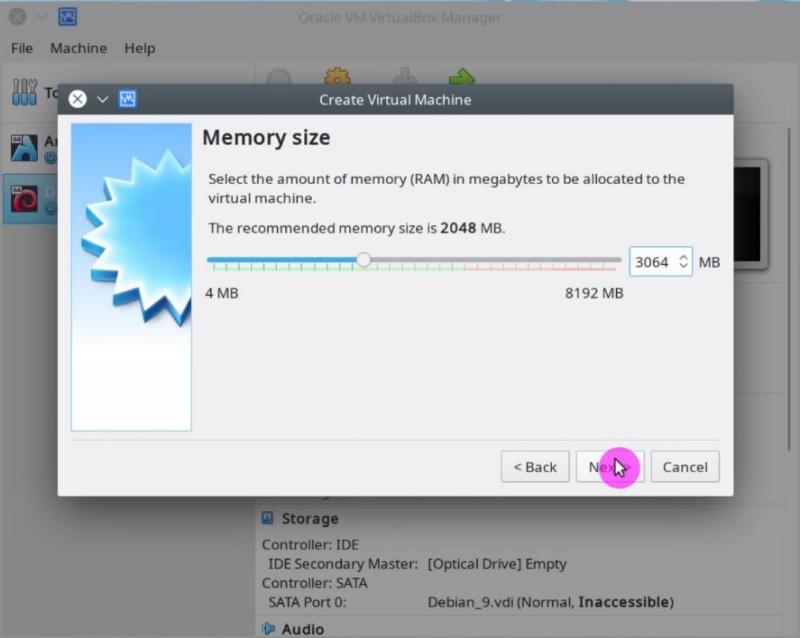
Next, you have to define the size of the RAM that the new virtual machine will use. For Windows 10 the recommended size is at least 3Gb. Then, click on the Next button:
After that, you need to choose the virtual hard disk that the virtual machine will use. Normally you have to create a new one. So, choose the second option and click on the Create button:
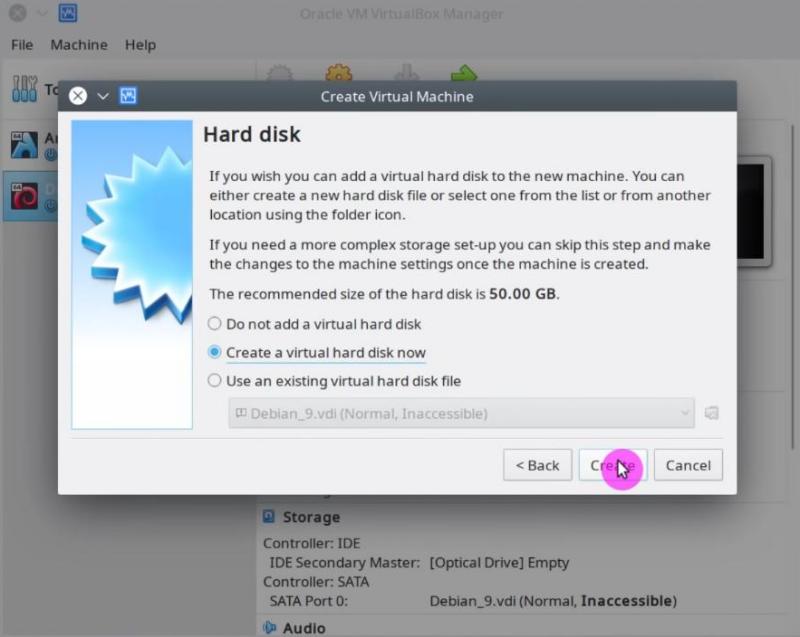
Then you have to choose the type of hard disk. There are three options, choose the first one (VDI):
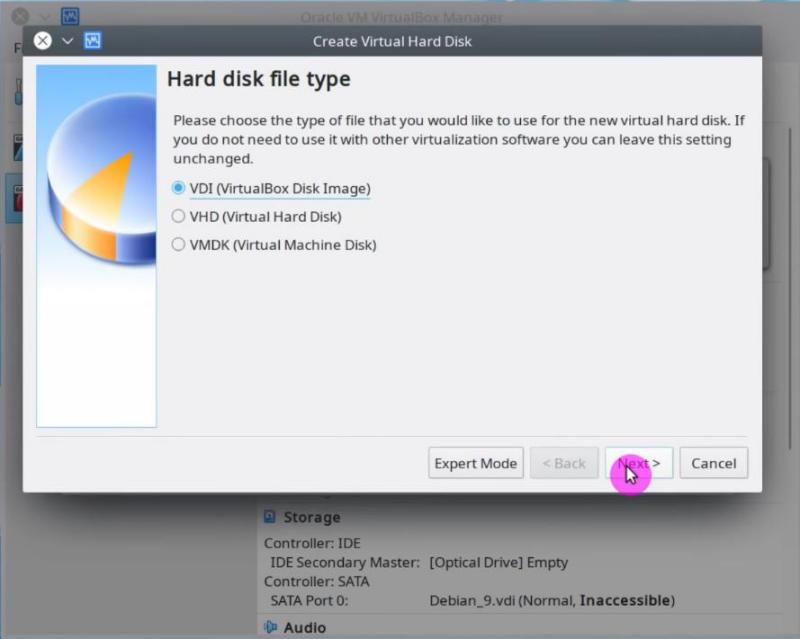
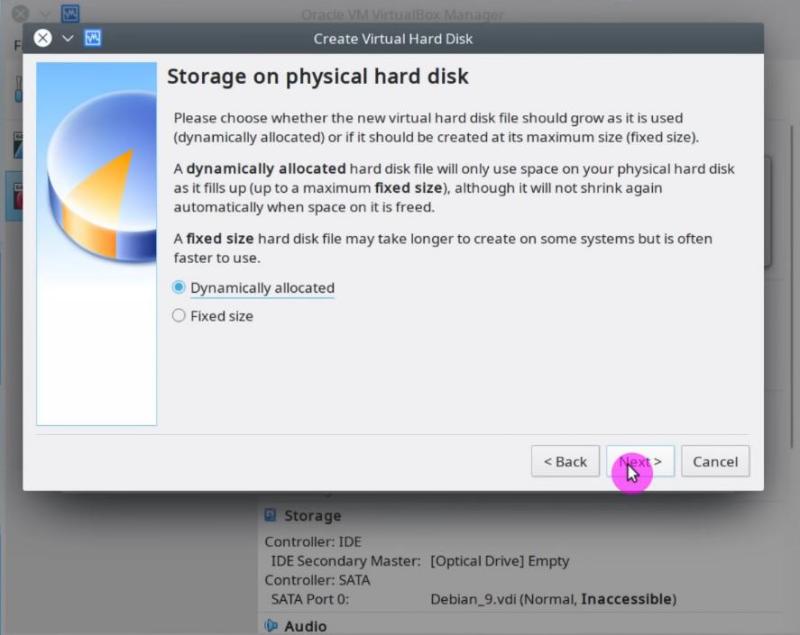
In the next window, choose Dynamically Allocated. This way the virtual disk will use only the amount of space that is taken by the virtual system instead of the maximum allocated space. This option helps to use the disk space more effectively:
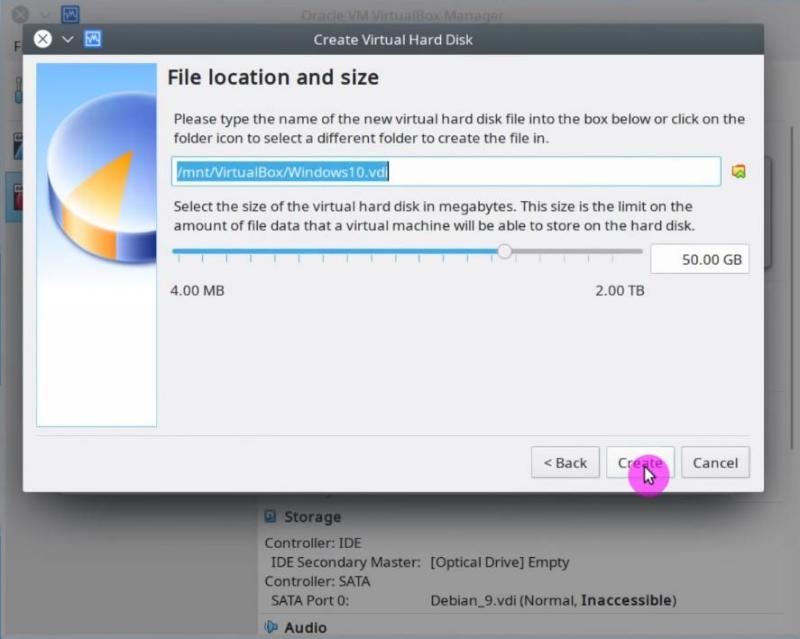
Finally, you have the option to set the path where the virtual hard disk file will be located and its size:
After this, the virtual machine will be created.
Configuring VirtualBox for Windows 10 installation
There are a few more things to be adjusted before you can use it to install Windows 10.
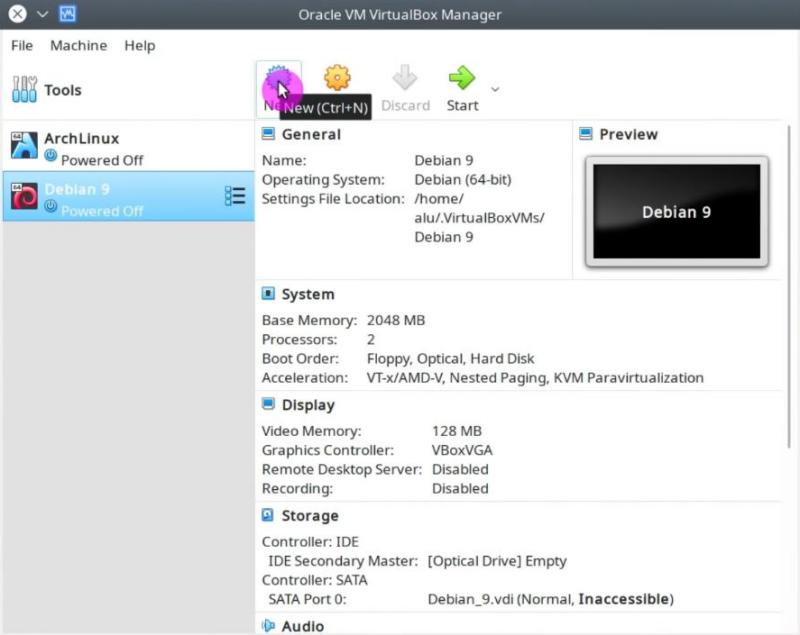
First, from the main VirtualBox window select the Windows 10 virtual machine and click on the Settings button:

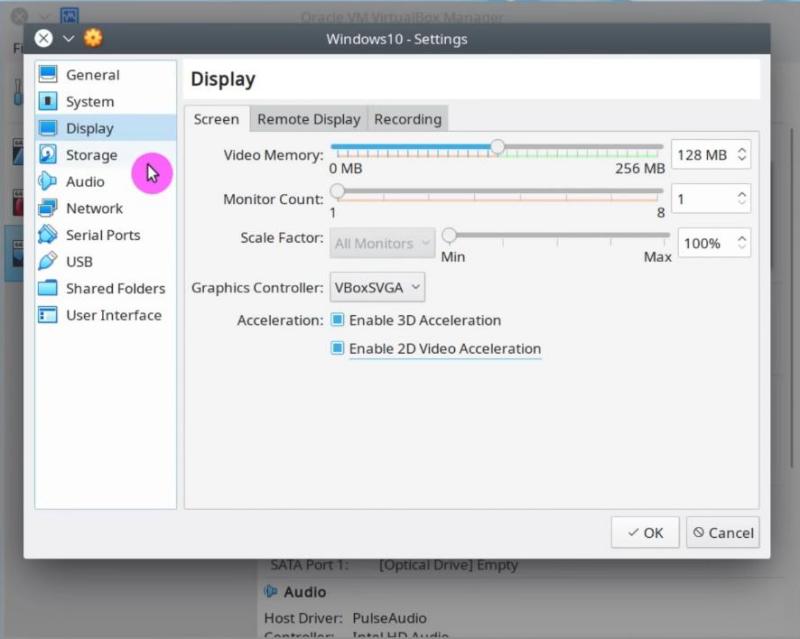
Now you will see the options of this virtual machine. On the left side click on the System section and then the Motherboard tab, and enable EFI because Window 10 requires the EFI mode:
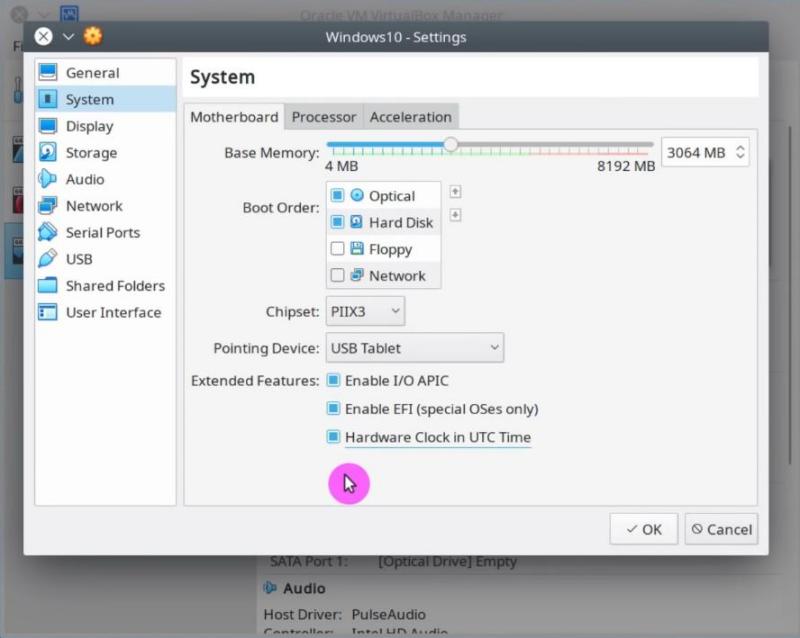
Then, in the Processor tab increase the number of processor cores to be used by the virtual machine. Check how many cores VirtualBox will allow you to use without warning. In my case, I have 4 cores and VirtualBox allows me to allocate 2 cores for the virtual machine without any harm for my main system:

After this, click on the Display section and increase the amount of Video Memory for the virtual machine. I recommend 128Mb minimum. Also for Windows 10, you need to enable 3D and 2D Video Acceleration:
Now, it is necessary to define the location of the ISO file of the Windows 10 ISO image. Click on the Storage section, and select the small disk icon that says Empty. Then, click on the disk image on the right side and select your Windows 10 ISO image:
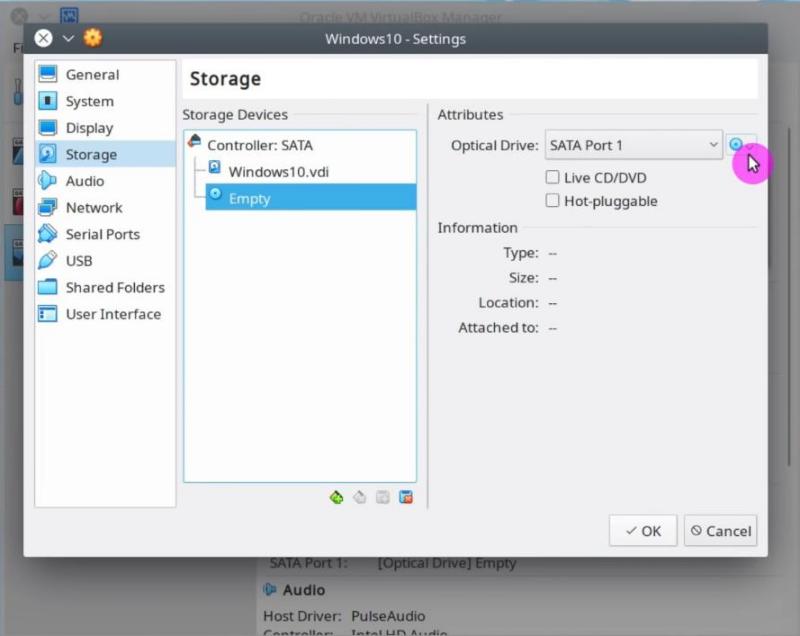
Next, click on the Ok button.
Download Windows 10 ISO
In case you do not have the Window 10 ISO image, you can download it from the Microsoft website:
Download Windows 10
Then, add this ISO image to VirtualBox as shown above.
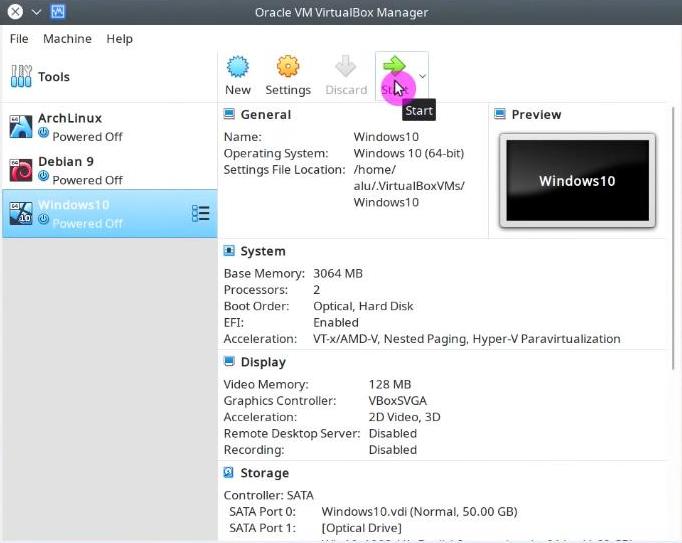
Install Windows 10 in VirtualBox
Now you can start the virtual machine. Select it and click on the Start button:
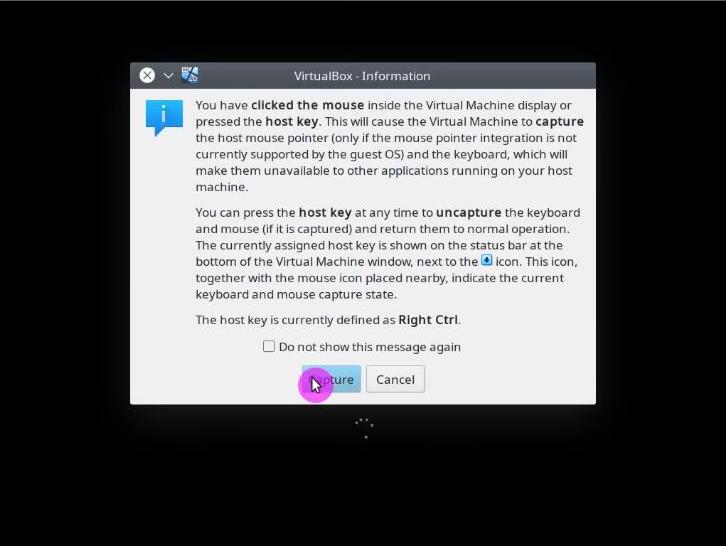
VirtualBox mouse pointer Capture
When you start the virtual machine you will be asked if you want the guest system (Windows 10) to capture the events of the mouse and keyboard. Read the instructions on how to use mouse integration with VirtualBox and agree to Capture:
The rest of the process is the standard Windows 10 installation.
Windows 10 installation
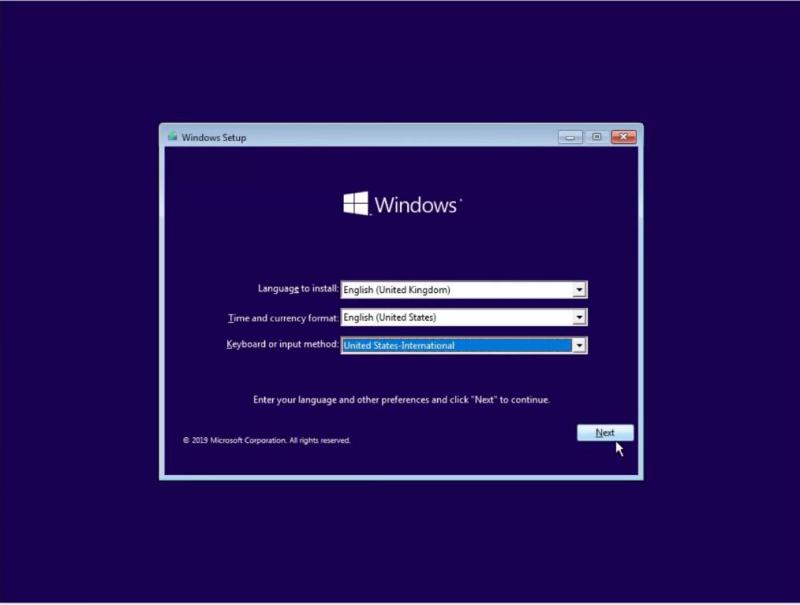
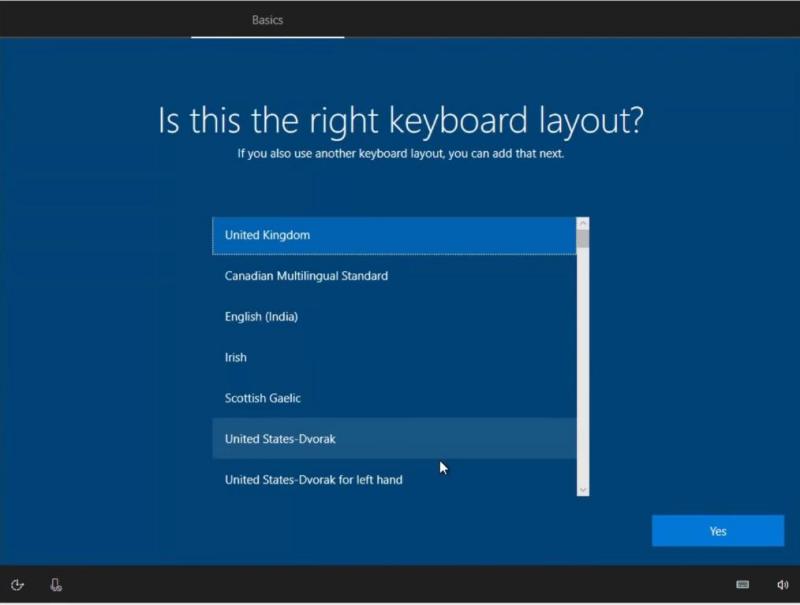
First, choose the language, keyboard layout, and time format:
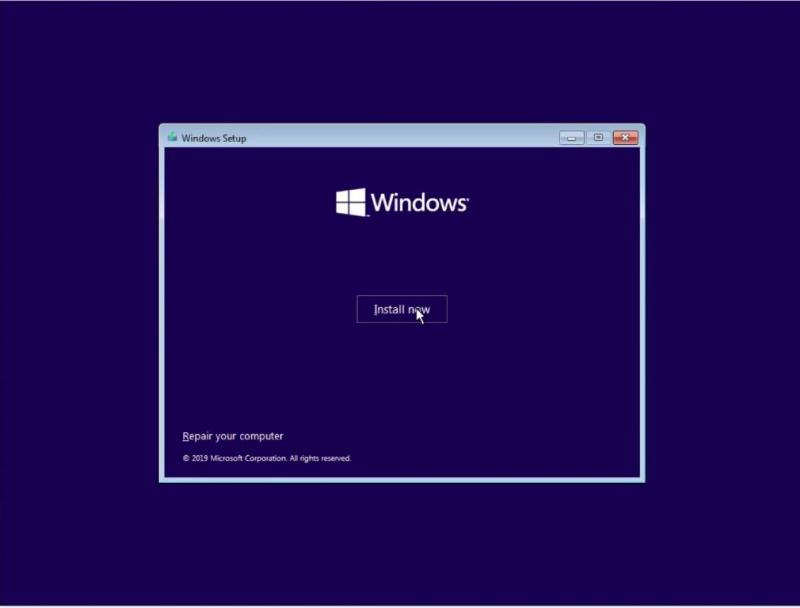
After that, click on the Install Now option:
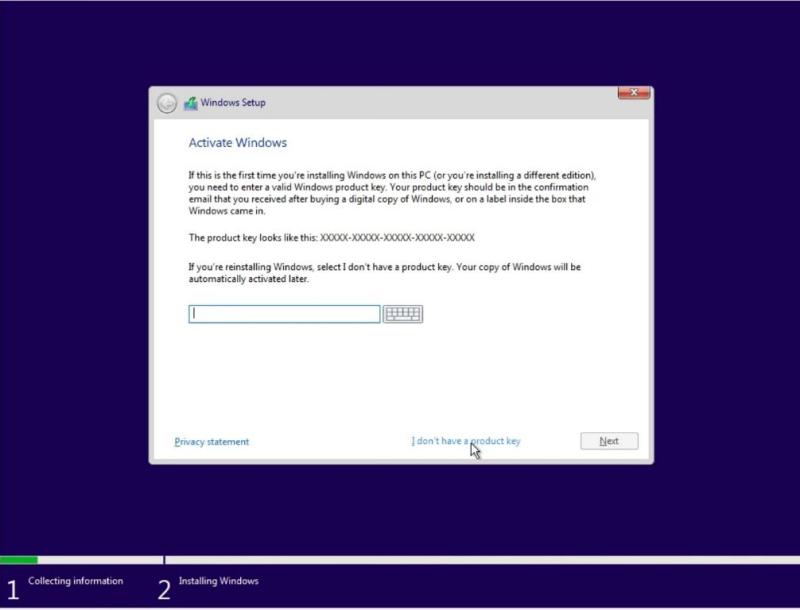
If you have a valid Windows 10 license, you can add it on the following screen. If not, you can click on the option I don’t have a product key and continue in a trial mode:
If you downloaded the ISO from the Microsoft website, it will contain several types of systems. You can select whatever version you prefer. I select Windows 10 PRO:

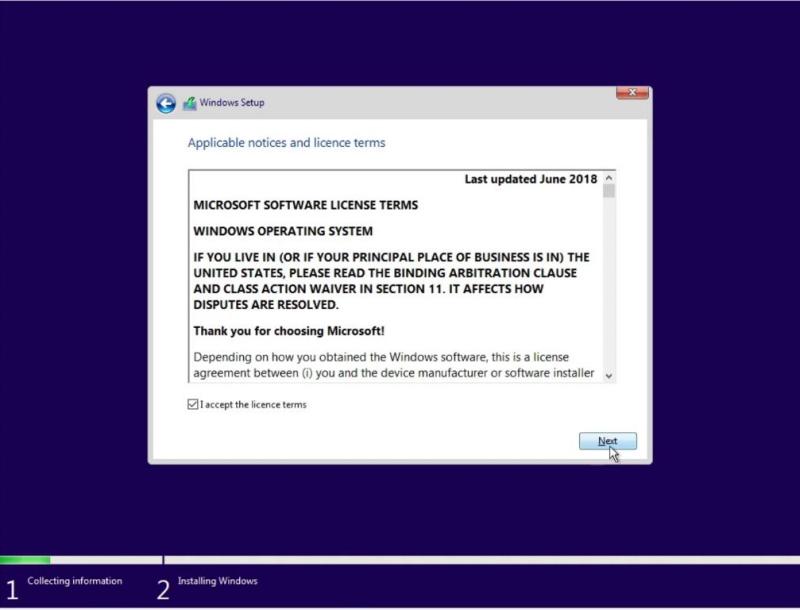
Accept the terms of the license and continue:
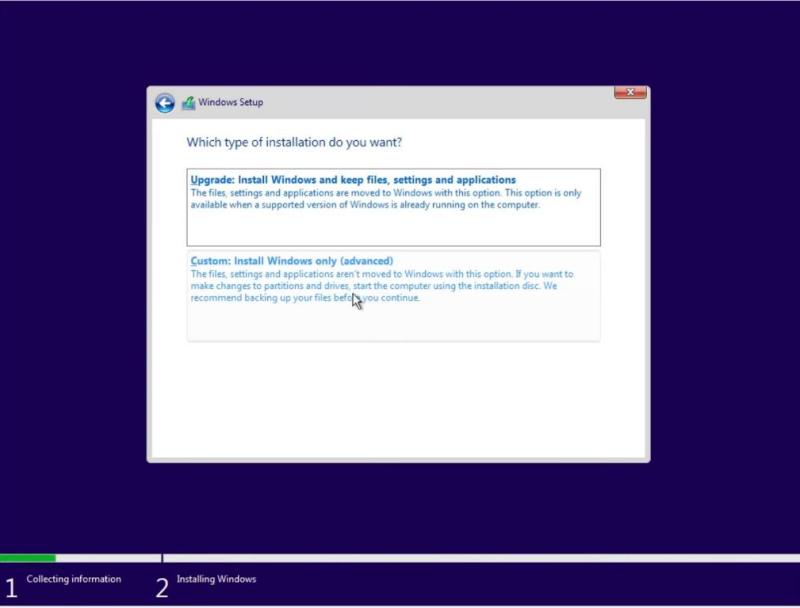
As the hard disk is newly created and has no partition created you will have to choose the Custom: Install Windows only option:
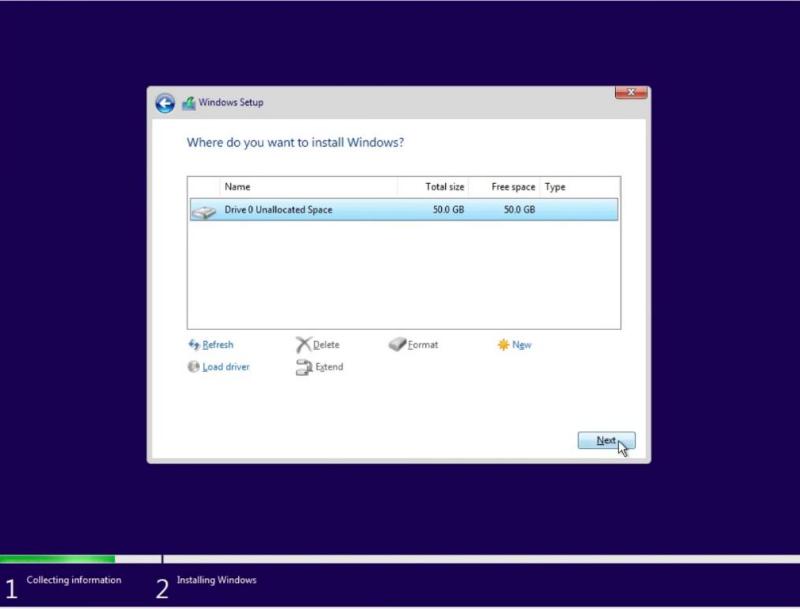
In this screen, you will only have to select the only visible disk and click on the Next button. The installer will create and format the partition automatically:
Then, it will start the installation:
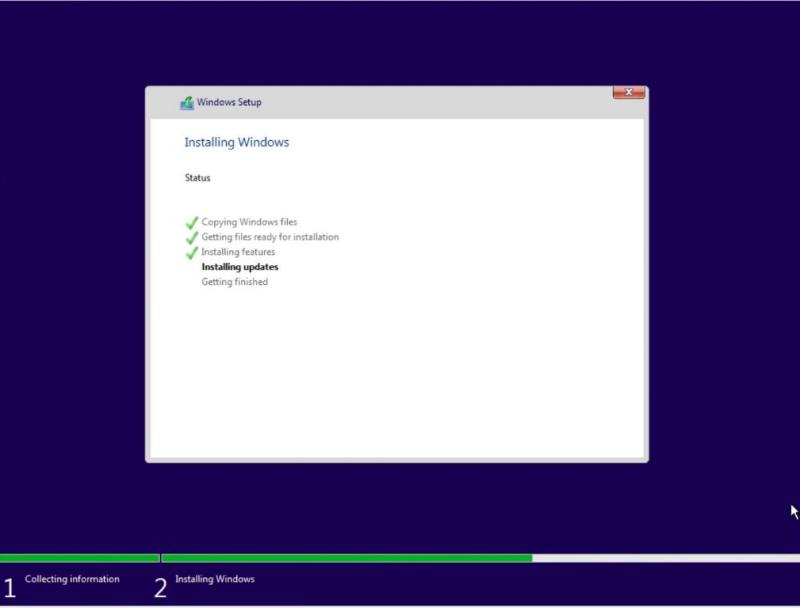
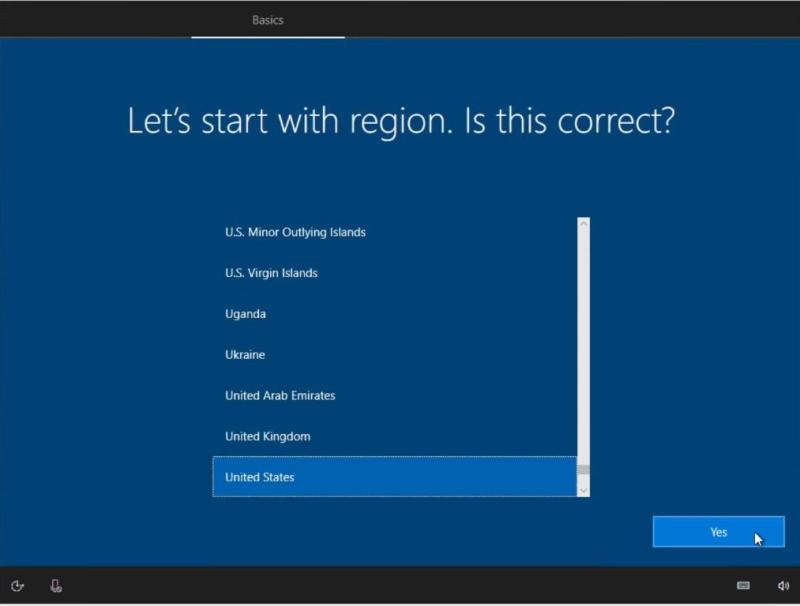
The Windows 10 installer will restart virtual machine several times. This is normal. After the restart, you will need to provide the information on your region:
Keyboard layout:
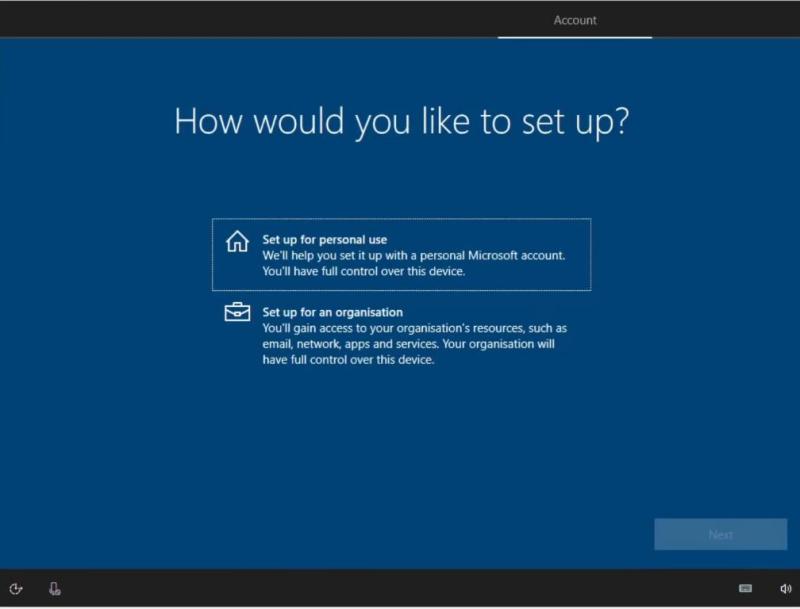
Then, you can choose to configure it for personal or business use. Likely, you will need to choose for personal use:
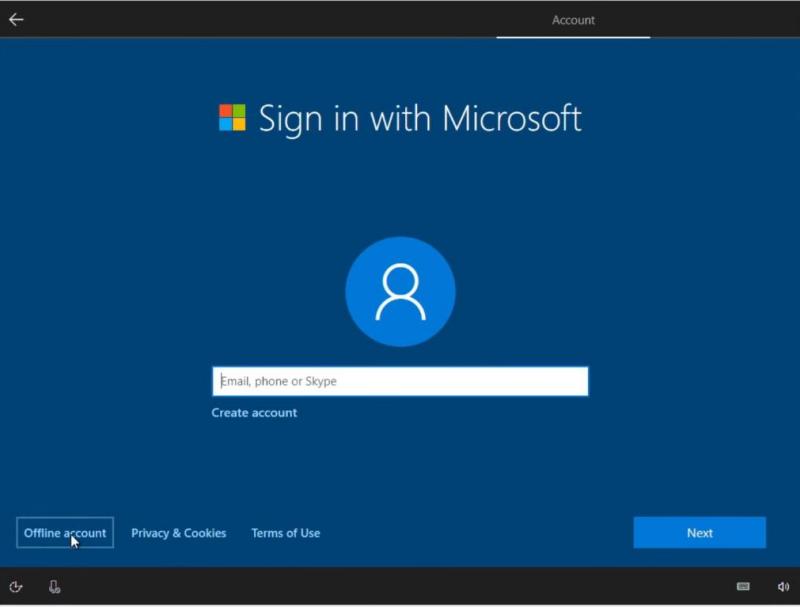
Next, you can log in to your Microsoft account or skip it by choosing Offline account:
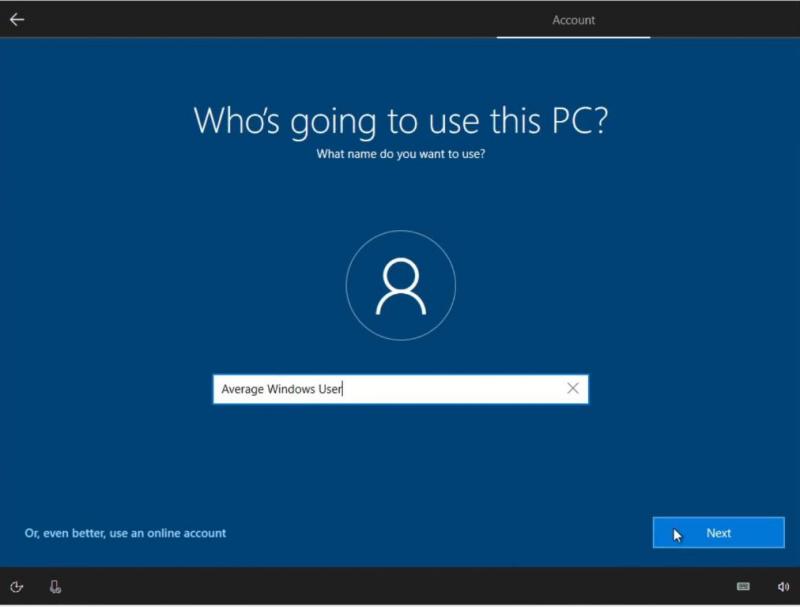
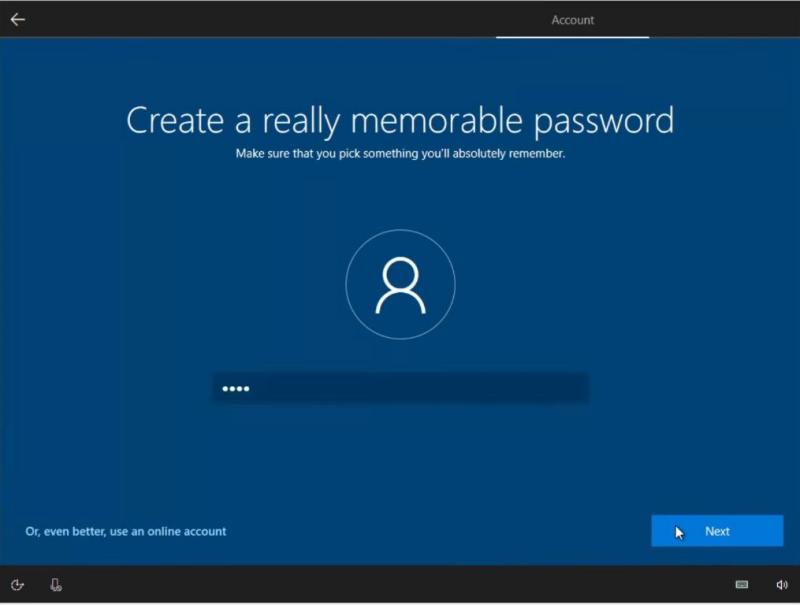
Type the name of the user who will use the system:
Set a password for the system:
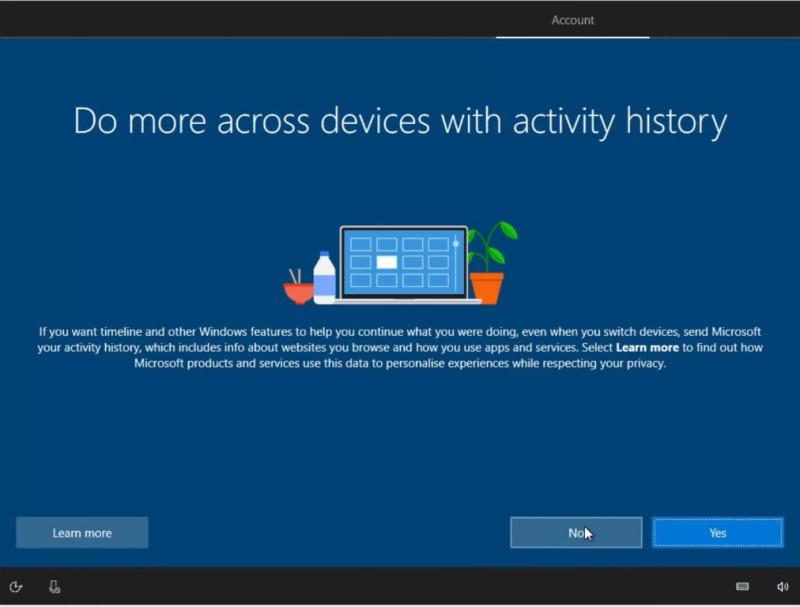
If you do not use multiple Windows 10 devices, you can skip this section:
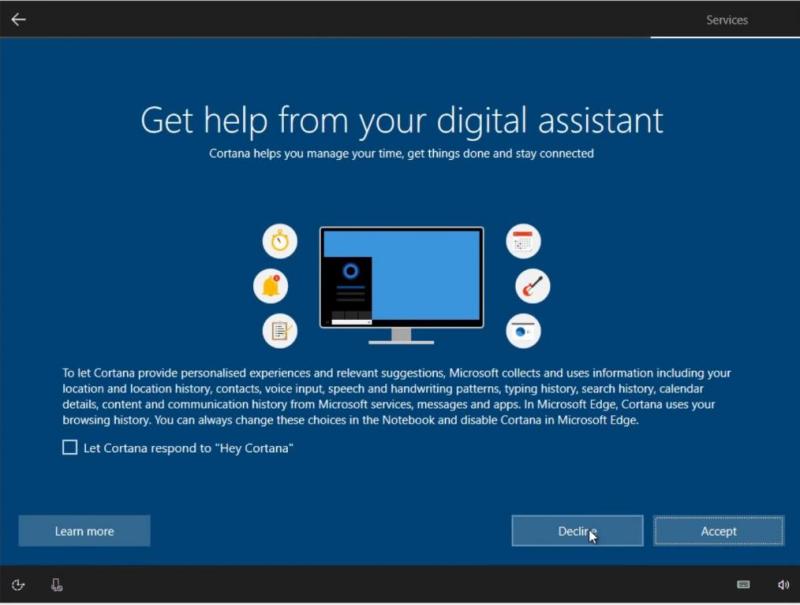
The following screen corresponds to the Cortana configuration. Probably, you won’t need it in a virtual machine, so you can also skip this section:
Configure your privacy settings. I usually disable all options in this screen:
Finally, you have to wait about half an hour to complete the install and then you will be able to log in to your Windows 10 in VirtualBox:
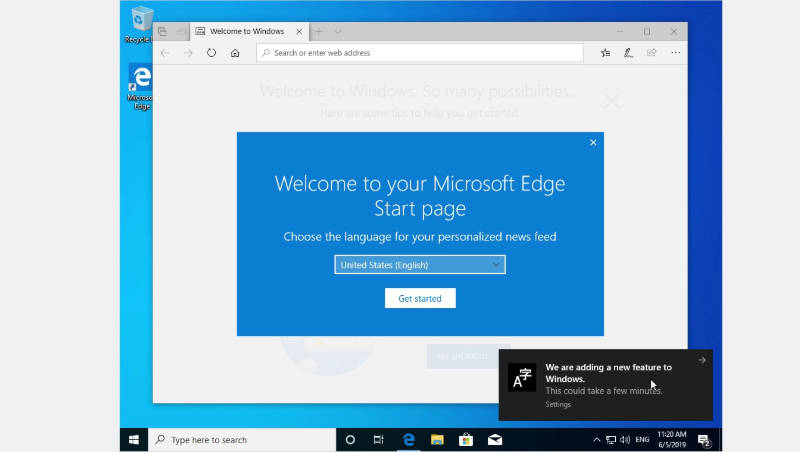
At this stage, Windows 10 is correctly installed but it is not fully functional. So, you need to do a few additional steps to get maximum from your Windows 10 in VirtualBox.
Fix the screen resolution for Windows 10 in VirtualBox
One of the first things you will notice is that this Windows screen is too small and not adapted to the size of your screen (see the image above). To fix that and also enable some additional features, you need to install VirtualBox Guest Additions.
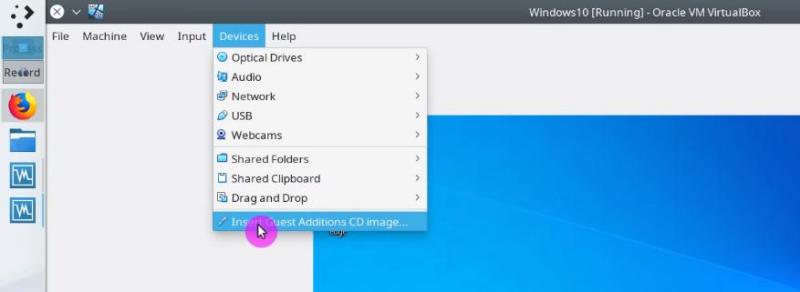
Install VirtualBox Guest Additions
Go to Devices in the VirtualBox menu of the running Windows 10 and click on the Insert Guest Additions CD image option:
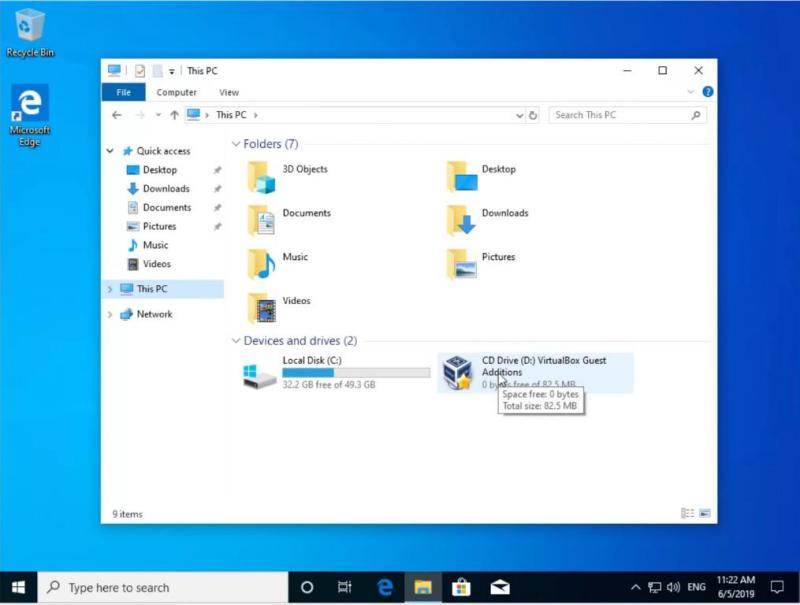
Then, in your Windows 10 system, open the file manager and go to This PC on the left side. In the Devices and Drives section, you will find the VirtualBox Guest Additions CD:
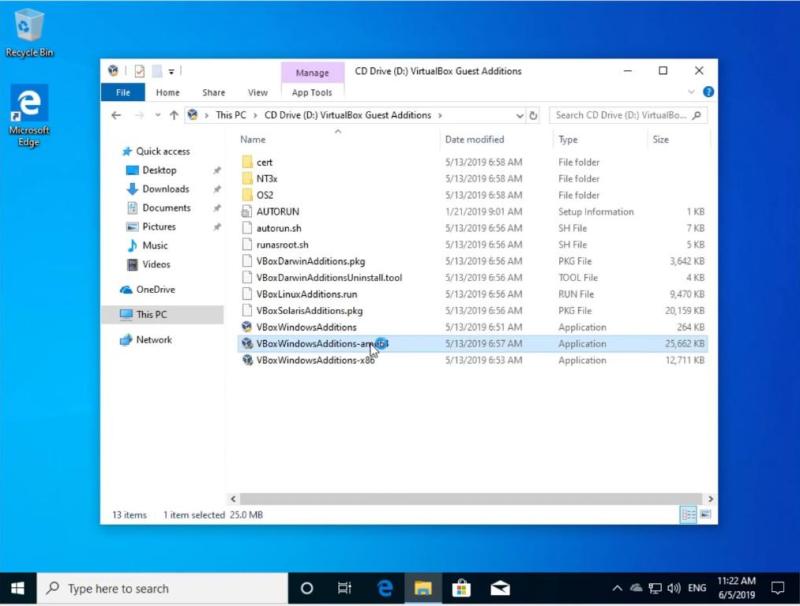
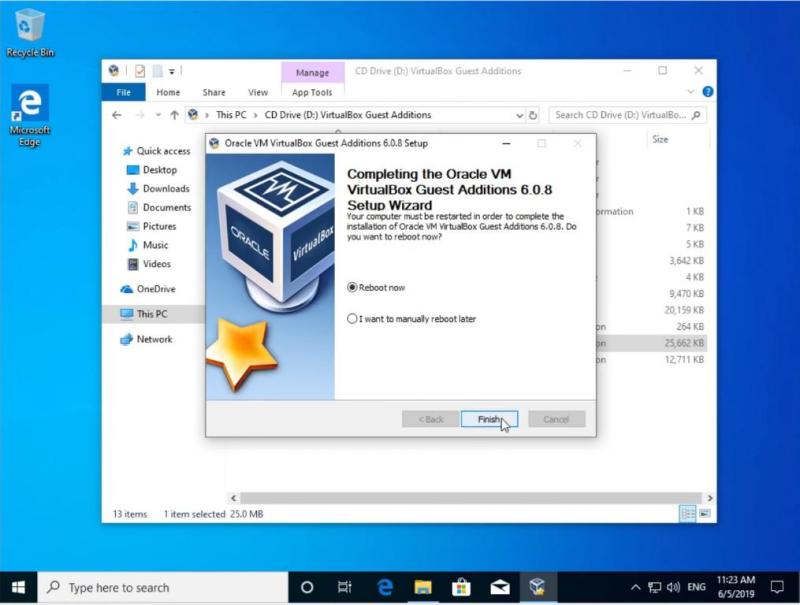
Once you have entered the image, you will see many different files. If the installed Windows 10 is 64-bit, you have to install the VBoxWindowsAdditions-amd64 file but if the system is 32-bit then you have to install VBoxWindowsAdditions-x86. Most Likely, you have the 64-bit system. So, install it by double-clicking on the file:
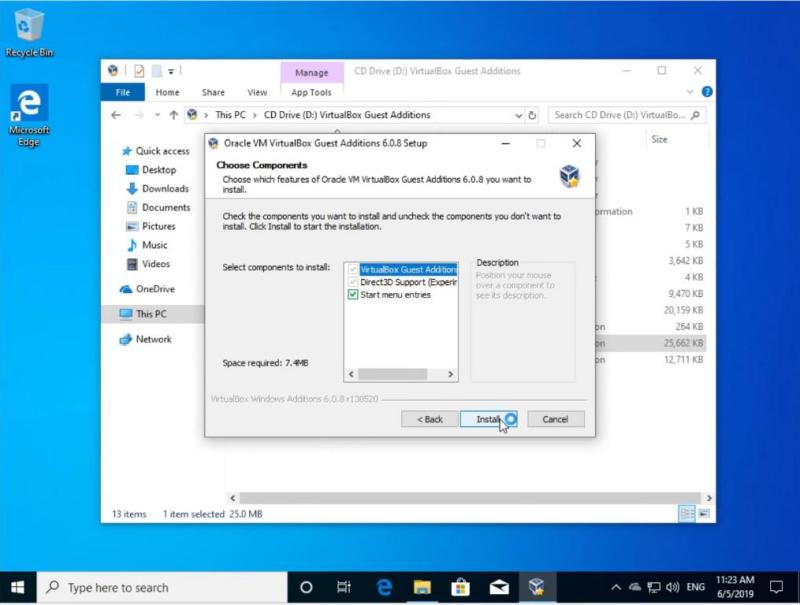
During the installation, keep all options by default:
Note: The screen will blink several times during the installation process. This is normal and there is nothing to worry about, just wait for the installation to finish.
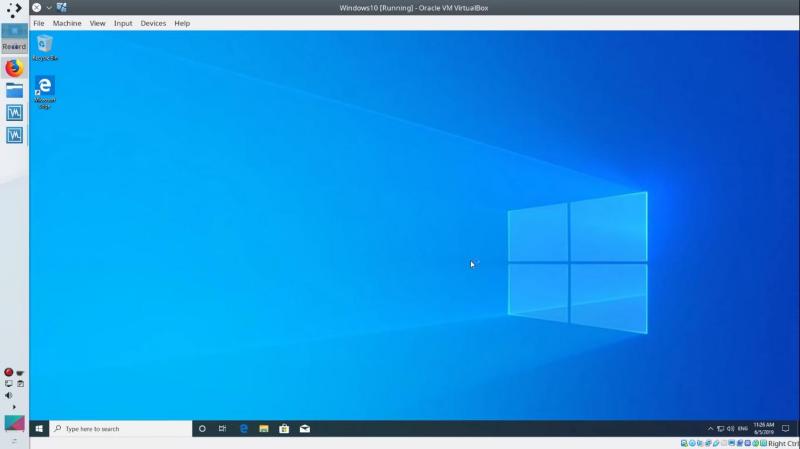
Once the installation is complete, it is necessary to restart the system to apply the changes:
When you start your system, your Windows 10 screen will adapt to the size of your real screen:
Test full-screen mode
You can even view this Windows 10 in the full-screen mode. To that end, go to the View menu and click on the full-screen mode option or simply press the keys right CTRL + F:
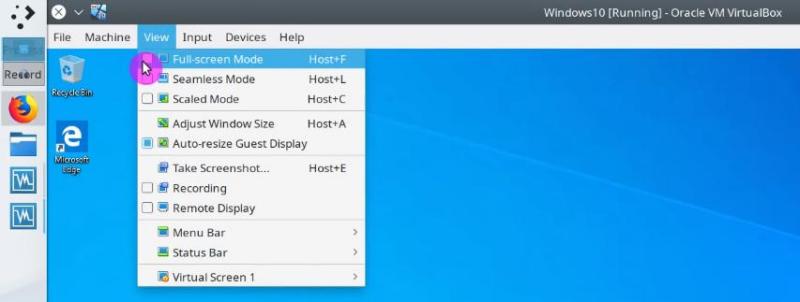
So, you can enjoy full-screen mode. To exit from the full-screen use the same shortcut right CTRL + F.
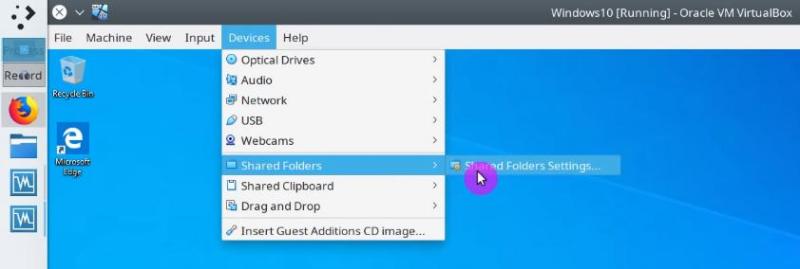
When working with virtual machines it is also convenient to share files between the host and the guest systems. This can be achieved with a Shared Folder.
To enable it, go to the Devices menu and in the Shared Folders category click on the Shared Folders Settings option:
In the opened window, select the Machine Folders option and click on the small folder icon on the right side:
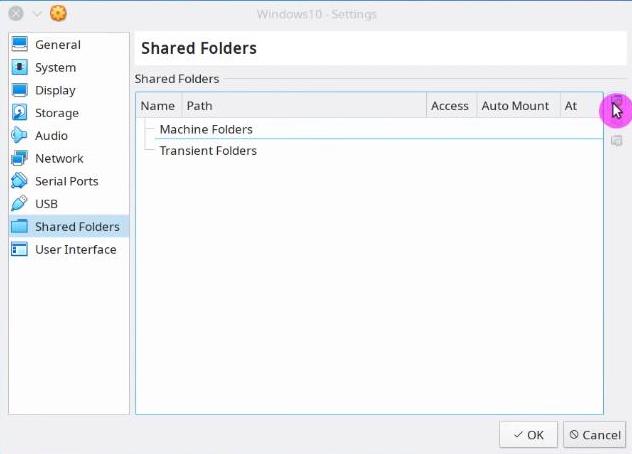
In Folder Path field, choose the path of the folder you want to share. In my case, I usually share my Public folder. If you want to increase the security of the folder you can check the Read-Only option to prevent Windows 10 from modifying the contents of this folder. This way only Linux system can modify this folder. It is also better to make the folder mount automatically and make it permanent:

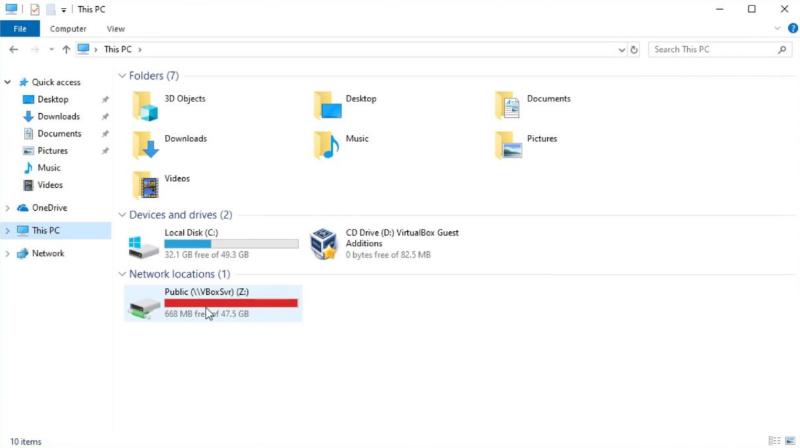
In the end, reboot the Windows 10 system to apply the new configuration.
After the reboot, you will find the shared folder in This PC section of the Windows 10 file manager. You can now use it to share files between to your Linux and Windows systems:
In the case of a Linux system as a guest, the process of enabling the shared folder is little different. Check out my post about How to enable a VirtualBox shared folder for Linux guest systems.
Another productive feature is the sharing of the clipboard between the two systems. That is, when you copy the text in one system, it will also be available in the other.
To enable this feature, you have to install VirtualBox Guest Additions as you have seen above, then go to the Devices menu and in the Shared Clipboard section click on the Bidirectional option.

Now if you can share the clipboard content on both systems.
Enable files drag and drop
Finally, you can also enable bidirectional drag and drop of files to share them between systems. I recommend using a shared folder for this purpose because a shared folder is more reliable. But you may try the drag and drop too.
To enable it, go to the Devices menu and in the Drag and Drop section click on the Bidirectional option:
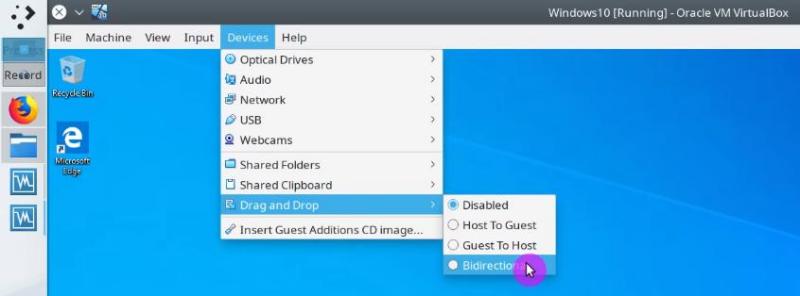
Now, you can drag a file from your host system and drop it to the Windows 10. It should also work the other way, but it did not work for me. Again, that’s why I recommend using a shared folder.
Conclusion
These were the essential steps to get Windows 10 working in VirtualBox. If you are required to use some Windows application but you run Linux as your main OS, this can be a lifesaver. Install Windows 10 in VirtualBox and running Windows programs inside it is not an ideal solution, but it is very reliable. All Windows programs will work correctly.
You can also try using emulators like Wine, but in my experience, very few Windows applications run well in Wine. Many users also prefer to dual boot Linux and Windows, but I am against such option. So, I think installing Windows in VirtualBox is the best solution to get Windows programs working in Linux.
Creating a Windows 10 virtual machine on VirtualBox can be simple and efficient. First, download and install VirtualBox, then get a Windows 10 ISO file. Create a new virtual machine, allocate resources, and install Windows 10 using the ISO file. Follow these steps to run a virtualized instance of Windows 10 on your computer.
This guide will walk you through the steps to set up your very own Windows 10 virtual machine using VirtualBox. Virtual machines are excellent for testing software, running different operating systems, or just exploring without risking your main system.
Step 1: Download and Install VirtualBox
Head over to the VirtualBox website and download the installer suitable for your operating system.
VirtualBox supports various OS like Windows, macOS, and Linux. The installation process is straightforward; just follow the prompts and accept the default settings unless you have specific needs.
Step 2: Download a Windows 10 ISO File
Go to the Microsoft website and download the Windows 10 ISO file.
You’ll need this file to install Windows 10 on your virtual machine. Ensure you download the correct version and save it somewhere easily accessible.
Step 3: Open VirtualBox and Create a New Virtual Machine
Launch VirtualBox and click on the “New” button to start creating a new VM.
A wizard will appear to guide you through the process. Name your virtual machine and select “Windows 10” as the version.
Step 4: Allocate Resources
Assign the amount of RAM and CPU cores to your new virtual machine.
For a smooth experience, it’s recommended to allocate at least 4GB of RAM and 2 CPU cores. However, adjust these settings based on your system’s capabilities.
Step 5: Create a Virtual Hard Disk
Choose to create a new virtual hard disk and select a file type for it.
The default VDI format works well. Allocate at least 30GB of storage space to ensure you have enough room to install and run Windows 10.
Step 6: Configure Storage Settings
Go to the “Settings” of your new virtual machine and navigate to the “Storage” section.
Here, you’ll need to link the Windows 10 ISO file to the virtual machine. Click on the empty disk icon and select “Choose a disk file” to locate your ISO.
Step 7: Start the Virtual Machine
Click on the “Start” button to power up your VM.
VirtualBox will boot from the ISO file, launching the Windows 10 installation process. Follow the on-screen instructions to complete the setup.
Step 8: Install Guest Additions
Once Windows 10 is installed, go to the “Devices” menu and select “Insert Guest Additions CD image.”
This step enhances the performance and usability of your virtual machine by installing additional drivers and tools.
After these steps, your virtual machine will run Windows 10 just like a physical computer. You can install programs, browse the internet, and customize settings within the virtual environment.
Tips for Creating a Windows 10 Virtual Machine on VirtualBox
- Allocate sufficient resources: Make sure you give your VM enough RAM and CPU power for smooth performance.
- Use dynamic storage: Selecting dynamic allocation for the virtual hard disk saves space on your physical drive.
- Update VirtualBox: Always use the latest version of VirtualBox for better compatibility and features.
- Backup regularly: Take snapshots of your VM to easily revert changes or recover from issues.
- Optimize settings: Tweak VirtualBox settings for optimal performance based on your specific use case.
Frequently Asked Questions
Why should I use a virtual machine?
Virtual machines allow you to run different operating systems on your existing hardware without affecting your main OS. They are great for testing software, experimenting, and improving security.
What is an ISO file?
An ISO file is a digital copy of a CD/DVD. For installing an operating system, it’s like having a virtual install disk.
How much RAM should I allocate?
For Windows 10, at least 4GB of RAM is recommended. However, if your system has more to offer, allocating more can improve performance.
Can I use VirtualBox on a Mac?
Yes, VirtualBox is compatible with macOS. The installation process is similar to Windows.
Are virtual machines safe?
Yes, VMs are isolated from your host system, meaning any issues within the VM won’t affect your main OS. However, always practice good security habits.
Summary
- Download and install VirtualBox.
- Download a Windows 10 ISO file.
- Open VirtualBox and create a new virtual machine.
- Allocate resources.
- Create a virtual hard disk.
- Configure storage settings.
- Start the virtual machine.
- Install guest additions.
Conclusion
Creating a Windows 10 virtual machine on VirtualBox can be a game-changer. It opens up a world of possibilities for testing, learning, and development in a secure environment. Whether you’re a student trying to learn more about different operating systems or a developer needing a safe space to test apps, a virtual machine is a versatile tool.
Remember to allocate enough resources to your VM and regularly update VirtualBox to ensure smooth operation. Don’t forget to take snapshots so you can easily return to a previous state if things go awry. With these tips and steps, you’ll be well on your way to mastering virtual machines. Happy virtualizing!
Matt Jacobs has been working as an IT consultant for small businesses since receiving his Master’s degree in 2003. While he still does some consulting work, his primary focus now is on creating technology support content for SupportYourTech.com.
His work can be found on many websites and focuses on topics such as Microsoft Office, Apple devices, Android devices, Photoshop, and more.