
-
Description
For many users, the ability to run Windows 10 on a Mac is essential for accessing specific software or tools that are unavailable on macOS. Fortunately, Apple provides an easy solution through Boot Camp, allowing users to install Windows alongside macOS. Here’s a step-by-step guide to help you set up Windows 10 on your Mac seamlessly.
Why Use Windows 10 on a Mac?
There are several reasons why someone might need Windows 10 on their Mac:
-
Software Compatibility: Certain applications, especially in professional fields like engineering or gaming, may only run on Windows.
-
Gaming: Many PC games are optimized for Windows, offering better performance and compatibility.
-
Testing and Development: Developers often need both operating systems to test their software or applications.
Requirements
Before you begin, make sure you have the following:
-
A Mac with an Intel processor or an Apple Silicon chip that supports virtualization (e.g., through Parallels Desktop).
-
A USB drive with at least 16 GB of storage (if required for the installation).
-
A Windows 10 ISO file, which you can download from the Microsoft website.
-
Sufficient disk space on your Mac to allocate to the Windows partition.
Using Boot Camp to Install Windows 10
-
Prepare Your Mac:
-
Update macOS to the latest version.
-
Back up your data using Time Machine or another backup tool.
-
-
Download the Windows ISO File:
-
Visit the Microsoft Windows 10 download page.
-
Select the appropriate version and save the ISO file to your Mac.
-
-
Launch Boot Camp Assistant:
-
Open Boot Camp Assistant from the Utilities folder in Applications.
-
Follow the on-screen instructions to create a Windows partition and select the ISO file.
-
-
Allocate Disk Space:
-
Decide how much storage to dedicate to Windows. Ensure you allocate enough space for the operating system and any applications or files you plan to use.
-
-
Install Windows:
-
Boot Camp will guide you through the installation process. Once your Mac restarts, follow the prompts to set up Windows.
-
-
Install Boot Camp Drivers:
-
After Windows installation, the Boot Camp installer will launch automatically. Install the drivers to ensure proper functionality of your Mac’s hardware, such as the trackpad, camera, and keyboard.
-
Using Parallels Desktop for Virtualization
For those who prefer not to partition their hard drive, Parallels Desktop is an excellent alternative for running Windows 10 on a Mac. This virtualization software allows you to run Windows as an app within macOS, offering convenience and flexibility.
-
Download and Install Parallels Desktop:
-
Visit the Parallels website and download the software.
-
Follow the installation instructions.
-
-
Install Windows 10:
-
Open Parallels and select the option to install Windows.
-
Use the Windows ISO file to complete the setup.
-
-
Run Windows and macOS Simultaneously:
-
With Parallels, you can switch between macOS and Windows effortlessly, making it ideal for multitasking.
-
Tips for a Smooth Experience
-
Keep Software Updated: Regularly update both macOS and Windows to ensure compatibility and security.
-
Allocate Sufficient Resources: If using virtualization, assign enough RAM and CPU cores to Windows for optimal performance.
-
Use Antivirus Software: Protect your Windows installation with reliable antivirus software.
By following these steps, you can enjoy the best of both worlds—macOS and Windows—on your Mac. Whether you choose Boot Camp or virtualization, having access to Windows 10 expands your Mac’s versatility and functionality.
| Name | Windows 10 Pro Lite x64 for Winclone [mactorrents.me].dmg |
|---|---|
| Size | 2.33 GB |
| Created on | 2017-12-15 22:55:22 |
| Hash | 4c1a7292f1fd64234bb8db3d68ae8c983c194c8d |
| Files | Windows 10 Pro Lite x64 for Winclone [mactorrents.me].dmg (2.33 GB) |
Download
Descriptions for Windows 10 Pro Lite x64 for Winclone
Name: Windows 10 Pro Lite x64 for Winclone
Mac Platform: Intel
Language : Multi
Web Site: https://www.microsoft.com/
Overview
Clone Windows image mounted for easy and quick installation on a Mac without capricious Boot Camp.
Tested on mac os 10.13.1. Set via Winclone Pro 6 v6.1.5.
Based on the assembly of “Windows 10 x64 Lite 1709 (16299.19) for SSD v3 xlx” .
The system weighs only about 5GB. Most of the poppy with a small disk.
Screenshots were made after the installation of Visual Studio and all drivers.
Adapted for mounting on SSD, but can be installed on the HDD, in this case, it is strongly recommended to apply Tweaks_SSD-to-HDD.reg
The paging file is exposed to a minimum. If you have little physical memory, including additional paging file to another drive ( “The size of the choice of the system”), or increase the “Maximum Size” on the main.
Completely disable swapping on the main disk is not recommended!
Printer services are disabled in the component, including, if necessary.
Windows Defender, Edge and Microsoft Store in all versions removed. Then install will not work.
In the assembly, you can opt out, only updated manually when in “the Windows Update” pressing the corresponding button. Also download off “Malicious Software Removal Tool”, hibernation, quick start.
When installing the assembly does not connect to the network setting “their” drivers, as Driver download automatically!
Application Off-SwapFile.reg file will disable swapfile.sys, used only for tile applications.
Features:
Maximum off “logging” and collecting all sorts of data, leaving only necessary to operate the system logs. Thus, the system does not waste time and resources to collect the data to be sent to the Hindus))).
Delete:
Shop all tile applications, “Windows Defender”, Edge (can not be restored!), OneDrive, Quick Help, Feedback, Disk Recovery, multipoint connector, Containers, Ponte data center, Active Directory Services Lightweight Directory, Geolocation, Telemetry .
The hosts file is added to the recording block sending telemetry and advertising on Skype.
Installation:
Download and extract the files.
Through the “Disk Utility” to create a partition for Windows format “MS-DOS (FAT)” , everywhere are advised to call it “BOOTCAMP”, but you can experiment.
The system weighs approximately 5GB, 25GB partition I made that got into the program. Less 10GB make sure it is not necessary.
Make sure that your computer is compatible: Generally a dozen works even on old computers a decade ago. But there can be problems with drivers Boot Camp. They simply can not be established. Download the driver via Boot Camp: Install and open the last Winclone. Drag it downloaded image c extension .winclone.
1. Select an image
2. Select the created partition
3. Run
- Topics
- It will activate with an internet connection.
- Language
- English
- Item Size
- 2.9G
Windows 10/Mac OS Big Sur-it is a Windows 10 lite edition to replicate Mac OS. System Requirements: 1GB (for 32 Bit) 2GB (for 64 Bit). Minimum Space: 16GB free HD. This will work on labtops that run Windows and it will also run on I Mac’s. I got this file from FileCR.com.
- Addeddate
- 2021-11-05 15:11:47
- Identifier
- windows-10-1909-mac-os-lite-big-sur-edition-x-64
- Scanner
- Internet Archive HTML5 Uploader 1.6.4
plus-circle Add Review
plus-circle Add Review
comment
Reviews
(7)
There are 7 reviews for this item. .
If you want to enjoy Windows 10 /11 on your Mac computer, you can download Windows 10/11 ISO for Mac, then install Windows on Mac via Boot Camp Assistant. In this article, MiniTool Software will show you how to download Windows ISO for Mac free for installation.
Can you run macOS on a Windows computer? Of course, the answer is yes. You can run macOS on a Windows PC using VMware. On the other hand, can you run Windows on a Mac computer? The answer is also yes. You can easily install Windows on your Mac computer with the help of Boot Camp Assistant. After that, you can switch between macOS and Windows as per your needs.
Before installing Windows 10/11 on your Mac computer, you need to download Windows 10/11 ISO for Mac. Now, let’s first talk about downloading Windows 10/11 ISO images for Mac.
Download Windows ISO for Mac Free
In this part, we will introduce how to download Windows 10 ISO for Mac and download Windows 11 ISO for Mac separately.
Download Windows 10 ISO for Mac Free
To protect your computer from viruses, malware, and spyware, you should download a Windows 10 ISO image for Mac using a reliable download source. Fortunately, Microsoft now enables you to directly download Windows 10 ISO image files for free from its official site. The Windows 10 ISO image direct download is only available when your computer agent is not Windows. So, it is very lucky. You can directly download a Windows 10 ISO image from Microsoft’s official site on your Mac computer and use it to install Windows 11 on Mac.
Tips:
If you are using a Windows PC, you can also directly download a Windows 10 ISO file from Microsoft by changing the user agent under the developer mode of your Chromium browser like Google Chrome or Microsoft Edge. See this post: Windows 10 ISO Images Direct Download via Microsoft’s Website.
Step 1: Go to the Download Windows 10 Disc Image (ISO File) page from Microsoft’s official site on your Mac.
Step 2: Click the Select edition menu and select Windows 10 (multi-edition ISO) option from the drop-down list.
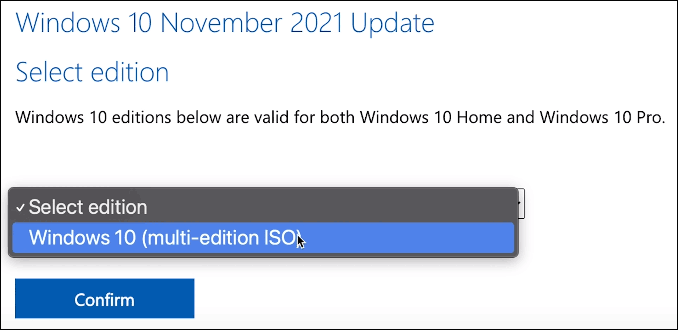
Step 3: Click the Confirm button and wait for your request to be verified
Step 4: Choose your language and click the Confirm button to continue.
Step 5: On the next page, you will see two available download buttons: 64-bit Download and 32-bit Download. Your Mac computer only allows you to install Windows 10 Home 64-bit edition or Windows 10 Pro 64-bit edition. So, you need to click the 64-bit Download button to start downloading Windows 10 ISO file for Mac.
Step 6: The size of the Windows 10 64-bit ISO file is about 5.8 GB. So, it will take a while to complete the whole downloading process. You should wait patiently.
After downloading the Windows 10 ISO file on Mac, you should let it stay in the download folder, move to the install section, and follow the steps to install Windows 10 on your Mac computer.
Download Windows 11 ISO for Mac Free
Microsoft has released a direct download link for all users since the official initial release of Windows 11. It is also free to download a Windows 11 ISO file for Mac from Microsoft.
Step 1: Go to the Download Windows 11 Disc Image (ISO File) page from Microsoft’s official site using your Mac.
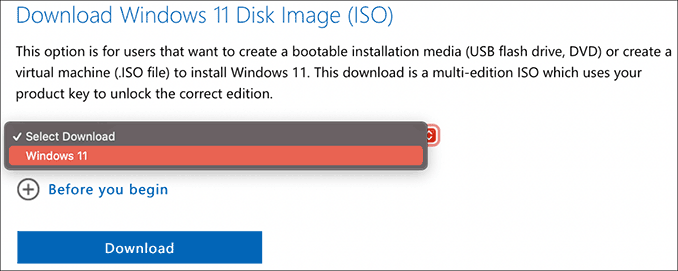
Step 2: Scroll down to the Download Windows 11 Disk Image (ISO) section. Then, click the Select Download menu and select Windows 11 option from the drop-down list.
Step 3: Click the Download button and wait for your request to be verified.
Step 4: Choose your language and click the Confirm button to continue.
Step 5: Windows 11 only has 64-bit editions. So, there is only one available download button: 64-bit Download. Click that button to download the Windows 11 ISO file on your Mac.
Step 6: The Windows 11 64-bit ISO file is 5.1 GB in size. You should wait patiently until the whole download progress ends.
Likewise, you should let the downloaded Windows 11 ISO image stay in the download folder, move to the install section, and follow the steps to install Windows 10 on your Mac computer.
Want to download Windows 10/11 ISO for Mac? This post introduces how to directly download one from Microsoft’s official site.Click to Tweet
Install Windows 10/11 on a Mac Computer
How to Install Windows 10 on Mac?
Preparations:
1. Windows 10 installation on Mac needs a Boot Camp Assistant and Boot Camp requires a Mac with an Intel processor. So, you need to have one of the following Mac computers:
- MacBook released in 2015 or later
- MacBook Air released in 2012 or later
- MacBook Pro released in 2012 or later
- Mac mini released in 2012 or later
- Mac Pro released in 2013 or later
- iMac released in 2012 or later1
- iMac Pro (all models)
2. You also need to install the latest macOS updates because they include the updates to Boot Camp Assistant.
3. To store the Windows 10 installation files, your Mac startup disk should have at least 64 GB of free storage space. Of course, more is better. For example, 128 GB of available storage space can provide the best experience because Windows updates will take up more space.
4. An external USB flash drive, which has at least 16 GB of space. However, if you are using one of the following Mac computers, it will not need a USB flash drive to install Windows 10:
- MacBook released in 2015 or later
- MacBook Air released in 2017 or later3
- MacBook Pro released in 2015 or later3
- Mac Pro released in late 2013 or later
- iMac released in 2015 or later
- iMac Pro (all models)
5. A Windows 10 Home 64-bit ISO file or Windows 10 Pro 64-bit ISO file. We have mentioned the download method above. If it is the first time to install Windows 10 on your Mac, you need to have a full version of Windows 10 rather than an upgrade.
Steps to install Windows 10 on Mac
To install Windows, use Boot Camp Assistant, which is included with your Mac.
Step 1: Change the Secure Boot settings if necessary. You need to use Full Security to install Windows 10 on Mac. After the Windows 10 installation, the Secure Boot setting will not affect the Windows startup.
Step 2: Open the Utilities folder of the Application folder. Then, open Boot Camp Assistant.
Step 3: Connect your external USB flash drive to your computer if you are required.
Step 4: Boot Camp Assistant will begin to create a Windows 10 bootable USB flash drive for installation.
Step 5: Boot Camp Assistant needs to create a BOOTCAMP partition for the Windows installation, which size should be at least 64 GB. You should not forget this. However, you should set the partition size as large as possible because you can’t change the size later.
Step 6: When Boot Camp Assistant ends the process, you need to restart your Mac to the Windows installer. In general, the installer will automatically select and format the BOOTCAMP partition. If not, the installer will ask where to install Windows. Then, you should select the BOOTCAMP partition manually and click Format to format it.
Step 7: Remove all unnecessary external drives from your Mac. Then, click the Next button and follow the onscreen instruction to install Windows 10.
Step 8: When the installation ends, your Mac machine will start up in Windows with a Welcome to the Boot Camp installer window. You need to follow the instructions to install Boot Camp and the necessary Windows support software drivers on Mac. You will be asked to restart your Mac when everything is done. Just do it.
Here is how to install Windows 10 on Mac.Click to Tweet
How to Install Windows 11 on Mac?
Windows 11 has new hardware and system requirements. Is it possible to install Windows 11 on your Mac computer? Of course, yes. But you need to use some extra steps to make the installation think your Mac device is compatible with Windows 11.
Step 1: You can also use the steps introduced in the How to Install Windows 10 on Mac section to install Windows 11 on Mac, but only when you see the Windows Setup interface pops up, you need to press Shift+F10 to call out the Command Prompt to make some changes to the related Registry key.
Step 2: Type regedit in Command Prompt and press enter to open Registry Editor.
Step 3: Go to HKEY_LOCAL_MACHINE\SYSTEM\Setup.
Step 4: Right-click the Setup folder and then select New > Key.
Step 5: Name the new key LabConfig.
Step 6: Right-click the newly created key and go to New > DWORD (32-bit). Then, name it BypassTPMCheck. After that, you should open this key and set the value to 1.
Step 7: Repeat the above steps to create two other new keys to bypass the RAM check and Secure Boot check. These two new keys should be named ByPassRAMCheck and ByPass SecureBootCheck. And their values should also be 1.
Step 8: Close the Registry Editor and Command Prompt to go back to the Windows setup interface. Then, click the Install Now button and follow the onscreen instructions to install Windows 11 on your Mac.
Here is how to install Windows 11 on Mac.Click to Tweet
Recover Lost and Deleted Files on Windows 10/11
MiniTool Power Data Recovery is a piece of professional data recovery software that works on all Windows versions, including Windows 11, Windows 10, Windows 8/8.1, and Windows 7. You can use it to recover all types of files like images, videos, music files, documents, and more.
This MiniTool data recovery software can recover data from different kinds of data storage devices like computer internal hard drives, external hard drives, memory cards, USB flash drives, pen drives, and more.
This software has a trial edition. If you are not sure if it can find the files you want to recover, you can use this trial edition to scan the drive you want to recover data from and then check the scan results for your needed files.
MiniTool Power Data Recovery TrialClick to Download100%Clean & Safe
Here is how to use this free file recovery tool to scan your drive for lost files:
Step 1: Download and install MiniTool Power Data Recovery Trial on your device.
Step 2: Open it to enter its main interface.
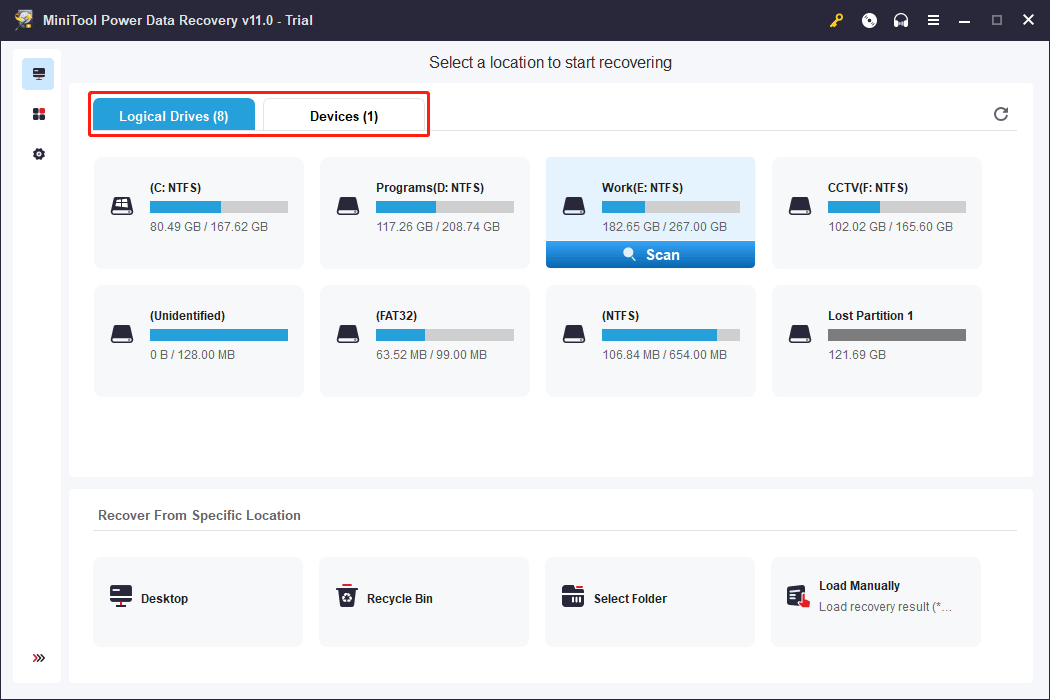
Step 3: Find the drive you want to recover data from under the Drives section. Hover over it and click the Scan button to start scanning that drive. If you don’t know which the target drive is, you can switch to the Devices section and select the entire disk to scan.
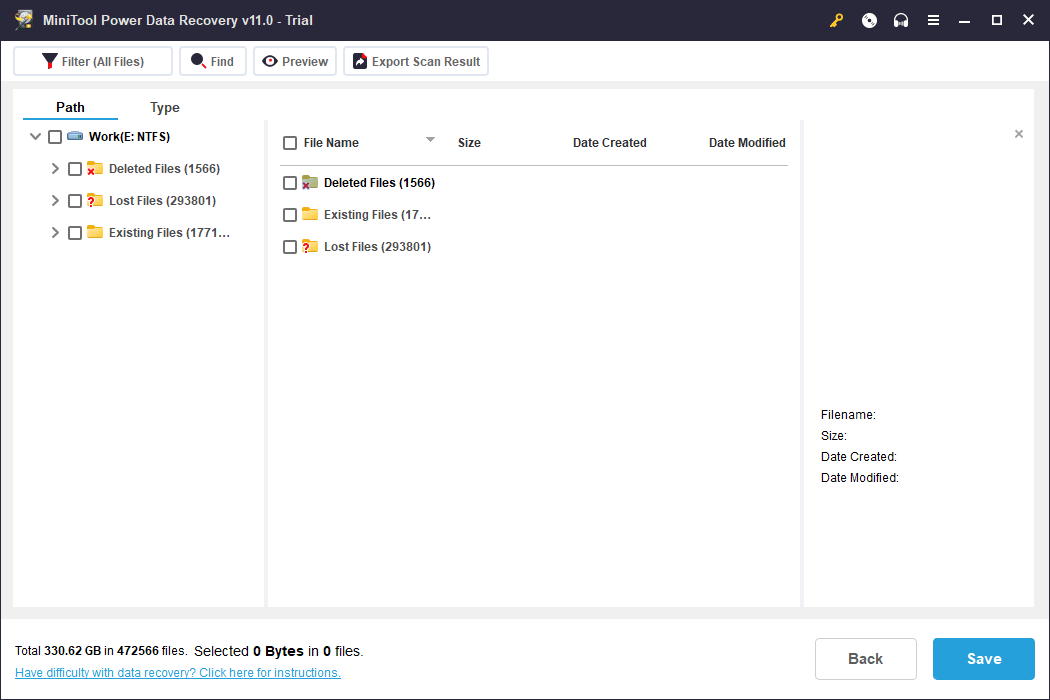
Step 4: Wait until the scanning ends. Then, check the scan results to find your needed files.
If you want to use this tool to recover your files, you need to use a full edition. You can just upgrade the software to a full edition in the scan results interface. So, you don’t need to take time to scan the drive again. After that, you can select all your needed files at once, click the Save button, and select a suitable folder to save files.
The End
Want to download Windows 10 ISO for Mac or download Windows 11 ISO for Mac? You can just get a Windows 10/11 ISO file from Microsoft’s official site on your Mac computer. This article shows you two related guides.
Additionally, you can also know how to install Windows 10 on Mac and how to install Windows 11 on Mac separately.
If you have other related issues to be fixed or have other good suggestions, you can let us know in the comment. You can also contact us via [email protected].
режим загрузки определяется автоматически из модели Мака
При необходимости изменить
Legacy MBR
Код
sudo ./winclone -y -l -p /dev/diskXsY -I I
UEFI
Код
sudo ./winclone -y -e -p /dev/diskXsY -I I
при отсутствии свободного диска/раздела его можно создать за счет уменьшения HFS+
Код
diskutil resizeVolume «/dev/disk0s3» «75%» MS-DOS DOS 0b
подробности — man diskutil
про BootCamp и его драйвера
можно скачать программой Brigadier
есть версия как для Мака, так и для Windows
справка по WinClone
Usage: winclone [options]
-h This message.
-p, —ntfspartition NTFS_PARTITION Specify NTFS_PARTITION (eg /dev/disk0s4) to use in operations.
-y, —self-extract Self-extract mode. Automatically sets the restore (-r) and associated flags (see -r usage). Requires -p for partition to restore to. Uses resources in the same location as this script.
-j, —resource_path . Path to resources. If not specified, the directory that the script is located in is used (if it is in a package). Should be set to the root of a Winclone image or the resource folder of the Winclone app
-q, —quiet Quiet mode. Don’t ask for confirmation…Just do it.
-e, —EFI Force EFI boot mode.
-f, —force Ignore SIP State and try anyways. Good for Netboot or external drive package deployments.
-l, —legacy Force Legacy boot mode.
-i, —wimindex Index in WIM file.
-b, —boot_mode Set boot mode. 0=Auto, 1=EFI, 2=Legacy.
команда, которой нет в документации
Код
sudo /Applications/Winclone.app/Contents/Resources/winclone -m /dev/diskXsY
монтирует диск с Windows как RW, для возможности вносить в него изменения
Пользоваться с осторожностью!
На более старых системах можно использовать и Winclone 6
Winclone 6 requires OS X 10.11 to macOS 10.13
команды в п8 несколько отличаются
сама установка:
Код
./tools/sbin/mkntfs -f -L WINDOWS /dev/diskXsY
./tools/bin/wimapply windows.wim I /dev/diskXsY
создание загрузчика
Код
sudo ./winclone -p /dev/diskXsY -e
или
Код
sudo ./winclone -p /dev/diskXsY -l
если Winclone не устанавливать установщиком, а распаковать, например, через Pacifist — 10ая версия работает в любой macOS