
Readers help support Windows Report. We may get a commission if you buy through our links.
Read our disclosure page to find out how can you help Windows Report sustain the editorial team. Read more
A great way to customize your Windows 10 computer is to change the default fonts and add custom designs, that you can use in any graphics program, like Art Text.
Or course, it won’t change your creations as dramatically as a photo effect or another visual customization, but it will complete the effect you want to achieve and make it more flowing.
Even if Windows versions have changed over time, the process of installing custom fonts has remained the same.
As you will see here, installing and deleting fonts can be done with great ease by anyone and it doesn’t require much training.
Installing new fonts on Windows 10 isn’t hard, and in this article, we’re going to cover the following topics:
- Fonts folder windows 10 – Fonts folder is located in Control Panel in Windows and it holds all your fonts. You can install new fonts simply by moving them to the Fonts folder
- How to install fonts Windows 10 – Installing new fonts on Windows 10 is same as on any other version of Windows
- Adding fonts to Windows 10 – Adding new fonts to Windows 10 is relatively simple, and you can do that with just a couple of clicks
What are Windows font packs and how to change them?
1. Use third-party fonts software
For customizing your system as well as content creation, you will need to find quality fonts.
This task isn’t complex as it seems because you have great support from third-party fonts tools capable of changing your Windows fonts in a few clicks.
Hence, you have creative options for updating fonts on your operating system. The process is fairly simple so you only have to install new fonts in the Windows 10 fonts folder.
With the right tool, you can get lots of qualitative fonts ready to be applied to your device. Plus, new ones coming out regularly so you can diversify.
Lastly, the installation can be done in a few steps so you personalize your OS or other projects exactly how you prefer.
2. Download from font repositories
If you are particularly interested in one font, chances are you will find them on one of the many font databases. I’ll give you a few websites, where you can download fonts for your computer.
Keep in mind that most of them are free, so be sure to check all of them before you decide to buy a font. Here are some great font databases to help you download fonts:
- Dafont
- FontSquirrel
- FontSpace
- FontZone
- FontFabric
- 1001FreeFonts
- Windows Fonts Megapack
You can easily find any font simply by entering its name in the search bar. You can also find the desired font simply by using many available filters or by selecting the appropriate font category.
If these websites don’t have the font that you are looking for, then you are in a tough position. Here, you can find thousands of fonts that are compatible with your Windows computer.
Also, keep in mind, if you come across font packs, they might be somewhat different than regular fonts. We’ll talk about them in a moment.
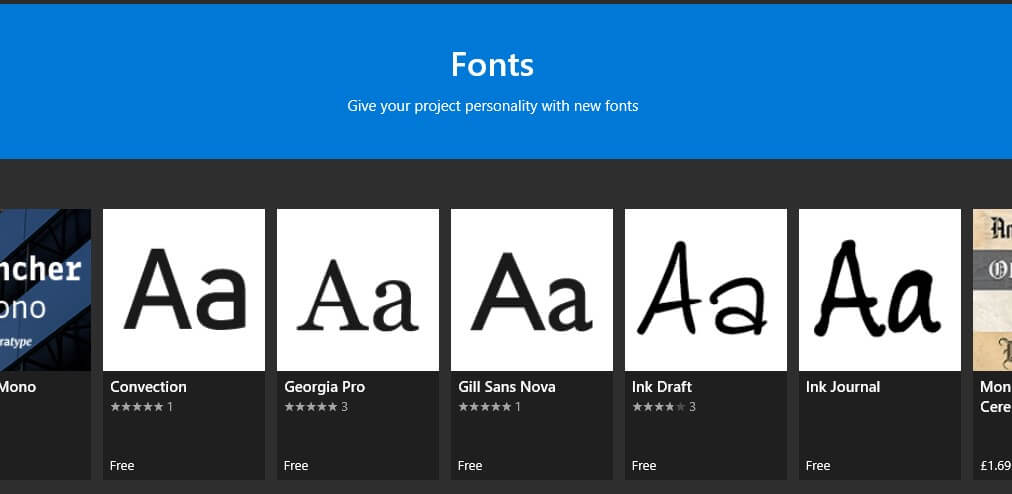
3. Download from Microsoft Store

- Go to Windows Settings > Personalisation > Fonts > Get more fonts in the Microsoft Store.
- Browse the selection of fonts available.
- Click on the font you want and select Install.
- The font will be downloaded and automatically installed.
4. Installing Fonts in Windows 10
- Locate and open the downloaded archive.
- Unzip the font file (you can recognize it by .ttf, .otf, or .fon extension).
- After extracting the font file, simply double click it to open it.
- Click the Install button and the font will be automatically installed.

After extracting the font file, you’ll see some basic information regarding the selected font. In addition, you can preview your font and see how it looks like in different sizes.
You can also install a font simply by dragging and dropping it to the Fonts section. Fonts section is located in the Windows Settings app, under Personalisation.
In almost all cases fonts are distributed in .zip archive, so you can easily open them without using a third-party tool.
However, if you want a dedicated tool for archiving, we advise you to check out the list of best archiver tools that we covered recently.
5. Uninstalling Windows 10 Fonts
Uninstal from Windows Settings
- Open the Settings App by pressing the Windows+I keys combination.
- Go to Personalization, then select Fonts.

- Click on the font and then select Uninstall.

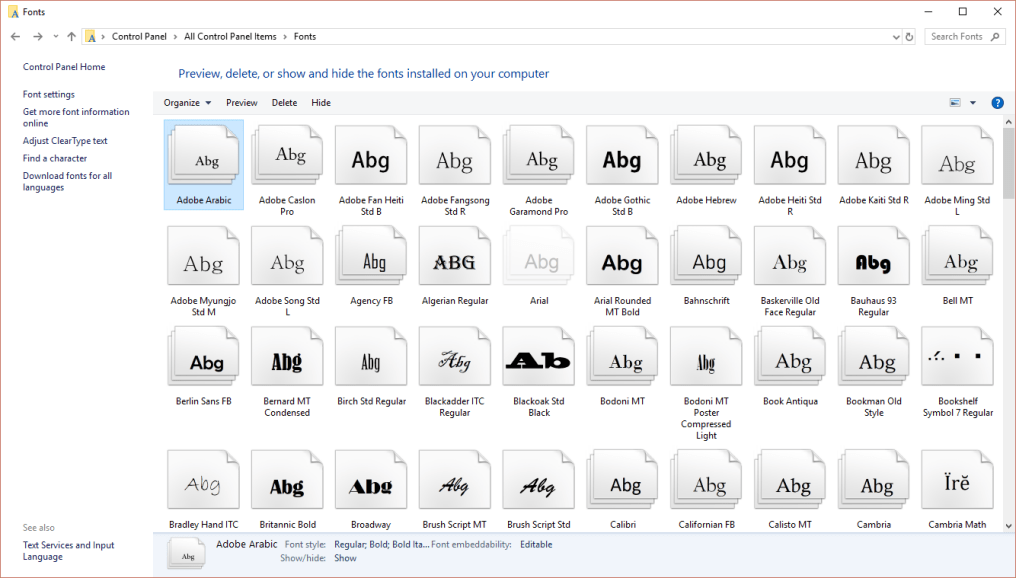
Uninstal from Control Panel
Additionally, you can do the same by navigating to Control Panel > Fonts. You can delete a font file using two methods:
- Select the font you want to delete and click on Delete option from the menu on the top.
- Locate the font you want to delete, right-click it and choose Delete from the menu.

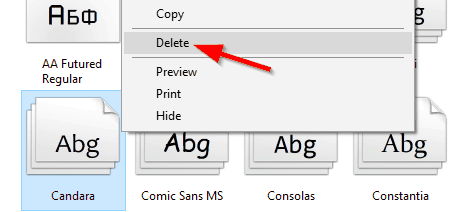
After choosing the Delete option the confirmation message will appear. Now you just have to click Yes to remove the font from your PC.
Note: Keep in mind that this action is irreversible, so you won’t be able to restore your font. If you want to restore a deleted font, you’ll have to download and install it again.
Installing new fonts on Windows 10 isn’t that hard, and after following our guide you should be able to install font packs and fonts on your Windows 10PC without any problems.
Please leave us a comment if our guide helped you, or if you have any suggestions or solutions that we should include in our article.
Milan Stanojevic
Windows Toubleshooting Expert
Milan has been enthusiastic about technology ever since his childhood days, and this led him to take interest in all PC-related technologies. He’s a PC enthusiast and he spends most of his time learning about computers and technology.
Before joining WindowsReport, he worked as a front-end web developer. Now, he’s one of the Troubleshooting experts in our worldwide team, specializing in Windows errors & software issues.
Любая операционная система для компьютера, включая Microsoft Windows 10, подлежит кастомизации. Таким образом, мы настраиваем внешний вид ОС и делаем ее более приятной для глаз. Немалую роль в этом всем отыгрывают и правильные шрифты.
Описание ПО
Изменить шрифт рабочего стола, различных приложений, окон, экрана, загрузки и так далее очень просто. Для этого достаточно скачать один из вариантов и произвести инсталляцию. Ниже мы как раз и рассмотрим, как это правильно делается.

Как установить шрифт
Для вашего компьютера мы подготовили большой пакет самых красивых шрифтов в едином архиве. Достаточно установить один из понравившихся вариантов:
- Найдите кнопку скачивания архива в самом конце странички. Распакуйте содержимое в какую-нибудь папку.
- Выберите понравившийся шрифт, сделайте двойной левый клик и в верхнем правом углу нажмите кнопку запуска установки.
- Дождитесь, пока начертание будет добавлено в операционную систему.

Теперь данный шрифт можно выбрать в качестве основного для операционной системы различных программ, экрана, загрузки и так далее.
Скачать
Скачать лучшие шрифты, включая стандартные, одним архивом можно при помощи прикрепленной ниже торрент-раздачи.
| Лицензия: | Бесплатно |
| Платформа: | Windows 7, 10, 11 x32/64 Bit |
| Язык: | Русский |
If you are looking for additional fonts to enhance your document editing or graphic design projects, there are various sources online where you can download them. However, this can be a time-consuming process of searching and filtering. Therefore, by successfully downloading and installing the comprehensive Windows 10 font pack, you will gain access to almost all the fonts you need.
In this article, FPT Shop will provide you with detailed instructions on how to download and install the comprehensive Windows 10 font pack. By following the simple steps outlined in this article, you will be able to customize your system interface, create professional documents, and bring your creative ideas to life.
What are Windows 10 Fonts?
The font system in Windows 10 includes a range of default fonts that can be expanded by installing additional fonts from external sources. Here are some popular fonts that are pre-installed in Windows 10:
- Segoe UI: This is the default font for the Windows 10 user interface. It is commonly used for headings, body text, and other parts of the operating system.
- Arial: A popular sans-serif font, commonly used in applications and web browsers.
- Times New Roman: A traditional serif font, commonly used in printed text and documents.
- Calibri: A modern sans-serif font, commonly used in office documents and presentations.
- Cambria: A high-quality serif font, commonly used in professional documents and reports.
By downloading the comprehensive Windows 10 font pack, users will have all of the above default fonts plus a wide range of additional fonts for document editing, printing, and design. Of course, this comprehensive font pack can also be installed on Windows 7, Windows 8, or Windows 11.
What’s Included in the Comprehensive Windows 10 Font Pack?
Specifically, the comprehensive Windows 10 font pack shared in this article includes 308 VNI fonts, 267 Unicode fonts, 105 TCVN3 fonts, and 196 UTM-encoded fonts. All fonts have been compressed into a .zip file format, so users need to download and extract it to their computers before installing the fonts.
How to Download and Install the Comprehensive Windows 10 Font Pack
To download and install the comprehensive Windows 10 font pack, you can follow these steps:
Step 1: First, you need to find and download the font pack you want to install. There can be various sources for downloading fonts, including websites that offer free fonts or websites that sell fonts.
In this article, the comprehensive Windows 10 font pack has been compiled and compressed into a .zip file for users’ convenience.
Download the comprehensive Windows 10 font pack HERE
Step 2: Download the font pack to your computer. Fonts are usually downloaded as compressed files (.zip or .rar).
After completing these steps, proceed to the next steps to install the fonts on Windows 10.
Step 3: Open the compressed file containing the fonts and extract them. You may see one or more font files with the extension .ttf (TrueType Font) or .otf (OpenType Font).
Step 4: After extracting the fonts, right-click on the font file and select Install.
You can install the fonts for the current user or for all users on the computer
Alternatively, you can open Control Panel, select Appearance and Personalization, and then select Fonts. Drag and drop or copy the font files into the Fonts folder to install them.
Access Appearance and Personalization in Control Panel
Select the Fonts folder
Frequently asked questions
There are various online sources where you can download fonts. However, it can be time-consuming to search and filter through them. FPT Shop offers a comprehensive Windows 10 font pack that gives you access to a wide range of fonts, saving you time and effort.
The Windows 10 font system includes a range of default fonts, such as Segoe UI, Arial, Times New Roman, Calibri, and Cambria. You can expand this collection by installing additional fonts from external sources. The comprehensive Windows 10 font pack provides you with all the default fonts plus a variety of extra fonts for your projects.
The font pack includes 308 VNI fonts, 267 Unicode fonts, 105 TCVN3 fonts, and 196 UTM-encoded fonts, totaling 876 fonts. All fonts are compressed into a .zip file format for convenient downloading and installation.
Follow these simple steps:
- Find and download the comprehensive Windows 10 font pack from FPT Shop or another source.
- Download the font pack to your computer; it will usually be in a compressed file format like .zip or .rar.
- Open the compressed file and extract the font files; they will typically have a .ttf or .otf extension.
- Right-click on each font file and select “Install,” choosing to install for the current user or all users on the computer. Alternatively, you can open the Control Panel, go to Appearance and Personalization > Fonts, and drag and drop or copy the font files into the Fonts folder.
3 Ways to Install Fonts on the Latest Windows 10 in 2024
Each font installation method has its own advantages and disadvantages, but they all help transform the appearance of your Windows 10 computer after installation. Adding new fonts not only allows you to personalize your computer, but also supports design work, text editing, and many other activities.
Computers without fonts will be bizarre! Everything in the OS will look random and identifying the files and options will be very difficult. So, it’s pretty good every other OS has its fonts set to display the crucial components. With Windows OS, there has been no problem with fonts and the OS always puts the best font to use and makes it easier for users. Windows OS comes with a variety of fonts pre-loaded but uses the Segoe UI as the default font for everything. Well, this font is pretty decent and goes well with every option in the OS. Well, the default font is pretty good and many users stick with it but some users really dislike the Segoe UI and like to change it with other cool fonts. So, Changing the font in Windows 10 is not very complicated and can be done with ease. So, here this article will explore everything you need to know about changing fonts packs in Windows 10 and also changing the default font on the OS.
There are hundreds of fonts that come pre-installed in Windows 10. But yet Segoe UI is the one that is used prominently throughout the OS. Well, as previously said it is the default font and is pretty neat for the user’s Interface of Windows 10. Well, if you are looking to change the font of the OS, you can surely go ahead and do it. But when it comes to choosing fonts, you have to be pretty careful as there are millions of fonts out there and you have to select the one that has all the variables and should go well with the OS.
So, before we dive into changing the fonts, you have to understand the philosophy of fonts. Well, it’s nothing complicated, but it’s a must before we dive into changing the OS font. So, a font is used to display the name tag or other details in the OS, so we get to understand what that particular thing stands for. So, the font that is to be used needs to be quite versatile and must have all variables like numbers, uppercase letters lowercase letters and symbols. Well, a versatile font is not difficult to find but you have to do some research on the best fonts of your liking and then change it as the default font on the OS.
Recommended Post:- Download and Install Teredo Tunneling Adapter on Windows 10 – Complete Guide
So, with a very large buffet of fonts available on the internet, you can hop onto any cool website and download the best and good fonts with ease. Here are some cool websites that you can check out and find some really awesome fonts for free or purchase a premium font, so you get a really good experience.
Font Libraries to Check Out for Cool Fonts
So, first, we will list out the free websites that you can checkout for fonts. And here they go:
- FontSquirrel.
- 1001Free Fonts.
- DaFont.
- Google Fonts.
- FontSpace.
- FontZone.
- Abstract Fonts.
So, listed are some of the free font repositories, you can access these websites and find some really cool fonts to use on your computer.
Here, are some cool premium font repositories. Check them out and get the best premium font for your Windows 10.
- Fonts.com.
- FontSpring.
- FontShop.
- MyFonts.
- Creative Market.
- GraphicRiver.
Well, these are some cool websites from where you can find the best fonts and use them on your computer. Well, going for premium fonts is a bit unnecessary because many free fonts are pretty good and come with all the variables necessary to be used as a default font on Windows computers.
So, now that you have some cool font libraries, download the font package from the website of your choice and then proceed to install them.
How to Install and Change the Default Font on Windows 10
- The first step of changing the font is to install the font you love. So, once you have selected and downloaded the font from the internet. You can go ahead extract the font pack.
- Now, right-click on the OTF file and then select the install for all users option to install the font on your computer.
- So, this is how you can install the font on the computer
And once you have installed the font of your choice, you need to note down the official name of the font from the settings application.
- To find out the official name of the font, open the Settings application by pressing the Windows key and the I key on the keyboard.
- Now, in the settings application go to the personalization options and then go to the fonts tab.
- Here find the font that you just installed and then open it.
- Here, you will find the official name of the font, which you can copy down.
- Now, exit the settings application and then open a notepad file on the desktop or any other location that you can access easily.
- In the notepad file copy and paste the following lines
Windows Registry Editor Version 5.00
- [HKEY_LOCAL_MACHINE\SOFTWARE\Microsoft\Windows NT\CurrentVersion\Fonts]
- “Segoe UI (TrueType)”=””
- “Segoe UI Bold (TrueType)”=””
- “Segoe UI Bold Italic (TrueType)”=””
- “Segoe UI Italic (TrueType)”=””
- “Segoe UI Light (TrueType)”=””
- “Segoe UI Semibold (TrueType)”=””
- “Segoe UI Symbol (TrueType)”=””[HKEY_LOCAL_MACHINE\SOFTWARE\Microsoft\Windows NT\CurrentVersion\FontSubstitutes]
- “Segoe UI”=”NEW-FONT”
- So, here, instead of New-Font change it with the official name of the font pack you just installed.
- Well, once done, save the notepad file as new default font and give it an extension of.reg.
- Now, save it with all files type in an easily accessible location.
- Once you have saved the file. Exit it. And now, right-click on the file and then select the merge option.
- Click on the yes option in the registry editor message prompt.
- Now, restart the computer.
- Once the computer has restarted the new font would have replaced the Segoe UI font.
So, the process is pretty simple but you have to keep in mind that you are changing the registry editor, so there are risks involved, so do the changes at your own risk.
Well, if you just want to edit the fonts installed on the Windows 10 OS, you can go to the settings application and to the fonts section and then uninstall fonts that you don’t want. If you need to install new fonts, you can search the websites for free and premium fonts and then install them with ease.
Hope the information provided above was helpful and informative, with these simple methods, you can change the default font of the OS and also make changes to the fonts that are installed on the computer.
Шрифты – это то, что отвечает за отображение написанного текста на экране вашего компьютера на Виндовс 10. ОС включает в себя большой набор предустановленных компонентов, однако при желании чуть украсить свою систему, вы всегда можете использовать сторонние решения.
Вы удивитесь, когда узнаете, что шрифты, или как они называются на английском – Fonts, придумали не в компании Microsoft, а в компании, которая является главным конкурентом. В Apple, и лишь затем эта тенденция распространилась и на Виндовс компьютеры. Хорошо, что это так произошло, ведь теперь по итогу мы имеем такую отличную возможность, как заменить классический вид.

Если вы устали от классических текстов, то выход простой – загрузить обновления. Все это очень удобно реализовано не только в десятке, но и в предыдущих версиях ОС. Компания Майкрософт довольно быстро осознала, что пропустила тренд и нагнала это таким бешенным темпом, что теперь практически перегнала Эпл по количеству. Вы можете найти:
- Прописные;
- Каллиграфические;
- Печатные;
- Другие.
Но всё, что нужно знать с самого начала – что для того, чтобы набор поддерживал русские буквы, вам нужно выбрать только тот пак, где заявлена поддержка кириллицы. В этом случае любой текст на русском языке вы сможете открыть в новом виде. Если же у вас другая задача – английский текст, то тут все намного проще, так как латиница поддерживается практически любой сборкой, ведь английский является универсальным языком.

Учтите, если вы установите обновку правильно, то она появится у вас и в Microsoft Word, и в Adobe Photoshop и в любом другом софте, который работает на базе Windows шрифтов. И не стоит переживать за нагрузку на свой ПК. Это, в отличие от заставок и прочих украшений, намного менее нагружает систему. Поэтому, без проблем устанавливаете такое количество, которое вам нужно.
Перед тем как приступить к операции, расскажем немного о том, что собой представляют шрифты, и где они находятся. Используемые Windows шрифты являются ничем иным, как файлами в формате TrueType (расширение .ttf) или OpenType (.otf). Они располагаются в специальной папке C:/Windows/Fonts, попасть в которую можно через Проводник или Панель управления.

Зайдя в указанную директорию, мы обнаружим все уже установленные в системе шрифты. Для управления ими предназначены расположенные сверху кнопки «Просмотр», «Удалить» и «Скрыть». Дважды кликнув по нужному шрифту, вы сможете просмотреть входящие в семейство варианты начертаний.

Раздел «Шрифты» есть и в интерфейсе штатной утилиты «Параметры». Здесь доступна более подробная информация о шрифтах в виде расширенных метаданных.

Какой набор выбрать
Выбирайте тот, который вам понравится по написанию. Вы сможете повторить всё тоже самое у себя на ПК, так как набор включает в себя конкретные буквы, например «А», «Б» и т.д., а значит, вы сможете набрать что угодно. Например текст «Съешь еще этих мягких булочек, да выпей чаю». В подобной фразе используются практически все буквы русского алфавита.

Но помимо языка и некоторых графических особенностей есть еще две большие категории – жирный и наклонный текст. Учтите, что один шрифт может существовать в разных вариантах. Например, с засечками, без засечек, с поддержкой жирного, с наклоном и т.д. В результате, вы можете узнать, какой формат вам нужен, но в итоге не получить нужного результата. Поэтому, всегда узнавайте заранее не только название конкретной «модели», но и ее параметры.
Также ориетируйтесь на то, в рамках какой лицензии распространяется тот или иной набор. Если это, например, свободная библиотека, то может ли она использоваться в рекламе и т.д. Соответственно, вы не сможете использовать какие-то бесплатные продукты в коммерческих целях, пока не выкупите права, или же сможете найти хорошие решения, который разрешено использовать везде, где вам угодно. Поэтому мы рекомендуем вам не совершать ошибку других — и всегда узнавать о правилах использования до того, как получите первую жалобу от правообладателя.

На этой странице вы сможете скачать шрифты для Виндовс 10. Понятно, что нам бы не получилось на 100% точно угадать, что именно вам придется по душе, поэтому мы собрали небольшой пак, в котором представлены не только самые популярные и самые красивые версии, но и некоторые экстравагантные. Тем, кто бесплатно загрузит набор и установит его на своем компьютере или ноутбуке, мы рекомендуем вернуться к нам и написать мнение, какой вариант понравился больше.
Встроенное средство восстановления шрифтов Windows
В первую очередь стоит попробовать восстановить стандартные шрифты Windows 10/8.1 с помощью встроенного функционала. Для этого:
- Откройте Панель управления и перейдите в раздел Оформление и персонализация –> Шрифты (Control Panel -> Appearance and Personalization -> Fonts);
- В левой панели выберите пункт Параметры шрифта (Font settings);

- В открывшемся окне нажмите кнопку Восстановить параметры шрифтов по умолчанию (Restore default font settings).


Данная опция позволяет удалить все сторонние шрифты, оставив только стандартные шрифты, поставляемые в дистрибутиве Windows 10/8.1. Однако, если файл нужного шрифта (*.fon или *.ttf) был удален или заменен, функция сброса не поможет. Чтобы вернуть нужный шрифт можно скопировать нужный файл из дистрибутива Windows (или с другого компьютера), или скачав и установив файл шрифта вручную (обратите внимание, что в Windows 10 есть функция блокировки установки сторонних шрифтов, которая может мешать установке новых шрифтов).
Совет. Установка большого количества шрифтов в Windows может привести к проблемам с производительностью системы и некоторых приложений (как правило, связанных с графикой и версткой).
Как поменять шрифт на компьютере Windows 10 и его размер
Существует несколько распространённых способов выполнения поставленной задачи. Также возможно поставить мелкий и крупный размер.

Через параметры дисплея
Данный метод предполагает смену масштабирования экрана и осуществляется по следующему алгоритму:
- Кликнуть по свободному пространству рабочего стола ПКМ.
- В появившемся меню тапнуть по строчке «Параметры экрана».
- Будет отображаться новое меню, в котором надо будет найти пункт «Масштаб и разметка» и нажать на него.
- Тапнуть по разделу «Дополнительные параметры масштабирования».
- В поле внизу окна будет написано число 100. Это процент, на который увеличен шрифт текста в операционной системе Windows 10 по умолчанию. Его можно стереть и указать собственное значение до 500 %.
- Вписать нужное число и кликнуть по кнопке «Применить».
- Перезагрузить компьютер.
Использование софта System Font Size Changer
Данное приложение позволяет изменять шрифт заголовков, меню, программ, установленных на виндовс 10, на собственное усмотрение пользователя.
Обратите внимание! Софт можно бесплатно скачать из Интернета.
Приложение имеет простой принцип действия:
- при запуске программы появится небольшое окно с простым интерфейсом;
- в верхней части представлено несколько значений, каждое из которых отвечает за изменение шрифта в определённом месте системы, например, в контекстном меню;
- пользователь должен будет поставить тумблер напротив нужного значения;
- посередине окна расположен ползунок, двигая который, можно наглядно посмотреть изменение шрифта. Пример будет показан справа;
- пользователю необходимо подвинуть ползун в положение, которое его устраивает, и нажать на «Apply».
Важно! Изменения вступят в силу после нажатия по кнопке «Apply», при этом перезагружать ПК не обязательно.

Применение Winaero Tweaker
Это очередной софт для изменения шрифта папок, иконок и прочих элементах на OC Windows. Программа обладает следующими особенностями:
- возможность полной смены дизайна системы;
- отсутствие русскоязычного интерфейса;
- возможность оптимизации OC Windows, что повышает производительность ПК;
- расширенный функционал. Встроено большое количество шаблонов со шрифтами;
- возможность бесплатного скачивания с официального сайта разработчика в Интернете. Лицензионный ключ вводить не требуется.
Проблемы с шрифтами
С начертаниями текстов в OC Windows 10 могут возникнуть определённые проблемы. Самые распространённые из них рассмотрены далее.
Размытые тесты в виндовс 10
Данная проблема возникает из-за изменений, внесённых пользователем в дизайн оформления OC Windows 10. Также размытые буквы в названиях папок и документов могут появиться вследствие вирусов или системных ошибок. Это решается следующим образом:
- Открыть пункт «Масштабирование» в панели управления компьютером и перейти в дополнительные параметры.
- Перевести ползунок напротив строки «Разрешить OC исправлять размытость в приложениях в активное положение».
- Перезагрузить ПК.
Как исправить масштабирование в системе, приложениях
Процедура отключения масштабирования системы осуществляется по алгоритму:
- Скачать программу «Windows 10 DPI Fix» с официального сайта разработчика.
- Запустить софт и поставить галочку напротив верхней строчки.
- Кликнуть по «Apply» и перезапустить компьютер.
После выполнения вышеуказанных действий размытость шрифтов в OC виндовс 10 должна исчезнуть.
Обратите внимание! Также можно подкорректировать настройки масштабирования у отдельной программы, установленной на операционной системе.
Как изменить масштабирование приложения
Для выполнения поставленной задачи можно воспользоваться следующим алгоритмом:
- Кликнуть ПКМ по значку софта и войти в его свойства.
- Переключиться на графу «Совместимость».
- Установить галочку рядом со строкой «Выключить оптимизацию на полный экран».
- Нажать по строке «Изменение параметров DPI».
- В следующем меню активировать функцию переопределения масштабирования, поставив галочку рядом со строкой.
- Нажать на «Ок», чтобы применить изменения.

Таким образом, на OC Windows 10 существует несколько способов изменения начертаний букв в названии приложений, папок и файлов. Вышеизложенная информация позволит понять, как настроить шрифт на компьютере Windows 10.
Устраняем проблему со сглаживанием
Текст не сглажен в одном или нескольких приложениях
Если проблема со сглаживанием текста замечена только в одном или нескольких приложениях, в то время как на рабочем столе, в проводнике и большинстве других программ все в порядке, значит она касается только указанного приложения. Решением конфликта будет выполнение таких процедур.
- Идем в «Свойства» ярлыка или исполняемого файла приложения, в котором замечена неполадка.
- Переходим во вкладку «Совместимость».
- Убираем показанный на скриншоте флажок.
- После клика по «Применить» настройка вступит в силу.