
Sometimes you may encounter frustrating and irritating computer issues just when you need to use the PC most. One of these issues is a problem with the mouse or the touchpad (for laptop users). Without the mouse, navigating the system can be a hard task and at times impossible. However, for Windows users, most mouse problems are easy to fix. If your mouse is not working correctly, here are some tips on how to fix mouse and touchpad problems in Windows.
Fixing Mouse Issues in Windows 10
Try
the below solutions to fix your mouse or touchpad problems:
- Basic troubleshooting
- Check Hardware and Devices
- Update incompatible driver
- Rollback driver
- Disable enhanced pointer precision
- Adjust mouse sensitivity
- Configure touchpad delay
- Enable or disable touchpad
- Reset touchpad
1. Basic Troubleshooting / Quick Solutions
Some
issues may seem very basic yet they are easy to ignore. If you encounter a
mouse problem, you should first try these options:
- If it is a first-time issue,
restarting your PC can resolve the issue instantly. - Confirm that the mouse or the
wireless adaptor is firmly connected to the PC. - You may also try to unplug the
mouse cable or the wireless adaptor and reconnect using a different port. - Check the mouse and the ports for
damages and even try the mouse on a different computer.
If
none of these solves the problem, you can now proceed to other solutions.
2. Troubleshoot Hardware and Devices
The
mouse problem could be resulting from a hardware/ device error. Fortunately,
Windows 10 allows you to troubleshoot and fix hardware issues without much
hassle.
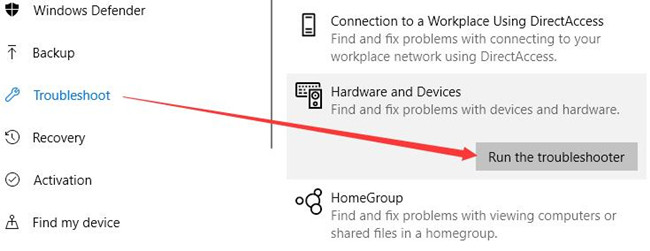
- Press the “Win + I” shortcut keys on your keyboard to open the settings app and select “Update & Security” settings.
- Select “Troubleshoot” from the left panel and under the “find and fix…” section, choose the “Hardware and Devices” option.

- Click the “Run the troubleshooter” button and wait for Windows to check for any hardware and device errors.

- If an error is found, click the “Apply this fix” option to resolve the issue. Once done, close your open apps and restart your computer.

Related: 10 tips to use mouse productively in Windows.
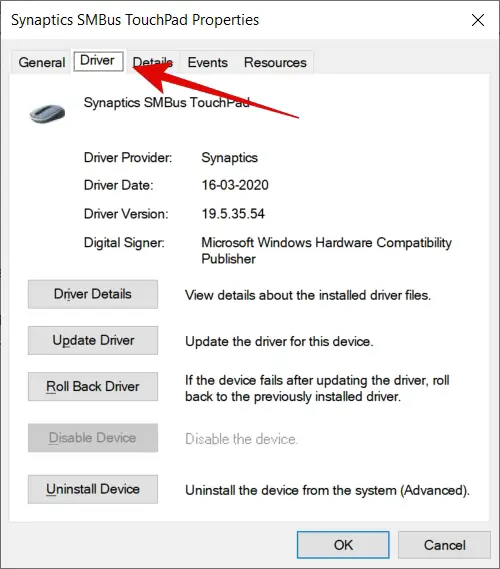
3. Updating Incompatible Mouse Drivers
Another
thing that could lead to mouse issues is an out-dated or incompatible driver.
To fix mouse drivers related issues:
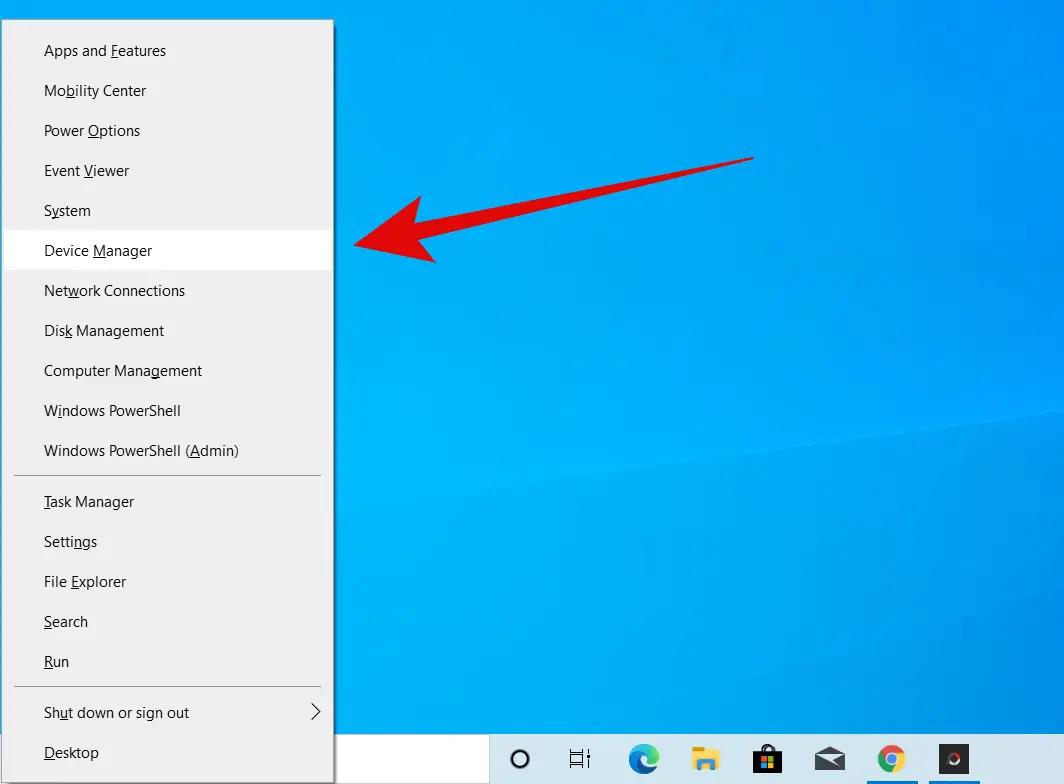
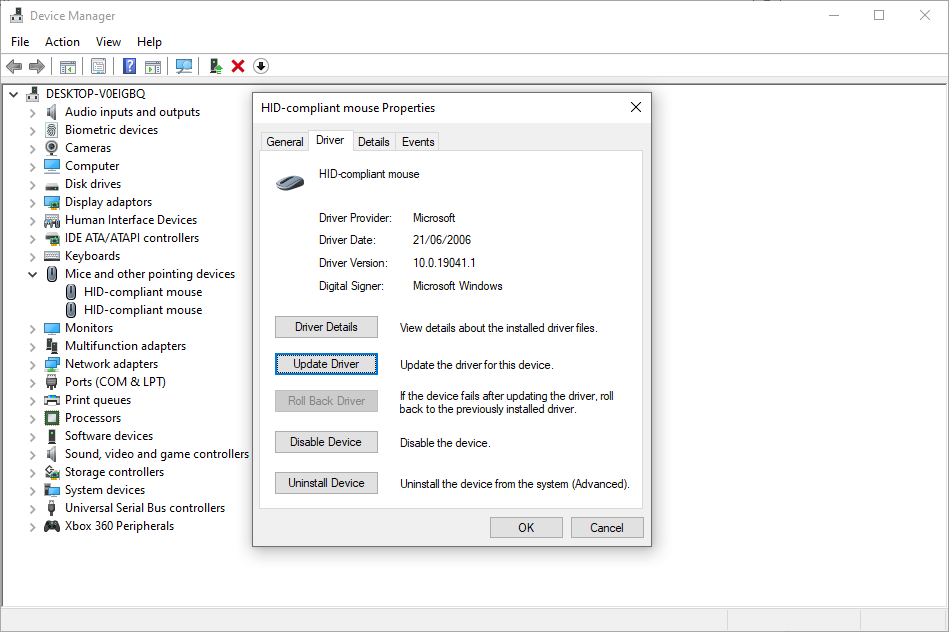
- Right-click the Windows start button and select “Device Manager” on the menu.
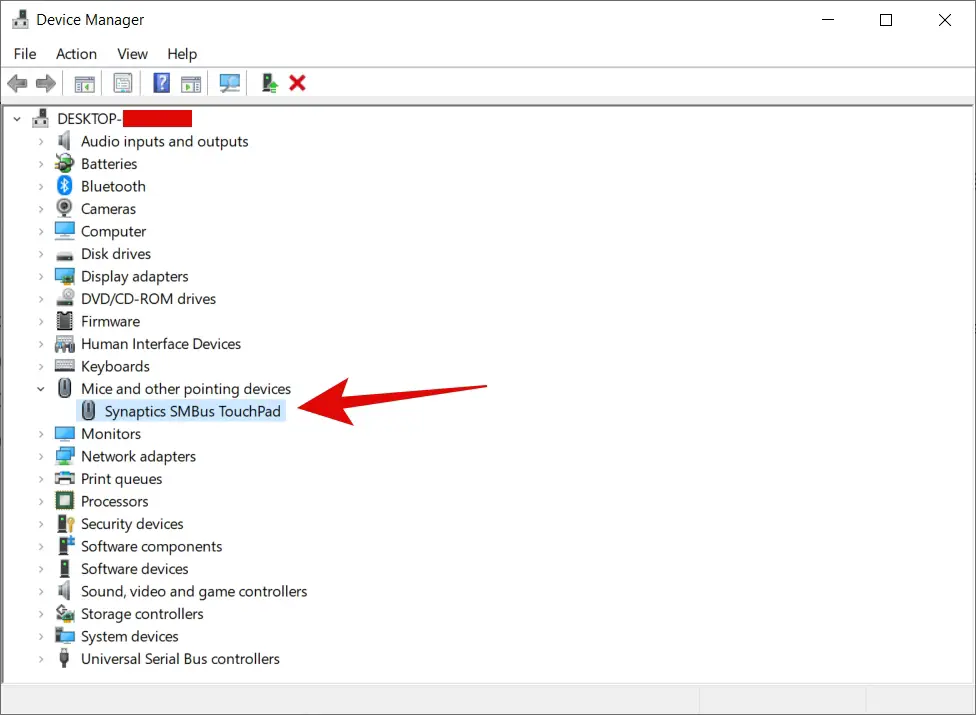
- Look for the “Mice and pointing devices”, double-click the device to open its properties.
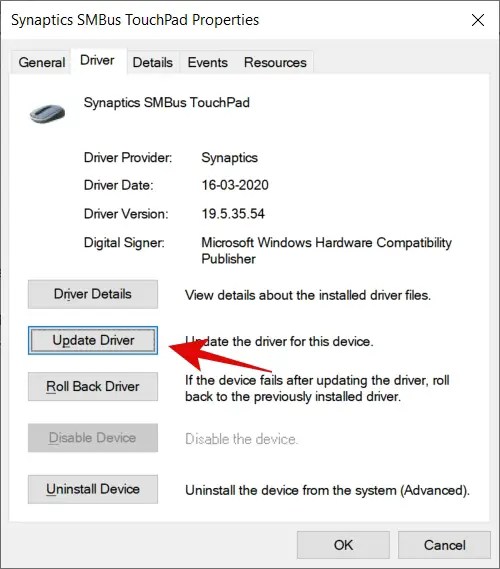
- On the “Properties” window, switch to the “Driver” tab and click the “Update Driver” button.

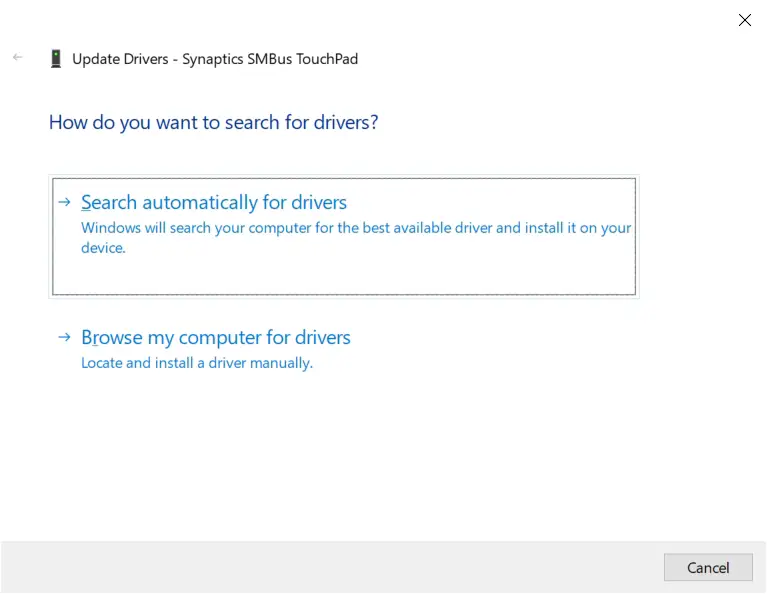
- This will open another pop-up window allowing you to browse for the drivers update on your computer, or allow Windows to automatically search and update the drivers.
4.
Roll Back or Reinstall Mouse Drivers
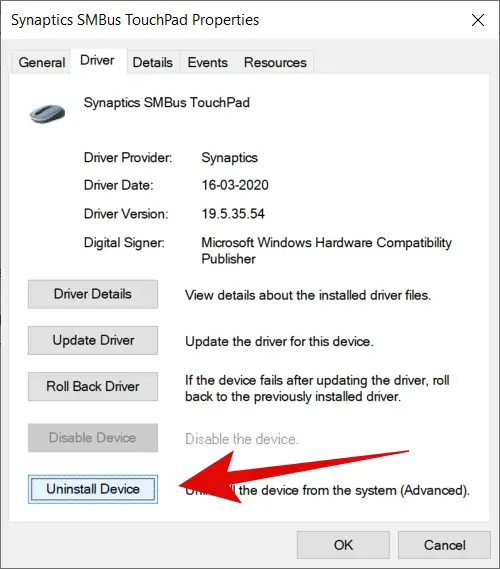
- If the problem started after updating Windows or the device drivers, you can try to restore the drivers to the previous version.
- On the “Driver” tab of the properties window, click the “Roll Back Driver” to restore the driver to a previously working condition.
- Another way to fix the driver-related problem is to uninstall and reinstall the mouse drivers.
- Click the “Uninstall Device” button to remove the driver and restart your PC. The drivers will automatically reinstall.
- You can also download the updated driver from the manufacturer’s website and reinstall manually.
5. Deactivate Enhanced Pointer Precision
Some
Mouse settings can cause freezing, disappearing and jumping cursor problems. Such
problems include:
- Cursor jumping around.
- Cursor freezing when the keyboard is on use.
- Pointer freezes and then disappears.
- Cursor not moving.
If
you are experiencing any of these issues, you may try the following fix:
- Press the “Win + I” keys to open the settings app and select the “Devices” settings.
- On the resulting window, click on “Mouse” from the left side panel and then under the “Related settings” section, click the link, “Additional mouse settings”.

- This will open the mouse properties in a new pop-up. Go to the “Pointer Options” tab and uncheck the “Enhance pointer precision” option, located under the “Motion” section.

- Click the “Ok” button at the bottom of the window, reboot your computer and check whether the problem still exists.
Related: How to fix printer problems in Windows 10?
6. Adjusting the Mouse Sensitivity
If
the problem persists, you can also try to adjust the sensitivity of the mouse.
To do so,
- On the mouse properties window,
switch to the “Pointer Options” tab and set the pointer speed to
moderate by sliding along the bar. - Click “Apply” and then “Ok” to see
whether the problem will disappear.
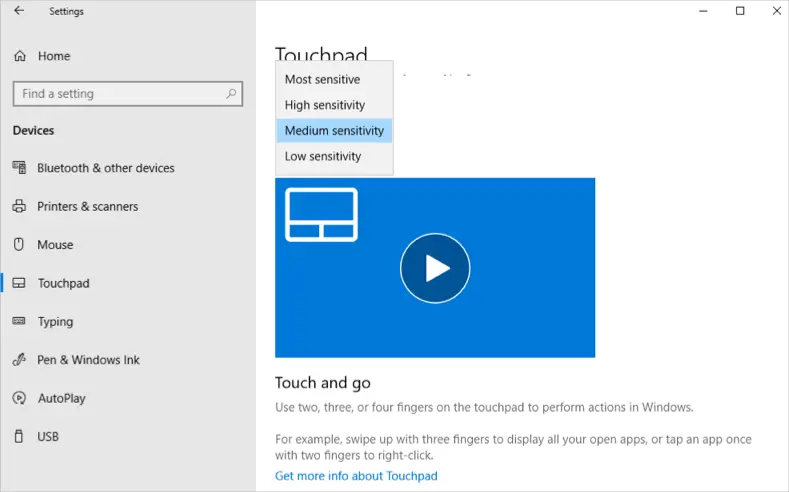
7. Configure Touchpad Delay
If
you are using a laptop, changing some touchpad settings could resolve the mouse
issue as both the mouse and touchpad control the pointer. You may try the
following touchpad configurations:
- Go back to the device settings and select “Touchpad” on the left panel.
- On the right side under the “Taps” section, expand the touchpad sensitivity options and select medium or low sensitivity.
Related: How to find mouse pointer quickly in Windows?
8. Enable Touchpad in Settings
One user left the comment the he accidentally pressed F6 in Dell laptop that is the hotkey to disable touchpad. To rule out this kind of accidental touchpad related problems, first make sure your touchpad is enabled in the settings page.

In addition, you can also try to disable the touchpad when an external pointing device is connected by unchecking the box against “Leave touchpad on when a mouse is connected”. This will disable touchpad whenever you connect a mouse to the laptop or PC.
You can also disable touchpad by following the below instructions from mouse properties.
- On the touchpad settings screen, open the “Additional settings” link to access more touchpad settings.
- This will take you to the “Touchpad” tab on the mouse properties window.
- Select, the “Disable” button to deactivate the touchpad. You may also check the box to disable internal pointing device when your PC is connected to an external mouse.

9. Reset Touchpad
If you are not able to solve the problem with your toucpad, there is an option to reset the settings and gestures. Scroll down on the touchpad settings page and click on the “Reset” button. This will delete your custom settings and set the touchpad to its original settings.

Wrapping Up
Mouse
problems make it hard to navigate your computer system, reducing your overall
productivity. However, you can try the above alternatives to restore your mouse
to its proper working condition. The best thing is to try each solution at a
time and test if the problem disappears to identify the possible cause and the
ideal fix to the problem.
Sometimes the mouse stops working on your computer, and the cursor does not move, or the mouse not working properly on Windows 11 or 10. This may happen with an external mouse with your tower PC or your laptop’s touchpad.
If you face problems with the mouse, you are not alone. This guide will help you to fix any mouse-related issues on your computer.
Before You Do
Now before you try the methods provided below, there are a few things you need to ensure. First of all, if you are using a laptop with a trackpad and can’t use it, there might also be some hardware issues.
You must use an external mouse on your laptop to rule that out. If the mouse works perfectly fine, there might be some hardware or driver issue with the trackpad.
On the contrary, if your mouse isn’t working with your PC or laptop, you can borrow a mouse from your friend and check it out. If the other mouse works fine, then there is some hardware issue with your mouse.
Finally, there might be some issue with the USB port itself. Ruling out the USB port issue is simple. Either you can try a different port on your PC or try connecting some other peripheral to the same port.
If the other device works fine, the issue is with the mouse itself, not the port. However, if the other device also doesn’t work on the port, there is some issue with the port.
The bottom line is you have to rule out any hardware issues with your mouse or the computer. Only then you can apply the fixes below.
Why Is My Mouse Not Working?
There are two main reasons for the mouse not working on Windows 10 or 11.
The first one is the hardware issues, of course. It can be problems with the trackpad, mouse, or the computer itself.
In the second scenario, the issue is with the drivers. Sometimes the drivers become corrupt, or they become outdated. In that case, you won’t be able to use the mouse properly. You need to update or install new mouse drivers on your PC to fix it.
For this guide, we will use the keyboard for the entire operation for apparent reasons. So follow the steps carefully.
Updating the Mouse Drivers
1: Press the Windows key on your keyboard to open the Start menu.
2: Type “Device Manager” and hit enter.
Alternatively, you can press the “Windows+X” keys and then use the down arrow(↓) key to select Device Manager. Once you do that, hit enter to open it.
3: Press the “Tab” key to select your computer. Press the down arrow(↓) key until you select Mice and other pointing devices.
4: Press the right arrow key(→) to expand the menu. Then press the down arrow(↓) key to select your mouse driver. Finally, press Enter to open its properties.
5: Press the Tab key until the General tab is highlighted.
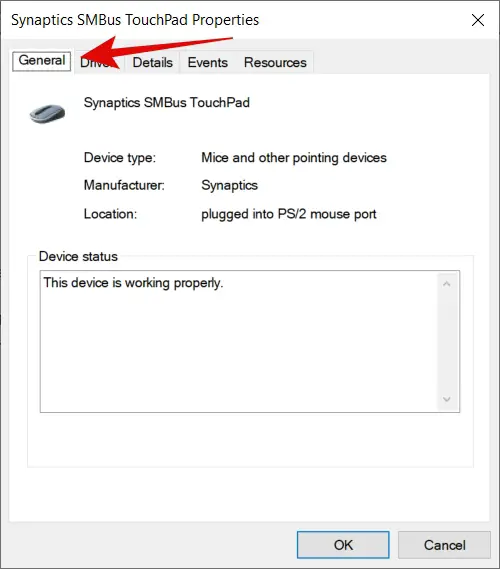
6: Now press the right arrow key(→) to open the Driver tab.
7: Press the Tab key to highlight Update driver and then hit enter.
8: Make sure you select the “Search automatically for drivers” option and hit Enter.
That’s it! Your Windows will now search for the latest drivers on the internet and install them for you. Make sure that you are connected to the internet. This should fix the issue for you. If not, you can follow the next method.
Reinstalling the Mouse Drivers
For this, you have to uninstall the mouse drivers on your PC first. Here is how to do it:
1: Press the Windows key on your keyboard to open the Start menu.
2: Type “Device Manager” and hit enter.
3: Press the “Tab” key to select your computer. Press the down arrow(↓) key until you select Mice and other pointing devices.
4: Press the right arrow key(→) to expand the menu. Then press the down arrow(↓) key to select your mouse driver. Finally, press Enter to open its properties.
5: Press the Tab key until the General tab is highlighted.
6: Now press the right arrow key(→) to open the Driver tab.
7: Press the Tab key to highlight Uninstall device and then hit enter. Highlight Uninstall and hit enter.
8: Press the Alt key on your screen to highlight the top menu of the Device Manager.
9: Press the right arrow key(→) to highlight the Action tab. Then hit enter.
10: Select “Scan for hardware changes” using the up and down arrow keys and hit enter.
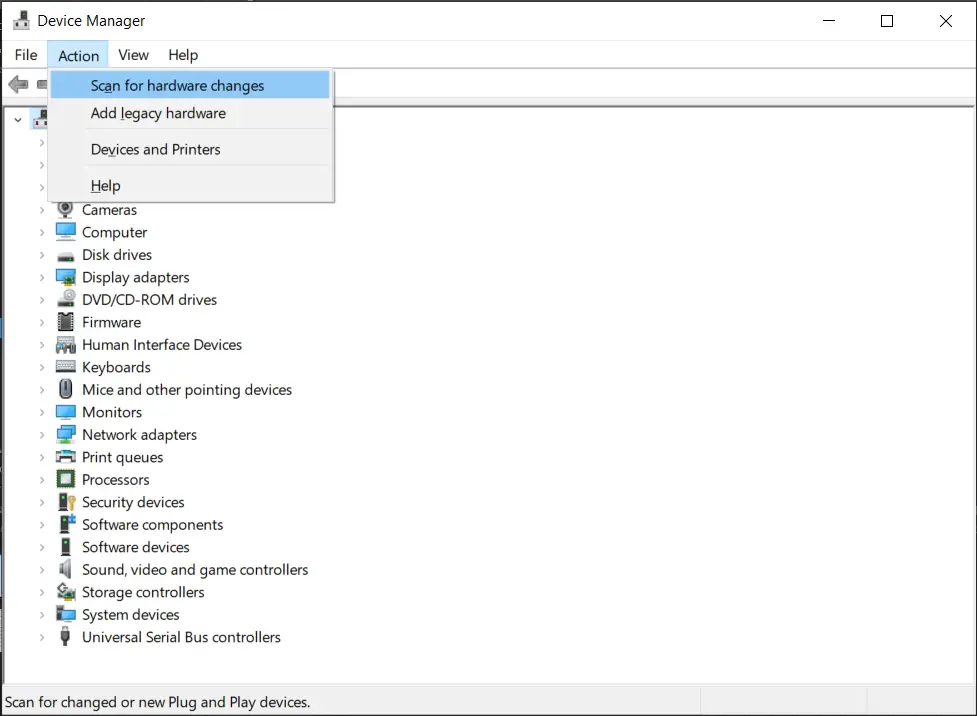
Note: You might not see the options in the Action tab immediately. So just wait a few minutes, and you will see the options.
That’s it! This will install the drivers for your mouse, and you will not face the mouse not working on Windows 10 error anymore.
Alternate Method To Reinstall Mouse Driver
1: Press the Windows key on your keyboard to open the Start menu.
2: Type “Device Manager” and hit enter.
3: Press the “Tab” key to select your computer. Press the down arrow(↓) key until you select Mice and other pointing devices.
4: Press the right arrow key(→) to expand the menu. Then press the down arrow(↓) key to select your mouse driver. Finally, press Enter to open its properties.
5: Press the Tab key until the General tab is highlighted.
6: Now press the right arrow key(→) to open the Driver tab.
7: Press the Tab key to highlight Uninstall device and then enter. Highlight Uninstall and hit enter.
8: Close the Device Manager window by pressing the “Alt+F4” keys.
9: Press the “Windows+X” keys and navigate to the Shutdown or sign out option using the up and down arrow keys.
10: Press the right arrow key(→) and select Restart. Finally, hit enter.
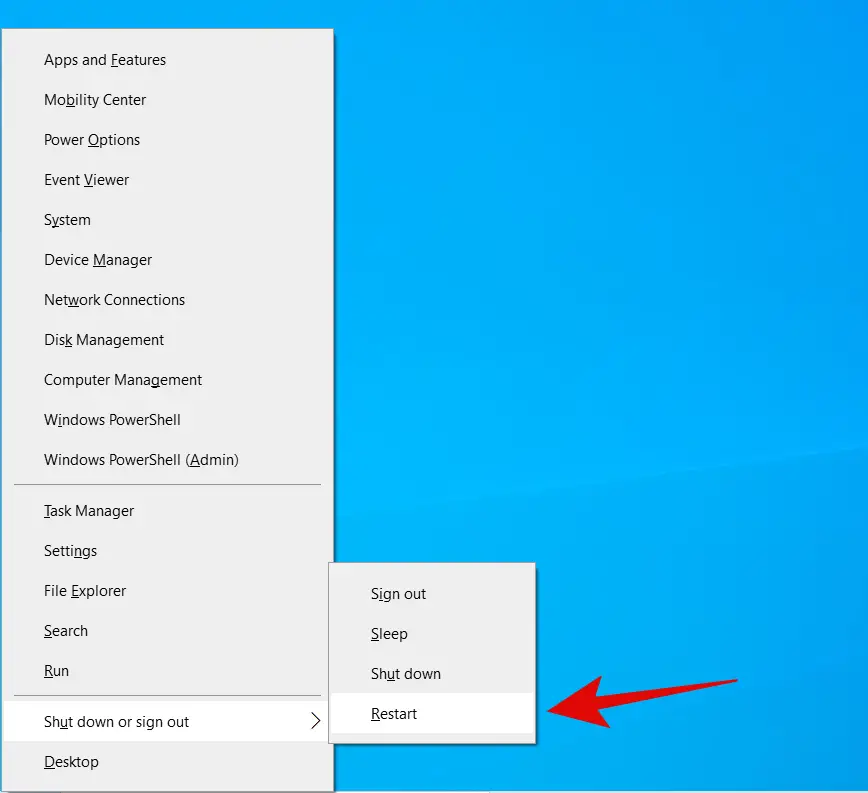
That’s it; doing so will restart your computer, and the drivers will be installed automatically.
Reinstall Touchpad Driver
If your laptop’s touchpad is not working, you can try installing the official touchpad driver from the manufacturer’s website. Most Windows laptop includes the Synaptic Touchpad driver, find and download the driver and install it by following the on-screen instructions.
Verdict
The mouse may stop working on Windows 10 due to failed updates, outdated drivers, or different types of malware; you can easily fix the issue by reinstalling the driver.
The above methods will help you to fix the mouse not working on the computer. The important thing to note is that you have to fix the drivers. I hope this guide helps you fix mouse-related issues on your PC. In case of any difficulty, feel free to reach out to us.
Also, Read
- 10 Desk Gadgets That You Need Right Now
- How to Fix Slow Windows 10 & Improve Performance – 200% Faster PC
- What is DISM Command & How To Use It To Repair Windows 10 Image
Whatever type of mouse you are using, Logitech, ASUS, Dell or HID-Compliant, and no matter it is wireless or USB or Bluetooth mouse, the common phenomenon is mouse often stumbles upon mouse freezing or lagging issue on Windows 10.
As you can always see, users are constantly complaining that the mouse is not working properly on Windows 10, which include not only mouse itself, like mouse not responding or mouse undetected, but also mouse pointer and mouse cursor, for example, mouse pointer or cursor is not moving or moving irregularly on Windows 10.
But for Windows users, the mouse is indispensable if you would like to run your PC on Windows 10 smoothly. Can you imagine what will happen if your mouse cursor disappears suddenly from Windows 10?
To better fulfill your hope, this post would concentrate more on the USB or wireless mouse (Logitech, Razer, ASUS or Dell) itself not working on Windows 10, such as Logitech wireless mouse not working. These methods sometimes can also be applied to fix keyboard or touchpad issues on Windows 10.
solutions:
1: Check Mouse Hardware and Connections
2: Reset Mouse Power
3: Troubleshoot Bluetooth Mouse Issue
4: Update the Mouse Driver
5: Reinstall the Mouse Driver
6:Turn off Fast Startup
7: Run Hardware and Devices Troubleshooter
Solution 1: Check Mouse Hardware and Connections
Whether you are using wireless or wired or Bluetooth mouse on Windows 10, upon your mouse stops working on Windows 10, you need to firstly check if your mouse is physically broken or disconnected from the PC.
Check Wireless, Wired, and Bluetooth Mouse Hardware and Connection Respectively:
If you are using a wireless mouse, you are supposed to make sure mouse power supply, mouse batteries, mouse port and mouse receiver are working in good condition.
It would be a thing of course that insufficient mouse power supply would cause your mouse to lag or freeze or even not work on Windows 10. Under this circumstance, checking your wireless mouse batteries is the first thing you have to do.
1. Check if you have used the correct type of batteries for your mouse. Refer to the mouse instructions which would guide you to install which kind of batteries.
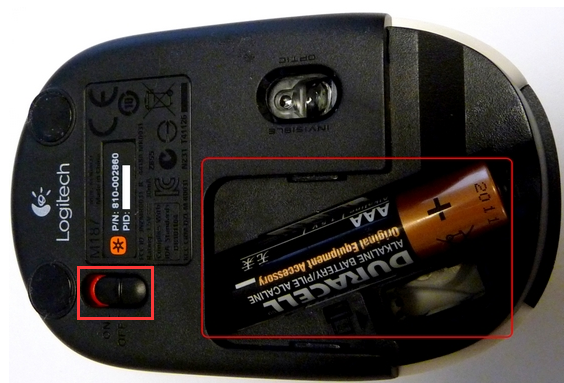
2. Replace all the batteries with the new ones to check if it is the problem with batteries.
3. Connect and disconnect your wireless mouse receiver to another mouse port or the USB port on another PC to see if the mouse can run well.
If you are wired mouse users, make sure you have plugged the wired mouse into PC correctly without any loose. Similarly, plug the wired mouse cable to another USB port or the port on another PC to check if it is the USB port not working.
If you are Bluetooth mouse users, check if the Bluetooth mouse can work on another PC so as to check the mouse condition. Furthermore, you need to ensure the Bluetooth on Windows 10 is turned on and connect to the Bluetooth mouse. Just make sure there is no Bluetooth connection error.
Once you have done all these investigations, if your mouse turns back to work, it is sure that the mouse out of work issue lies in mouse batteries. If not, you need to read on for more ways.
Solution 2: Reset Mouse Power
For wireless mouse users, if you have used the mouse for a long time without the batteries off, your mouse will become not so responsive due to the lost flash memory.
Therefore, you need to reset your mouse power on Windows 10, which is extremely foolproof. What you need to do is turn off or remove the mouse power for a while and then turn on it.
Maybe after a moment, your wireless Logitech, Dell, ASUS or any other mouse can back to work from undetected.
Tips:
If you are using a wireless mouse, you should attach importance to the place your mouse possesses beside the PC.
To unfreeze or make your wireless mouse not working disappear, you are to place your wireless closer to the wireless transceiver and make sure there is no impediment between your wireless mouse and transceiver.
Solution 3: Troubleshoot Bluetooth Mouse Issue
People who use Mouse with Bluetooth device can also meet with the problem that the Bluetooth mouse not working or undetected on Windows 10.
Just as wireless and USB mouse, you are supposed to check if the Bluetooth settings are positioned properly, for example, you have to make sure the Bluetooth has been turned on and connected to your mouse.
Solution 4: Uninstall the Mouse Driver
As you have failed to fix this no mouse or mouse out of work issues such as Dell wireless mouse not working on Windows 10 by way of hardware examining, you now are supposed to solve this USB or wireless unresponsive problem from software aspect.
Most of you have found this not working issue right after upgrading to Windows 10 from Windows 7, 8. Accordingly, it is easier for you to think about the mouse driver is outdated or even corrupted on Windows 10, thus causing your mouse to stop working. You might as well uninstall your mouse driver and then reinstall the latest and most compatible one for Windows 10.
1. Go to Device Manager.
2. Expand Mice and other pointing devices and then right-click the mouse adapter to Uninstall it.
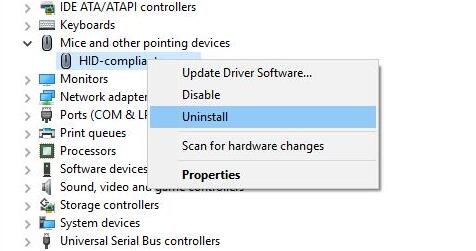
3. Confirm to Uninstall the mouse driver.
Then your mouse drivers will have been removed from your computer, this time, your mouse is completely out of work. To turn it back to work and make it detected by Windows 10, you must reinstall a new mouse driver.
Of course, here you are able to scan for hardware changes or reboot Windows 10 to let Device Manager reinstall one for you, but this mouse driver may still the one whose version is the same as the older one. So you need to update the mouse driver in hope that Logitech wire mouse, wired mouse, and Bluetooth mouse not responding will be fixed successfully.
Solution 5: Update the Mouse Driver
Many ways are offered to you to install the updated mouse drivers for Windows 10, either manual way to automatic way. But whey your mouse stops working, or mouse cursor do not move on Windows 10, you would find it rather troublesome to install the up-to-date Logitech or Dell or ASUS drivers of the official site for Windows 10. Consequently, it is advised that you make use of Driver Booster to reinstall the mouse driver.
1. Download, install and run Driver Booster on your PC.
2. Click Scan to allow Driver Booster to search your PC for outdated or corrupted or damaged drivers, including your mouse driver.

Here you will be informed all the drivers that can be updated for Windows 10.
3. Locate Mice and other pointing devices and then hit Update to download and install the latest mouse driver.
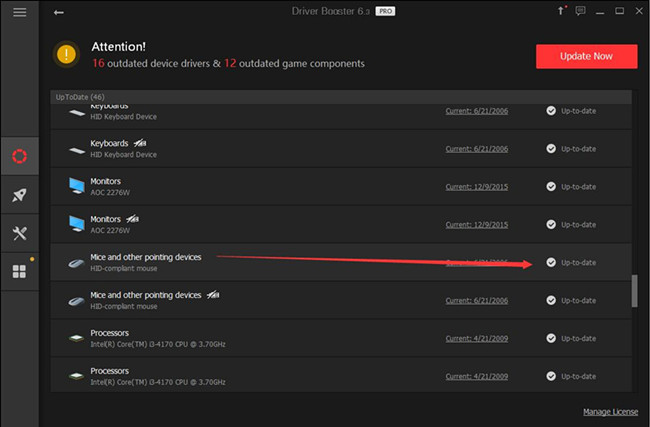
On this point, the most up-to-date Logitech, Dell, ASUS mouse driver has been reinstalled on Windows 10, when you use the mouse again, you can find the mousse out of work or the mouse pointer not moving issue has been fixed.
Solution 6: Turn off Fast Startup
For some clients whose mouse freezes or lags or even unresponsive on Windows 10, you would better try your best to decrease all the activities that make your mouse not working correctly on Windows 10.
A fast startup can be one of the options. Once you turn it on, though it can bring some convenience, your PC will perform slowly which may result from mouse out of work issues.
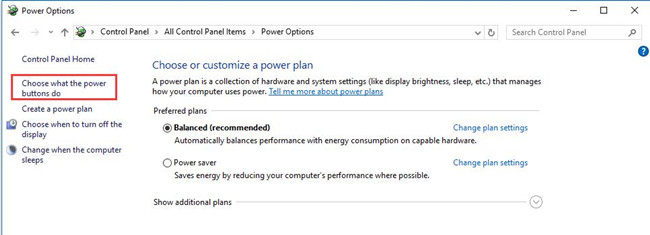
1. Choose Settings from Start.
2. Select System from all the options.
3. Under Power & Sleep settings, choose Additional power settings to arrive at the choice Choose what the power buttons do.
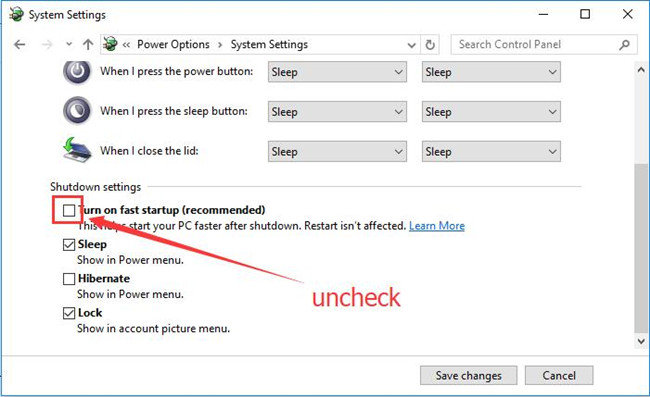
4. Click Change settings that currently unavailable.
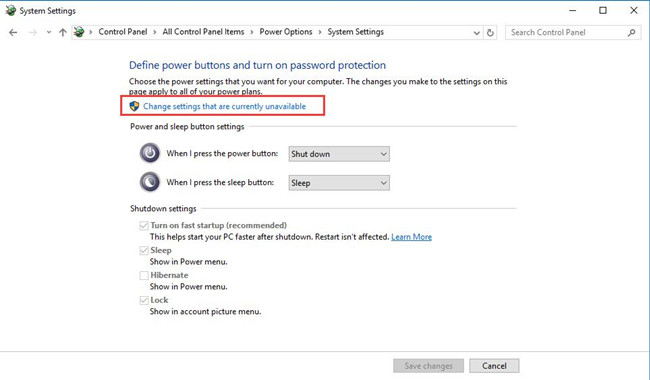
5. Untick the box of Turn on fast startup. And then click Save changes to take effect.
With your closing fast startup, may your computer can work well with your mouse. Or at least you can tackle the freezing or lagging mouse problems for Windows 10, such as Dell wireless mouse not working.
Solution 7: Run Hardware and Devices Troubleshooter
With the upgraded operating system, the built-in troubleshooting tool for Windows 10 has also improved a lot. If you are not so sure what to do if there are mouse problems, such as mouse do not work all of a sudden, or mouse pointer move in an irregular way, troubleshooter for Windows 10 are always a way for you.
Go to the path: Start > Update & Security > Troubleshoot > Hardware and Devices > Run the troubleshooter.
It is possible that Windows 10 troubleshooter can find and solve the hardware and devices errors, such as your mouse freezing or lagging troubles on Windows 10.
Mouse not working or respond issue will disappear as long as you can try some of them for your PC. While after you have correctly fixed this wireless or USB mouse not working for Windows 10, there is much need for you to adjust some mouse settings, for instance, change mouse scroll wheel.
More Articles:
Fix Mouse Settings Keep Resetting Windows 10/11
How to Turn off Mouse Acceleration Windows 10/11
Microsoft Mouse and Keyboard Center No Support Device Detected
The most irritating and frustrating computing issues always hit at the worst times. Just about to start your tax return? Keyboard issues. Ready to Skype your distant relatives? Microphone issues. One issue tops them all: a faulty mouse. Without your mouse, navigating your system is a tricky affair.
Luckily, most mouse problems have a resolution unless you have a terminal hardware problem. Here are six ways you can fix your mouse issues in Windows 10.
Windows 10 Mouse Fixes to Try First
We say this in every single troubleshooting article: check your connections. It is an incredibly simple thing to overlook. Sometimes, a loose cable is the only thing creating an issue.
- Check your mouse or wireless adapter hasn’t become unseated in its port
- Try fully unplugging the mouse cable or wireless adapter and reconnecting in a different port
- If it is a new issue, sometimes restarting your system will provide an immediate fix
If none of these quick tips fix your Windows 10 mouse problem, read on!
1. Incompatible Mouse Drivers
Your system drivers are one of the first ports of call for a Windows 10 mouse issue. Windows 10 takes care of your driver updates for most of your hardware, and your Windows 10 mouse drivers are no different. However, it doesn’t always get it right, and at times, it doesn’t always find a driver update after release. That doesn’t mean you cannot manually install a driver update.
- Type device manager in your Start Menu search bar and select the Best Match.
- Browse down to Mice and other pointing devices, select, then right-click your mouse input and select Properties.
- Select the Driver tab, then Update Driver.
If You Have the Correct Driver
If you have downloaded the correct driver, you should Browse my computer for driver software. On the next page, use the Browse option to locate the driver, then press Next. The Windows 10 mouse driver will install. Reboot your system when it completes.
If You Do Not Have the Correct Driver
If you haven’t downloaded a driver directly from the manufacturer, select Search automatically for updated driver software. Windows will now automatically scan your computer and the internet for any driver updates and install accordingly. Windows will inform you if there are no updates available.
There Is No Driver Update Available
In the event there is no driver update available, you can try reinstalling the mouse driver manually. Note the name of your mouse or touchpad in the Device Manager, then head to the manufacturer’s website. The manufacturer should provide a download of the latest version of your mouse driver.
If you cannot find the relevant download on the manufacturer’s site, complete an internet search for «[PC model] windows 10 mouse driver» or «[laptop model] windows 10 touchpad driver.» It should turn up the correct driver for your hardware.
Once you download the new mouse driver, head back to the Device Manager. Then, back to Mouse Properties and the Device tab. Select Uninstall and follow the instructions. Now, install the mouse driver you downloaded manually, and restart your system (see If You Have the Correct Driver, above).
2. Mouse Freezing and Disappearing Cursor
A common Windows 10 mouse issue relates to the Realtek HD Audio Manager. Unfortunately, the Realtek HD Audio Manager is also a culprit for audio driver issues.
- Right-click the Taskbar, select Task Manager, and head to the Start-up tab.
- If you see Realtek HD Audio Manager, right-click and select Disable.
- Now, reboot your system.
Disabling the Realtek HD Audio Manager is known to fix both mouse freezing and disappearing cursor issues.
3. Mouse Lagging and Beeping Sound
Your third mouse issue fix is another driver-related issue. Your mouse lags and emits a strange beeping sound. Microsoft first addressed these issues in April 2016, with Cumulative Updates KB3147458 and KB3147461.
However, you’ll benefit from attempting the following fix if you’re still experiencing some Windows 10 mouse lag.
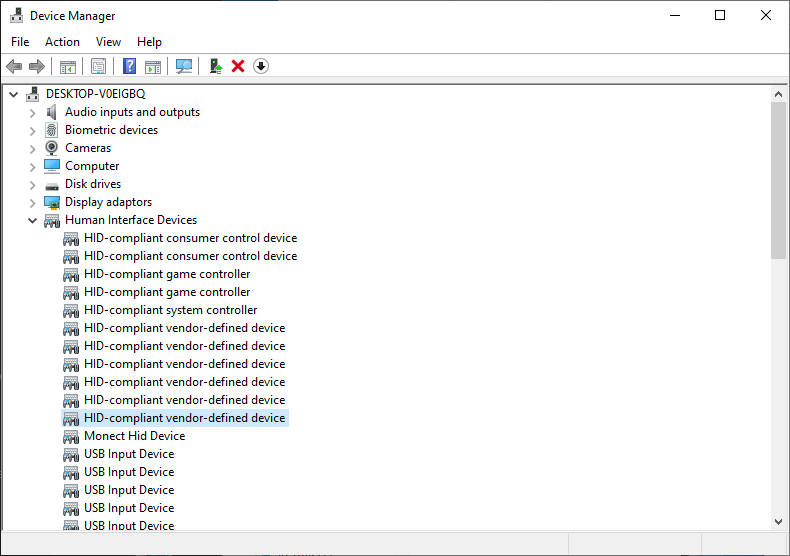
- Head to the Device Manager and locate Human Interface Devices. If you see XINPUT Compatible HID or HID-compliant vendor- listed, this fix may well work for you.
- Right-click and select Update Driver Software.
- Select Browse my computer for driver software, followed by Let me pick from a list of device drivers on my computer.
On the next screen, select Have Disk. This allows you to browse the system for a driver of your choice. Locate the extracted files using the Browse button. Next, select xinputhid or HID-compliant device, then Open > OK.
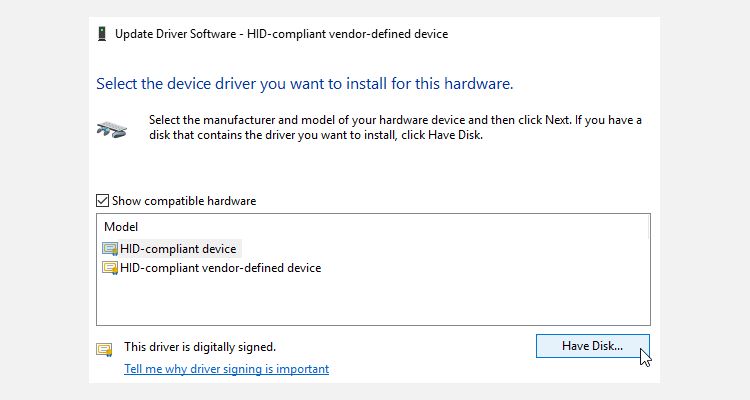
You should now return to the driver selection screen, where the «new» driver will be available for selection. Press Next, then reboot your system.
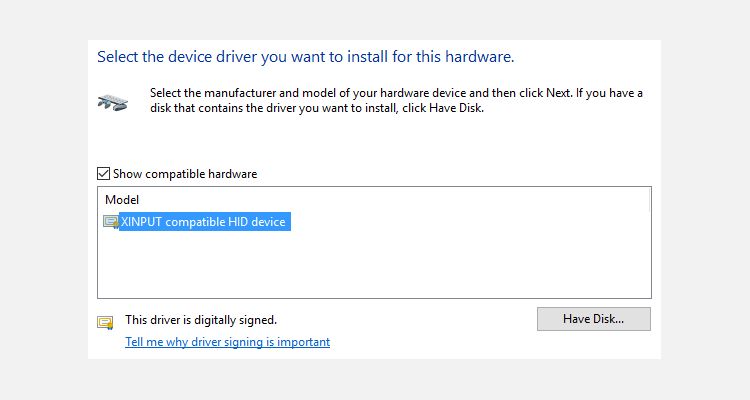
Please note that the Human Input Device (HID) listing may vary from system to system. This fix has been shown to work on a variety of systems, using different hardware setups.
4. Windows 10 Touchpad Freezing
Some Windows 10 users report touchpad freezing issues while using a laptop. The touchpad freezing or jumping issues usually stem from out-of-date touchpad drivers, depending on the device manufacturer.
The process of updating your Windows 10 touchpad settings is similar to a regular mouse.

- Type device manager in your Start Menu search bar and select the Best Match.
- Browse to Mice and other pointing devices and unfurl using the arrow.
- Right-click your touchpad driver and select Update Driver > Search automatically for drivers.
Manufacturer Touchpad Settings
Depending on the device manufacturer or touchpad manufacturer, you may have a second set of touchpad settings lurking somewhere on your system. When your Windows 10 touchpad starts acting strangely, it could be that a setting has gone awry.
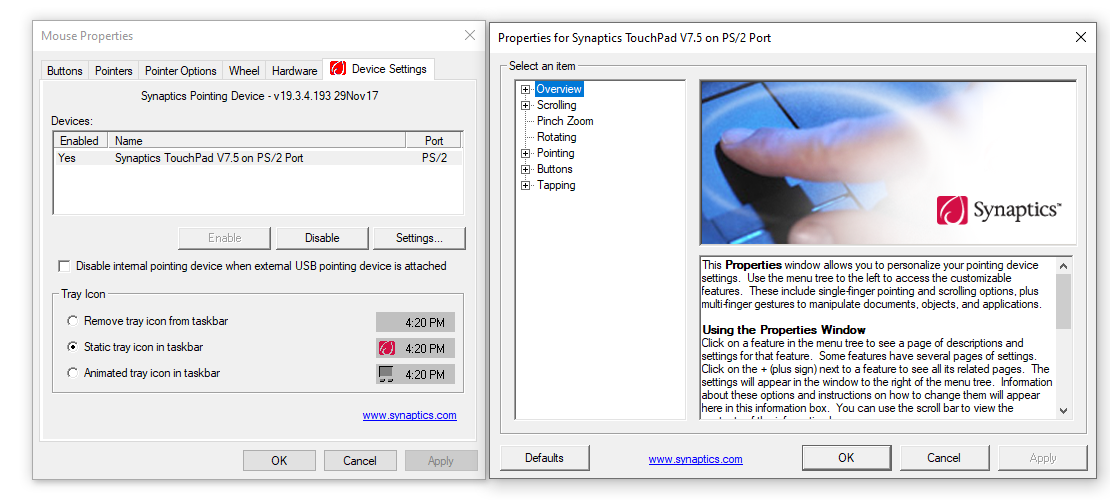
In the touchpad screenshot above, you’ll note the name Synaptics PS/2 Port Touchpad. The manufacturer’s name is Synaptics, so that’s the manufacturer settings or control panel I’ll search for. You can find your touchpad manufacturer name using the Device Manager. Alternatively, some manufacturers insert an extra tab into the Windows 10 Mouse Properties.
- Input mouse in the Start menu search bar and select the Best Match.
- Select Additional mouse options.
- Check for an extra tab with the manufacturer or touchpad name or similar.
- Adjust any settings that seem broken, or alternatively, restore the touchpad settings to the default configuration.
The above process may vary between manufacturers but gives you a rough outline of what to expect.
5. Mouse Acceleration
A mouse acceleration issue is incredibly frustrating, especially for the gamers among us. You’re lining up a headshot, and BAM! Your mouse drifts to the opposite side of the screen, and you’re staring at a respawn screen.
Windows 10 users report mouse acceleration issues in several scenarios. Unfortunately, there’s no single fix for the mouse acceleration issues, but you can try some of the fixes below to see which one works for you.
Turn Mouse Acceleration Off and On
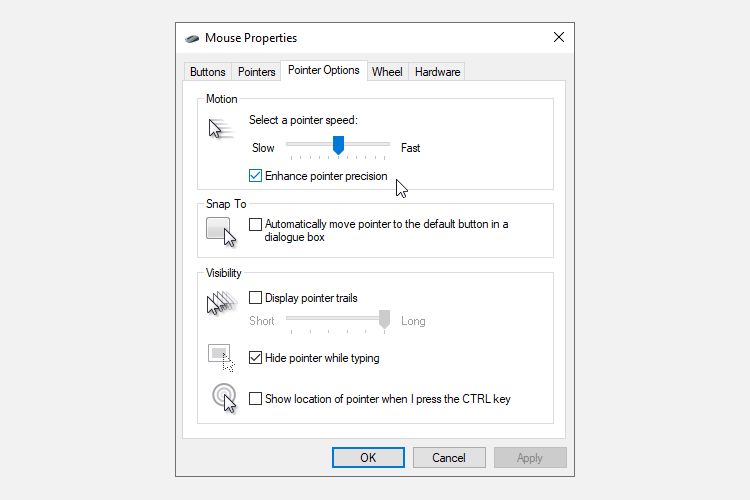
First, try turning mouse acceleration on and off in your system settings.
- Head to Control Panel > Hardware & Sound > Mouse.
- Select the Pointer Options tab.
- Uncheck the Enhance pointer precision box to turn acceleration off.
- Select Apply and OK. Check how your mouse now responds.
MarkC Mouse Fix
If the good old «Have you tried turning it off and on» doesn’t work, you can try to use the MarkC Mouse Fix to fix your Windows mouse acceleration problem. The MarkC Mouse Fix is a registry file that removes Windows 10 mouse pointer acceleration, readjusting the feature to the level of accuracy you would expect.

- First up, download the MarkC Mouse Fix compressed file and extract it to a memorable location.
- Next, you need to find out the display DPI (Dots Per Inch) you’re currently using by pressing Windows Key + I, then heading to System > Display.
- Under Scale and layout, check the current settings you’re using. For example, 100% (Recommended) is the default scale option. Depending on your screen size and resolution, you may see scaling options up to 350 percent.
- Make a note of the current scale settings.
- Head back to the extracted MarkC Mouse Fix folder, locate your version of Windows, and open the folder.
- Select the registry file that corresponds with your display DPI, then double-click to import the file. Answer Yes or OK to the prompts that appear. Now reboot your system for the fix to complete.
You should now enjoy exact 1-to-1 mouse control, with no acceleration or pausing between movements.
Mouse Issues and the Xbox Game Bar
The Xbox Game Bar, formerly known as the Windows 10 Game Bar, is a handy feature for gamers. Sure, other options can record and stream your games. But Microsoft knows that the Xbox Game Bar integration with Windows 10 gives it an edge with gamers who use both a desktop and an Xbox.
Anyway, back to the Windows 10 mouse problems. The Xbox Game Bar in Windows 10 can trigger a mouse acceleration issue. Unfortunately, it isn’t a uniform problem. As such, there isn’t a definite fix. Some users report that other mouse acceleration fixes have a positive effect. Others have gone so far as to remove the built-in game features completely via the Windows PowerShell.
A common theme for those experiencing mouse acceleration problems while using the Windows 10 Game Bar is using the Windows Key + G shortcut to trigger a recording event. Try it for yourself and note if your mouse acceleration issue starts afterward.
6. Nvidia Drivers
After every Windows 10 update, users report mouse issues in certain environments or scenarios. Specifically, the mouse buttons continue working, but the movement stops. Or, your left-click mouse button suddenly fails to register.
One common fix for this issue stems from outdated Nvidia drivers.
To update your Nvidia drivers, first head to the Nvidia drivers page. Select your Nvidia product from the dropdown boxes, then select Start Search. The latest drivers for your Nvidia graphics card will appear in the results. Download and install the latest version.
Alternatively, if you use the Nvidia GeForce Experience, open the desktop app and check if an update is available.
7. Fix Mouse Issues With the Hardware Troubleshooter
Windows 10 includes several troubleshooters you can use in an attempt to identify and fix mouse issues automatically. However, the success of these troubleshooters varies depending on the issue, and you might have to take their suggestions with a grain of salt.
For example, the Wi-Fi troubleshooter often suggests a complete network reset, restoring your settings to default if your internet drops out, rather than just suggesting switching the router off and on first.
To find the Windows 10 hardware troubleshooter:
- Press Windows Key + I to open the Settings panel.
- Head to Updates & Security > Troubleshoot.
- Under Hardware and Devices, select Run the troubleshooter.
Windows 10 will attempt to detect any mouse issues, then ask if you want to apply a fix.
8. Turn Off Mouse Power Management
Windows 10 will at times decide that it wants to turn certain features off to save power. The Power Management feature typically affects laptops more than desktops, as the former is likely to use battery power more often and benefit from even slight reductions in power. However, Power Management can have unintended consequences, such as turning off your wireless mouse adapter without you realizing.
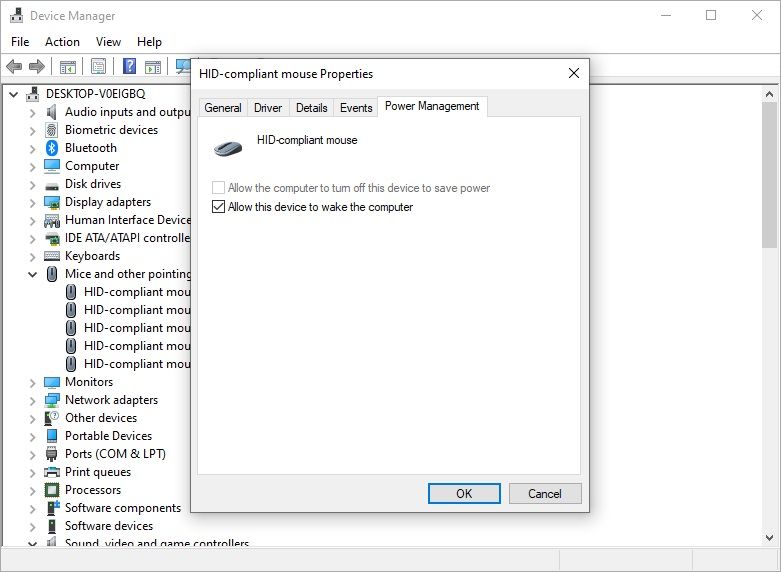
- Type device manager in your Start Menu search bar and select the Best Match.
- Browse down to Mice and other pointing devices, select, then right-click your mouse input and select Properties.
- Open the Power Management tab and ensure Allow the computer to turn off this device to save power remains unchecked.
Solving Windows 10 Mouse Problems
One of these fixes will sort your Windows 10 mouse or touchpad issue out. The Windows Update system always has a chance of breaking something, somewhere. That Microsoft has relaxed Windows 10’s previously stringent update rules can only help end-users. If a buggy update isn’t installed automatically, you stand a better chance of steering clear of time-consuming mouse-related bugs.
Mouse lag can frustrate Windows users, impacting productivity and overall user experience. This issue, characterized by delayed or jerky cursor movements, can occur in Windows 10 and 11.
We will examine common causes of mouse lag and provide practical solutions to resolve mouse lag and restore smooth cursor operation on your system.
6 Ways to Solve Mouse Lag in Windows 10/11
Check Windows Update
Keeping your Windows system up-to-date is crucial for optimal performance, including smooth mouse operation. Microsoft regularly releases updates that can fix various issues, including mouse lag.
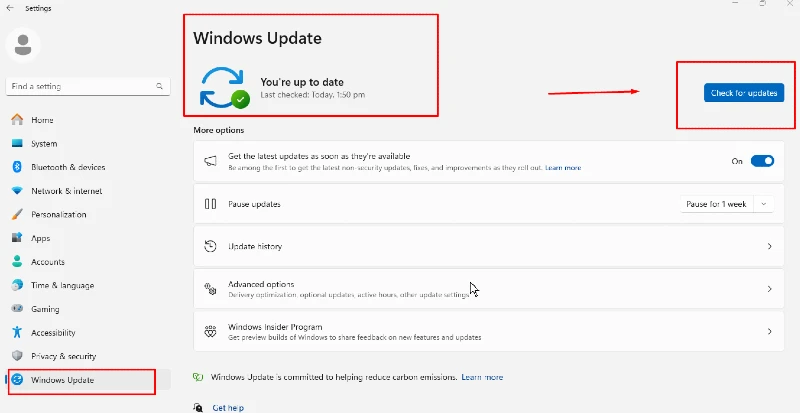
Steps:
- Press Windows key + I to open Settings
- Click on “Update & Security” (Windows 10) or “Windows Update” (Windows 11)
- Click “Check for updates.”
- If updates are available, download and install them
- Restart your computer when prompted
Disable Mouse Trails
While helpful for some users, mouse trails can cause lag on specific systems. Disabling this feature might improve your mouse responsiveness.
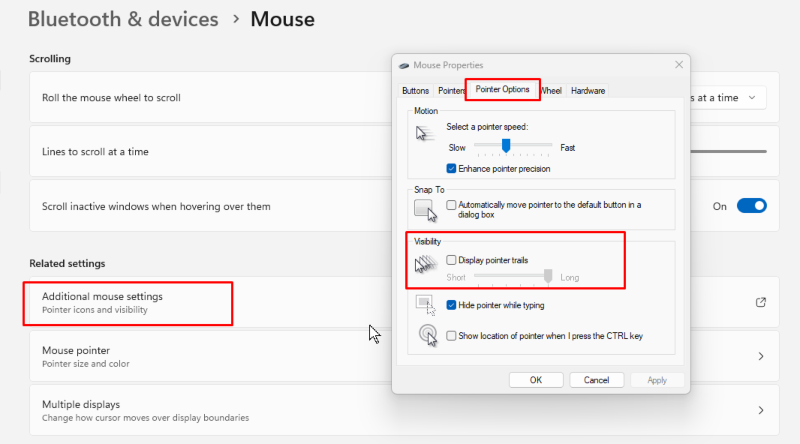
Steps:
- Open the Start menu and type “Mouse settings.”
- Click on “Mouse settings” in the search results
- Scroll down and click on “Additional mouse options.”
- In the Mouse Properties window, go to the “Pointer Options” tab
- Uncheck the box next to “Display pointer trails.”
- Click “Apply” and then “OK.”
Enable/Disable Scroll Inactive
The scroll inactive windows feature can sometimes interfere with mouse performance. Toggling this setting may help resolve lag issues.
Steps:
- Open Settings (Windows key + I)
- Click on “Devices” (Windows 10) or “Bluetooth & devices” (Windows 11)
- Select “Mouse” from the left sidebar
- Toggle the “Scroll inactive windows when I hover over them” option on or off
- Test your mouse to see if the lag is resolved
Update Mouse Driver
Outdated or corrupt mouse drivers can lead to lag. Updating your mouse driver can often resolve these issues.
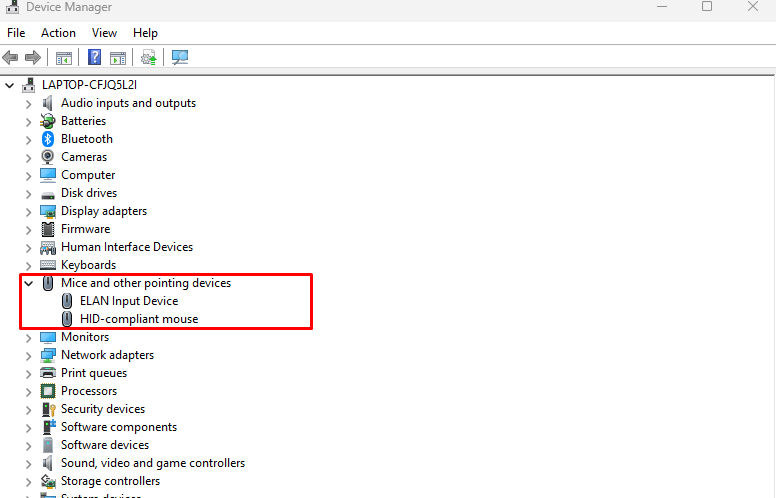
Steps:
- Right-click the Start button and select “Device Manager”
- Expand the “Mice and other pointing devices” category
- Right-click on your mouse device and select “Update driver”
- Choose “Search automatically for updated driver software”
- Follow the prompts to complete the update
- Restart your computer
Another option is to invest in third-party software with automatic driver update functionality, such as Fortect.
Fortect premium driver updater automatically scans all installed drivers on your Windows PC, identifies faulty or outdated ones, including your mouse driver, which causes lag, notifies you in real time, and updates them as needed.
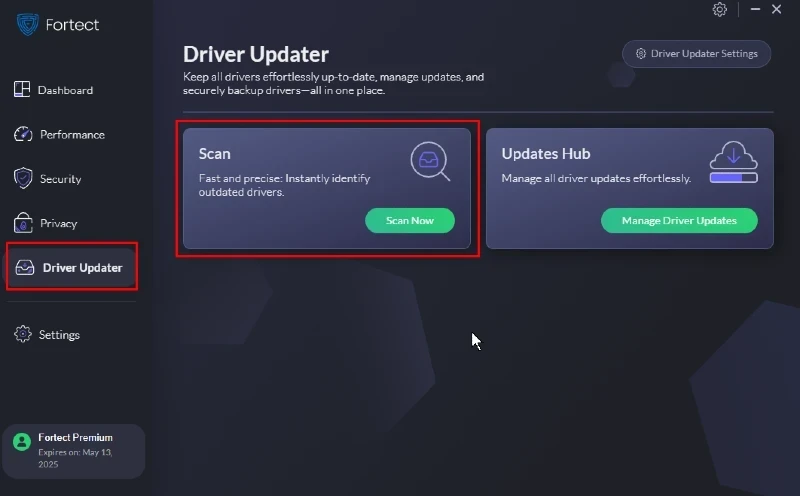
This ensures your drivers stay current and can improve your PC’s overall performance and stability.
Download and install Fortect now.
Disable Adaptive Sync Settings
While adaptive sync benefits display performance, it can sometimes cause mouse lag. Turning off this feature may improve mouse responsiveness.
Steps:
- Right-click on your desktop and select “Display settings.”
- Scroll down and click on “Advanced display settings.”
- Click on “Display adapter properties” for your display
- Go to the “Monitor” tab
- Uncheck “Enable Adaptive Sync” if it is available
- Click “Apply” and “OK.”
Run Full System Scan
Malware or viruses can cause various system issues, including mouse lag. Running a full system scan can help identify and remove any threats.
Steps:
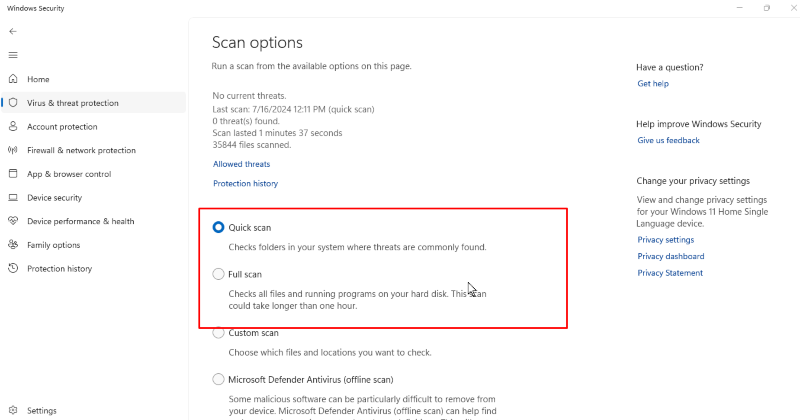
- Open Windows Security (formerly Windows Defender)
- Click on “Virus & threat protection.”
- Click “Scan options.”
- Select “Full scan” and click “Scan now.”
- Wait for the scan to complete and follow any prompts to remove detected threats
Cause of Windows 11 Mouse Lagging
Mouse lag in Windows 11 can be attributed to various factors, including:
- Outdated or incompatible drivers
- System resource constraints
- Interference from third-party software
- Hardware issues
- Graphics settings conflicts
- Windows 11 specific bugs or compatibility issues
Understanding these potential causes can help troubleshoot and resolve mouse lag more effectively.
Conclusion
Mouse lag can significantly impact your Windows experience, but these solutions can restore smooth cursor operation. Remember to update your system and drivers and regularly check for software conflicts. If the issue persists after trying these methods, consider checking your mouse hardware or consulting with Microsoft support for further assistance.
By maintaining a well-optimized system and addressing mouse lag promptly, you can ensure a seamless and productive computing experience on your Windows 10 or 11 device.