
What will you do if Windows 10 Explorer keeps crashing? If you don’t know how to get rid of this problem, then this post from MiniTool will tell you the answer. You can find several methods here.
Windows Explorer, also called File Explorer, is one of the most frequently used applications on Windows computers. But sometimes you may encounter serious issues related to it such as File Explorer isn’t responding and Windows Explorer needs to be restarted.
This post focuses on the Windows 10 Explorer keeps crashing issue. And there are several causes of the Windows Explorer keeps crashing Windows 10 error: improper system settings, incompatible third-party software, permission issues, and some other causes.
Tip: If you lose some important data because File Explorer keeps crashing Windows 10, then it is recommended to use MiniTool Power Data Recovery to recover your data.
10 Solutions to Windows 10 Explorer Keeps Crashing
How to solve the problem that Windows 10 File Explorer crashes? There are 10 useful methods for you.
Note: Before you try the methods below, you need to make sure that you have the stable internet and log in to your computer as an administrator.
Quick Video Guide:
Solution 1: Keep Your Windows Up to Date
The first and easiest solution you can try to fix the problem is to keep your Windows up to date. Keep your operating system up to date can solve many problems related to the system.
But if you cannot ensure whether your Windows system is up to date, then follow the instructions below to check for updates:
Step 1: Press Win + I keys at the same time to open Settings and then select Update & Security.
Step 2: Choose Windows Update and then click Check for updates on the right panel.
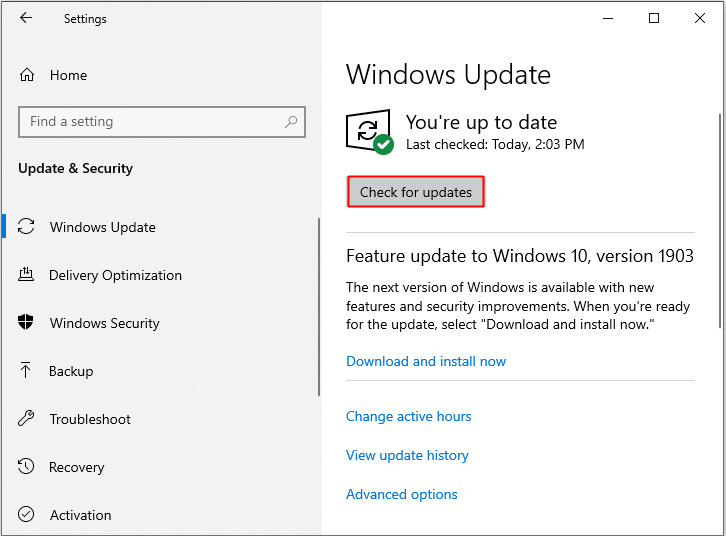
Step 3: If there are available updates, Windows will start to download them automatically. After downloading the updates successfully, restart your computer to perform the installation process.
After you have installed the up to date operating system, see whether Windows 10 File Explorer keeps crashing. If yes, try the next methods.
Solution 2: Disable Thumbnails
Thumbnails can be the culprit of causing Windows 10 Explorer to keep crashing, especially when there are a number of images in a folder. Thus, disabling thumbnails can be a useful solution to solve the issue that Windows 10 Explorer keeps crashing. Here is a quick guide:
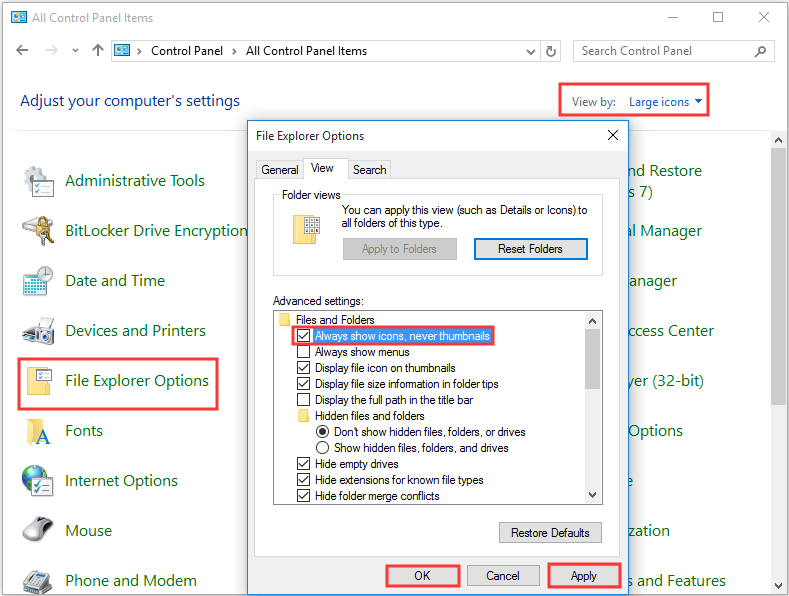
Step 1: Type control panel in the Search bar and then click Control Panel.
Tip: If you cannot find the Search bar, then you can read this post – Windows 10 Search Bar Missing? Here Are 6 Solutions.
Step 2: Set View by: Large icons and then click File Explorer Options.
Step 3: Go to the View tab and then check Always show icons, never thumbnails. Click Apply and OK to save changes.
After disabling thumbnails, the problem that Windows 10 Explorer keeps crashing should be solved.
Solution 3: Clear File Explorer History
Clearing File Explorer history can help you to resolve the issue that Windows 10 Explorer keeps crashing. Follow the steps to do that:
Step 1: Open File Explorer Options and then go to the General tab.
Step 2: Click Clear in the Privacy section. Then File Explorer history will be cleared in seconds.
Solution 4: Launch Folder Windows in a Separate Process
All File Explorer windows run in the explorer.exe process by default. Therefore, if one of the File Explorer windows crashes, then the problem that Windows Explorer keeps crashing will appear.
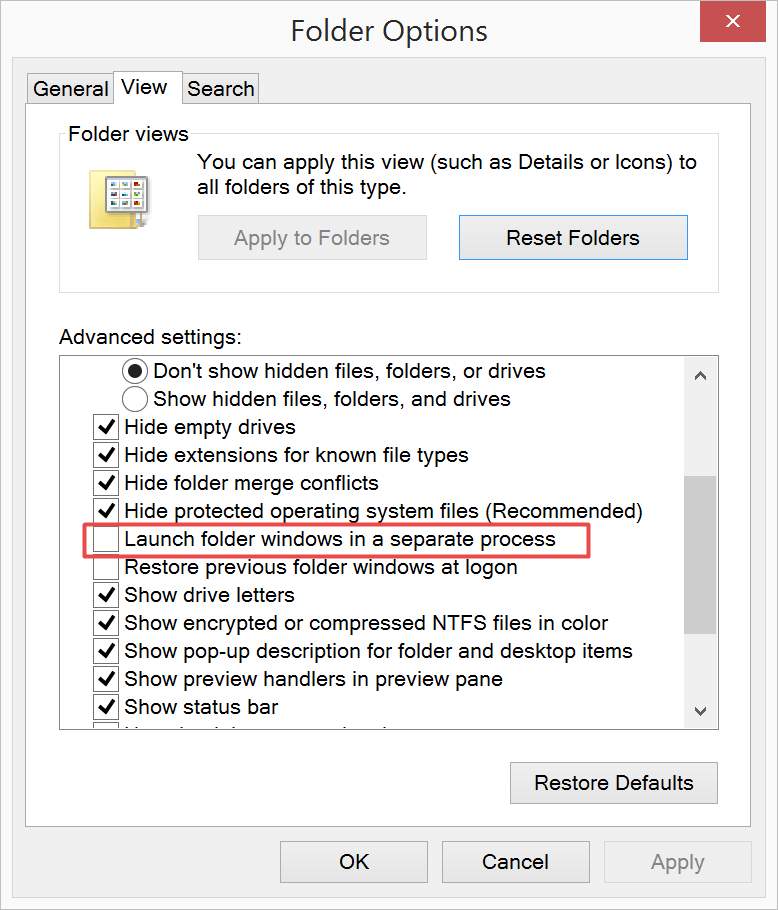
In order to solve the problem, you should enable the “Launch folder windows in a separate process” setting. Here is a quick guide:
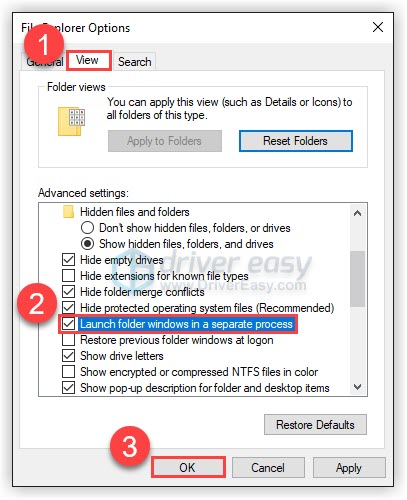
Step 1: Open File Explorer Options and then go to the View tab.
Step 2: Check Launch folder windows in a separate process and then click Apply and OK to save changes.
Solution 5: Run CHKDSK and SFC Scans
You can also try to run CHKDISK and SFC scans to solve the problem that Windows 10 Explorer keeps crashing.
Perform a Hard Disk Check
Step 1: Type cmd in the Search box and then right-click Command Prompt to choose Run as administrator. Click Yes.
Step 2: Type chkdsk /f /r in the window and then press Enter.
Step 3: Press Y key to confirm that you want to run a hard disk check when the system starts the next time and Enter key. Then exit the command line window.
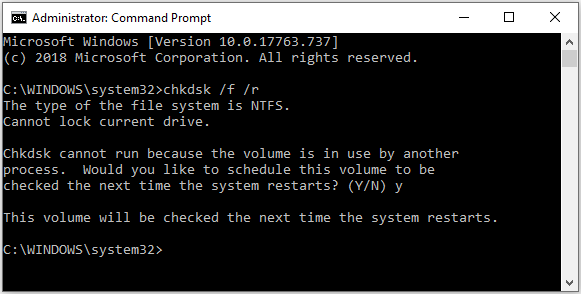
Now restart your computer to make Windows perform the hard disk check. Then check if this solves the issue that Windows 10 Explorer keeps crashing.
Perform a System File Check
If run CHKDSK doesn’t work, then you can try to perform a system file check.
Step 1: Open Command Prompt as administrator.
Step 2: Type sfc /scannow in the window and then press Enter.
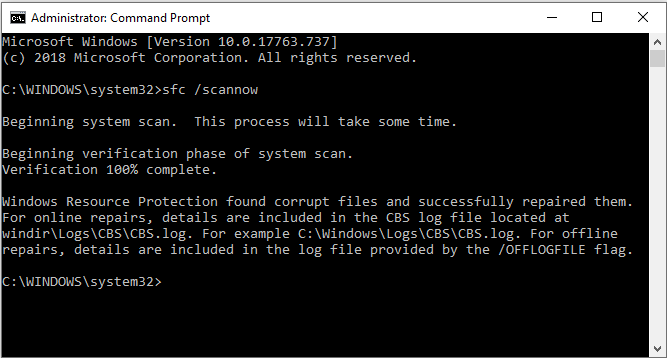
Then wait for Windows to detect whether you have damaged system files, if there are, Windows will fix them automatically.
Now restart your computer to check if Windows 10 Explorer keeps crashing, if it does, try the following methods.
Tip: If the SFC cannot work, then you should read this post – Quickly Fix – SFC Scannow Not Working (Focus on 2 Cases).
Solution 6: Make Changes to Graphics Card Driver
Outdated graphics card drivers can cause the error that Windows 10 Explorer keeps crashing, therefore, you should update or reinstall your graphics card driver. Here is the tutorial to reinstall your graphics card driver:
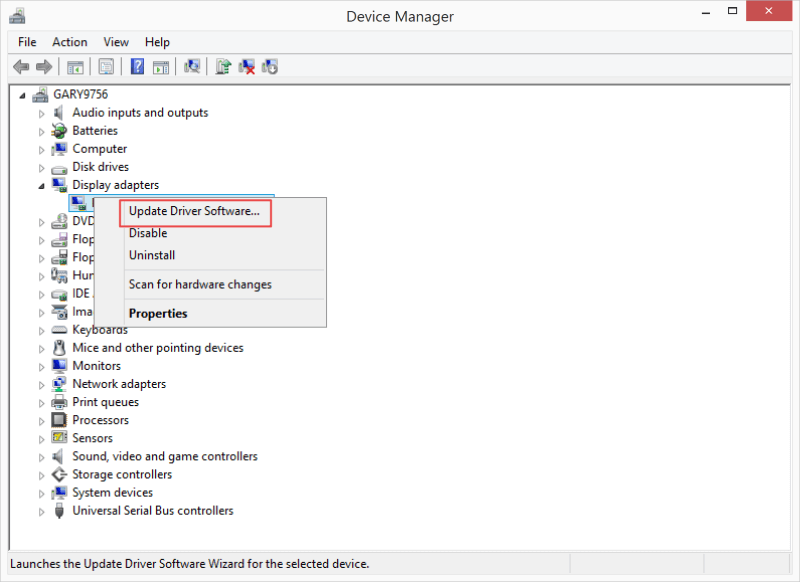
Step 1: Press Win + X keys at the same time to choose Device Manager.
Step 2: Expand Display adapters in the newly pop-out window, then right-click your graphics card to choose Uninstall device.
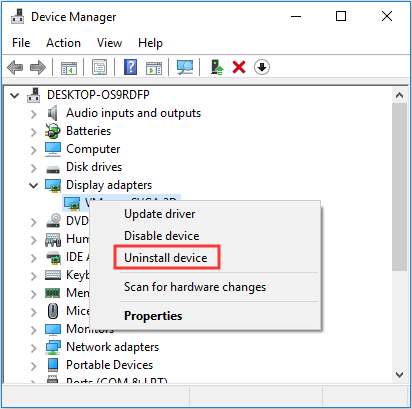
Step 3: Check Delete the driver software for this device and then click Uninstall.
Step 4: Reboot your computer, your system will automatically reinstall your graphics card.
Step 5: If Windows doesn’t reinstall your graphics card driver, then you should visit your graphics card manufacturer’s website to download the latest driver for your device.
Step 6: Open Device Manager again, click Action on the top to choose Scan for hardware changes.
After the process has finished, restart your computer to check if Windows 10 Explorer keeps crashing. If yes, try the next ones.
Solution 7: Check Installed Add-ons
The culprit of the Windows 10 Explorer keeps crashing issue can be the installed add-ons. A number of applications install add-ons in Windows Explorer. These add-ons are very convenient, but they can also slow down or crash Windows Explorer.
Therefore, you should see whether you have installed add-ons to Windows Explorer. If there are installed add-ons, then you should disable or uninstall all third-party add-ons. And if this solution works, then you can re-enable the add-ons one by one to find the culprit.
You can use the third-party to see detailed information and then use it to disable installed add-ons.
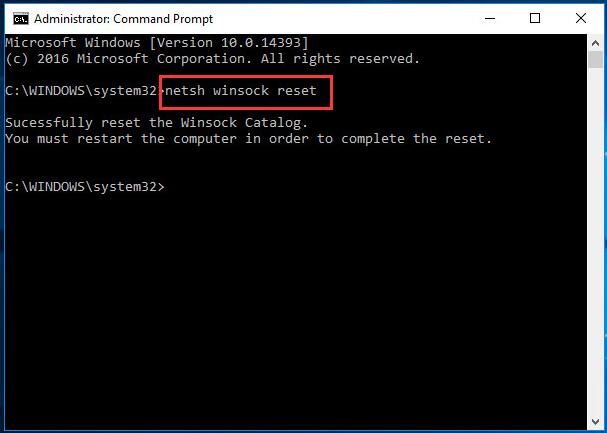
Solution 8: Run Netsh Winsock Reset
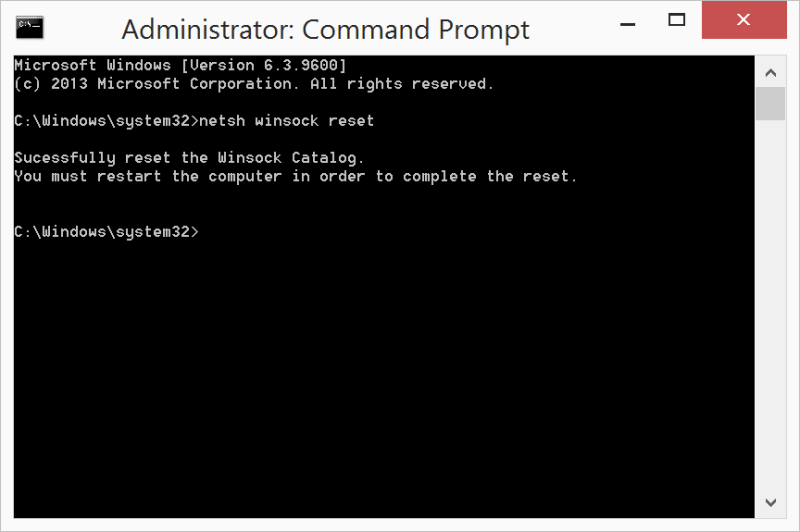
Running Netsh Winsock Reset can help you to solve the issue that Windows 10 Explorer keeps crashing. Follow the steps to do that:
Step 1: Open Command Prompt as administrator.
Step 2: Type netsh winsock reset in the window and then press Enter.
Step 3: Restart your computer and then check if Windows 10 Explorer keeps crashing.
Solution 9: Check Account Permission
If you notice that Windows 10 Explorer keeps crashing when you try to access a specific folder, then you’d better check if you have the full permission over this folder. Follow the instructions below to do that:
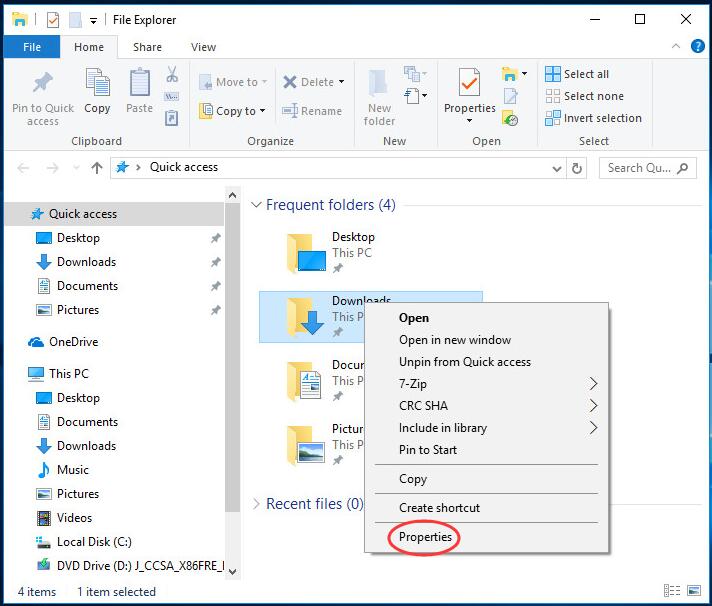
Step 1: Open File Explorer, then right-click the folder you want to make changes to choose Properties.
Step 2: Go to the Security tab and then choose Advanced.
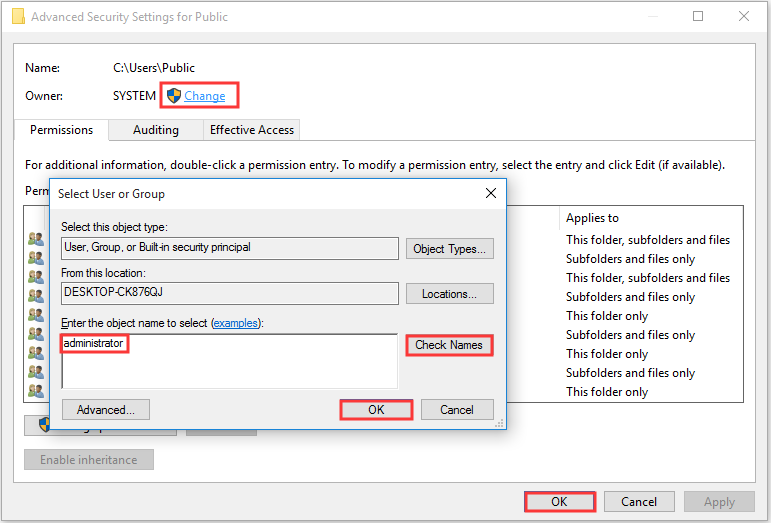
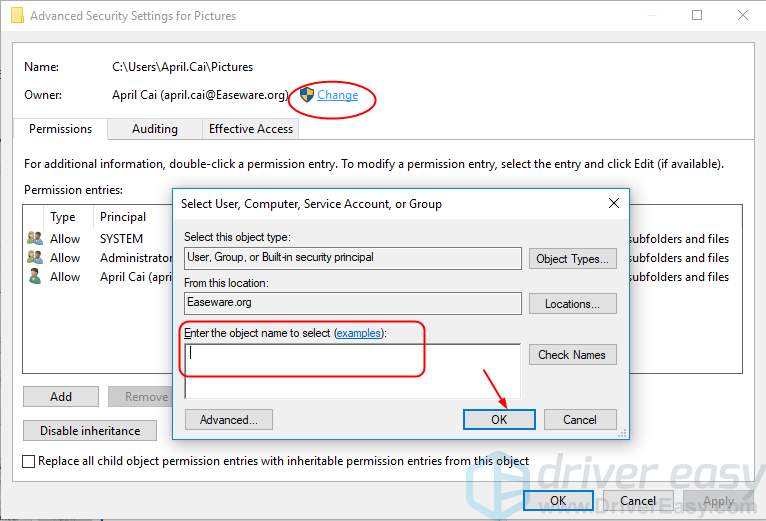
Step 3: Click Change next to Owner, and then input administrator (your user account) in the box under the Enter the object name to select section. Click Check Names to make sure that the name is right. Click OK to exit Select User or Group and then click OK to save changes.
Step 4: In the User Properties window, go to the Security tab and then click Edit… to change permissions.
Step 5: In the Permission for Administrators section, check Allow for Full Control, and then click OK to save changes.

After you get the full permission to access the folder, then check if Windows 10 Explorer keeps crashing.
Solution 10: Disable Quick Access and Set Open File Explorer to This PC
In most cases, Quick access can make it easier and faster to open a folder. However, this can be the cause that Windows 10 Explorer keeps crashing. Therefore, you can try disabling Quick access to fix the problem. Here is the tutorial:
Step 1: Open File Explorer Options and then go to the General tab.
Step 2: Set Open File Explorer to This PC instead of Quick access.
Step 3: Uncheck both Show recently used files in Quick access and Show frequently used folders in Quick access under the Privacy section. Click Apply and OK to save changes.
Click to tweet
Useful Suggestion
When you use your computer, Windows 10 Explorer may crash, so does your system. Therefore, in order to quickly restore your computer when Windows 10 Explorer crashes or system crashes, you’d better create s system image when your computer runs normally.
Referring to create a system image, it is highly recommended to use MiniTool ShadowMaker – a piece of fantastic and professional backup and restore software. It is pretty easy and safe to back up and restore your system.
In addition to backing up your operating system, you can also use MiniTool ShadowMaker to back up files and folders, disks and partitions. And you can also perform universal restore other than restoring your system to the original computer.
What’s more, MiniTool ShadowMaker allows you to sync files and folders to other locations and use the Clone Disk feature to make a bootable external hard drive. What’s better, you can use it for free within 30 days, so just download it and have a try.
MiniTool ShadowMaker TrialClick to Download100%Clean & Safe
Here are the instructions to create a system image with MiniTool ShadowMaker:
Step 1: Download and launch MiniTool ShadowMaker, then click Keep Trial.
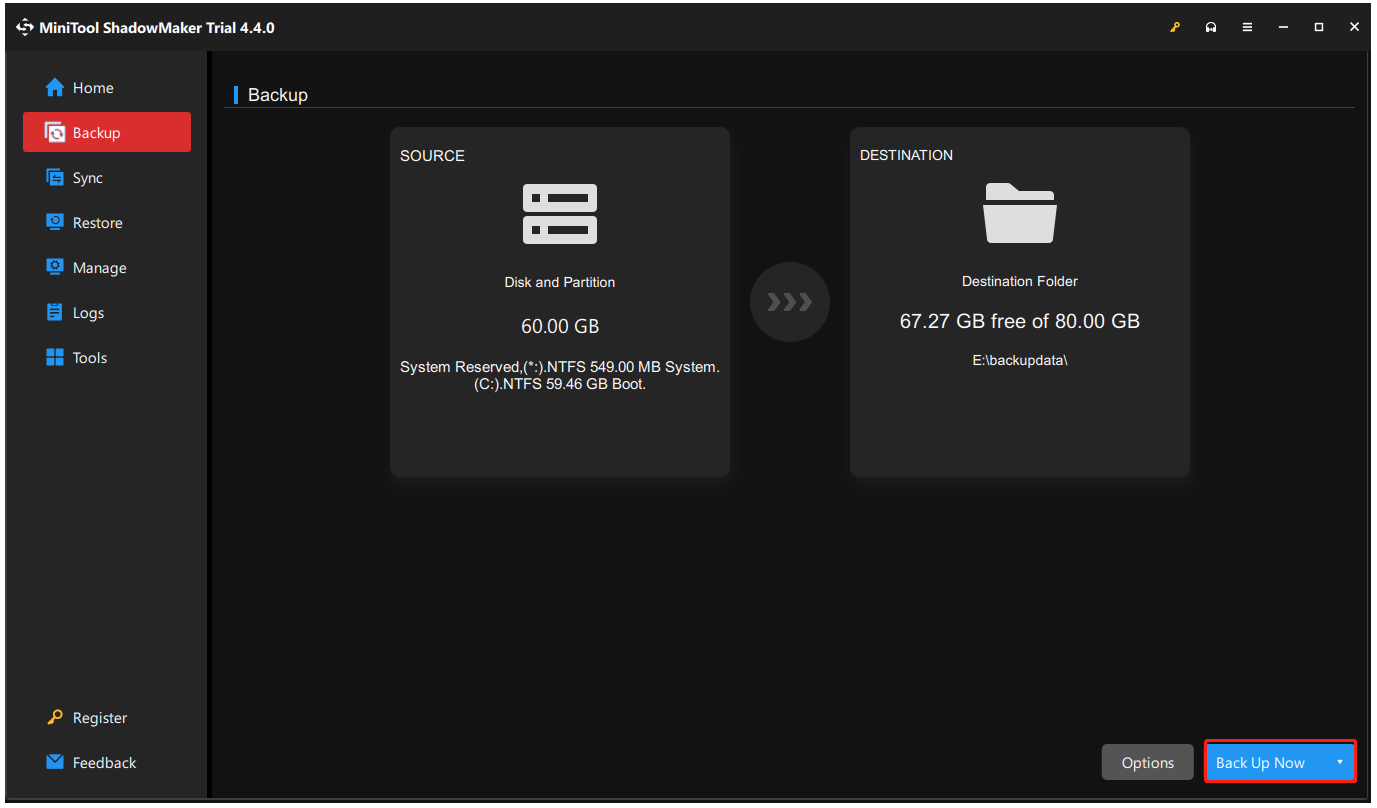
Step 2: Go to the Backup page. MiniTool ShadowMaker backs up the operating system and selects the destination by default. So you just need to click Back Up Now to start creating a system image.
Tip: If you click Back Up Later, then you need to click Back Up Now to begin the backup task on the Manage page.
Step 4: Wait for MiniTool ShadowMaker to finish backing up the operating system.
Note: You’d better create bootable media in advance in order to boot the computer to perform some recovery solutions when the system crashes.
Final Words
To sum up, if you want to find some feasible solutions to get rid of the Windows 10 Explorer keeps crashing problem, try the methods mentioned above in this post. In addition, backing up your system regularly can help you to safeguard your system and files.
If you have other solutions to deal with the Windows 10 Explorer keeps crashing issue or have any confusion about the solutions, leave a comment below or send an email to [email protected].
It would be quite awful if there’s something wrong with Windows Explorer, as it is in charge of creating parts of the user interface, such as the Start Menu, Taskbar, desktop icons, file manager and more in Windows OS.
If Windows Explorer (or the explorer.exe process) keeps crashing on your Windows 11 / 10 / 8.1 / 7 PC, you’re not alone. Lots of Windows users have reported the exact same issue. The good news is, you’ve come to the right place, and you should be able to resolve this issue quickly and easily after reading this guide!
Try these fixes
Here’re the latest 5 fixes that have helped many Windows users fix the Windows 10 File Explorer crashes (and for other Windows edition). You may not have to try them all; just work from the first one until you solve your problem.
- Clear File Explorer history
- Update your graphics driver
- Launch folder windows in a separate process
- Give your account full permission to access the folder content
- Run netsh and winsock reset
- Shorten file path
Fix 1: Clear File Explorer history
Using Windows Explorer for a long period of time will accumulate a lot of files, and such files may cause the executable module (explorer.exe) to crash. According to some Windows users, they fixed this issue after clearing Flie Explorer.
Before trying anything more complicated, follow the steps below to clear File Explorer history:
- On your keyboard, press the Windows logo key and R at the same time to envoke the Run command box. Type control folders and press Enter to open the File Explorer Options window.

- Under the General tab, click the Clear button next to “Clear File Explorer history” to clear File Explorer history. Then OK to save the changes.

- On your keyboard, press the Windows logo key and E at the same time to open File Explorer and check to see if it works fine.


If it still crashes, read on and try the next fix, below.
Fix 2: Update your graphics driver
An outdated or corrupted graphics driver could also cause Windows Explorer to crash. If Fix 1 didn’t work for you, try update your graphics driver.
Generally, there are two ways to update your graphics driver: manually or automatically.
Manual driver update – You can update your graphics driver manually by going to the manufacturer’s website for your graphics card, and searching for the most recent correct driver for each. Be sure to choose only drivers that are compatible with your variant of Windows OS.
Automatic driver update – If you don’t have the time, patience or computer skills to update your graphics driver manually, you can, instead, do it automatically with Driver Easy.
Driver Easy will automatically recognize your system and find the correct drivers for it. You don’t need to know exactly what system your computer is running, you don’t need to be troubled by the wrong driver you would be downloading, and you don’t need to worry about making a mistake when installing. Driver Easy handles it all.
You can update your drivers automatically with either the 7 days free trial or the Pro version of Driver Easy. It takes just 2 clicks, and you get full support and a 30-day money-back guarantee with the Pro version:
- Download and install Driver Easy.
- Run Driver Easy and click the Scan Now button. Driver Easy will then scan your computer and detect any problem drivers.

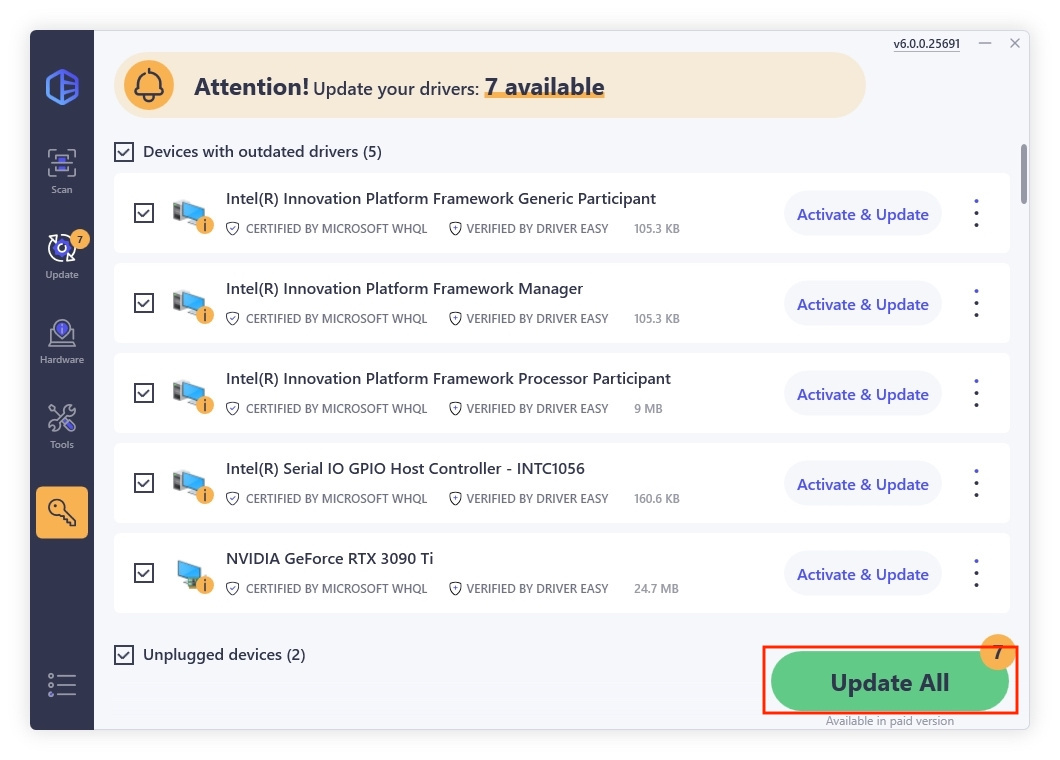
- Click the Activate & Update button next to the flagged device to automatically download and install the correct version of this driver.
Or click Update All to automatically download and install the correct version of all the drivers that are missing or out of date on your system (You’ll need the Pro version for this – when you select Update All, you’ll get a prompt to upgrade. If you’re not prepared to purchase the Pro version yet, Driver Easy provides a 7-day trial at no cost, granting access to all Pro features like fast downloads and easy installation. No charges will occur until after your 7-day trial period ends.)

- Once done, press the Windows logo key and E at the same time on your keyboard to open File Explorer and check to see if it works fine.

If you need assistance, please contact Driver Easy’s support team at support@drivereasy.com.
Fix 3: Launch folder windows in a separate process
By default, File Explorer runs as a single process. In rare cases, this may introduce stability issues to slower PCs, which would cause Windows Explorer to crash. To fix it, you can try launching folder window in a separate process:
- On your keyboard, press the Windows logo key and R at the same time to envoke the Run command box. Type control folders and press Enter to open the File Explorer Options window.
- Navigate to the View tab and check the box nex to “Launch folder window in a separate process”. Click OK to save the changes.
- On your keyboard, press the Windows logo key and E at the same time to open File Explorer and check to see if it works fine.
See if this issue persists. If this fix didn’t work for you, try the next fix, below.
Fix 4: Give your account full permission to access the folder content
File Explorer also crashes when your account is not given full permissions to access the contents of a folder. You can follow the instructions below to grant your account full permission to access the foloder content:
- On your keyboard, press the Windows logo key and E at the same time to open the File Explorer.
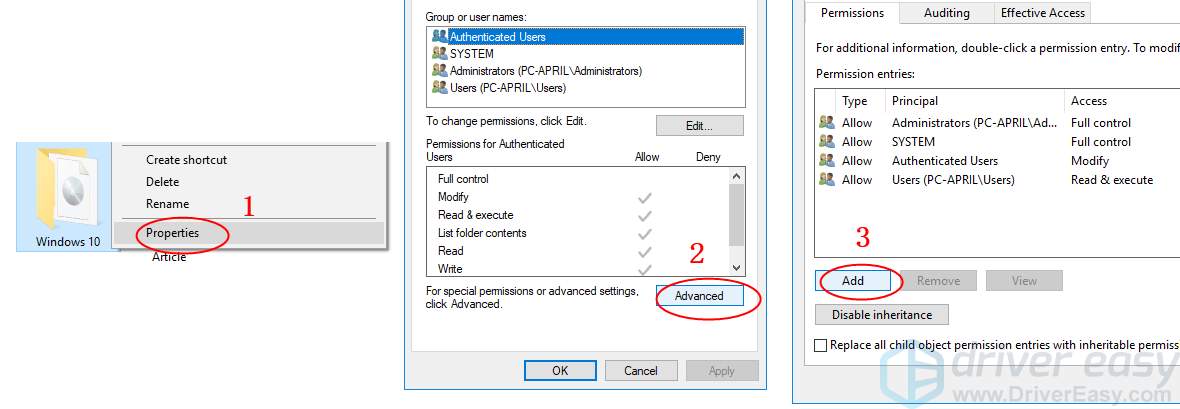
- Right-click on any file folder in File Explorer. Then click Properties.

- Navigate to the Security tab.Then click Advanced.
- Click Change on the pop-up window. Then enter your account name in the box and then click OK.

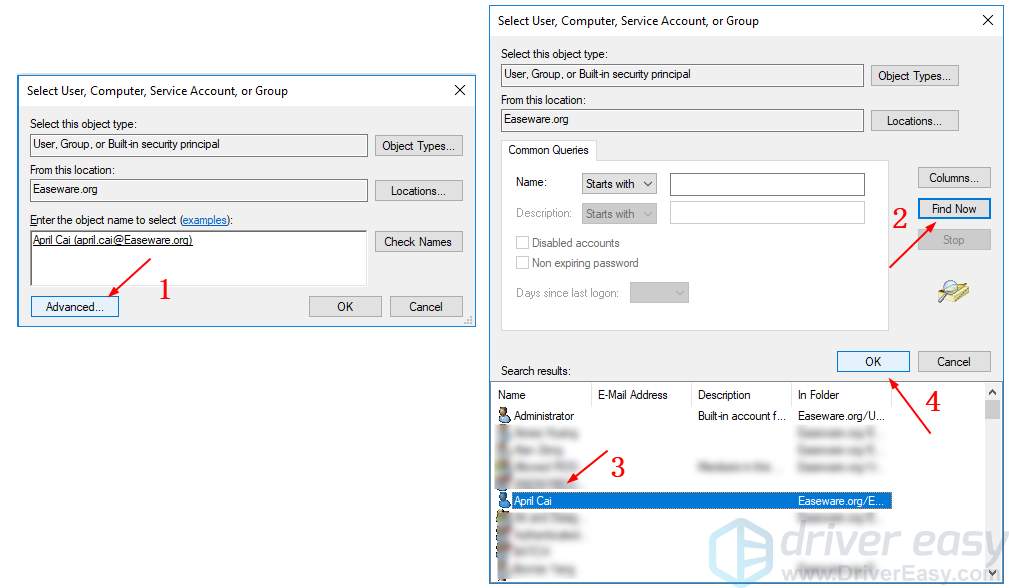
NOTE: If you aren’t sure your account name, follow these:
Click Advanced > Find Now. Find and click your account from search results. Then click OK to on the previous window.

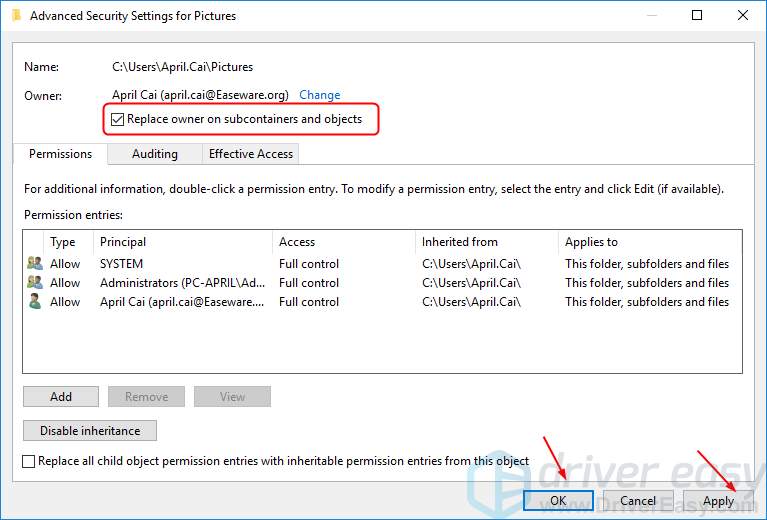
- Now it will automatically back on Advanced Security Settings window. Check on Replace owner on subcontainers and objects. Then click OK.

- Back on the File Explorer window, this time right-click on the file folder which you want to set full access to your account. Click Properties, then click Advanced > Add.

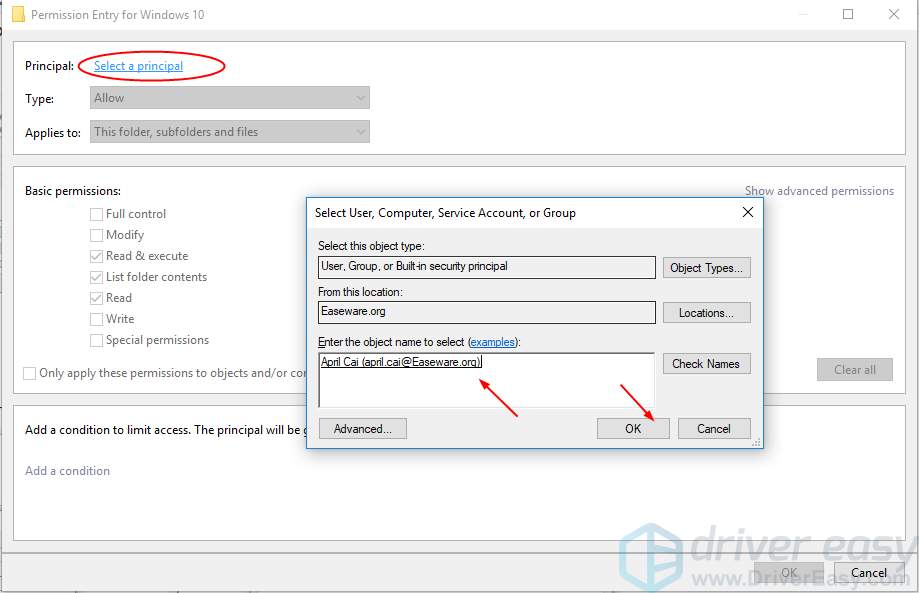
- Click Select a principal. Then enter your account as the previous steps you set and click OK.

- Once you had set your principal, set the Type to Allow. Check the box next to Full Control under Basic permissions. Then click OK.

- Click OK when it goes back on each previous window.
- On your keyboard, press the Windows logo key and E at the same time to open File Explorer and check to see if it works fine.

See if this issue is fixed. If not, try the next fix, below.
Fix 5: Run netsh and winsock reset
Some Windows users resolved the Windows Explorer crashes by running netsh and winsock reset. If you didn’t try this fix before, and none of the fixes above worked, give this fix a shot:
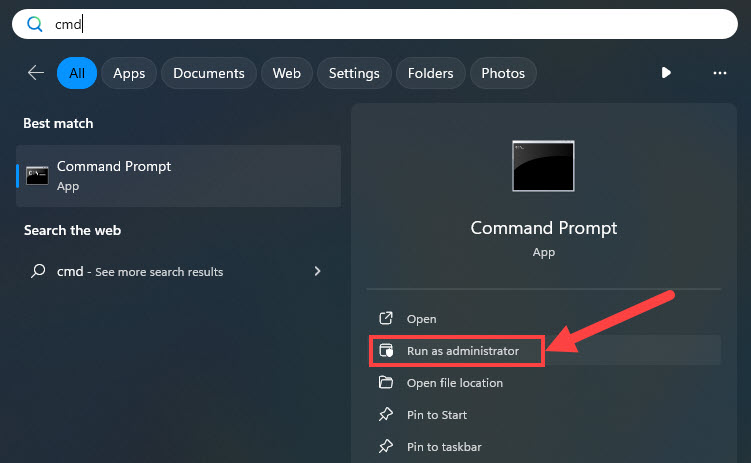
- On your keyboard, press the Windows logo key and type cmd, then right-click on Command Prompt to select Run as administrator. Click Yes when prompted by the UAC.

- Type the following commandin the Command Prompt window and press Enter to run it.
netsh winsock reset
- Restart Windows OS.
- On your keyboard, press the Windows logo key and E at the same time to open File Explorer and check to see if it works fine.
Fix 6: Shorten file path
This fix is derived from a reader’s real experience. He/she found out that when the combination of folder names and file names is too long, Windows 10 explorer will crash when trying to copy. Also, some programs such as Acrobat Reader will report that access is denied when attempting to open the program file. However, attempts to rename the file will not be successful either.
It’s true that the maximum path length for a file or folder in Windows is 260 characters. If the combination of folder names and file names exceeds the limit, you may encounter various issues, including crashes in Windows Explorer. This limitation is due to the historical design of the Windows file system, which has a maximum path length constraint. The issue is not specific to Windows 10 but has been present in earlier versions of Windows as well.
This reader also provides two approaches to verify this problem:
- Copy the folder which contains the problem file to a shorter combination of folder and file names in the path.
- Attempt to create a new text document in the same folder as the problem file and to make the name of that new text file long to the point that additional characters will not be accepted. A comparison of the length of the accepted file name to the name of the problem file may reveal that the name of the problem file is too long.
If your File Explorer is crashing due to this issue, check the following fixes we tried:
- Shorten file paths: Try to organize your files and folders in a way that reduces the overall path length. This might involve renaming folders or using shorter names for files.
- Use mapped network drives: If the files are on a network drive, you can try using mapped network drives with shorter paths.
- Consider moving files: If possible, consider moving files to a different location with a shorter path.
- Use third-party tools: There are third-party tools available that can help you manage long file paths. Some tools can recursively shorten paths for multiple files.
We would like to express sincere gratitude and appreciation to this reader for providing us with new methods. Also, if you have other fixes or thoughts, please don’t hesitate to share them below or email us. Thank you!
Hopefully, this guide helped you fix the Windows 10 File Explorer crashing issue. If you have any questions or suggestions on this issue, feel free to drop a line in the comment area below. Thanks for reading!
66
66 people found this helpful
[SOLVED] Windows 10 File Explorer Crashes: If you are facing the issue where File Explorer crashes in Windows 10 or Windows Explorer keeps crashing (in the earlier version of Windows) then don’t worry as by simply changing the File Explorer settings seems to fix this issue. There are more than one fix for this issue & you need to try all of them before you can fix this issue because what might work for one user might not necessarily work for another.
Whenever you open File Explorer in Windows 10, you will notice that it keeps crashing and you won’t be able to access Windows 10 File Explorer. This issue seems to be a common problem to those who have recently upgraded to Windows 10. In some cases, File Explorer only crashes when using the search function while in others simply right-clicking on any file or folder seems to do the trick.
There are no particular causes which seem to lead to this issue but there are various possible reasons such as a recent software or hardware upgrade might have a conflict with File Explorer, Windows 10 settings might get corrupted, system files might be damaged, malfunctioning of Shell Extensions etc. So without wasting any time let’s see How to Fix Windows 10 File Explorer Crashes with the help of the below-listed tutorial.
Table of Contents
Make sure to create a restore point just in case something goes wrong.
Method 1: Run SFC and DISM
1.Press Windows Key + X then click on Command Prompt(Admin).
2.Now type the following in the cmd and hit enter:
Sfc /scannow
sfc /scannow /offbootdir=c:\ /offwindir=c:\windows (If above fails then try this one)

3.Wait for the above process to finish and once done restart your PC.
4.Again open cmd and type the following command and hit enter after each one:
Dism /Online /Cleanup-Image /CheckHealth
Dism /Online /Cleanup-Image /ScanHealth
Dism /Online /Cleanup-Image /RestoreHealth

5.Let the DISM command run and wait for it to finish.
6. If the above command doesn’t work then try on the below:
Dism /Image:C:\offline /Cleanup-Image /RestoreHealth /Source:c:\test\mount\windows
Dism /Online /Cleanup-Image /RestoreHealth /Source:c:\test\mount\windows /LimitAccess
Note: Replace the C:\RepairSource\Windows with the location of your repair source (Windows Installation or Recovery Disc).
7.Reboot your PC to save changes and see if you’re able to Fix Windows 10 File Explorer Crashes Issue.
Method 2: Clear File Explorer History
1.Press Windows Key + R then type control and hit Enter to open Control Panel.
2.Search for File Explorer and then click File Explorer Options.

3.Now in General tab click Clear next to Clear File Explorer history.
4.Restart your PC to save changes.
This method should able to Fix Windows 10 File Explorer Crashes Issue, if not then continue with the next one.
Method 3: Find the cause of the Problem using Event Viewer
1.Press Windows Key + R then type eventvwr and hit Enter to open Event Viewer or type Event in the Windows search then click Event Viewer.
2.Now from the left-hand side menu double click on Windows Logs then select System.

3.In the right window pane look for error with the red exclamation mark and once you find it, click on it.
4.This will show you the details of the program or process causing the Explorer to crash.
5.If the above app is the third party then make sure to uninstall it from Control Panel.
Method 4: Fix File Explorer Crashing Issue Root Cause
.Type Reliability in the Windows Search and then click Reliability History Monitor.
2.It will take some time to generate a report in which you will find the root cause for the Explorer crashing issue.
3.In most of the cases, it seems to be IDTNC64.cpl which is the software supplied by IDT (Audio software) which is not compatible with Windows 10.

4.Press Windows Key + Q to bring up the search and type cmd.
5.Right-click on the cmd and select Run as Administrator.
6.Type the following command in the cmd and hit Enter:
ren IDTNC64.CPL IDTNC64.CPL.old

7.Close Command Prompt and reboot your PC.
8.If you’re not able to rename the above file then you need to uninstall IDT Audio Manager from the Control Panel.
9.If your Control Panel closes automatically then you need to disable Windows Error Reporting Service.
10.Press Windows Key + R then type services.msc and hit Enter.
11.Find Windows Error Reporting Service then right-click on it and select Properties.

12.Make sure Startup Type is set to Disable and the service is not running, else click on Stop.

13.Now type control in Windows Search then click on Control Panel from the search result.
14.Uninstall IDT Audio from Control Panel to finally Fix Windows 10 File Explorer Crashing Issue.
15.Reboot your PC to save changes.
Note: Again set the Startup type of Windows Error Reporting Service back to Manual.
Method 5: Launch Folder Windows In A Separate Process
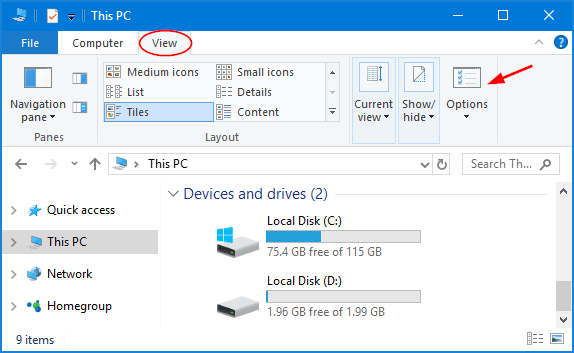
1.Open File Explorer then click View and then click on Options.

Note: If you can’t access File Explorer then open Control Panel and search for File Explorer Options.
2.Switch to the View tab and then check mark “Launch folder windows in a separate process.“
3.Click Apply followed by OK.
4.Reboot PC to save changes.
Method 6: Run netsh and Winsock reset
1.Press Windows Key + X then select Command Prompt (Admin).
2.Type the following command into cmd one by one and hit Enter after each one:
ipconfig /flushdns
netsh winsock reset catalog
netsh int ipv4 reset reset.log
netsh int ipv6 reset reset.log
pause
shutdown /r

3.Reboot your PC and see if you’re able to Fix Windows 10 File Explorer Crashes Issue.
Method 7: Change the size of text, apps, and other items
1.Press Windows Key + I to open Setting then click System.

2.From the left-hand menu switch to Display tab.
3.Now Make sure to Change the size of text, apps, and other items to 150% or 100%.

Note: Just make sure the above setting is not set at 175% which seems to be causing this issue.
4.Reboot your PC to save changes.
Method 8: Disable all Shell Extensions
When you install a program or application in Windows, it adds an item in the right-click context menu. The items are called shell extensions, now if you add something which might conflict with the Windows this could certainly cause the File Explorer to crash. As Shell extension is part of Windows File Explorer hence any corrupt program could easily cause Windows 10 File Explorer Crashes Issue.
1.Now to check which of these programs are causing the crash you need to download a 3rd party software called ShexExView.
2.Double-click the application shexview.exe in the zip file to run it. Wait for few seconds as when it launches for the first time it takes some time to collect information about shell extensions.
3.Now click Options then click on Hide All Microsoft Extensions.

4.Now Press Ctrl + A to select them all and press the red button in the top-left corner.

5.If it asks for confirmation select Yes.
6.If the issue is resolved then there is a problem with one of the shell extensions but to find out which one you need to turn them ON one by one by selecting them and pressing the green button on the top right. If after enabling a particular shell extension Windows File Explorer crashes then you need to disable that particular extension or better if you can remove it from your system.
Method 9: Disable Quick access
1.Open File Explorer then click View and then click Options.

Note: If you can’t access File Explorer then open Control Panel and search for File Explorer Options.
2.Now in General tab uncheck “Show recently used files in Quick access” and “Show frequently used folders in Quick access” under Privacy.
3.Click Apply followed by Ok.
4.Reboot your PC to save changes.
Method 10: Give yourself full permission to access the folder content
This method is only helpful if you are facing the File Explorer crashing problem with some particular files or folders.
1.Right-click on the File or Folder which is having an issue and select Properties.
2.Switch to Security tab and then click Advanced.
3.Click Change next to Owner then Enter your user account name and click Check Names.

4.If you don’t know you user account name then just click Advanced in the above window.
5.Now click Find Now which will show you your user account. Select your account and double click on it in order to add it to the owner window.

6.Click OK to add your user account to the list.
7.Next, on Advanced Security Settings window check mark “replace owner on subcontainers and objects.“

8.Then click OK and again Open Advanced Seucity Settings window.
9.Click Add and then click Select a principal.

10.Again add your user account and click OK.
11.Once you had set your principal, set the Type to be Allow.

12.Make sure to check mark Full Control and then click OK.
13.Click Apply followed by OK.
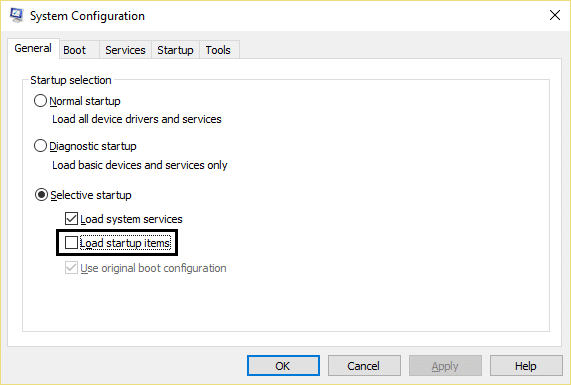
Method 11: Perform a Clean Boot
Sometimes 3rd party software can conflict with Windows File Explorer and therefore the Windows 10 File Explorer Crashes. In order Fix Windows 10 File Explorer Crashes issue, you need to perform a clean boot in your PC and diagnose the issue step by step.
Method 12: Make sure Windows is up to date
1.Press Windows Key + I and then select Update & Security.
2.Then under Update status click on “Check for updates.“

3.If an update is found for your PC, install the update and reboot your PC.
Method 13: Temporarily Disable Antivirus and Firewall
1.Right-click on the Antivirus Program icon from the system tray and select Disable.
2.Next, select the time frame for which the Antivirus will remain disabled.

Note: Choose the smallest amount of time possible for example 15 minutes or 30 minutes.
3.Once done, again try to start the app or program and check if the error resolves or not.
4.Press Windows Key + R then type control and hit Enter to open Control Panel.
5.Next, click on System and Security.
6.Then click on Windows Firewall.

7.Now from the left window pane click on Turn Windows Firewall on or off.
8.Select Turn off Windows Firewall and restart your PC. Again try to start the program and see if you’re able to Fix Windows 10 File Explorer Crashes Issue.
Method 14: Reinstall your graphics card driver
1.In Safe Mode press Windows Key + R then type devmgmt.msc and hit enter to open Device Manager.

2.Expand Display adapter then right-click on your integrated Display adapter and select uninstall.

3.Now if you have a dedicated Graphics Card then right-click on it and select Disable.

4.Now from the Device Manager menu click Action then click Scan for hardware changes.
5.Reboot your PC to save changes.
Recommended:
- Fix Bluetooth Peripheral Device Driver Not Found Error
- Windows 10 Black Screen With Cursor [100% Working]
- Fix Two Finger Scroll Not Working in Windows 10
- Fix Clock Watchdog Timeout Error on Windows 10
That’s it you have successfully learned How to Windows 10 File Explorer Crashes but if you still have any queries regarding this post then feel free to ask them in the comment’s section.
If you are a victim of Windows Explorer crashing & freezing in Windows 10 issue then it might be an irritating situation for you to perform your daily tasks on the Windows 10 operating system.
Windows Explorer freezes and tries to display things but you can’t click on it or you have to exit from it and restart it to load the task again.
Usually, Windows explorer crash when excess add-ons are enabled, Windows open new folder in a single process, thumbnails, and others.
Well, this problem can be solved if you perform the fixes stated in this article one after the other.
The solutions are simple and easy to perform and will guide you to overcome Windows explorer crash or freeze issue without any hassle.
Fix 1. Clear Windows Explorer history
To solve Windows Explorer crashing Windows 10 issue try clearing the Windows explorer history. This is the easiest solution that will help you fix this issue.
Following are the steps to do so:
- Press Windows + E key to open file explorer
- Click on View tab and then click on options
- Select change folder and search options
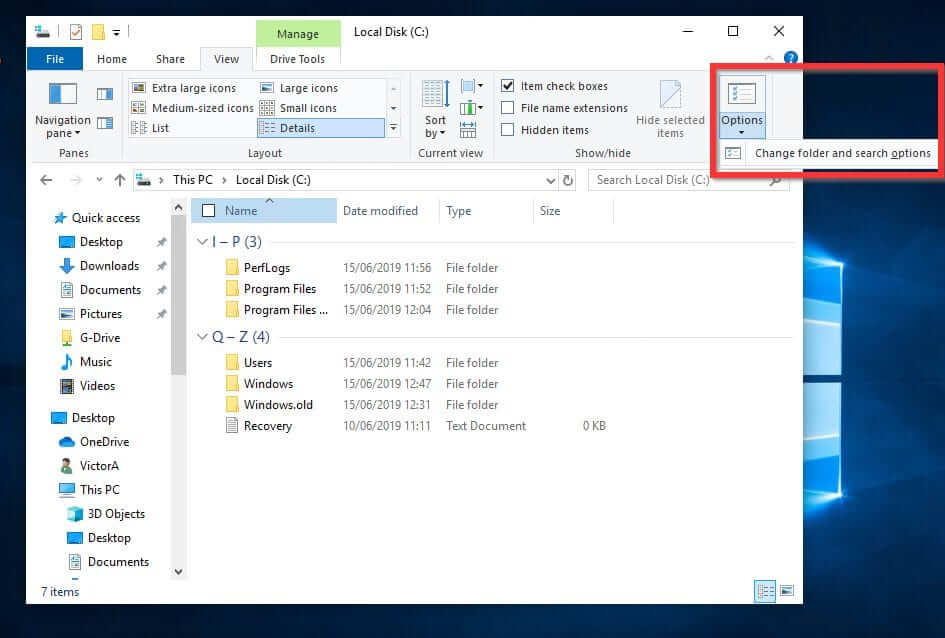
- In the folder options windows, click on clear button
This will clear all the history
In case you don’t want to save recent files then uncheck the boxes in the privacy section and then click OK.
Fix 2. Execute System File Checker
Windows explorer keeps crashing windows 10 problem can also trigger your system if any of the system files are corrupted or damaged.
To overcome this issue you need to repair system files by using an SFC scan. Here are the steps to do so:
- Press Windows + X key
- Select Command prompt (admin)
- In the command prompt window, type the below command and hit the enter key
sfc/scannow
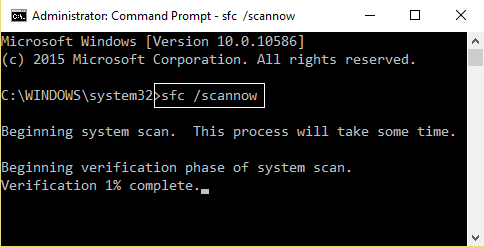
This scanning process will take a couple of minutes to get completed so you need to be patient.
Once the command is executed and scanning is over, restart your PC and see if the Windows explorer crashes or not.
Fix 3. Run CHKDSK Command
If your hard drive leads Windows Explorer crash or freeze then you must check your hard drive for the issue. Performing the CHKDSK command will verify the issue in the hard drive and fix it.
Steps to perform CHKDSK command:
- Open the Command prompt (admin) by pressing Windows + X key
- In the command prompt window, type the command given below and hit the enter key
chkdsk c:/f
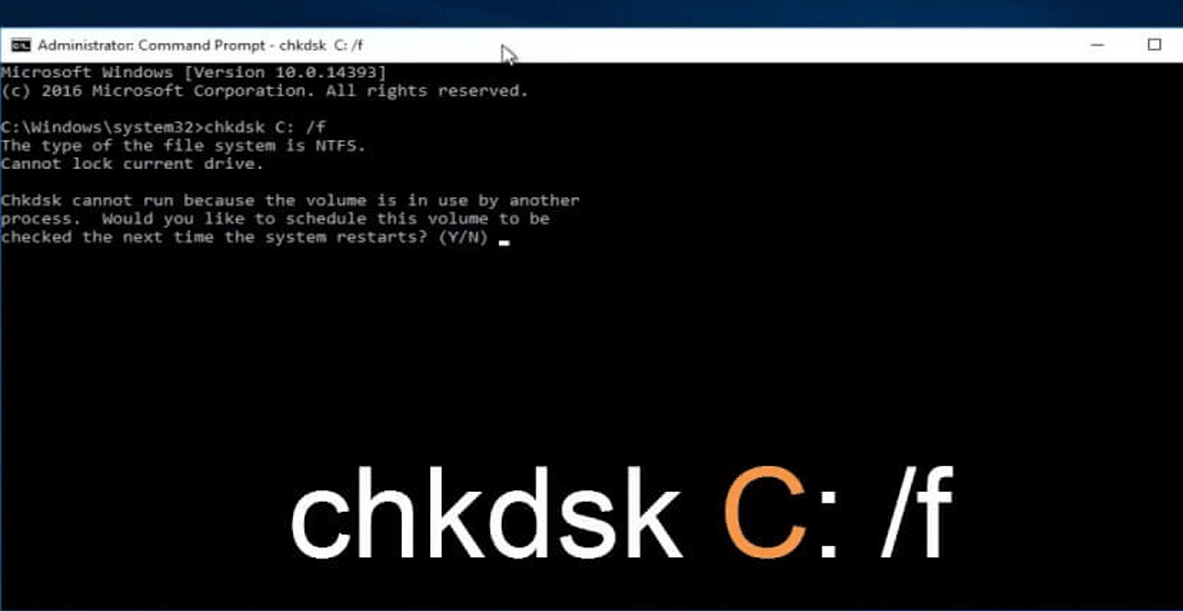
Wait for the command to get executed and check the hard drive
Restart your PC after the process is completed and check if it fixes Windows Explorer crashing & freezing in Windows 10.
Fix 4. Disable the Third-Party Add-Ons
There are many applications in Windows explorer that install add-ons like the entries in the context menu. This may lead to the Windows Explorer crash or slow down.
So, to fix Windows Explorer crashing & freezing in Windows 10 you need to disable the add-ons. Later on, you can enable them after the issue is solved.
Follow the steps to disable the add-ons:
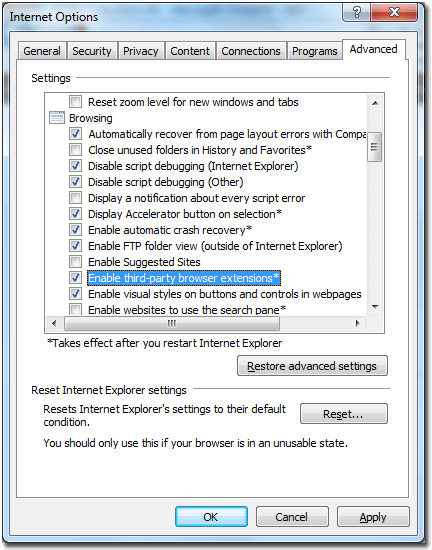
- First of all, open the internet explorer
- Click on Tools and then select Internet options
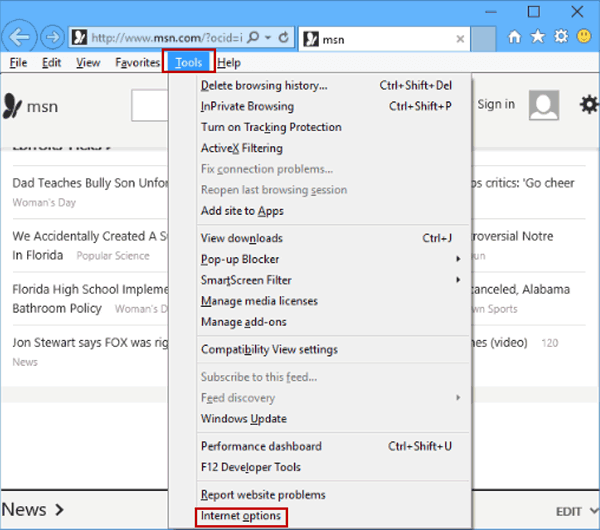
- In the Internet Options windows, click on Advanced tab and uncheck the Enable third-party browser extensions box
- Click on OK
Now, the third-party add-ons are disabled, you can restart your explorer and see if the crashing issue got resolved or not.
Fix 5. Disable the Thumbnails
Thumbnails can also cause a Windows Explorer crash or freeze issue, especially when too many images are there in the folder. So, to stop Windows Explorer from crashing, disable the thumbnails.
Here are the steps to disable them:
- Press Windows + E key to open file explorer
- Click on View tab and then click on options
- Select change folder and search options
- In the folder options window, click on the view tab
- Select Always shows icons, never thumbnails option
- Click on OK to save changes
These steps will disable the thumbnails and fix Windows explorer keeps crashing Windows 10 issue.
Fix 6. Launch the Folder Windows in Separate Process
Windows open the folder in a solo process and this can create conflicts that might lead to Windows Explorer crash or freeze.
Windows can be forced to open a new folder with a new process every time. To do so, follow the steps given below:
- Press Windows + E key to open file explorer
- Click on View tab and then click on options
- Select change folder and search options
- In the folder options window, click on the view tab
- Check Launch folder windows in a separate process box
- Click on OK to save the changes
Every time Windows open a folder with a new process will prevent Windows explorer crashing & freezing in Windows 10.
Fix 7. Check the Windows Event Viewer
Windows explorer keeps crashing Windows 10 issue can also trigger because of an application or the Windows process that must be recorded in Event viewer.
Therefore, check the Windows event viewer to find out the error that crashes Windows explorer. Below are the steps to check the event viewer:
- Press Windows + R key
- Type eventvwr and click OK to open Event viewer
- Double click on Windows logo in the left panel and select Application
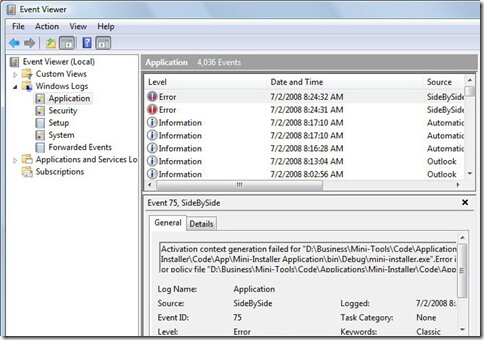
- A list of different event logs will appear, click on the Level that is sort by errors
- Now, search for the error that causes Windows explorer crash
- When you found the error, click on it and see its description in the General tab below.
The error also points out the application’s location the causes the problem. So, you might need to uninstall it or reinstall to solve the issue.
Fix 8. Move explorer.exe File in the System32 Folder
To fix Windows Explorer crashing & freezing in Windows 10 you need to move explorer.exe in the system32 folder. Following are the steps that will guide you to do so:
- Open the file explorer
- Click on the system drive (local C:)
- Go to Windows folder and search for explorer.exe file
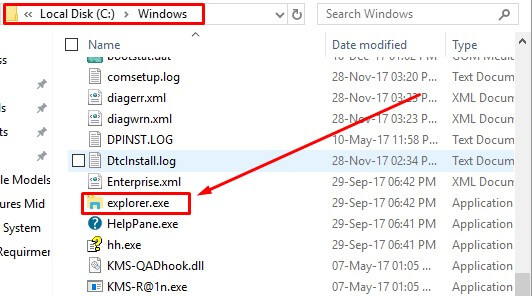
- Copy the explorer.exe file, locate system32 folder and paste the file

Note: Copy the file; do not cut it as the file should also remain in the Windows folder as well.
- Close the folder
- Restart your PC.
Once the file is moved, it is expected that the Windows explorer crashing Windows 10 problem will be fixed.
Fix 9. Disable Preview Pane
Here is another solution that will help you overcome Windows explorer keeps crashing Windows 10. Try to disable the preview pane and then restart to check whether it solved the issue or not.
Here are the steps to do so:
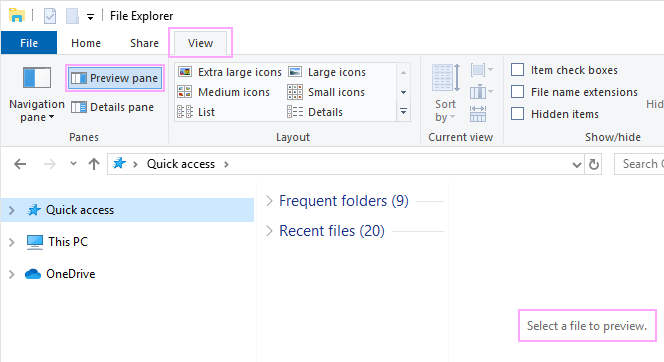
- Press Windows key
- Type File Explorer and hit the enter key
- Click on the View tab
- If the preview pane has a blue background then it is enabled, click on it to disable.
That’s it the preview pane is disabled.
FAQ
1: Why does Windows Explorer keep Crashing when I right-click?
Windows explorer crashes on right click are mainly due to lots of items added in the context menu of right-clicking, improper coded items added to third-party and other.
2: Why does my Windows explorer keep freezing?
If your Windows Explorer keeps freezing, then the problem can be related to the file associations. However, this issue can be easily fixed by resetting the file associations to default.
Speed Up Windows PC/Laptop Performance
If your Windows OS is performing slow or get freeze between tasks then you should scan your PC with the PC Repair Tool to speed up its performance.
This repair tool is really amazing, you just have to download it in your system, and it will scan your entire system, detects all the internal issues, and solves them with ease.
Windows stubborn errors like BSOD, registry, DLL, application, browser & others are solves easily and along with this damaged system files are also repaired and much more.
Get PC Repair Tool to Speed Up Windows PC/Laptop Performance
Conclusion
Fix Windows Explorer crashing & freezing in Windows 10 with the easy solutions mentioned in this article.
No Windows users want their system to crash or freeze during their tasks. So, to continue working without getting stuck you must solve this issue.
I hope that your Windows explorer keeps crashing Windows 10 problem is fixed and your Windows 10 is working fine with the help of this article.
If you encounter that your file explorer not working in Windows 10 then get the solutions to fix this issue as well.
In case you got any questions to ask then write to us on our Facebook page. We’ll be happy to assist you.
Hardeep has always been a Windows lover ever since she got her hands on her first Windows XP PC. She has always been enthusiastic about technological stuff, especially Artificial Intelligence (AI) computing. Before joining PC Error Fix, she worked as a freelancer and worked on numerous technical projects.
Summary: In this article, you will get all the effective ways to fix Windows 10 Explorer keeps crashing error with the help of the best Bitwar Data Recovery Software.
“I love every aspect of the new Windows 10. But Windows 10, as mighty it may be, there are still some glitches, and one of the most talked and frustrating one is related to the File Explorer. I have faced it, and it is very frequent these days. But I have no idea, how to fix Windows 10 Explorer keeps crashing issue.”
The Windows 10 is clearly on the better performing Operating Systems in the world. It’s a heaven for the content creator or simple games, basically all type of users. But users are not too happy with every 5-10 minutes crush of File Explorer. This issue is insanely frustrating that is also jamming the performance of the entire Operating System.
Table of Contents
As you may have realized, there is no official response for the “Windows 10 Explorer Keeps Crashing” issue and it has become so frequent that the users are searching for alternative options.
You can use the following 8 methods that have been useful to some users. So, follow the discussed steps carefully.
Method 1: Clear the File Explorer Search History
The new File Explorer keeps a history of all your opened files, it is a great feature but may cause File Explorer not responding if the files are too big. So, one of the ways to fix Windows explorer crashes is to erase all the history from the File Explorer. It can be done via a simple procedure, have a look;
Step 1: Open your computer and click on Start.
Step 2: Type Control inside the search box. In the search result, you will find the Control Panel, click on it.
Step 3: Enter the files, visible at the top right corner of the Control Panel Window, you will find File Explorer Options in the results, click on it.
Step 4: After that, click Clear to erase the File Explorer History.

Step 5: Then, click Apply, and then OK.
Step 6: Now, press the Windows key and E at the same time to open the File Explorer, It should be working properly.
Hopefully, this procedure works to fix the “Windows 10 Explorer Keeps Crashing” error. If the crashing issue persists, you can try to un-check Show recently used files in Quick Access and Show Frequently used folders in Quick access to give another try.

Method 2: Launch Folder Windows in a Separate Process
This is a different procedure than the previous one that probably fixes Windows 10 Explorer Keeps Crashing issue. Take a look at the procedure below:
Step 1: Press Win Logo Key + E at the same time to open Windows File Explorer, and then click on View from the menu bar.
Step 2: Now, click Options – Change Folder and Search Option.
Step 3: After that, turn to the View tab. Tick the launch Folder Windows in a separate process. You will find all these in the Advanced Settings. After that, click Apply and OK.
Step 5: Lastly, as usual, press Windows key and E at the same time to check if the File Explorer working properly.
Method 3: Fix “Windows 10 Explorer Keeps Crashing” Issue with CMD
CMD is a closely associated program, integrated on Windows Operating Systems. This is a very useful, text-based tool that is used in fixing a lot of issues with the said Operating System. Have a look below:
Step 1: Go to Start and type cmd in the search box.
Step 2: After that, make a right-click on the Command Prompt and select Run As Administrator.
Step 3: If any prompt appears by the User Account Control you need to click on Yes.
Step 4: After that, type the following command on the Command Prompt window: netsh winsock reset. Then, hit Enter to run it.
Step 5: Now, you must reboot your computer. After it starts again, press the Windows Key and E together to launch the File Explorer.
This should fix Windows 10 Explorer Keeps Crashing issue permanently.
Method 4: Delete Windows Registry Keys
Sometimes, File Explorer keeps crashing on Windows 10 caused by bad registry keys kept saving in the system, although you have deleted some unwanted software, the registry keys still exist there. That’s the reason, for this situation, we need to try to remove these keys to help fix the crash error.
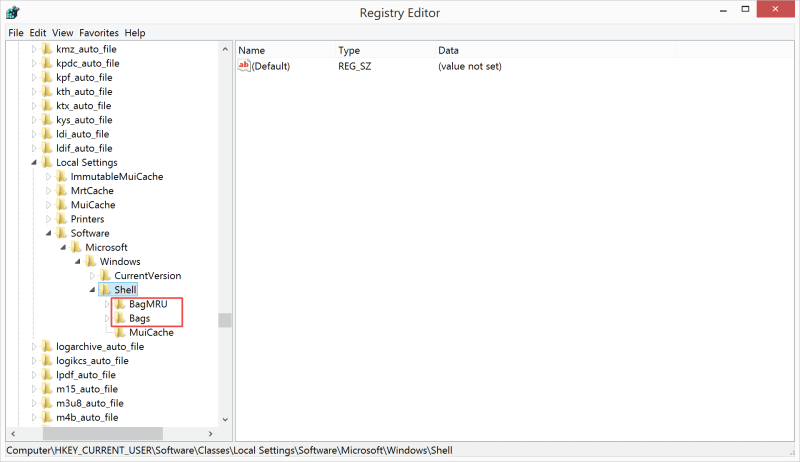
Step 1: Press Win Logo key + R and then type Regedit.exe.
Step 2: Locate HKEY_CURRENT_USER\Software\Classes\Local Settings\Software\Microsoft\Windows\Shell
Step 3: Expand the Shell List and look for BagMRU and Bags folder
Step 4: Delete these two folders and restart the computer
You can try to launch the File Explorer to check whether the crashing issue persisted or not.
Method 5: Change Monitor Display Settings
Yes! Wrong Monitor Display settings can cause Windows 10 explorer keeps crashing. Hence, it’s suggesting to check Display settings to eliminate the error.
Step 1: Press Win logo key + S and then type Display
Step 2: Now, look for Change Display Settings and click to open.
Step 3: You can see Change the size of text, app and other items in Scale and Layout section.
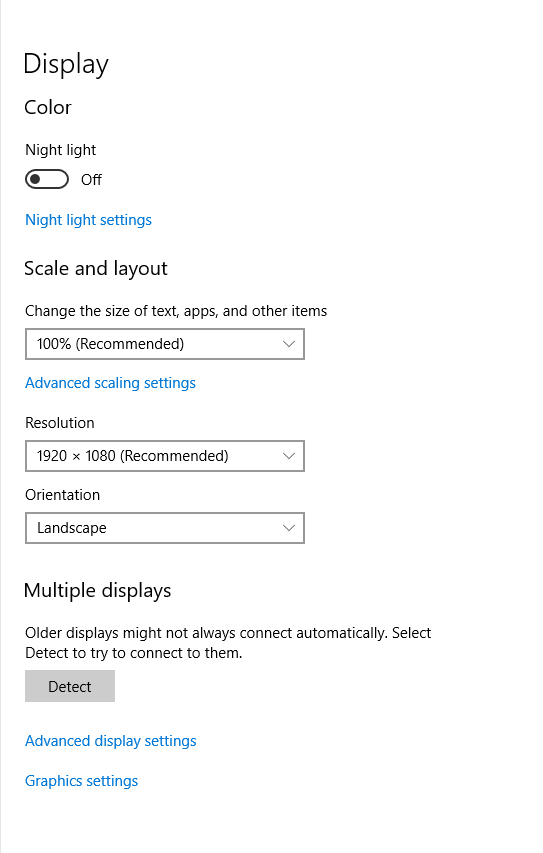
Step 4: Choose 100% Recommended or 200% from the list.
Hopefully, this can fix File Explorer crashing issue, otherwise, you probably need to update the Display Adapter’s driver followed by this way: Press Win logo key + R and type: devmgmt.msc > Navigate Display Adapters and click to expand it > Right-click on the display and then choose Update Driver
Method 6: Change Account Permission
Missing relevant folder access & control permissions is another possible reason that can cause Windows 10 explorer keeps crashing, especially, when you need to access the specific folder, and then File Explorer crashed, to troubleshoot it, you can try to edit the account permissions by following steps:
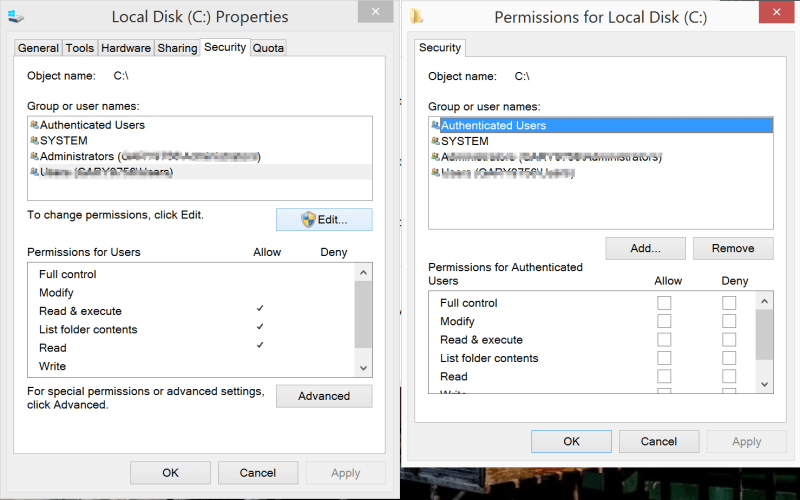
Step 1: Right-click on the folder you are willing to access and then click Properties.
Step 2: Turn to Security Tab and then look for the SYSTEM in Groups and Names list.
Step 3: Highlight SYSTEM and then click Edit, after that, choose Allow to obtain Full Control Permissions.
Method 7: Uninstall Third-party Anti-virus Software
If File Explorer keeps crashing after installing third-party anti-virus software, you should be able to uninstall it to check.
Method 8: Update the Windows System
Keep Windows system up-to-date is also another way to prevent Windows 10 explorer keeping crash, be aware to update Windows when the update released or you can try to update the system manually.
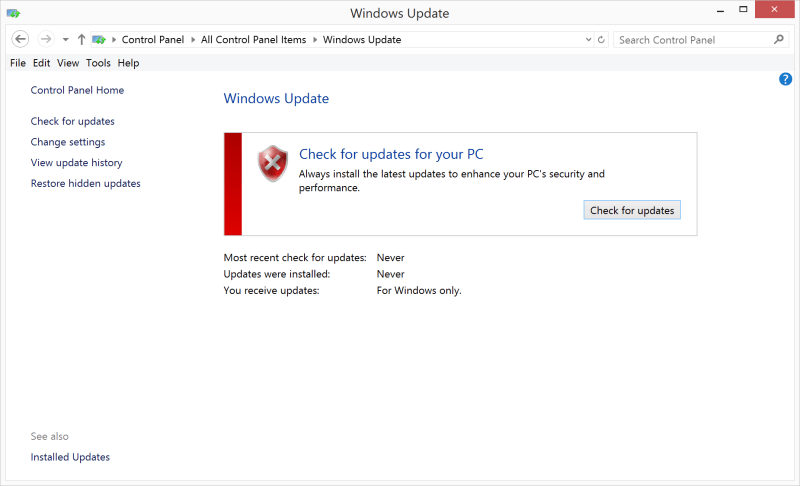
Step 1: Go to Start Menu and then type Control Panel
Step 2: Type Windows Update at the top-right searching bar, and then click to open the Update Window.
Step 3: Click on Check for Update button and wait for the system to find any updates from the server.
These 8 solutions should be able to fix the Windows 10 explorer keeps crashing issue, however, if you have deleted some vital files during the fixing, you can try with Bitwar Data Recovery to restore your lost data.
Part 2: Restore Lost Data
A chunk of data might get erased when fixing windows 10 explorer keeps crashing issue, so, you need to be prepared with a data recovery software to restore that erased file in a moment’s notice.
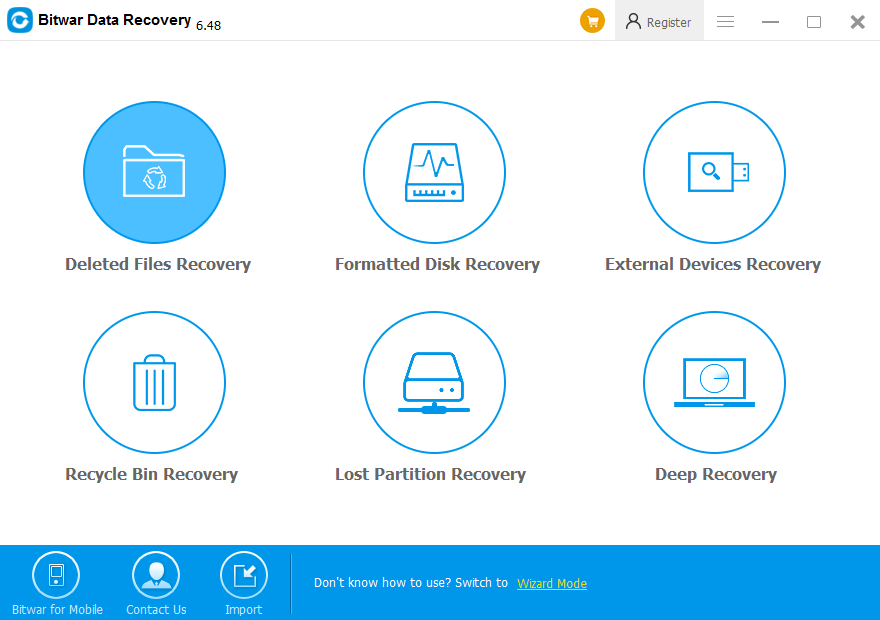
Bitwar Data Recovery Software helps recover files that lost or deleted due to mistaken operations, such as: emptied the Recycle Bin, used Shift + Delete Key to erase the files permanently, formatted the hard drive without backing up the vital properly.
Also, it can recover any kind of document, image, archive, audio, and video files from any storage mediums, like, internal & external hard drive, USB flash drive, SD memory card, etc.
Moreover, the software offers only 3 steps to help get back the needed data: Scan > Preview > Recovery, if you are having the data loss issue, try with Bitwar Data Recovery Software for Windows or Mac now!
Conclusion
None the less, the Windows 10 Explorer Keeps Crashing is a very troubling issue and Microsoft should have come up with a definite solution, already. But all the discussed fixes will definitely help to fix the issue. But if any loss of file occurs you can use the Bitwar Data Recovery program immediately.
Read More
- How to Restore files from Windows old folder
- Fixed: Windows cannot Access the Specified Device Path or File Error
- [Q&A] Will Upgrading to Windows 10 Delete My Files?
- Quick Fix Recycle Bin Corrupted Error with a Few Clicks!
- Need to Recover Files Lost by Ctrl+Z? 3 Proven Ways Help You!