
Enabling IPv6 on Windows 10 is a straightforward process that involves a few simple steps within the network settings on your computer. By enabling IPv6, you can improve your network performance and future-proof your system. All you need to do is access the Network and Sharing Center, navigate to your network properties, and activate IPv6. It’s a quick, easy task that will have you ready to embrace the next generation of internet protocol connectivity in no time.
To enable IPv6 on your Windows 10 machine, you will need to delve into the network settings and make a small adjustment. Let’s walk through the steps to get your system set up for IPv6.
Step 1: Open the Control Panel
First, click on the Start button and type “Control Panel,” then hit enter.
Opening the Control Panel gives you access to various system settings, including network configurations. It’s the hub for many adjustments you can make on your computer.
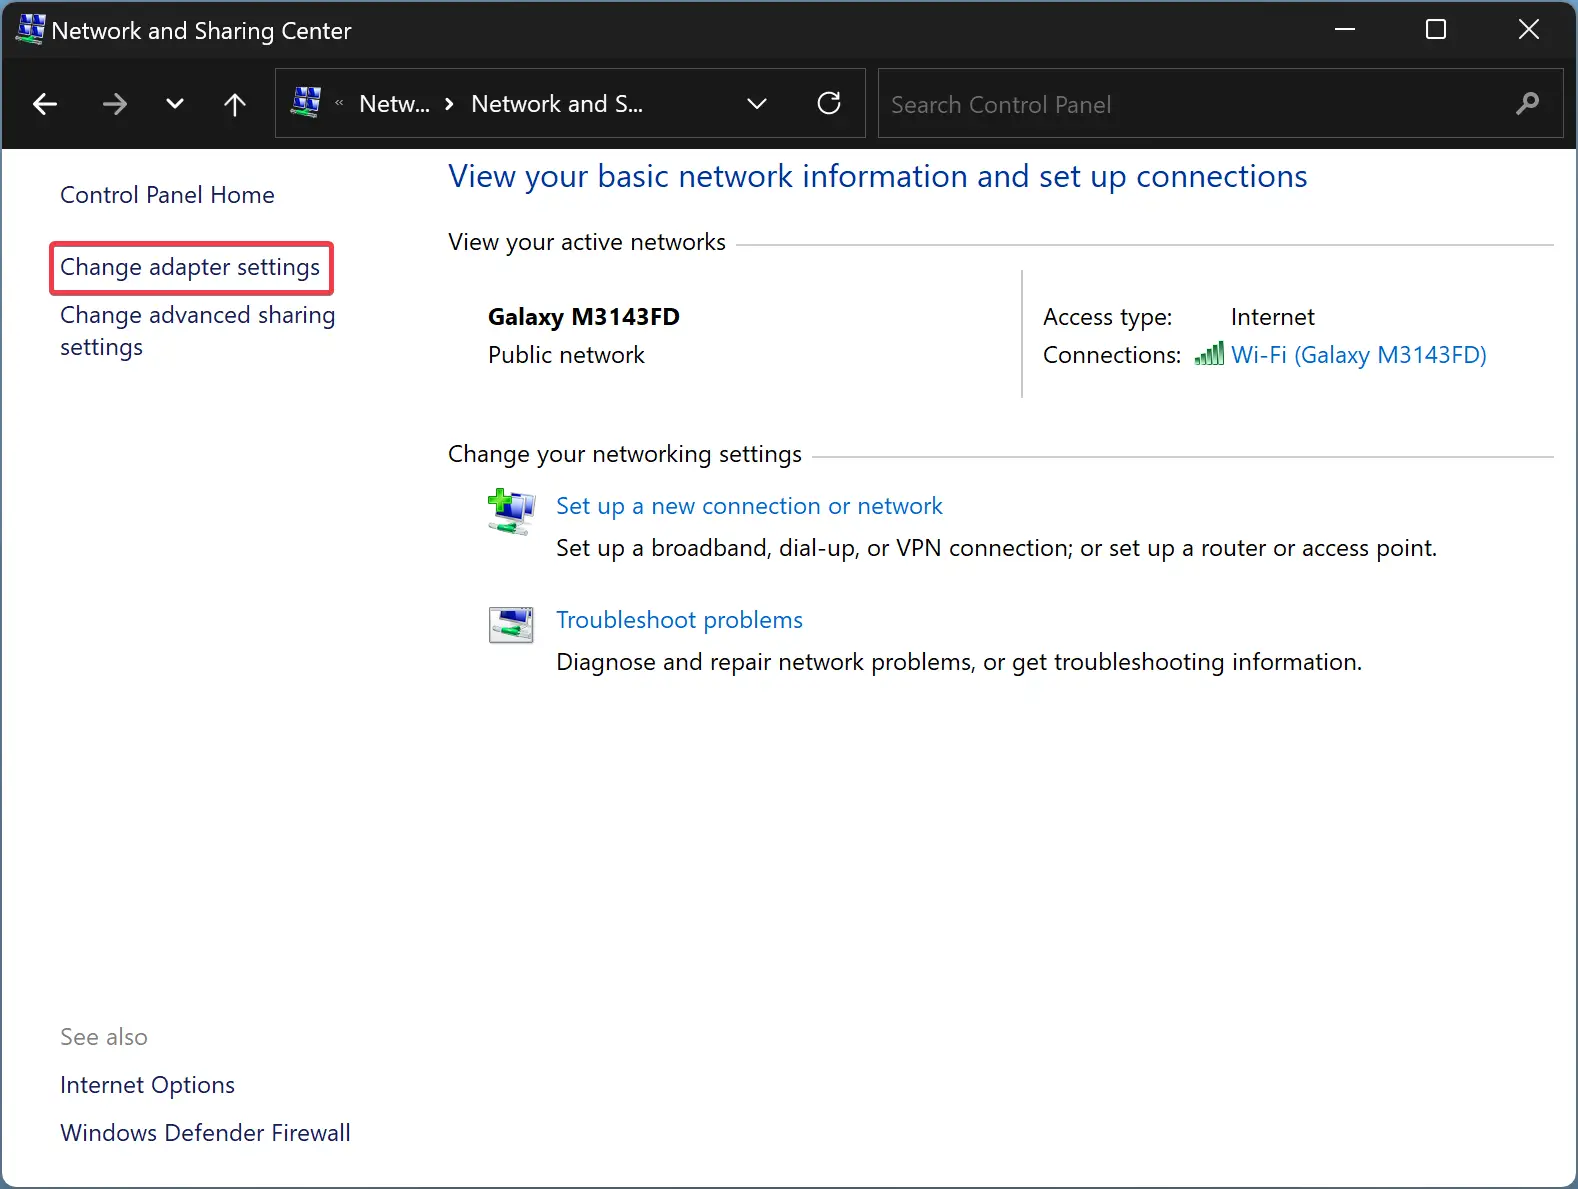
Step 2: Go to Network and Sharing Center
In the Control Panel, select “Network and Internet,” then click on “Network and Sharing Center.”
This section of the Control Panel allows you to view and manage your network connections. You’ll find all the tools you need to modify your network settings here.
Step 3: Access Change Adapter Settings
On the left-hand side, click on “Change adapter settings.”
Here, you can see all your network connections. This step is crucial as it leads you to where you can modify each network’s properties.
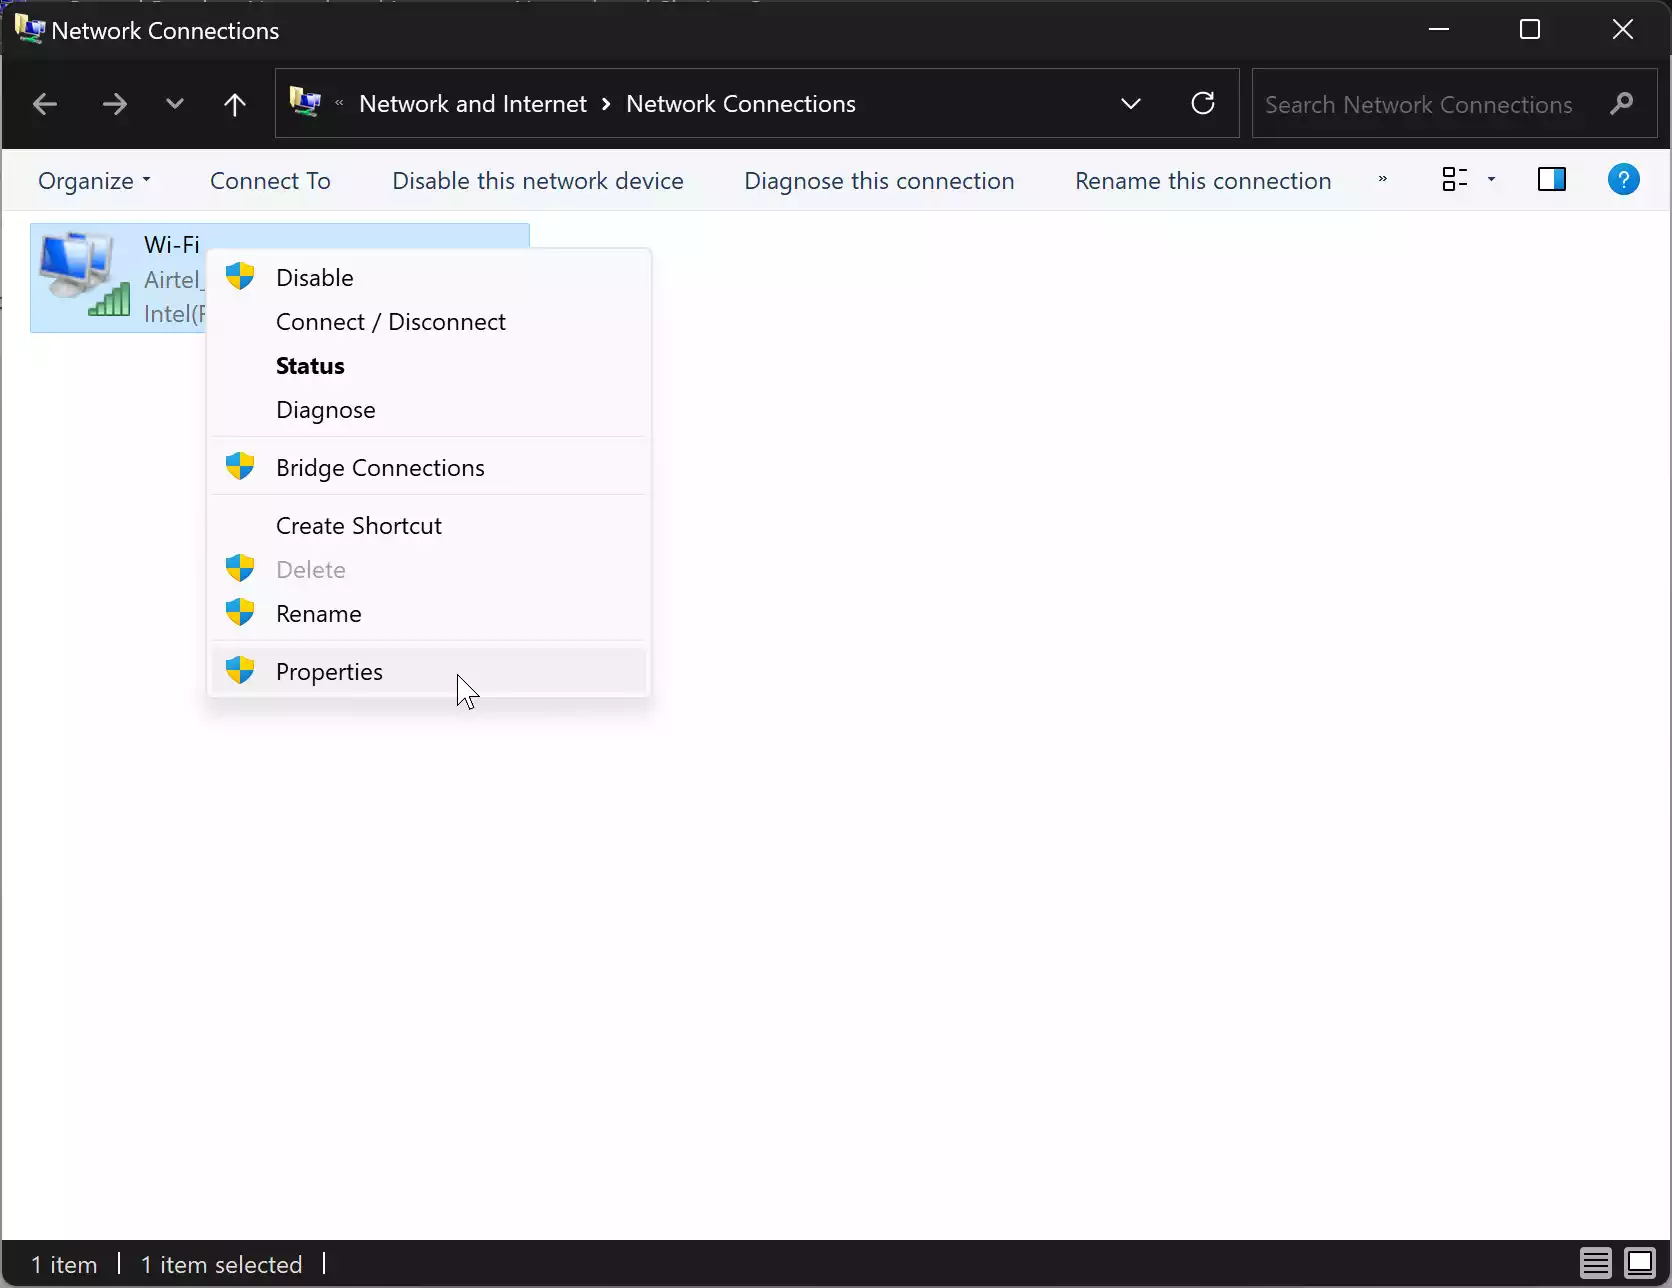
Step 4: Right-Click on Your Network Connection
Right-click on the connection you’re using, either “Wi-Fi” or “Ethernet,” then select “Properties.”
By looking at your network connection properties, you can change various settings, including enabling or disabling different protocols like IPv6.
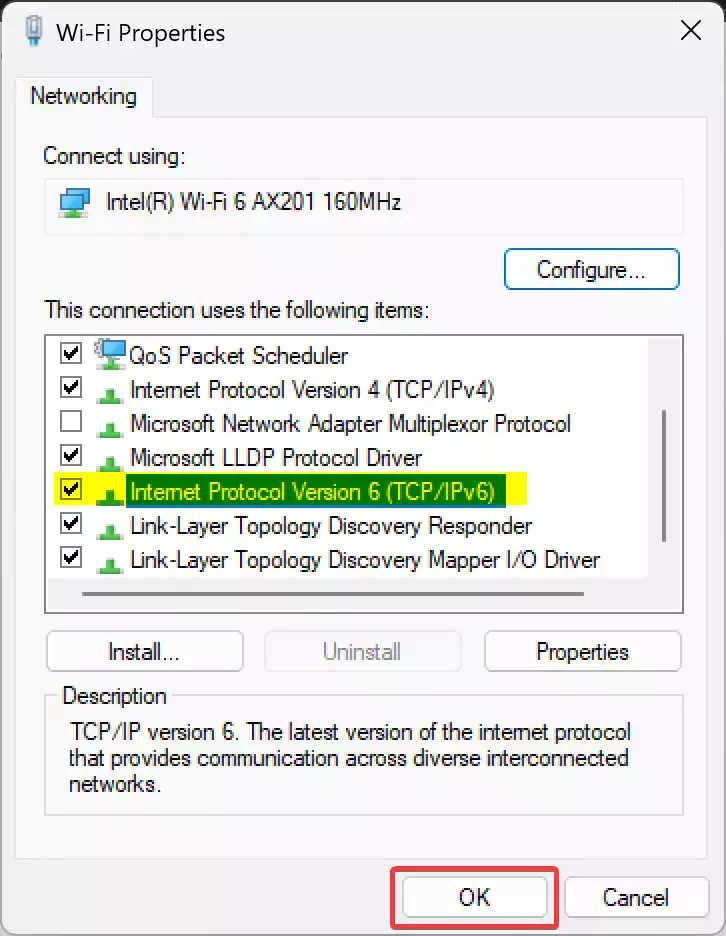
Step 5: Enable IPv6
In the Properties window, check the box next to “Internet Protocol Version 6 (TCP/IPv6),” then click “OK.”
This action activates IPv6 on your system, allowing you to use this protocol for internet connections. It’s a simple yet significant step towards better connectivity.
Once you have completed these steps, your computer will start using IPv6 if your network supports it. You may notice improved connection speeds and better ability to connect with modern devices and services. You’ve now opened the door to a new world of networking potential.
Tips for Enabling IPv6 on Windows 10
- Ensure your router supports IPv6 to fully utilize the protocol.
- Check with your Internet Service Provider (ISP) to confirm they offer IPv6.
- If you encounter issues, restarting your computer and router can help.
- Keep your Windows 10 updated for the best compatibility with IPv6.
- Monitor network performance to ensure IPv6 improves your connection.
Frequently Asked Questions
What is IPv6?
IPv6 is the latest version of Internet Protocol, designed to replace IPv4 and provide a larger address space among other improvements.
Why should I enable IPv6?
Enabling IPv6 prepares your system for future internet advancements and can improve network performance.
Will enabling IPv6 slow down my internet?
No, enabling IPv6 should not slow down your internet. It may even enhance your connection speed.
How do I know if my ISP supports IPv6?
You can contact your ISP directly or check their website for details on IPv6 support.
Do I need to disable IPv4 when enabling IPv6?
No, you can keep both protocols enabled. Windows will choose the best one for each connection automatically.
Summary
- Open the Control Panel.
- Go to Network and Sharing Center.
- Access Change Adapter Settings.
- Right-click on your network connection.
- Enable IPv6.
Conclusion
Enabling IPv6 on Windows 10 is a simple yet impactful task. As the world moves towards more complex and connected systems, having IPv6 enabled ensures your system remains ahead of the curve. This protocol not only expands the number of IP addresses available but also brings improvements in security and efficiency, particularly as more devices connect to the internet.
By following the steps outlined above, you’ve taken a crucial step towards modernizing your internet connectivity. Understanding how to manage and optimize your network settings is a valuable skill in today’s digital world. If you haven’t already, consider upgrading your router or checking with your ISP about IPv6 support to fully leverage this technology.
Knowledge is power, and knowing how to enable IPv6 on Windows 10 empowers you to make the most of your digital experiences. Embrace the change, optimize your connectivity, and explore the vast possibilities that come with faster, more reliable internet access. Feel free to delve deeper into network management or share your newfound skills with others who might benefit from your expertise.
Matt Jacobs has been working as an IT consultant for small businesses since receiving his Master’s degree in 2003. While he still does some consulting work, his primary focus now is on creating technology support content for SupportYourTech.com.
His work can be found on many websites and focuses on topics such as Microsoft Office, Apple devices, Android devices, Photoshop, and more.
The Internet Protocol version 6 (IPv6) is the next-generation Internet protocol designed to replace the aging IPv4. With the rapid growth of connected devices, there’s an evident need for more IP addresses. IPv6 offers a virtually unlimited number of unique IP addresses, ensuring that every device can have a globally unique IP address.
What’s IPv6 in Windows?
IPv6 is a mandatory protocol in modern operating systems, including Windows 10 and 11. It is enabled by default and coexists with IPv4 to promote compatibility with older networks and applications. IPv6 provides several benefits over IPv4, such as improved security, better performance, and simplified network configuration.
One of the primary advantages you get when you enable IPv6 is its vast address space, which eliminates the need for complex address translation mechanisms like Network Address Translation (NAT) used in IPv4 networks. This simplifies network administration and improves end-to-end connectivity.
Configuring network adapter settings
To configure IPv6 in Windows, you need to access the network adapter properties. This section covers how to access and enable IPv6 settings for your network adapters.
Accessing network properties
To access network properties follow these steps:
- Open the Control Panel and navigate to the Network and Sharing Center.
- Click on “Change adapter settings” to view the list of network adapters.
- Right-click on the adapter you want to configure and select “Properties.”
- In the Properties window, scroll down and select “Internet Protocol Version 6 (TCP/IPv6).”
- Click on the “Properties” button to access the IPv6 configuration settings.
IPv6 address configuration options
After opening the “Properties” button as explained in the previous paragraph, you have several options to configure IPv6 in Windows settings:
- Obtain an IPv6 address automatically: This option allows your computer to automatically obtain an IPv6 address from a DHCP server or through stateless address autoconfiguration.
- Use the following IPv6 address: This option lets you manually enter a static IPv6 address and subnet prefix length. This is typically used in larger enterprise networks or when specific addressing requirements need to be met.
- Obtain DNS server address automatically: This option automatically obtains the DNS server address from the DHCP server or through stateless address autoconfiguration.
- Use the following DNS server addresses: This option allows you to manually specify the IPv6 addresses of DNS servers. This may be necessary in certain network environments or when using specific DNS servers for performance or security reasons.
How to disable IPv6?
In some cases, you may need to disable IPv6 on your Windows system, such as when troubleshooting network issues or working with legacy applications that do not support IPv6. Here’s how you can disable IPv6:
- Follow the steps to access the network adapter properties as described earlier.
- In the Properties window, uncheck the box next to “Internet Protocol Version 6 (TCP/IPv6).”
- Click “OK” to save the changes and close the Properties window.
After you disable IPv6, your system will only use the IPv4 protocol for network communication. However, it’s important to note that disabling IPv6 may affect the functionality of certain applications or services that rely on IPv6 connectivity.
Troubleshooting IPv6 connectivity
Despite the improvements in IPv6, you may still encounter connectivity issues or compatibility problems. This section covers some troubleshooting steps and common issues you may encounter when you configure IPv6 in Windows.
Network diagnostics
Windows includes built-in network diagnostic tools that can help identify and resolve IPv6 connectivity issues. You can use the Network Troubleshooter or the Command Prompt to run various diagnostic commands, such as ipconfig, ping and tracert. These tools can provide valuable information about your IPv6 configuration, connectivity status and potential issues.
Common configuration errors
Some common configuration errors that can cause IPv6 connectivity issues include:
- Incorrect subnet prefix or gateway settings
- Firewall rules blocking IPv6 traffic
- Misconfigured DNS server settings
- Compatibility issues with older applications or hardware
It’s important to carefully review your IPv6 configuration settings and make sure that they are correct and consistent across your network devices and systems.
Compatibility issues
While IPv6 is widely supported, there may still be compatibility issues with legacy applications or hardware that were designed solely for IPv4. In such cases, you may need to temporarily disable IPv6 or use compatibility modes to enforce proper functionality. However, it’s recommended to upgrade or replace legacy systems whenever possible to take advantage of the benefits and improved security features of IPv6.
IPv6 configuration best practices
While IPv6 is designed to be more straightforward than IPv4, there are still some IPv6 configuration best practices to follow for optimal performance and security.
Subnet prefix settings
When configuring static IPv6 addresses, it’s important to use the correct subnet prefix length. The prefix length determines the number of bits in the address that are used for the network portion and the remaining bits for the host portion. Consult your network administrator or follow industry standards for proper subnet prefix configuration.
Gateway configuration
If you’re using static IPv6 addresses, you’ll need to configure the IPv6 gateway address correctly. The gateway acts as the entry and exit point for network traffic and an incorrect gateway configuration can lead to connectivity issues. Check that the gateway address is reachable and correctly configured on your network devices.
Protocol preferences
In Windows, you can specify the order in which network protocols are used. It’s generally recommended to prioritize IPv6 over IPv4 to encourage the adoption of the newer protocol. However, you may need to adjust the protocol preferences based on your specific network requirements. For example, if you have legacy applications that only support IPv4, you may need to prioritize IPv4 for those applications.
Security
IPv6 includes several security enhancements over IPv4, such as mandatory IPsec support and better protection against address spoofing. However, it’s still important to follow best security practices, such as using firewalls, keeping your software up-to-date and implementing access controls.
Learn how IPConfig works and why it matters – click to watch!
Security considerations for IPv6
As with any network protocol, it’s important to consider security when configuring and using IPv6. Here are some security considerations to keep in mind:
- Implement firewalls: While IPv6 includes improved security features, it’s still important to use firewalls to control network traffic and protect against unauthorized access. Configure your firewalls to allow only necessary IPv6 traffic and block any suspicious or unwanted connections.
- Keep software updated: Regularly update your operating system, applications and network devices with the latest security patches and features. Software vulnerabilities can be exploited by attackers, so keeping your systems up-to-date is required for maintaining a secure network.
- Use access controls: Implement access controls, such as user authentication and authorization mechanisms, to restrict access to your network resources and sensitive data. This can help prevent unauthorized access and mitigate the risk of data breaches or cyberattacks.
- Monitor network traffic: Regularly monitor your network traffic for any suspicious activity or potential security threats. Use network monitoring tools and log analysis to detect and respond to security incidents in a timely manner.
Tools like NinjaOne can further enhance the experience by providing integrated network management and monitoring capabilities. When coupled with these IPv6 configuration best practices, IT professionals can guarantee a smooth and secure IPv6 transition. Start your free trial today.
Windows 10 and 11 allow to enable and disable IPv6, currently available most advanced version of Internet Protocol, with a small registry tweak. This protocol is primarily responsible for identifying moreover locating Network for computers connected to the World Wide Web. In addition, it also acts as a communication protocol for routing web traffic online. But many users don’t prefer to use IPv6 due to a lack of support from a few modems and router. They also hesitate to go with new technology including features so want it to turn off completely.
For IPv6 Internets, an issue can take place on a handful of hosts where there is no routing path to it. This produces a delay in establishing the connection to the resource because the host attempts first for IPv6, which fails, then for IPv4. IPv6 in Windows Server 2016 and Windows 10 and 11 identifies this situation then stops the starting connection effort. So if you Want to that no delay may occur during making a connection you opt to disable it.
IPv6 in Windows 11 and 10
Step 1 – You have to first sign into Windows 11 or 10 as an administrator. This is very necessary as it is only the administrator that can disable or enable IPv6 in Windows 11 or 10. Next, type the word regedit into the search box and then press the Enter key.
Step 2 – You will be prompted by the User Access Control, just click on Yes to proceed. At this point, you have to expand the registry trees with the help of the Registry Editor and navigate to
HKEY_LOCAL_MACHINE\SYSTEM\CurrentControlSet\Services\TCPIP6\Parameters.
Step 3 – Right-click on an empty space then select New followed by “DWORD (32-bit) Value”. Give the name DisabledComponents to this Value.
Step 4 – It is now time to modify the DisabledComponents value. For you to accomplish this, right-click on DisabledComponents and select Modify from the list. Once you have done this, a dialog box will appear, type in ffffffff and then click OK. You can also provide 0xFF as the value data as it works to Disable and Enable IPv6 in Windows 11 or 10 in the same way.
Step 5 – After this, you have to restart the system in other to disable the IPv6. You can confirm that the successful disabling of the IPv6 by running ipconfig /all command from the command prompt. The process is successful if the output displays only the IPv4.
Re-enable IPv6 in Windows 11 or 10
Step 6 – For you to enable the IPv6, all you have to do is to repeat steps 1, 2, 3, 4 and then delete the DisabledComponents registry value. Alternatively, you can change the registry data to 0. Restart the system and that’s all!
Most of the time, users tend to disable IPv6 in Windows 11 or 10 by unchecking its checkbox under the properties of the Network Adapter. An opposite task is employed by them when they want to enable the same protocol. But the truth is that merely checking or unchecking the IPv6 checkbox does nothing but unbinds or binds IPv6 from a particular network adapter. But if you really want to overcome common issues that occur with IPv6 in Windows 11 or 10, you will have to manipulate the registry entries.
However, you must be very cautious when carrying out this crucial task as any slightest mistake in the Windows registry, is very much capable of sending the entire Window install to glitch
Conclusion
This is a pretty simple method to Disable/Enable IPv6 in Windows 11 or 10. Although IPv6 is better in most of the consequences than IPv4, in the condition, when you find any trouble, this article will hopefully help you so much.
Internet Protocol version 6 (IPv6) is the latest version of the Internet Protocol, designed to replace the older IPv4 protocol that’s been in use for decades. While IPv6 brings several advantages, some situations might require you to enable or disable it on your Windows 11/10 computer. Whether you need to troubleshoot network issues or prefer to use only IPv4, here’s a user-friendly guide on how to enable or disable IPv6 on Windows 11/10.
What is IPv6?
IPv6 provides a larger address space than IPv4, enabling more devices to connect directly to the Internet and supporting the growth of the Internet ecosystem. It brings benefits such as improved security, auto-configuration, and streamlined routing. However, IPv4 is still widely used, and in some cases, disabling IPv6 can resolve compatibility issues with certain networks or applications.
Follow these simple steps to enable or disable IPv6 on your Windows 11or PC:-
Step 1. Right-click on the Start button located on the taskbar, and from the context menu, select “Run.”
Step 2. In the Run dialog box, type “control” or “control panel” and press Enter or click OK. This will open the Control Panel.
Step 3. In the Control Panel, set the “View by” option to “Category” (usually located in the top-right corner).
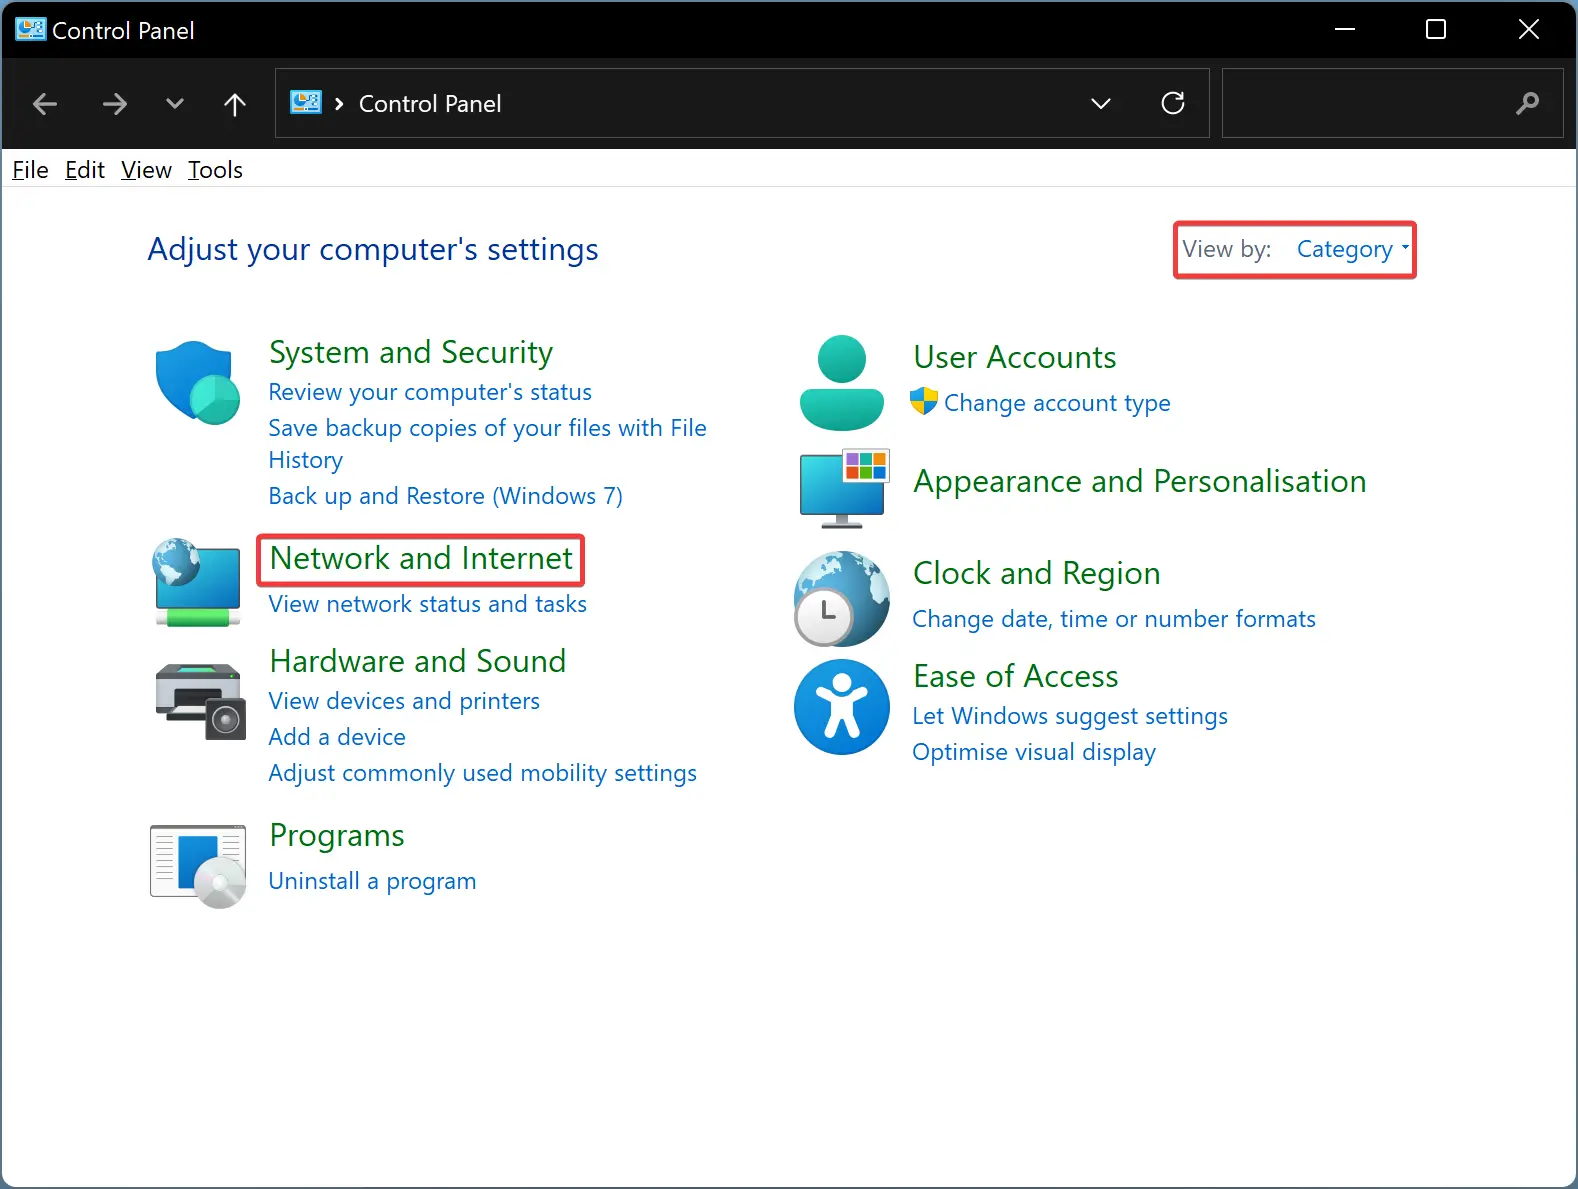
Step 4. Click on the “Network and Internet” category.
Step 5. Now, click on “Network and Sharing Center.”

Step 6. In the Network and Sharing Center window, find and click on the “Change adapter settings” link on the left-hand side.
Step 7. You’ll now see a list of network connections on your computer. Right-click on the network connection you want to modify (e.g., Ethernet or Wi-Fi) and select “Properties” from the context menu.
Step 8. In the Properties window, locate and select “Internet Protocol Version 6 (TCP/IPv6)” from the list of items.
Step 9. To enable IPv6, make sure the checkbox next to “Internet Protocol Version 6 (TCP/IPv6)” is checked. If it’s not, check the box and then click “OK.”
Step 10. To disable IPv6, uncheck the box next to “Internet Protocol Version 6 (TCP/IPv6)” and click “OK.”
Step 11. If you made any changes to the IPv6 settings, you might be prompted to restart your computer for the changes to take effect fully. If so, save your work and restart your PC.
Using the Control Panel method, you can easily enable or disable IPv6 on your Windows 11 computer. Remember to consider the implications of disabling IPv6, as it’s generally recommended to leave it enabled for the best internet experience.
Notes:
- Disabling IPv6 should generally be done with caution and only when you encounter specific issues that can be resolved by doing so. IPv6 offers several advantages and is becoming more widely adopted.
- It’s advisable to update your network hardware and drivers to the latest versions if you experience any compatibility issues with IPv6.
That’s it! You have successfully enabled or disabled IPv6 on your Windows 11/10 computer. Remember that IPv6 is the future of the internet and offers many benefits, so it’s generally recommended to leave it enabled unless you have a specific reason to disable it.
Conclusion
In conclusion, configuring IPv6 settings on Windows 11/10 is a straightforward task, and this user-friendly guide provides step-by-step instructions to enable or disable IPv6 as needed. While IPv6 offers several advantages, it’s essential to weigh the implications of disabling it, as it plays a crucial role in the future of the internet. By staying informed and making informed choices, you can ensure a seamless and efficient network experience on your Windows 11/10 PC.
In recent years, the internet has grown exponentially, leading to a pressing need for increased IP address space. Internet Protocol version 6 (IPv6) was developed as a successor to Internet Protocol version 4 (IPv4), which had become limited in its address availability. As of now, IPv6 adoption is crucial due to the ever-increasing number of devices that connect to the internet. However, you might find situations in which enabling or disabling IPv6 is necessary to troubleshoot network issues or optimize your setup. In this article, we will explore how to enable or disable IPv6 in Windows 11 and Windows 10, along with practical insights into why you might choose to do so.
Understanding IPv6
IPv6 is an internet protocol that contains a larger address space than its predecessor, IPv4. While IPv4 uses a 32-bit address scheme that allows for just over 4 billion unique addresses, IPv6 employs a 128-bit scheme, resulting in an astronomically large number of unique IP addresses. This shift is notably important due to the exponential growth of internet-connected devices — smart home appliances, IoT devices, and even wearables have all contributed to the depletion of IPv4 addresses.
Despite the advantages that come with IPv6, some users may experience compatibility issues with certain networks or software that may not fully support IPv6. In such cases, you may find it advantageous to disable IPv6 temporarily or permanently.
Common Reasons for Disabling IPv6
- Compatibility Issues: Some older applications or network equipment may not work seamlessly with IPv6.
- Network Conflicts: Having both IPv4 and IPv6 activated sometimes results in conflicting network configurations.
- Performance Improvements: In specific scenarios, disabling IPv6 can improve speed and reduce latency.
- Testing and Troubleshooting: Fault isolation during network troubleshooting can lead to temporarily disabling IPv6.
How to Enable or Disable IPv6 in Windows 10 and 11
Before you start the process of enabling or disabling IPv6, it is essential to understand that administrative privileges are generally required to adjust your network settings. Make sure you are logged in as an administrator before proceeding.
Method 1: Using Network Connection Settings
The most straightforward method to enable or disable IPv6 in Windows is through the Network Connection settings. Here’s how to do it step by step.
Step 1: Open Network Connections
-
Windows 10:
- Right-click the Start button and select Network Connections.
- Alternatively, press
Windows + Ito open Settings, click on Network & Internet, and then select Status to find Network and Sharing Center.
-
Windows 11:
- Right-click the Network icon in the taskbar and select Network and Internet settings.
- Go to Advanced network settings and then select More network adapter options.
Step 2: Access the Properties of Your Active Connection
- You will see a list of network connections. Right-click on the active connection you are using (Local Area Connection, Wi-Fi, etc.) and select Properties.
Step 3: Enable or Disable IPv6
- In the connection properties window, look for Internet Protocol Version 6 (TCP/IPv6) in the list.
- To enable IPv6, ensure the checkbox is marked.
- To disable it, uncheck the box next to Internet Protocol Version 6 (TCP/IPv6).
- Click OK to save your changes.
Step 4: Restart Your Computer or Connection
For the changes to take effect, you may need to restart your computer or simply disconnect and reconnect your network connection.
Method 2: Using Command Prompt
If you prefer using a command-line interface, you can enable or disable IPv6 using Command Prompt. Here’s how to do it:
Step 1: Open Command Prompt as Administrator
- Press
Windows + Xand select Windows Terminal (Admin) or Command Prompt (Admin). - If prompted by User Account Control (UAC), click Yes to allow administrative permissions.
Step 2: Disable IPv6
To disable IPv6, type the following command and press Enter:
netsh interface ipv6 set gray if="" admin=disableReplace “ with the name of your network adapter (for example, «Ethernet» or «Wi-Fi»). You can list all interfaces by typing:
netsh interface show interfaceStep 3: Enable IPv6
If you decide to re-enable IPv6 later, type this command:
netsh interface ipv6 set gray if="" admin=enableMethod 3: Using Windows Registry
For advanced users who are comfortable working with the Windows Registry, you can enable or disable IPv6 via Registry Editor.
Step 1: Open Registry Editor
- Press
Windows + Rto open the Run dialog box. - Type
regeditand pressEnter. - If prompted by UAC, click Yes.
Step 2: Navigate to the IPv6 Key
Go to the following path:
HKEY_LOCAL_MACHINESYSTEMCurrentControlSetServicesTcpip6ParametersStep 3: Modify the “DisabledComponents” Value
- Right-click the Parameters folder, hover over New, and select DWORD (32-bit) Value.
- Name the new value
DisabledComponents. - Set its value:
- To disable IPv6 entirely, set it to
FF. - To enable IPv6, just delete the
DisabledComponentsvalue or set it to0.
- To disable IPv6 entirely, set it to
- Restart your computer for the changes to take effect.
Method 4: Using PowerShell
PowerShell provides another method for enabling and disabling IPv6.
Step 1: Open PowerShell as Administrator
- Press
Windows + Xand select Windows PowerShell (Admin). - If prompted by UAC, click Yes.
Step 2: Disable IPv6
To disable IPv6, type the following command:
Set-NetAdapterBinding -Name "" -ComponentID ms_tcpip6 -Enabled $falseStep 3: Enable IPv6
To enable IPv6 again, use this command:
Set-NetAdapterBinding -Name "" -ComponentID ms_tcpip6 -Enabled $trueMethod 5: Group Policy Editor
Windows Pro, Enterprise, and Education versions support the Group Policy Editor, and you can also manage IPv6 settings here.
Step 1: Open Group Policy Editor
- Press
Windows + Rand typegpedit.msc, then pressEnter.
Step 2: Navigate to the Network Settings
Go to:
Computer Configuration -> Administrative Templates -> Network -> Network ConnectionsStep 3: Configure IPv6 Settings
- Look for the setting named “Prohibit use of Internet Protocol version 6 (IPv6)”.
- Double-click it to modify.
- Set it to Enabled to disable IPv6.
- Set it to Not Configured or Disabled to enable IPv6.
- Click OK and restart your computer.
Checking IPv6 Status
After enabling or disabling IPv6, it may be useful to verify the changes. Here’s how you can check if IPv6 is enabled or disabled:
Method 1: Using Command Prompt
Open Command Prompt and type the following command:
ipconfigLook for the sections titled Ethernet adapter or Wireless LAN adapter. If IPv6 is enabled, you will see addresses starting with 2001: for public addresses or ::1 for localhost.
Method 2: Using PowerShell
Open PowerShell and type:
Get-NetAdapter | Get-NetIPConfigurationThis command lists all network adapters and IP configurations, showing you if IPv6 is enabled.
Troubleshooting IPv6 Issues
If you encounter any issues after enabling or disabling IPv6, here are a few troubleshooting tips:
-
Check DNS Settings: Incorrect DNS configurations can cause connectivity issues.
-
Reset the Network Stack: If problems persist, consider flushing the DNS cache and resetting the network stack. Run these commands in Command Prompt:
ipconfig /flushdns netsh int ip reset -
Check Firewall Settings: Ensure that your firewall settings allow for IPv6 traffic if you are using one.
-
Update Network Drivers: Outdated drivers can lead to problems with network configurations. Visit the manufacturer’s website for the latest versions.
-
Use Windows Troubleshooter: Windows has a built-in troubleshooter that can help diagnose and fix network issues. Access it by right-clicking the network icon in the taskbar and selecting Troubleshoot problems.
Conclusion
IPv6 is an essential technology that facilitates the ongoing expansion of the internet, providing a solution to the limitations imposed by IPv4. However, it is crucial to assess when and why you should enable or disable IPv6 in your Windows 10/11 operating system.
Whether you’re doing so for compatibility reasons, troubleshooting, or performance enhancements, the processes outlined above will help you make the necessary changes effectively. Always remember to check your network settings to ensure that your connection remains stable and secure after making any alterations. Depending on your specific requirements and configurations, one or multiple methods discussed may fit your needs.
Understanding your network setup, staying informed about updates to internet protocols, and knowing how to adjust these settings will empower you to maintain an optimal browsing experience in an ever-evolving digital landscape.