Windows 10 enable hibernation

В этой инструкции подробно о том, как включить и отключить гибернацию в Windows 10, восстановить или удалить файл hiberfil.sys (или уменьшить его размер), а также добавить пункт «Гибернация» в меню Пуск. Заодно расскажу о некоторых последствиях отключения режима гибернации.

А для начала о том, о чем идет речь. Гибернация — энергосберегающее состояние компьютера, предназначенное в первую очередь для ноутбуков. Если в режиме «Сна» данные о состоянии системы и программ хранятся в оперативной памяти, потребляющей энергию, то при гибернации эта информация сохраняется на системном жестком диске в скрытом фале hiberfil.sys, после чего ноутбук выключается. При включении, эти данные считываются, и вы можете продолжить работу с компьютером с того момента, на котором закончили.

Как включить и отключить гибернацию Windows 10

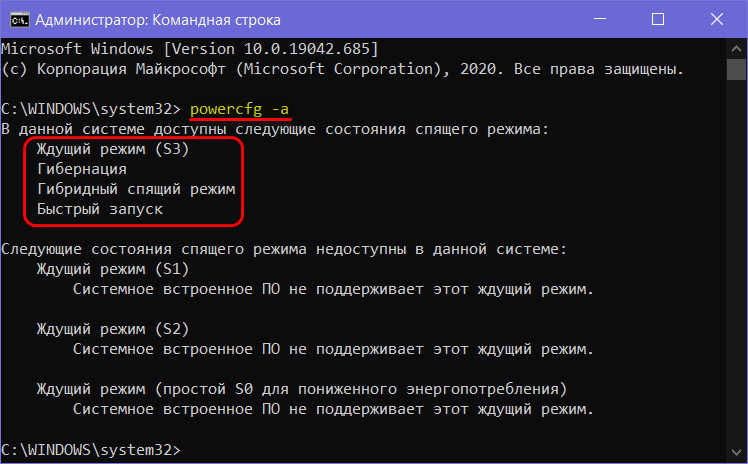
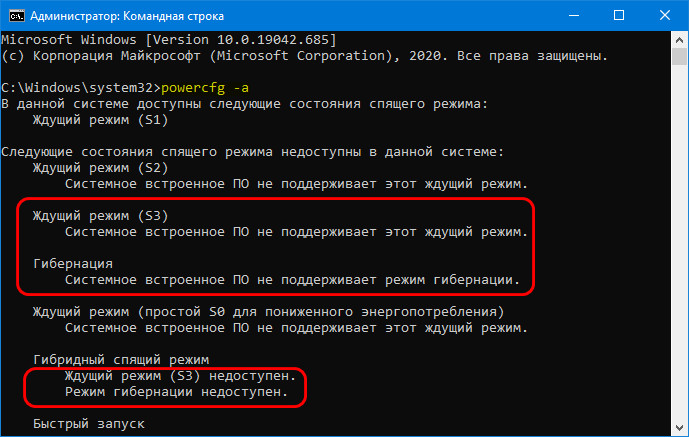
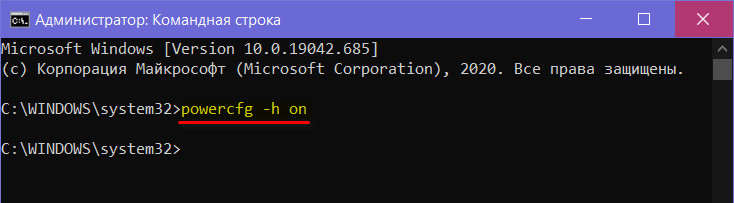
Самый простой способ включения или отключения режима гибернации — использовать командную строку. Потребуется запустить ее от имени администратора: для этого кликните правой кнопкой мыши по кнопке «Пуск» и выберите соответствующий пункт.

Отключение гибернации

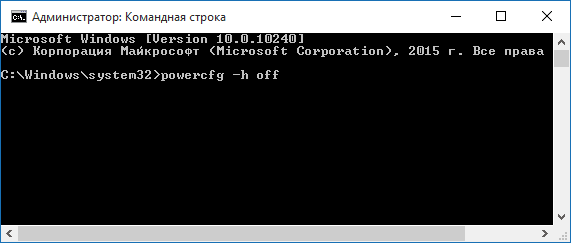
Чтобы отключить гибернацию, в командной строке введите powercfg -h off и нажмите Enter. Это отключит данный режим, удалит файл hiberfil.sys с жесткого диска, а также отключит опцию быстрого запуска Windows 10 (которая также задействует данную технологию и без гибернации не работает). В данном контексте рекомендую прочитать последний раздел этой статьи — об уменьшении размера файла hiberfil.sys.

Для включения режима гибернации, используйте команду powercfg -h on тем же образом. Учтите, что эта команда не добавит пункт «Гибернация» в меню Пуск, как это сделать описано далее.

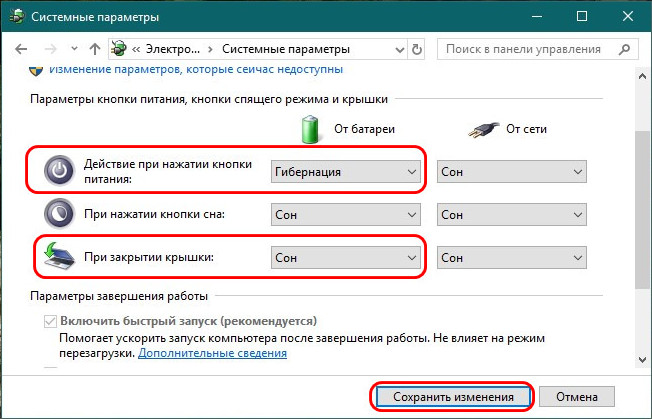
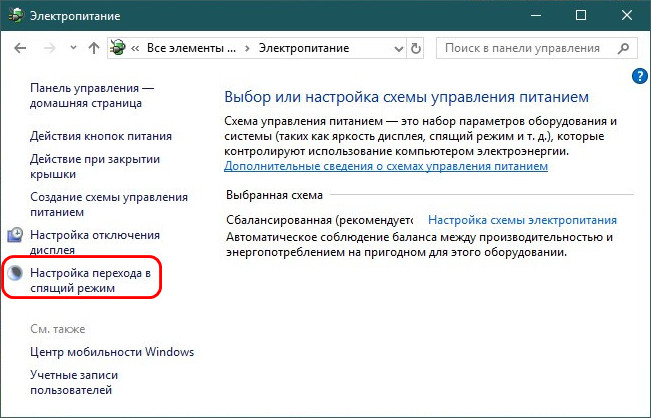
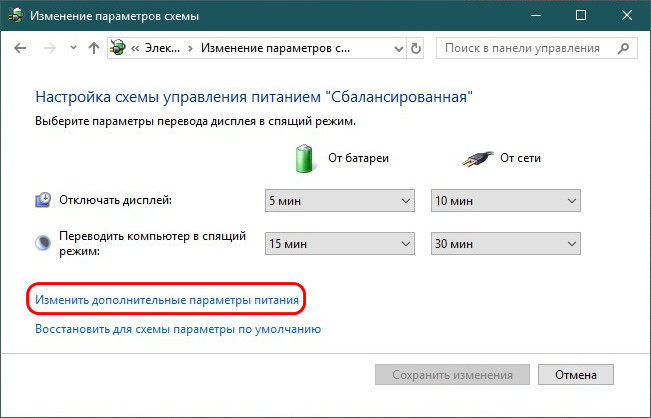
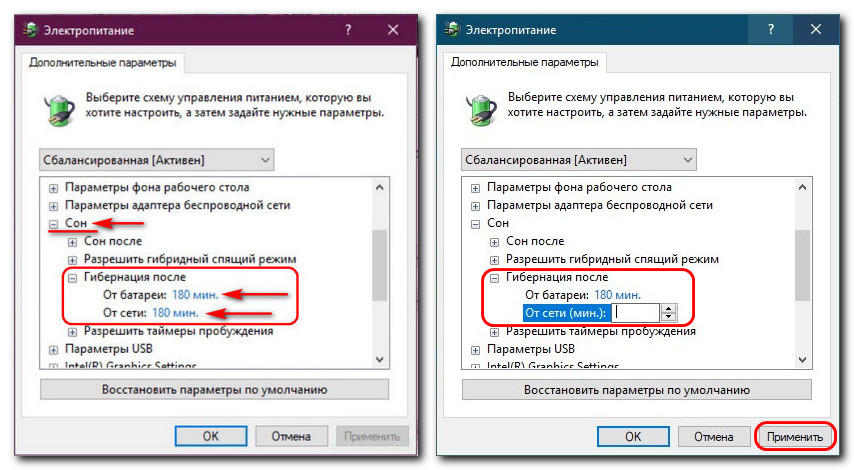
Примечание: после отключения гибернации на ноутбуке следует так же зайти в Панель управления — Электропитание, кликнуть по настройке используемой схемы питания и посмотреть дополнительные параметры. Проверьте, чтобы в разделах «Сон», а также действиях при низком и критическом разряде батареи не был установлен переход в гибернацию.

Еще один способ отключения гибернации — использование редактора реестра, для запуска которого можно нажать клавиши Win+R на клавиатуре и ввести regedit, после чего нажать Enter.

В разделе HKEY_LOCAL_MACHINE\ System\ CurrentControlSet\ Control\ Power найдите значение DWORD с именем HibernateEnabled, дважды кликните по нему и установите значение 1, если гибернацию следует включить и 0 — чтобы выключить.

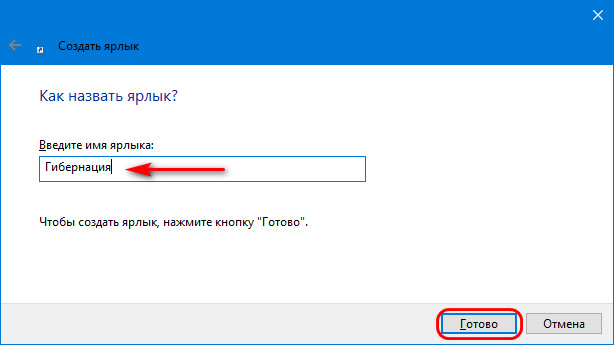
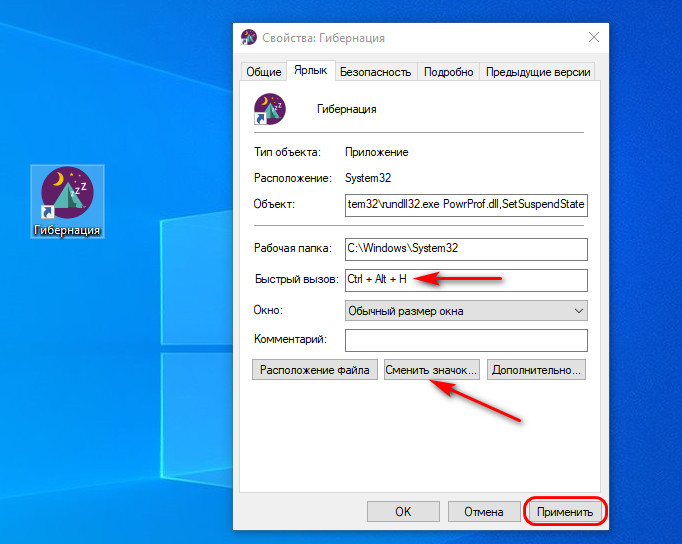
Как добавить пункт «Гибернация» в «Завершение работы» меню Пуск

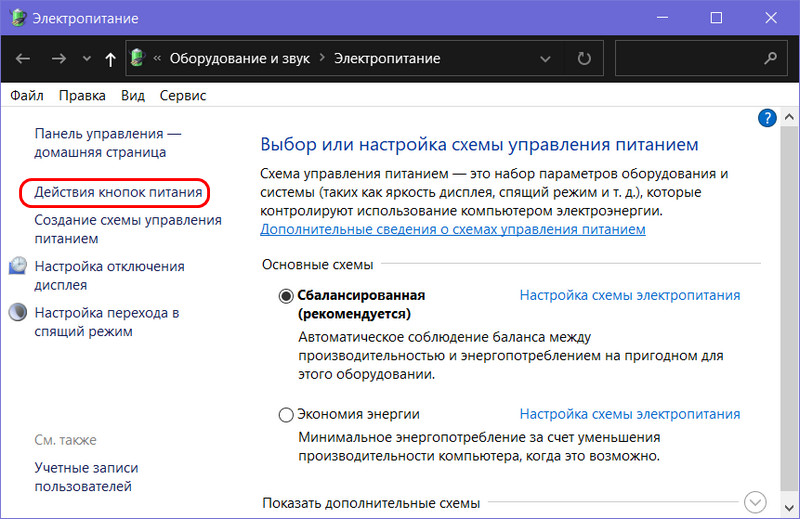
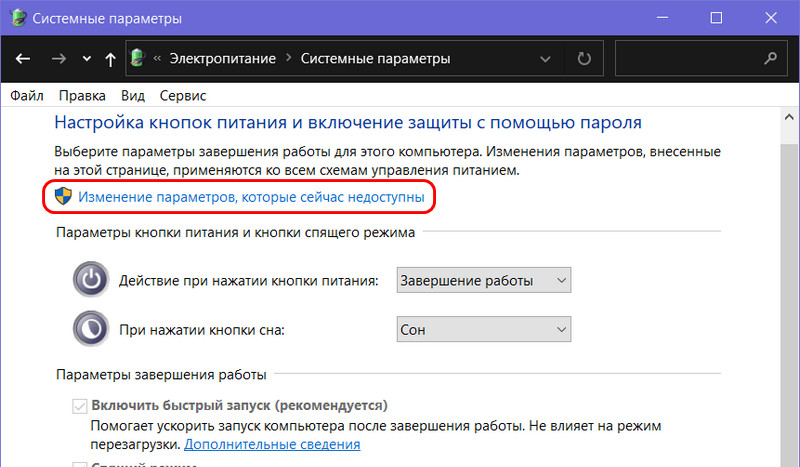
По умолчанию в Windows 10 отсутствует пункт гибернации в меню Пуск, но его можно туда добавить. Для этого, зайдите в Панель управления (чтобы попасть в нее, можно нажать правой кнопкой мыши по кнопке Пуск и выбрать нужный пункт меню) — Электропитание.

Дополнительные параметры питания Windows 10

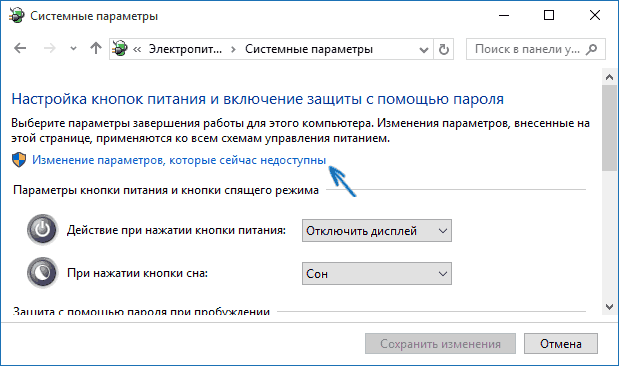
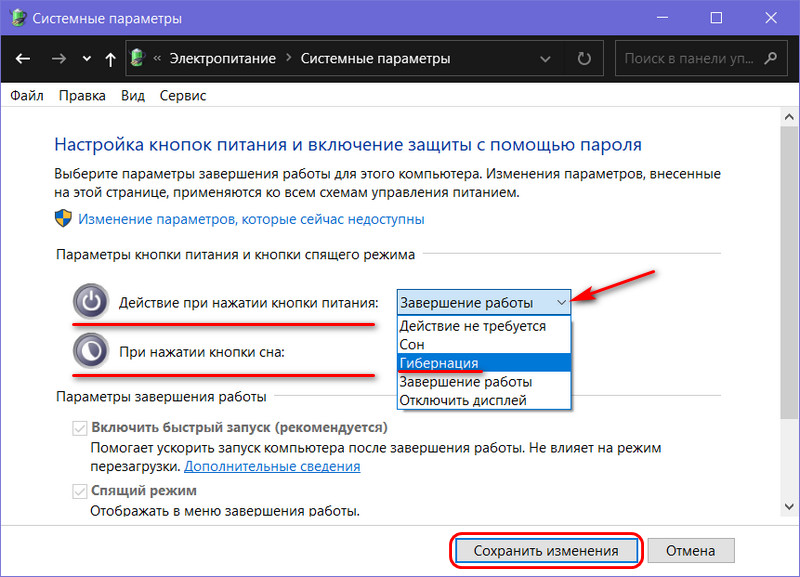
В окне настроек электропитания, слева, нажмите пункт «Действие кнопок питания», а затем кликните «Изменение параметров, которые сейчас недоступны» (требуются права администратора).

Добавить пункт Гибернация в меню пуск Windows 10

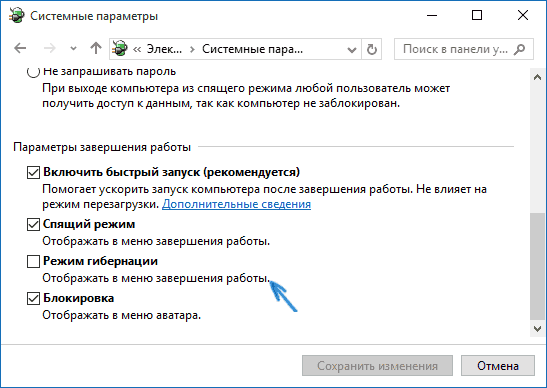
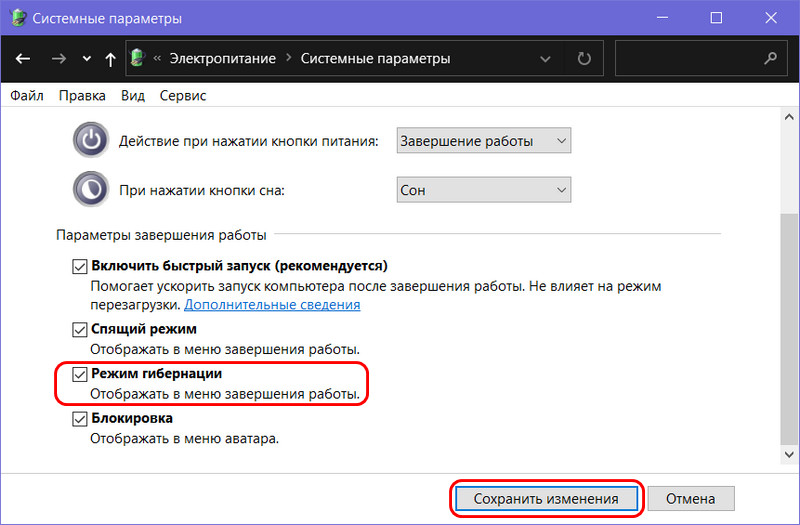
После этого вы сможете включить отображение пункта «Режим гибернации» в меню завершения работы. Если пункт отсутствует или не активен, используйте инструкцию Что делать, если нет пункта Гибернация в меню Пуск Windows 10 и Windows 11.

Как уменьшить файл hiberfil.sys

В обычных условиях, в Windows 10 размер скрытого системного файла hiberfil.sys на жестком диске составляет чуть более 70 процентов размера оперативной памяти вашего компьютера или ноутбука. Однако, этот размер можно уменьшить.

Если вы не планируете использовать ручной перевод компьютера в режим гибернации, но при этом хотите сохранить опцию быстрого запуска Windows 10, вы можете установить уменьшенный размер файла hiberfil.sys.

Для этого, в командной строке, запущенной от имени администратора, введите команду: powercfg /h /type reduced и нажмите Enter. Для того, чтобы вернуть все в исходное состояние, в указанной команде вместо «reduced» используйте «full».

Если что-то осталось не ясным или не получается — спрашивайте. Хочется надеяться, что вы сможете найти здесь полезную и новую информацию.

Table of contents

  • What is Hibernation?
  • Why Should You Hibernate?
  • Is Hibernation Risky?
  • Difference Between Hibernation and Sleep Mode
  • How to Enable ‘Hibernate’ on Windows 10/11
    • Solution 1: Enabling the hibernate function via control panel
    • Solution 2: Enabling the hibernate function via the command prompt
    • Solution 3: Enabling the hibernate function via the registry editor
  • How to Hibernate Windows 10/11?
  • How to Turn Off Hibernation on Windows 10/11?
  • How to Disable Sleep Mode on Windows 10/11?
  • Conclusion
  • FAQ

One of the most persistent questions since PCs became a thing is how to increase laptop battery life. Using Windows hibernation function or Sleep Mode is a common suggestion to achieve this aim.

However, activating these functions is not always a straightforward process. Even after understanding how to enable and disable hibernation in Windows 10/11, it’s important to be aware of the implications of each choice.

This article is all about hibernation in Windows: how your computer hibernates, how to turn off hibernation in Windows 10/11, and even a bit about Sleep Mode. But first, let us look at what hibernation in Windows is.

What is Hibernation?

Hibernation is like shutting down your computer, except that it does not turn it off completely or shut it down. Instead, it places it in a sleep state that allows it to quickly wake up the next time you turn on your computer. In more technical terms, hibernation is an alternative to the Shut Down function or Sleep Mode. Just before you click the Hibernate option in the Power menu, Windows captures the system’s current state and stores that ‘snapshot’ to your hard drive. That way, it can immediately restore your system to that state when you turn it back on. 

Why Should You Hibernate?

Hibernation is known to achieve two different things for the average PC user. The first is helping your computer wake up faster than usual so you can resume work from where you stopped.

Keeping app windows open is one of the main reasons people keep their computers turned on for long periods.

The second is conserving battery life. When you hibernate your computer, power is cut off from different components, such as your RAM, to prevent your system from using power while in this state.

Thus, if you were using your PC and wanted to step out quickly, you could enable Hibernate on Windows 10/11 .

First, your PC will boot up faster when you do so. And second, only a trickle of battery life would have been used.

Is Hibernation Risky?

While there are minor concerns about hibernation, they are not significant enough to make you stop the practice entirely.

The only downside that you may notice is slow performance at startup when your computer loads the ‘snapshot’ onto the RAM.

That said, it’s always a good idea to shut down your computer occasionally to improve its lifespan.


Also Read: Laptop Lifespan: Why You Should Definitely Shut Down Your PC Every Night


Difference Between Hibernation and Sleep Mode

Hibernation and Sleep Mode are often considered to be similar in the sense that both of them are conditions of ‘half asleep, half awake’ computers.

Yes, both are functions for shutting down computers without shutting them down completely. But they are also different from each other.

The biggest difference between hibernation and Sleep Mode in Windows 10/11 is the state of inactivity.

Choosing the hibernate power option means your computer is almost completely turned off, which is why it uses up so little battery life.

But Sleep Mode essentially puts the computer on ‘standby,’ keeping your apps open.

A second notable difference between Hibernation Mode and Sleep Mode in Windows 10/11 is that hibernation saves the snapshot of your computer state to the hard disk.

On the other hand, Sleep Mode saves the snapshot to your RAM.


Also Read: How to Stop Apps from Running in the Background on Windows 10 PC?


How to Enable ‘Hibernate’ on Windows 10/11

Now that we have defined the hibernation function in Windows 10/11 and differentiated it from Sleep Mode, how do you enable it? Not all Windows computers have hibernation enabled as a default power option. In computers with this function enabled by default, you will find it alongside the Restart and Sleep Mode functions in the Power menu.  However, for the majority of PCs, you have to activate the hibernation function yourself, after which it will be included in the Windows Power menu. Once activated, you can click the power icon and select Hibernate or go to the Control Panel window and prompt your computer to hibernate whenever you press the power button or close the lid. Now, let’s show you the different ways to activate the Hibernate option.

Solution 1: Enabling the hibernate function via control panel

Control Panel is the most common route for enabling the hibernation function. This method leads you to the Power Options on your Windows PC, allowing you to determine how to use available options to turn on the hibernate function.


Also Read: [FIXED] “There Are Currently No Power Options Available” Windows Issue


Follow these steps:

  • Open the Run dialog window (press
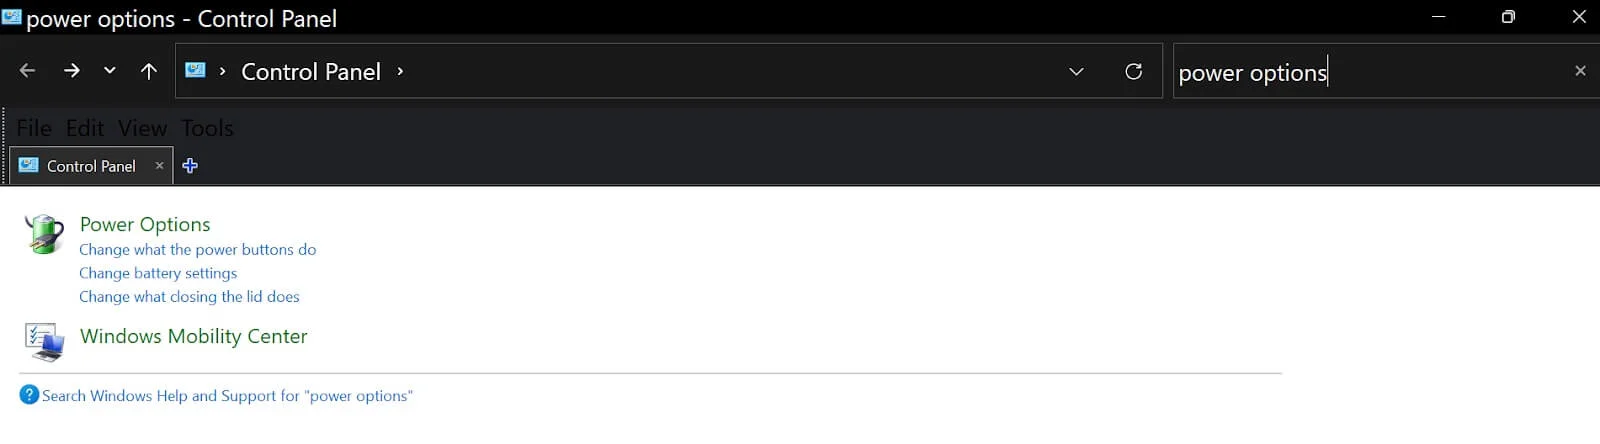
 Windows + R), type control into the text field, and hit Enter.
  • Type power options in the search field and click Choose what the power buttons do under Power Options.

Choose what the power buttons do under Power Options.

  • Now, go to the Shutdown settings section on the subsequent screen and check the box beside Hibernate.

Shutdown settings section on the subsequent screen

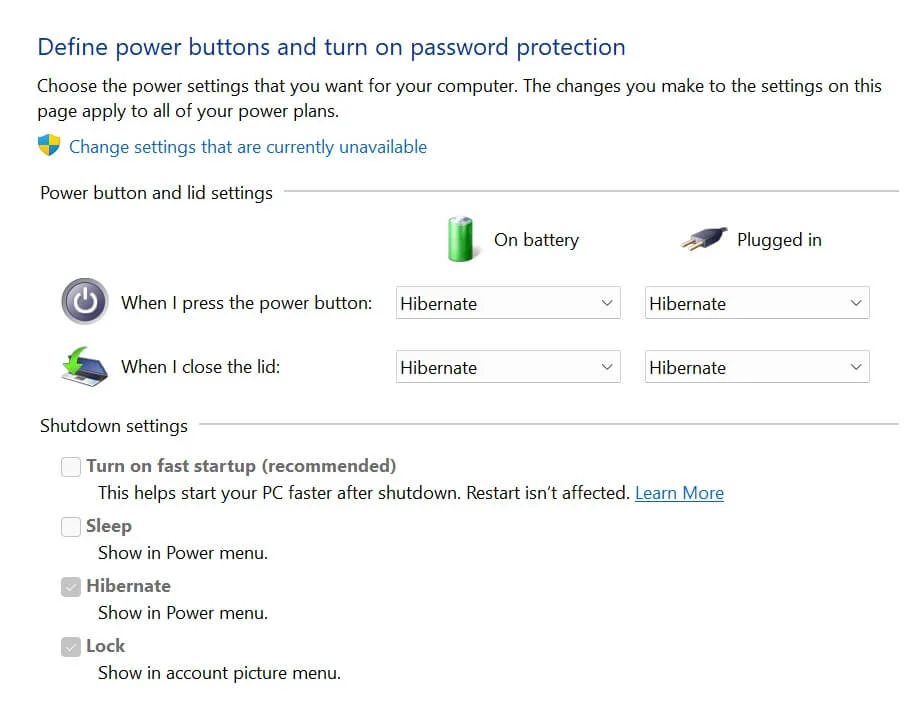
As a bonus, you can also choose to enable the Hibernate option whenever you close your PC lid or press the power button. 

Solution 2: Enabling the hibernate function via the command prompt

The second method is the quickest, and it involves using the Command Prompt.  Follow these steps:

  • Go to the Start menu, type CMD or Command Prompt, and select the Run as administrator option in the search result.

Run Command Prompt as Administrator

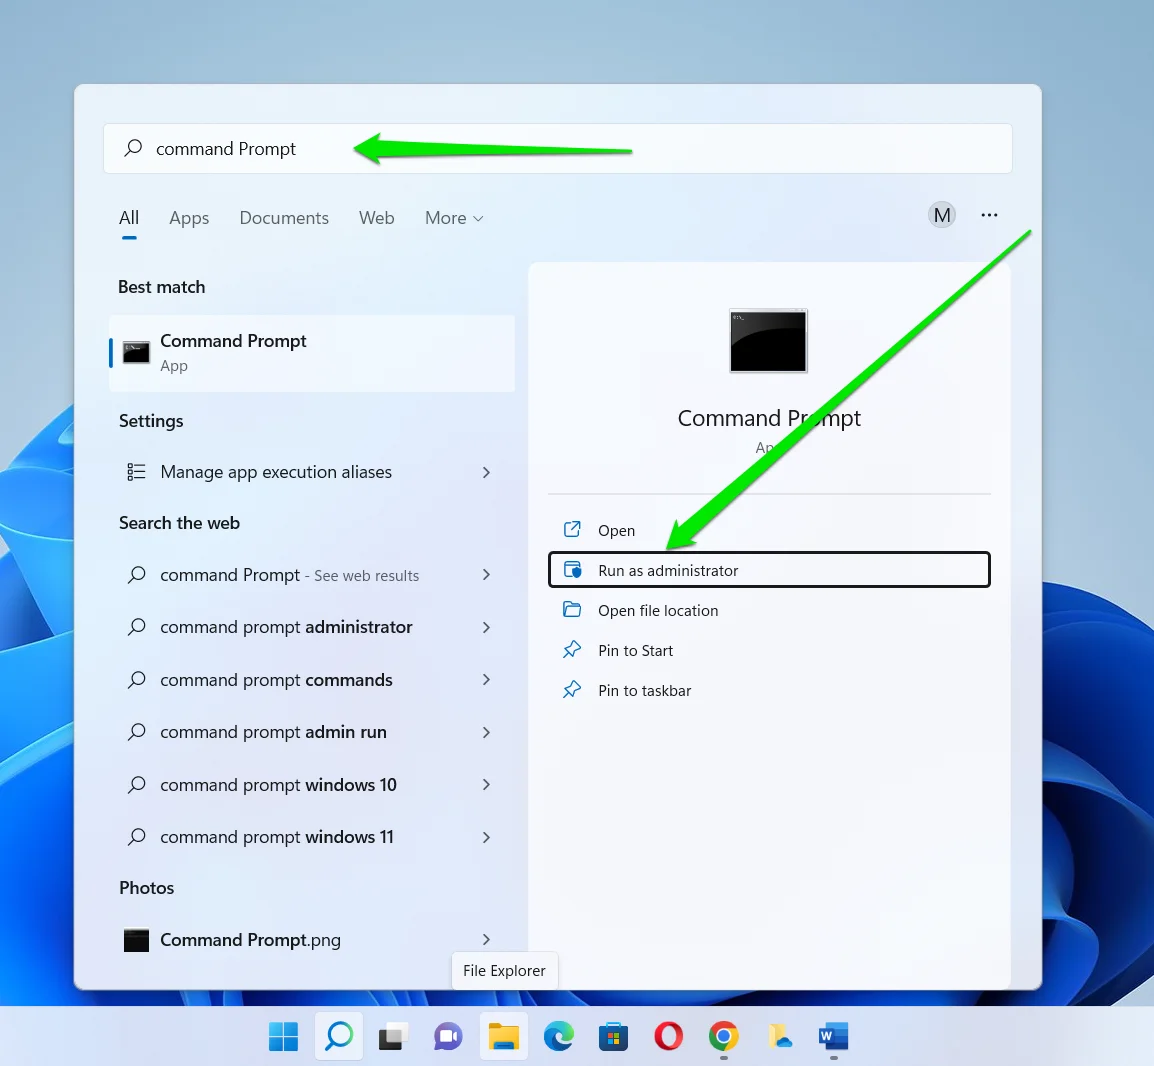
  • Click Yes if Windows asks for permission to allow the program to make changes to your PC.
  • Type the following code and press the Enter keyboard button once the Command Prompt window appears:

powercfg.exe /hibernate on  You should now be able to hibernate your computer through the Power menu.


Also Read: Windows Command Prompt: 28 Most Useful CMD Commands [with Examples]


Solution 3: Enabling the hibernate function via the registry editor

The Windows Registry is one of the ‘sacred’ and delicate places on your Windows PC. Windows users are usually advised to stay away unless they are power users and know what they are doing. But you can use the Registry Editor to enable Hibernate on your PC if you’re careful enough . That said, it’s important that you create a System Restore point or back up the registry before you proceed. That way, you can reverse any potential erroneous adjustment .


Also Read: Ultimate Guide: How to Fix Broken Registry Items in Windows 10/11


Follow these steps to enable the hibernate function on your Windows 10/11 via the Registry Editor:

  • Go to the Start menu, type regedit or registry editor, and click the first result.

Enabling the Hibernate Function Via the Registry Editor

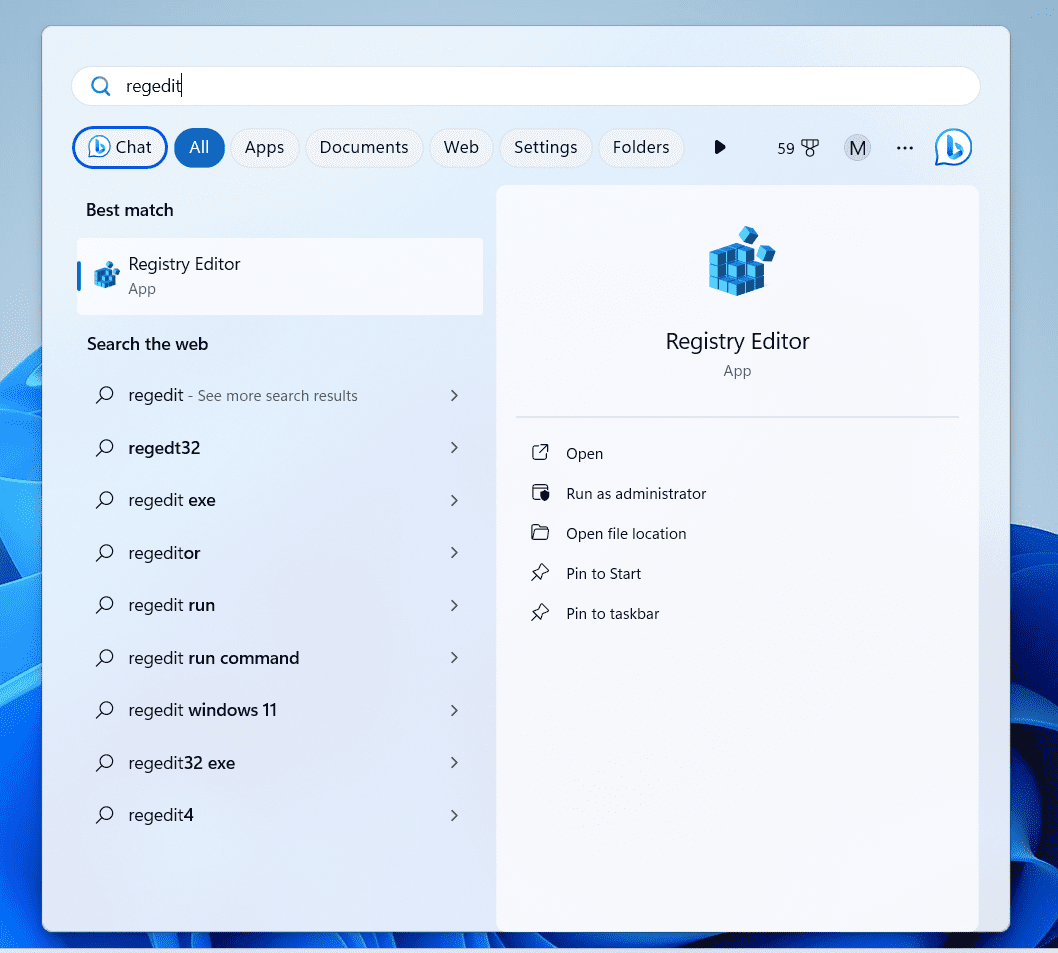
  • Click Yes to grant the program advanced permission.
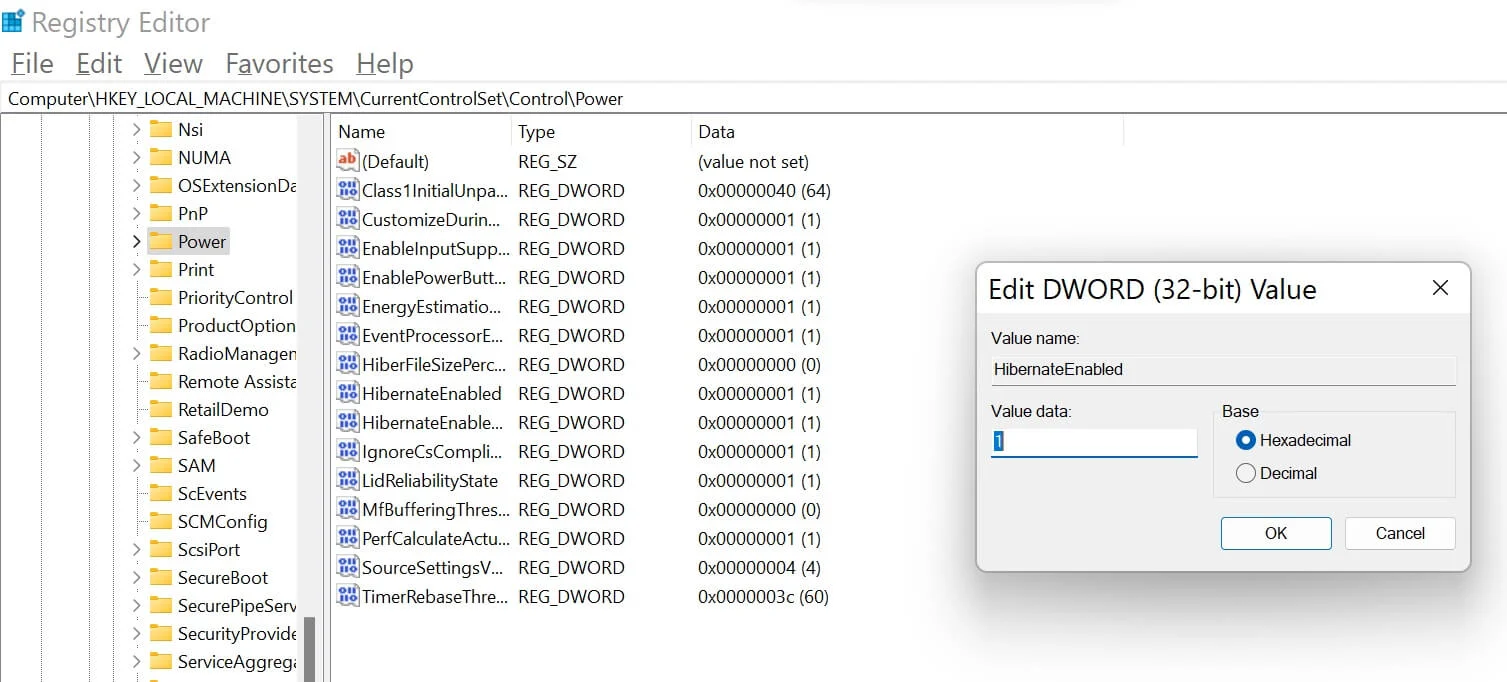
  • After the Registry Editor window opens, go to the left sidebar and head to the following key:

Computer\HKEY_LOCAL_MACHINE\SYSTEM\CurrentControlSet\Control\Power

  • Once you select the Power key, go to the right side of the screen and double-click the HibernateEnabled DWORD. If you don’t see that particular DWORD, right-click the space, select New > DWORD (32-bit) Value, and rename the new DWORD to HibernateEnabled.

Rename the new <em>DWORD</em> to <em>HibernateEnabled</em> » src=»https://www.auslogics.com/en/articles/wp-content/uploads/2023/11/Registry-Editor-Hibernate-Enabled-1.png»></p>
<div class= Картинка с сайта: www.auslogics.com

  • Next, type 1 in the Value data text field and hit Enter in the Edit DWORD (32-bit) Value dialog.
  • Restart your computer.

type 1 in the Value data text field


Important Read: Ultimate Guide: Why and How to Defrag Windows Registry?


How to Hibernate Windows 10/11?

There are three main ways you can hibernate your Windows PC: Power Button: From the section on how to enable hibernation on Windows 10/11, we explained how to enable hibernation via Control Panel (Power Options). There, you can select Hibernate for When I press the power button.

Power Button

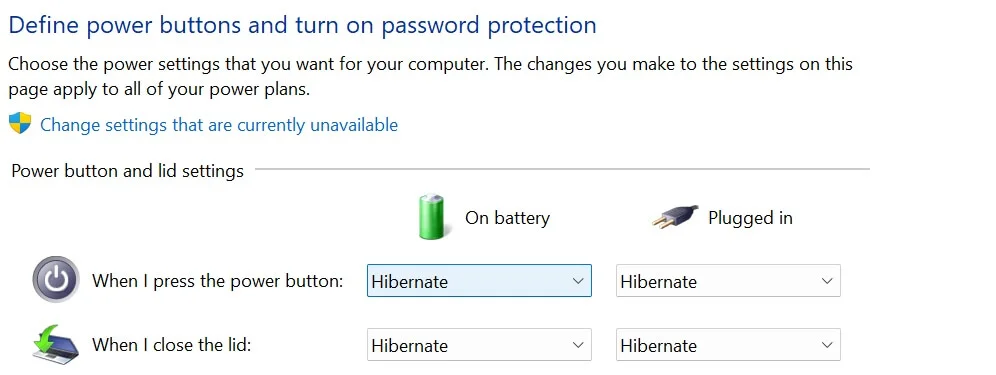
Close PC Lid: In the same page as cited for the power button method, you can choose Hibernation for When I close the lid.

Using Keyboard Shortcut: Many PCs have the Sleep Mode attached to the F3 function key. To activate it, you need to use the fn + F3 key combination and your PC will hibernate. However, this option is only available on some computer models.

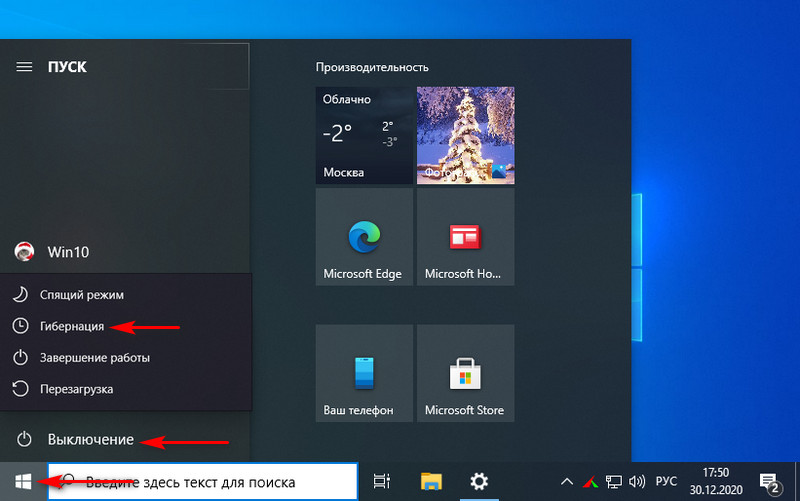
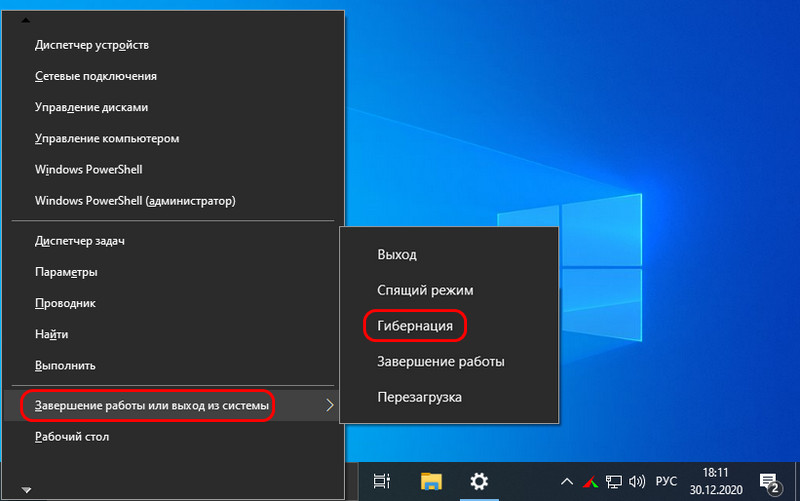
Using the Power Menu: The more traditional method would be to open the Start menu, click the power icon, and select Hibernate. You can also right-click the Start button or press Windows + X, choose Shut down, and click Hibernate.

How to Turn Off Hibernation on Windows 10/11?

To turn off hibernation on Windows 10/11, you only have to reverse each of the activation processes we have described in this article. For example, for Command Prompt hibernation activation, you can enter

powercfg.exe / hibernate off instead of  powercfg.exe / hibernate on

Similarly, for the Registry Editor option, when you modify the Value data for HibernateEnabled, enter 0 instead of 1 to turn off hibernation.

How to Disable Sleep Mode on Windows 10/11?

As earlier described, Sleep Mode is typically the default mode for your PC standby. However, if you want to turn it off so that your PC does not go into this standby mode, all you have to do is:
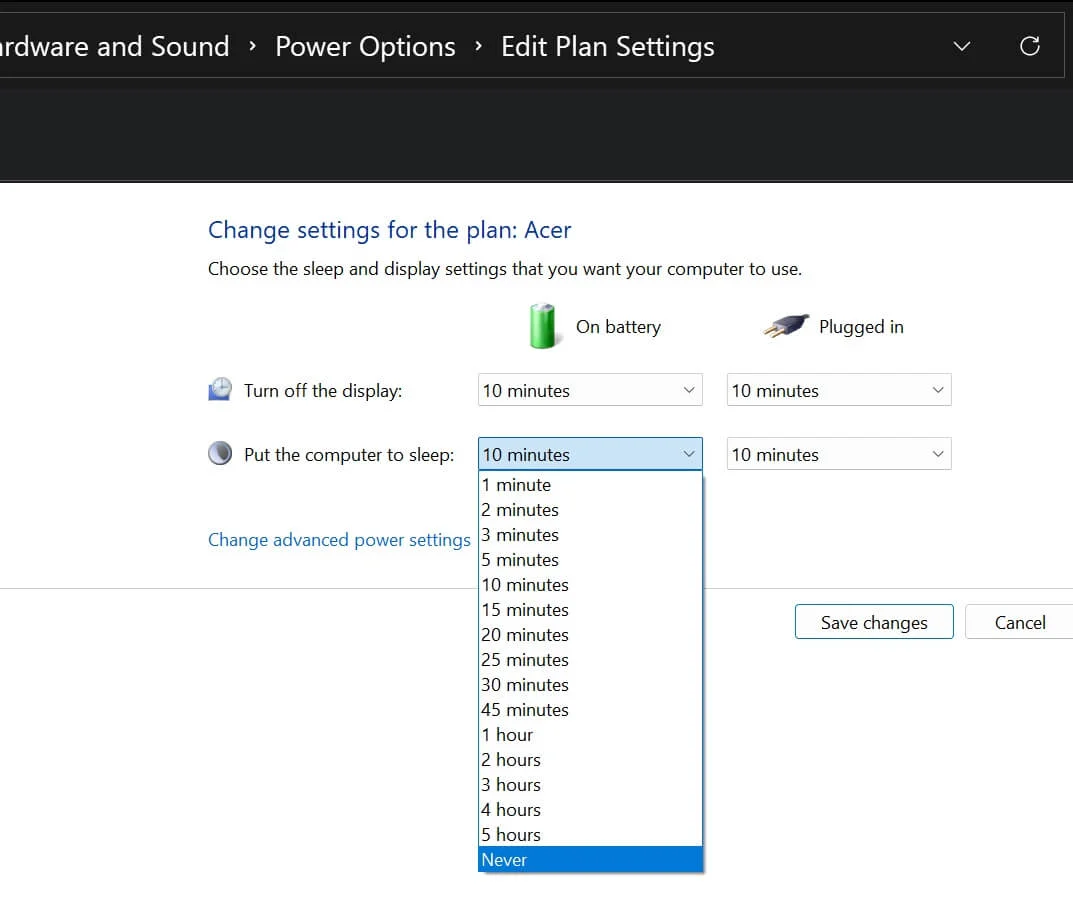
  • Search for edit power plan on the Windows Start Menu.
  • Under the Change settings for the plan submenu, move your cursor to the Put the computer to sleep option and choose Never from the options.

Change settings for the plan submenu

Conclusion

Enabling and using the hibernation function on Windows 10/11 can help you conserve your PC’s battery and let you continue work where you left off. You can always use the methods we showed you earlier to disable it whenever you change your mind.

FAQ

What is the main difference between sleep mode and hibernation?

The main difference is that Sleep Mode keeps your computer components, such as the RAM, running while Hibernation cuts power to those components.

Can I disable hibernation if I have limited storage space?

Yes, you can turn off hibernation whenever you want to.

Is hibernation safe for SSDs?

While hibernating your computer means there will be some write operation on the SSD, it doesn’t harm the device.

How do I know if Hibernation is enabled on my PC?

You will see the Hibernate option in the Power menu.

Привет, друзья. Эту статью мы посвятим вопросу – как включить гибернацию в Windows 10. Гибернация – это один из трёх режимов энергосбережения операционной системы от Microsoft наряду со спящим режимом и гибридным спящим режимом. Сама операционная система отдаёт меньшее предпочтение гибернации, по умолчанию предлагая пользователю в качестве альтернативы выключению компьютера спящий режим. Тем не мене гибернация условно используется на ноутбуках. И при желании мы также можем пользоваться ей в отдельных ситуациях, когда именно этот режим энергосбережения будет целесообразен. Ну и вот, собственно, давайте ниже разберём, что такое гибернация, как она работает, чем отличается от двух других режимов энергосбережения Windows 10, и как её включить.

Как включить гибернацию в Windows 10

Что такое гибернация

Итак, друзья, режим гибернации Windows 10 – один из трёх режимов энергосбережения этой операционной системы, унаследованных актуальной версией от версий-предшественниц. Своё название режим получил от англ. hibernation — «зимняя спячка» из-за сходства принципа работы с зимней спячкой некоторых животных. Появилась гибернация ещё в Windows XP, но она называлась спящим режимом. Начиная с Vista спящим режимом стал называться усовершенствованный ждущий режим Windows XP, а первичный спящий режим стал гибернацией. Три режима энергосбережения – это спящий режим, гибридный спящий режим и, собственно, гибернация.


Примечание: все эти три режима, друзья, могут быть не на каждом ПК, ноутбуке, моноблоке или прочем компьютерном устройстве. Устройства должны аппаратно поддерживать режимы энергосбережения. И их поддержка не должна быть выключена в BIOS. Какие из режимов энергосбережения поддерживает конкретно ваше компьютерное устройство, вы можете посмотреть с помощью командной строки. Запустите её от имени администратора и введите:

Далее вы получите перечень всех доступных вам режимов энергосбережения режимов. И также в этом перечне будет отображаться технология быстрого запуска Windows 10, которая, кстати, работает на базе гибернации. Спящий режим в этом перечне отображается как ждущий режим (S3). Вот в этом случае на ПК доступны все три режима.

А вот, например, на виртуальной машине VMware ни спящий режим, ни гибернация недоступны.


Эти три режима энергосбережения предназначены для экономного расходования заряда аккумулятора портативных компьютеров и электроэнергии стационарными компьютерами. Они являют собой более удобную альтернативу выключению компьютера на случаи, когда нам нужно на время отлучиться от него, это альтернатива, сохраняющая наш рабочий сеанс. Если нам в течении дня необходимо на какое-то время отойти от компьютера, нам не нужно закрывать все наши программы и файлы, выключать компьютер, потом снова его включать, запускать по новой программы и файлы. При погружении в режим энергосбережения операционная система фиксирует наш рабочий сеанс – все наши фоновые процессы, активные программы, открытые окна, документы и проекты. И потом восстанавливает всё это при выходе из режима энергосбережения. Для выхода из любого такого режима нужно нажать кнопку питания, любую клавишу на клавиатуре или пошевелить мышкой. Восстановление из режима энергосбережения занимает меньше времени, чем включение Windows 10, и избавляет от рутинных действий по новому запуску всех нужных нам программ и файлов. Между собой три режима энергосбережения отличаются оперативностью возобновления рабочего сеанса и эффективностью экономии энергии.

Гибернация – это самый эффективный в плане экономии энергии режим. При погружении в него наш рабочий сеанс сохраняется в специальный файл на жёстком диске, и компьютер отключается полностью, т.е. от электропитания отключаются все его компоненты. Но восстановление рабочего сеанса из гибернации происходит дольше, чем при других режимах. Дольше потому, что записанный на жёстком диске сеанс работы должен быть выгружен в оперативную память. У спящего режима этот процесс отсутствует, поскольку наш сеанс сохраняется непосредственно в оперативной памяти. Потому спящий режим более быстрый в плане восстановления работы компьютера. Однако он менее эффективный в плане экономии энергии, чем гибернация. При спящем режиме отключаются все компоненты, кроме оперативной памяти, где хранится наш сеанс, на этот компонент компьютера продолжает поступать питание. Но, друзья, как вы знаете, оперативная память не способна сохранять данные при отсутствии питания, и, если в спящем режиме произойдёт сбой питания – разрядится аккумулятор ноутбука или в случае с ПК в электросети произойдёт сбой, наш рабочий сеанс будет утерян. И вот третий режим энергосбережения — гибридный спящий режим – являет собой компромисс между спящим режимом и гибернацией. Он работает по принципу обычного спящего режима, т.е. обеспечивает оперативность восстановления данных. Но в гибридном спящем режиме наш рабочий сеанс дополнительно переписывается с оперативной памяти на жёсткий диск. И мы свой сеанс получим восстановленным, если даже произойдёт сбой питания.

Гибернация, друзья, не является дефолтным режимом энергосбережения Windows 10. Операционная система отдаёт предпочтение спящему режиму. Именно он реализован в опциях завершения работы системы, и уход именно в него настроен по умолчанию при определённом времени бездействия компьютера. Более подробно о спящем режиме, о всех его преимуществах можете почитать в статье сайта «Спящий режим Windows 10». Также в этой статье вы найдёте инструкцию по включению гибридного спящего режима, если сочтёте его более подходящим к вашей ситуации. Мы же вернёмся к гибернации. По умолчанию в Windows 10 уход в гибернацию назначается только для ноутбуков по истечении 180 минут нахождения устройства в спящем режиме. Таким образом операционная система упреждает потерю рабочего сеанса из-за разрядки аккумулятора в спящем режиме. 

Итого, друзья, о гибернации. Она дольше других режимов энергосбережения восстанавливает наш рабочий сеанс. Поскольку она хранит данные нашего рабочего сеанса на жёстком диске, она производит дополнительные операции перезаписи, а, соответственно, изнашивает ресурс SSD. Но она надёжна в плане сохранности нашего рабочего сеанса. Такая надёжность, конечно, не нужна, если в помещении, где стоит ПК, нечасто происходят перебои с электропитанием. И если с аккумулятором ноутбука всё в порядке. Повторюсь, гибернация сама включится на ноутбуке после трёх часов нахождения в спящем режиме. Но если у вас часто происходят перебои с электропитанием, если аккумулятор ноутбука сильно изношен, в таком случае вам лучше предпочесть дефолтному спящему режиму гибернацию. Давайте разберём дальше, как включить гибернацию в Windows 10 и настроить её автоматическое применение после спящего режима.

Как включить гибернацию в Windows 10

Чтобы включить гибернацию, отправляемся в системные настройки электропитания. В поле команды «Выполнить» или в системный поиск вписываем:  

Кликаем «Действия кнопок питания».

Здесь, если хотите, можете назначить погружение в режим гибернации на кнопку питания компьютера или на клавишу сна, если у вас расширенная клавиатура.

Если у вас ноутбук, гибернацию вы можете назначить ещё и на закрытие крышки. И также вам будут доступны варианты назначения всего этого отдельно, когда ноутбук работает от батареи, и отдельно, когда он работает от сети. Назначенный при питании от сети спящий режим оставляйте как есть, а вот при питании от батареи либо на кнопку питания, либо на закрытие крышки можете назначить гибернацию.

Но можете кнопки не трогать, а просто добавить гибернацию в перечень вариантов завершения работы. Жмём «Изменение параметров, которые сейчас недоступны»

Ставим галочку «Режим гибернации» и жмём «Сохранить изменения».

И вот у нас гибернация появилась в вариантах выключения компьютера в меню «Пуск».

И также она появилась в вариантах выключения компьютера в меню по клавишам Win+X.


Важно: если у вас гибернация не появилась в вариантах выключения компьютера, возможно, у вас гибернация отключена на системном уровне. Чтобы включить, запустите командную строку от имени администратора, введите:

И смотрите, появилась ли гибернация в числе вариантов выключения компьютера.


Также, друзья, вы можете создать на рабочем столе или закрепить на панели задач Windows 10 кнопку погружения компьютера в гибернацию. На пустом рабочем столе делаем клик правой клавишей мыши, выбираем создание ярлыка.

Вписываем объект:

C:\Windows\System32\rundll32.exe PowrProf.dll,SetSuspendState

Называем объект «Гибернация». Жмём «Готово».

На созданном ярлыке делаем клик правой клавишей мыши, запускаем свойства. В свойствах меняем значок и можем задать свои горячие клавиши.

Автоматический уход в гибернацию 

А как сделать так, чтобы компьютер при бездействии автоматически погружался не в сон, как это предусмотрено Windows 10, а в гибернацию? Настройка автоматического погружения в гибернацию так прямо не предусмотрена операционной системой, но мы можем использовать настройки гибернации после сна, как это назначено по умолчанию на ноутбуках. Идём снова в настройки электропитания (в системный поиск или команду «Выполнить» вписываем powercfg.cpl). Жмём «Настройки перехода в спящий режим».

Жмём «Изменить дополнительные параметры питания».

В пункте «Сон» раскрываем подпункт «Гибернация после». Здесь на ПК будет стоять значение «Никогда», а на ноутбуках должно стоять 180 минут (отдельно для питания от батареи и отдельно для питания от электросети). И вот нам нужно указать, через какое время после погружения в сон мы хотим, чтобы компьютер уходил в гибернацию. При необходимости вы можете выставить самое минимальное значение в 1 минуту.

***

Вот это, друзья, всё, что касается такой функции, как гибернация, и как её включить в Windows 10. Дополнительно о ней вы также можете узнать в статье сайта «Как отключить гибернацию в Windows 10». Там мы будем говорить о файле гибернации hiberfil.sys, об уменьшении размера этого файла, а также об отключении этой функции.

While both Sleep and Hibernate Mode are Power Saving Modes, the Hibernate Mode is specifically designed to conserve more battery life on Windows Laptops.

When a Windows 11/10 computer goes into Hibernate mode, it offloads its data to a hidden file (hiberfil.sys) located on the hard disk and goes into a state of deep sleep mode, without using any power.

In comparison, when a computer goes into Sleep Mode it offloads its data to RAM and still keeps using a small amount of power, in order to keep the data in the RAM alive.

Enable or Disable Hibernatation Mode in Windows 11/10

You can find below the steps to Enable or Disable Hibernation Mode on a Windows 10/11 computer.

Advertisement

1. Enable/Disable Hibernate Mode By Using PoweShell

The easiest way to enable or disable Hibernate Mode in Windows 10/11 is by using PowerShell or Command Prompt.

1. Type PowerShell in the Search bar > right-click on PowerShell and click on Run as Administrator option.

Open PowerShell As Admin

2. On the PowerShell screen, type powercfg –h off and press the Enter key on the keyboard of your computer.

Disable Hibernate Mode in Windows Using PowerShell Command

Once the Command is executed, Hibernate Mode will be disabled and “hiberfil.sys” file will be removed from the hard disk of your computer.

Note: Disabling Hibernate Mode will also disable Windows 10 “Fast Boot” feature on your computer. Fast Boot uses the same technology and does not work without Hibernate.

At any time you can Enable Hibernatation by opening PowerShell (Admin) and using powercfg –h on command.

Enable Hibernate Mode in Windows Using PowerShell Command

Once the Command is executed, your computer will be able to Hibernate.

3. Enable/Disable Hibernation Using Advanced Power Settings

1. Right-click on the Start button and click on Run.

2. In the Run Command window, type Powercfg.cpl and click on OK.

Advertisement

3. From the Power Options screen, go to Change Plan Settings > Change Advanced Power Settings.

4. On Advanced Power Settings screen, expand the Sleep entry > expand Hibernate After entry and set both On Battery and Plugged in to Never.

Disable hibernation Using Advanced Power Options

5. To Enable Hibernation, set On Battery & Plugged-in to 90, 120 minutes or any other time that suites your own requirements.

3. Enable/Disable Hibernatation Using Registry

Another way to enable or disable Hibernate mode in Windows 10/11 is by using Registry Editor.

1. Right-click on the Start button and click on Run.

2. In the Run Command Window, type regedit and click on OK.

3. On Registry Editor screen, navigate to HKEY_LOCAL_MACHINE\System\CurrentControlSet\Control\ Power and double-click on HibernateEnabled DWORD in the right-pane.

Open HibernateEnabled DWORD in Windows 10

4. On the next screen, you can enable Hibernate Mode by changing the Value Data to 1 and disable Hibernate Mode by changing Value Data to 0.

5. Click on OK to close the registry editor and save the changes on your computer.

Have you ever needed to step away from your computer for an indefinite period but didn’t want to shut it down? This could be for various reasons; maybe you have some work that you wish to get right back into post your lunch break or your PC boots on like a snail. The sleep mode in Windows OS lets you do just that, but what if I told you there’s a better power-saving feature than the usual sleep mode?

Hibernation mode is a power option that lets Windows users exploit the features of both a complete system shut down and the sleep mode. Just like Sleep, users can configure when they want their systems to go under Hibernation, and if they wish, the feature can be entirely disabled, too (although keeping it active does make for a better overall experience).

In this article, we will be explaining the difference between sleep and hibernation modes, and also show you how to enable or disable hibernation on Windows 10.

Table of Contents

What is Hibernation?

Hibernation is a power-saving state primarily made for laptops, although it is available on certain computers as well. It differs from Sleep in terms of power usage and where your currently open (before you left your System); files are saved.

The sleep mode is activated by default when you leave your computer without shutting it down. In the sleep state, the screen is turned off, and all the foreground processes (files and applications) are saved in the memory (RAM). This allows the System to be in a low-power state but still be running. You can get back to work by a single click of the keyboard or by simply moving your mouse. The screen boots on within a few seconds, and all your files & applications will be in the same state as they were when you left.

Hibernation, pretty much like Sleep, also saves the state of your files & applications and is activated after your System has been under Sleep for a prolonged period. Unlike Sleep, which stores files in the RAM and therefore requires a constant power supply, Hibernation doesn’t require any power (like when your System is shut down). This is made possible by storing the current state of the files in the hard drive instead of the temporary memory.

When in an extended sleep, your computer automatically transfers the state of your files to the hard disk drive and switches to Hibernation. As the files have been moved to the hard drive, the System will take a little extra time to boot on than required by Sleep. Although, the boot on time is still faster than booting your computer after a complete shutdown.

Hibernation is particularly useful when the user doesn’t want to lose the state of his/her files but also won’t have the opportunity to charge the laptop for some time.

As obvious, saving the state of your files requires reserving some amount of memory and this amount is occupied by a system file (hiberfil.sys). The reserved amount is roughly equal to 75% of the System’s RAM. For example, if your System has 8 GB of RAM installed, the hibernation system file will take up almost 6 GB of your hard disk storage.

Before we move on to enabling Hibernation, we will need to check if the computer has the hiberfil.sys file. If absent, the computer can not go under Hibernation (PCs with InstantGo do not have the hibernation power option).

To check if your computer can hibernate, follow the below steps:

1. Launch File Explorer by double-clicking on its icon on the desktop or pressing the keyboard shortcut Windows Key + E. Click on Local Drive (C:) to open C Drive.

Click on Local Drive (C) to open C Drive

2. Switch to the View tab and click on Options at the end of the ribbon. Select ‘Change folder and search options’.

Switch to the View tab and click on Options at the end of the ribbon. Select ‘Change folder and search options’

3. Again, switch to the View tab of the Folder Options window.

4. Double click on Hidden files and folders to open a sub-menu and enable Show hidden files, folders, or drives.

Double click on Hidden files and folders to open a sub-menu and enable Show hidden files, folders, or drives

5. Uncheck/untick the box next to ‘Hide protected operating system files (Recommended).’ A warning message will appear when you try to untick the option. Click on Yes to confirm your action.

Uncheck/untick the box next to ‘Hide protected operating system files (Recommended)’

6. Click on Apply and then OK to save changes.

Click on Apply and then OK to save changes | Enable or Disable Hibernation on Windows 10

7. The Hibernation file (hiberfil.sys), if present, can be found at the root of the C drive. This means your computer is eligible for hibernation.

Hibernation file (hiberfil.sys), if present, can be found at the root of the C drive

Enabling or disabling Hibernation is quite easy, and either action can be achieved in a couple of minutes. There are also multiple methods via which one can enable or disable Hibernation. The easiest one is executing a single command in an elevated command prompt while other methods include editing Windows Registry Editor or accessing advanced power options. 

Method 1: Enable or Disable Hibernation using Command Prompt

As mentioned, this is the easiest way to enable or disable Hibernation on Windows 10 and, therefore, should be the first method you try.

1. Open Command Prompt as an administrator using any of the listed methods.

2. To enable Hibernation, type powercfg.exe /hibernate on, and press enter.

To disable Hibernation, type powercfg.exe /hibernate off and press enter.

Enable or Disable Hibernation on Windows 10

Both the commands do not return any output, so to check if the command you entered was executed properly, you will need to head back to the C drive and look for the hiberfil.sys file (Steps are mentioned earlier). If you find the hiberfil.sys, it implies you were successful in enabling Hibernation. On the other hand, if the file is absent, Hibernation has been disabled. 

Method 2: Enable or Disable Hibernation Via Registry Editor 

The second method has the user editing the HibernateEnabled entry in the Registry Editor. Be careful when following this method as Registry Editor is an extremely powerful tool, and any accidental mishap can lead to a whole other set of problems.

1. Open Windows Registry Editor using any of the following methods

a. Open Run Command by pressing Windows Key + R, type regedit and press enter.

b. Press Windows Key + S, type regedit or registry editor, and click on Open when the search returns.

Press Windows Key + R then type regedit and hit Enter to open Registry Editor

2. From the left panel of the registry editor window, expand HKEY_LOCAL_MACHINE by double-clicking on it or by clicking on the arrow to its left.

3. Under HKEY_LOCAL_MACHINE, double-click on SYSTEM to expand.

4. Now, expand CurrentControlSet

Follow the same pattern and navigate to Control/Power.

The final location indicated in the address bar should be: 

HKEY_LOCAL_MACHINE\SYSTEM\CurrentControlSet\Control\Power

Final location indicated in the address bar

5. In the right-hand panel, double click on HibernateEnabled or right-click on it and select Modify.

Double click on HibernateEnabled or right-click on it and select Modify

6. To enable Hibernation, type 1 in the text box under Value Data

To disable Hibernation, type 0 in the text box under Value Data.

7. Click on the OK button, exit registry editor, and restart your computer.

Again, head back to the C drive and look for the hiberfil.sys to ensure if you were successful in enabling or disabling Hibernation.

Also Read: Disable Windows Pagefile and Hibernation To Free Up Space

Method 3: Enable or Disable Hibernation Via Advanced Power Options

The final method will have the user enable or disable Hibernation through the Advanced Power Options window. Here, users can also set the time frame after which they want their system to go under Hibernation. Like the previous methods, this one is also quite simple. 

1. Open Advanced Power Options by any of the two methods

a. Open Run command, type powercfg.cpl, and press enter.

b. Open Windows Settings (Windows Key + I) and click on System. Under Power & Sleep settings, click on Additional power settings.

2. In the Power Options window, click on Change plan settings (highlighted in blue) under the Selected plan section.

Click on Change plan settings under the Selected plan section | Enable or Disable Hibernation on Windows 10

3. Click on Change advanced power settings in the following Edit Plan Settings window.

Click on Change advanced power settings in the following Edit Plan Settings window

4. Expand Sleep by clicking on the plus to its left or by double-clicking on the label.

5. Double-click on Hibernate after and set the Settings (Minutes) to how many minutes you would like your System to sit idle for before going into Hibernation.

To disable Hibernation, set the Settings (Minute) to Never and under Allow hybrid sleep, change the setting to Off.

6. Click on Apply, followed by OK to save the changes you made.

Recommended:

  • How to Enable Google Feed in Nova Launcher
  • 5 Ways to Remove Hyperlinks from Microsoft Word Documents
  • How to Identify different USB Ports on your Computer

We hope you were successful in enabling or disabling Hibernation on Windows 10. Also, let us know which one of the three above methods did the trick for you.

Понравилась статья? Поделить с друзьями:
0 0 голоса
Рейтинг статьи
Подписаться
Уведомить о
guest

0 комментариев
Старые
Новые Популярные
Межтекстовые Отзывы
Посмотреть все комментарии
  • Смена фона входа в windows 10
  • Windows enable rdp windows 7
  • Считывание qr кода для windows
  • Как установить internet explorer для windows 11
  • Как убрать автозапуск discord windows 10