
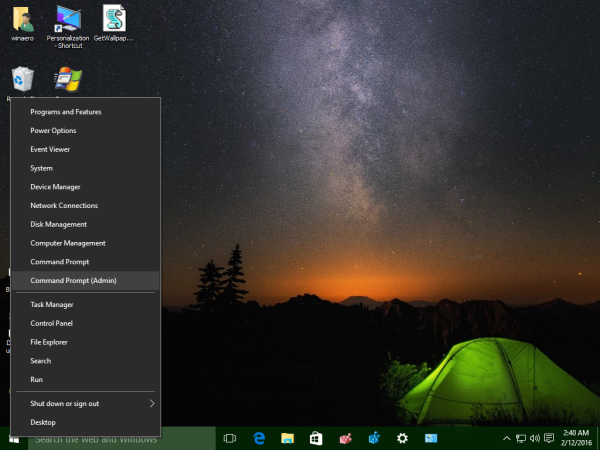
Download Windows Speedup Tool to fix errors and make PC run faster
We always prefer backing up our important data – and for that, we have many free backup software available. But have you ever backed up your WiFi or Wireless Network Profile? Today we will show you how to Backup and Restore your Wireless Network Profiles in Windows. Windows OS has an in-built feature that lets you do so very easily. To get started, you would need to have a USB storage device ready; it can be anything such as a USB Pen drive or any other Mass Storage device.
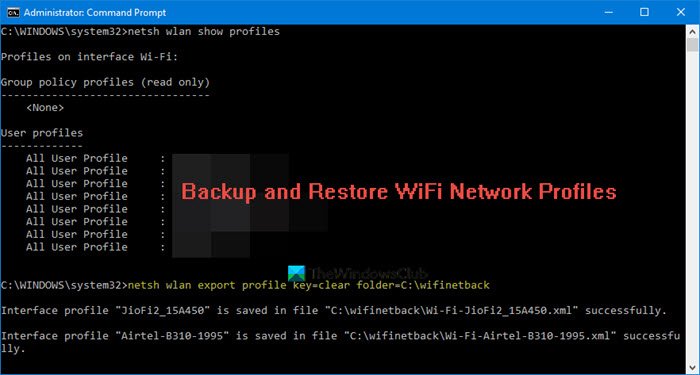
To export or backup WiFi Network Profiles, you can make use of the built-in netsh command-line tool.
To list all your WiFi network profiles, open an elevated command prompt, type the following and hit Enter:
netsh wlan show profiles
To back up or export all your WiFi network profiles, use the following command:
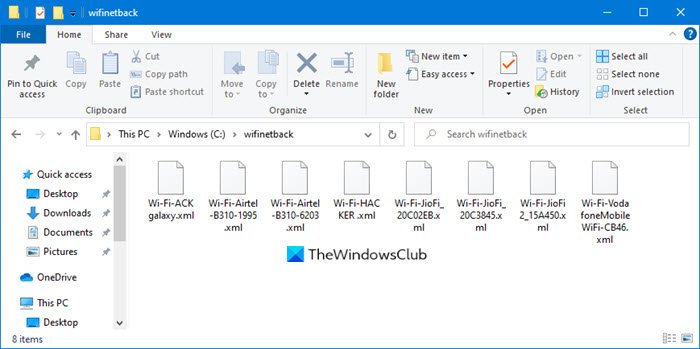
netsh wlan export profile key=clear folder=C:\wifinetback
You have to first create a folder wifinetback on the C drive, All the profiles will get backed up here as an XML file.
To back up or export only a single WiFi profile, use the following command:
netsh wlan export profile "profile_name" key=clear folder=c:\wifinetback
Restore WiFi Network Profiles in Windows 11/10
To restore or import the WiFi profiles, for all users use this:
netsh wlan add profile filename="c:\wifinetback\profile-name.xml" user=all
Here replace the actual file name of the backed up XML file.
That’s it.
Windows 7 users can use the Control Panel
Open Control Panel\All Control Panel Items\Network and Sharing Center. In the left side, you will be able to see an option “Manage Wireless Networks”. Click on the option to proceed.
Double click the connection you want to back up. Now you can see another window, displaying the details about the network.

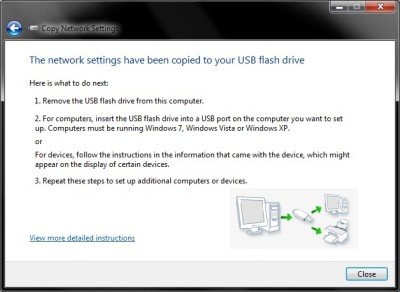
Click on the option that says: “Copy this network profile to a USB flash Drive.”
A new wizard will start. You simply need to follow the on-screen instructions and click on the Next button – but make sure that the USB drive displayed is correct.

When the task is finished, click on Close.
Do note that any other previously taken backups of wireless network profiles would be deleted on the USB drive. If you want to have those backups also, copy the backup files from the root folder of the Drive to any other Folder.
Now you have successfully backed up your Wireless Network Profile.
Now let’s see how to restore the Wireless Network Profile.
Plugin your USB drive into the computer that you want to restore the Wireless Network Profile.
In the autorun menu click on the option that says: “Connect to a Wireless Network”. That’s all! You would be connected to your Wireless Network very quickly and the Network Profile would be restored to that PC.
If the autorun has been disabled on that PC, you can follow these steps:
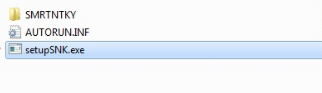
Step 1: Open the USB flash drive with Windows Explorer.
Step 2: There will be a setup file called setupSNK.exe in the root folder of USB drive. Open that setup file and you will be prompted by a message box. Click on “Yes” and you are done! You’ve now successfully restored your backup.
Hope you liked the tip!
Now Read: Delete, remove or forget Wireless Network Profiles in Windows 11/10.
Lavish loves to follow up on the latest happenings in technology. He loves to try out new Windows-based software and gadgets and is currently learning JAVA. He loves to develop new software for Windows. Creating a System Restore Point first before installing a new software is always recommended, he feels.
Skip to content
In Windows 10, it is possible to create a backup of your wireless network configuration. This will include authorized SSIDs, saved passwords and other information related to wireless network profiles stored on your PC such as the authentication used. All this information will be stored in a file, so you will be able to restore your wireless connection configuration quickly from that file after you reinstall Windows 10.
To backup of your wireless network configuration in Windows 10, you need to do the following:
- Open an elevated command prompt.

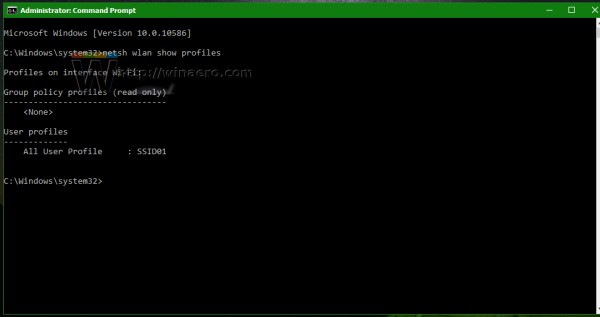
- First, it is a good idea to see which wireless profiles you have stored in Windows 10. Type the following command:
netsh wlan show profiles
In my case, there is only one wireless profile named «SSID01»:

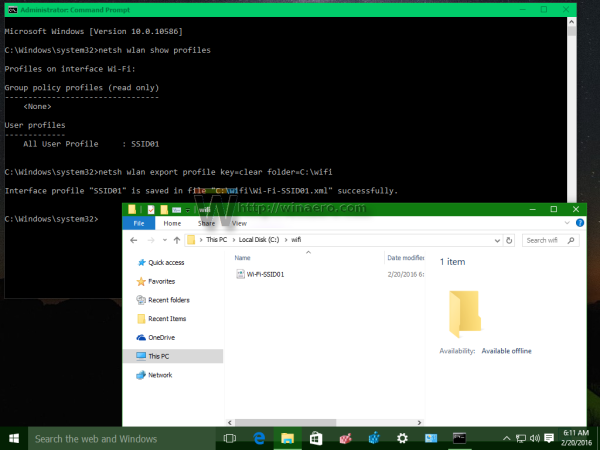
- To backup all profiles at once, enter the following:
netsh wlan export profile key=clear folder=C:\wifi
Replace the folder path=C:\wifi with the path to the folder where you want to store the backup. The folder should exist.
It will create XML files, one per wireless profile:
Note: This command will save all your wireless profiles along with stored passwords. In case you want to create a backup without passwords, just omit the «key=clear» part of the command, i.e.:
netsh wlan export profile folder=C:\wifi
- To back up only a single wireless profile, type the following command:
netsh wlan export profile "type_profile_name_here" key=clear folder=c:\wifi
Again, you can omit the «key=clear» parameter to store the profile without the password.
Restore a wireless profile from a backup in Windows 10
To restore a wireless profile in Windows 10, you need to use one of the following commands:
- To restore the profile and make it available only for the current user:
netsh wlan add profile filename="c:\wifi\profilename.xml" user=current
Replace «c:\wifi\profilename.xml» with the actual path to the desired backup file from which you want to restore.
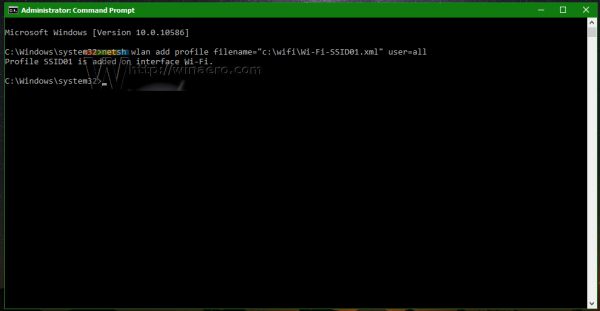
- To restore the profile and make it available for all user accounts on the Windows PC:
netsh wlan add profile filename="c:\wifi\profilename.xml" user=all
That’s it. As you can see, the netsh wlan command makes it very easy to manage your wireless networks. It contains functionality that is missing in the GUI. Using it, you can easily backup and restore wireless profiles in Windows 10.
Support us
Winaero greatly relies on your support. You can help the site keep bringing you interesting and useful content and software by using these options:
If you like this article, please share it using the buttons below. It won’t take a lot from you, but it will help us grow. Thanks for your support!
Network administration — Do you need to backup or distribute network settings? In this article, I will show you how to work with your wireless profile, configure TCP / IP and 802.1X authentication settings .
This tutorial will show you how to backup and transfer network settings. We will target the following major network settings:
- Wireless profile. Encryption and authentication settings
- Configure TCP / IP . Static IP addresses and detailed information about DNS
- Profile running wire. 802.1X authentication settings
The main method we will use is the command line network shell (Netsh) tool, which can work at the command prompt. Although Netsh has been integrated into Windows since Windows 2000, support for the ability to work with wireless and wired network profiles has not been added until Windows Vista.
We will also work with Windows Connect Now (WCN), which is available in Windows XP SP2 and later versions. Microsoft has developed this feature to make it easy to set up and configure small networks.
Import and Export Wi-Fi settings with Netsh (Windows Vista and Windows 7 only)
In Windows Vista and Windows 7, Microsoft added some wireless commands to the Netsh command line tool. This feature allows you to export the profiles of wireless networks that you have saved in Windows; It also allows you to import profiles to other Windows Vista or Windows 7 computers.
To start with Netsh, open the command prompt window. Since you need to know the profile name, you can review the list of your saved profiles:
netsh wlan show profiles
If you want to see details about your profiles, use the following command:
netsh wlan show all
When ready to export the profile, use the following syntax:
netsh wlan export profile folder = » PATH_TO_FOLDER » name = PROFILENAME
This command will create an XML file (Figure 1 shows an example) in the directory you specify and use the interface name and profile you enter (for example, Wireless Network Connection-mynetworkname.xml ).

Figure 1: Example of a wireless profile exported in XML format
Note that you do not need to specify any parameters; Just enter the following command:
netsh wlan export profile
If the directory name is not provided, Windows will automatically select the home directory of the user’s personal folders. If you do not distinguish the profile, Windows will export all profiles.
Tip : After exporting a profile, you can change network settings. Right-click on the XML file and select Open With> Notepad (or your favorite file editor). Then edit and save the file. Be careful not to corrupt the schema in the XML file! If you are interested in editing the profile, check the detailed information about the schema from Microsoft’s MSDN website here.
After exporting a profile, you can import it to another Vista or Windows 7 computer:
netsh wlan add profile filename = » PATH_AND_FILENAME .xml».
You can specify an interface to import profiles; This option is quite useful if the computer has multiple wireless adapters. You can also specify that you want to use profiles for all computer users, or only for current users. Here is an example of how to use both of these parameters:
netsh wlan add profile filename = » PATH_AND_FILENAME .xml» Interface = » Wireless Network Connection » user = current
If you do not specify the interface, Windows will add it to all interfaces by default. In addition, if no user parameters are specified, Windows will add profiles to all users.
Import and export wired authentication settings with Netsh (Windows Vista and Windows 7 only)
If you are performing 802.1X authentication on a wired network, you may find it useful to export and import your wired network profile in Windows Vista and Windows 7. (If you want to backup or transfer information only) For details about IP or DNS, see the next section The wired profile only includes authentication settings.
First, you can print the list of wired profiles and their settings:
netsh lan show profiles
Then, when ready to export the profile, use the following syntax:
netsh lan export profile folder = PATH_TO_FOLDER interface = » INTERFACE_NAME «
This command will create an ML file (see Figure 2 for example) in the directory you specified, and use the specified interface name; For example, Local Area Connection.xml .

Figure 2: Example of a wired connection profile exported in XML format
It should be noted that identifying an interface is completely optional. If you do not specify the interface, Windows will export the profiles for all interfaces. However, you must specify a directory.
You can import a wired profile to another Windows Vista or Windows 7 computer using the following command:
netsh lan add profile filename = » PATH_AND_FILENAME .xml» interface = » INTERFACE_NAME «
Import and export the TCP / IP configuration with Netsh
If you assign static or DNS IP addresses to your computers, exporting and importing the TCP / IP configuration can be quite useful. You can save the settings to use for backup purposes, or use the configuration as a template to configure other computers quickly. For example, you can configure a computer with a static IP address and DNS details, export it, and then before importing to other computers, change the IP address to avoid address conflicts.
Note : Remember that some settings, such as the interface name, may vary according to the computers.
To dump or export the TCP / IP configuration, use the following command:
netsh -c interface dump> PATH_AND_FILENAME .txt
Tip : You can open and edit the configuration file in your favorite text editor (such as Notepad).
Use the following command to import the TCP / IP configuration:
netsh -f PATH_AND_FILENAME .txt
Transfer wireless network settings via USB
Windows Connect Now (WCN) provides wireless network profile copy to USB so you can easily distribute network settings (name, WEP or WPA / WPA2-PSK encryption settings, .) to computers and other wireless devices are not connected.
To export the wireless network profile to USB in Windows XP SP2 or SP3 and Windows Vista, you can use the Wireless Network Setup wizard. You can launch this wizard in a few different ways. For example:
- Click Start> Programs> Accessories> Communications> Wireless Network Setup .
- Open Control Panel, open the Network and Internet Connections folder, and then open Wireless Network Setup .
WPA / WPA2-Enterprise is not supported by Windows Connect Now, but you can use Netsh to backup or transfer network profiles using WPA / WPA2 mode as described above.
To export wireless network profiles to a USB in Windows 7, open the profile or wireless network connection settings. One simple way is to click on the network icon in the system tray, right-click on the network name and select Properties. On the Connection tab, click «Copy this network profile to a USB flash drive».
To import a profile to a Windows XP, Vista, or Windows 7 computer, insert it into USB. When the AutoPlay dialog box appears, click on the «Connect to a Wireless Network link using Windows Connect Now» or «Wireless Network Setup Wizard». If the AutoPlay menu does not appear, you can initiate the import action by running SetupSNK.exe on the USB root directory.
Keep your settings safe
You now know how to export and import all major network settings. It is safe to keep backups or copies of network settings because it probably includes network keys!
By Eric Geier (NoWiresSecurity Founder & Owner) — originally published on InformIT
This tutorial covers how to back up and/or transfer your network settings. We’ll address these main network settings:
-
Wireless profiles. Encryption and authentication settings.
-
TCP/IP configuration. Static IP addresses and DNS details.
-
Wired profiles. 802.1X authentication settings.
The chief method we’ll use is the network shell (Netsh) command-line tool, which works at the command prompt. Although Netsh has been included in Windows since Windows 2000, support for working with wireless and wired network profiles wasn’t added until Windows Vista.
We’ll also work with Windows Connect Now (WCN), available in Windows XP SP2 and later. Microsoft developed this feature to make it easier to set up and configure smaller networks.
Importing and Exporting Wi-Fi Settings with Netsh (Windows Vista and Windows 7 Only)
In Windows Vista and Windows 7, Microsoft includes wireless commands for the Netsh command-line tool. This feature gives you the ability to export the profiles of wireless networks you’ve saved in Windows; it also lets you import the profiles into other Vista or Windows 7 machines.
To get started with Netsh, open a command window. Since it’s nice to know the profile name, you can first review a list of the saved profile names:
netsh wlan show profiles
If you want to see the details of your profiles, use this command:
netsh wlan show all
When you’re ready to export a profile, use the following syntax:
netsh wlan export profile folder=»PATH_TO_FOLDER» name=PROFILENAME
This command creates an XML file (Figure 1 shows an example) in the folder you specify, and using the name of the interface and the profile you enter (for example, Wireless Network Connection-mynetworkname.xml).
Keep in mind that you don’t have to specify any parameters; you can simply enter the command:
netsh wlan export profileIf you don’t provide a folder name, Windows will automatically choose the main directory of the user’s personal folders. If you don’t identify a profile name, Windows will export all the profiles.
TIP: After you’ve exported a profile, you can modify the network settings. Right-click the XML file and choose Open With > Notepad (or your favorite file editor). Then edit and save the file. Be careful not to mess up the schema in the XML file! If you’re interested in editing a profile, check out the schema details from Microsoft’s MSDN site.
After exporting a profile, you can import it into another Vista or Windows 7 machine:
netsh wlan add profile filename=»PATH_AND_FILENAME.xml»
You can specify an interface to import the profile; this option is useful if the computer has multiple wireless adapters. You can also specify that you want to apply the profile to all users of the computer, or just to the current user. Here’s an example using both parameters:
netsh wlan add profile filename=»PATH_AND_FILENAME.xml» Interface=»Wireless Network Connection» user=current
If you don’t specify an interface, Windows adds it for all interfaces by default. Also, if you don’t specify the user parameter, Windows adds the profile for all users.
Importing and Exporting Wired Authentication Settings with Netsh (Windows Vista and Windows 7 Only)
If you’re running 802.1X authentication on a wired network, you might find it useful to export and import your wired network profile in Windows Vista or Windows 7. (If you want to back up or transfer the IP and DNS details, however, see the next section. The wired network profile consists of the authentication settings only.)
First, you can print a list of the wired profiles and their settings:
netsh lan show profilesThen, when you’re ready to export a profile, use the following syntax:
netsh lan export profile folder=PATH_TO_FOLDER interface=»INTERFACE_NAME»
This command creates an XML file (see Figure 2 for an example) in the folder you specify, and using the name of the specified interface; for example, Local Area Connection.xml.
Keep in mind that identifying an interface is optional. If you don’t specify the interface, Windows exports the profiles for every interface. However, you must specify a folder.
You can import a wired profile into another Windows Vista or Windows 7 machine with this command:
netsh lan add profile filename=»PATH_AND_FILENAME.xml» interface=»INTERFACE_NAME»
Importing and Exporting TCP/IP Configuration with Netsh
If you assign static IP or DNS addresses to your computers, exporting and importing a TCP/IP configuration might be useful. You can archive the settings for backup purposes, or use the configuration as a template to configure other computers more quickly. For instance, you might configure a computer with the static IP and DNS details, export it, and then before importing it onto other computers simply change the IP address to avoid conflicting addresses.
NOTE: Remember that some settings, such as the interface names, may vary across different PCs.
To dump or export the TCP/IP configuration, use this command:
netsh -c interface dump > PATH_AND_FILENAME.txt
TIP: You can open and edit the configuration file in your favorite text editor (such as Notepad).
Use this command to import the TCP/IP configuration:
netsh -f PATH_AND_FILENAME.txt
Transferring Wi-Fi Network Settings via USB Flash Drive
Windows Connect Now (WCN) provides the ability to copy a wireless network profile to a USB flash drive so that you can easily distribute the network settings (name, WEP or WPA/WPA2-PSK encryption settings, etc.) to other wireless computers and devices that aren’t connected yet.
To export wireless network profiles to a flash drive in Windows XP SP2 or SP3 and Windows Vista, you can use the Wireless Network Setup wizard. You can start this wizard from any of several shortcut locations. For example:
Click Start > Programs > Accessories > Communications > Wireless Network Setup.
Open the Control Panel, open the Network and Internet Connections folder, and then open Wireless Network Setup.
WPA/WPA2-Enterprise isn’t support by Windows Connect Now, but you can use Netsh to back up or transfer network profiles using the WPA/WPA2 mode, as discussed earlier,.
To export wireless network profiles to a flash drive in Windows 7, first open the profile or wireless network connection settings. One simple way is to click the network icon in the system tray, right-click a network name, and select Properties. On the Connection tab, click «Copy this network profile to a USB flash drive.»
To import the profile into a Windows XP, Vista, or 7 machine, insert the USB flash drive. When the AutoPlay dialog box appears, click the shortcut «Connect to a Wireless Network using Windows Connect Now,» or click the «Wireless Network Setup Wizard» shortcut. If the AutoPlay menu doesn’t appear, you can also initiate the import by running SetupSNK.exe on the flash drive’s root directory.
Keep Your Settings Safe!
Now you know how to export and import all the main network settings. Remember to keep track of your backups or copies[md]the wireless settings, for instance, might include the keys to the network!
АрхивСистема
При переустановке Windows много времени тратится на повторную настройку всех параметров системы, в том числе и сетевых, о переносе которых можно позаботиться заранее.
При переустановке Windows много времени тратится на повторную настройку всех параметров операционной системы, в том числе и сетевых, о переносе которых можно позаботиться заранее и сэкономить, тем самым, массу драгоценного времени.
Как это делается? Очень просто. Берется машина с требующей переинсталяции Windows, открывается на ней редактор реестра (Пуск -> Выполнить -> regedit.exe), отыскивается ветка HKEY_LOCAL_MACHINE\SYSTEM\CurrentControlSet\Services
\Tcpip\Parameters и экспортируется во внешний файл. При этом в окне экспорта перед сохранением обязательно лишний раз убедиться, что в поле «Диапазон экспорта» установлена опция «Выбранная ветвь».
Далее, после переустановки «форточек» вновь возвращаемся к сохраненному файлу и двойным кликом прописываем сетевые настройки в свежеустановленной операционной системе. Естественно, для закрепления изменений потребуется перезагрузить Windows.
P.S. Кстати, файлик с сетевыми настройками лучше приберечь — вдруг пригодится в будущем.