Общепринятые практики информационной безопасности требуют обязательной блокировки экрана компьютера при неактивности пользователя. Пользователь Windows может самостоятельно заблокировать экран компьютера (сочетанием клавиш Win+L). Но лучше внедрить групповую политику, которая обеспечит автоматическую блокировку экрана при бездействии на всех компьютерах домена.
Содержание:
- Включить блокировка компьютера при неактивности с помощью групповой политики
- Групповая политика с настройками скринсейвера для блокировки экрана пользователя
Включить блокировка компьютера при неактивности с помощью групповой политики
На уровне безопасности компьютера можно включить политику, которая требует от любого пользователя повторно выполнить аутентификацию (ввести пароль) после заданного периода неактивности.
-
- Откройте консоль управления доменными политиками Group Policy Management console (
gpmc.msc
), создайте новый объект GPO (LockScreenPolicy) и назначьте его на корень домена (или на OU с компьютерами на которых вы хотите применить политику блокировки);
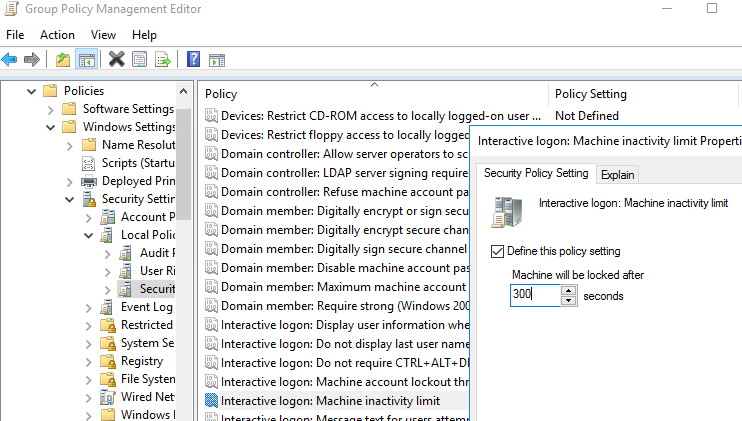
- Перейдите в раздел Computer Configuration -> Policies-> Windows Settings -> Security Settings -> Local Policies -> Security Options;
- В параметре Interactive logon: Machine inactivity limit задайте через сколько секунд неактивности нужно заблокировать компьютер. Например, чтобы блокировать компьютер через 5 минут, задайте здесь 300;
- Для применения новых настроек групповых политик нужно перезагрузить компьютеры. Теперь ваши компьютеры будут автоматически блокироваться после неактивности, отключения дисплея (задается в настройках электропитания, или при запуске скринсейвера).
- Откройте консоль управления доменными политиками Group Policy Management console (
Эта GPO изменяет значение параметра реестра InactivityTimeoutSecs в ветке HKLM\Software\Microsoft\Windows\CurrentVersion\Policies\System. Если значение этого параметра – 0, значит рабочий стол компьютера не будет блокироваться.
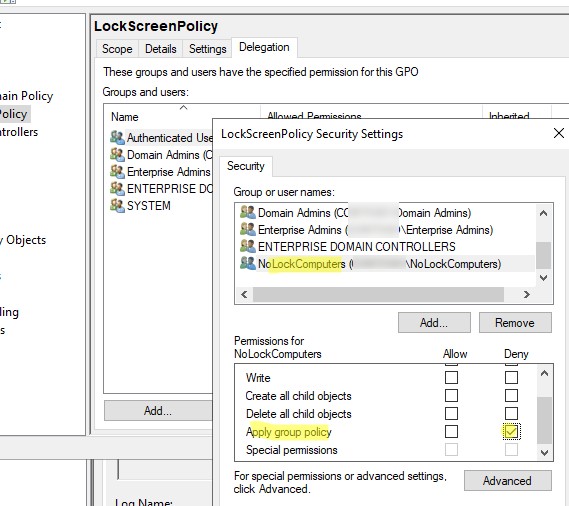
С помощью GPO Security Filtering вы можете задать список компьютеров, на которые не применяется политика блокировки экрана.
- Создайте в AD группу безопасности NoLockComputers и добавьте в нее учетные записи компьютеров, которые не должны блокироваться;
- В консоли GPMC выберите вашу политику, перейдите на вкладку Delegation и нажмите кнопку Advanced;
- Добавьте группу безопасности, которую вы создали, и задайте для нее Deny в поле Apply group policy;

- Теперь экраны компьютеров в этой группе не будет блокироваться автоматически.
Групповая политика с настройками скринсейвера для блокировки экрана пользователя
С помощью параметров скринсейвера Windows можно также внедрить политику автоматической блокировки экрана у пользователей. Такую политику можно применить на пользователей (а не на компьютеры).
- Создайте GPO и назначьте ее на OU с учетными записями пользователей;
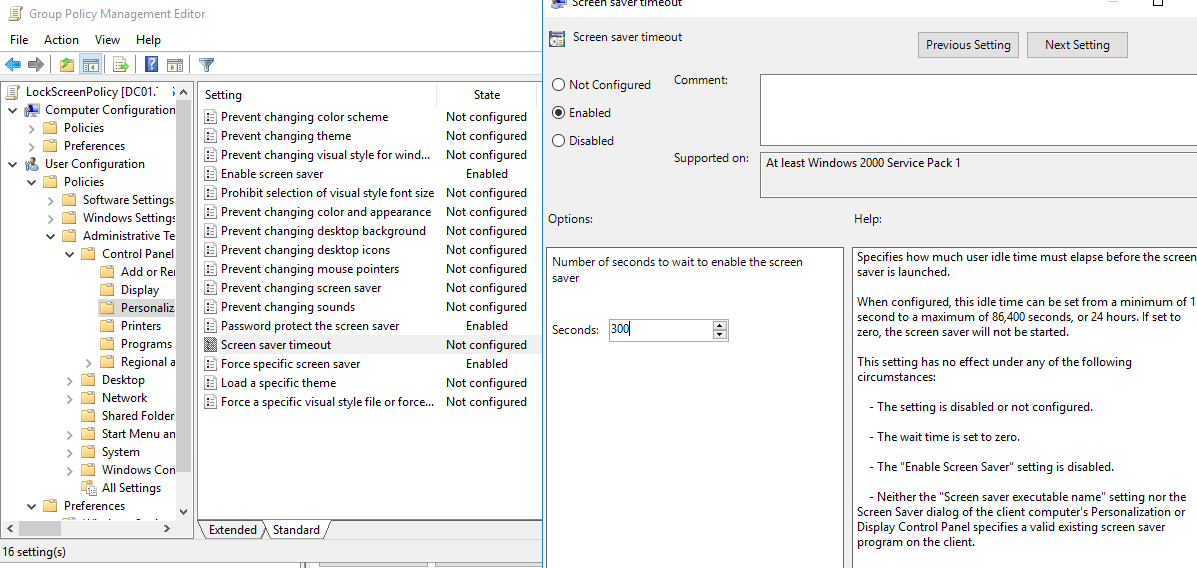
- Отредактируйте политику и перейдите в User Configuration -> Policies -> Administrative Templates -> Control Panel -> Personalization (Конфигурация пользователя -> Политики -> Административные шаблоны -> Панель управления -> Персонализация);
- В этом разделе GPO есть несколько параметров для управления экранной заставкой и настройками блокировки экрана:
- Enable screen saver — включить экранную заставку;
- Password protect the screen saver — требовать пароль для разблокировки компьютера;
- Screen saver timeout – через сколько секунд неактивности нужно включить экранную заставку и заблокировать компьютер (чтобы автоматически блокировать экран через 5 минут, укажите здесь 300);
- Force specific screen saver – можно указать файл скринсейвера, которые нужно использовать. Чаще всего это
scrnsave.scr
( подробнее о настройке экранной заставки с помощью GPO); - Prevent changing screen saver – запретить пользователям менять настройки экранной заставки.
- Дождитесь обновления настроек групповых политик на клиентах или обновите их вручную командой (
gpupdate /force
). - После этого настройки экранной заставки и блокировки экрана станут недоступными для изменения, а сессия пользователя будет автоматически блокироваться после 5 минут неактивности и запускаться пустая экранная заставка. Настройки блокировки будут применяться как к консольным сессиям пользователей, так и к RDP сеансам на RDS серверах.
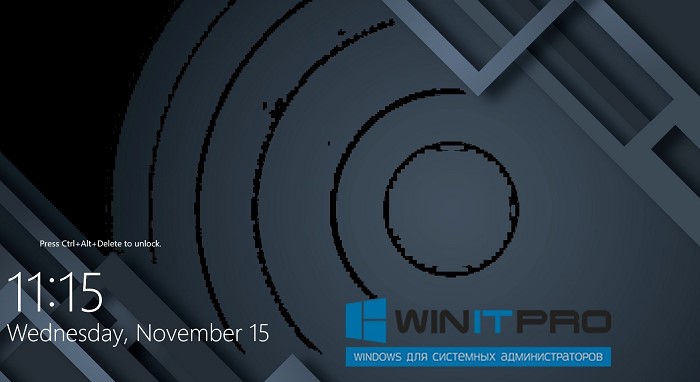
Чтобы разблокировать компьютер, пользователю нужно нажать Ctrl+Alt+End, щелкнуть по экрану или нажать любую клавишу (в зависимости от версии Windows) и ввести пароль.
Если вам нужно настроить разные параметры блокировки экрана для разные групп пользователей, можно использовать GPO Security Filtering (как указано выше), или внедрять параметры блокировки через реестр. Например, для офисных работников нужно блокировать экран через 10 минут, а на компьютерах операторов производства экран не должен блокироваться никогда
Рассмотренным выше политикам соответствуют следующие параметры реестра в ветке HKEY_CURRENT_USER\Software\Policies\Microsoft\Windows\Control Panel\Desktop:
- Password protect the screen save – параметр типа REG_SZ с именем ScreenSaverIsSecure = 1;
- Screen saver timeout – параметр типа REG_SZ с именем ScreenSaveTimeout = 300;
- Force specific screen saver – параметр типа REG_SZ с именем ScreenSaveActive = 1 и SCRNSAVE.EXE = scrnsave.scr.
Вы можете с помощью GPO распространить нужные значения параметров реестра на разные группы пользователей.
Создайте в домене группу пользователей ( SPB-not-lock-desktop ), для которых нужно отменить действие политики блокировки и наполните ее пользователями. Создайте в секции GPO (User Configuration -> Preferences -> Windows Settings -> Registry рассмотренные выше параметры реестра). Для каждого параметра с помощью Item Level Targeting укажите, что политика не должна применяться для определенной группы безопасности (the user is not a member of the security group SPB-not-lock-desktop).
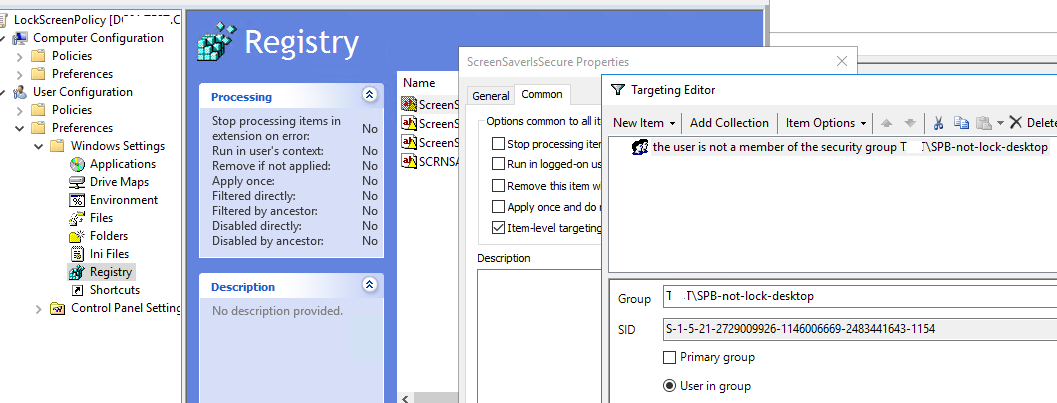
Также придется создать еще 4 параметра реестра со значениями REG_SZ 0, которые принудительно отключают блокировку экрана для группы SPB-not-lock-desktop (иначе, политики не будут перезатирать установленные ранее значения).
If you are a small business or a company that is licensed for Window 10 Professional as opposed to Windows 10 Enterprise, there are some major differences in functionality. Particularly, enterprise functionality. In this post, we are going to talk about a simple Group Policy Object (GPO) to set the Windows 10 Lock Screen. There is an actual GPO to set the lock screen on your Windows 10 desktops (if you are licensed and running Windows 10 Enterprise as your desktop operating system). However, if you are running Windows 10 Professional, this policy will not work!
However, there is a way to configure Windows lock screen on Windows 10 Professional computers. This can be done by changing the proper registry keys.
Why would anyone want to change the Windows 10 lock screen via GPO anyway? Well, on occasion, your Marketing/HR teams might want to communicate specific events via a Windows 10 lock screen image. For example, they might want to remind associates to enroll for their benefits or maybe the company wants to display the company goals or perhaps it might be something as simple as display the company logo and colors. Whatever the reason, you can do this WITHOUT having Windows 10 Enterprise as your operating system.
Below are the instructions for setting and deleting the group policy that controls the lock screen.
Group Policy Name = Lock_Windows_Screen_Mktg
Configuration (User/Computer) = Computer
Steps to push Enable Lock Screen with new image
- Copy the image to a central repository that everyone has READ permissions. Ideally, you’d like to use DFS to distribute the image to local servers throughout your organization. (i.e. \\server\images\lockscreen,jpg)
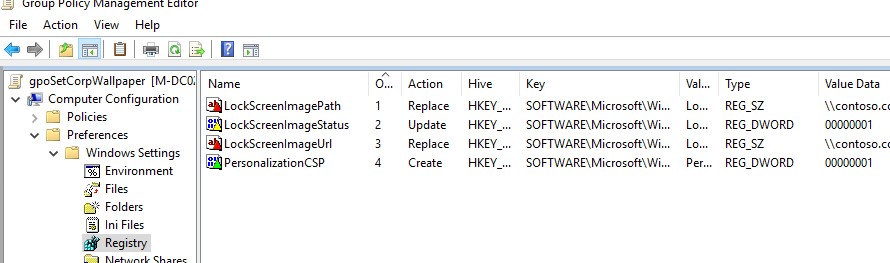
- Create the GPO, name it whatever you want (i.e. Lock_Windows_Screen_Mktg). This will be a Computer GPO. In Computer Configuration, navigate to Preferences/Windows Settings/Registry
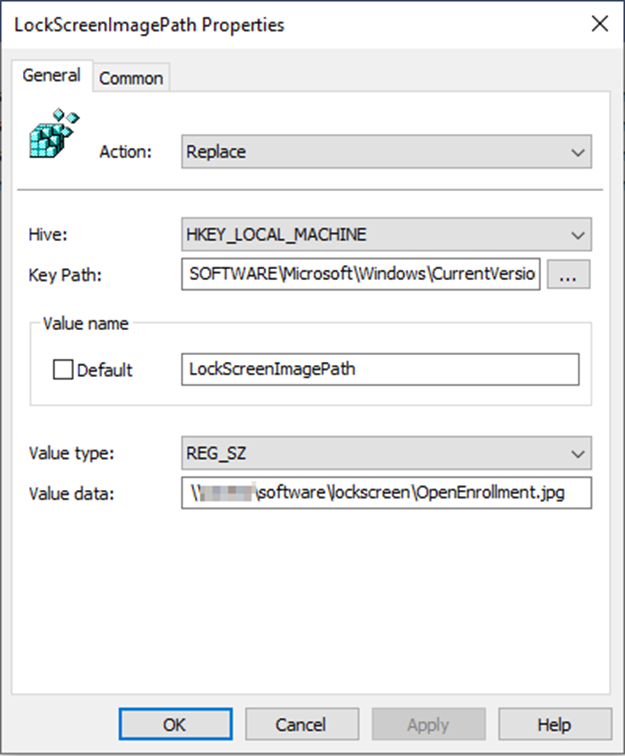
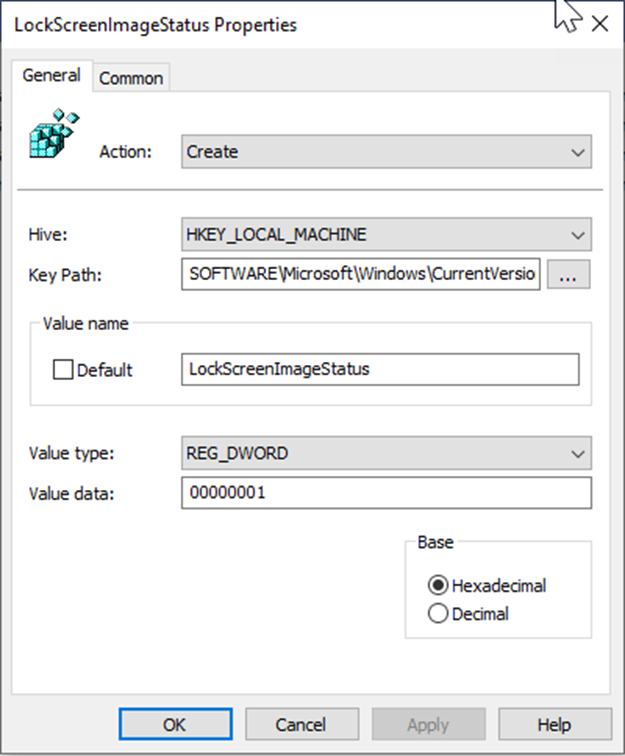
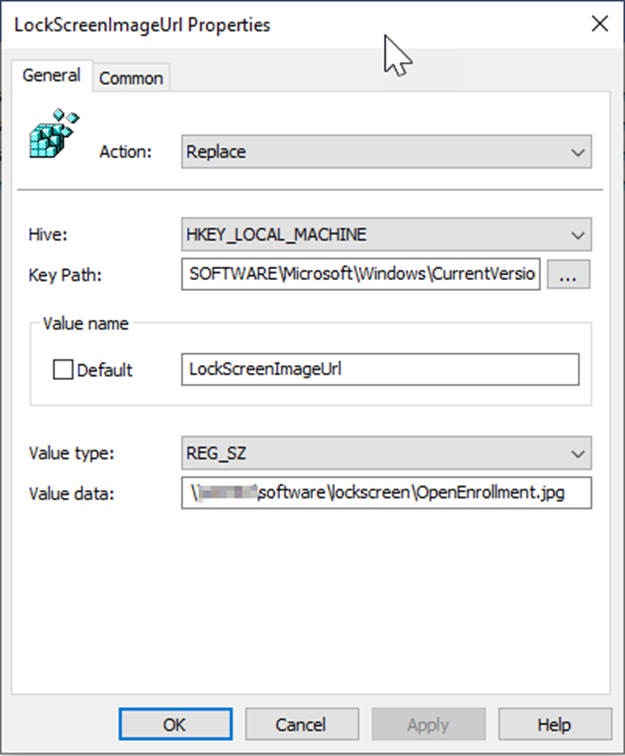
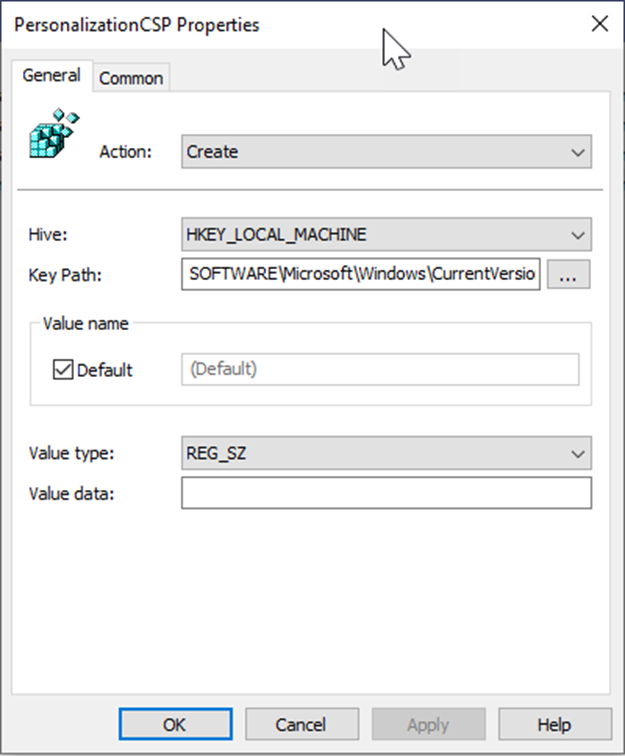
- Configure the following 4 registry entries. Please note the Action for each registry:
LockScreenImagePatch: Action=Replace
LockScreenImageStatus: Action=Create
LockScreenImageUrl: Action=Replace
PersonalizationCSP: Action=Create
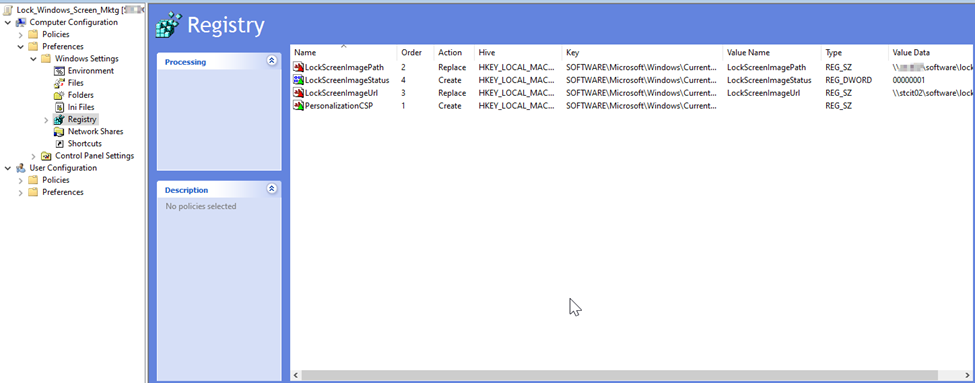
KeyPath = SOFTWARE\Microsoft\Windows\CurrentVersion\PersonalizationCSP
KeyPath = SOFTWARE\Microsoft\Windows\CurrentVersion\PersonalizationCSP
KeyPath = SOFTWARE\Microsoft\Windows\CurrentVersion\PersonalizationCSP
KeyPath = SOFTWARE\Microsoft\Windows\CurrentVersion\PersonalizationCSP
Steps to push Disable Lock Screen
To disable the lock screen, just set the Action to Delete for the 4 registry items.

GPO — Lock computer screen after inactivity
GPO — Lock computer screen after inactivity
This tutorial will show you how to create a GPO on Windows server to lock Windows computer screen after 10 minutes of IDLE time.
The domain controller is running Windows 2008 R2.
The domain computers are running Windows 7 and Windows 10.
Equipment list
Here you can find the list of equipment used to create this tutorial.
This link will also show the software list used to create this tutorial.
Windows Playlist:
On this page, we offer quick access to a list of videos related to Windows.
Don’t forget to subscribe to our youtube channel named FKIT.
Windows Related Tutorial:
On this page, we offer quick access to a list of tutorials related to Windows.
Tutorial — Creating a GPO to Lock Windows Computer
Click on the Start menu, locate and open the Group Policy Management tool.

On the Group Policy Management screen, locate the folder named Group Policy Objects.
Right-click the Group Policy Objects folder and select the New option.
Enter a name for your new policy.
In our example, the new GPO was named: LOCK WINDOWS SCREEN.
On the Group Policy Management screen, expand the folder named Group Policy Objects.
Right-click your new Group Policy Object and select the Edit option.

On the group policy editor screen, you will be presented to User configurations and Computer configurations.
We will change the User configurations to automatically lock the screen after 600 seconds of IDLE time.
We don’t need to change any computer configuration.
On the group policy editor screen, expand the User configuration folder and locate the following item.
Access the folder named Personalization.
On the right, the configuration items available for the control panel personalization will be presented.

Double click the configuration item named Enable Screen Saver.
On the configuration item screen, you need to select the Enabled option.

Double click the configuration item named Password protect the screen saver.
On the configuration item screen, you need to select the Enabled option.

Double click the configuration item named Screen saver timeout.
On the configuration item screen, you need to select the Enabled option.
Set the amount of IDLE time that you want to wait before locking the computer screen.
In our example, we set a limit of 600 seconds.

Double click the configuration item named Force specific screen saver.
On the configuration item screen, you need to set the following specific screensaver:
This command will lock the computer screen immediately instead of showing a screensaver.

Here is a quick summary of our configuration:

To finish the group policy creation you need to close the Group policy editor window.
Only when you close the group policy window, the system will save your configuration.
Tutorial — Applying the GPO to Lock Windows Computer
You have finished the creation of the require GPO to lock the screen of windows computers.
But, you still need to enable the use of your new Group Policy.
On the Group policy management screen, you need to right-click the Organizational Unit desired and select the option to link an existent GPO.

In our example, we are going to link the group policy named LOCK WINDOWS SCREEN to the root of our domain named TECH.LOCAL.

After applying the GPO you need to wait for 10 or 20 minutes.
During this time the GPO will be replicated to other domain controllers that you might have.
After waiting 20 minutes, you should reboot a user’s computer.
During the boot, the computer will get and apply a copy of the new group policy.
To test the configuration, you need to login on a domain computer and do nothing for 600 seconds.
Your computer screen should automatically lock itself after 600 seconds.
VirtualCoin CISSP, PMP, CCNP, MCSE, LPIC22023-03-16T02:38:55-03:00
Related Posts
Page load link
Ok
In this blog post, we will explore how to set a custom desktop wallpaper and lock screen background image using group policy on Active directory domain joined computers including laptops with intermittent network connectivity and those who connect to the corporate network occasionally via VPN. For this setup, we will require:
- Desktop and Lock Screen Wallpaper files in JPEG or JPG format.
- Wallpaper files copied to SYSVOL folder on one of the domain controllers.
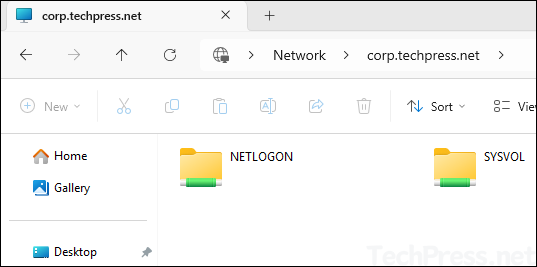
By default, all domain users have read permissions on SYSVOL folder and it’s accessible from all domain joined computers. You can also use NETLOGON folder instead of SYSVOL.
Contents
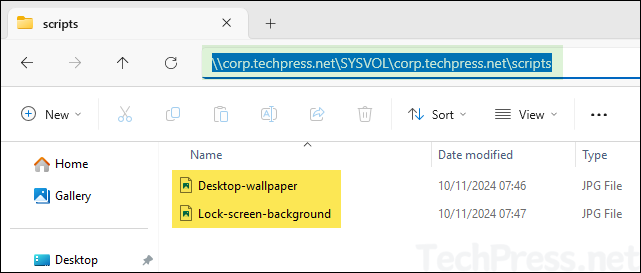
Prepare desktop and lock screen wallpaper files in JPEG or JPG format. For demonstration purpose, I have created two files Desktop-wallpaper.jpg and Lock-screen-background.jpg.
2. Copy Wallpaper files to SYSVOL folder
Next step is to copy wallpaper files to the SYSVOL folder on one of the Active directory domain controllers. To copy the files, follow below steps:
- Login to one of the Domain controllers.
- Go to the location \\<domain name\SYSVOL\domain name\scripts and paste the wallpaper files.
3. Create a Group Policy
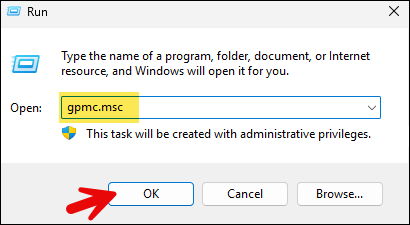
- Open Group policy management console (gpmc.msc).
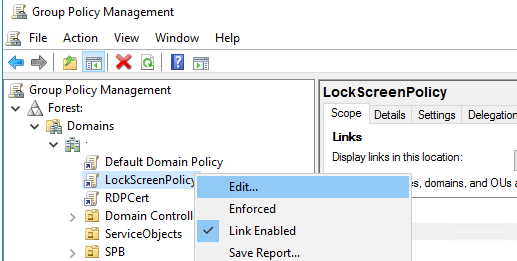
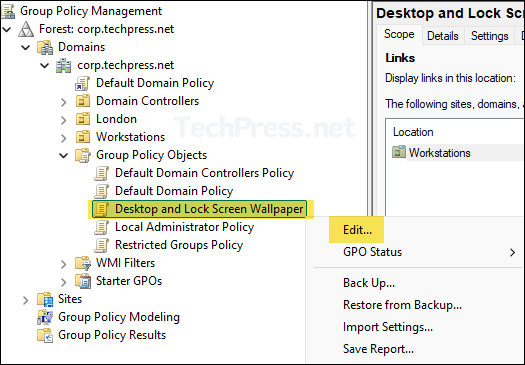
- Create and Edit a Group Policy. I have already created a group policy called Desktop and Lock Screen Wallpaper. Right-click on it and select Edit. We will be configuring three group policy settings to change desktop wallpaper and lock screen background image on the windows workstations.
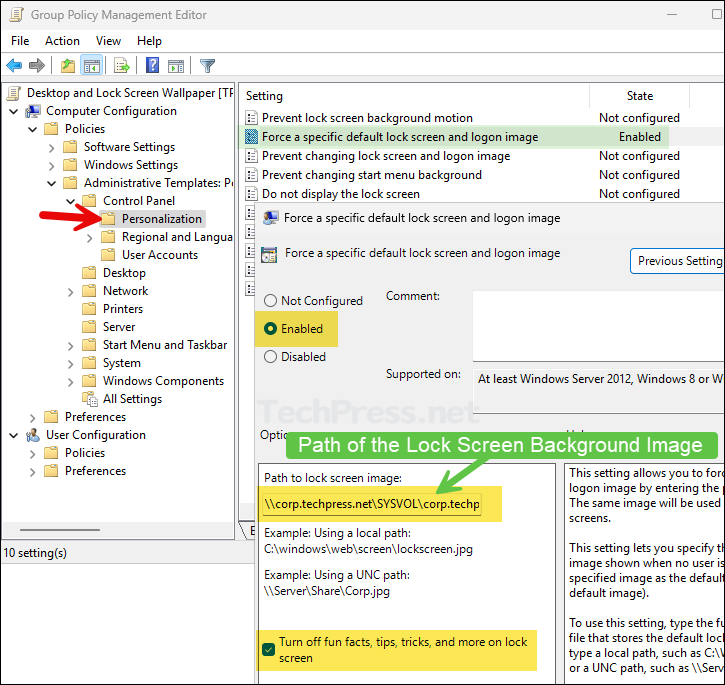
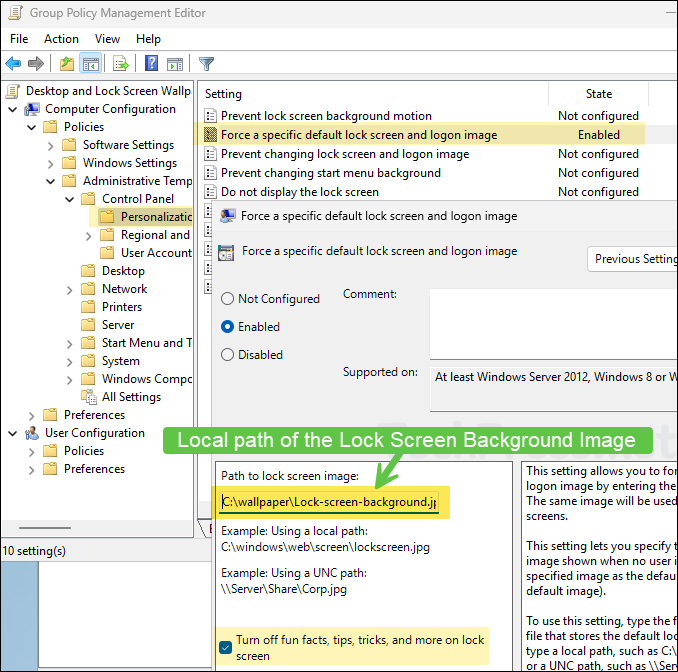
3.1. Force a specific default lock screen and logon image
Navigate to the path Computer Configuration > Policies > Administrative Templates > Control Panel > Personalization and Enable Force a specific default lock screen and logon image policy.
- Path to lock screen image: Provide the path of the lock screen image. In our example, we have set the path to \\corp.techpress.net\SYSVOL\corp.techpress.net\scripts\Lock-screen-background.jpg.
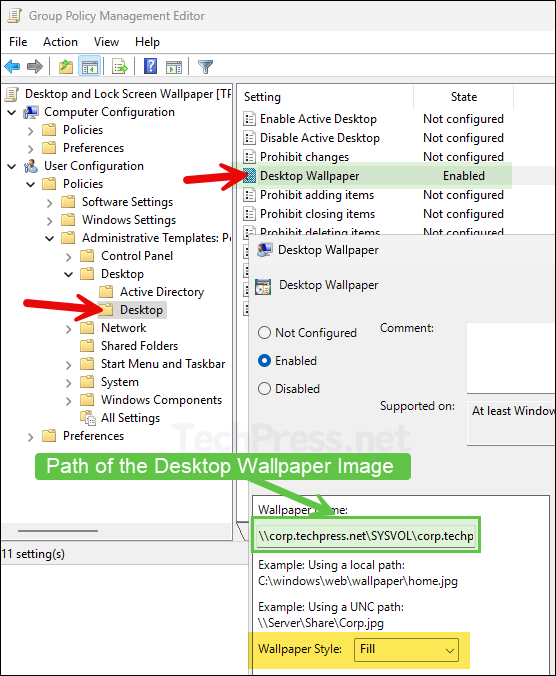
3.2. Desktop Wallpaper Setting
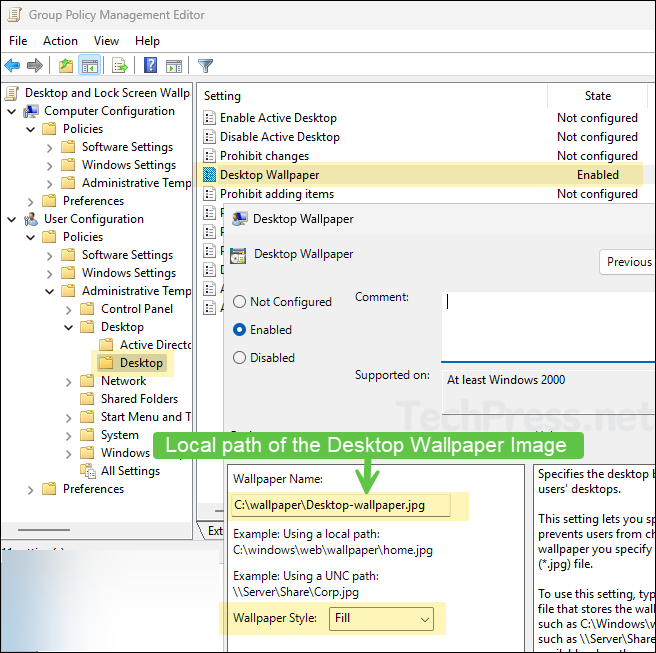
Navigate to the path User Configuration > Policies > Administrative Templates > Desktop > Desktop and Enable Desktop Wallpaper setting.
- Wallpaper Name: Provide the path of the desktop wallpaper image. In our example, we have set the path to \\corp.techpress.net\SYSVOL\corp.techpress.net\scripts\Desktop-wallpaper.jpg.
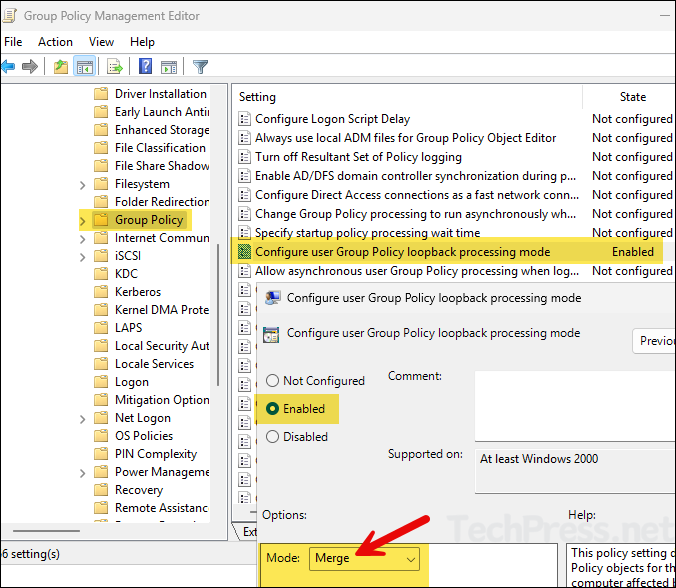
3.3. Loopback Processing Mode
Set the loopback processing mode to Merge by navigating to Computer Configuration > Policies > Administrative Templates > System > Group Policy. Enable the policy setting Configure user Group Policy loopback processing mode and set it to Merge.
4. Add Domain Computers to the Security Filtering
Select the Group Policy and add Domain Computers in the Security Filtering.

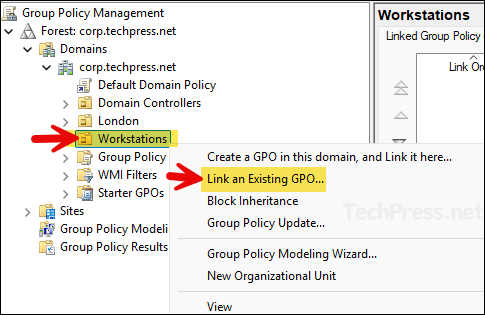
5. Link the GPO to Workstations OU
Once you have configured the GPO settings, link it to an OU containing Windows devices. Right-click on the OU and select Link an Existing GPO.
- Select the GPO Desktop and Lock Screen Wallpaper and click on OK to link.
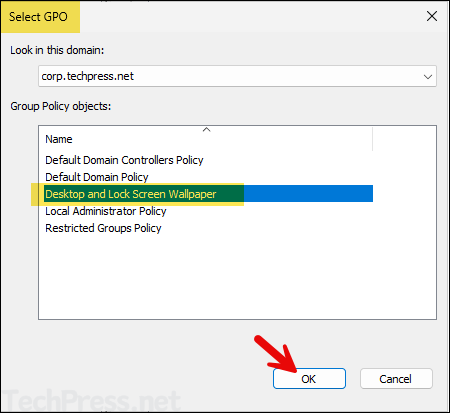
- GPO is now linked to the Workstations OU.
6. Test the Group Policy
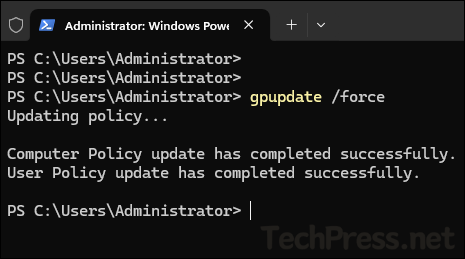
- Login to one of the target Windows client device, open command prompt in admin mode and type
gpupdate /forceand Restart your computer.
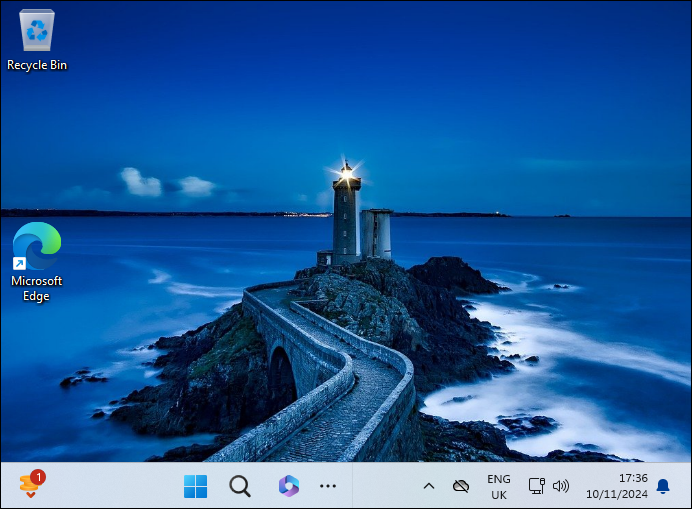
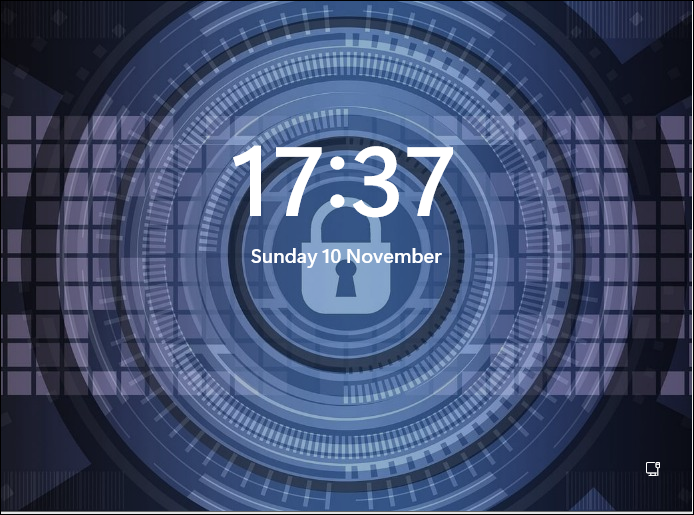
- Desktop and Lock screen wallpapers will be set as per the GPO.
By default, group policy refreshes/updates every 90 minutes. To speed up the process, you can open command prompt or PowerShell console in Admin mode and execute
gpupdate /forcecommand.
Verify Desktop and Lock Screen WallPaper Configuration from Registry Editor
Once the desktop and lock screen wallpapers GPO has been applied successfully, it will create registry entries at the following location in the Windows registry editor.
Open Registry editor regedit and Navigate to the following paths:
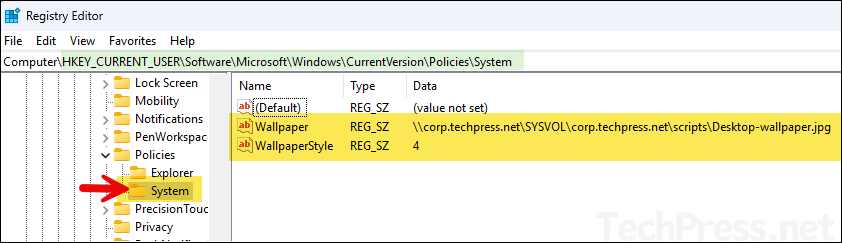
- For Desktop wallpaper: HKEY_CURRENT_USER\Software\Microsoft\Windows\CurrentVersion\Policies\System. There would be a REG_SZ entry called Wallpaper, which will be set to the path of the Desktop wallpaper image configured in the GPO.
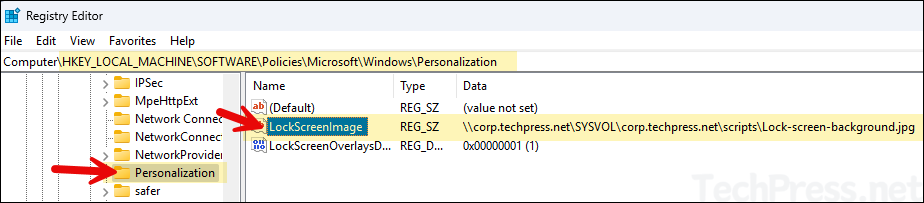
For Lock Screen background: HKEY_LOCAL_MACHINE\SOFTWARE\Policies\Microsoft\Windows\Personalization. There would be a REG_SZ entry called LockScreenImage which will be set to the path of the lock screen image configured in the GPO.
Update Desktop and Lock Screen Wallpaper
Once you have configured desktop and lock screen wallpaper on windows devices, you may want to update them with new wallpaper images in the future. To update the wallpapers, follow below steps:
- Prepare new desktop and lock screen wallpaper images and keep the same name as the one copied in the SYSVOL location.
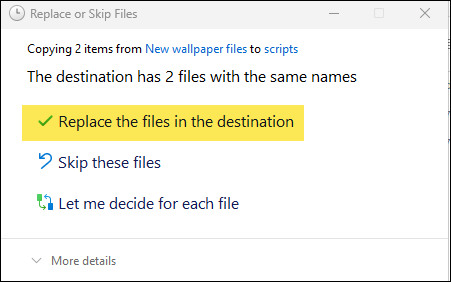
- Replace the new wallpaper files to overwrite the files at SYSVOL location. If required, you can first take a backup of old wallpaper files before replacing.

- If prompted, Select Replace the files in the destination.
- That’s it! When GPO will refresh next time and users will reboot their devices. New Desktop and Lock Screen Wallpaper Images will be displayed. I have tested the policy for updating both wallpapers and it works fine.
Option 2: Setting Desktop and Lock Screen WallPaper by First Copying Wallpaper files on Client Devices
Previous option to configure desktop and lock screen wallpaper requires windows client devices access to SYSVOL folder. In some cases, if users have intermittent connectivity to the corporate network and does not always have access to SYSVOL folder, desktop and lock screen wallpaper might not set correctly.
Therefore, an alternative approach is to copy the desktop and lock screen image on the client devices first and use the local path of the wallpaper files in the GPO. In this case, even if users does not have access to SYSVOL folder, there will be no issues with desktop and lock screen wallpapers.
Prepare wallpaper.bat file
- Save Desktop and Lock screen wallpaper files in SYSVOL folder.
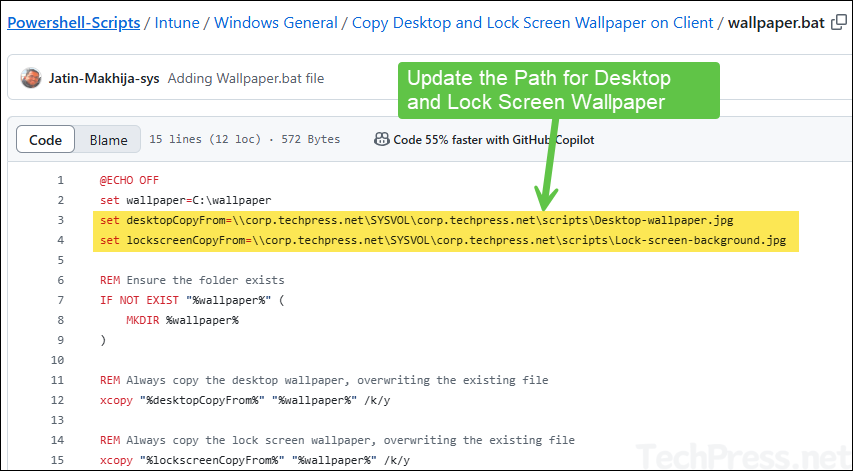
- Download wallpaper.bat file from my Github repo.
- Update
desktopCopyFromandlockscreenCopyFromvariables and point it to the desktop and lock screen wallpaper files.
Create a Group Policy
- Create and Edit a Group Policy. I have already created a group policy called Desktop and Lock Screen Wallpaper. Right-click on it and select Edit.
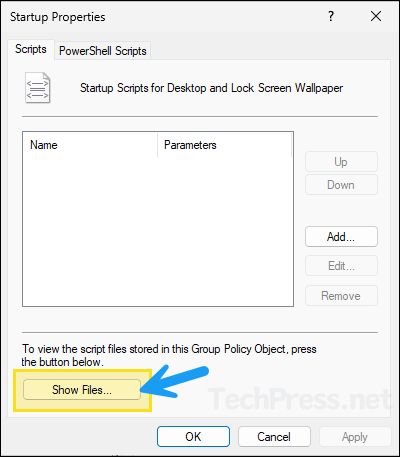
- Navigate to Computer Configuration > Policies > Windows Settings > Scripts.
- Double-click on Startup and click on Show Files button at the bottom.
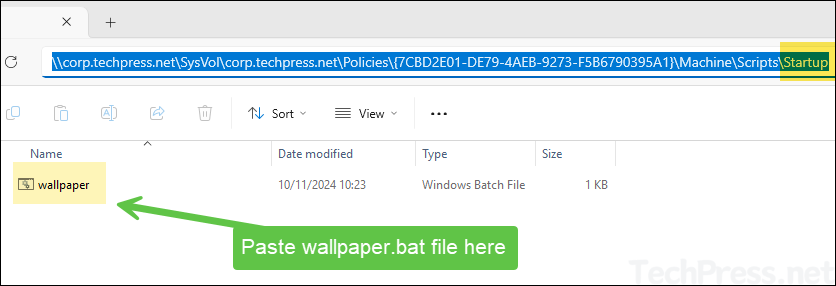
- Copy and Paste wallpaper.bat file in the Startup folder.
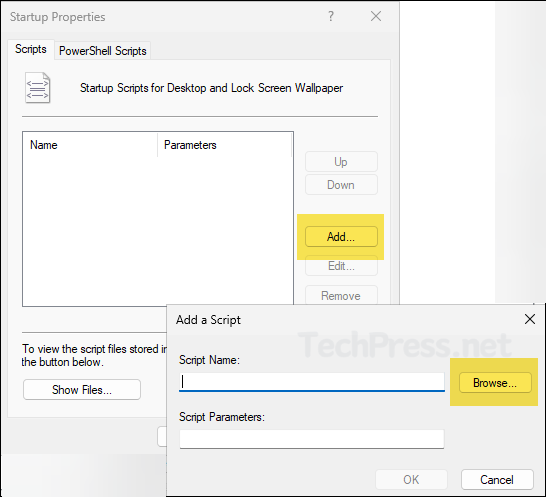
- Go back to the Startup Properties settings. Click on Add and then click on Browse button.
- Select wallpaper.bat file.
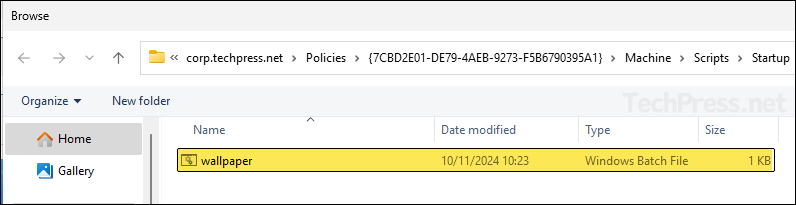
- wallpaper.bat file added.
- Enable Force a specific default lock screen and logon image and set path to lock screen image as c:\wallpaper\<lockscreenimage>.jpg.
- Enable Desktop Wallpaper setting and set Wallpaper name to: C:\wallpaper\<desktopwallpaperimage>.jpg. Configure a Wallpaper Style.
- Enable Configure user Group Policy loopback processing mode and set it to Merge.
Add Domain Computers to the Security Filtering
Select the Group Policy and add Domain Computers in the Security Filtering.
Link the GPO to Workstations OU
Link the GPO to an OU containing Windows computers.
Test the Group Policy
You can wait for group policy refresh or to speed up the testing you can use gpupdate /force command and reboot the client computer. Let’s check the steps:
- Login to one of the target Windows computer.
- Open command prompt as an adminstrator and type gpupdate /force command.
- Reboot the computer and verify if desktop and lock screen wallpapers are set.
Deploy Desktop and Lock Screen Wallpaper (In a VPN Scenario)
Its more challenging to set desktop and lock screen wallpaper for remote users who do not connect to the corporate network very often. This may include the users who are working from home using domain joined windows computers and connect via VPN.
First solution we discussed configures wallpapers using SYSVOL location and In the second solution, we copied wallpaper files using a Startup script. In some cases, you may have Issues with the execution of Startup script and therefore wallpaper files are not copied on the client machine.
Either you can provide wallpaper.bat file to the user so that they can double-click on it and manually Execute it to fetch the wallpapers or you can also create a GPO that will copy Wallpaper. bat file from a shared location accessible from the device on to users desktop or any other location on their device (e.g. c:\temp).
Copy Wallpaper.bat file on Users desktop
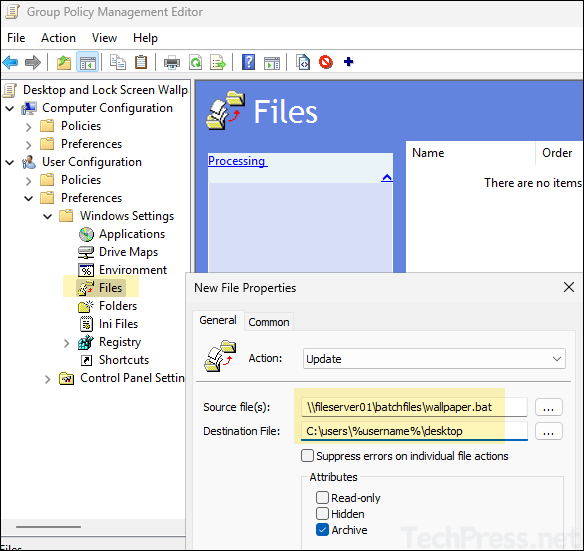
- Create and Edit a Group Policy and navigate to User configuration > Preferences > Windows Settings > Files. Right-click on it > New > File.
- Source file: Provide the location of the wallpaper.bat file which is accessible from client devices. For example: \\corp.techpress.net\SYSVOL\corp.techpress.net\scripts\wallpaper.bat or it could be a shared folder on a file server \\fileserver01\batchfiles\wallpaper.bat.
- Destination file: C:\users\%username%\desktop to copy wallpaper.bat on to users desktop or you can provide c:\temp or any other location which users can easily access.
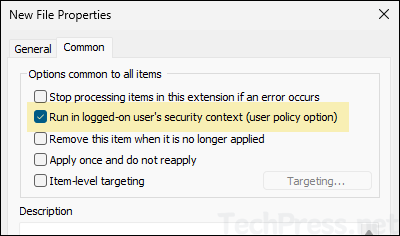
- Under Common tab, select Run in logged-in user’s security context.
Configure Execution of Wallpaper.bat file
To ensure that wallpaper.bat file is executed everytime the device is restarted. You can create an entry in the Run registry location: HKLM\SOFTWARE\Microsoft\Windows\CurrentVersion\Run.
- Go to Computer Configuration > Preferences > Registry > Create a registry Item
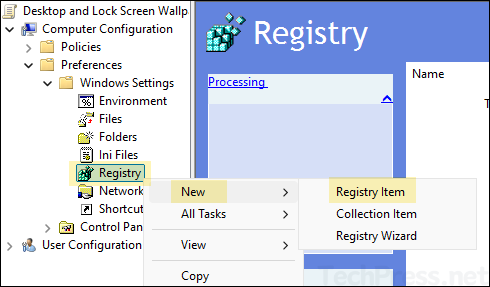
- Action: Update
- Hive: HKEY_LOCAL_MACHINE
- Key Path: /SOFTWARE\Microsoft\Windows\CurrentVersion\Run
- Value Name: Wallpaper
- Value type: REG_SZ
- Value data: C:\users\%username%\desktop\wallpaper.bat
- Make sure to enable Configure user Group Policy loopback processing mode and set it to Merge in the same GPO.
Group Policy Troubleshooting
If there are any issues with the GPO, you can follow below steps to troubleshoot.
- Ensure that the domain controllers are replicating fine. To force AD replication, open the command prompt as an administrator on a domain controller and run repadmin /syncall /APed.
- Run
gupdate /forcecommand on the workstation to force sync any policy changes.
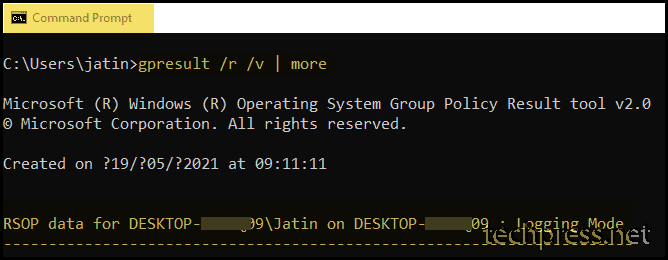
- Run the command gpresult /r /v | more to get a list o policies applied on the computer. This will only show user configuration policy settings.
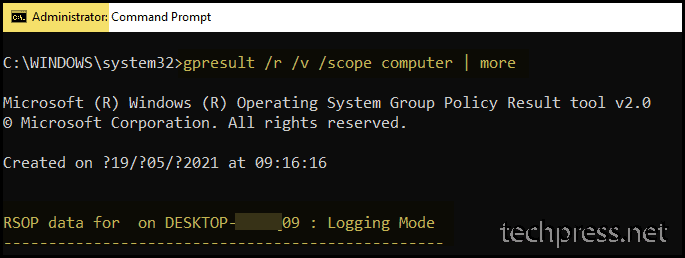
- To check the computer configuration policy, open the command prompt as an administrator and run the command gpresult /r /v /scope computer | more.
Gpresult User Configuration Policy
Gpresult Computer Configuration Policy
Read Next
Задать фоновый рисунок рабочего стола и экрана блокировки Windows через групповые политики
C помощью групповых политик вы можете задать одинаковый корпоративный рисунок рабочего стола (обои) и экрана входа в Windows на всех компьютерах домена.
Вам понадобится файл в формате JPEG с картинкой, которую вы хотите использовать в качестве обоев. Разрешение картинки должно соответствуют минимальному разрешению, которое используется на мониторах в вашей компании (например, 1280 x 1024). Такая картинка будет размещена в центре и растянута на мониторах с большим разрешением.
Вы можете предварительно скопировать JPEG файл на компьютеры пользователей через GPO, или поместить ее в сетевую папку доступную все пользователям. В примере будет использоваться для хранения обоев каталог SYSVOL на контроллере домена. Этот каталог автоматически реплицируется между всеми DC, что позволит уменьшить нагрузку на WAN каналы при получении клиентами файла с рисунком. Например, в данном случае UNC путь к файлу с фоновым рисунком \\itoservice.loc\SYSVOL\itoservice.loc\scripts\Screen\corp_wallpaper.jpg.

Проверьте, что у всех пользователей и компьютеров домена есть права на чтение этого файла в SYSVOL (в NTFS разрешениях файла должно присуствовать право Read для группы Authenticated Users).
Создаем групповую политику с обоями для рабочего стола
Теперь нужно создать групповую политику, которая задает этот рисунок в качестве обоев рабочего стола.
-
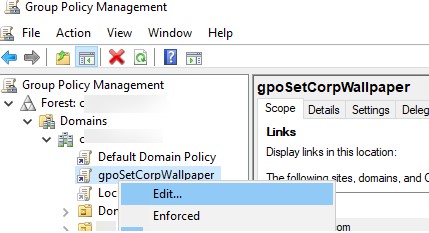
- Откройте консоль управления доменными GPO ( GPMC.msc );
- Создайте новую групповую политику gpoSetCorpWallpaper и назначьте ее на нужный OU с пользователями (в нашем примере мы хотим, чтобы политика применялась на все компьютеры и сервера домена, поэтому мы повесим политику на корень домена). Отредактируйте политику;

- Перейдите в секцию секции User Configuration -> Policies -> Administrative Templates -> Desktop -> Desktop (Конфигурация пользователя -> Административные шаблоны -> Рабочий стол -> Рабочий стол);
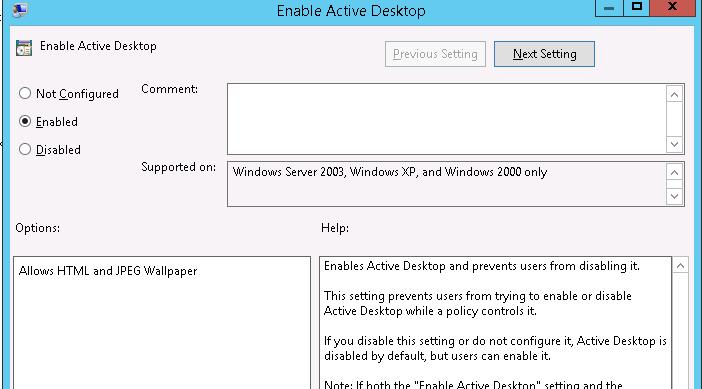
- Включите политику Enable Active Desktop (Включить Active Desktop);

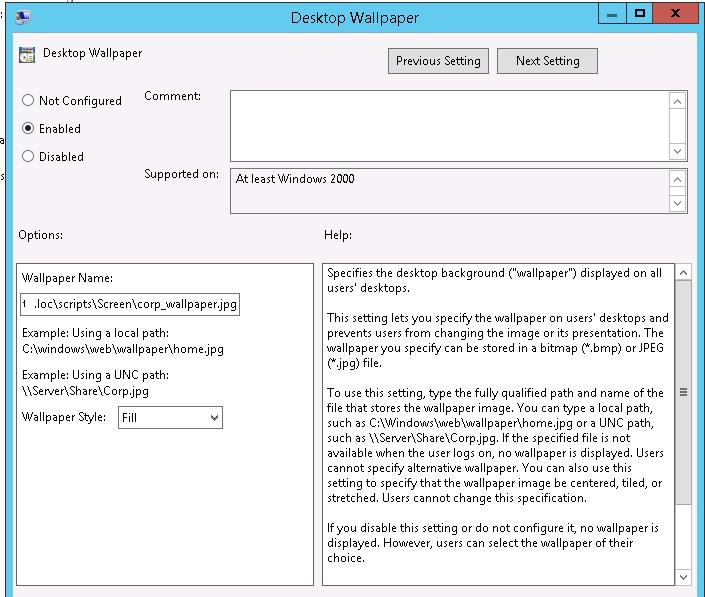
- Затем включите политику Desktop Wallpaper (Фоновые рисунки рабочего стола). В параметрах политики укажите UNC путь к файлу с рисунком и выберите стиль фонового рисунка (Wallpaper Style) — Fill (Заполнение);

Совет. Как правило, стиль фонового рисунка “Fill” выглядит нормально почти на всех разрешениях экрана.
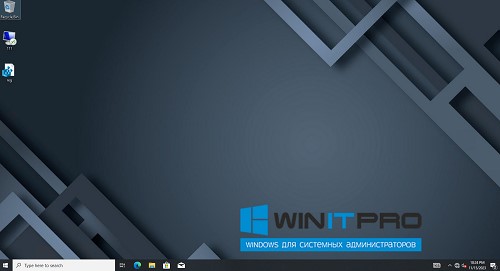
- Обновите настройки групповых политик на компьютере пользователя и перезапустите процесс explorer.exe (можно просто выполнить logoff ) и проверьте, что на рабочем столе отображаются новые обои.

Если групповая политика не применяется на компьютерах, выполнить диагностику на конкретном клиенте с помощью команды gpresult (убедить что ваша политика отображается в секции Applied Group Policy Objects).
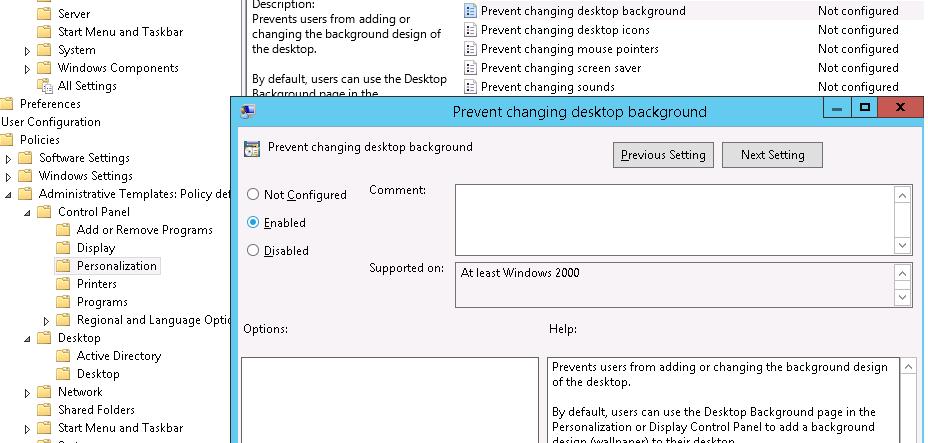
Чтобы запретить пользователям менять фоновый рисунок рабочего стола, включите политику Prevent Changing Desktop Background (Запрет изменения фона рабочего стола) в разделе User Configuration -> Administrative Templates -> Control Panel -> Personalization.
С помощью WMI фильтров GPO можно нацелить политику так, чтобы она применялась только к рабочим станциям пользователей с Windows 10 и 11:
Select * from Win32_OperatingSystem WHERE Version like «10.%» AND ProductType= «1»
В Windows 10 и 11 встречается проблема при обновлении файла с обоями рабочего стола в исходном каталоге. Если путь к картинке не изменился, в Windows не происходит обновление кэша, соответственно пользователь будет видеть старую картинку, даже если вы обновили ее в каталоге на сервере.
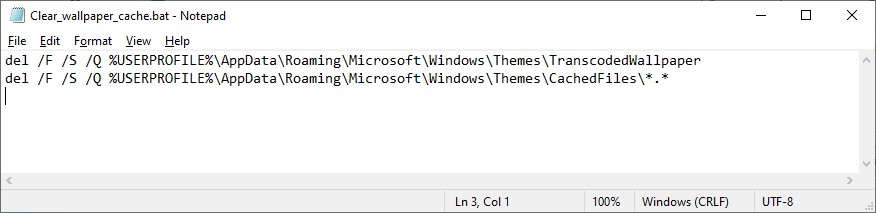
Поэтому для Windows 10/11 можно добавить дополнительный логоф скрипт GPO, который очищает кэш изображения при выходе пользователя из системы. Это может быть bat файл Clear_wallpaper_cache.bat с кодом:
del /F /S /Q %USERPROFILE%\AppData\Roaming\Microsoft\Windows\Themes\TranscodedWallpaper
del /F /S /Q %USERPROFILE%\AppData\Roaming\Microsoft\Windows\Themes\CachedFiles\*.*
Изменить обои рабочего стола через реестр и GPO
Вы можете настроить фонового рисунка рабочего стола через реестр. Путь к файлу обоев хранится в строковом (REG_SZ) параметре реестра Wallpaper в ветке HKEY_CURRENT_USER\Control Panel\Desktop\ или HKEY_CURRENT_USER\Software\Microsoft\Windows\CurrentVersion\Policies\System. В этом параметре нужно указать UNC путь к вашей картинке.
В этой же ветке реестра параметром WallpaperStyle (REG_SZ) задается положение изображения на рабочем столе. Для растягивания изображения используется значение 2.
Если вы хотите запретить пользователям менять фон рабочего стола, создайте в ветке реестра HKEY_LOCAL_MACHINE\SOFTWARE\Microsoft\Windows\CurrentVersion\Policies\ActiveDesktop параметр «NoChangingWallPaper»=dword:00000001
Эти настройки реестра можно распространить на компьютеры пользователей с помощью Group Policy Preferences. Для этого перейдите откройте GPO, перейдите в раздел User Configuration -> Preferences -> Windows Settings и создайте два параметра реестра с режимом Update.
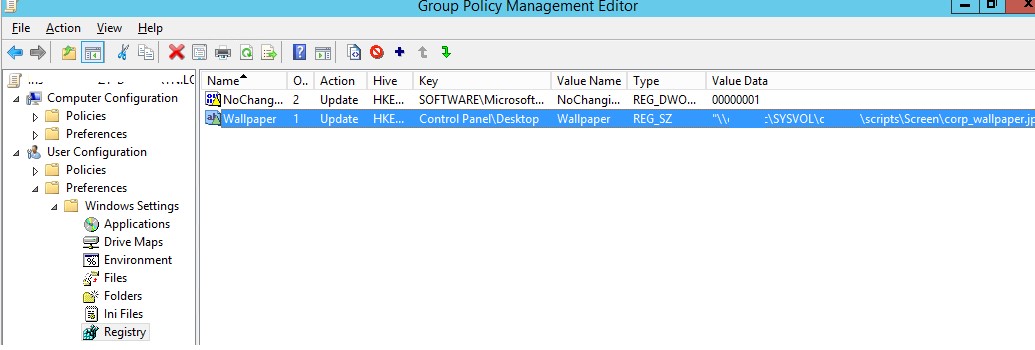
Item level Targeting в GPP позволяет более точно назначить политику обоев на клиентов. Например, можно применить фоновый рисунок рабочего стола только для определенных пользователей (добавленных в группу безопасности AD) и компьютеров с Windows 10.
Откройте свойства парам реестра в политике, на вкладке Common включите Item level Targeting, нажмите кнопку Targeting. Настройте два правила “the operating system is XXX” и “the user is member of the security group XXX”.
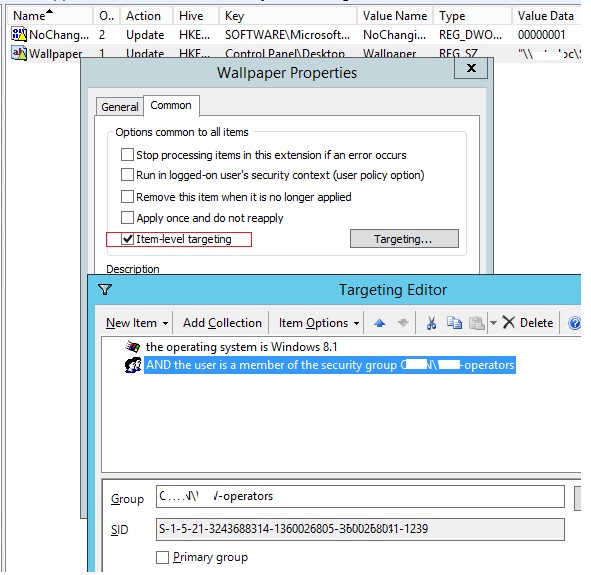
Это позволить вам применять разные обои рабочего стола для разных групп категорий сотрудников.
Дополнительно вы можете настроить на компьютерах единый корпоративный скринсейвер в виде слайдшоу из набора jpeg картинок.
Изменить фоновую картинку экрана блокировки Windows с помощью GPO
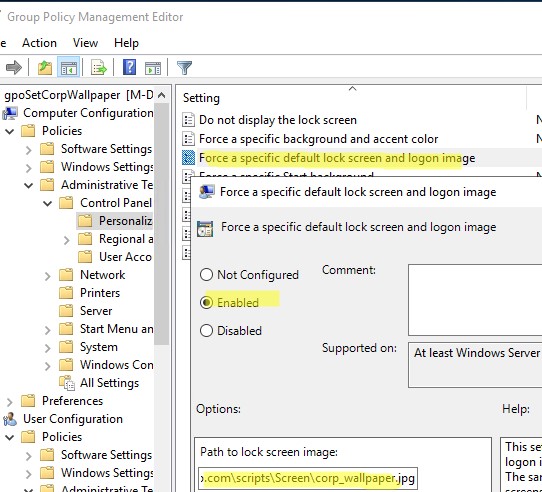
Групповые политики позволяют изменить картинку на экране входа в Windows. Для этого нужно настроить политику Force a specific default lock screen and logon image в разделе GPO Computer Configuration -> Policies -> Administrative Templates -> Control Panel -> Personalization. Включите политику и укажите путь к файлу с изображением.
Однако такая политика применяется только к Windows 10/11 с редакциями Enterprise и Education, а также к Windows Server.
Вы можете изменить фоновую картинку на экране входа для Windows 10 Professional через реестр.
- Откройте свою GPO и перейдите в Computer Configuration -> Preferences -> Windows Settings -> Registry;
- Создайте следующие параметры в разделе реестра HKEY_LOCAL_MACHINE по пути SOFTWARE\Microsoft\Windows\CurrentVersion\PersonalizationCSP:
Имя Действие Тип Значение LockScreenImagePath Replace REG_SZ Полный путь к файлу с картинкой (можно UNC путь) LockScreenImageStatus Create REG_DWORD 1 LockScreenImageUrl Replace REG_SZ Полный путь к файлу с картинкой (можно UNC путь) PersonalizationCSP Create REG_DWORD 1 
- Перезагрузите компьютер и проверьте, что на экране входа в Windows (и на экране блокировки) отображается заданный вами фон.