
| ⚙️Complex Level | Low, Beginners |
| ⏱️Duration | 5-10 minutes |
| 💻Applies to | Speed up file transfer on Windows 11/10 (Network/USB file transfer) |
| ✏️Fixes |
|
| 🔨Tools | EaseUS Todo PCTrans |
We are here to help you get rid of the Windows 11/10 slow file transfer problems. In this post, we cut through the useful method for you to make file transfer faster in Windows 11/10. You can speed up network file transfer by using the smart data transfer software — EaseUS Todo PCTrans Free in fix 1.
The following solutions help you to figure out what exactly causes the slow file transfer issue or change the way of Windows 11/10 file transfer on your PC or laptop.
Make File Transfer Faster Windows 11/10 with Free File Transfer Software
When the file transfer speed slows down on a computer, various reasons may cause it, including network speed, storage capacity of the target drive, file size, etc. A direct way to make the file transfer speed faster in Windows computers is to turn to reliable and fast file transfer software for help.
EaseUS Todo PCTrans Free is a powerful and easy-to-use PC transfer software that can ease you from the slow file transfer issue on your computer. It enables you to migrate files and drive content efficiently via several transfer plans, including:
- Transfer of 2GB and five programs to another computer or drive for free
- Transfer unlimited files quickly from PC to PC or from PC to an external storage device with or without the network.
- Transfer applications between drives/disks locally. For instance, transfer programs from C drive to D drive without any start-up problem.
Here are the detailed steps for Windows file transfer over the network:
Step 1. Set Up the Old PC
- First, install and launch EaseUS Todo PCTrans and select Data Transfer on the left panel of the main interface.
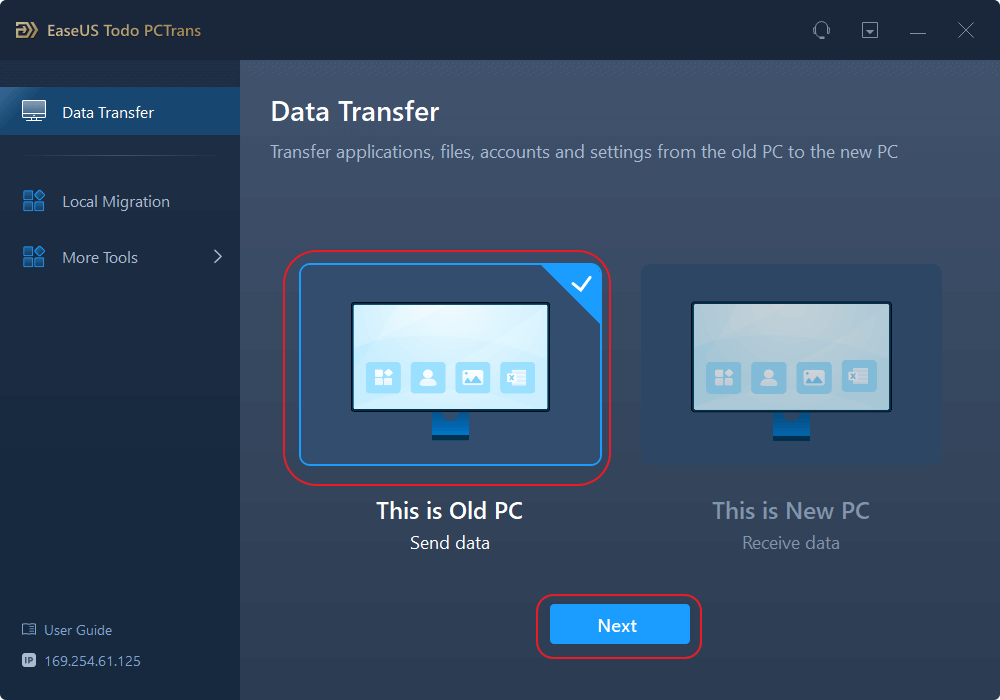
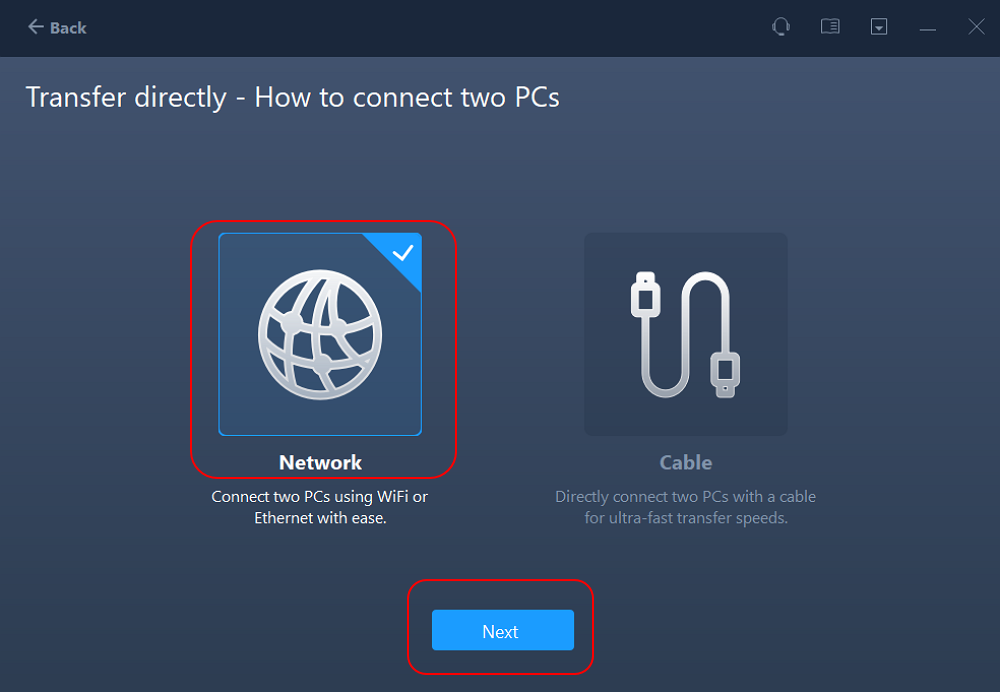
- Select «Transfer Directly» and click «Next» to continue.
Step 2. Set Up the New PC
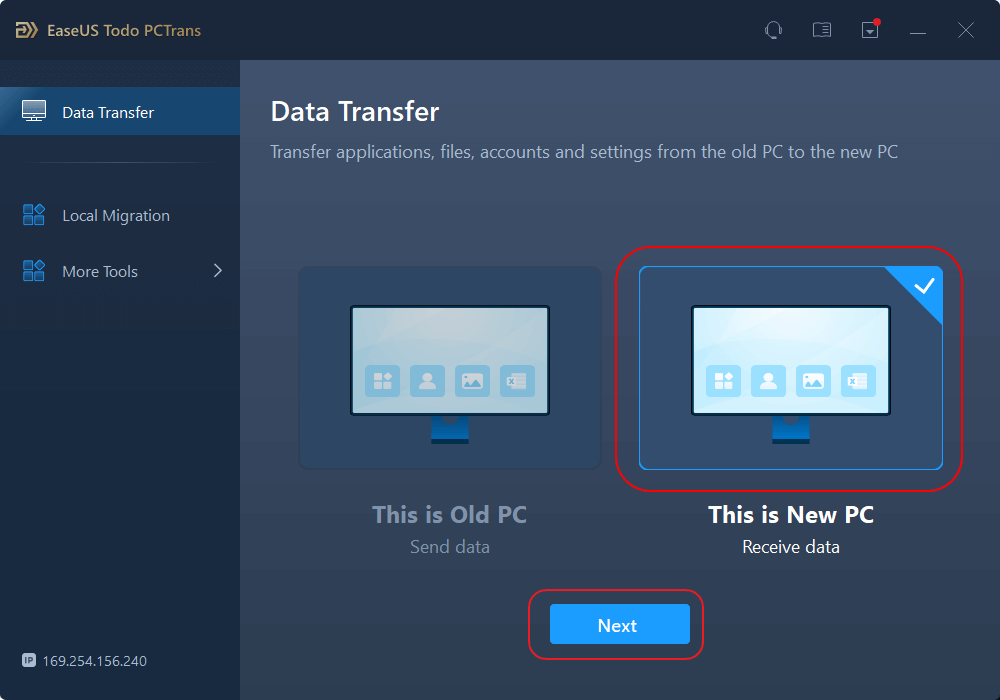
- Download and launch EaseUS Todo PCTrans on the new computer; select «This is New PC» and click «Next».
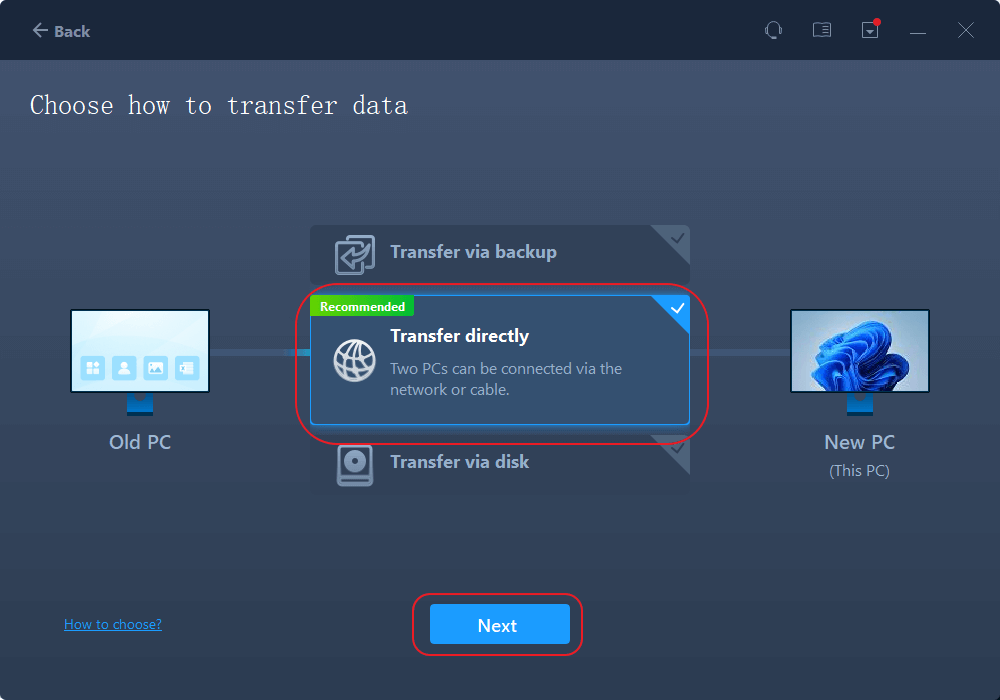
- Select «Transfer directly» and click «Next» to continue.
- Select «Network» and click Next to continue. This will automatically scan the old PC. (Make sure the two PCs are connected to the same LAN.)
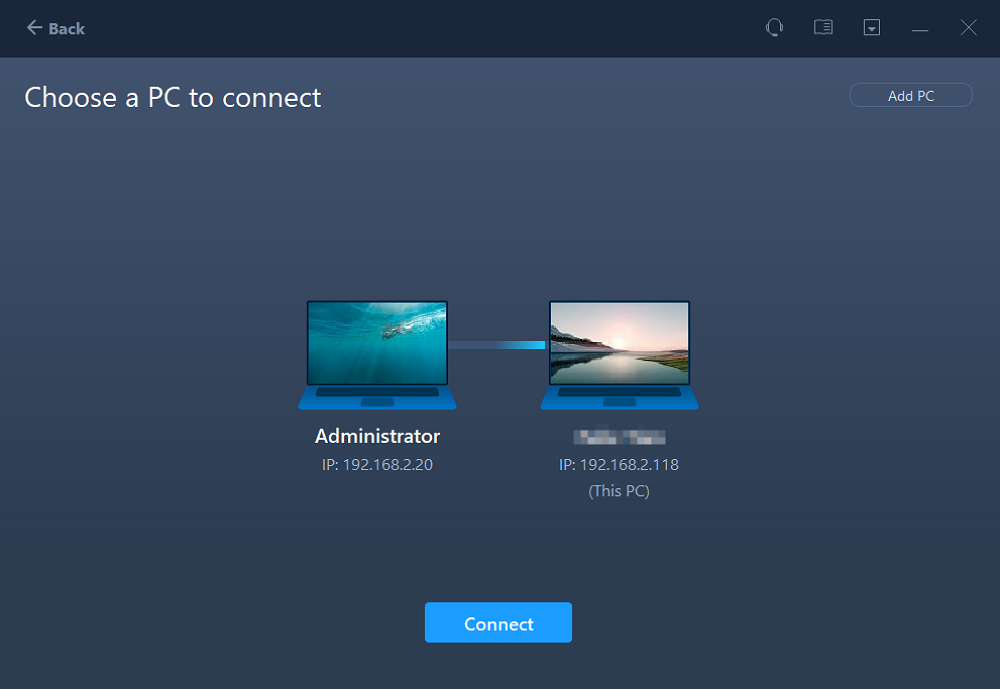
- Select the target PC and click Connect. Then, it will take some time to scan and analyze the data in old PC.
Step 3. Select the Files to Transfer
- Finally, on the new PC, select the Files tab, select the files you need to transfer. Then, click «Transfer» to start.

Also, don’t forget to share this tutorial online to help more people fix Windows 10 slow file transfer error:
Furthermore, we put three solutions here to cope with the very slow file transfer in Windows 11/10, which contains network problems, external drive problems, or computer problems. You can choose the best method for increasing file transfer speed in Windows 11/10. Take it easy and check your methods one by one.
Fixes for Windows 11/10 Slow Network File Transfer
Some people may find that the network data transfer becomes very slow in Windows 11/10. To solve the problem, the two approaches below are worth trying.
1. Disable Windows Auto-Tuning
If you are copying some data over the network, the auto-tuning feature can improve the performance of programs that receive TCP data over a network. But in some situations, disabling this feature might bring a faster copy speed.
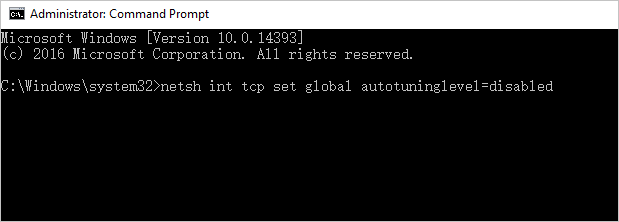
Step 1. Press the Windows key + X and select Command Prompt(Admin).
Step 2. Type netsh int tcp set global autotuninglevel=disabled and press Enter.
Step 3. Now, try to transfer the files and check the data transfer speed. You can go to Command Prompt(Admin) again and type netsh int tcp set global autotuninglevel=normal and press Enter to turn on the Auto-tuning again.
2. Turn off RDC (Remote Differential Compression)
The Remote Differential Compression feature can cause slow network file transfer in Windows 10. To fix this problem, you need to disable this feature on your PCs by doing the following.
Step 1. Press Windows Key + S and enter windows features. Click «Turn Windows features on or off.»
Step 2. Find and uncheck Remote Differential Compression and click «OK.»
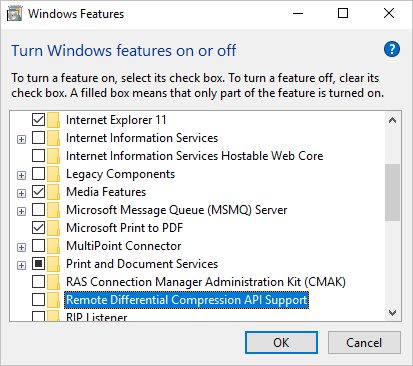
Step 3. Restart your PC. You need to repeat this on all the computers on your network. After that, check if the problem is still there.
After the process, you will find your network data transfers faster. Click the buttons below to share these fixes with others.
Solutions to Slow USB Transfer in Windows 11/10
Copying files between USB drives and computers is one of the most basic ways to share data. But lots of users complain that their PCs are transferring files very slowly on Windows 11/10. The easiest way you can try is to use a different USB port/cable or check/update the USB drivers if they are outdated. If the situation doesn’t improve, continue to use the following advanced solutions.
1. Check the USB or Hard Drive for Corruption
The first step to fix the slow USB transfer issue is checking its state. You can use the Windows built-in tool for help. Once you start the process, it will find the corrupted sectors and fix them if needed.
Step 1. Open «This PC» or «File Explorer».
Step 2. Right-click on the USB drive or hard drive and click «Properties.»
Step 3. Click the «Tool» tab. Under the «Error-checking» section, click «Check.»
- Relevant reading: How to Fix USB flash drive not showing up in Windows 10/8/7
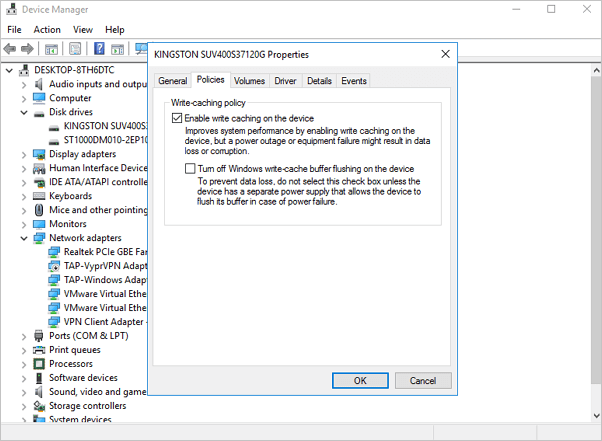
2. Change the Removal Policy for USB Drive/HDD
The external USB drive or HDD on your computer provides you with a Quick removal policy that avoids caching and a better performance policy that writes caching. If your USB flash drive is small-sizes, you’d better choose the former one. If you are using an external hard drive to move large files, the Better performance policy is more appropriate. Let’s see how to change the Removal policy.
Step 1. Plugin in your USB or external hard drive to the PC.
Step 2. Click «Start,» type Device Manager, and open it.
Step 3. Expand the «Disk drives.» Then, right-click on the target drive. Open «Properties» and select «Policy.»
Step 4. Choose a Quick removal policy for the USB flash drive and a Better performance policy for the external hard drive.
Share these ways to help others transfer files faster and remove the slow transfer issues.
3. Format USB Flash Drive to NTFS
After you convert the USB drive from FAT 32 to NTFS, there may be visible improvements in the transfer speed. If you don’t know how to format a USB flash drive to NTFS, follow this link to see details: Format USB flash drive to NTFS in Windows 10/8/7.
Methods for Windows 11/10 Slow File Transfer on Hard Drives/Disks
The slow data transfer also can be hardware or computer issues. You might be able to fix this simply by disabling certain antivirus or cleaning up temporary cache files. If these don’t work, move to increase the disk transfer speed from the following points.
1. Disable Drive Indexing
Windows offers a Drive Indexing feature to index all files and substantially reduce the waiting time when you search for them in File Explorer. However, it can slow the data transfer speed if it starts indexing data while the copying is still going on. So, we suggest that you temporarily disable Drive Indexing for a trial.
Step 1. Open «This PC» or «File Explorer».
Step 2. Select the partition you want to turn off the indexing feature. Right-click it and click «Properties».
Step 3. Uncheck the «Allow files on this drive to have contents indexed in addition to file properties» box and restart your PC to enable the function.
2. Convert File System from FAT to NTFS
EaseUS Partition Master Free allows users to convert FAT to NTFS without losing data effortlessly. Now, download this free partition manager software, and let’s begin.
Step 1. Install and launch EaseUS Partition Master on your computer.
Step 2. Go to the Disk Converter tab, select «FAT => NTFS» and click «Next.»
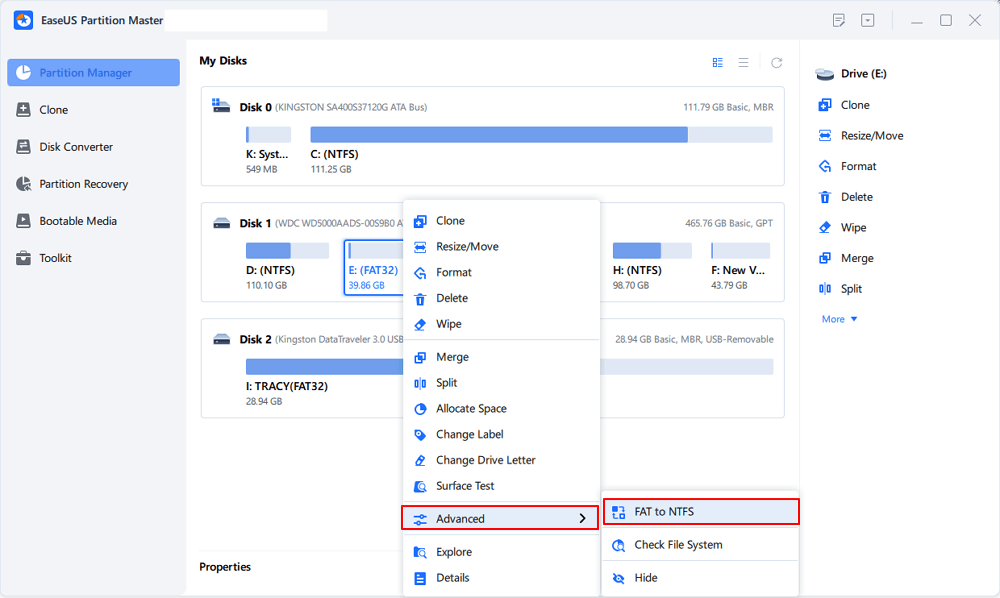
Step 3. Select the partition that you want to convert to NTFS and then click on «Convert.» (Tick the «Show More» option in the panel’s upper right corner to display the hidden partitions.)
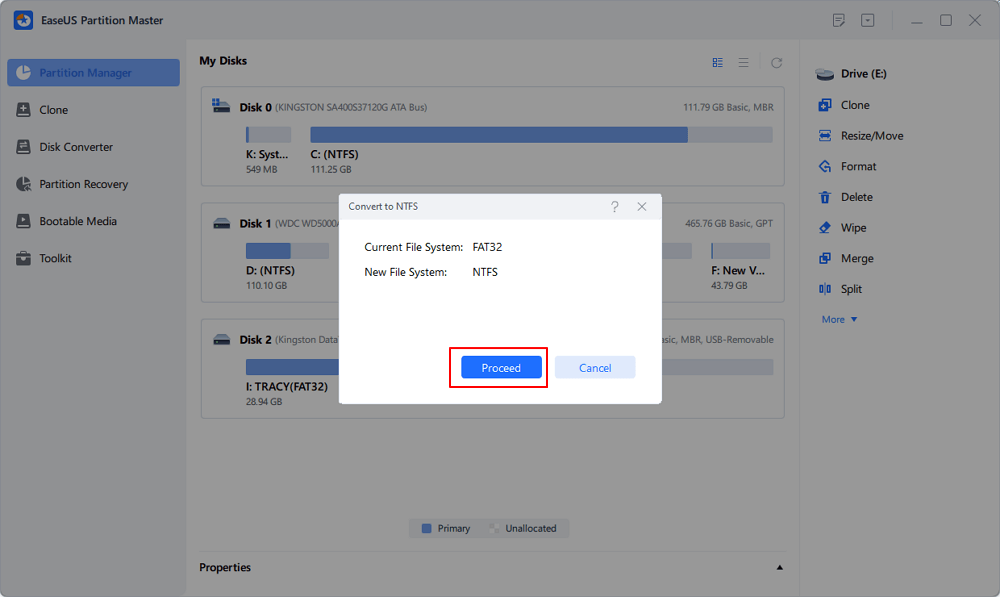
Step 4. Wait until the operation process is finished.
3. Check and Repair System Errors
A corrupted Windows 10 file system could disable, interrupt, or slow down the file transfer speed, so let’s use the System Maintenance Troubleshooter to repair the wrong files.
Step 1. Open the Control Panel and click on the Troubleshooting icon.
Step 2. Select View all in the top left corner.
Step 3. Run System Maintenance Troubleshooter.
Methods Summary
Whether it is a network transfer, USB data copying, or a hard disk data migration, slow file transfer in Windows may be caused by a variety of reasons. If the network transfer is delayed, you can try to find a solution to the network and computer problems. If the USB moving is not fast, you can find the reason from the USB drive and your computer. I hope the above solution can help you effectively.
Finally, if none of the previous solutions help you deal with the slow file copying issue, it’s time to try some third-party tools to speed up the transfer. Here, we’d like to recommend you try EaseUS Todo PCTrans.
FAQ about Speed Up Network File Transfer Windows 10
Do you know how to speed up network file transfer on Windows 11/10 now? If you still have any doubts, this part lists three questions to help you. Check them below:
1. How do I fix Windows 10 slow internet?
- Disable Windows Auto-Tuning.
- Turn off Remote Differential Compression.
- Check if your hard drive is corrupted.
- Check your Ethernet cable.
- Stop running unnecessary programs.
2. Why do we encounter Windows 10 slow file transfer over the network?
The network file transfer runs so low that it stems from your network settings and other hardware failures. Sometimes, checking your router settings is a common solution.
If you can not fix slow file transfer in Windows 10, EaseUS Todo PCTrans can help you to transfer files from one computer to another computer without the Internet.
More details:
3. How do I transfer files faster in Windows 10?
To fix Windows 10 slow file transfer, we recommend EaseUS Todo PCTrans to move all your data to another PC at a fast speed.
Step 1. Download EaseUS Todo PCTrans.
Step 2. Choose PC to PC mode, and click Start.
Step 3. Connect two PCs via entering the password or verification mode.
Step 4. Select the files you want to transfer.
See detailed steps…
Добрый день. По какой-то причине подвисает копирование/удаление файлов в самом конце процесса, причём временами довольно надолго (возможно, зависит от объёма копируемого)
Как это выглядит — прогресс-бар доходит до 99%, счётчик оставшихся данных показывает «Осталось элементов: 0 (0 байт)», оставшееся время — «примерно 5 с».
И в таком состоянии прогресс-бар может висеть минуту, а то и несколько. Причём судя по всему физически данные уже удалились, то есть я могу закрыть это окно вручную и продолжить работу. Но окно не исчезает и непонятно, что именно вызывает такой фриз.
Система — Windows 10 1803 (build 17134), SSD Plextor PX-512M5Pro.
Связано ли это с диском, или с самой системой? И если с системой, каким образом можно вылечить, кроме переустановки? Спасибо!

-
Вопрос задан
-
22925 просмотров
Пригласить эксперта
Скорее с системой. Так долго не должно бы, хотя при перемещении и удалении большого количества файлов вполне возможна небольшая пауза — TRIM. Особенно при сильной фрагментации или очень мелких файлах.
только что лечил от этой беды: даже пустая папка минут 10 зависало удаление на 99% (на самом деле уже удалилось — это окошко висело).
начал делать по этой рекомендации: https://support.microsoft.com/ru-ru/help/4026529/w…
Но пока делалось DISM.exe /Online /Cleanup-image /Restorehealth запустил проверку диска С стандартными средствами. Проверка через полчаса выдала что ошибок нет. DISM сказал что восстановление выполнено успешно примерно тогда же. НА ЭТОМ МОМЕНТЕ ПРОБЛЕМА УЖЕ ИСПРАВИЛАСЬ. Но кто помог проверка диска или сам факт скачивания исправленных файлов восстановления (система же в случае сбоя заменяет на копию оттуда) я не могу сказать точно до следующего такого случая.
Также я на всякий случай сделал ещё sfc /scannow
Войдите, чтобы написать ответ
-
Показать ещё
Загружается…
Минуточку внимания
Are you looking for the fastest way to copy files from one drive to another? If so, you come to the right place. In this post, MiniTool offers several fast copy Windows 10 methods. With the given methods, you can enjoy a fast copy.
Windows 10 is a great operating system, which performs well on many aspects. However, the copying files from one location to another aspect is not so satisfying. The copy process won’t take you much time when you copy only a few files or folders.
However, if you copy a large number of files at one time, the process may get flimsy. You need to spend a lot of time to move files if you often copy large files. What’s worse, you may receive errors like calculating the time required to copy the files while copying files.
Why Do Files Take So Long to Copy
To get a quick copy in Windows 10, you need to know the factors that are related to the file transfer. In other words, you should find out the reasons behind slow file transfer Windows 10. First and foremost, you should check the type of your hard drive you are using at present.
Then, check the USB port of your storage device. In addition, file transfer utilizes and the size of files are also responsible for the slow file transfer. Now, you can speed up file copy process based on these factors.
How to Fast Copy in Windows 10
In this section, we would provide you with 5 methods. With these methods, you are able to enjoy Windows 10 fast copy.
Tip: The Method 1 and Method 2 can improve the speed of copy in essence. However, if you don’t want to change your hard drive or USB port, you can boots copy speed via other methods.
Method 1: Upgrade HDD to SSD
Hard drives decide the speed of file copy. According to SSD vs HDD, SSD is faster than HDD, particularly the boot time. Additionally, SSD is faster than HDD on the aspect of loading applications. In a word, your computer can boot, launch and run apps, and transfer files faster with an SSD.
If you still utilize HDD, you are recommended to upgrade it to SSD to get fast copy Windows 10. How to upgrade your hard drive to SSD without reinstalling OS? The Migrate OS to SSD/HD Wizard feature of MiniTool Partition Wizard enables you to do that within a few clicks.
To execute this operation, you need to prepare some items.
- Prepare a suitable SSD. Before buying SSD, you should check the size, thickness, and capacity of the HDD and then take these standards as your reference.
- Get a SATA to USB adapter to connect the SSD to computer.
- Download and install MiniTool Partition Wizard by clicking the button below.
MiniTool Partition Wizard DemoClick to Download100%Clean & Safe
Step 1: Connect the new SSD to your computer via the adapter.
Step 2: Launch MiniTool Partition Wizard to enter its main interface.
Step 3: Click on the Migrate OS to SSD/HD Wizard option in the left pane.
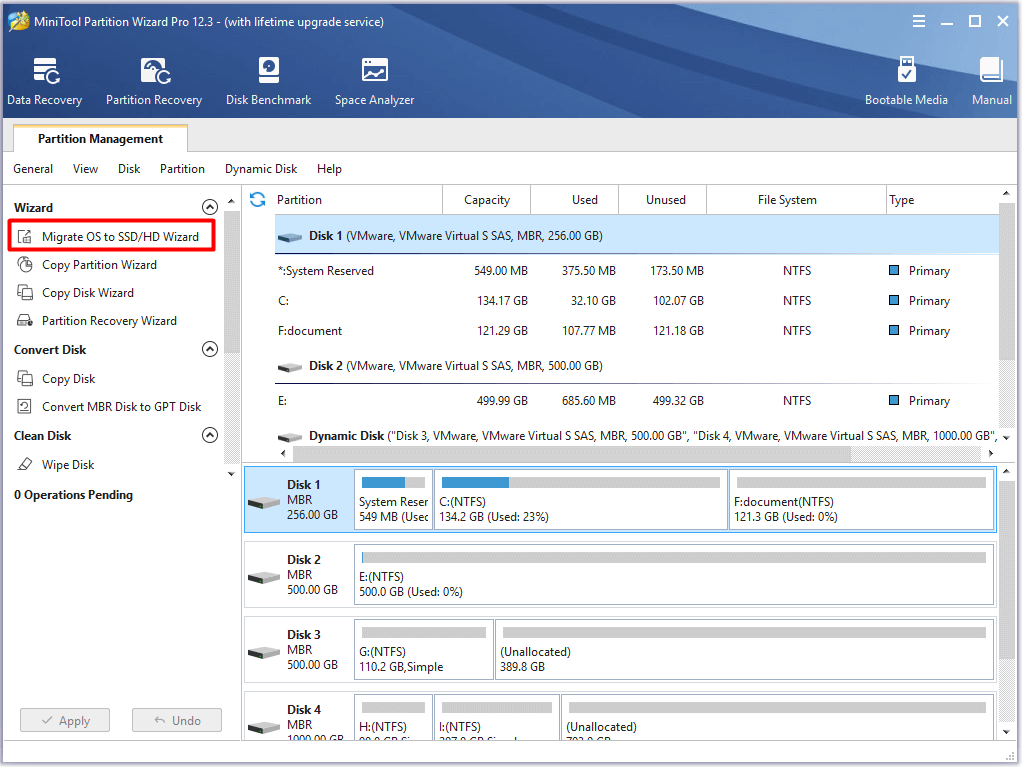
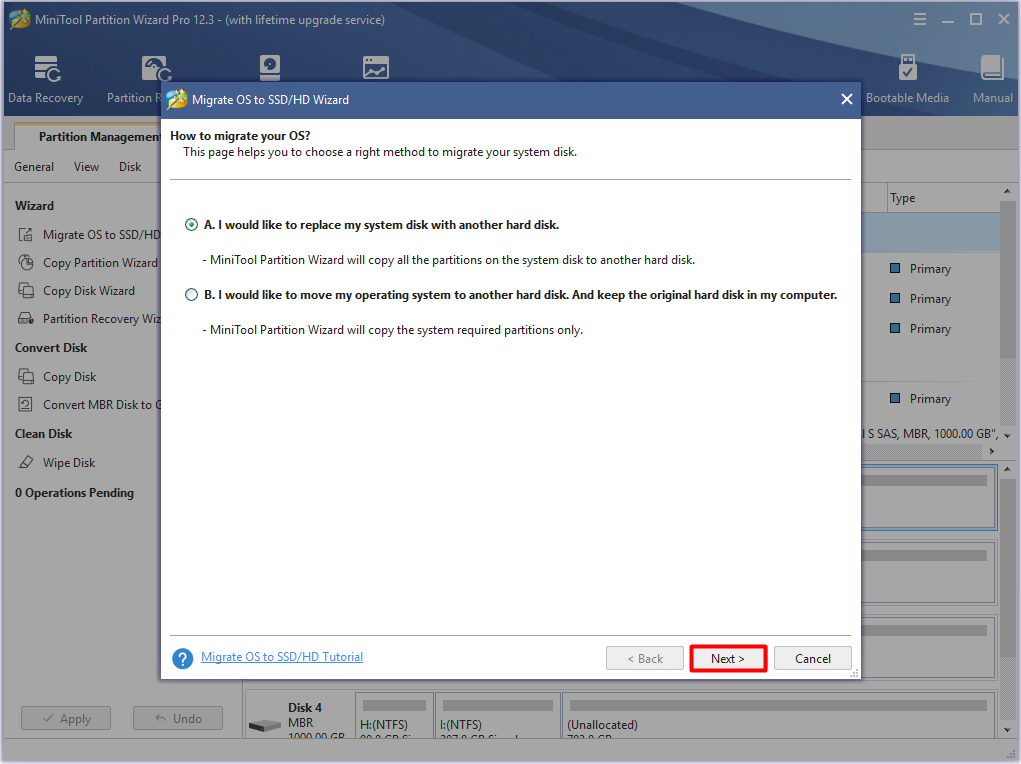
Step 4: In the pop-up window, choose a way to migrate OS. As you need to replace the HDD with the SSD here, you should select the Option A. Then click on the Next button to continue.
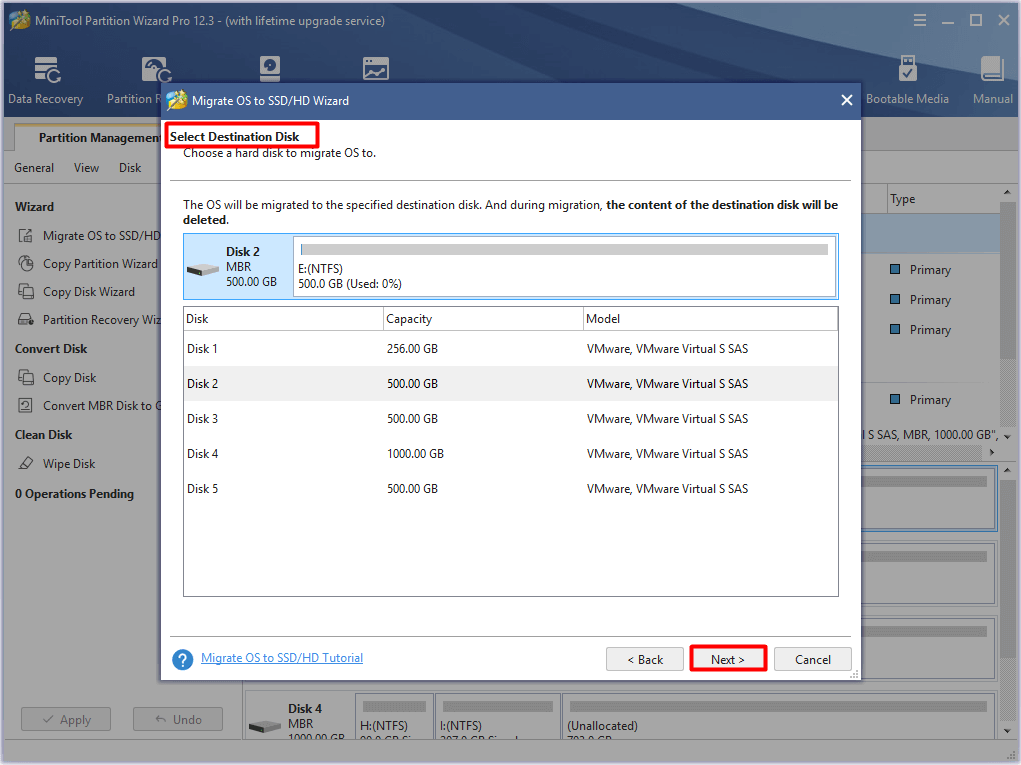
Step 5: In this window, you need to select a destination disk for the OS. Here, click on the connected SSD from the listed disks and click Next.
Tip: The data on the selected drive will be destroyed during the migration process. You need to make sure that there is no important data on the SSD before clicking the Yes button.
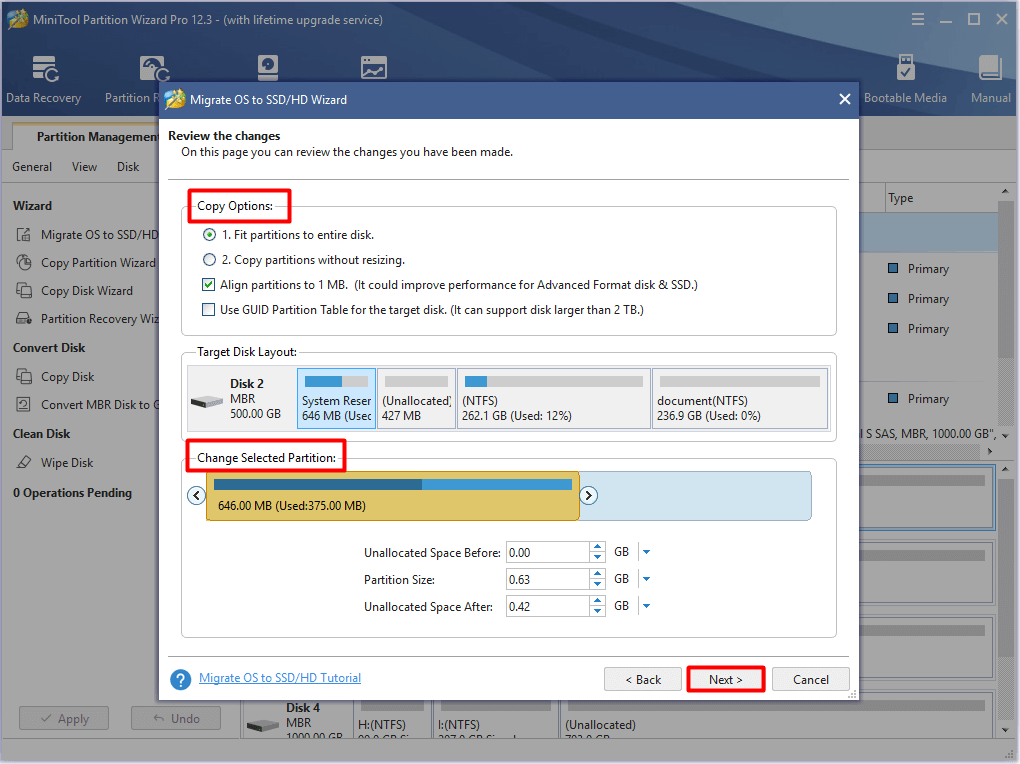
Step 6: You can view the changes in this window. Choose the copy options and change the selected partitions based on your demand. After that, click Next to continue.
- Fit partitions to entire disk: This option will make all the partitions on the original disks to fill the new disk by an equal proportion.
- Copy partitions without resizing: All the partitions on the previous disk will be copied to SSD without any changes in size.
- Align partitions to 1 MB: This option is helpful for improving the performance of advanced format disk and SSD.
- Use GUID partition tablet for the target disk: You are recommended to choose this option when the HDD is an MBR drive and SSD is a GPT drive. To boot from GPT, you are required to change BIOS mode to UEFI.
Step 7: Click the Finish button to confirm the changes you have made, and then click Apply to execute the operation.
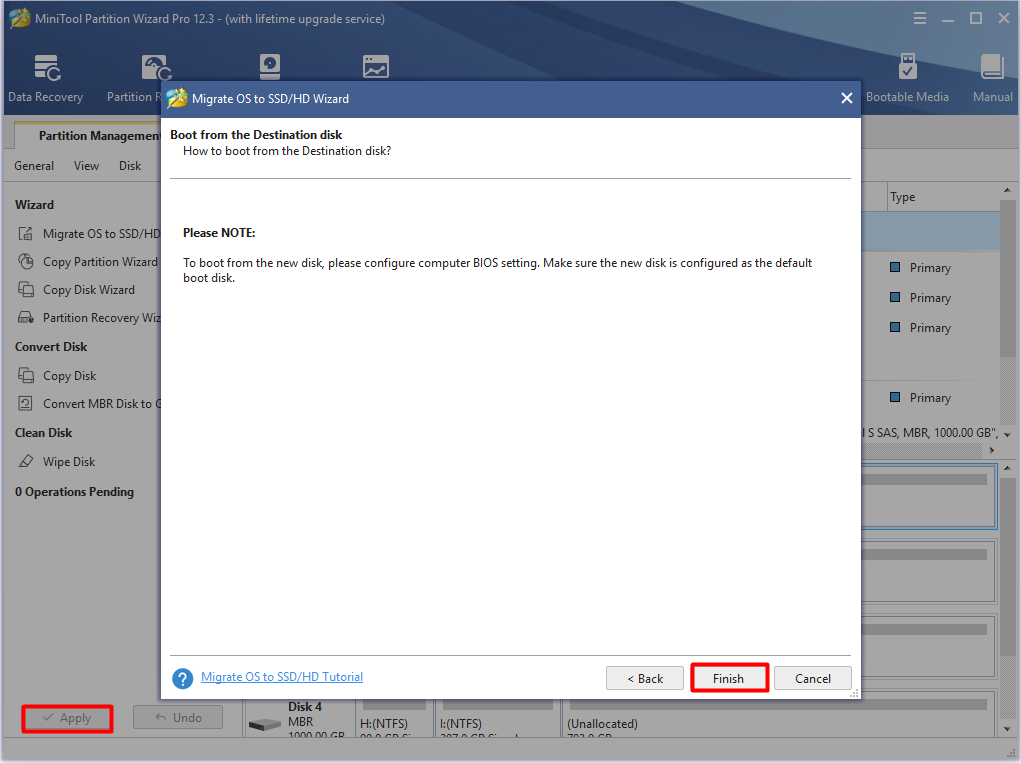
Step 8: After migration, turn off your computer and then reboot it to set the new SSD as the boot disk in BIOS.
Method 2: Change USB Ports
You can try changing USB ports to obtain fast copy on Windows 10 as well. This method is a consideration from the aspect of copying to or from external storage devices like USB flash drive, external hard drive, TF card, etc. When you use a flash drive with USB 2.0 or an old external HDD, the transfer speed is slow.
In this case, you should replace the old USB ports with modern USB 3.0 or newer ports that have fast data transfers.
Tip: If you suffer from a slow USB 3.0, you can fix it with this guide. When USB 3.0 ports not working, repair them by using the fixes in this post: Top 3 Fixes for Solving USB 3.0 Ports Not Working Issue.
Method 3: Copy Files with Shortcuts
Generally speaking, you can copy files via keyboard shortcuts. This method is simple and fast. Here are some commonly used shortcuts.
Ctrl + A: It can choose all the contents in the current folder.
Ctrl + X: It can cut a file and move it for future pasting.
Ctrl + C: It can copy files without cutting them.
Ctrl + V: It can paste the content you’ve copied.
Ctrl + Left: It enables you to choose the content to copy.
If you want to copy some files, press Ctrl key on the keyboard and the Left click on the mouse to choose the files to copy. Then move to the destination, press Ctrl + V to paste the copied content. Alternatively, you can right-click on the empty space on the destination and click the Paste option.
Recommended reading: 7 Methods to Fix Copy and Paste Function Not Working
Method 4: Copy Files Quickly with File Copy Programs
Copying files using file copiers probably is the fastest way to copy files from one drive to another. Which file copy programs to choose? Here, we are going to recommend you some.
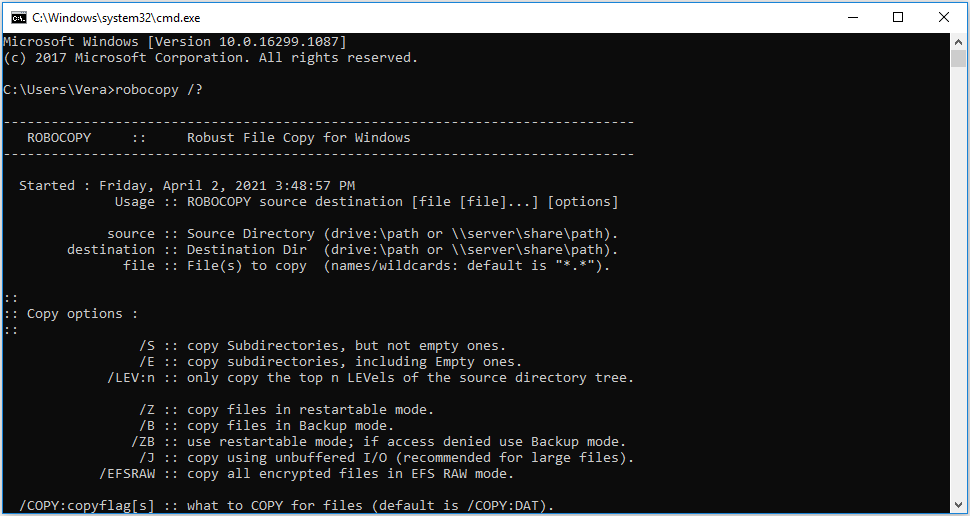
Robocopy
Short for Robust File Copy, Robocopy is an embedded tool in Windows 10. It can help you copy files quickly, especially over a network. It is useful in occasions that you need to run repetitive or complex file copy processes.
How to copy files via Robocopy? Here are steps.
Step 1: Open Run window by pressing Windows + R keys, and then type cmd and hit Enter. You can use Robocopy in Windows PowerShell too. Type powershell in the search box and click on Windows PowerShell from the listed search results.
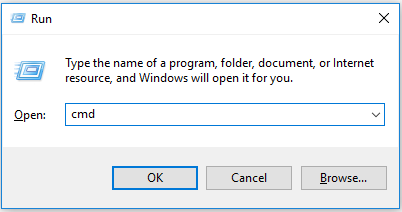
Step 2: In the elevated window, type robocopy /? and press the Enter key to carry out the command. In the Windows PowerShell, type the same command and execute it by hitting Enter.
Note: Alternatively, you can click here to get the Microsoft’s help page.
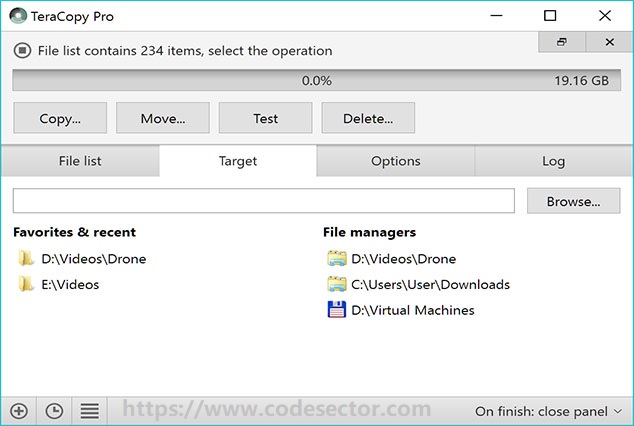
TeraCopy
TeraCopy is a popular file copy program on the market. It is a full-featured and good-looking copier. TeraCopy is compatible with Windows 7/8/10. More importantly, it is capable of recovering from errors. It keeps updating new versions.
TeraCopy has its own strengths and weaknesses.
Advantages
- Exclude problematic files when copying files
- Drag and drop to stop moving large folders
- Include advanced tools for experienced users
- Provide portable version
Disadvantage
High resource usage
Copy Handler
Copy Handler allows you to transfer a large number of files from one system to another and transfer files between drives and computers. It is a dedicated file copy utility that can transfer bulk files with least time. During the copy process, you can see the basic details.
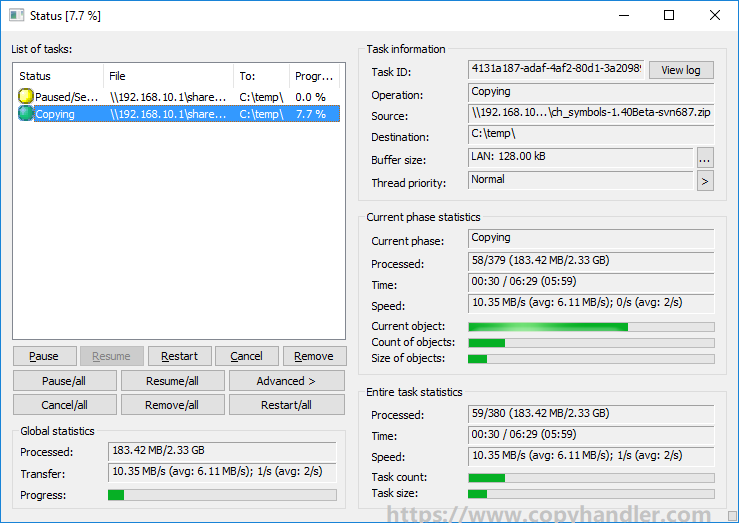
In addition, you are able to pause, resume, restart, and cancel the copy process according to your need. This program enables you to execute multilingual data copy program. Unlike other file copiers, Copy Handler will continue to execute the incomplete tasks automatically when PC boots up. It is compatible with Windows & Mac.
Advantages
- Drag & drop functions
- Pause, Resume, Restart, and Cancel buttons
- Much information of present and past operations
Disadvantage
- Issues with file copier setup
- Tricky to uninstall the product
FF Copy
FF Copy is regarded as one of the best file copy software. It is compatible with Windows 7 and Windows 10. It is a simple file copier. After you choose multiple files and folders onto the window, they will be copied to the destination that you choose from the button or drop-down menu.
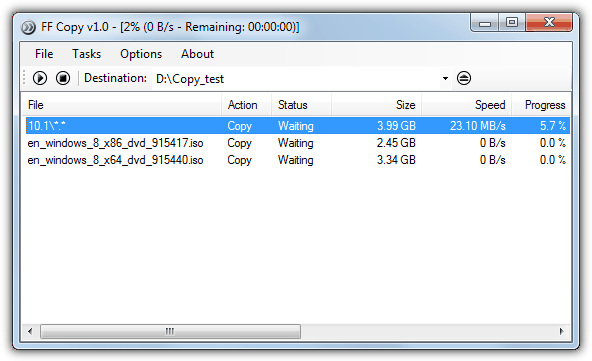
This copier is famous as the super-fast copy software because of the divergent transfers, push parallel transfers & ability to allocate disk space, and reduce disk fragmentation. To help you get a further understanding of FF Copy, we list its pros and cons as below.
Advantages
- Shows complete status progress
- Buttons to pause and resume copying process
- Improve the speed of the entire process
Disadvantage
Basic dashboard
MiniCopier
MiniCopier, one of the best interactive Windows copy programs, is compatible with Windows, Mac, and Linux. Compared with other file copiers, MiniCopier is a little different because it is written in Java. It means that it has different versions for Windows, Linux, and Mac OSX.
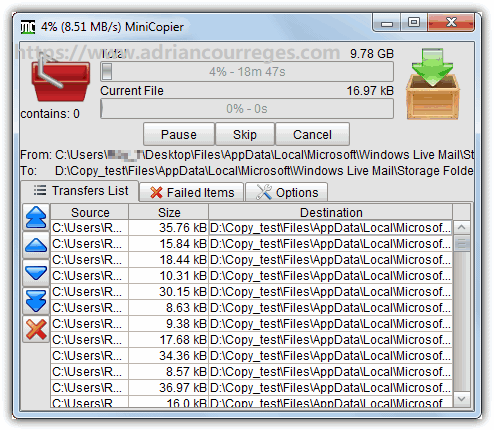
To copy files with this super-fast file copier, all you need to do is to drop the target files or folders onto the red basket. After that, the process will begin automatically.
Advantages
- Add multiple files and folder to basket
- Pause/resume process by clicking the buttons
- Skip the current transfer to the next
- Allow you to overwrite files
- Keep track of the transfers that get failed
Disadvantage
Basic user-interface
Method 5: Compress Files before Copying
To get a quick copy on Windows 10, you can try compressing files before copying. Utilities like WinRAR and 7Zip can compress files quickly. After compressing files with compressors, you can obtain a fast copy experience.
Recommended reading: Top 6 Methods to Fix Error 42125 Zip Archive Is Corrupted
How to copy files quickly? If you don’t know, read this post now! The methods offered by this post enables you to enjoy fast copy Windows 10. Click to Tweet
Conclusion
Do you want to copy files faster on Windows 10? Here are 5 methods to get fast copy experience on Windows 10. If you have any new thoughts and ideas, please share with us by writing them down in the comment area below. For any questions about MiniTool software, directly send us an email via [email protected].
Copying files from external media to your local storage is the most basic task of all. Especially, since the DVD Era is behind us and USB memory drives are used for basically all data transfers. The flash memory speeds up the reading/writing speeds substantially, and thus the emergence of the Solid State Drives was a rather expected next step.
However, lots of users’ reports state that their PCs are copying files slowly or slower than usual. Both from the external media and between different drives/partitions sharing the local storage or network.
This is not so unusual. And there are various factors why something like that would happen. We enlisted some ways to speed up your PC if it’s copying files slowly or slower than usual.
Your PC takes a while to copy files? Here’s why and how to speed it up
1. Check the HDD and external media for corruption
Let’s start by checking the state of your HDD or the external drive. The quickest way to do so is by using the built-in tool which can be found in the partition properties. Once you run it, it should locate the corrupted sectors and fix them if needed so.
Here’s how to run this tool on Windows 10:
- Open This PC or File Explorer.
- Right-click on the partition or drive and open Properties.
- Select the Tool tab.
- Under the “Error checking” section, click Check.
2. Disable the Auto-Tuning feature
If you’re having a hard time transferring files swiftly over the network, we suggest disabling the Auto-Tuning feature. This feature should monitor and dynamically adjust the buffer size of the receiving files. Thus, in theory, it should speed up the whole procedure of TCP data transfer. However, it also might cause problems and additionally slow down copying files over a network.
Here’s how to disable it in a few steps:
- Right-click on Start and open Command Prompt (Admin).
- In the command line, copy-paste the following command and press Enter:
- netsh int tcp set global autotuninglevel=disabled

- netsh int tcp set global autotuninglevel=disabled
- Try transferring files again and, if the problem isn’t resolved, don’t forget to re-enable the Auto-Tuning. Use the same command, just replace “disabled” with “normal” at the end of the line.

3. Turn Off RDC
RDC or Remote Differential Compression has a similar goal but it utilizes alternative ways to help you synchronize large chunks of data. It compresses the data during the network sync, but it can also be a drawback. That’s why we suggest disabling it. If the problem isn’t solved, you can always re-enable it and move onward through the list.
Here’s how to turn off RDC:
- In the Windows Search bar, type Turn Windows and open Turn Windows features on or off.
- Scroll down and uncheck the “Remote Differential Compression API support” box.
- Confirm changes.

4. Use a different USB port
This seems more than obvious but a lot of people ignore it for no apparent reason. Namely, if you have a 3.0 or 3.1 USB port, it should be your primary choice. However, if there are multiple ports, you can switch between them until you get the supposed transfer speeds.
Of course, there’s also file fragmentation at stake. If you have a cluster of 1000 files taking up 5 GB, it’ll take much more time than 1 5 GB- a large file.
5. Check USB drivers
Since its introduction, Windows 10 has had a lot of issues with various drivers for all kinds of devices. The same goes for generic chipset drivers which are automatically administered via Windows Update. What we suggest is replacing those drivers with the official ones obtained from the OEM’s support website.
By simply googling your motherboard, you should find all the latest drivers you need. After you install these drivers, the copying speed should improve substantially.
6. Disable Drive Indexing
In order to speed up access to files stored on the local storage, Windows offers Drive Indexing. When enabled, this feature will index all files and substantially reduce the waiting time when you search for them in File Explorer. This is a great feature if you have dozens of similar files which help you distinguish them and access them quicker than usual.
However, even though it should work when the PC is idle, it sometimes doesn’t. And you can imagine how it can slow the data transfer if starts indexing files while the copying is still at hand.
For that reason, we suggest disabling it. At least temporarily. Here’s how to do it:
- Open This PC or File Explorer.
- Right-click on the partition you want to relieve of indexing and open Properties.
- Uncheck the “Allow files on this drive to have contents indexed in addition to file properties” box and restart your PC.

7. Disable your antivirus
In a similar manner, as Drive Indexing can slow down copying, an antivirus might, as well. Of course, instead of indexing, its real-time engine might scan them for malware presence. Besides slowing down the transfer, it can also affect the whole system and hog the resources. Which adds up to an already heavy burden. That’s the reason why you should disable it until all files are transferred. Obviously, you would want to enable it afterward.
Here’s how to disable Windows Defender:
- Open Windows Defender Action Center from the notification area.
- Choose Virus & threat protection.
- Under the Virus & threat protection settings, click Manage settings.
- Toggle off Real-time protection.


8. Use the Disk Cleanup utility
The sole presence of temporary files might slow down the execution of various system services. So, the next viable step is to clean up all temporary files stored in your system partition. This can be done with various third-party tools but, for the sake of simplicity, we suggest using the built-in utility called Disk Cleanup.
Follow these instructions to run Disk Cleanup:
- Press Windows key + S to open Search bar.
- Type in dsk and open Disk Cleanup.
- Choose the system partition and click OK.
- Click on Clean system files and choose the system partition again. The calculation can take some time.
- Check all boxes and click OK.

9. Format the USB flash drive in the NTFS format
Some users reported visible improvements in the copying speeds as soon as they re-formatted their thumb drives in the NTFS format instead of FAT32. Most USB thumb drives are, by default, formatted in the FAT32 format which shouldn’t be a problem. However, that doesn’t mean that the NTFS format won’t help you resolve horrendously slow copying speeds on your PC.
If you’re unsure how to format a USB flash drive to NTFS, follow these steps:
- Back up data from the USB flash drive and plug it in.
- Open This PC or File Explorer.
- Right-click on the USB flash drive and choose Format from the contextual menu.
- Choose NTFS as the format.
- Wait until the procedure ends.
10. Change the drive’s Removal policy
Every external USB storage allows you to choose between the Quick removal policy which avoids caching and the Better performance policy which writes caching. The former is usually a better choice for small-sized USB flash drives. However, if we’re talking about copying dozens of gigabytes from an external HDD, the Better performance policy is the way to go.
Here’s how to change the Removal policy for the external drives on your PC:
- Connect the external drive to the PC.
- Right-click on Start and open Device Manager.
- Expand the Disk drives section.
- Right-click on the external drive and open Properties.
- Choose the Policy tab.
- Toggle Better performance instead of Quick removal.

11. Use a third-party application to copy the files
Besides relying on solely system resources, you can try some third-party tools to speed up the copying. There are a whole lot of available tools, and they tend to deal better with large chunks of data. Most of them are free of charge and small in size. Some even doesn’t require installation in order to use them.
Here are some tools we can recommend:
- FastCopy
- Copy Handler
- ExtremeCopy
Finally, if none of the previous solutions helped you deal with the slow file copying, we can only suggest a clean reinstallation of Windows 10. If you’ve upgraded to Windows 10 over the Windows 7/8.1 installation, chances are the system will underperform. That’s why we suggest reinstalling Windows 10. Wiping out your HDD and repartitioning it before the installation might help, as well.
With that said, we can conclude this article. Hopefully, at least some of the enlisted steps helped you resolve the problem at hand. If they did, make sure to tell us in the comments section below.
Aleksandar Ognjanovic
Aleksandar’s main passion is technology. With a solid writing background, he is determined to bring the bleeding edge to the common user. With a keen eye, he always spots the next big thing surrounding Microsoft and the Windows OS.
Focused on Windows errors and how to solve them, he also writes about the OS’s latest features as well as its interface.
In his free time, he likes to read, listen to music, and enjoy the nature. Hiking is one of his newly found passions.
Основная: Приведенная ниже статья поможет пользователям исправить зависания или зависания Windows 10 при копировании файлов без потери данных, и если, к несчастью, вы потеряли некоторые важные файлы, вы можете вернуть их, используя Восстановление данных BitWar!
ПОБЕДНАЯ ВЕРСИЯ MAC-ВЕРСИЯ
Оглавление
Обзор Windows 10 зависает и зависает при копировании файлов
Большинство пользователей сталкивались с тем, что их Windows зависает и зависает, когда они пытаются скопировать файлы из одного местоположения файла в другое. Эта проблема возникает в Windows 7, 8 и 10, как и в случае с нашими пользователями Windows.
“This afternoon, I was trying to copy some folders from my local disk D: to E: on my Windows 10, but my PC suddenly turns frozen up and I cannot access or continue copying my files. What should I do to remove this window hangs problem without losing any data?”
Suppose that you are stuck and unable to access anything on your computer you will need to follow the solutions below to fix it as soon as possible to prevent any data loss!
Лучшие решения для исправления зависания / зависания Windows 10
В этой части мы покажем вам эффективные решения для исправления и ускорения процесса копирования файлов Windows.
Решение 1. Остановите и повторите попытку копирования файла
Suppose that your Windows 10 gets stuck when you are copying files, you will need to stop the process and retry again. On the file copying taskbar, click the cancel option to close it. Then, press Yes to confirm the operation and copy the files again from the folder to your new file location.
Решение 2. Принудительно остановить запуск программ
Иногда ошибка возникает из-за других запущенных на вашем компьютере программ.
Шаг 1: Нажимать ALT + CTRL + DEL и выбрать Диспетчер задач.
Шаг 2: Check и щелкните правой кнопкой мыши the запущенные программы которые набирают высоту Диск or объем памяти использование.
Шаг 3: Выбирать End task чтобы принудительно закрыть программы.
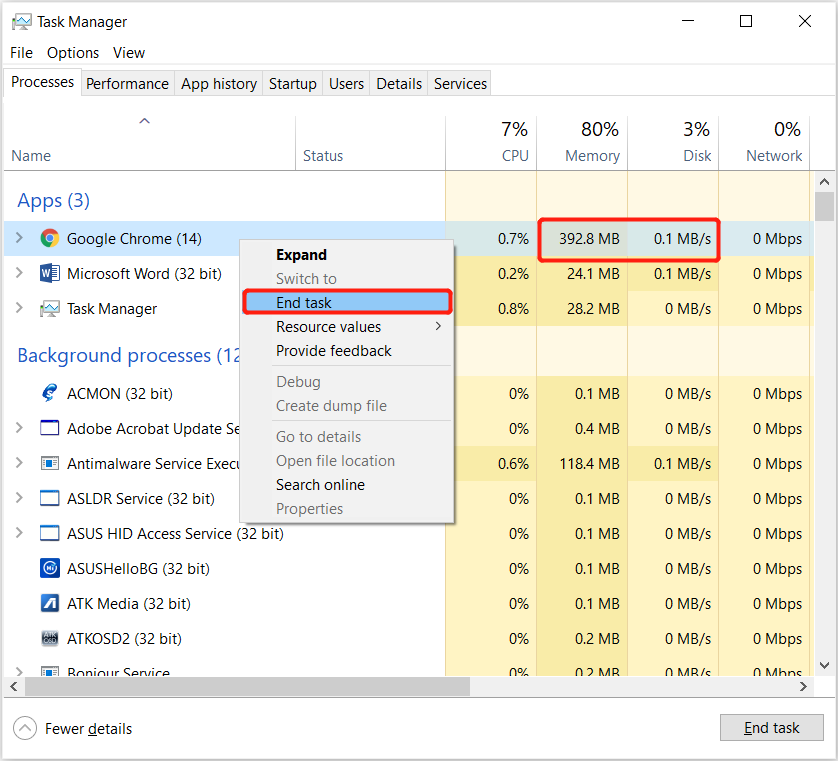
После его закрытия вы можете продолжить с помощью проводника Windows, чтобы снова скопировать файлы, чтобы увидеть, зависает ли ваша Windows по-прежнему или нет.
Решение 3. Удалите файл Desktop.ini
Большая часть файла Desktop.ini имеет большой размер, что может снизить производительность диска компьютера, поэтому вам придется удалить эти ненужные файлы.
Шаг 1: Перейти к Windows File Explorer и выберите Options from the Вид Вкладка.
Шаг 2: Перейти к Вид Вкладка и отметьте Показать скрытые файлы, папки или дискии снимите галочку Скрыть защищенные файлы операционной системы.
Шаг 3: Click ОК to save the change.
Шаг 4: Перейдите в проводник и найдите файл Desktop.ini. Если размер файла превышает 100 МБ, удалите их и перезагрузите компьютер.
Решение 4. Функция Windows
Шаг 1: Нажимать Победы + S to open the Поиск меню и ищи Возможности системы Windows.
Шаг 2: Select the Включение и отключение функций Windows.
Шаг 3: Снять галочку the Поддержка API удаленного разностного сжатиякоробка и щелкните Хорошо.
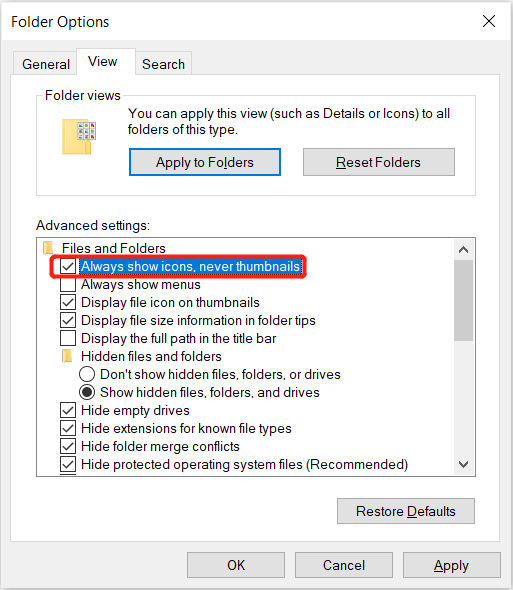
Решение 5. Отключите эскиз в Windows
Помимо файлов Desktop.ini, миниатюры также могут замедлить процесс копирования файлов.
Шаг 1: Перейти к Windows File Explorer и выберите Вариант из Вид вкладку снова.
Шаг 2: Click the Вид вкладка и отметьте Всегда показывает значки, а не эскизы.
Шаг 3: нажмите Apply и Хорошо.
Восстановление данных: восстановление потерянных данных из Windows 10 зависает при копировании файлов
Если вам не повезло, что ваши файлы были удалены при копировании файлов в вашей Windows, не беспокойтесь, так как вы все еще можете восстановить их, используя data recovery software.
Мы предлагаем Программное обеспечение для восстановления данных Bitwar because it provides 100% clean scans and supports Windows 7, 8, and 10. Moreover, it can restore 300+ file types from both internal and external storage devices.
Поэтому выполните следующие действия, чтобы восстановить потерянные данные с ПК с Windows:
Шаг 1: Скачать и Install the data recovery software from Центр загрузки Битварсофт.
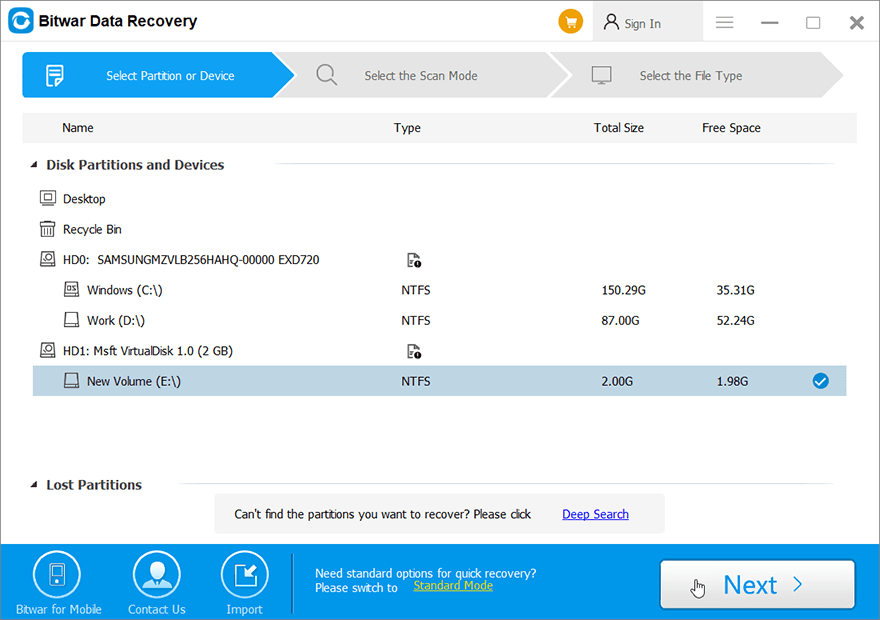
Шаг 2: Select the Folder где находятся файлы утерянных копий и нажмите Следующий.
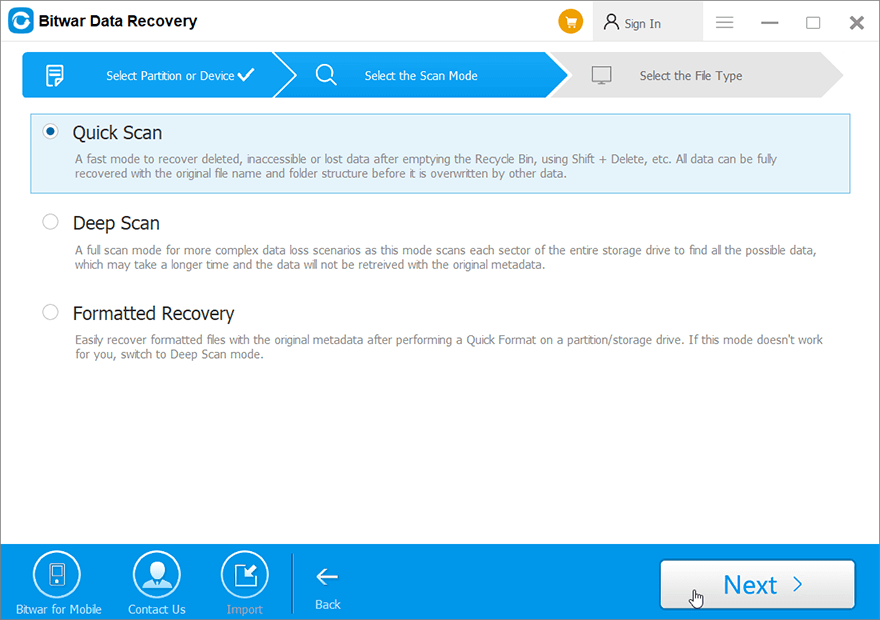
Шаг 3: выберите Режим сканирования и выберите Следующий.
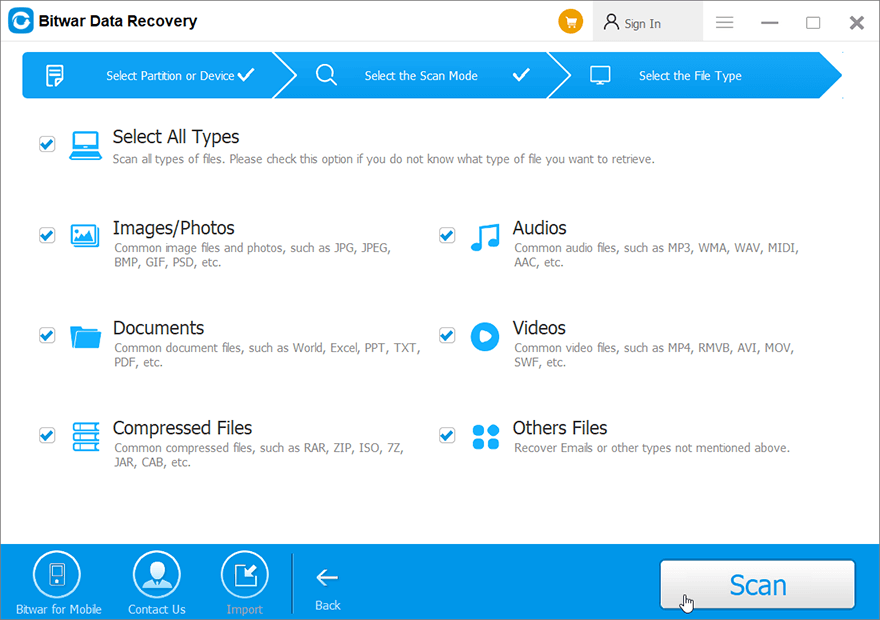
Шаг 4: выберите типы файлов that are lost and click Следующий.
Шаг 5: Превью результаты сканирования и нажмите оправляться button to get back the lost files.
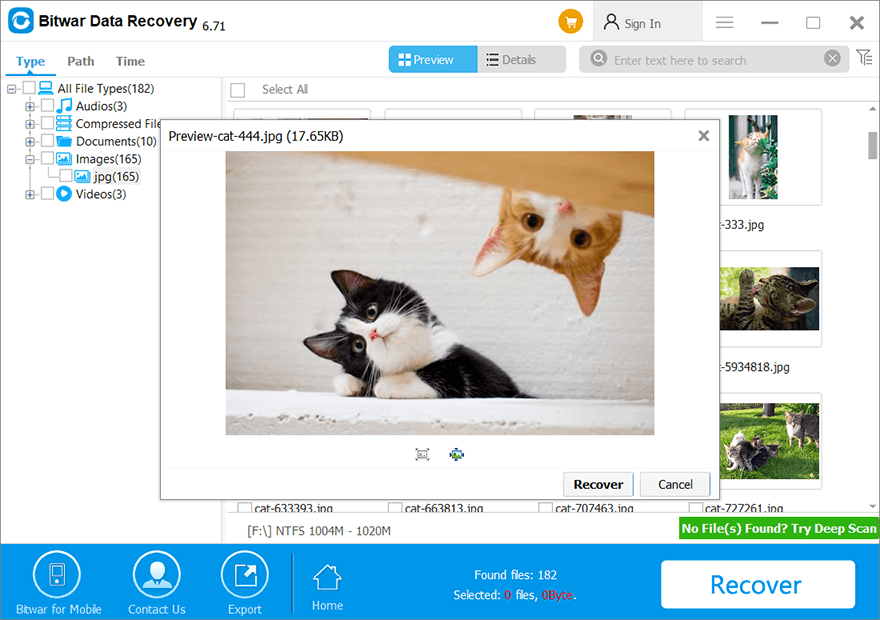
НАПОМИНАНИЕ: SAVE ALL данные в новое расположение файла, чтобы PREVENT ANY DATA OVERWRITTEN!
Исправьте зависание Windows прямо сейчас!
Когда ваш компьютер зависает при копировании файлов, лучше всего принудительно закрыть программы или удалить ненужные обширные файлы, чтобы ускорить работу вашего компьютера. Если вы потеряли какие-либо важные данные, столкнувшись с ошибкой, используйте Восстановление данных BitWar to recover the lost files back to prevent any permanent data loss!