
Время на прочтение3 мин
Количество просмотров116K
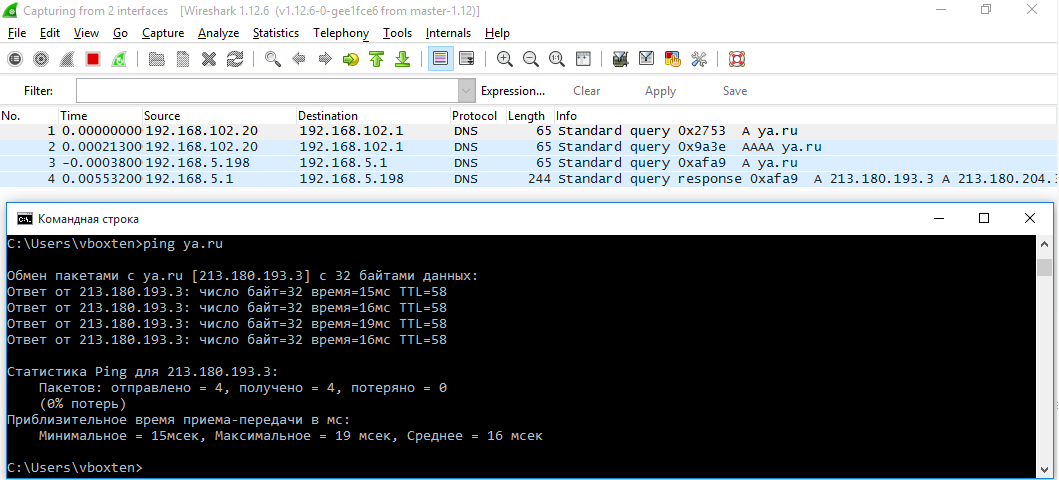
TL;DR: DNS-резолвер в Windows 10 отправляет запросы на все известные системе адреса DNS-серверов параллельно, привязывая запрос к интерфейсу, и использует тот ответ, который пришел быстрее. В случае, если вы используете DNS-сервер из локального сегмента, такое поведение позволяет вашему провайдеру или злоумышленнику с Wi-Fi-точкой подменять записи DNS, даже если вы используете VPN.
Современные версии Windows добавляют головные боли активным пользователям VPN. DNS-резолвер до Windows 7 включительно имел предсказуемое поведение, совершая запросы к DNS-серверам в порядке очереди и приоритета DNS-серверов, в общем-то, как и все остальные ОС. Это создавало так называемый DNS Leak (утечка DNS-запроса через внешний интерфейс при подключенном VPN) только в том случае, если DNS-сервер внутри VPN-туннеля не ответил вовремя, или ответил ошибкой, и, в целом, не являлось такой уж вопиющей проблемой.
Windows 8
С выходом Windows 8, Microsoft добавила весьма интересную функцию в DNS-резолвер, которая, как я могу судить по Google, осталась совершенно незамеченной: Smart Multi-Homed Name Resolution. Если эта функция включена (а она включена по умолчанию), ОС отправляет запросы на все известные ей DNS-серверы на всех сетевых интерфейсах параллельно, привязывая запрос к интерфейсу. Сделано это было, вероятно, для того, чтобы уменьшить время ожидания ответа от предпочитаемого DNS-сервера в случае, если он по каким-то причинам не может ответить в отведенный ему таймаут (1 секунда по умолчанию), и сразу, по истечении таймаута, отдать ответ от следующего по приоритету сервера. Таким образом, в Windows 8 и 8.1 все ваши DNS-запросы «утекают» через интернет-интерфейс, позволяя вашему провайдеру или владельцу Wi-Fi-точки просматривать, на какие сайты вы заходите, при условии, что ваша таблица маршрутизации позволяет запросы к DNS-серверу через интернет-интерфейс. Чаще всего такая ситуация возникает, если использовать DNS-сервер внутри локального сегмента, такие DNS поднимают 99% домашних роутеров.
Данную функциональность можно отключить, добавив в ветку реестра:
HKEY_LOCAL_MACHINE\Software\Policies\Microsoft\Windows NT\DNSClient
Параметр типа DWORD с названием:
DisableSmartNameResolution
и любым значением, отличным от нуля, что возвращало старое поведение резолвера.
Windows 10
Хоть Windows 8 и 8.1 отправляли все ваши запросы без вашего ведома через публичный интерфейс, совершить подмену DNS-ответа таким образом, чтобы перенаправить вас на поддельный сайт, было проблематично для злоумышленника, т.к. ОС бы использовала подмененный ответ только в том случае, если не удалось получить правильный ответ от предпочитаемого DNS-сервера, коим является сервер внутри шифрованного туннеля.
Все изменилось с приходом Windows 10. Теперь ОС не только отправляет запрос через все интерфейсы, но и использует тот ответ, который быстрее пришел, что позволяет практически всегда вашему провайдеру перенаправить вас на заглушку о запрещенном сайте или злоумышленнику на поддельный сайт. Более того, способ отключения Smart Multi-Homed Name Resolution, который работал в Windows 8.1, не работает на новой версии.
Единственный приемлемый (хоть и не самый надежный) способ решения проблемы — установить DNS на интернет-интерфейсе вне локального сегмента, например, всем известные 8.8.8.8, однако, он не поможет в случае с OpenVPN. Для OpenVPN единственным (и некрасивым) решением является временное отключение DNS на интернет-интерфейсе скриптами.
UPD: ранее в статье рекомендовалось использовать параметр redirect-gateway без def1 для OpenVPN. Оказывается, Windows возвращает маршрут по умолчанию от DHCP-сервера при каждом обновлении IP-адреса, и через какое-то время весь ваш трафик начинал бы ходить в обход VPN. На данный момент, красивого решения не существует.
UPD2: Я написал плагин.
UPD3: Windows 10, начиная с Creators Update, теперь отправляет DNS-запросы на все известные адреса DNS-серверов по порядку, а не параллельно, начиная со случайного интерфейса. Чтобы повысить приоритет конкретного DNS, необходимо уменьшить метрику интерфейса. Сделал патч для OpenVPN, надеюсь, его включат в 2.4.2: https://sourceforge.net/p/openvpn/mailman/message/35822231/
UPD4: Обновление вошло в OpenVPN 2.4.2.
By default, a Windows Server 2012 R2 DNS server is enabled for «round-robin» and «netmask ordering». These settings come into effect when there are multiple addresses registered for the same host. The round-robin setting will instruct the DNS server to rotate the order in which the addresses are returned; while netmask ordering will give priority to addresses that are within the same subnet as the client (as they are considered to be «local»). Note: This comparison defaults to a class C network, but it can be modified.
When netmask ordering is enabled (and round robin disabled), the order in which the «local» addresses are returned is random. When both settings are in effect, local addresses will still be given priority over remote addresses, and their order randomised, while the order of non-local addresses will be rotated.
By default, when a Microsoft Windows 10 client initiates a DNS query, and is returned more than one IP address, it will select the first entry in the list. This typically works well when the DNS server is configured with round-robin and netmask ordering enabled.
However, you can override this behaviour, and force Windows 10 to perform its own client-side prioritisation of addresses in accordance with RFC 6724. Rule 9 of the specification is particularly interesting. It requires the DNS client to compare its own IP address with each of the addresses returned from a query, and to select the value with the longest matching prefix.
You can switch to RFC 6724, by creating a DWORD value named OverrideDefaultAddressSelection under HKLM\SYSTEM\CurrentControlSet\services\TcpIp\Parameters, and setting the value to 0.
Unfortunately, there is a catch; as of today, the implementation of the RFC in Windows 10, or at least the implementation of rule 9, is fundamentally broken. As indicated, rule 9 compares the client IP address with each address retrieved from a DNS query, identifying the value with the longest matching prefix. This comparison is based on the IPv6 translation of an IPv4 address (even if IPv6 is not enabled), but unfortunately, instead of basing the comparison on the length of an IPv6 address, the comparison incorrectly uses the length of an IPv4 address (i.e. only a part of the translated IPv6 address is actually used in the comparison). The product team at Microsoft have confirmed the bug, and have developed a private hotfix, which should be publicly available in the next few weeks.
So you might be wondering why rule 9 is important. Well, let’s say you operate a large network with multiple sites connected via high-latency WAN links. Each site includes a local domain controller acting as a DNS server, with both round robin and netmask ordering enabled (the default configuration). In this scenario, the workstations at each site are not within the same class C subnet as the domain controller, and hence server-side netmask ordering is not invoked. In this hypothetical configuration, when a client initiates a DNS query for the domain name, it may end up resolving a domain controller located at a remote site.
We can potentially mitigate this issue, by forcing clients to perform client-side address prioritisation based on RFC 6724. In this case, if the IP ranges assigned to each site mirror the network topology, when a client initiates a DNS query for the domain, it should be able to select the «closest» domain controller from the list of returned addresses, as the client will have «more in common» (or a longer common prefix) with the address of a local server, than with the address of any of the remote domain controllers.
This is good, but it’s not a silver bullet, as it relies on the adoption of an IP plan that ensures a high degree of commonality between the address ranges assigned to a site (e.g. contiguous addressing). Unfortunately, this is not always possible. To identify cases where this doesn’t occur, and hence rule 9 of RFC 6724 may not be effective, I wrote the following PowerShell script. It identifies which domain controller will be selected by a client following a DNS query for the domain when rule 9 is invoked.
Note: The behaviour described in this article pertains to DNS queries, and not domain controller locator requests (which are «site aware»).
$dcs = @{}

function longest($ip, $mask) {
  $max = 0; $dcs.getenumerator() | %{
    for ($i = 0; $i -lt $mask; $i++) {
      if ($ip[$i] -ne $_.value[$i]) { return }
      if ($i -ge $max) { $max = $i; $found = $_.name }
    }
  }

  return $found
}

function tobinary($ip, $mask) {
  $n = [convert]::tostring(([ipaddress][string]([ipaddress]$ip).address).address,2)
  return ("0" * (32 - $n.length)) + $n
}

function frombinary($ip) {
  return ([system.net.ipaddress]"$([convert]::toint64($ip,2))").ipaddresstostring

}

function closestdc($ip) {
  $temp = $ip.split("/")
  $mask = $temp[1]
  $ip   = $temp[0]

  return longest (tobinary $ip) $mask
}

[system.directoryservices.activedirectory.domain]::getcurrentdomain().domaincontrollers | %{
  $dcs.add($_.name, (tobinary $_.ipaddress))
}
To find the name of the domain controller that will be selected by a client with an IP address of 10.0.1.100 and a class C mask:
closestdc "10.0.1.100/24"The mask is required, because RFC 6724 actually mandates that the IP address comparison is restricted by the length of the client IP mask. This is different behaviour from that used in Windows 7, which in accordance with the now obsolete RFC 3484, uses the entire address in the comparison.
Note: The above code does not translate IPv4 addresses to IPv6 prior to checking similarity, but the end result should be unchanged.
As a side note, you can confirm the bug in Windows 10 by setting the OverrideDefaultAddressSelection registry value to 0, rebooting, and then running the following command to initiate a network trace:
logman create trace "net_netio" -ow -o c:\temp\netio.etl -p "Microsoft-Windows-TCPIP" 0xffffffffffffffff 0xff -nb 16 16 -bs 1024 -mode circular -f bincirc -max 4096 -etsNow perform a ping test to a system with multiple DNS A records.
To stop the trace, and convert the resultant ETL file to text format:
logman stop "net_netio" -ets
netsh trace convert c:\temp\netio.etl
Open c:\temp\netio.txt and search for «address pair». You should find an event such as the following (one for each A record):
[0]0A0C.0A2C::2016-06-06 21:12:46.215 [Microsoft-Windows-TCPIP]IP: Address pair (::ffff:10.0.1.60, ::ffff:10.0.1.30) is preferred over (::ffff:10.0.1.60, ::ffff:10.0.2.20) by SortOptions = 0, Rule = S 10.0. The suffix of «Rule = S 10.0» indicates that rule 10 was matched. This is a dummy rule that indicates all other nine rules of RFC 6724 were ignored.
Once Microsoft release a patch to fix the implementation of the RFC, the network trace should show that rule 9 was invoked when the test is repeated.
So where to from here? Well, as indicated previously, even when this bug is fixed, client-side DNS prioritisation based on address similarity won’t work in all scenarios. If you are specifically needing to resolve a domain name to a local IP address, well, you could always try hacking the hosts file 
I don’t recommend this approach, but for the brave of heart (or foolhardy), you could create a script to programmatically determine the IP address of a local domain controller, and then write that value into c:\windows\system32\drivers\etc\hosts. The best way of triggering the script would be to create a scheduled task that runs on system startup, at scheduled intervals (e.g. hourly), and whenever the network status changes (e.g. in response to event 10000 in the Microsoft-Windows-NetworkProfile/Operational event log). The script could determine the Active Directory site of the client computer, select a random domain controller from the site, check the server is responsive, and then add the IP address of the server to the hosts file. And of course, if no domain controller is accessible, the hosts file would be cleared.
Here is a script to implement the above process:
$domainfqdn = (get-itemproperty HKLM:SYSTEM\CurrentControlSet\Services\Tcpip\Parameters -name domain).domain
$domain     = $domainfqdn.split('.')[0]

[system.directoryservices.activedirectory.activedirectorysite]::getcomputersite().servers | select-object ipaddress | sort-object {get-random} | %{
  if (test-connection -count 1 $_.ipaddress) {
    $entry = "{0} {1} {2}" -f $_.ipaddress, $domain, $domainfqdn; return
  }
}

$entry | set-content c:\windows\system32\drivers\etc\hosts
It’s not ideal, but it might get you out of a bind.
Or you could wait for DNS policies in Windows Server 2016.
Provide feedback
Saved searches
Use saved searches to filter your results more quickly
Sign up
What is DNS and how does it work? DNS stands for Domain Name System or Domain Name Server or Domain Name Service. DNS is the backbone of modern-day networking. In today’s world, we are surrounded by a huge network of computers. The Internet is a network of millions of computers which are connected to one another in some or other ways. This network is very helpful for efficient communication and transmission of the information. Every computer communicates with another computer over an IP address. This IP address is a unique number that is assigned to everything which is present in the network.
Every device whether it is a mobile phone, a computer system or a laptop each has its own unique IP address which is used to connect with that device in the network. Similarly, when we surf the internet, each and every website has its own unique IP address which is assigned to it to be uniquely identified. We see the name of websites like Google.com, Facebook.com but they are just masked which are hiding these unique IP addresses behind them. As humans, we have the tendency to remember the names more efficiently as compared to numbers that is the reason why each website has a name that is hiding the IP address of the website behind them.

Now, what DNS server do is that it brings the IP address of the website you requested to your system so that your system can connect to the website. As a user, we just type the name of the website we like to visit and it is the responsibility of the DNS server to fetch out the IP address corresponding to that website name so that we can communicate with that website on our system. When our system gets the required IP address it sends the request to the ISP regarding that IP address and then the rest of the procedure follows.
The above process happens in milliseconds and this is the reason we don’t usually notice this process. But if the DNS server that we are using is slowing down your internet or they aren’t reliable then you can easily change the DNS servers on Windows 10. Any problem in the DNS server or changing the DNS server can be done with the help of these methods.
Table of Contents
Make sure to create a restore point just in case something goes wrong.
Method 1: Change DNS Settings by configuring IPv4 settings in Control Panel
1.Open the Start menu by clicking on the start button in the bottom left corner of the screen on the taskbar or press the Windows Key.
2.Type Control Panel and hit Enter to open it.
3.Click on Network and Internet in the Control Panel.

4.Click on Network and Sharing Center in Network and Internet.

5.On the upper left side of the Network and Sharing Center click on Change Adapter Settings.

6.A Network Connections window will open, from there select the connection that is connected to the internet.
7.Right-click on that connection and select Properties.

8.Under the heading “This connection uses the following items” select Internet Protocol Version 4 (TCP/IPv4) and click on the Properties button.
9.In IPv4 Properties window, checkmark “Use the following DNS server addresses“.
10.Type the preferred and alternate DNS servers.
11.If you want to add a public DNS server then you can use Google public DNS server:
Preferred DNS Server: 8.8.8.8
Alternate DNS Server box: 8.8.4.4

12.In case you want to use OpenDNS then use the following:
Preferred DNS Server: 208.67.222.222
Alternate DNS Server box: 208.67.220.220
13.In case you want to add more than two DNS servers then click on Advanced.

14.In the Advanced TCP/IP properties window switch to the DNS tab.
15.Click on the Add button and you can add all the DNS server addresses you want.


16.The priority of the DNS servers that you will add will be given from top to bottom.

17.Finally, click OK then again click OK for all the open windows to save changes.
18.Select OK to apply changes.
This is how you can change DNS settings by configuring IPV4 settings via the control panel.
Method 2: Change DNS Servers using Windows 10 Settings
1.Press Windows Key + I to open Settings then click on Network & Internet.
2.From the left-hand menu, click on WiFi or Ethernet depending on your connection.
3.Now click on your connected network connection i.e. WiFi or Ethernet.

4.Next, scroll down until you see the IP settings section, click on the Edit button under it.

5.Select ‘Manual’ from the drop-down menu and toggle the IPv4 switch to ON.

6.Type your “Preferred DNS” and “Alternate DNS” addresses.
7.Once done, click on the Save button.
Method 3: Change DNS IP Settings using Command Prompt
As we all know that every instruction which you perform manually can also be performed with the help of Command Prompt. You can give every instruction to Windows using cmd. So, in order to deal with DNS settings, the command prompt can also be helpful. To change the DNS settings on Windows 10 through the command prompt, follow these steps:
1.Open the Start menu by clicking on the start button in the bottom left corner of the screen on the taskbar or press the Windows Key.
2.Type Command Prompt, then right-click on it and Run as Administrator.
3.Type wmic nic get NetConnectionID in Command Prompt to get the names of Network adapters.

4.To change the network settings type netsh.
5.To add the primary DNS IP address, type the following command & hit Enter:
interface ip set dns name= “Adapter-Name” source= “static” address= “Y.Y.Y.Y”
Note: Remember to replace the adapter name as the name of the network adapter you have viewed in step 3 and change X.X.X.X with the DNS server address that you want to use, for example, in case of Google Public DNS instead of X.X.X.X. use 8.8.8.8.

5.To add an alternative DNS IP address to your system type the following command & hit Enter:
interface ip add dns name= “Adapter-Name” addr= “Y.Y.Y.Y” index=2.
Note: Remember to put the adapter name as the name of the network adapter you have and viewed in step 4 and change Y.Y.Y.Y with the secondary DNS server address that you want to use, for example, in case of Google Public DNS instead of Y.Y.Y.Y use 8.8.4.4.

6.This is how you can change the DNS settings in Windows 10 with the help of the command prompt.
These were three methods to change the DNS settings on Windows 10. Many third-party applications such as QuickSetDNS & Public DNS Server Tool are useful to change the DNS settings. Do not change these settings when your computer is at the workplace as the change in these settings can cause connectivity problems.
As the DNS servers provided by the ISP’s are quite slow so you can use the public DNS servers that are fast and more responsive. Some of the good public DNS servers are offered by Google and the rest you can check out here.
Recommended:
- Fix Faulty Hardware corrupted page error on Windows 10
- How to install Internet Explorer on Windows 10
- Fix Printer Driver is unavailable on Windows 10
- Fix Logitech Wireless Mouse Not Working
I hope the above steps were helpful and now you can easily change DNS settings on Windows 10 but if you still have any questions regarding this post then feel free to ask them in the comment section.
По умолчанию для всех VPN подключений в Windows используется режим Force Tunnel (в настройках VPN включена опция ‘
Use default gateway on remote network
‘/’
Использовать основной шлюз в удаленной сети
‘). В этом режиме для разрешения имен будут использоваться DNS сервера, которые назначены вашему подключению сервером VPN, и вы не сможете разрешать имена устройств в вашей локальной сети.
Для VPN подключения в Windows доступно два режима:
- Force Tunnel (включена опция Use default gateway) — весь трафик, в том числе DNS, отправляется в VPN туннель. В таком режиме после подключения к VPN вы теряете возможность резолвить DNS имена хостов в вашей локальной сети (после подключения к VPN вы также теряете доступ в Интернет через свою LAN). Доступ будет работать только по IP адресам (частично в этом случае спасает кэш DNS клиента);
В Google я нашел рекомендации по отключению IPv6 на локальном (LAN) подключении и это работает (если вы хотите использовать Force-Tunnel).
- Split Tunnel (отключена опция Use default gateway on remote network) — в VPN туннель маршрутизируется только трафик к корпоративным серверам (в соответствии с таблицей маршрутизацией). В этом режиме Windows для разрешения имен использует ваши локальные DNS и игнорирует DNS сервера и DNS суффикс VPN подключения. Таким образом доступ в Интернет и разрешение имен выполняется через вашу локальную сеть (в соответствии с настройками локального сетевого адаптера).
Windows 10/11 отправляет DNS запросы с сетевого интерфейса с наивысшим приоритетом (у которого самое маленькое значение метрики интерфейса). Чтобы вывести значения метрик сетевых интерфейсов компьютера, выполните PowerShell команду:
Get-NetIPInterface | Sort-Object Interfacemetric
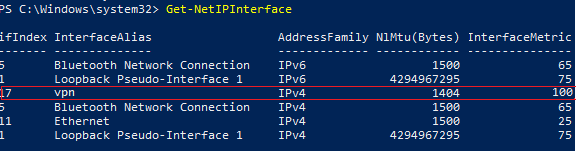
На данном компьютере есть два подключение:
- Ethernet подключение с метрикой 25
- VPN подключение – метрика 100
Это значит, что ваши DNS запросы отправляются через интерфейс с меньшей метрикой (Ethernet) на ваши локальные DNS сервера, а не на DNS сервера VPN подключения. В такой конфигурации вы не можете резолвить адреса во внешней VPN сети.
Windows 10/11 задают метрики IPv4 сетевым интерфейсам автоматически в зависимости от их скорости и типа:
| Скорость и тип подключения | Метрика |
| Ethernet 1 Гб | 25 |
| Ethernet 100 Мб | 35 |
| Wi-Fi интерфейс со скоростью 50-80 Мб | 50 |
(см. таблицу https://support.microsoft.com/en-us/help/299540/an-explanation-of-the-automatic-metric-feature-for-ipv4-routes).
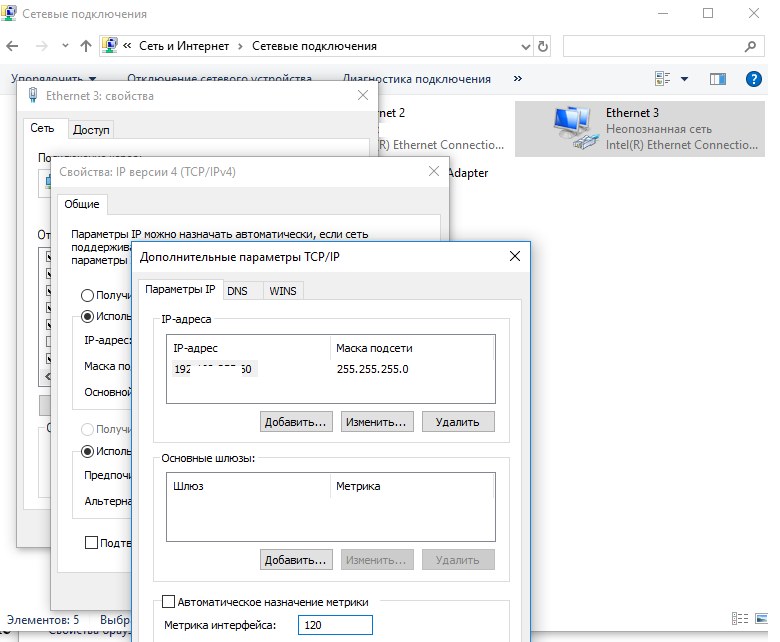
Например, вы хотите, чтобы DNS запросы отправлялись через VPN подключение. В нашем примере это означает, что нужно увеличить метрику локального Ethernet адаптера и сделать его больше 100.
Вы можете изменить метрики сетевых интерфейсов из графического интерфейса или из командной строки.
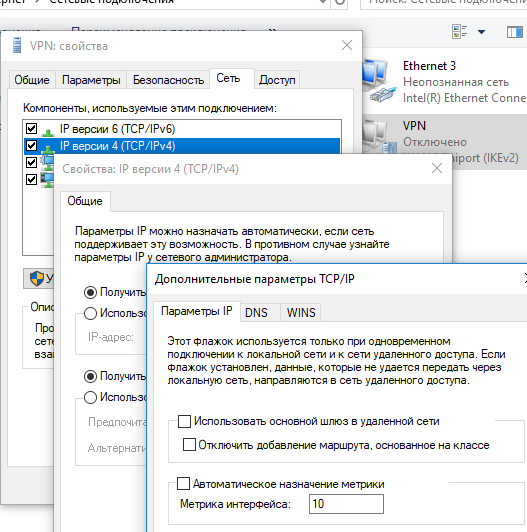
- Откройте панель управления сетевыми подключениями (
ncpa.cpl
), откройте свойства вашего Ethernet подключения, выберите свойства протокола TCP/IPv4, перейдите на вкладку “Дополнительные параметры TCP/IP”. Снимите галку “Автоматическое назначение метрики” и измените метрику интерфейса на 120.
- Также вы можете изменить метрику с помощью команд PowerShell для управления сетевыми настройками (используйте индекс вашего LAN интерфейса, полученный с помощью командлета
Get-NetIPInterface
):
Set-NetIPInterface -InterfaceIndex 11 -InterfaceMetric 120
Или netsh (нужно указать имя вашего LAN подключения)
netsh int ip set interface interface="Ethernet 3" metric=120
Аналогично вы можете уменьшить значение метрики в свойствах VPN подключения.
В такой конфигурации DNS запросы будут выполняться через VPN подключение.
Также вы можете изменить настройки вашего VPN подключения, изменив режим на SplitTunneling (трафик DNS по умочалнию идет в вашу LAN) и указать DNS суффикс для подключения c помощью PowerShell:
Get-VpnConnection
Set-VpnConnection -Name "VPN" -SplitTunneling $True
Set-VpnConnection -Name "VPN" -DnsSuffix yourdomain.com
Указанный DNS суффикс будет автоматически добавляться к коротким именам при отправке их на DNS сервер.
Также можете указать трафик каких подсетей нужно всегда отправлять в VPN туннель:
Add-VpnConnectionRoute -ConnectionName $VpnName -DestinationPrefix 172.16.10.0/24
Add-VpnConnectionRoute -ConnectionName $VpnName -DestinationPrefix 10.24.2.0/24
Если вы используете OpenVPN сервер, вы можете назначить клиентам дополнительные маршруты и DNS сервера с помощью опций:
push "route 10.24.1.0 255.255.255.0"
push "dhcp-option DNS 192.168.100.11"
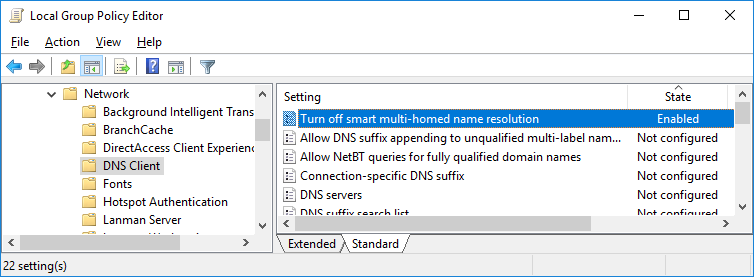
В версиях с Windows 8.1 до Windows 1703 по умолчанию включена опция Smart Multi-Homed Name Resolution (SMHNR). При активной SMHNR Windows отправляет DNS запросы на все известные системе DNS сервера параллельно и использует тот ответ, который пришел быстрее. Это не безопасно, т.к. потенциально внешние DNS сервера (которые указаны в вашем VPN подключении) могут видеть ваши DNS запросы (утечка ваших DNS запросов вовне). Чтобы предотвратить утечку DNS запросов, желательно отключить SMHNR с помощью групповой политики:
Или можно внести аналогичное изменение в реестр с помощью команд PowerShell:
Set-ItemProperty -Path "HKLM:\Software\Policies\Microsoft\Windows NT\DNSClient" -Name DisableSmartNameResolution -Value 1 -Type DWord
Set-ItemProperty -Path "HKLM:\SYSTEM\CurrentControlSet\Services\Dnscache\Parameters" -Name DisableParallelAandAAAA -Value 1 -Type DWord