
Запуск планшета Surface с USB-диска может пригодиться, если вы хотите изменить параметры встроенного ПО или параметры загрузки Windows.
Загрузка с USB-устройства не обновляет или не возвращает планшет Surface в исходное состояние. Вместо этого он позволяет запустить Surface с помощью Windows или другой операционной системы, которая находится на USB-устройстве.
-
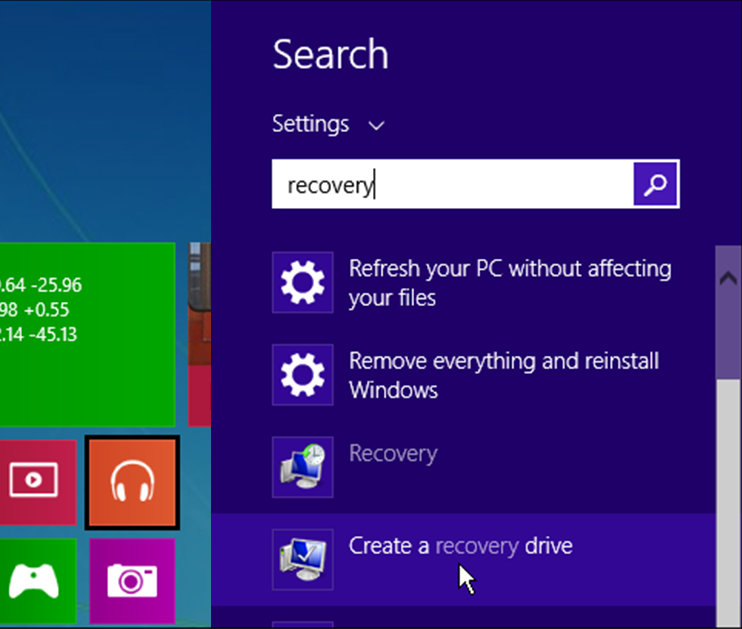
Сведения о создании загрузочного USB-накопителя для Surface см. в статье Создание и использование USB-накопителя восстановления для Surface.
-
Сведения о том, как скачать образ восстановления для устройства Surface, см. в статье Скачивание образа восстановления Surface для дальнейших действий.
Запуск устройства Surface с USB-накопителя
Примечание: Если вы не хотите запускать Surface с USB-накопителя, убедитесь, что диск не вставлен в USB-порт на устройстве Surface при запуске.
Для всех моделей Surface
Перед началом работы убедитесь, что к планшету Surface не подключены другие USB-устройства, включая usb-мышь, клавиатуры и другие накопители. Surface попытается загрузиться с других подключенных USB-устройств. Вот как выполнить загрузку с USB.
-
Завершите работу планшета Surface.
-
Вставьте загрузочный USB-диск в USB-порт на планшете Surface.
-
Нажмите и удерживайте кнопку уменьшения громкости на surface. Во время этого нажмите и отпустите кнопку питания.
-
На экране появится логотип Microsoft или Surface. Продолжайте удерживать кнопку уменьшения громкости. Отпустите кнопку, когда под логотипом появятся вращающиеся точки.
-
Выполните инструкции на экране для загрузки с USB-диска.

Начало работы с USB через Windows
Если у вас возникли проблемы с запуском Surface с загрузочным USB-накопителем, попробуйте загрузиться через Windows. Для этого выполните указанные ниже действия.
-
Вставьте USB-накопитель в USB-порт и выберите Запустить > Параметры > Восстановление системы > .
-
В разделе Особые варианты загрузки выберите Перезагрузить сейчас.
-
На экране Выбор действия выберите пункт Использовать устройство > USB-накопитель.
Настройка surface для запуска с USB-накопителя
После настройки USB-накопителя в качестве загрузочного диска с соответствующей операционной системой на нем необходимо настроить surface для загрузки с этого диска. Для этого необходимо внести изменения в UEFI, чтобы USB-накопитель был первым вариантом. Вот как это сделать.
-
Завершите работу планшета Surface.
-
После выключения Surface нажмите и удерживайте кнопку увеличения громкости.
-
Удерживая кнопку увеличения громкости, нажмите и отпустите кнопку питания.
-
Продолжайте удерживать кнопку увеличения громкости, пока с экрана не исчезнет логотип Surface или Windows.
-
Теперь вы должны увидеть экран Surface UEFI. Чтобы продолжить работу, вам потребуется выполнить определенные инструкции.
Изменение порядка загрузки
Вам потребуется изменить порядок загрузки, чтобы устройство Surface загружалось с USB-устройства.
Для большинства моделей Surface
Эти инструкции применяются к следующим моделям Surface:
-
Surface Pro 6 и более поздних поколений, Surface Pro X
-
Surface Book 3, Surface Book 2
-
Surface Laptop 2 и более поздних поколений, Surface Laptop Studio 2, Surface Laptop Studio, Surface Laptop SE, Surface Laptop Go и более поздних поколений
-
Surface Go 4, Surface Go 3, Surface Go 2
-
Surface Studio 2+, Surface Studio 2
-
Surface Hub 2S
Чтобы изменить конфигурацию загрузки Surface, выполните следующие действия.
-
Выберите пункт Конфигурация загрузки.
-
Выберите USB-накопитель и перетащите его в верхнюю часть списка. Кроме того, можно провести пальцем влево по USB-хранилищу , чтобы немедленно загрузить устройство. Это не повлияет на порядок загрузки.
-
Выберите Выход и нажмите Перезагрузить сейчас.
Если USB-накопитель не работает
Проверьте следующее в Surface UEFI. Сведения об использовании UEFI см. в статье Использование UEFI Surface.
-
Если в настоящее время у вас установлена сборка программы предварительной оценки Windows, может потребоваться сначала отключить, а затем включить безопасную загрузку для распознавания загрузочного usb-диска.
-
Убедитесь, что параметр Включить загрузку с USB-устройствустановлен в разделе Дополнительные параметры экрана конфигурации загрузки UEFI.
-
Если вы настроили порядок загрузки, проверка дополнительные параметры на экране конфигурации загрузки UEFI, чтобы убедиться, что параметр Включить альтернативную последовательность загрузки включен.
-
По возможности используйте другой USB-накопитель.
Если проблема не в этом, убедитесь, что USB-накопитель имеет формат FAT32. Вот как убедиться, что USB-устройство правильно отформатировано в качестве загрузочного диска:
Предупреждение: Настройка USB-накопителя стерет все, что на нем хранится. Перед продолжением обязательно перенесите все важные данные на USB-накопителе на другое запоминающее устройство.
-
Вставьте USB-накопитель в surface. (Usb-накопитель должен иметь не менее 16 ГБ.)
-
Откройте окно командной строки с правами администратора. (Для этого щелкните правой кнопкой мыши пункт Командная строка и выберите Запуск от имени администратора.)
-
В окне командной строки введите diskpart и нажмите клавишу ВВОД.
-
Чтобы определить номер или букву USB-диска, введите в командной строке list disk и нажмите клавишу ВВОД.
Команда list disk (Список дисков) отображает все диски на компьютере. Запишите цифру или букву USB-диска.
-
В командной строке введите select disk X (где X — это номер диска или буква USB-накопителя, который вы записали на последнем шаге) и нажмите клавишу ВВОД.
-
Введите clean и нажмите клавишу ВВОД. Это приведет к удалению всех данных с USB-диска.
-
Чтобы создать новый основной раздел на USB-диске, введите команду create part pri и нажмите клавишу ВВОД.
-
Чтобы выбрать только что созданный раздел, введите команду select part 1 и нажмите клавишу ВВОД.
-
Чтобы отформатировать раздел, введите команду format fs=fat32 quick и нажмите клавишу ВВОД.
-
Введите команду active, затем нажмите клавишу ВВОД.
-
Введите команду exit, затем нажмите клавишу ВВОД.
-
Сохраните образ операционной системы, который вы хотите использоваться для загрузки, в корневом каталоге USB-диска.
Статьи по теме
-
Создание и использование USB-диска восстановления для Surface
A Pre-made bootable ISO image of Windows 10 build 15035 intended for Microsoft Surface RT based devices with 32-bit arm (x86) CPU’s
It includes Office 2013 taken from RT


How to Use:
Use Rufus to put the ISO on a USB with a GPT partition scheme for UEFI booting.
Boot the surface from USB by ether holding Vol down + power OR if running WinRT already, holding down F8 whilst it starts and selecting USB boot from the advanced boot options menu.
A command prompt will open when it’s finished booting, press 1 and then Enter to start the install
This is a script created with windows 10 media builder
The Operating System will be deployed via Microsoft Deployment Image Servicing and Management tool (version 6.3.9600.17031)
After install you’ll need to reboot and accept the EULA, to do that, use the Volume up and Down keys to select Accept, then press the surface logo on the bottom front of your device.

The device should then finish up it’s installation and allow you to create an user account.
after the install it will automatically start installing Office 2013, there are groups on Reddit that have put together software lists of there own recompilation’s of open source software e.g. Notepad++, Paint.NET and many others

May 15th 2020
September 16th 2021
Alexenferman
⚠ WARNING:
Alexenferman, Google, Microsoft, XDA Developers, are not responsible for any damages or bricks made to your device. Please do some research if you have any concerns about this installation, the leaked Windows 10 build, features and downsides. You are choosing to make these modifications, you should blame yourself for any mistakes you make. Once installed, the partition 4 of the drive (i.e. C:) will be completely wiped. Make sure you backed up all of your data to another drive or on a computer.
Do not install Windows 10 unless you have followed very carefully the tutorial and have Secureboot disabled! Not disabling Secureboot properly might lead to a unrecoverable soft bricked device as reported by some members.
The download links associated to Yandex Disk are not owned by Alexenferman. The files can be changed at any moment by its owner without further notice. If a file in question is not accessible, please leave a comment below.
BEFORE STARTING
Please read the warning very carefully. You understand that you are responsible for any damages made to your device.
Frequently asked questions
A lot of people have asked the same questions, so here are some of the questions and answers: FAQ: Windows 10 on the Surface RT
You will need:
- Surface RT or Surface 2
- USB Flash drive (Minimum 8GB)
- Keyboard (USB Keyboard or Surface Keyboard
- Basic familiarity with the command prompt (cd / del / file.exe)
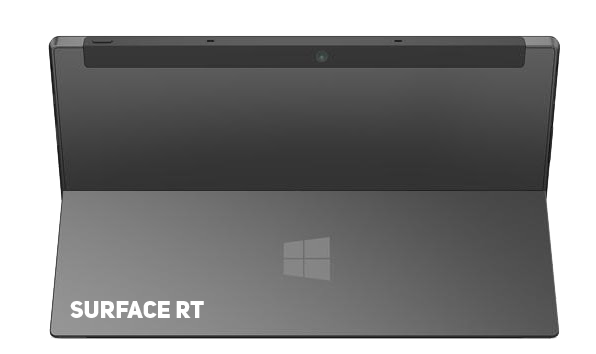
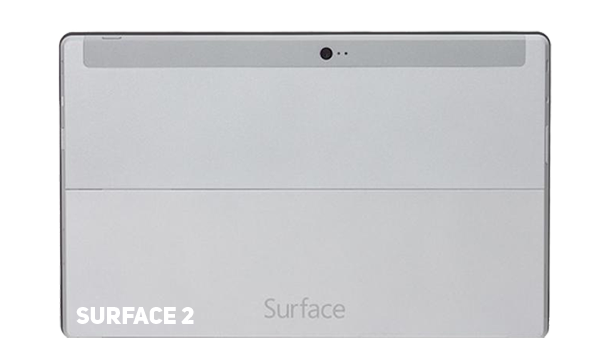
Identifying the Surface tablet generation
There are 2 different models of Surface tablets running Windows RT. You must know the model of your tablet to get the appropriate files for it. Turn your tablet around to see the colour of the metal back cover. The left one is the Surface RT and the right one is the Surface 2.
Download Options
There are different ways to get your files. You don’t have to download them now, as the tutorial will link you to the files when they will be necessary.
Yandex disk: Due to the recent addition of the «Download limit exceeded» message, Yandex Disk is no longer a viable option to download files from. Instead, a Google drive mirror will be offered.
RT Drive (Google Drive)
PART 1: PREPARING THE INSTALLATION
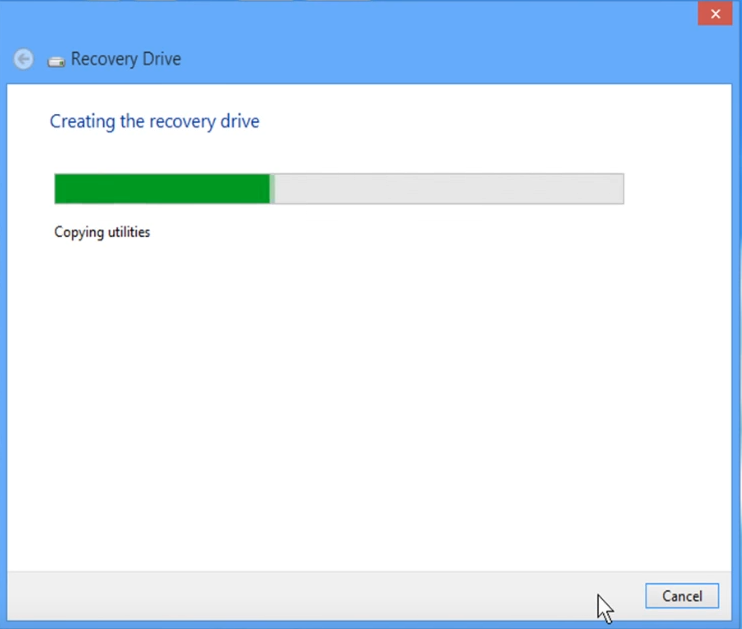
Creating a USB recovery drive
On your Surface RT, Click Start and click on the search icon, type «Create Recovery Drive» and select the search result. You may be asked to enter an administrator password or confirm your choice.
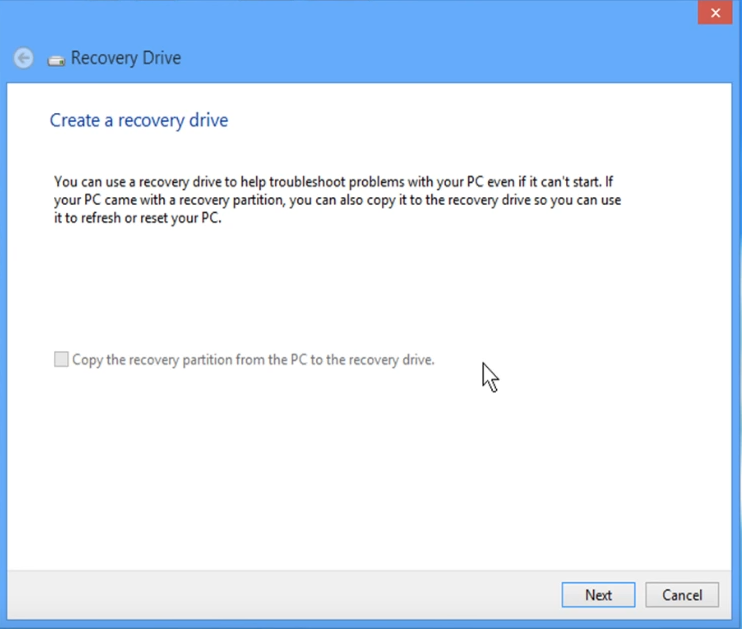
After the tool opens, make sure that «Back up system files to a recovery drive» is not selected, and then select «Next».
Make sure that «Back up system files to a recovery drive» is not selected. If you do not disable this option, it will cause errors in the future.
Connect the USB flash drive to your computer, select it, and then select «Next».
Select «Create». A large number of files need to be copied to the recovery drive, so it may take some time to complete.
It’s time to download the install.wim file. Download the one for your specific device. (Surface RT or Surface 2)
Make sure to download the correct file for your specific device. By installing the wrong image, you will not be able to get past the setup screen.
Windows RT Surface 1 (RT).wim
Windows RT Surface 2.wim
Mega.nz Mirrors: Windows RT Surface 1 (RT).wim and Windows RT Surface 1 (RT).wim
To make the installation process easier, rename the downloaded file to «install.wim».
Copy the install.wim to your flash drive.
PART 2: INSTALLING THE PATCHED WINDOWS RT IMAGE
Basically, this patched Windows image is necessary since it has Bitlocker disabled and updates that patch the secureboot vulnerability are not installed, which allows you to take advantage of the exploit to partially disable secureboot.
Entering Recovery mode
Make sure Surface is turned off.
Plug the USB drive in the USB port of the tablet.
Hold the volume down button and press the Power button once.
When the Microsoft or Surface logo is displayed, release the buttons.
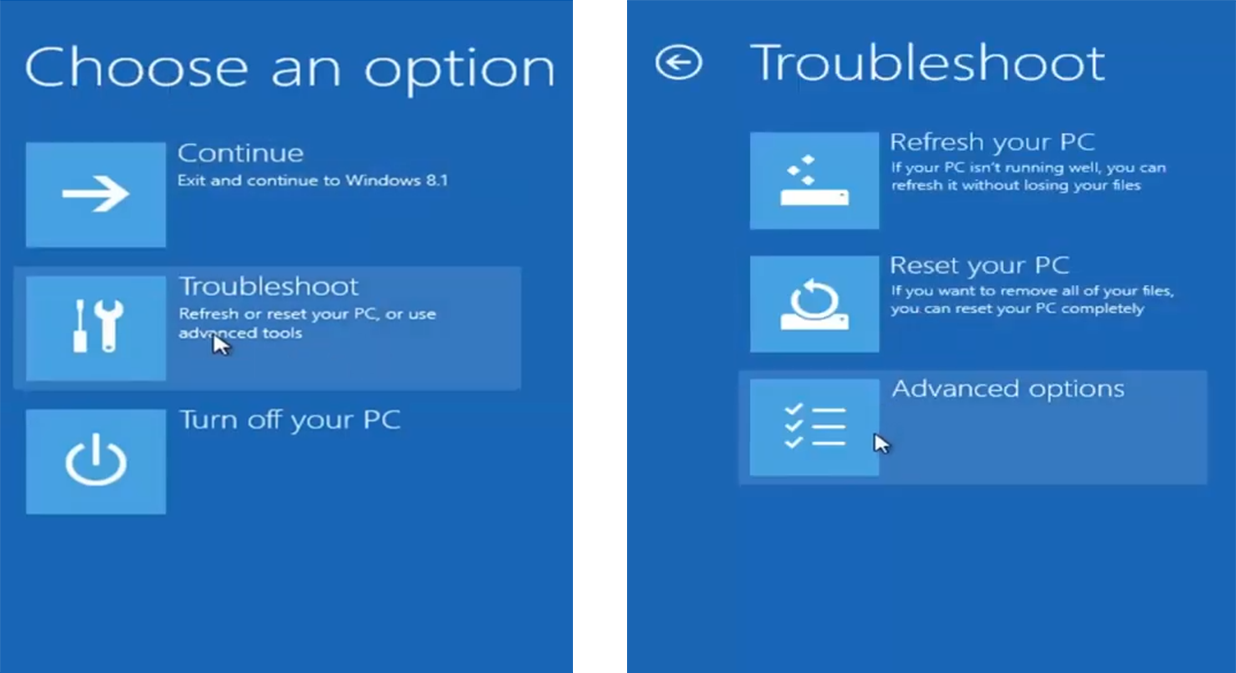
After seeing the prompt, select English US.
Select «Troubleshooting», «Advanced Options» and «Command Prompt»
If prompted for a recovery key, select «Skip this drive» at the bottom of the screen.

Formatting partition 4
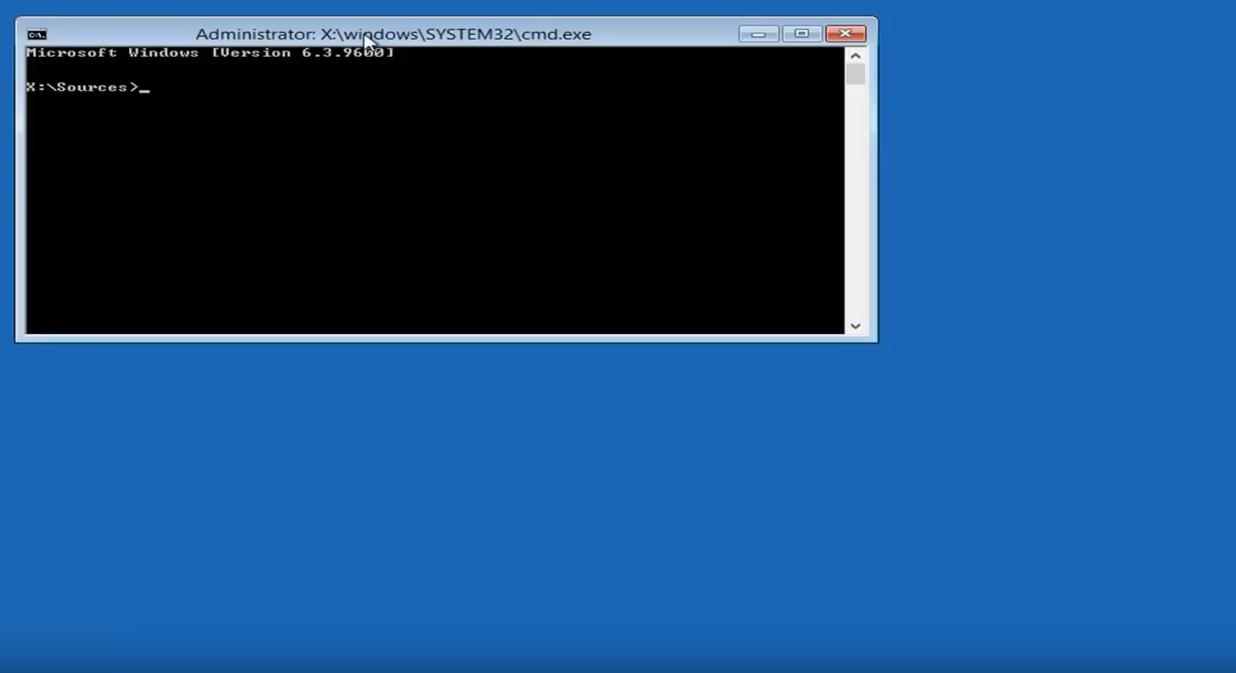
In the command prompt window, type the following commands:
diskpart
sel dis 0
sel par 4
for quick fs = ntfs override
exit
Installing the patched Windows RT image
In the command prompt window, type the following command:
dism /apply-image /imagefile:[DIRECTORY] /applydir:c: /index:1
[DIRECTORY]: Replace this path with the path of the install.wim we copied to the drive.
Example: dism /apply-image /imagefile:d:\sources\install.wim /applydir:c: /index:1
Restart your tablet
Setup the tablet quickly, do not set any Microsoft account, do not connect to the internet.
For Surface 2 users, Windows will be in Chinese. Use Google translate with the camera function. You can change the Windows language in the Settings app.
Once you are done, open file explorer and click on «This PC»
If the C: drive does not have a lock icon, you successfully cracked Bitlocker and have installed the patched Windows 8.1 image!
PART 3: DISABLING SECUREBOOT
Disabling UAC
Download the disabling_uac.reg file.
Disabling_UAC.reg
Mega.nz Mirrors: Disabling_UAC.reg
On your Surface RT, run this file as an administrator.
Restart your tablet.
Modifying Registry keys
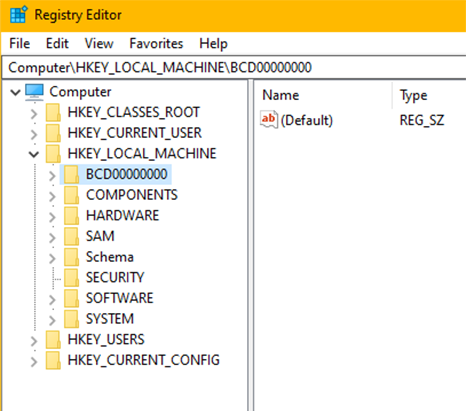
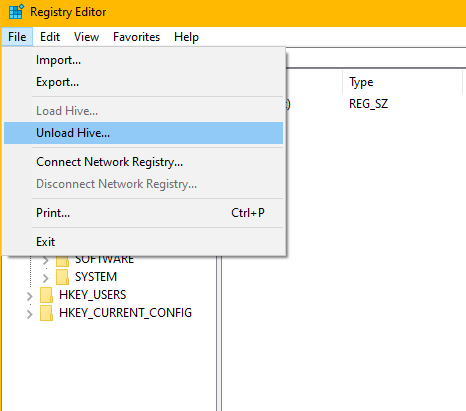
Open the registry editor
Navigate to HKEY_LOCAL_MACHINE \ BCD00000000
Make sure that the folder BCD00000000 is selected and click [File], [Unload/Uninstall Hive]
Installing the Secure Boot Debug Policy
Download the following file:
SecureBootPatch.zip
Extract the SecureBootPatch.zip and transfer it in the internal storage of the device.
Right-click the InstallPolicy.cmd and click «run as administrator».
Restart your tablet.
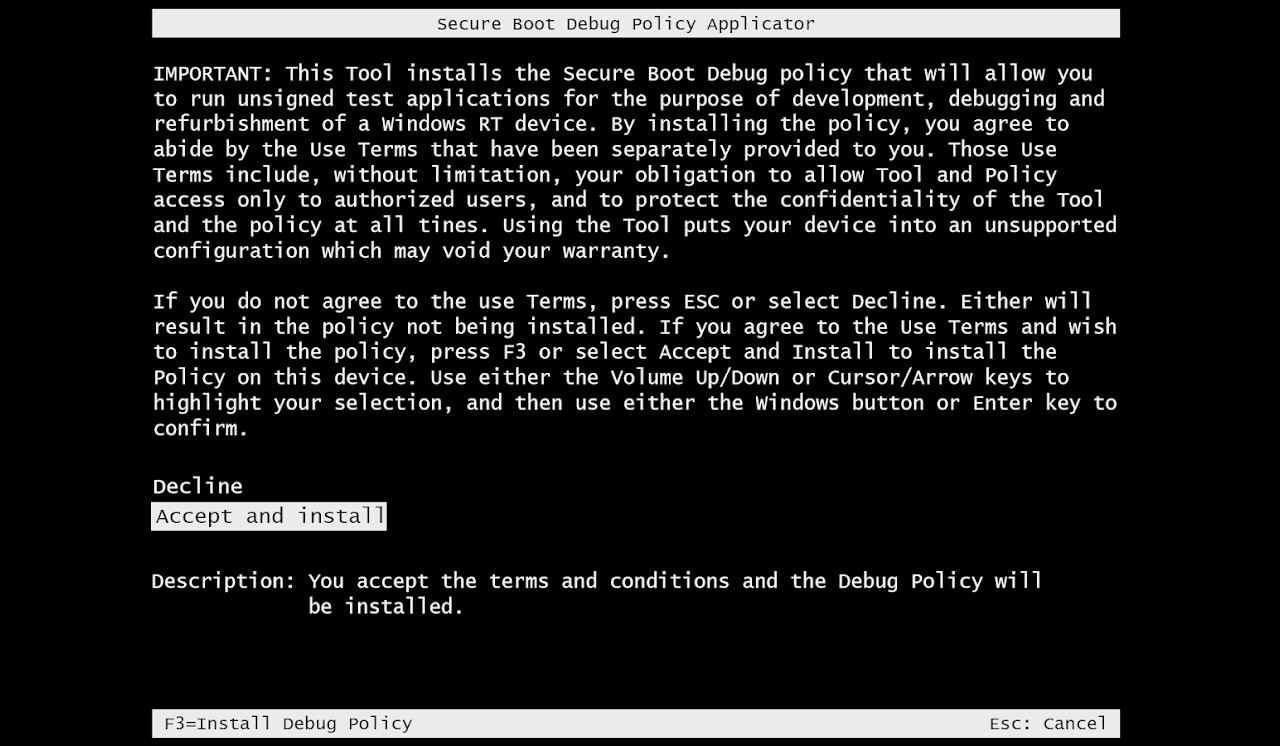
After restarting, you will see a «Secure Boot Debug Policy Applicator» screen.
Using the Volume buttons, select the option «Accept and Install»
Press the Windows button to select the option.
If you see the Windows boot manager error 0xc000000f instead, follow these steps to fix it and come back here
Installing the Secure Boot Debug Policy
Run the command prompt and enter:
bcdedit /set {default} testsigning on
bcdedit /set {bootmgr} testsigning on
bcdedit /set {default} NoIntegrityChecks Yes
Restart your tablet.
If you see an error after applying the commands, follow these steps to fix it and come back here
If your Surface does not turn on anymore, follow these steps to fix it and come back here
To make sure that you have disabled Secure Boot (VERY IMPORTANT)
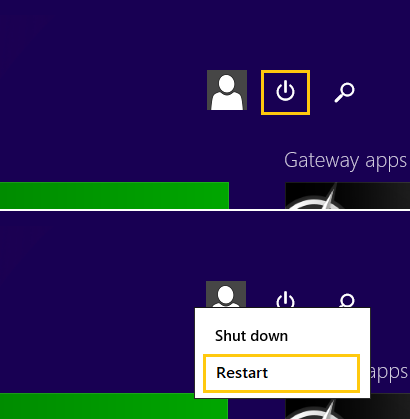
Click Start
Plug in a USB keyboard or your Surface keyboard
Click on the power icon on the top right part of the start menu
Press shift on your keyboard and at the same time click on restart
It will go into the recovery mode on the tablet (not the USB recovery)
Select «Troubleshooting»
Select «Advanced Options»
Select «Command Prompt»
It might ask for a password. Leave it empty and click on next.
You should see this text at the bottom right of the screen:
If you see this, you can now proceed to part 4!
Otherwise, if you don’t know what you did wrong, you can repeat Part 3.
You must make sure that Secure Boot is actually disabled before proceeding! Do not skip this step, otherwise, if you do not disable secureboot, your Surface RT might refuse to boot anything at all! By this stage, Alexenferman, Google, Microsoft, XDA Developers, are not responsible for any permanent damages or bricks made to your device. You are choosing to make these modifications, you should blame yourself for any mistakes you make. You have been warned!
PART 4: INSTALLING WINDOWS 10
It’s time to download the Windows 10 install.wim file. Download the one for your specific device. (Surface RT or Surface 2)
Make sure to download the correct file for your specific device. By installing the wrong image, you will not be able to get past the setup screen.
Windows 10 Surface 1 (RT).wim
Windows 10 Surface 2.wim
Mega.nz Mirrors: Windows 10 Surface 1.wim and Windows 10 Surface 2.wim
To make the installation process easier, rename the downloaded file to «install.wim».
Copy the install.wim to your flash drive.
NOTE: you can delete the old Windows 8 install.wim on your flash drive if the storage space is getting low. You will not need it anymore.
Entering Recovery mode
Make sure Surface is turned off.
Plug the USB drive in the USB port of the tablet.
Hold the volume down button and press the Power button once.
When the Microsoft or Surface logo is displayed, release the buttons.
After seeing the prompt, select English US.
Select «Troubleshooting», «Advanced Options» and «Command Prompt»
If prompted for a recovery key, select «Skip this drive» at the bottom of the screen.
Formatting partition 4
In the command prompt window, type the following commands:
diskpart
sel dis 0
sel par 4
for quick fs = ntfs override
exit
Installing Windows 10 image
In the command prompt window, type the following command:
dism /apply-image /imagefile:[DIRECTORY] /applydir:c: /index:1
[DIRECTORY]: Replace this path with the path of the install.wim we copied to the drive.
Example: dism /apply-image /imagefile:d:\sources\install.wim /applydir:c: /index:1
Restart your tablet.
If you see a blue screen with error 0xc000000f or 0xc000428 instead, follow these steps to fix it and come back here
Booting up Windows 10
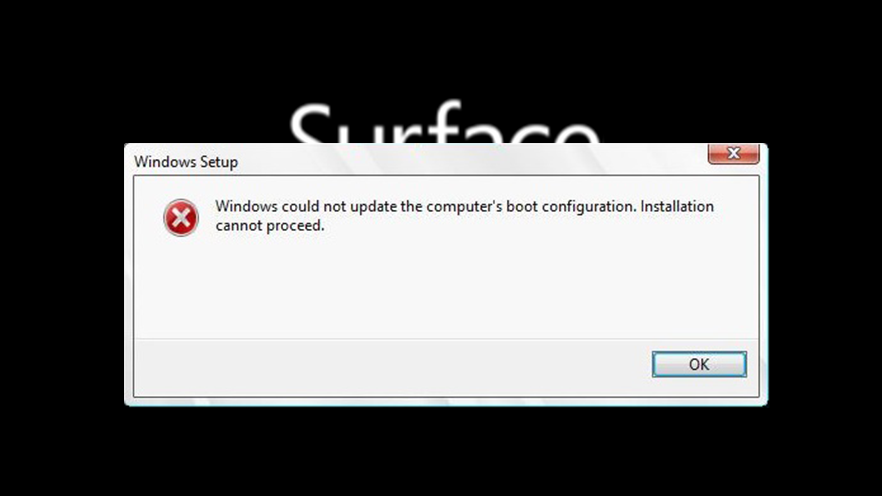
After waiting for a few minutes, you should see an error message. Don’t worry, this is normal.
Using a keyboard, press the following keys:
External USB keyboard: Press SHIFT + F10
Surface keyboard: Press FN + SHIFT + End
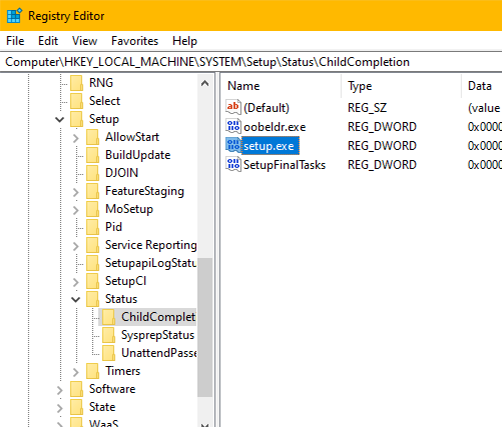
Type «Regedit»
Navigate to HKEY_Local machine/SYSTEM/SETUP/STATUS/ChildCompletion
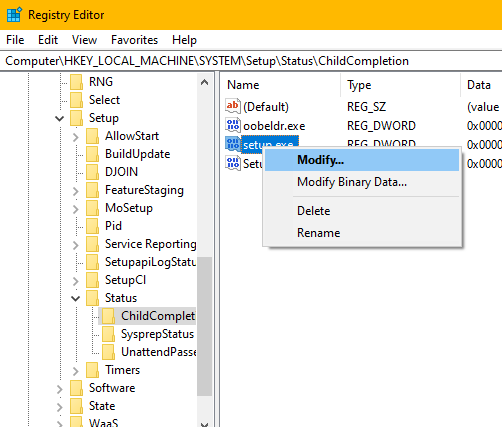
On the right pane, right-click «setup.exe»
Click on «Modify»
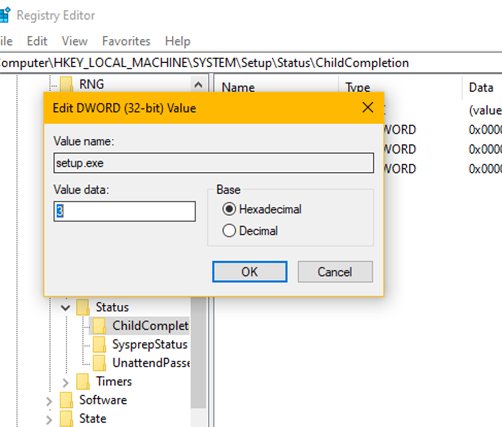
Change the Value to 3
Click OK
On the error message, click on OK.
PART 5: SETTING UP WINDOWS 10
Setting up Windows 10 for the first time
Follow the instructions on the screen to setup Windows 10.

Activating Windows 10
Open Powershell and type:
slmgr.vbs /upk
slmgr /ipk NPPR9-FWDCX-D2C8J-H872K-2YT43
slmgr /skms kms.03k.org
slmgr /ato
slmgr /skms zhang.yt
Installing frameworks and programs
Download the following files:
APPX1.rar
Microsoft.NET.Native.Framework.1.1.appx
Microsoft.NET.Native.Runtime.1.1.appx
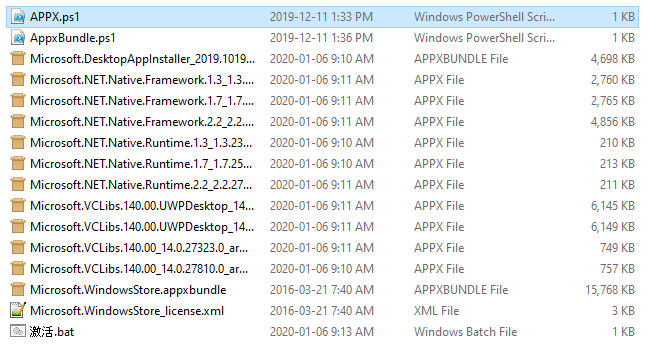
Extract APPX1.zip
Open the APPX1 folder
copy the files on the USB drive and copy them to the Surface RT internal storage.
Right-click Appx.ps1, select «run with powershell».
Right-click AppxBundle.ps1, and select «run with powershell».
From the other files downloaded, install the Microsoft.NET.Native.Runtime.1.1.appx and Microsoft.NET.Native.Runtime.1.1.appx packages by simply running them.
You are done!
EXTRAS
You may notice that the OS is quite bear bones, and might not have all of the Surface features. See this section to install App Updates, Office 2013, and fix a few issues. Visit Extras Section
ALTERNATIVE INSTRUCTIONS
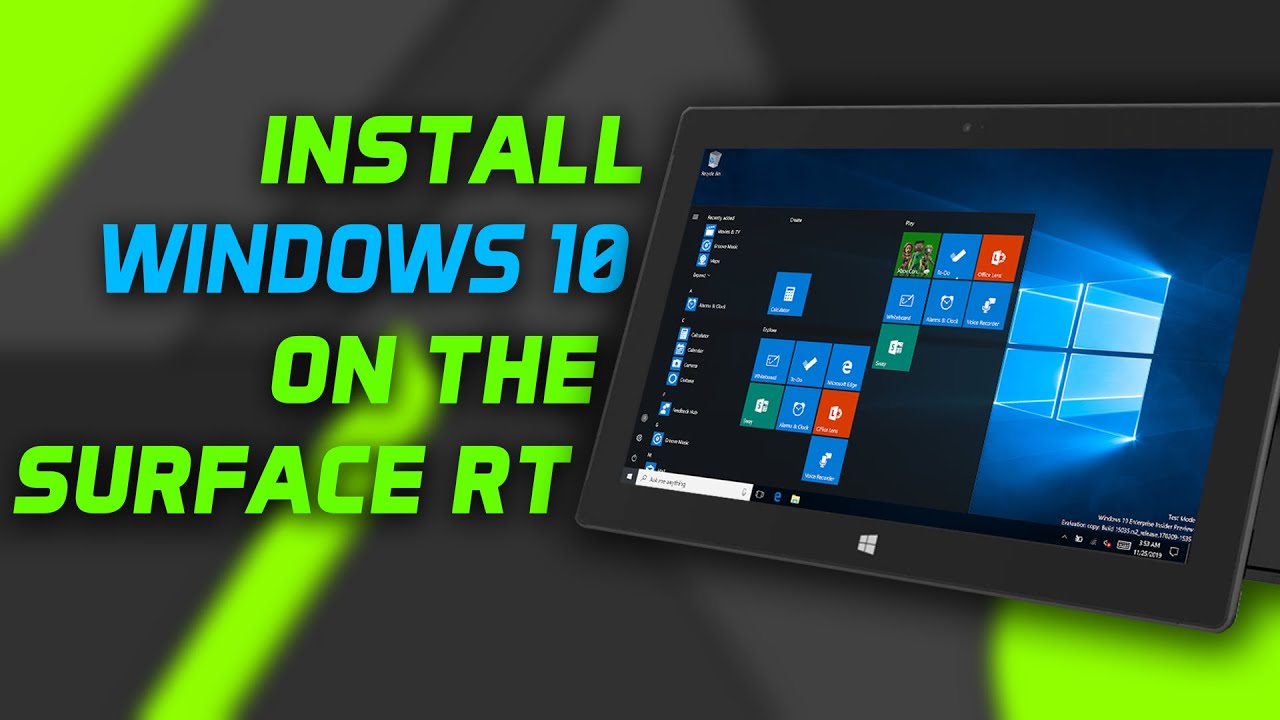
How to install Windows 10 on the Surface RT 💻
YouTube
13:28
Elektrohax
COMMENTS

Preparing Your Surface Rt 8.1 for Windows 10 Installation
If you own a Surface Rt 8.1 tablet and want to upgrade to Windows 10, you might be wondering how to go about it. Although Microsoft officially ended support for the Surface Rt series, there is a way to install Windows 10 on your device. However, before you start the installation process, there are a few important preparations you need to make. This article will guide you through the steps to prepare your Surface Rt 8.1 for a successful Windows 10 installation.
1. Backup Your Data
Before you begin the installation process, it’s crucial to backup all your important data on the Surface Rt 8.1 tablet. Since the installation process involves formatting the device’s internal storage, all existing data will be erased. To avoid losing any important files or documents, it’s recommended to create a backup.
You can backup your Surface Rt 8.1 by connecting it to a computer and transferring the files manually. Alternatively, you can utilize cloud storage services like OneDrive or Google Drive to store your data securely offsite. Make sure to double-check that all your important files are backed up before proceeding with the installation.
Additionally, it’s a good idea to take note of any installed applications or programs that you wish to reinstall after the Windows 10 installation. This can help you ensure that you have everything you need once the upgrade is complete.
2. Check System Requirements
Before attempting to install Windows 10 on your Surface Rt 8.1, it’s important to verify that your device meets the minimum system requirements. Windows 10 has higher hardware demands compared to Windows 8.1, so it’s crucial to ensure compatibility for a smooth installation and optimal performance.
| Minimum System Requirements for Windows 10 |
| — Processor: 1 GHz or faster |
| — RAM: 1 GB (32-bit) or 2 GB (64-bit) |
| — Storage: 16 GB (32-bit) or 20 GB (64-bit) |
| — Display resolution: 800 x 600 |
| — Graphics: Microsoft DirectX 9 or later with WDDM 1.0 driver |
Ensure that your device meets these requirements for a successful installation. If your Surface Rt 8.1 falls short on any of these specifications, it’s recommended to consider upgrading to a newer device that officially supports Windows 10.
It’s also important to have a stable internet connection throughout the installation process to download necessary updates and drivers. If you have a slow or unreliable connection, consider using an ethernet cable for a wired connection to ensure a smooth installation.
3. Update Surface Rt 8.1 Software
Prior to installing Windows 10, it’s essential to ensure that your Surface Rt 8.1 is running the latest software updates. This ensures that your device is up-to-date and prepares it for the upgrade process.
To check for updates, go to the Start menu, open the Settings app, and navigate to the «Update & Security» section. Click on «Windows Update» and select «Check for updates.» If any updates are available, make sure to install them before proceeding with the Windows 10 installation.
Keep in mind that the update process may take some time, depending on the number and size of the updates. It’s important to have patience and allow the updates to complete before moving forward.
4. Disable Secure Boot
In some cases, the Secure Boot feature on your Surface Rt 8.1 device may interfere with the Windows 10 installation process. To ensure a smooth upgrade, it’s recommended to temporarily disable the Secure Boot feature.
To disable Secure Boot, restart your Surface Rt 8.1 and press the «Volume Up» button repeatedly during startup to access the UEFI settings. Navigate to the «Secure Boot Control» section and disable the feature. Save the changes and exit the UEFI settings.
Keep in mind that disabling Secure Boot may leave your device slightly more vulnerable to certain security threats. Therefore, it’s important to re-enable Secure Boot once the Windows 10 installation is complete.
Installing Windows 10 on Surface Rt 8.1
Now that you have prepared your Surface Rt 8.1 for the installation of Windows 10, it’s time to proceed with the actual installation process. Follow the steps below to install Windows 10 on your device.
1. Download the Required Files
The first step is to download the necessary files for the Windows 10 installation on your Surface Rt 8.1 device. Due to the unconventional nature of this installation process, you will need to acquire specific files from a trusted source.
Search online for a trusted source that provides the required files for installing Windows 10 on Surface Rt 8.1. It’s important to ensure that the source is reputable and that the files are legitimate and secure.
Once you have found a trusted source, download the files to your computer. Make sure to save them in a location that you can easily access during the installation process.
2. Creating a Bootable USB Drive
The next step is to create a bootable USB drive that will allow you to install Windows 10 on your Surface Rt 8.1. This process involves creating a USB drive with the Windows 10 installation files.
To create a bootable USB drive, you will need a USB flash drive with sufficient storage capacity. It’s recommended to use a USB drive with at least 8 GB of storage to ensure all the necessary files fit.
Insert the USB flash drive into your computer and open a file explorer window. Locate the downloaded Windows 10 installation files and copy them to the USB flash drive. Make sure to copy all the files and not just the folder containing them.
Once the files are copied, safely eject the USB flash drive from your computer. It is now ready to be used as a bootable device for the Windows 10 installation.
3. Starting the Installation Process
With the bootable USB drive prepared, it’s time to start the installation process on your Surface Rt 8.1. Follow the steps below to begin:
- Connect the bootable USB drive to your Surface Rt 8.1 using a USB OTG (On-The-Go) cable.
- Power off your Surface Rt 8.1 completely.
- Press and hold the «Volume Down» button on your device.
- While keeping the «Volume Down» button pressed, press and release the «Power» button. Continue to hold the «Volume Down» button until the Surface logo appears on the screen.
- Release the «Volume Down» button, and the Surface Rt 8.1 will boot from the USB drive.
4. Following the Installation Wizard
Once your Surface Rt 8.1 boots from the USB drive, you will be presented with the Windows 10 installation wizard. Follow the instructions provided by the wizard to proceed with the installation.
During the installation process, you will be able to choose various options such as language preferences, installation type, and partitioning. Make sure to review the options carefully and select the appropriate settings for your preferences.
It’s important to note that the installation process might take some time, depending on the speed of your device and the complexity of the installation. Ensure that your Surface Rt 8.1 is connected to a power source to prevent any interruptions during the installation.
Once the installation is complete, your Surface Rt 8.1 will reboot, and you will be greeted with the Windows 10 setup screen. Follow the on-screen instructions to set up your device and customize the settings according to your preferences.
Congratulations! You have successfully installed Windows 10 on your Surface Rt 8.1. Enjoy the enhanced features and improved performance of the latest operating system.

Installing Windows 10 on Surface RT 8.1
Surface RT 8.1 was released by Microsoft as a tablet device running Windows RT, a version of Windows designed for ARM processors. Unfortunately, Microsoft has not provided official support for upgrading Surface RT 8.1 to Windows 10. However, if you are determined to install Windows 10 on your Surface RT 8.1, there are a few unofficial methods you can try.
Method 1: Windows 10 ARM32/ARM64 Installer
A community developer has created an unofficial Windows 10 installer that supports ARM32/ARM64 devices like the Surface RT 8.1. This method involves downloading the installer, creating a bootable USB, and following the installation process. Be aware that this method is not officially supported and may have compatibility issues.
Method 2: Windows IoT Core
Another unofficial method is to install Windows IoT Core on your Surface RT 8.1. Windows IoT Core is a stripped-down version of Windows 10 that runs on devices with limited resources. It is primarily used for Internet of Things (IoT) development, but it can also be installed on ARM devices like the Surface RT 8.1. Keep in mind that this method is intended for developers and may not provide a full Windows 10 experience.
Before attempting either method, it is crucial to back up your Surface RT 8.1 and be aware of the potential risks. Unofficial methods may void your warranty and could lead to instability or incompatibility. It is recommended to thoroughly research and understand the process before proceeding.
Key Takeaways: «How to Install Windows 10 on Surface RT 8.1»
- Surface RT 8.1 is not officially supported for Windows 10 installation.
- There are alternative methods available to install Windows 10 on Surface RT 8.1.
- One method involves using a tool called «Windows RT Jailbreak Tool» for unlocking the device.
- Another method is to use an unofficial Windows 10 installer created by third-party developers.
- It is important to note that these methods may void your warranty and can be risky.
Frequently Asked Questions
In this section, we will provide answers to some commonly asked questions about installing Windows 10 on Surface RT 8.1.
1. Can I install Windows 10 on my Surface RT 8.1?
Unfortunately, it is not possible to install Windows 10 on Surface RT 8.1. Microsoft has not provided an official upgrade path for this device. The Surface RT 8.1 runs on an ARM processor, while Windows 10 is designed for devices with x86 or x64 processors. Therefore, even if you try to manually install Windows 10, it will not work properly on the Surface RT 8.1.
It is important to note that the end of mainstream support for Surface RT 8.1 was in 2015. This means Microsoft is no longer actively developing updates or providing new features for this device. As a result, it is recommended to consider upgrading to a newer device that supports Windows 10 if you require the latest features and security updates.
2. Can I upgrade my Surface RT 8.1 to Windows 10 Mobile?
No, you cannot upgrade your Surface RT 8.1 to Windows 10 Mobile. Windows 10 Mobile is designed specifically for smartphones and does not support the Surface RT 8.1. The Surface RT 8.1 runs on a different version of Windows called Windows RT, which is not compatible with Windows 10 Mobile.
If you are looking to upgrade your device, it is recommended to consider a newer Windows 10-compatible device that suits your needs.
3. What are the alternatives to upgrading my Surface RT 8.1 to Windows 10?
If you are looking for new features and updates, there are several alternatives to upgrading your Surface RT 8.1 to Windows 10:
- Consider purchasing a newer Windows 10-compatible device that meets your requirements.
- Explore cloud-based services and apps that are compatible with Windows 8.1, such as Microsoft 365 or other cloud productivity suites.
- Regularly update your Surface RT 8.1 with the latest security updates provided by Microsoft to ensure your device remains protected.
4. Can I install alternative operating systems on my Surface RT 8.1?
No, you cannot install alternative operating systems on your Surface RT 8.1. The device is designed to run on Windows RT, and Microsoft does not provide official support for installing other operating systems on this device. Any attempt to install an alternative operating system may result in instability or voiding your warranty.
If you are looking for a device that supports running alternative operating systems, it is recommended to consider other Windows 10-compatible devices or devices specifically designed for running different operating systems.
5. How can I ensure the security of my Surface RT 8.1?
While Microsoft is no longer actively developing new features or updates for Surface RT 8.1, you can still ensure the security of your device by following these best practices:
- Regularly install the latest security updates provided by Microsoft for Surface RT 8.1.
- Use a reliable antivirus software and keep it updated to protect against malware and other threats.
- Be cautious when downloading and installing third-party applications, and only download from trusted sources.
- Enable Windows Firewall to add an additional layer of protection to your device.
- Avoid clicking on suspicious links or opening unknown email attachments.
To sum up, installing Windows 10 on Surface RT 8.1 is not officially supported by Microsoft, but there are workarounds available. By following the steps outlined in this guide, you can successfully upgrade your Surface RT 8.1 to Windows 10 and enjoy the enhanced features and improved performance it offers.
Remember to back up your important files and create a recovery USB drive before proceeding with the installation. It is also important to note that installing Windows 10 on Surface RT 8.1 may void your warranty, so proceed with caution.
Disclaimer
Windows 10 Build 15035 is now [over] five years old and it should not be considered as suitable for daily use. In addition to being outdated, it has numerous bugs and other issues expected of an expired pre-release build. -https://jwa4.gitbook.io/windows/tools/windows-media-builder
This process will overwrite the current Windows 8 RT operating system on the Surface RT tablet. I have tested these steps on my own device (as shown in this video), but I am not responsible if you damage or brick your device. Verify this process will work on your device before starting and make sure to backup any data you do not want to lose before proceeding.
Things You Will Need
- A USB flash drive, at least 8 GB https://amzn.to/3wkR5ju | https://amzn.to/3qkrJ1p | https://amzn.to/3Nhu9b9
- A x86/x64 PC with ~50 GB of free disk space to create the installation media
Creating the Installation Media
💡 NOTE: These steps must be completed on a separate x86/x64 based PC and cannot be done from the Surface RT tablet
- Insert the USB flash drive into the PC and note the drive letter assigned to it
- Download the Windows 10 Media Builder Download
- Extract the downloaded Windows 10 Media Builder .zip file to the root of the c:\ drive
- Navigate into the extracted folder > Right click Build.cmd > Run as administrator
- In the Windows Media Builder application, type the number that corresponds to the target hardware in the list > Press Enter
- Read the notes displayed > type Y and press Enter to continue
- Choose to install the app pack by entering Y or N > Press Enter
- If the app pack is not being installed, Choose to uninstall provisioned apps by entering Y or N > Press Enter
- Choose to uninstall BitLocker by entering Y or N > Press Enter
- Choose to uninstall Cortana by entering Y or N > Press Enter
- Choose to uninstall Windows Defender by entering Y or N > Press Enter
- Choose to set a product key and use KMS activation by entering Y or N > Press Enter
- Choose to install Microsoft Office 2013 RT Home & Student Plus by entering Y or N > Press Enter
- Choose if you need a language other than English for Microsoft Office 2013 RT by entering Y or N > Press Enter
- Choose an update level to include with Microsoft Office 2013 RT by enter 1, 2 or 3 > Press Enter
- Type 1 and press enter to use the default Windows setup mode
- Type 1 to use the Windows Imaging Format (WIM) compression > Press Enter
- Review the displayed summary of selected options > Type Y > Press Enter to continue
- Wait while the Windows 10 files are downloaded and prepared based on the selections made above
- When prompted, type Y to create USB installation media > Press Enter
- Enter the target USB drive letter to write the installation files to and Press Enter
⚠ Double check the drive letter entered, as the drive will be formatted and all data on the drive will be lost
- Type Y and press Enter to confirm formatting the selected flash drive
- Type N and press Enter when prompted to create an ISO image
- Press any key to close out of the Windows Media Builder application
Installing Windows 10
🚨 WARNING: Continuing beyond this point will format the storage on the Surface RT tablet and all files and the Windows 8 RT operating system will be lost
- Insert the prepared USB flash drive in the Surface RT tablet
- Hold Vol- and press the power button, releasing the Vol- when Surface logo appears
- Wait for Windows Setup to begin
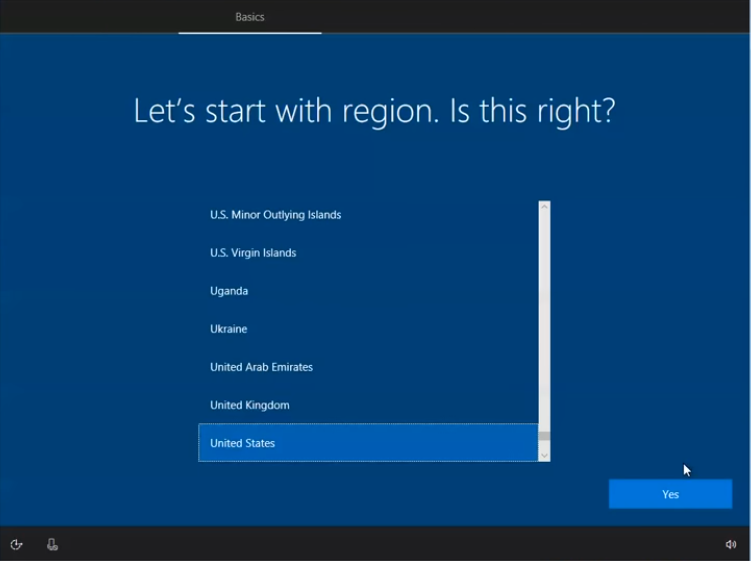
- Click Next
- Check the I accept box > Click Next
- Click Custom: Install Windows only (advanced)
- Delete the existing partitions by selecting each one and clicking Delete
- Once all partitions have been deleted, click the Unallocated Space to select it > Click Next
- Wait while Windows 10 RT copies and installs files
- Once the installation completes the tablet will reboot automatically
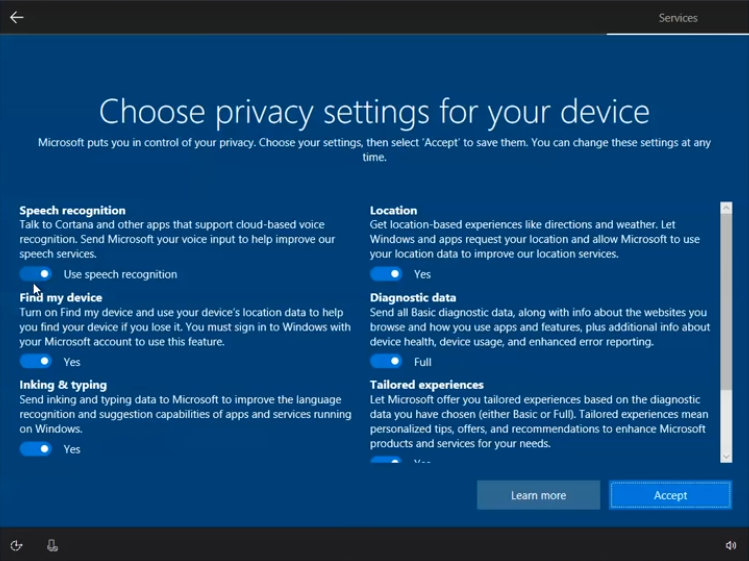
- Complete the Windows 10 Out of Box Experience (OOBE)
Fixing Some Known Issues
- Open Notepad and paste the following into the new document
Windows Registry Editor Version 5.00
; DISABLE USER ACCESS CONTROL (UAC)
[HKEY_LOCAL_MACHINE\SOFTWARE\Microsoft\Windows\CurrentVersion\Policies\System]
«EnableLUA»=dword:00000000; FIX CAMERA DRIVERS
[HKEY_LOCAL_MACHINE\SOFTWARE\Microsoft\Windows Media Foundation\Platform]
«EnableFrameServerMode»=dword:00000000 - Save the file to the desktop and name it bugfix.reg
- Double click bugfix.reg on the Desktop > Click Yes to confirm the changes
- Click OK to close out of the success popup
Sources: https://jwa4.gitbook.io/windows/tools/windows-media-builder, https://openrt.gitbook.io/open-surfacert/common/windows-10/known-issues