
When it comes to installing DLL files in Windows 10, there are several recommended locations depending on the purpose and usage of the DLL file. Here are the steps to determine the appropriate location for installing DLL files:
1. System32 folder: If the DLL file is intended to be used by the operating system or critical system components, it should be installed in the System32 folder. The path to this folder is typically «C:\Windows\System32\«. However, be cautious and ensure that the DLL file is from a trusted source to avoid any security risks.
2. Program folder: For DLL files used by specific programs or applications, it is generally recommended to place them in the program’s installation folder. This helps ensure that the program can easily locate and access the DLL when needed. The program installation folder’s path usually varies depending on the software and can be found in the «Program Files» or «Program Files (x86)» directory.
3. SysWOW64 folder: If you have a 64-bit version of Windows 10, you might encounter 32-bit DLL files. In such cases, these DLL files should be installed in the SysWOW64 folder, which can be found at «C:\Windows\SysWOW64\«. This enables compatibility with 32-bit applications running on a 64-bit system.
4. Shared DLLs folder: Windows offers a shared DLL folder known as the WinSxS (Windows Side-by-Side) folder. It is primarily used for system libraries and shared components, ensuring multiple applications can utilize the same DLL without conflicts. It is not recommended to manually place DLL files in this folder unless specifically instructed by software developers.
Remember to exercise caution while installing DLL files and ensure they originate from trustworthy sources. Improper installation or utilization of DLL files can cause system instability or security vulnerabilities.
Video Tutorial: Where is DLL folder in Windows 10?
How do I install a missing DLL in Windows 10?
To install a missing DLL file in Windows 10, you can follow these steps:
1. Identify the missing DLL: Firstly, determine the specific DLL file that is missing. It is important to have the correct information to perform the installation accurately. You can typically identify the missing DLL by the error message displayed when you try to run a particular program or application.
2. Check the Recycle Bin: Sometimes, DLL files may be accidentally deleted and end up in the Recycle Bin. If that is the case, simply restore the DLL file from the Recycle Bin to its original location on your computer.
3. Use the System File Checker (SFC) tool: Windows has a built-in utility called the System File Checker that scans the system for corrupted or missing system files, including DLL files.
a. Open the Command Prompt as an administrator: Press the Windows key, type «cmd,» right-click on «Command Prompt,» and select «Run as administrator.«
b. In the Command Prompt window, type the following command and press Enter: `sfc /scannow`
c. Wait for the scan to complete: The System File Checker will automatically scan your system for missing or corrupted DLL files and other system files. It may take some time to finish the scan and repair any issues it finds.
4. Update Windows: Keeping your Windows operating system up to date is vital as updates often fix known issues and provide necessary DLL files. Make sure your Windows 10 is updated with the latest patches and updates by following these steps:
a. Press the Windows key, type «Settings,» and open the «Settings» app.
b. Click on «Update & Security.«
c. In the Windows Update section, click on «Check for updates» and allow Windows to install any available updates.
5. Download the missing DLL file from trusted sources: If the above methods didn’t resolve the issue, you can download the specific DLL file from reliable sources. Be cautious and ensure you only download DLL files from trustworthy websites to avoid malware or other security risks.
a. Search for the specific DLL file: Use a search engine to find a trusted website that offers the DLL file you need.
b. Download the DLL file: Locate the appropriate DLL file, download it, and save it to a specific folder on your computer.
c. Place the DLL file in the correct system directory: Once downloaded, locate the folder where the missing DLL should be stored (often the System32 folder), and copy the downloaded DLL file into that directory.
6. Register the DLL file: Finally, you may need to register the DLL file with Windows using the regsvr32 command. To do this:
a. Open the Command Prompt as an administrator.
b. In the Command Prompt window, type the following command and press Enter: `regsvr32 `
c. Replace « with the actual file path of the DLL file you downloaded, including the file extension.
After performing these steps, restart your computer and check if the program or application that previously displayed the missing DLL error is now working correctly. Remember to exercise caution when dealing with DLL files and only download them from reputable sources.
How do I run a DLL file in Windows 10?
To run a DLL (Dynamic Link Library) file in Windows 10, follow these steps:
1. Identify the DLL file: Confirm that you have the specific DLL file you want to run. DLL files contain functions and resources that multiple programs can use. Check if the DLL file is compatible with your version of Windows. Ensure that you have obtained the DLL file from a reputable source.
2. Place the DLL file in the appropriate location: DLL files usually need to be placed in specific folders for applications or the operating system to access them. The most common locations for DLL files are the application folder (where the program is installed) and the Windows system folder (typically C:\Windows\System32 or C:\Windows\SysWOW64 for 64-bit systems).
3. Register the DLL file (if necessary): Some DLL files require registration to work properly. To register a DLL file, you can use the regsvr32 command in the Command Prompt. Open the Command Prompt as an administrator, navigate to the folder containing the DLL file using the «cd» command, and then use the following command: regsvr32 .dll
4. Run an application that uses the DLL file: Once the DLL file is in place and registered (if needed), you can run an application that relies on it. Launch the application as you normally would, and it should automatically access and utilize the DLL file.
Note: Be cautious when working with DLL files, as incorrect handling can potentially cause system errors or compromise your computer’s security. It’s advisable to back up your system and exercise caution when obtaining and using DLL files from external sources.
Remember, running DLL files should be done cautiously and preferably with guidance from an experienced professional or trusted sources.
How do I put DLL files on my computer?
To put DLL files on your computer, you can follow these steps:
1. Identify the DLL file: First, ensure you have the DLL file you want to install on your computer. DLL files are dynamic link library files that contain code and data that multiple programs can utilize.
2. Check compatibility: Make sure the DLL file is compatible with your operating system. DLL files are specific to the version of the operating system and the software they are designed for.
3. Determine the appropriate directory: Identify the appropriate directory on your computer where the DLL file needs to be placed. Typically, DLL files are stored in the System32 or SysWOW64 folders within the Windows directory.
4. Copy the DLL file: Copy the DLL file from its current location. You can either use Windows File Explorer or the command prompt to perform this action. Ensure you have the necessary permissions to copy files in the destination folder.
5. Paste the DLL file: Navigate to the appropriate directory where you want to put the DLL file. Right-click on an empty space within the folder and select «Paste» to place the DLL file.
6. Register the DLL file (optional): In some cases, you may need to register the DLL file to make it usable by programs. To register a DLL file, open the command prompt with administrative privileges, navigate to the directory where the DLL file is located, and use the «regsvr32» command followed by the DLL file name.
7. Restart your computer: After placing the DLL file, it is recommended to restart your computer. This ensures that any changes related to the DLL file can take effect properly.
Note: It is essential to be cautious when dealing with DLL files. Ensure you download DLL files from trusted sources and always keep an updated backup of your files in case any unexpected issues arise.
How do I manually install a DLL in Windows 10?
Manually installing a DLL file in Windows 10 involves a few steps. Here’s a guide to help you through the process:
1. Identify the DLL file: Ensure you have the correct DLL file that you want to install. It’s crucial to obtain it from a reliable source or from the software’s official distribution.
2. Place the DLL file in the appropriate directory: The DLL file needs to be placed in the correct location for it to work properly. The typical directory for system DLL files is the System32 folder, located in the Windows installation folder (usually C:\Windows\System32). If it’s a user-specific DLL, you may need to put it in the corresponding application folder or in the Program Files directory.
3. Open the File Explorer: Press the Windows key + E or navigate to it via the taskbar.
4. Locate the DLL file: Use the File Explorer to navigate to the folder where you placed the DLL file.
5. Copy the DLL file: Right-click on the DLL file and select «Copy» from the context menu.
6. Navigate to the target directory: Open another File Explorer window and go to the folder where you want to install the DLL file. For system DLLs, navigate to C:\Windows\System32.
7. Paste the DLL file: Right-click inside the target directory and choose «Paste» from the context menu.
8. Administrator privileges: If prompted, grant administrative privileges to confirm the file transfer.
9. Register the DLL (optional): Certain DLL files require registration to function properly. To register a DLL, open the Command Prompt with administrative rights (press Windows key, type «Command Prompt,» right-click on it, and choose «Run as administrator«) and enter the command «regsvr32 filename.dll» (replace «filename» with the actual name of the file).
10. Confirm registration (optional): A dialog box should appear confirming that the DLL was successfully registered.
Remember that manual installation of DLL files can carry risks. It’s essential to exercise caution and ensure the file is obtained from a trusted source. If you’re unsure or want to be on the safer side, it’s advisable to consult professional assistance or use software provided by trusted developers to handle DLL installations.
How do I know if a DLL is loaded in Windows?
To determine if a DLL (Dynamic Link Library) is loaded in Windows, you can follow these steps:
1. Open the Task Manager: You can do this by right-clicking on the taskbar and selecting «Task Manager» from the menu that appears.
2. Navigate to the «Processes» or «Details» tab: This section will display a list of all the processes currently running on your system.
3. Locate the process of the application you suspect is using the DLL: Scroll through the list or use the search function to find the specific process associated with the application.
4. Check the «Modules» or «DLLs» column: In the Task Manager, you will usually find a column labeled «Modules» or «DLLs» that shows the modules loaded by each process. It displays the filenames of the DLLs that are currently loaded by the process.
5. Look for the DLL you are interested in: Scan through the DLL names in the Modules or DLLs column to find the DLL you want to check. If the DLL is present in the list, it means it is loaded by the corresponding process.
Please note that if a DLL is being dynamically loaded and unloaded by an application during its execution, it may not appear in the list of loaded modules at all times. In such cases, you might need to resort to additional tools or techniques to investigate the dynamic loading behavior of the application.
Remember, the steps provided here are based on general knowledge of Windows systems and the Task Manager interface. Depending on your specific Windows version or configuration, there could be slight variations in the steps or the names of the options presented.
How do I run a DLL directly?
Running a DLL (Dynamic Link Library) directly involves a few steps. Here’s a guide on how to do it:
1. Identify the purpose of the DLL: DLLs contain reusable code and resources that can be utilized by multiple applications. Before running a DLL, you need to determine its purpose and ensure it matches your requirements.
2. Check if the DLL is compatible: DLLs are designed to work with specific operating systems and applications. Verify if the DLL is compatible with the operating system you are using and the program you intend to use it with. Ensure you have the necessary software dependencies installed.
3. Place the DLL in the appropriate directory: Most DLLs need to be placed in specific directories for them to be detected and used by applications. These directories include the application’s working directory, system directories, or the directory where the specific application expects the DLL to be located. Consult the DLL’s documentation or the application’s documentation to determine the correct directory.
4. Register the DLL: In some cases, DLLs need to be registered before they can be used. This process involves adding the DLL’s information to the system registry. To register a DLL, open a command prompt with administrative privileges, navigate to the DLL’s location, and use the regsvr32 command followed by the DLL’s name. For example: regsvr32 mydll.dll.
5. Load the DLL in an application: Once you have ensured compatibility and placed the DLL in the correct directory, you can load and use it in an application that supports DLL integration. This typically involves writing code to import and access the functions or resources provided by the DLL. The process for loading a DLL varies depending on the programming language and framework being used.
It’s important to note that running DLLs directly should be done with caution. Ensure you obtain DLLs from trusted sources to avoid potential security risks or conflicts with your system. Additionally, be aware of any licensing restrictions or terms of use associated with the DLL you are using.
Remember to consult official documentation, relevant forums, or seek professional advice specific to the DLL you are working with for a more detailed and accurate procedure.
DLL files, also known as Dynamic Link Library files, are essential components of Windows operating systems. These files contain code, data, and resources that multiple programs can use simultaneously. When it comes to locating DLL files in Windows 10, there are specific directories where they should be placed. Here are the steps to find the appropriate location:
1. System Directory (SYSWOW64 or System32):
– 32-bit DLL files: These should be placed in the SysWOW64 directory, typically found in the C:\Windows\SysWOW64 path.
– 64-bit DLL files: These should be placed in the System32 directory, typically located in the C:\Windows\System32 path.
Note: The distinction between SysWOW64 and System32 may seem counterintuitive, as the names suggest the opposite of their intended purposes. However, this is a result of Microsoft’s naming conventions to ensure backward compatibility.
2. Program Directory:
– Occasionally, DLL files are stored within the same directory as the application or program that requires them. This approach is less common nowadays, as it is generally preferable to have DLL files in their designated system directories to ensure proper organization and avoid duplications.
It is essential to put DLL files in the correct location for them to be accessible by the corresponding programs that rely on them. Placing them in the wrong directory may lead to errors or operating system instability. Therefore, it is advised to adhere to the recommended locations mentioned above.
Remember to exercise caution when dealing with DLL files, as they are crucial system components. Modifying or replacing them without proper knowledge or from untrusted sources can potentially harm your system’s stability and security.
Video Tutorial: How to add DLL to exe file?
Where are the DLL files installed?
DLL files, short for Dynamic Link Library files, are critical components of the Windows operating system. They contain code and data that multiple programs can use simultaneously, allowing for efficient code reuse and modularity. DLL files are typically installed in specific directories on a Windows computer. Here are the typical locations where DLL files are installed:
1. System32 directory: The primary directory for system DLL files is located at «C:\Windows\System32» on most modern versions of Windows. It contains essential DLL files that are required for the smooth functioning of the operating system.
2. SysWOW64 directory: On 64-bit Windows systems, a secondary directory called «C:\Windows\SysWOW64» is present. This directory contains 32-bit system DLL files to maintain compatibility with older applications designed for a 32-bit environment.
3. Program Files directory: DLL files associated with specific software applications are usually located in the «Program Files» directory. Each program typically has its own subdirectory under «Program Files» where its DLL files are stored. For example, if you have an application called «ExampleApp,» its DLL files may be found in «C:\Program Files\ExampleApp«.
4. Application-specific directories: Some applications may install their DLL files in their own directories located outside of the «Program Files» directory. These directories can vary depending on the application and how it is installed. It is common for applications to have a designated folder where all their DLL files are stored.
It is important to note that the specific locations of DLL files can vary depending on the Windows version, system architecture (32-bit or 64-bit), and the application or software being installed. While the aforementioned locations are the typical ones where DLL files are found, it is always recommended to refer to the documentation provided by the software developer or rely on the installation processes to ensure accurate file placement.
How to check DLL version on Windows 10?
To check the DLL version on Windows 10, you can follow these steps:
1. Open the File Explorer: You can do this by clicking on the folder icon located on the taskbar or pressing the Windows key + E.
2. Navigate to the specific folder containing the DLL file: If you know the path of the DLL file, you can directly navigate to that location. Otherwise, you can use the search bar in the top-right corner of the File Explorer to search for the file.
3. Right-click on the DLL file: Once you’ve located the DLL file, right-click on it to open the context menu.
4. Select «Properties«: From the context menu, select the «Properties» option at the bottom.
5. Go to the «Details» tab: In the Properties window, you’ll find several tabs at the top. Click on the «Details» tab.
6. Look for the «File version» or «Product version» information: Scroll through the list of properties until you find the «File version» or «Product version» information. The exact property name may vary depending on the specific DLL file.
7. Note down the version details: Once you’ve found the version information, take note of the numbers. It may look something like «x.x.x.x» or «x.x.xxx.x«.
This process allows you to check the DLL version on Windows 10. It’s essential to note that the steps may vary slightly depending on the specific version of Windows you’re using or any modifications made to Windows settings.
How do I find missing DLL files?
Finding missing DLL files can be done through a few steps:
1. Check the error message: When encountering a missing DLL file error, take note of the specific file name mentioned in the error message. This information will be helpful in identifying the correct DLL file.
2. Search the file online: Use a search engine to find the missing DLL file online. Be cautious when downloading DLL files from third-party websites, as they may contain malware. Stick to reputable sources like Microsoft’s official website or trusted software repositories.
3. Check system folders: DLL files are usually stored in specific system folders. You can check the default directories like the System32 or SysWOW64 folders for 32-bit and 64-bit DLL files, respectively. Use the Windows File Explorer to navigate to these folders and search for the missing DLL file.
4. Utilize the System File Checker (SFC) tool: The System File Checker is a built-in Windows utility that scans and restores missing or corrupted system files. Open the Command Prompt as an administrator and run the command «sfc /scannow.» This will initiate a system scan, and if any missing DLL files are detected, they will be replaced with the correct versions.
5. Reinstall the application: If the missing DLL file error is specific to a particular application, try reinstalling the application. Uninstall it completely, reboot your computer, and then reinstall the application from a reliable source. This process often replaces any missing or corrupted DLL files associated with the application.
6. Verify Windows updates: Ensure that your Windows operating system is up to date. Microsoft periodically releases updates that include security patches and bug fixes, which could potentially address issues related to missing DLL files. Go to the Windows Update settings and check for any pending updates.
By following these steps, you should be able to find and resolve missing DLL file errors on your system. Remember to exercise caution when downloading files from the internet and prioritize official sources to minimize the risk of malware infections or system instability.
Where is DLL loaded in memory?
In modern operating systems, such as Windows, DLLs (Dynamic Link Libraries) are loaded into memory during the execution of an application or when they are referenced by other DLLs or the main executable. Here are the steps involved in the loading process of DLLs:
1. Application Initialization: When an application starts, the operating system reserves memory space to load the application’s binary code and initializes necessary data structures.
2. DLL Loading: After the application’s initialization, any DLLs that are directly referenced by the application’s executable or other DLLs are loaded into memory. This loading process may involve searching for the DLL in predefined locations, such as the application’s directory or system directories, including the Windows directory and the system32 folder.
3. Memory Allocation: Once the operating system locates the DLL, it allocates memory space to load the DLL’s code and data. This memory space consists of various regions like the code section, data section, and other sections, which store the DLL’s instructions and variables.
4. Address Resolution: After the DLL is loaded, the operating system resolves the addresses of its exported functions and data. This is done by updating the import address table (IAT) and resolving any dependencies the DLL might have on other DLLs.
5. Execution: Once the DLL is loaded and its dependencies are resolved, the application can execute the code within the DLL. The application references the DLL’s functions and data through memory addresses, which are accessible within its own address space.
In conclusion, DLLs are loaded into memory during the execution of an application or when referenced by other DLLs or the main executable. The loading process involves locating the DLL, allocating memory space, resolving addresses, and enabling the execution of the DLL’s code within the context of the application.
Where is DLL library located?
DLL (Dynamic Link Library) files are an integral part of the Windows operating system and several software applications. These files contain executable code and data that multiple programs can use simultaneously, reducing redundancy and conserving memory. In Windows, DLL libraries are typically stored in specific locations for system-wide accessibility. However, the exact location depends on various factors such as the operating system version, whether it is a 32-bit or 64-bit system, and whether the DLL is part of the system or a third-party application.
Here are the general locations where DLL libraries can be found:
1. System32 folder: On 32-bit systems, system DLL files are stored in the C:\Windows\System32 folder. For 64-bit systems, they are stored in C:\Windows\SysWOW64 (for 32-bit DLLs) and C:\Windows\System32 (for 64-bit DLLs). However, note that the naming can be a bit confusing since 32-bit DLLs are stored in the SysWOW64 folder due to historical reasons.
2. Application folders: Many software applications have their own DLL libraries, which are typically stored within the application’s installation folder. These DLLs are specific to the application and are not accessible from other programs unless explicitly shared.
3. Shared DLL folders: Windows also has shared DLL folders where commonly used system DLLs are stored. These folders include C:\Windows\WinSxS (for side-by-side assemblies), C:\Windows\Microsoft.NET\Framework (for .NET assemblies), and others. These locations help ensure compatibility and allow multiple processes to reference the same DLL versions.
4. Custom folders: Developers or software installers can also create their own custom folders to store DLLs. These locations may vary depending on how the software is designed. For example, an application might have a «Lib» or «DLL» folder within its installation directory.
It is important to note that modifying or deleting system DLL files can cause significant issues for your operating system and other software applications. Only experienced users or developers should attempt to make changes to DLL files, and it is generally recommended to leave system DLLs untouched unless explicitly instructed by trustworthy sources or software developers.
Среди частых вопросов пользователей, особенно после того, как они сталкиваются с тем, что какая-то из библиотек DLL отсутствует в Windows 10, Windows 11 или других версиях системы — как зарегистрировать DLL в соответствующей версии ОС.
В этой инструкции подробно о способах регистрации библиотек DLL в Windows x64 и x86 (32-бит) с помощью regsvr32.exe (и кратко о regasm.exe), о возможных нюансах и проблемах, которые могут возникнуть в процессе.
Регистрация библиотеки DLL в Windows 10, Windows 11 и предыдущих версий системы
Дальнейшие шаги описаны в предположении, что DLL, которую нужно зарегистрировать, уже находится в нужном расположении: папке C:\Windows\System32, C:\Windows\SysWOW64 или, в некоторых случаях — отдельных папках программ, к которой относится соответствующая библиотека, например, для 1С — C:\Program Files\1cv8\номер_версии\bin (или Program Files x86 в случае 32-битной версии).
Прежде чем приступить к регистрации библиотеки, учитывайте следующие моменты:
- В x64 версиях Windows 64-битные DLL хранятся в System32, а 32-битные — в SysWOW64 (у некоторых начинающих пользователей бывает обратное предположение исходя из имён папок).
- Файлы DLL x64 и x86 (32-бит) — это разные файлы. И если прямого указания на разрядность в месте загрузки файла нет, то чаще это 32-битный файл (что не мешает ему работать в x64 системе), но это не всегда так.
- Для регистрации библиотеки DLL используется системный инструмент regsvr32.exe, который также доступен в двух версиях, которые лежат в папках System32 и SysWOW64 (в случае 64-битных систем). По умолчанию при описываемых далее действиях запускается x64 версия.
- 32-битным программам и играм (по умолчанию устанавливаются в Program Files x86 в 32-битных системах) для работы нужны 32-битные DLL, не зависимо от разрядности Windows.
Сам процесс регистрации в общем случае состоит из следующих шагов:
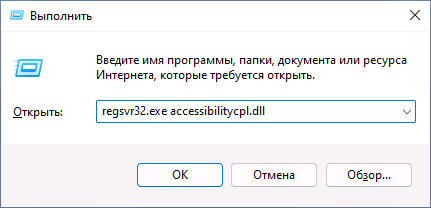
- Нажмите клавиши Win+R на клавиатуре (Win — клавиша с эмблемой Windows). Также можно нажать правой кнопкой мыши по кнопке «Пуск» в Windows 11 или Windows 10 и выбрать пункт контекстного меню «Выполнить».
- Введите команду regsvr32.exe путь_к_файлу (если путь к файлу содержит пробелы, возьмите весь путь в кавычки), например, для регистрации библиотеки DLL COMCNTR.DLL в 1С (для 64-бит) команда может иметь вид:
regsvr32.exe "C:\Program Files\1cv8\8.3.19.1150\bin\comcntr.dll"
Если DLL находится в System32, полный путь указывать не обязательно, достаточно простого имени файла, как на изображении ниже.

- Нажмите Ок или Enter.
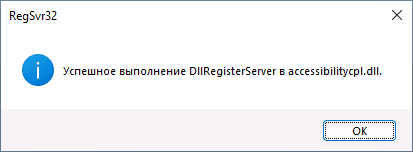
- При успехе вы получите сообщение вида «Успешное выполнение DllRegisterServer в имя_файла.dll» или «Успешное выполнение DllRegisterServer и DllInstall в имя_файла.dll».

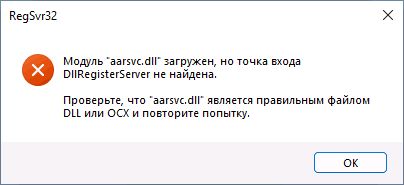
Возможна и неудача — сообщение об ошибке «Модуль dll загружен, но точка входа DllRegisterServer не найдена. Проверьте, что файл является правильным файлом DLL или OCX и повторите попытку». Подробнее об ошибке — в следующем разделе статьи.
Дополнительно: для регистрации классов из библиотек DLL .NET Framework в COM с созданием необходимых записей в реестре используется regasm.exe из .NET SDK, причем базовая команда регистрации DLL выглядит тем же образом, что и в случае с regsvr32.exe. Подробнее по использованию regasm — https://docs.microsoft.com/ru-ru/dotnet/framework/tools/regasm-exe-assembly-registration-tool.
Почему не удается зарегистрировать DLL
Ошибка при регистрации с помощью regsvr32 вида «Точка входа DllRegisterServer не найдена» говорит о том, что эта библиотека DLL не поддерживает регистрацию описанным методом. Можно попробовать использовать вариант команды:
regsvr32 /i /n путь_к_файлу.dll
но с большой вероятностью и это не поможет.
У большинства домашних пользователей такая проблема возникает при регистрации файлов DLL для игр и программ, часто не вполне лицензионных, которые сообщили, что нужный файл DLL не обнаружен или отсутствует. Причем сами библиотеки DLL обычно скачаны со сторонних сайтов (и чаще всего имеют имена начинающиеся с «vc», «msvc» или «d3d»). А решение, как правило, простое — выяснить, частью какого набора компонентов является эта DLL и установить эти компоненты с помощью их собственного установщика. Более подробно проблема и подходы к решению описаны в инструкции Точка входа DllRegisterServer не найдена — причины и возможные решения.
Видео
Надеюсь, цель достигнута, а количество вопросов, связанных с регистрацией DLL в Windows, уменьшилось.
- Where are the DLL files located in Windows 10?
- Where are Windows DLLs located?
- Where can I find DLL files in Visual Studio?
- How do I register a DLL file in Windows 10 64 bit?
- How do I register ISDone DLL on Windows 10 64 bit?
- Where are DLL in registry?
- What is .dll file in Windows?
- What is DLL search order hijacking?
- Are DLL files dangerous?
- Is DLL files safe?
- How do I read a DLL file?
- How do I edit a DLL file in Windows 10?
- How do I add missing DLL files to Visual Studio?
Where are the DLL files located in Windows 10?
Your DLL files are located in C:\Windows\System32. When Windows Defender runs a Full Scan, it includes that directory and so all of your DLLs will be scanned. This will scan your DLL files for any malware infections.
Where are Windows DLLs located?
If the DLL is listed in the Windows registry in the HKEY_LOCAL_MACHINE\System\CurrentControlSet\Control\Session Manager\KnownDLLs key, Windows searches for the DLL in the following locations in order: The %SystemRoot%\SYSTEM32 directory. The .exe file directory.
Where can I find DLL files in Visual Studio?
Open DLL files in Windows 7, 10 using Windows Visual Studio tool
- Click on the ‘Start’ Menu.
- Within the ‘Search programs and files’ tab type Visual Studio and then press the ‘Enter’ button in the keyboard.
- Visit the folder that contains the Visual Studio Command Prompt.
How do I register a DLL file in Windows 10 64 bit?
To register a . dll file in a Windows 10 64 bit, you may check with the steps listed below and see if it works: Go to the Search window and type cmd, right click on Command Prompt and choose Run as an administrator option. Type the following command in the command window and hit Enter — regsvr32 <dllname>
How do I register ISDone DLL on Windows 10 64 bit?
Register 32 or 64-bit DLLs in Windows
- Step 1: First click on Start, then Run.
- Step 2: Now all you have to do to register a DLL file is to type in the regsvr32 command, followed by the path of the DLL file.
- Step 3: Now click OK and you should get a confirmation message that the DLL has been registered successfully.
Where are DLL in registry?
If you have one machine where it is already registered, you can:
- Open regedit and search for your DLL filename.
- If it is registered, you will find filename under a key that is under the TypeLib. The key will look like: 9F3DBFEE-FD77-4774-868B-65F75E7DB7C2
What is .dll file in Windows?
Stands for «Dynamic Link Library.» A DLL (. dll) file contains a library of functions and other information that can be accessed by a Windows program. DLL files can also be used by more than one program. … In fact, they can even be used by multiple programs at the same time.
What is DLL search order hijacking?
DLL search order hijacking is a simple but effective attack that takes advantage of how Windows handles DLLs to allow an attacker to load malicious code into a legitimate process. … However, it can be easily detected by monitoring for attempts to place the malicious DLL high in the search order.
Are DLL files dangerous?
The answer to that is no, by itself it will not be able to harm your computer. The . dll file by itself is not executable and cannot be run without hooking up to an executable file. … dll file is hooked to an executable file that is meant to cause your computer harm then it is possible that it can be dangerous.
Is DLL files safe?
DLL Files From DLL Download Sites May Be Infected With Viruses. … Assuming you have a good antivirus program, an infected DLL file might be quarantined as you download it, but there’s certainly no guarantee of that. Take the safe route and simply avoid downloading DLL files from these DLL download sites.
How do I read a DLL file?
If you are using Windows 7 or newer, open the folder containing the new DLL file, hold the Shift key and right-click in the folder, and select «Open command window here». The Command Prompt will open directly to that folder. Type regsvr32 dllname . dll and press Enter.
How do I edit a DLL file in Windows 10?
Part 2 of 2: Editing DLLs with Hex Editor
- Install the Hex Editor. …
- Click File. …
- Select Open. …
- Click Open File…. …
- Find the DLL you want to edit. …
- Select the DLL. …
- Click Open. …
- Edit the DLL’s contents.
How do I add missing DLL files to Visual Studio?
First, make sure that you are in Debug mode, rather than Release mode:
- Select your project in the Solution Explorer.
- From the «View» menu, select «Property Pages.»
- If you’re using C# or F#, click the «Build» or «Debug» tab. …
- In the «Configuration» drop-down list, select «Debug.»
DLL stands for Dynamic Link Libraries and are external parts of applications that run on Windows 10/8/7 or any other operating systems. Most applications are not complete in themselves and store code in different files. If there is a need for the code, the related file is loaded into memory and used.
- Where do DLL files go in Windows 10?
- How do I install a DLL file in Windows 10?
- How do I enable DLL files in Windows 10?
- How do I access DLL files?
- Why DLL files are missing?
- Why do you need to register a DLL?
- What are DLL rules?
- What is RegServer command?
- How do I register a DLL file in Windows 10 using cmd?
Where do DLL files go in Windows 10?
Your DLL files are located in C:\Windows\System32. When Windows Defender runs a Full Scan, it includes that directory and so all of your DLLs will be scanned. This will scan your DLL files for any malware infections.
How do I install a DLL file in Windows 10?
Navigate to your root drive (usually C:), and then to «Windows» and «system32.» Anywhere in this folder, right click on the screen, and select «paste.» This will copy the DLL into the registry folder for Windows.
How do I enable DLL files in Windows 10?
To enable the DLL rule collection
From the AppLocker console, right-click AppLocker, and then click Properties. Click the Advanced tab, select the Enable the DLL rule collection check box, and then click OK.
How do I access DLL files?
You can open the command prompt by going to the Windows Start menu or by holding Windows Key+R and typing «cmd» in the prompt that appears on screen. Open the folder with the DLL file. Once you find the folder, hold the Shift key and right-click the folder to open the command prompt directly in that folder.
Why DLL files are missing?
Sometimes, you’ll get a missing . dll file error while using hardware such as a printer. This error can be due to an older version of the driver that is not compatible with the updated . dll file, so the printer is looking for a wrong .
Why do you need to register a DLL?
By registering a DLL, you are adding information to a central directory (the Registry) for use by Windows. The information typically includes a «friendly name» for the component, which makes it easier to use from within another program, and the full path to the . dll or .
What are DLL rules?
If you use DLL rules, a DLL allow rule has to be created for each DLL that is used by all of the allowed apps. Caution. When DLL rules are used, AppLocker must check each DLL that an app loads. Therefore, users may experience a reduction in performance if DLL rules are used.
What is RegServer command?
If the server is packaged in an EXE module, the application wishing to register the server launches the EXE server with the command-line argument /RegServer or -RegServer (case-insensitive).
How do I register a DLL file in Windows 10 using cmd?
Click Start > All Programs > Accessories and right-click on «Command Prompt» and select «Run as Administrator» OR in the Search box, type CMD and when cmd.exe appears in your results, right-click on cmd.exe and select «Run as administrator» At the command prompt, enter: REGSVR32 «PATH TO THE DLL FILE»