
(Image credit: Dell)
If you’re a content creator, programmer, data analyst, or gamer, a system with multiple monitors not only looks great but can significantly improve productivity when multitasking with more than one app. However, a multi-monitor setup is only practical if you configure it correctly.
Windows 10 has several features and settings to support one, two, three, four, and even more monitors without needing third-party software for the best experience.
In this how-to guide, I’ll provide tips on configuring and using a multi-monitor setup, whether you’re connecting an external display to your laptop or two, three, or more monitors to your workstation.
Before configuring a multi-monitor setup
Before configuring multiple monitors on your computer, ensure the required cables are connected to the monitors and the computer. This includes connecting power and video signals using VGA, DVI, HDMI, or DisplayPort (recommended) cables.
If you’re unsure, confirm the monitor’s make and model (usually from a sticker on the back) and search online for the manufacturer’s manual to understand better how to connect the display.
How to rearrange multiple displays on Windows 10
While you can connect a monitor to any of the available video ports on the graphics card, it’s easy to plug them in the wrong order when setting up a dual-monitor or triple-monitor setup. Although they will still work, you may run into issues using the mouse and running applications until you rearrange them correctly.
To rearrange monitors on Windows 10, use these steps:
All the latest news, reviews, and guides for Windows and Xbox diehards.
- Open Settings.
- Click on System.
- Click on Display.
- Drag and drop each display to rearrange them according to their physical layout on your desktop under the «Rearrange your displays» section.

- Quick tip: When rearranging monitors in the «Display» settings page, ensure all monitors align at the top perfectly. Otherwise, you’ll have problems moving the mouse cursor between monitors from the corners.
- Click the Apply button.
Once you complete the steps, Windows 10 will save the physical layout, and you can work across each display and run apps without issues.
If you’re unsure which monitor you’re selecting, click the «Identify» button. If one of the monitors isn’t showing up, ensure it’s receiving power and connected correctly, and click the «Detect» button. If you still have problems, reset the connections (or restart the computer) and try the «Detect» button again.
How to adjust displays scale and layout on Windows 10
Windows 10 does a pretty good job detecting and configuring the most optimal settings when connecting one or multiple displays to a computer. However, depending on your requirements, you may need to adjust each monitor’s scaling, resolution, and orientation.
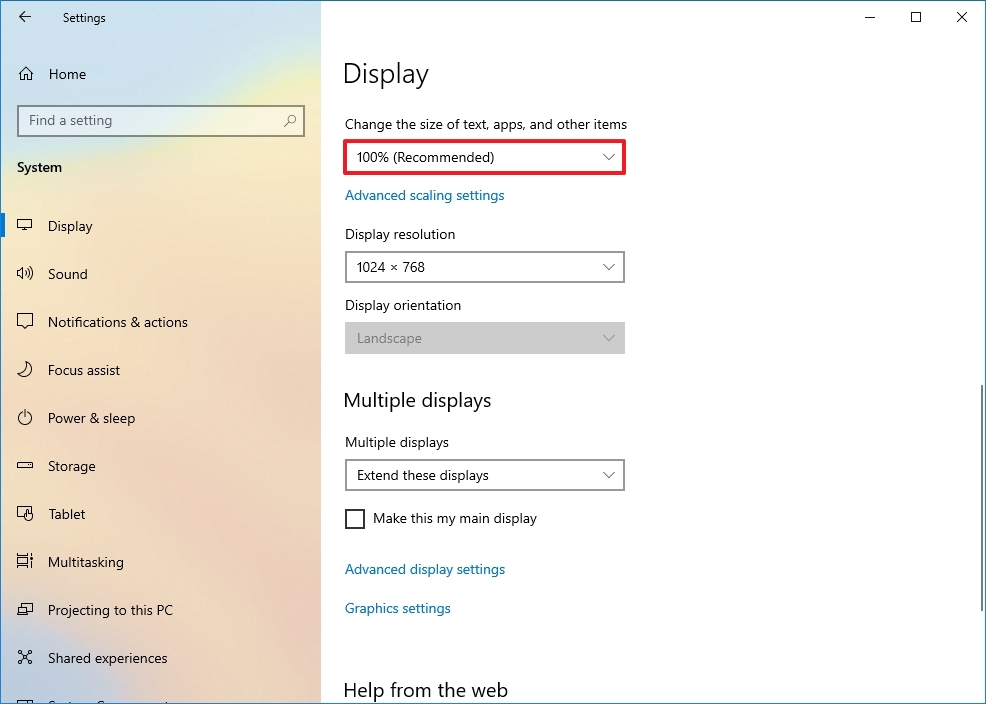
Select correct scale
Windows 10 includes settings to adjust scaling, which is useful when setting up various monitors of different sizes and screen resolutions to make text, apps, and other items look the same size across the displays. For example, if you have a 4K display, adjusting the scale settings can help make items bigger and more readable.
To select the correct scale setting that suits your requirements, use these steps:
- Open Settings.
- Click on System.
- Click on Display.
- Select the monitor to adjust under the «Rearrange your displays» section.
- Select the appropriate scale option from the «Change the size of text, apps, and other items» drop-down menu.
After you complete the steps, you may need to repeat steps 4 and 5 to change the scaling settings on the other monitors and then click the Sign-out option to apply the changes.
While you can adjust the scaling settings per monitor, it’s always best to use the same make and model of monitors with the same configuration when possible. Otherwise, you may run into issues, and the operating system may have problems scaling elements.
Custom scaling
To specify a custom scaling value, use these steps:
- Open Settings.
- Click on System.
- Click on Display.
- Select the monitor to adjust under the «Rearrange your displays» section.
- Click the «Advanced scaling settings» option under the «Scale and layout» section.

- Specify the scaling size between 100 and 500 percent under the «Custom scaling» section.

- Click the Apply button.
After completing the steps, sign out of your account and back in to test the new settings. If the new scaling configuration doesn’t look right, repeat the same steps and try a different value until you find a comfortable setting.
If you want to switch to the predefined scale settings, you must first turn off custom scaling and sign out. Otherwise, the option will be grayed out.
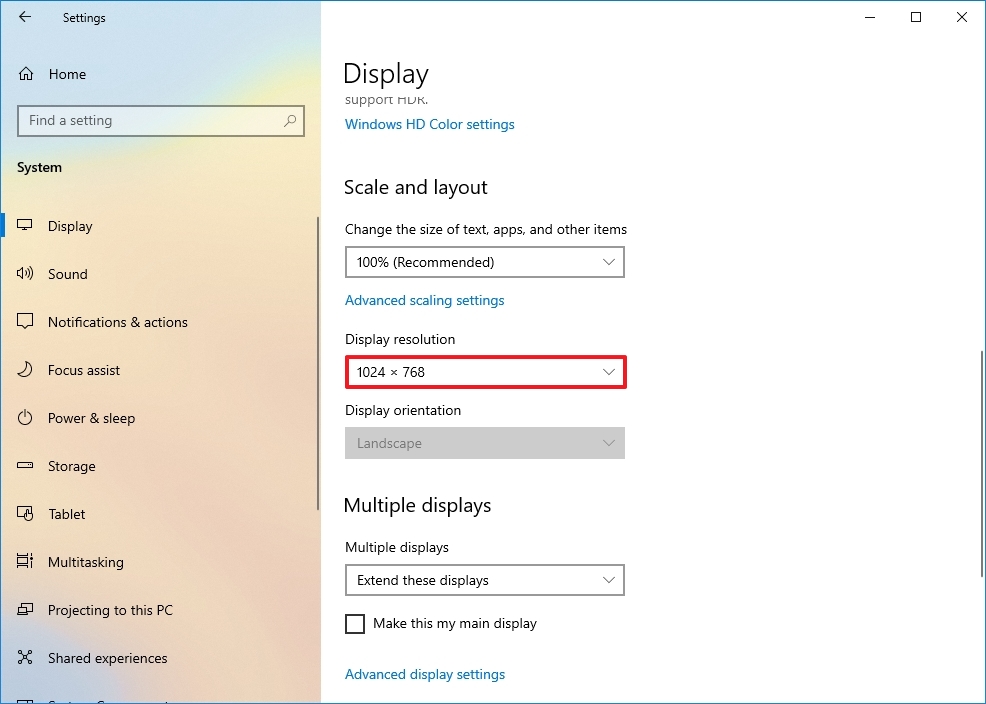
Select correct resolution
Usually, after connecting a monitor, Windows 10 will set the recommended pixel resolution automatically, but you can also change the resolution manually with these steps:
- Open Settings.
- Click on System.
- Click on Display.
- Select the monitor that you want to adjust under the «Rearrange your displays» section.
- Use the Resolution drop-down menu to select the correct pixel resolution under the «Scale and layout» section.
Once you complete the steps, repeat steps 4 and 5 to change the resolution on the remaining monitors.
If you want to make text and other items bigger on the screen, you should change the scaling settings, not the display resolution.
Select correct orientation
Windows 10 also allows you to rotate the screen horizontally or vertically, which is particularly useful when you have monitors with stands that rotate, and you want to use them with a different orientation for reading or coding.
To change the orientation per-monitor, use these steps:
- Open Settings.
- Click on System.
- Click on Display.
- Select the monitor that you want to adjust under the «Rearrange your displays» section.
- Use the Orientation drop-down menu to select the mode under the «Scale and layout» section:
- Landscape.
- Portrait.
- Landscape (flipped).
- Portrait (flipped).
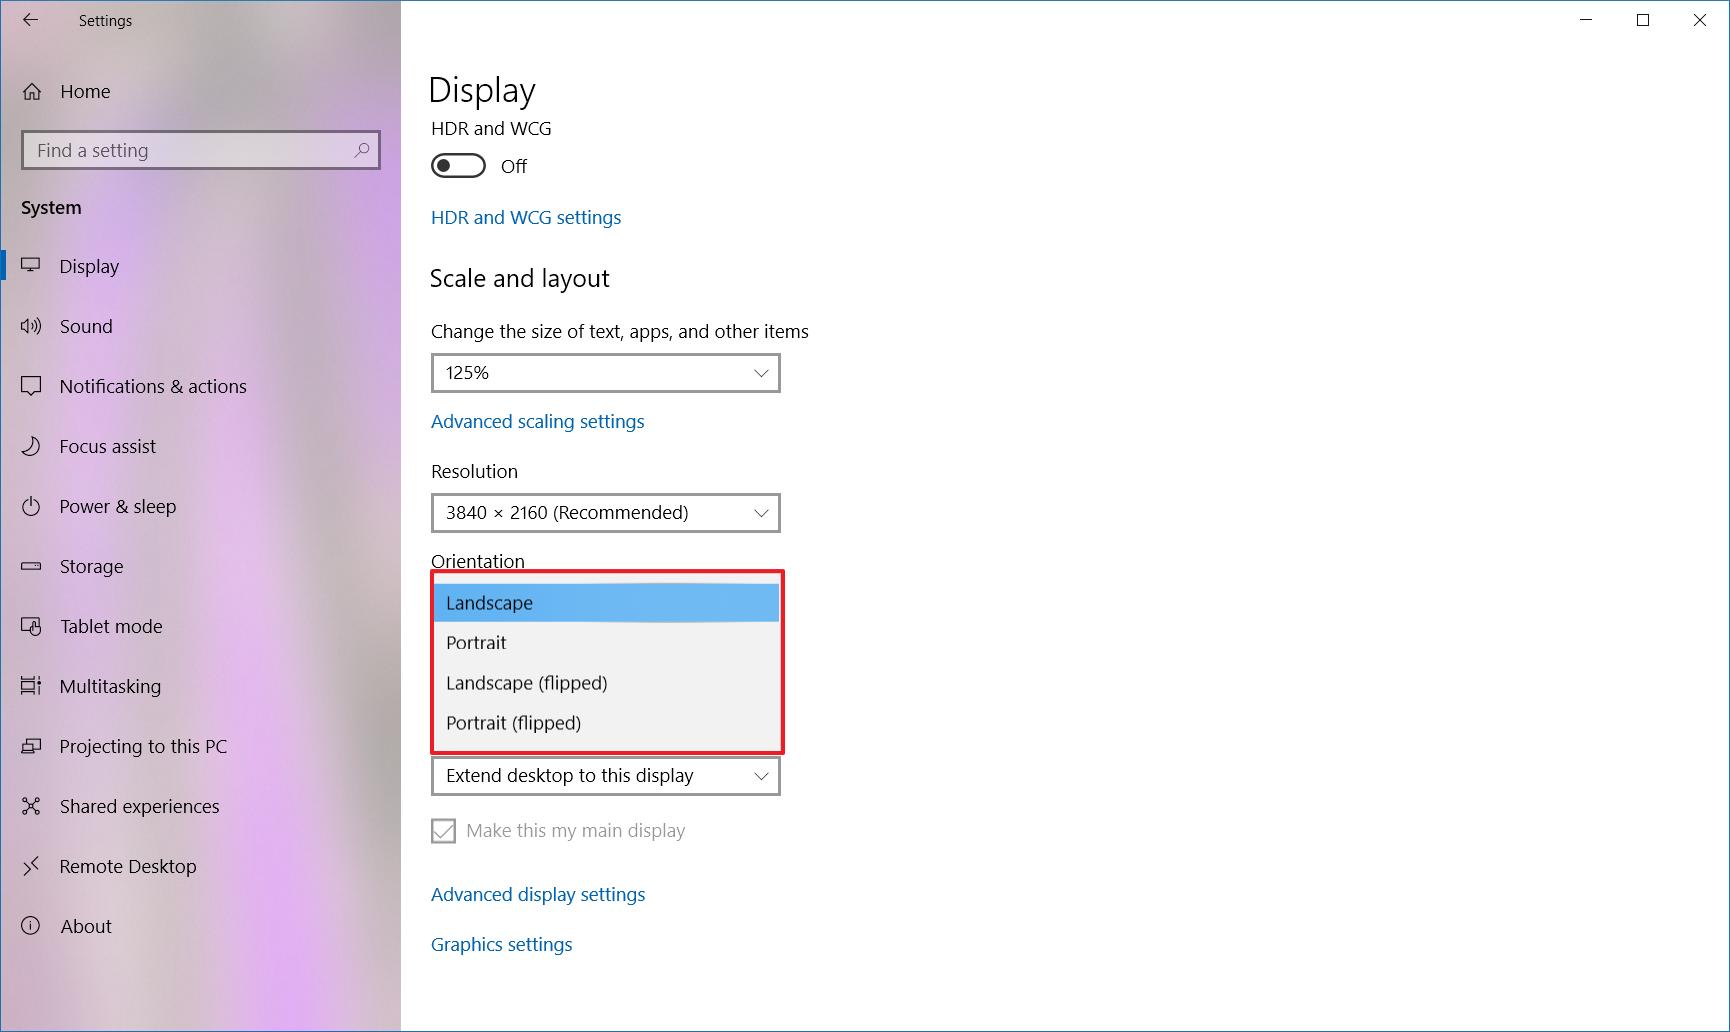
Once you complete the steps, the display will shift to the orientation you selected.
How to select multiple displays viewing mode on Windows 10
You can also choose the viewing mode for your displays using the available settings. For example, if you’re using a second monitor, you can expand the main screen to the new display, or you can mirror both monitors, which is ideal when showing a presentation. If you’re using a laptop with an external monitor, you can even disable the main display and only use the second monitor as your primary.
To change the viewing mode on Windows 10, use these steps:
- Open Settings.
- Click on System.
- Click on Display.
- Select the monitor that you want to adjust under the «Rearrange your displays» section.
- Use the drop-down menu to set the appropriate viewing mode under the «Multiple displays» section:
- Duplicate desktop — Shows the same desktop on both displays.
- Extend — Expands the primary desktop to the secondary display.
- Disconnect this display — Turn off the selected monitor.
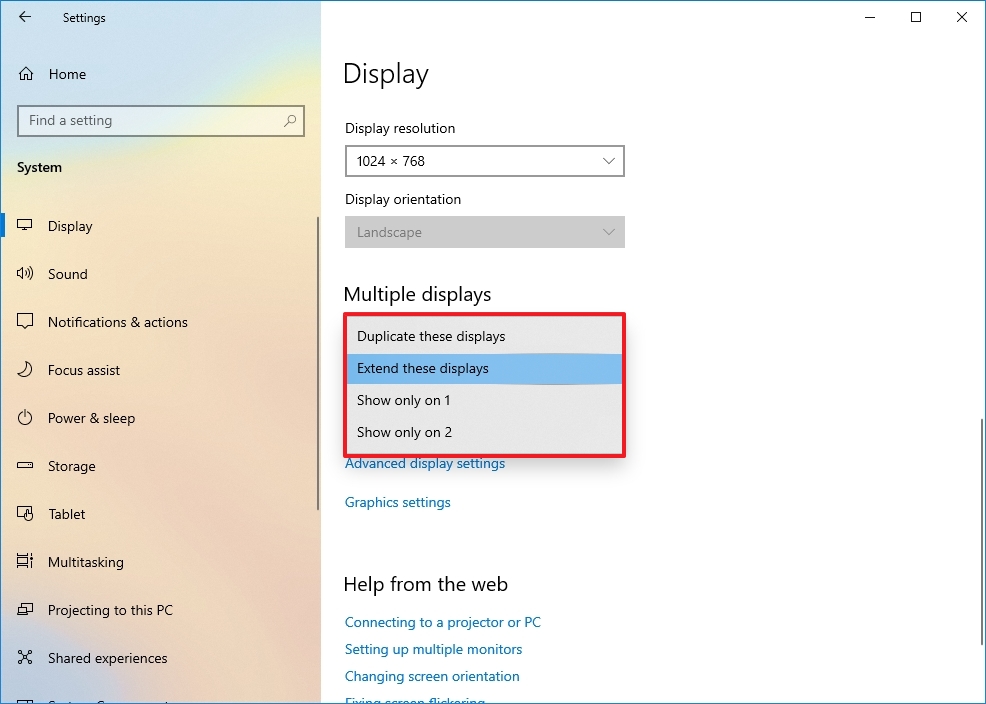
After you complete the steps, you may need to repeat steps 4 and 5 to set the display mode on the remaining monitors. Also, note that using these settings, you can make any of the monitors your primary display.
Switch display modes with shortcut
In addition to using the Settings app, Windows 10 allows you to switch display modes on the fly using the «Project» feature, which you can access with the «Windows key + P» keyboard shortcut.

Once you invoke the shortcut, a flyout will open from the right side with four options, including:
- PC screen only — Only the primary display is used.
- Duplicate — Secondary displays will mirror the primary monitor.
- Extend — Both screens are combined to offer an extended desktop.
- Second screen only — Only the secondary displays are used.
Typically, when using a multi-monitor setup on a desktop or laptop, you want to use the «Extend» option. This allows you to use the primary and secondary monitors normally at their native resolution, creating a single large canvas.
«Duplicate» is a good option when using a second monitor or projector to show a presentation. In contrast, the «Second screen only» option is great when you want to close the lid on a laptop and work only with the external monitor.
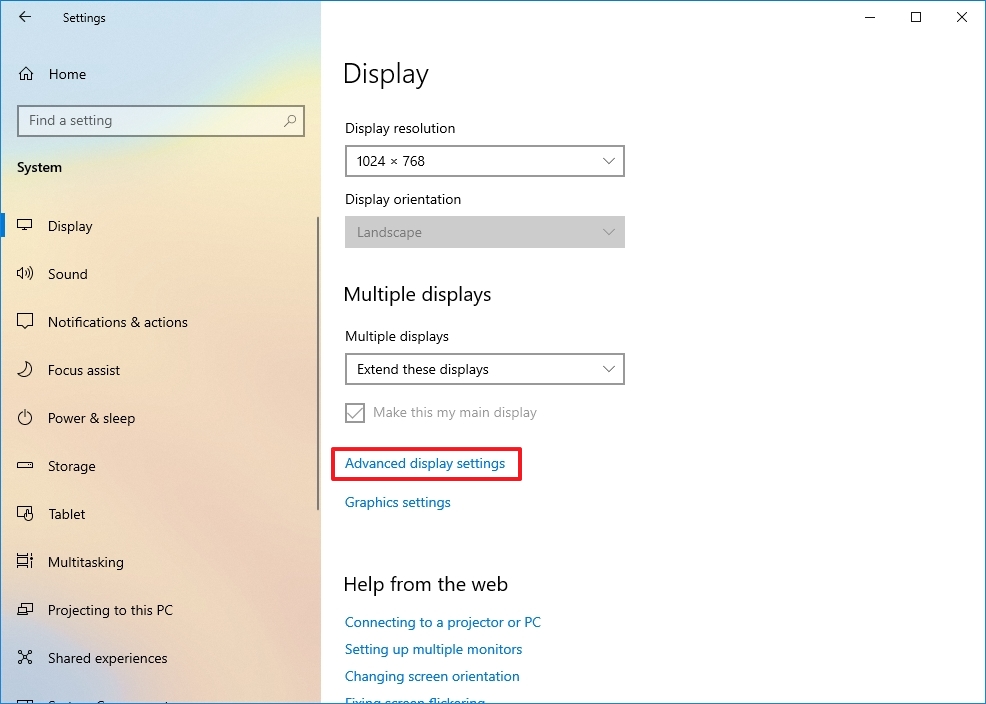
How to manage advanced display settings on Windows 10
Although it’s not always recommended to modify your advanced display settings because not all monitors are created equal, sometimes, you may need to make a few adjustments to improve color accuracy and remove screen flickering.
Important: I recommend adjusting the advanced settings only if you have a rough idea of what you want to do. Typically, you should be fine with the default display settings.
Set a custom color profile
If your monitors aren’t rendering the colors accurately, you can use a custom color profile to improve color accuracy using these steps:
- Open Settings.
- Click on System.
- Click on Display.
- Click the «Advanced display settings» option.
- Click the «Display adapter properties» option for the display you want to set a custom color profile.

- Click the Color Management tab.
- Click the Color Management button.
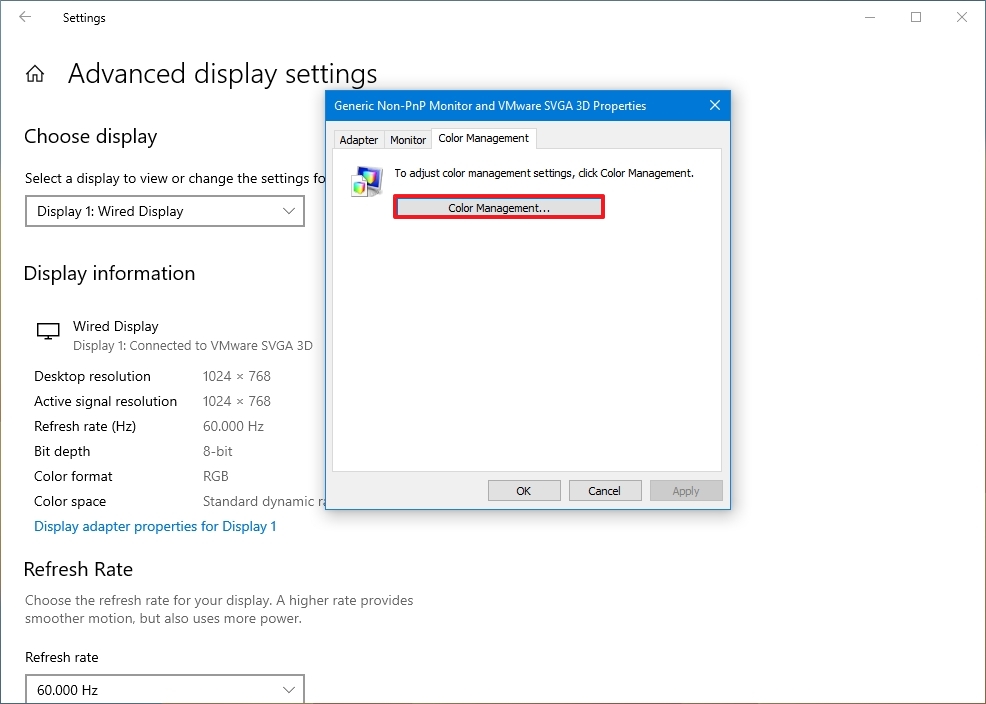
- Click the Devices tab.
- Select a display from the list.
- Check the «Use my settings for this display» option.
- Click the Add button.
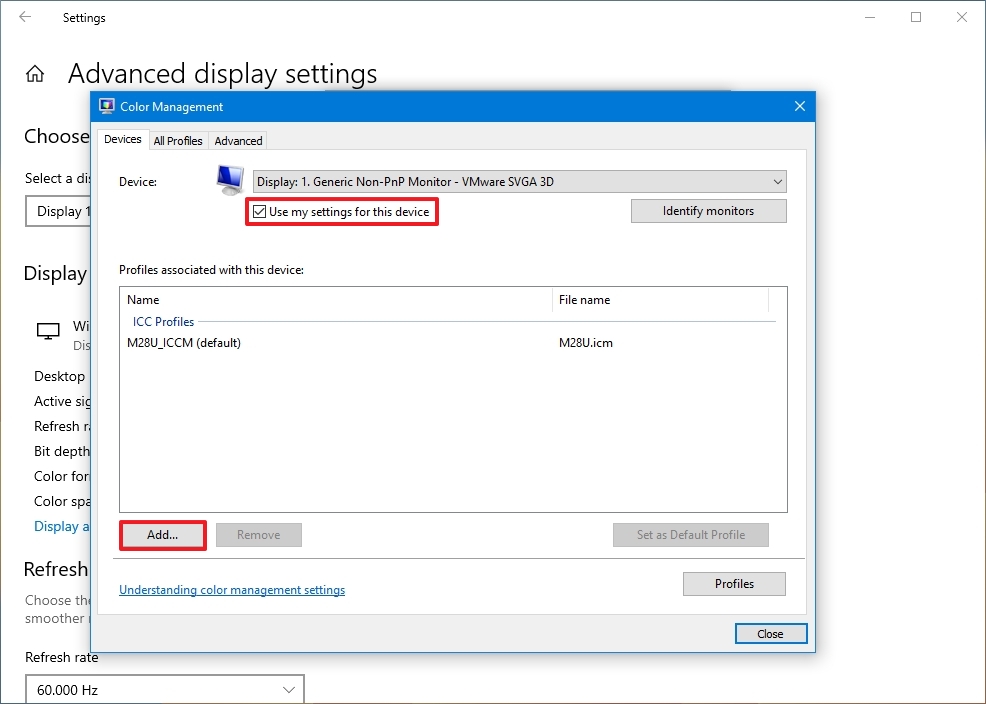
- On the «Associate Color Profile» page, click the Browse button and locate the new color profile.
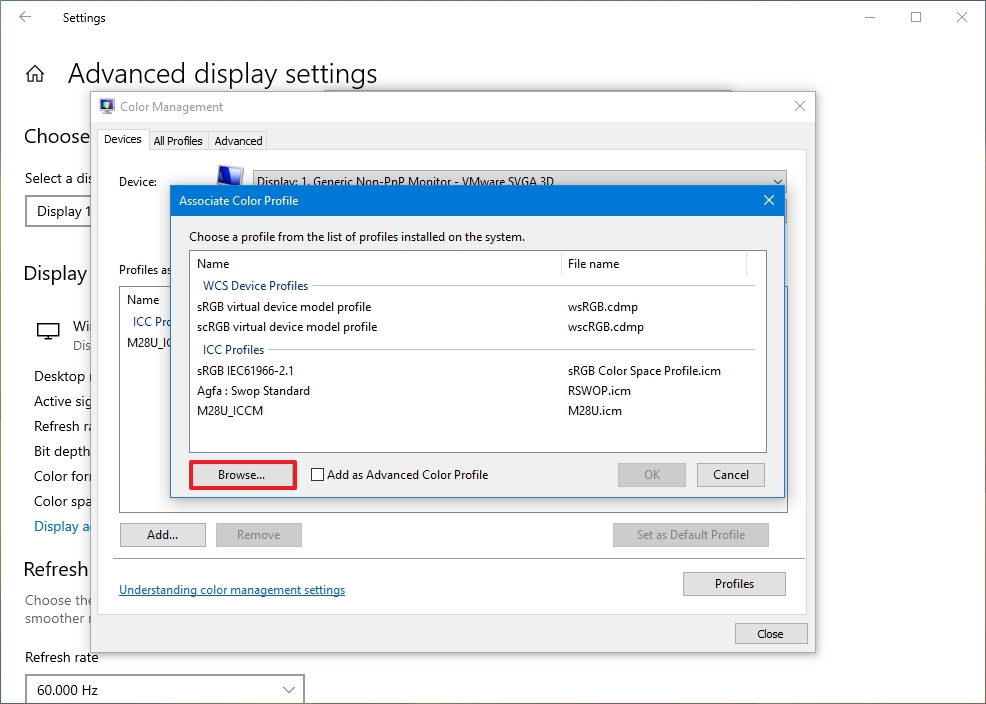
- Double-click the «.icm» file to install the new profile.
- Click the Close button.
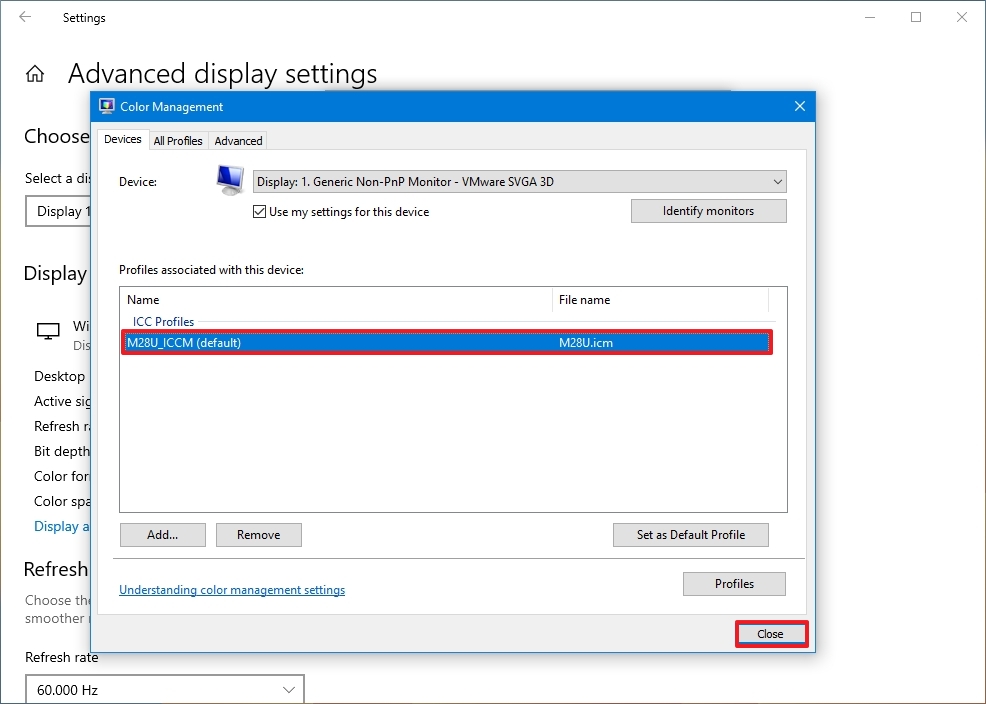
Once you complete the steps, you may need to repeat steps 9 through 13 to set a custom profile for the other monitors.
When configuring a custom color profile, use those created by your display manufacturer or from a trusted source. If you’re not sure, you can use these steps to download the correct color profile for your monitors.
Change the refresh rate
Usually, a refresh rate (frames per second) of 59Hz or 60Hz is more than enough to operate a computer, though you’ll want to look at the best monitors for Xbox Series X and Series S if you plan to game at higher framerates. However, if you’re noticing screen flickering or if you have monitors that support a higher refresh rate, bumping the settings can provide a better and smoother viewing experience — especially for gamers.
To adjust the refresh rate of a monitor, use these steps:
- Open Settings.
- Click on System.
- Click on Display.
- Click the «Advanced display settings» option.
- Use the drop-down menu to set the correct refresh rate under the «Refresh Rate» section.

After you complete the steps, you may need to repeat them to change the refresh rate on the remaining monitors.
How to show taskbar across multiple displays on Windows 10
On a multi-monitor setup, the taskbar by default will appear only in the main display, but you can change the settings to show it across all the displays using these steps:
- Open Settings.
- Click on Personalization
- Click on Taskbar.
- Turn on the «Show taskbar on all displays» toggle switch under the «Multiple display» section.

If you want to control in which Taskbar the buttons for running apps should appear, then use the «Show taskbar button on» the drop-down menu and select one of the available options:
- All taskbars.
- Main taskbar and taskbar where window is open.
- Taskbar where window is open.
You can also use this guide to optimize the space on the Taskbar to pin even more apps or to keep it as minimal as possible.
How to change background on multiple displays on Windows 10
Windows 10 offers many settings to adjust the look and feel of the desktop, but when using multiple monitors, setting up different background images on each display is one of the most significant customizations you can make to personalize your experience.
To show different wallpapers on a multi-monitor setup using a slideshow, use these steps:
- Open Settings.
- Click on Personalization.
- Click on Background.
- Use the «Background» drop-down menu and select the Slideshow option.

- Click the Browse button.
- Select a folder with a collection of images that you’d like to display on the monitors.
- Click the Choose this folder button.
- Select the rotation frequency using the «Change picture every» drop-down menu.
- Turn on the Shuffle toggle switch.
- (Optional) If you’re using images with different sizes, use the Choose a fit drop-down menu and select the Fill option.
Once you complete the steps, the images will rotate on the desktop background using your selected rotation frequency.
Customize each monitor with a different background
If you want to set a different background image for each monitor, use these steps:
- Open Settings.
- Click on Personalization.
- Click on Background.
- Use the «Background» drop-down menu and select the Picture option.

- Click the Browse button.
- Select the wallpaper and click the Choose picture option.
- Right-click the image and select the monitor you want the wallpaper to show.
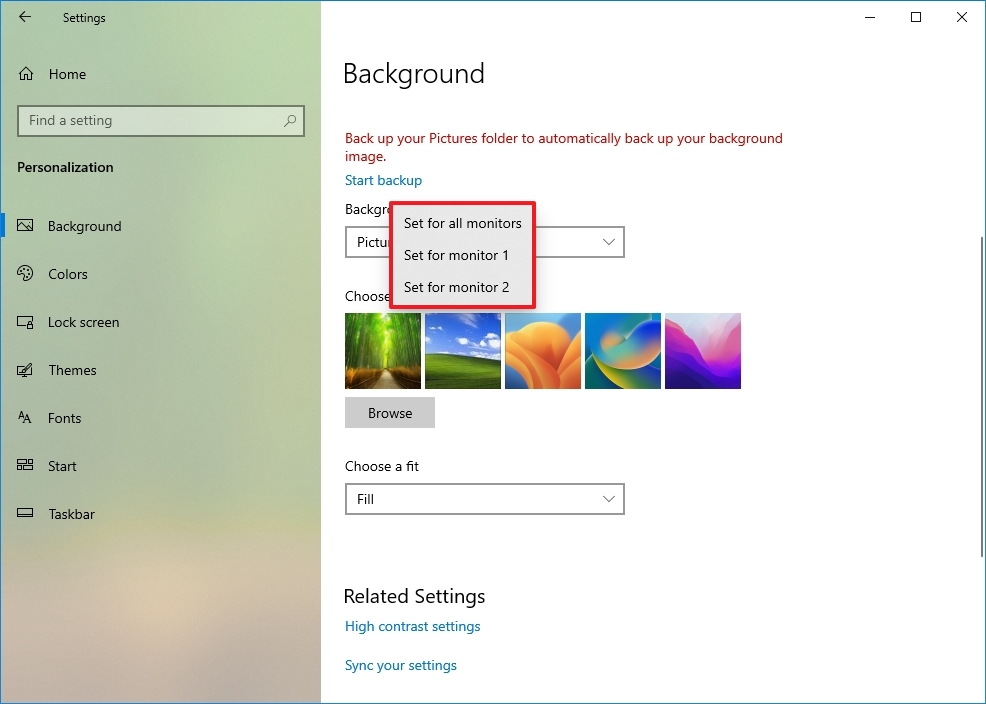
- Repeat steps 5, 6, and 7 to set a custom background for another monitor.
After you complete the steps, each monitor will display a custom wallpaper.
In addition to the instructions outlined above, here are a few additional tips to remember when setting up a computer with multiple monitors. For example, unless it’s a laptop, you shouldn’t try to adjust the brightness or color using Windows 10 or another application. Instead, you should use the controls built into the monitor.
If the second monitor isn’t detected in Windows 10 or Windows 11, check its connections and use the «Detect» button in the Settings app. If you still have issues, use our guide linked above to troubleshoot and fix common problems.
Finally, when using one or multiple monitors, you may encounter a black screen, typically a video driver-related problem. If you’re not sure how to fix this issue, follow these steps to resolve it.
It’s worth noting that recent updates to the operating system also added the ability to show dynamic wallpapers with the «Windows Spotlight» feature.
More resources
For more helpful articles, coverage, and answers to common questions about Windows 10 and Windows 11, visit the following resources:
- Windows 11 on Windows Central — All you need to know
- Windows 10 on Windows Central — All you need to know
Mauro Huculak has been a Windows How-To Expert contributor for WindowsCentral.com for nearly a decade and has over 15 years of experience writing comprehensive guides. He also has an IT background and has achieved different professional certifications from Microsoft, Cisco, VMware, and CompTIA. He has been recognized as a Microsoft MVP for many years.
Display switch is actually projecting your desktop to a second display screen. It can be projected to a bigger second screen with the help of a projector or any such device. The Display Switch can be classified into several types, PC screen only, duplicate on another screen, extend across another screen, or on the second screen only. This means if you want to project your desktop screen to a secondary screen, while keeping both the screens turned on, then select duplicate on another screen but if you want to display it only on the second screen while turning off your desktop display. Again you can switch to a split screen or extend across mode where your desktop screen is extended beyond your primary screen to a second screen. The following tutorial will help you create a shortcut for it, so that you can easily open it with a single tap.
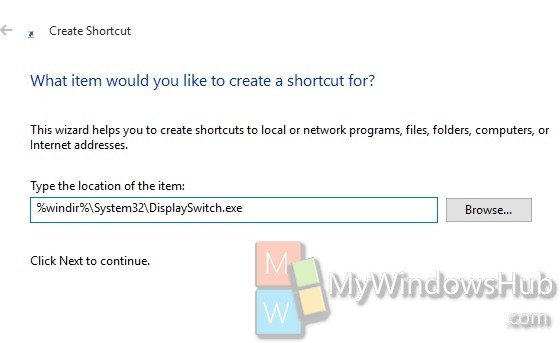
1. Right click in an empty space on Desktop, go to New and then select Shortcut.
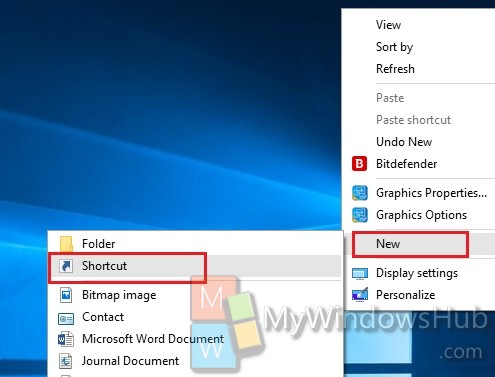
2. In the target field, copy and paste any one of the following texts, depending on your requirement
%windir%\System32\DisplaySwitch.exe (for Project flyout)
%windir%\System32\DisplaySwitch.exe /internal (for PC screen only)
%windir%\System32\DisplaySwitch.exe /clone (for Duplicate)
%windir%\System32\DisplaySwitch.exe /extend (for Extend)
%windir%\System32\DisplaySwitch.exe /external (for Second screen only)
Click Next.
3. Now type the name, Display Switch with the specific name. Click Finish.
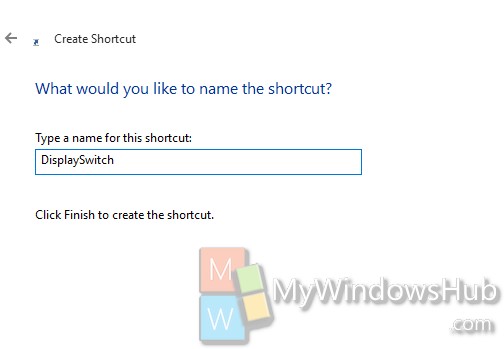
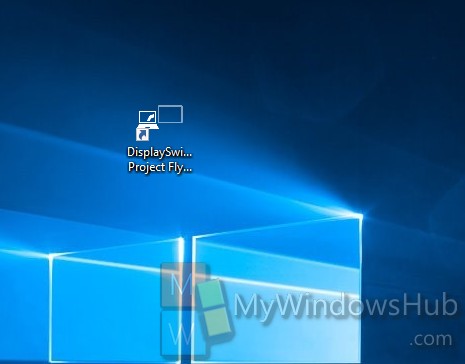
4. The icon will be created.
- Shortcut switch Sheet in Excel
- Create Shortcuts, Restart Your Computer … on the Desktop Windows 10
Display Switch (also known as Project or Second Screen) is used to change the display mode of the main screen for Windows 10 device or PC to display only on the PC screen, showing the same on both screens. , display content that expands on all screens or displays only on the second screen. This article will show you how to create or download the Display Switch shortcut in Windows 10.
- How to use 2 screens on a computer
- How to use a laptop as the second screen for laptops and computers
- Computer not found the second screen? This is how to fix it
Projection mode
Describe
PC screen only Activate only on the current home screen. All connected screens will be disabled. (When connected to a wireless projector, this option will change to Disconnect ). Duplicate The main screen will be projected to the second screen. Extend (default) The main screen will be expanded on all connected screens. Second screen only The current main screen will be disabled. All other connected screens will be activated with the second screen being used as the new main screen.
Note: By default, you can press Win + P to open the display frame of screen selection modes.
1. Download the two screen switch mode shortcut
Step 1 . Download the .zip file under this link.
Step 2. Save the .zip file to your desktop.
Step 3. Unblock the .zip file
Step 4. Open the .zip file and extract (drag and drop) the shortcut on the desktop.
Step 5. If you like, you can pin it to the Taskbar, go to the Start menu, add All apps, add Quick Launch, assign keyboard shortcuts or switch this shortcut to anywhere you want to use.
Step 6. When done, you can delete the downloaded .zip file if you want.
2. Create two screen switch mode shortcut
Step 1. Right-click or click and hold on an empty area on the desktop and click New and Shortcut .
Step 2 . Copy and paste the location you want to use below into the location field and click Next .
- Project flyout :% windir% System32DisplaySwitch.exe
- PC screen only :% windir% System32DisplaySwitch.exe / internal
- Duplicate :% windir% System32DisplaySwitch.exe / clone
- Extend :% windir% System32DisplaySwitch.exe / extend
- Second screen only :% windir% System32DisplaySwitch.exe / external

Step 3 . Type Display Switch in the name field for the shortcut and click the Finish button.

Note : You can name it anything you want.
I wish you all success!
5 stars4 stars3 stars2 stars1 star4 ★ | 8 Vote
You should read it
- How to convert speakers with a shortcut on Windows 10
- What is a shortcut? How to create a Shortcut on Windows
- How to create Screen Snip shortcut in Windows 10
- How to create a website shortcut on the Windows screen
- How to create custom shortcut keys for Raspberry Pi
- How to create a printer shortcut on Windows 10
- How to create WhatsApp chat shortcuts
- The shortcut virus removal has never been this simple
May be interested
- How to uninstall the driver completely on Windows

to avoid problems and dead blue screen errors, you need to delete the failed driver, causing problems. this article will show you how to uninstall the driver completely on windows.
- How to reset network data usage on Windows 10
windows 10 has a feature that allows you to view pc network data usage in the past 30 days. this article will show you how to reset network data usage to 0 when needed on windows 10.
- How to turn on the search box on the lock screen on Windows 10
starting with windows 10 build 18932, a new experimental feature allows adding a search box on the lock screen so users can search the web using bing directly on the lock screen. and this is how to turn it on.
- How to fix the Game Bar problem does not work on Windows 10
some users of windows 10 version 1809 and above are having problems launching the game bar. this article will help you fix the problem of game bar not working and some other problems.
- How to move user folders on Windows 10
this article will show you how to move the users folder, including all user profiles and folders during the new windows installation, without any user accounts and on preinstalled windows, already. have an account on the system.
- How to turn off Focus Assist notifications on Windows 10
the windows 10 focus assist feature automatically hides notifications while you play games or use other full-screen applications. but cortana likes to announce that it is a hidden message. this is how to turn off these annoying focus assist notifications.


Все способы:
- Способ 1: Приложение «Параметры»
- Способ 2: «Панель управления NVIDIA»
- Способ 3: Сторонние программы
- NirCmd
- Monitor Profile Switcher
- Вопросы и ответы: 0
Способ 1: Приложение «Параметры»
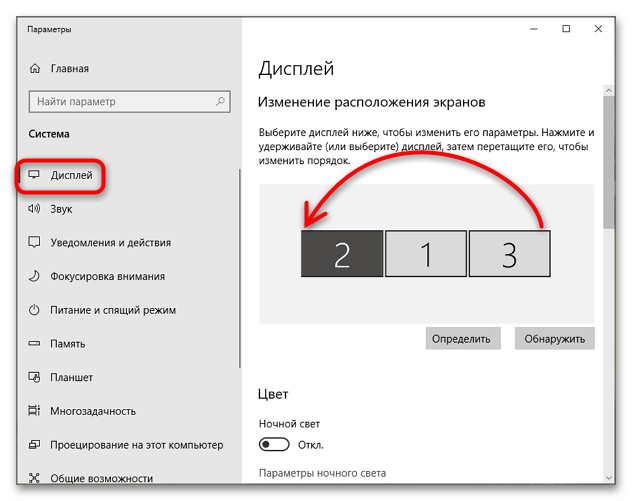
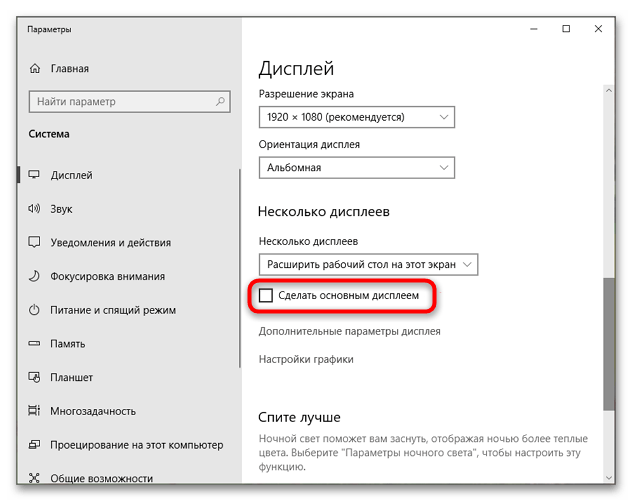
Проще всего изменить порядок подключенных к компьютеру мониторов в стандартных настройках приложения «Параметры».
- Кликните правой кнопкой мыши по рабочему столу и выберите из контекстного меню пункт «Параметры экрана» либо перейдите в приложении «Параметры» в раздел «Дисплей» или «Экран».
- В области «Выбрать дисплеи и изменить их порядок» захватите мышкой тот дисплей, который хотите сделать основным, и перетащите его влево.
- Прокрутите содержимое окна немного вниз, найдите и активируйте опцию «Сделать основным дисплеем».
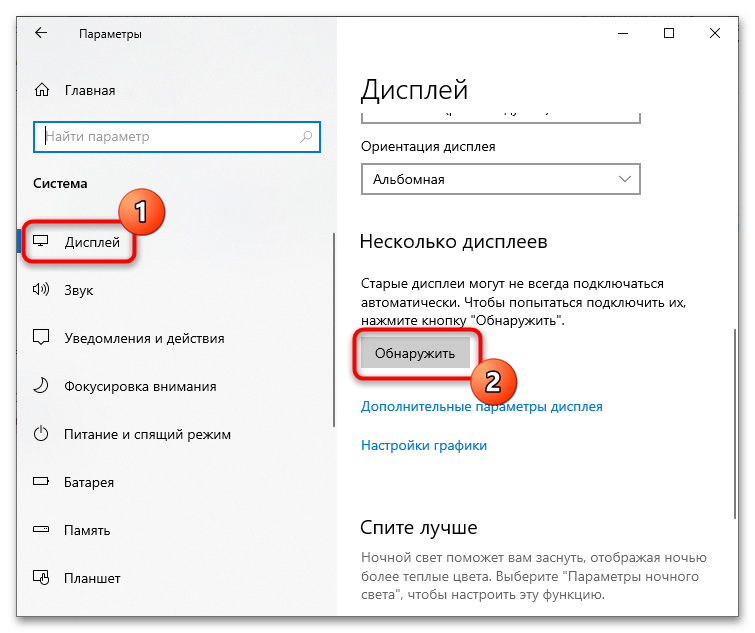
Если один из мониторов не обнаруживается, что может быть со старыми устройствами вывода видеоизображения, в разделе «Дисплей» в блоке «Несколько дисплеев» нажмите кнопку «Обнаружить».
Способ 2: «Панель управления NVIDIA»
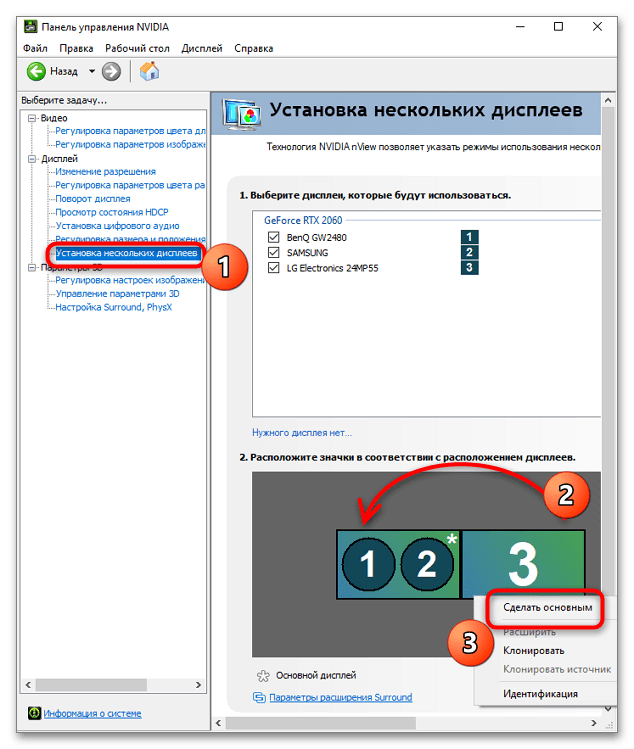
Если на компьютере имеется дискретная видеокарта от производителя NVIDIA, изменить порядок дисплеев можно в настройках панели управления видеокартой.
- Кликните правой кнопкой мыши по рабочему столу и выберите из контекстного меню пункт «Панель управления NVIDIA».
- Перейдите в раздел «Дисплей» → «Установка нескольких дисплеев», расположите перетаскиванием значки дисплеев в нужном порядке, а затем нажмите правой кнопкой мыши по монитору, который хотите сделать основным. Через контекстное меню задайте ему статус «Сделать основным».
Способ 3: Сторонние программы
Если менять порядок расположения мониторов приходится часто, удобнее использовать для переключения между ними сторонние приложения.
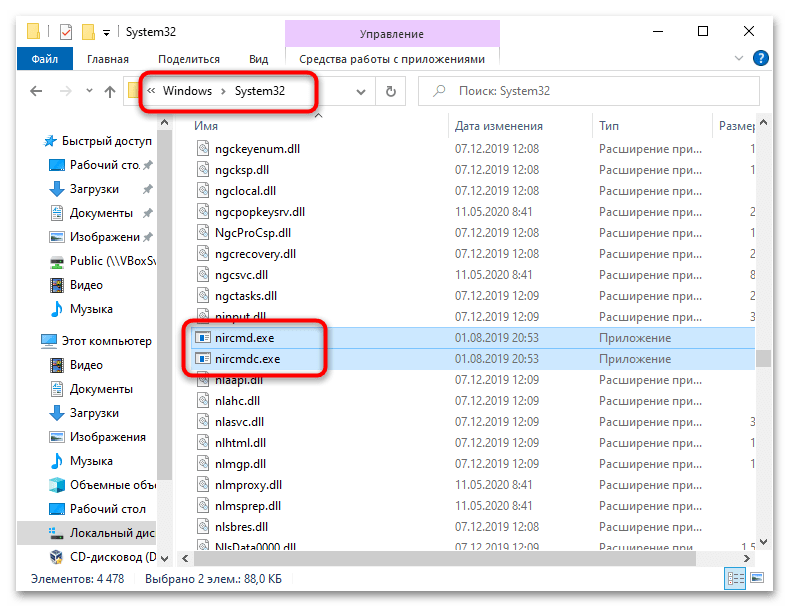
NirCmd
NirCmd – это небольшая бесплатная утилита, предназначенная для выполнения различных команд с использованием интерфейса классической «Командной строки».
Скачать NirCmd с официального сайта
- Скачайте архив с утилитой с официального сайта и распакуйте в расположение
C:\Windows\System32. - Чтобы переключить экран, вызовите нажатием клавиш Win + R окошко быстрого выполнения команд, введите в него команду
nircmdc setprimarydisplay 1и нажмите клавишу ввода. «1» в данном примере – это номер монитора, который нужно сделать основным.
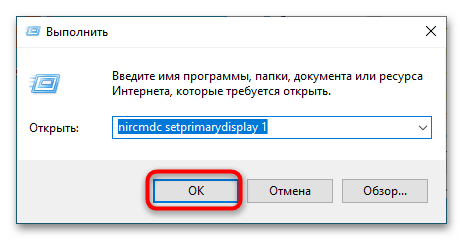
Посмотреть номера подключенных к компьютеру мониторов можно в разделе «Дисплей» или «Экран» приложения «Параметры».
Monitor Profile Switcher
Еще один бесплатный инструмент, предназначенный для быстрого переключения между мониторами. Утилита позволяет сохранять конфигурации мониторов в виде профилей и переключаться между ними из системного трея.
Скачать Profile Switcher с официального сайта
- Посетите страницу разработчика на проекте GitHub и кликните там ссылку загрузки утилиты «v0700 Download from Sourceforge.net».
- Распакуйте архив с утилитой и запустите исполняемый файл MonitorSwitcherGUI.exe.
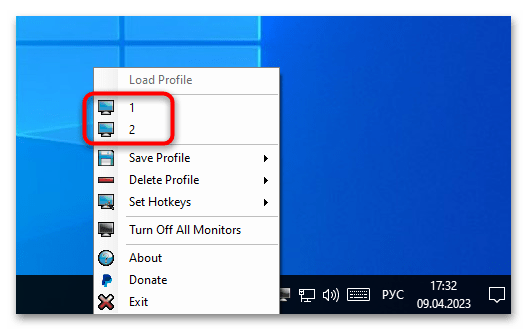
- Кликните правой кнопкой мыши по иконке приложения в области системного трея и выберите опцию «Save Profile» → «New Profile».
- В открывшемся диалоговом окошке дайте создаваемому профилю любое имя и нажмите «OK».
- Переключитесь средствами Windows 10 на другой экран и точно так же создайте второй профиль со своим именем.
- Используйте контекстное меню значка Monitor Profile Switcher для быстрого переключения между профилями, то есть мониторами.
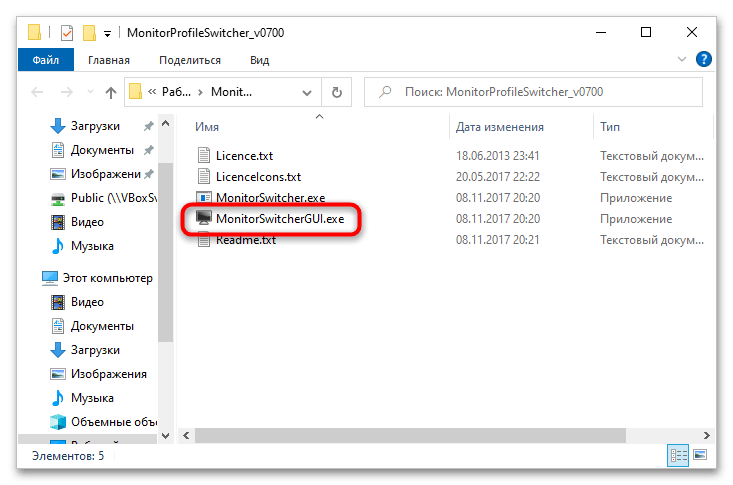

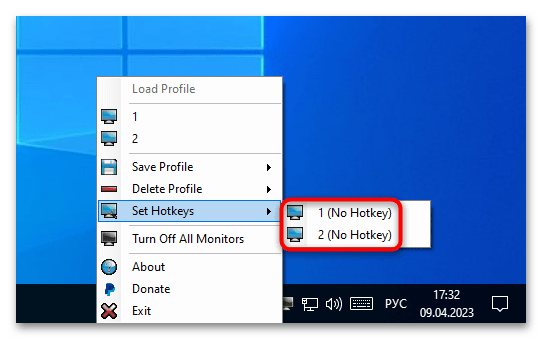
При желании каждому профилю можно назначить горячие клавиши, чтобы иметь возможность переключаться между мониторами с клавиатуры. Сделать это можно в подменю «Set Hotkeys».
Если переключаться между мониторами приходится часто, есть смысл добавить утилиту в автозагрузку.
Подробнее: Добавление программ в автозагрузку Windows 10
Наша группа в TelegramПолезные советы и помощь
How to Switch Display 1 and 2 in Windows 10
If you’ve got two monitors set up on Windows 10 and you want to switch which one is Display 1 and which one is Display 2, it’s a breeze! Head to your Display settings, select the monitor you want to change, and adjust the settings so that your primary monitor reflects your preference. Let’s dive in and walk through each step.
Step-By-Step Tutorial on How to Switch Display 1 and 2 in Windows 10
Ready to make the switch? Follow these simple steps, and you’ll be a dual-monitor pro in no time.
Step 1: Open Display Settings
First, go to your desktop, right-click on an empty space, and select «Display settings.»
This is your starting point. You’ll see a window pop up that shows you how your screens are currently arranged.
Step 2: Identify Your Monitors
Click the «Identify» button to see which monitor is currently labeled as 1 and which is labeled as 2.
The numbers will appear on the screens, letting you know their current assignment. This visual aid helps ensure you’re working with the correct monitors.
Step 3: Select the Monitor You Want to Change
Click on the monitor you want to change (either 1 or 2).
A blue rectangle will outline the selected monitor, indicating that any changes you make will apply to that specific screen.
Step 4: Change the Monitor
Scroll down to find the option «Make this my main display,» then check the box.
This will swap the primary status of your monitors, effectively switching Display 1 and Display 2. It may take a second for the settings to apply.
Step 5: Apply the Changes
Click «Apply» to save your new settings.
You might notice your screens flicker or go black for a moment as they adjust to the new configuration. Don’t worry, that’s totally normal!
After completing these steps, your monitors should be switched. You’ll notice that your primary display has moved, and applications will now open on your newly assigned Display 1.
Tips for Switching Display 1 and 2 in Windows 10
- Label Your Monitors: Use physical labels if you frequently switch monitors to remember which is which.
- Check Cable Connections: Sometimes, simply swapping the cables can also change the display order.
- Update Drivers: Make sure your graphics drivers are up to date to avoid any display issues.
- Use DisplayPort and HDMI Wisely: Different ports can sometimes impact which monitor is designated as primary.
- Keep Resolutions Consistent: Matching the resolution of both monitors can provide a more seamless experience.
Frequently Asked Questions
Can I switch the displays without physically moving the monitors?
Yes, you can. Just follow the steps above to switch the displays in the settings.
Do I need any special software to switch displays?
Nope, you can do it all within Windows 10’s Display settings.
Will this change affect my screen resolution?
Switching the displays won’t affect the resolution settings, but you can always adjust them separately if needed.
Can I make temporary changes?
Yes, you can always go back into the settings and change your displays back to the original configuration.
What if the displays don’t switch as expected?
Double-check your selections and ensure you clicked «Apply.» Updating your drivers can also solve most issues.
Summary of Steps
- Open Display Settings
- Identify Your Monitors
- Select the Monitor You Want to Change
- Change the Monitor
- Apply the Changes
Conclusion
Switching Display 1 and 2 in Windows 10 is a straightforward task that can significantly improve your productivity. Whether you’re a gamer, a designer, or just someone who likes having multiple screens, knowing how to configure your displays is invaluable. Just follow the steps, and you’ll have your monitors set up precisely how you want them in no time.
If you often find yourself needing to switch displays, these tips can make the process even smoother. And don’t forget to check the FAQ section if you run into any hiccups along the way.
Now that you’ve got the basics down, why not explore other customization options within Windows 10? You might find new ways to optimize your workspace. Happy switching!
Matt Jacobs has been working as an IT consultant for small businesses since receiving his Master’s degree in 2003. While he still does some consulting work, his primary focus now is on creating technology support content for SupportYourTech.com.
His work can be found on many websites and focuses on topics such as Microsoft Office, Apple devices, Android devices, Photoshop, and more.