
Для проверки целостности системных файлов и восстановления поврежденных файлов (библиотек) компонентов в Windows (Windows Server) можно использовать команды SFC и DISM. Эти две утилиты могут быть крайне полезными, если операционная система Windows работает нестабильно, появляются ошибки при запуске стандартных приложений или служб, после вирусного заражения и т.д.
В этой статье мы рассмотрим, как использовать команды
sfc /scannow
,
DISM /Online /Cleanup-Image /RestoreHealth
или
Repair-WindowsImage -Online -RestoreHealth
для восстановления образа и системных фалов в Windows 10/11 и Windows Server 2022/2019/2016.
Содержание:
- SFC /scannow: восстановление системных файлов Windows
- Проверка целостности хранилища компонентов Windows с помощью DISM
- Восстановление образа Windows с помощью DISM /RestoreHealth
- DISM /Source: восстановление образа Windows с установочного диска
- Восстановление образа Windows с помощью PowerShell
- DISM: восстановление поврежденного хранилища компонентов, если Windows не загружается
SFC /scannow: восстановление системных файлов Windows
Перед тем, как восстанавливать образ Windows с помощью DISM, рекомендуется сначала попробовать проверить целостность системных файлов с помощью утилиты SFC (System File Checker). Команда
sfc /scannow
позволяет проверить целостность системных файлов Windows. Если какие-то системные файлы отсутствуют или повреждены, утилита SFC попробует восстановить их оригинальные копии из хранилища системных компонентов Windows (каталог C:\Windows\WinSxS).
Утилита SFC записывает все свои действия в лог-файл
windir%\logs\cbs\cbs.log
. Для всех записей, оставленных SFC в файле CBS.log проставлен тег [SR]. Чтобы выбрать из лога только записи, относящиеся к SFC, выполните команду:
findstr /c:"[SR]" %windir%\Logs\CBS\CBS.log >"%userprofile%\Desktop\sfc.txt"
Если команда sfc /scannow возвращает ошибку “
Программа защиты ресурсов Windows обнаружила повреждённые файлы, но не может восстановить некоторые из них / Windows Resource Protection found corrupt files but was unable to fix some of them
”, скорее всего утилита не смогла получить необходимые файла из хранилища компонентов (образа) Windows.
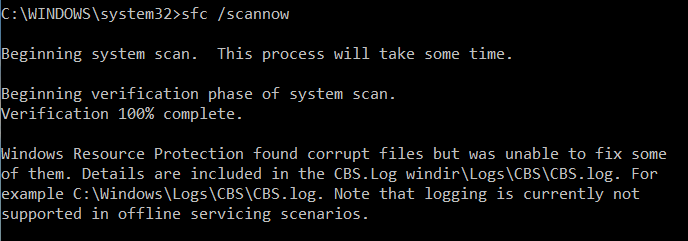
В этом случае вам нужно попробовать восстановить хранилище компонентов вашего образа Windows с помощью DISM.
После восстановления образа вы можете повторно использовать утилиту SFC для восстановления системных файлов.
Проверка целостности хранилища компонентов Windows с помощью DISM
Утилита DISM (Deployment Image Servicing and Management) доступна во всех версиях Windows, начиная с Vista.
Для сканирования образа Windows на наличие ошибок и их исправления используется параметр DISM /Cleanup-image. Команды DISM нужно запускать из командной строки, с правами администратора.
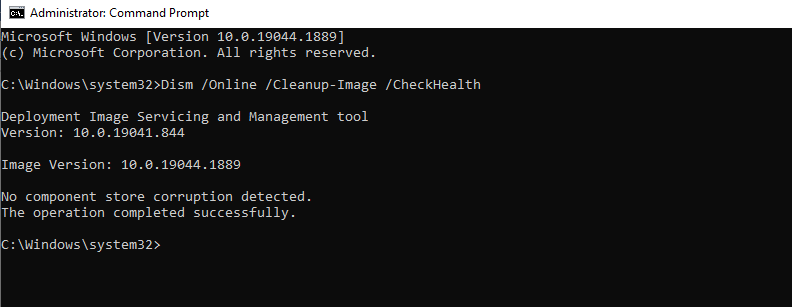
Чтобы проверить наличие признака повреждения хранилища компонентов в образе Windows (флаг CBS), выполните команду (не применимо к Windows 7/Server 2008R2):
DISM /Online /Cleanup-Image /CheckHealth
Эта команда не выполняет полное сканирование хранилища компонентов. Проверяются лишь записанные ранее маркеры повреждений и события в журнале Windows. Изменения в образ не вносятся. Команда проверит, не помечен ли ваш образ Windows как поврежденный и возможно ли исправить его.
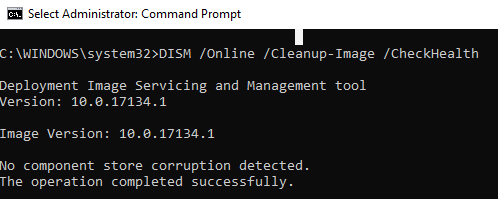
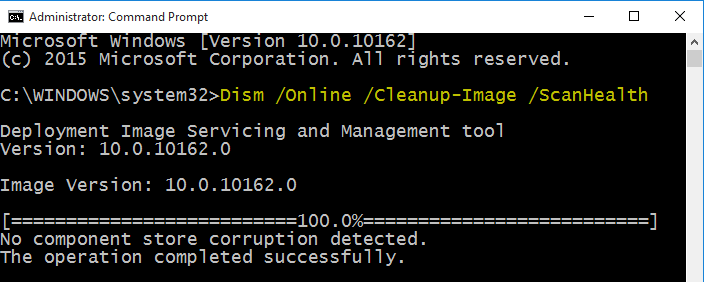
В этом примере команда вернула, что с образом все хорошо:
No component store corruption detected.
The operation completed successfully.
Чтобы выполнить полное сканирование хранилища компонентов на наличие повреждений в хранилище компонентов Windows, запустите команду:
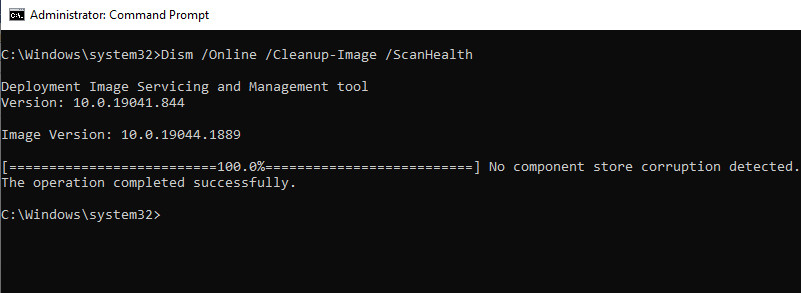
DISM /Online /Cleanup-Image /ScanHealth
Команда проверки образа Windows может выполняться довольно долго (от 10 до 30 минут). И вернет один из трех результатов:
- No component store corruption detected – DISM не обнаружил повреждения в хранилище компонентов;
- The component store is repairable – DISM обнаружил ошибки в хранилище компонентов и может исправить их;
- The component store is not repairable – DISM не может исправить хранилище компонентов Windows (попробуйте использовать более новую версию DISM или вам придется восстанавливать образ Windows из резервной копии, сбрасывать или полностью переустанавливать вашу копию Windows.

В Windows 7 и Windows Server 2008 R2 для использования параметра DISM /ScanHealth нужно установить отдельное обновление KB2966583. Иначе при запуске DISM будет появляться “
Ошибка 87. Параметр ScanHealth не распознан в этом контексте
”.
Команда DISM /ScanHealth может вернуть ошибки:
- Ошибка: 1726. Сбой при удалённом вызове процедуры;
- Ошибка: 1910. Не найден указанный источник экспорта объекта.
Это однозначно говорит о том, что ваш образ Windows поврежден и его нужно восстановить.
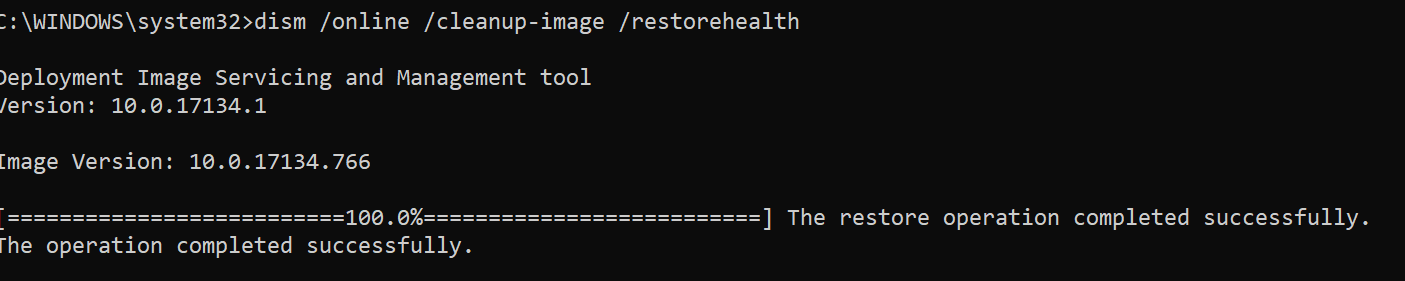
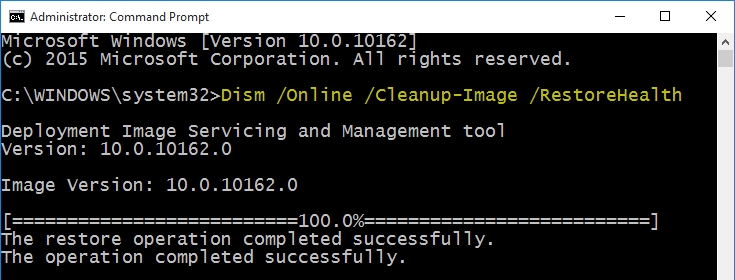
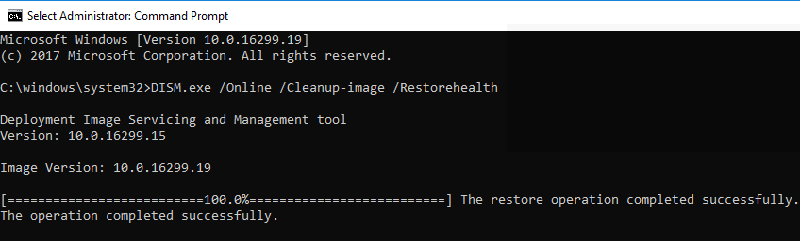
Восстановление образа Windows с помощью DISM /RestoreHealth
Чтобы исправить повреждения в хранилище компонентов образа Windows нужно использовать опцию RestoreHealth команды DISM. Эта опция позволит исправить найденные в образе ошибки, автоматически скачать и заменить файлы повреждённых или отсутствующих компонентов эталонными версиями файлов из центра обновлений Windows (на компьютере должен быть доступ в Интернет). Выполните команду:
DISM /Online /Cleanup-Image /RestoreHealth
В Windows 7/2008 R2 эта команда выглядит по другому:
DISM.exe /Online /Cleanup-Image /ScanHealth
Процесс сканирования и восстановления компонентов может быть довольно длительным (30 минут или более). DISM автоматически загрузит недостающие или поврежденные файлы образа с серверов Windows Update.
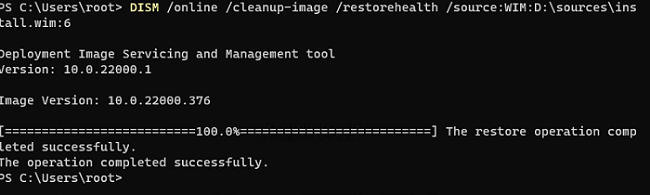
Восстановление выполнено успешно. Операция успешно завершена.
The restore operation completed successfully.
DISM /Source: восстановление образа Windows с установочного диска
Если на компьютере (сервере) отсутствует доступ в Интернет или отключена/повреждена служба Windows Update (как восстановить клиент Windows Update), то при восстановлении хранилища компонентов появятся ошибки:
- 0x800f0906 — Не удалось скачать исходные файлы. Укажите расположение файлов, необходимых для восстановления компонента, с помощью параметра Источник (0x800f0906 — The source files could not be downloaded. Use the source option to specify the location of the files that are required to restore the feature);
- Ошибка: 0x800f0950 — Сбой DISM. Операция не выполнена (0x800f0950 — DISM failed. No operation was performed);
- Ошибка:0x800F081F. Не удалось найти исходные файлы. Укажите расположение файлов, необходимых для восстановления компонента, с помощью параметра Источник (Error 0x800f081f, The source files could not be found. Use the «Source» option to specify the location of the files that are required to restore the feature).

<
Во всех этих случаях вы можете использовать альтернативные средства получения оригинальных файлов хранилища компонентов. Это может быть:
- Установочный диск/флешка/iso образ Windows
- Смонтированный файл wim
- Папка \sources\SxS с установочного диска
- Файл install.wim с установочным образом Windows
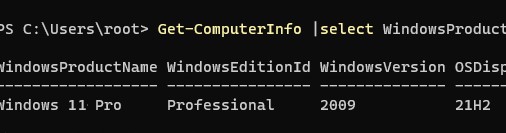
Вы можете указать WIM или ESD файл с оригинальным установочным образом Windows, который нужно использовать в качестве источника для восстановления файлов системы. Предположим, вы смонтировали установочный ISO образ Windows 11 в виртуальный привод D:.
Примечание. Для восстановления поврежденных файлов в хранилище компонентов из локального источника версия и редакция Windows в образе должна полностью совпадать с вашей.
С помощью следующей PowerShell команды проверьте, какая версия Windows установлена на вашем компьютере:
Get-ComputerInfo |select WindowsProductName,WindowsEditionId,WindowsVersion, OSDisplayVersion
Выведите список доступных версий Windows в установочном образе:
Get-WindowsImage -ImagePath "D:\sources\install.wim"
В нашем случае образ Windows 11 Pro в образе install.wim имеет
ImageIndex = 6
.
Для восстановления хранилища компонентов из локального WIM/ESD файла с блокированием доступа в интернет, выполните следующую команду (не забудьте указать ваш индекс версии Windows в файле):
DISM /online /cleanup-image /restorehealth /source:WIM:D:\sources\install.wim:6 /limitaccess
Или:
DISM /online /cleanup-image /restorehealth /source:ESD:D:\sources\install.esd:6 /limitaccess
Если при запуске появляется
- Ошибка Error: 50: DISM does not support servicing Windows PE with the /Online option, значит ваша DISM считает, что вы используете WinPE образWindows. Чтобы исправить это, удалите ветку реестра HKEY_LOCAL_MACHINE\SYSTEM\CurrentControlSet\Control\MiniNT.
Ошибка DISM Error 87: проверьте правильно написания команды, убедитесь что вы используете версию DISM для вашей версии Windows (обычно бывает при загрузке через WinPE/WinRE).
Утилита DISM пишет подробный журнал сканирования и восстановления системных файлов в файл
C:\Windows\Logs\DISM\dism.log
.
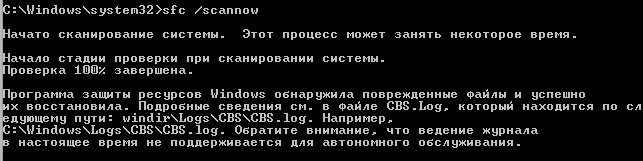
После восстановления хранилища компонентов вы можете запустить утилиту проверки системных файлов
sfc /scannow
. Скорее всего она успешно восстановит поврежденные файлы:
Программа защиты ресурсов Windows обнаружила поврежденные файлы и успешно их восстановила.
Windows Resource Protection found corrupt files and successfully repaired them.
Если все системные файлы целы, появится сообщение:
Windows Resource Protection did not find any integrity violations
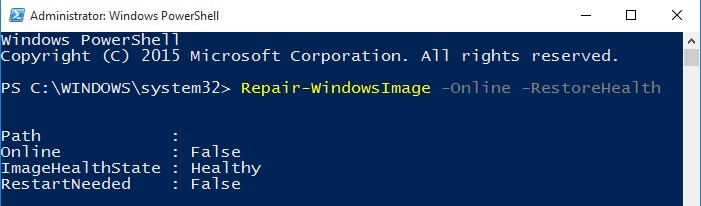
Восстановление образа Windows с помощью PowerShell
В версии PowerShell в Windows 10/11 и Windows Server 2022/2019 есть аналоги рассмотренных выше команд DISM. Для сканирования хранилища компонентов и поиска повреждений в образе выполните:
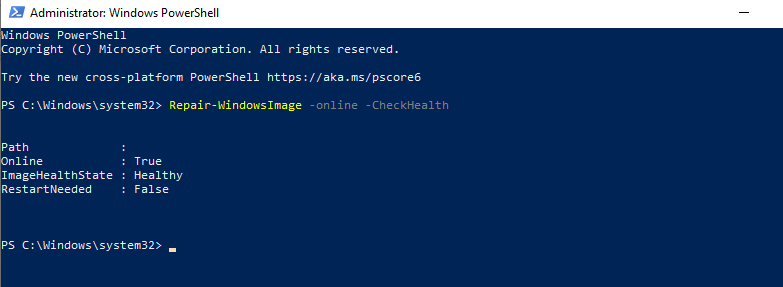
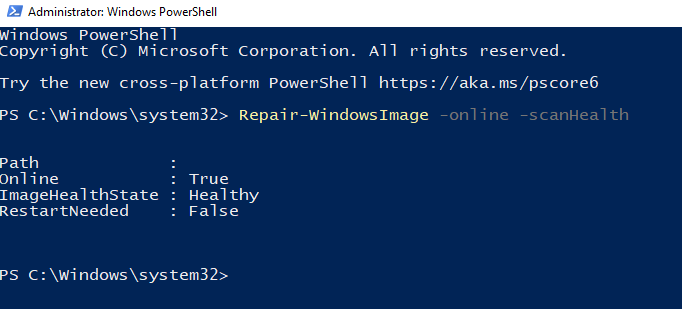
Repair-WindowsImage -Online –ScanHealth
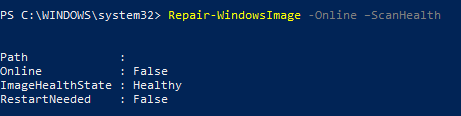
Если ошибок в хранилище компонентов не обнаружено, появится сообщение:
ImageHealth State: Healthy
Для запуска восстановления системных компонентов и файлов наберите:
Repair-WindowsImage -Online -RestoreHealth
При отсутствии доступа к интернету эта команда может зависнуть в процессе восстановления образа. Вы можете восстановить системные компоненты из локальной копии образа Windows в виде WIM/ESD файла, скопированного с установочного ISO образа Windows 10 (здесь также нужно указать индекс версии Windows в wim файле в качестве источника восстановления):
Repair-WindowsImage -Online -RestoreHealth -Source D:\sources\install.wim:5 –LimitAccess
DISM: восстановление поврежденного хранилища компонентов, если Windows не загружается
Если Windows не загружается корректно, вы можете выполнить проверку и исправление системных файлов в оффлайн режиме.
- Для этого загрузите компьютер с установочного образа Windows (проще всего создать загрузочную USB флешку с Windows 10/11 с помощью Media Creation Tool) и на экране начала установки нажмите
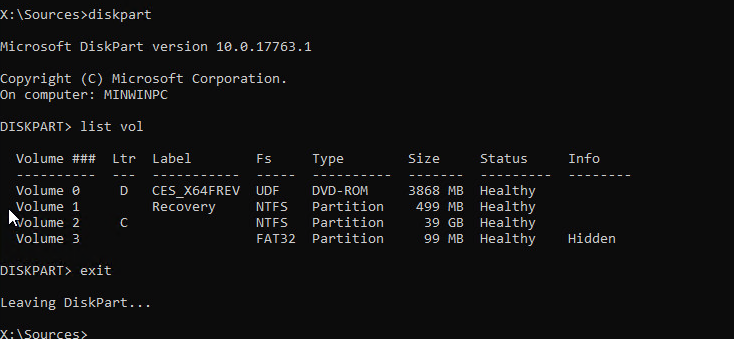
Shift + F10 - Чтобы разобраться с буквами дисков, назначенных в среде WinPE, выполните команду
diskpart
->
list vol
(в моем примере диску, на котором установлена Windows присвоена буква C:\, эту букву я буду использовать в следующих командах);
- Проверим системные файлы и исправим поврежденные файлы командой:
sfc /scannow /offbootdir=C:\ /offwindir=C:\Windows
- Для исправления хранилища компонентов используйте следующую команду (в качестве источника для восстановления компонентов мы используем WIM файл с установочным образом Windows 10, с которого мы загрузили компьютер):
Dism /image:C:\ /Cleanup-Image /RestoreHealth /Source:WIM:D:\sources\install.wim:6
- Если на целевом диске недостаточно места, то для извлечения временных файлов нам понадобится отдельный диск достаточного размера, например F:\, на котором нужно создать пустой каталог:
mkdir f:\scratch
и запустить восстановление хранилища компонентов командой:
Dism /image:C:\ /Cleanup-Image /RestoreHealth /Source:D:\sources\install.wim /ScratchDir:F:\scratch


Совет. Другие полезные команды DISM, которые должен знать администратор:
-
DISM /Add-Package
– установка MSU/CAB файлов обновлений, интеграция обновлений в образ Windows; -
DISM /Get-Drivers
– получение списка установленных драйверов; -
DISM /Add-Driver
– добавление драйверов в образ; -
DISM /Export-Driver
– экспорт установленных драйверов Windows; -
DISM /Add-Capability
– установка дополнительных компонентов Windows через Features on Demand (например, RSAT, сервер OpenSSH или ssh клиент Windows; -
DISM /Enable-Features
и
/Disable-Features
– включение и отключение компонентов Windows (например, протокола SMBv1), -
DISM /online /Cleanup-Image /StartComponentCleanup
– очистка хранилища компонентов и удаление старых версий компонентов (папки WinSxS); -
DISM /set-edition
– конвертирование ознакомительной редакции Windows на полную без переустановки.
If you’ve been using Windows for a long time, you might remember how often Windows Vista images became unserviceable in the past and needed to be repaired. Although the issue is not nearly as common on Windows 10, there are still occurrences, particularly when trying to use the System File Checker(SFC) to fix a modified system file.
Luckily, Windows 10 ships with an extremely helpful command-line utility known as Deployment Image Servicing and Management (DISM). Typically, DISM is used when a sfc/scannow command is unable to repair corrupted or modified system files. By performing a DISM repair, System file Checker commands should be working just fine.
DISM can be used to repair Windows images, Windows Setup and Windows PE. The tool has been around since Windows Vista SP1, but now it comes installed by default on Windows 10 and Windows 8.1.
There are two ways we can go around repairing an image with DISM on Windows 10; we can either use Windows PowerShell or use an elevated Command prompt. Since both PowerShell and Command Prompt need roughly the same commands, it doesn’t really matter which solution you choose. But for the sake of diversity, we provided guides on using both.
Method One: Running DISM/Cleanup-Image Tool in Command Prompt
- Search for “cmd” inside Windows search bar. Right click on command prompt and click on Run as administrator.
- Insert the command below to check if the Windows image has been flagged by your OS as corrupted. If it was, you’ll also get confirmation if the corruption can be repaired.
Dism /Online /Cleanup-Image /CheckHealth


Note: This step is meant to save you some time in seeing weather corruption exists. It does not fix anything but you’ll get an idea whether it’s worth to go through the whole process.
- If the CheckHealth has showed signs of corruption, it’s recommended to do a wider scan on the image file. The command below checks for component store corruption and records any of it in a log file. If you want to take a look over the log files, you can find them in C:\Windows\Logs\CBS\CBS.log or C:\Windows\Logs\DISM\dism.log.
Dism /Online /Cleanup-Image /ScanHealth

Note: As opposed to /CheckHealth, /ScanHealth is not instant and will take anywhere from 5 to 20 minutes to finish. Don’t close the command line if the loading screen freezes for a while. It usually stays at 20% for 5 minutes before continuing.
- Insert the command below to scan the image for corruption, perform repair operations automatically and record any signs of corruption to the log file. Depending on your system specs and image size, this operation can take anywhere from 20 minutes to 4 hours or more.
Dism /Online /Cleanup-Image /RestoreHealth

Note: Similar to /Scanhealth, the setup will freeze at 20% for a while, so don’t close it prematurely.
That’s it. Your Windows 10 image should be working now.
Method Two: Running DISM/Cleanup-Image” Tool in PowerShell
- Search for “powershell” inside Windows search bar. Right click on Windows PowerShell and click on Run as administrator.
- Insert the following command inside the elevated Powershell window:
Repair-WindowsImage -Online –CheckHealth


Note: This command’s sole purpose is to check whether the image has been flagged as corrupted by your system. It does not fix anything, but serves as a quick way to check if corruption exists. If you want to take a look over the log files, you can find them in C:\Windows\Logs\CBS\CBS.log or C:\Windows\Logs\DISM\dism.log.
- Copy and paste the following command inside the elevated PowerShell window to perform an image scan for corruption:
Repair-WindowsImage -Online –ScanHealth


Note: This command won’t fix anything but instead it will check for corruption and record any of it inside a log file.
- In the elevated command prompt, copy and paste the following command and press Enter:
Repair-WindowsImage -Online –RestoreHealth

Note: This command will scan the image for corruption. If it encounters any bad sectors, the setup will automatically perform repair operations and record any signs of corruption inside the log file. The operation can take anywhere from 15 minutes to a few hours, depending on your system specifications.
That’s it, your Windows image should be fixed!
Kevin Arrows
Kevin Arrows is a highly experienced and knowledgeable technology specialist with over a decade of industry experience. He holds a Microsoft Certified Technology Specialist (MCTS) certification and has a deep passion for staying up-to-date on the latest tech developments. Kevin has written extensively on a wide range of tech-related topics, showcasing his expertise and knowledge in areas such as software development, cybersecurity, and cloud computing. His contributions to the tech field have been widely recognized and respected by his peers, and he is highly regarded for his ability to explain complex technical concepts in a clear and concise manner.
DISM (Deployment Image Servicing and Management) is the cutting-edge utility used for online and offline health scans and repair of the compromised Windows operating system.
In this guide, we’ll discuss what the DISM command is and how it works, and we’ll show you how to use it to repair Windows.
What is DISM Command?
DISM (Deployment Image Servicing and Management) is the Windows inbuilt command-line tool to fix corrupted or damaged Windows operating system files and features directly from Windows online servers.
It is used for both online (currently running operating system) and offline Windows images in a .wim, .vhd, or .vhdx format to fix the issues. DISM is accessed via the command line and Windows PowerShell.
System administrators also utilize the DISM utility for servicing, migrating, and creating new images, particularly during Windows PE (Preinstallation Environment), Windows RE (Recovery Environment), and Windows Setup.
Another program for fixing corrupted Windows files is System File Checker (sfc.exe); however, it compares corrupted files to the system’s saved .wim store; if the latter is corrupt, SFC might not be able to fix the issues. DISM tool overcomes this issue. Based on parent copies kept on Microsoft’s update servers, it can scan and repair the .wim store.
In the following section, we will take a look at some DISM commands and their practical application with PowerShell and Windows command line to scan and debug the Windows operating system:
Run DISM through Command Prompt
You can use the command line to launch the DISM tool and check and fix Windows for errors:
Enter cmd (a shorthand for command prompt) in the search bar.As demonstrated below, right-click the command prompt and choose “Run as Administrator“: To use the DISM command line program, you must be an administrator.
The part below shows us how to use multiple DISM commands to scan and fix Windows issues.
Repair Windows 10 using DISM
DISM uses three significant parameters to scan, inspect, and repair a broken or corrupted Windows image, and those are ScanHealth, CheckHealth, and RestoreHealth.
There are two more inputs used in conjunction with the commands above for extensive checking Cleanup-image for extensive checking and Online for checking the running operating system.
#1. Using DISM CheckHealth Command
The CheckHealth argument launches the fundamental check for corruption in the component store. It operates quickly and only searches for mistakes that have already been part of the log file. This command scans a portion of the component store.
The component store tracks and maintains every component that makes up the Windows operating system. To run CheckHealth online, type the following at the command prompt and enter.
Dism /Online /Cleanup-Image /CheckHealthFollowing the completion of the scan, the window shown below will appear:
#2. Using DISM ScanHealth Command
ScanHealth requires more time than CheckHealth because it thoroughly scans the component store for corruption. The time it takes to finish checking the Windows component store will depend on how well your Windows 10 operating system is doing.
Run the following command from the command prompt to begin the scan:
Dism /Online /Cleanup-Image /ScanHealthAfter completing the scan, the window shown below will appear:
ScanHealth examines individual components for corruption in the component store by comparing the hash value of the current file to a stored hash value which is why ScanHealth generally takes longer to scan than CheckHealth.
Additionally, a log file is produced, which can be used for failure analysis. In the event of a loss, first, check the DISM.log file for particular issues. Examine the Sessions.xml log file next, followed by the CBS.log file.
#3. Using DISM RestoreHealth Command
RestoreHealth is the third most crucial DISM parameter after CheckHealth and ScanHealth.
It is used with DISM to repair the Windows image either online or office using different source files.
The following Restorehealth command is used to repair the online operating system:
DISM.exe /Online /Cleanup-image /RestorehealthDISM uses Windows Update to get the necessary files to fix corruptions when you perform this command. Depending on the extent of deterioration, scanning and restoring the Component Store may take a while. From Windows Update servers, DISM will automatically download and replace the files of damaged or missing components.
When the command is finished, the following screen appears:
Offline Repairing of the Windows Images
The above-explained DISM commands are for online, for the current running windows operating system.
The addition and deletion of updates, drivers, language packs, and other configuration tasks can all be handled offline via DISM.
Now, we will see how DISM is used to fix offline Windows files.
To perform an offline operation, you can utilize bootable install discs, Windows 10 ISO files, or locally stored source files like “install.wim” or “install.esd” files from another device and mount as a drive.
Before proceeding, check that the files match the version, edition, and language of the Windows 10 version that needs fixing.
Let’s look at one example of how to use the DISM command prompt to fix an offline image.
To fix an offline image, run the DISM command listed below from the command prompt:
Dism /Image:C:\offline /Cleanup-Image /RestoreHealth /Source:c:\test\mount\windows\LimitAccessThe source location needs to be changed per your offline image, and it’s usually a WIM, VHD, or VHDX file.
LimitAccess tells DISM not to check Windows Update or Windows Server Update Services for source files.
Run DISM Utility through PowerShell
In the sections above, we looked at using the Windows command-line tool to scan for, identify, and resolve operating system issues. However, the same operations can be completed using the Windows PowerShell Cmdlets.
Type the PowerShell command in the search box and run it with administrator rights as indicated in the screenshot below to access PowerShell Cmdlets.
powershell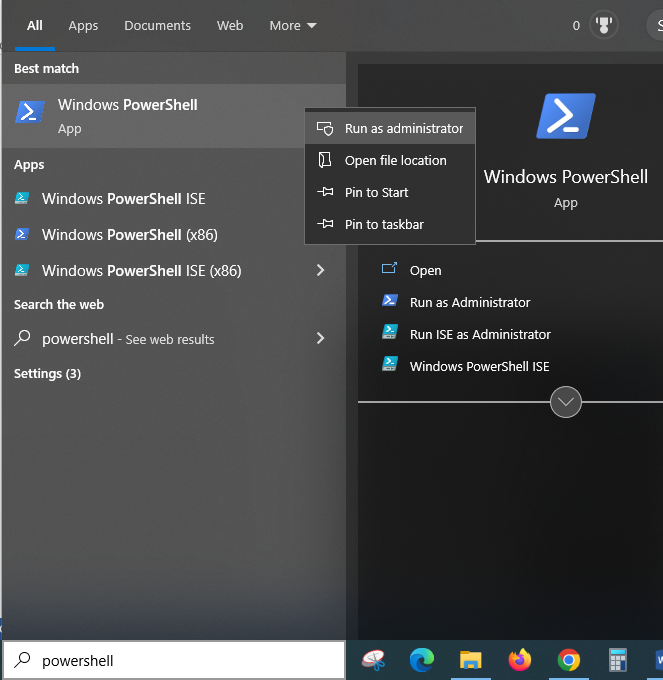
The cmdlets of the DISM PowerShell frequently match the arguments in Dism.exe directly. You can obtain the entire table of all DISM commands along with their PowerShell cmdlet equivalents from the Microsoft website.
To view related syntax, switches, and parameters, use the PowerShell help command “get-help – examples.“
Some of the commands used in PowerShell are
- For CheckHealth: Repair-WindowsImage -CheckHealth
- For ScanHealth: Repair-WindowsImage -ScanHealth
- For RestoreHealth: Repair-WindowsImage -RestoreHealth
Examples of how to use PowerShell to perform the DISM command
Type the following to launch the CheckHealth Powershell cmdlets.
Repair-WindowsImage -online –CheckHealthAfter the completion of the command, the below screen will appear:
You can use the ScanHealth Powershell cmdlets to perform thorough checking and repairing as follows:
Repair-WindowsImage -online –ScanHealthThe following screen will appear after running the command successfully.
Please be aware that you must have administrative rights to perform these commands; otherwise, you will receive the error message “The requested operation requires elevation,” and the DISM command won’t work.
DISM Error Troubleshooting
The goal of DISM is to scan and repair the operating system automatically. But occasionally, it might fail.
The section will highlight some common errors you may encounter while running the DISM utility.
Error: 0x800f0954 – DISM failed. No operation was performed
This error is a common problem that arises when the DISM command fails.
This error occurs when a third-party antivirus program interferes with the DISM during command execution.
Let’s look at how to overcome these challenges so that the DISM runs successfully.
Interference of Antivirus program
Solution: If the error still occurs after stopping the antivirus, you can uninstall and reinstall it after the DISM function completion. There is no need for a third-party antivirus because Microsoft Defender is a powerful antivirus with Windows 10.
Corrupted Windows update components and registry.
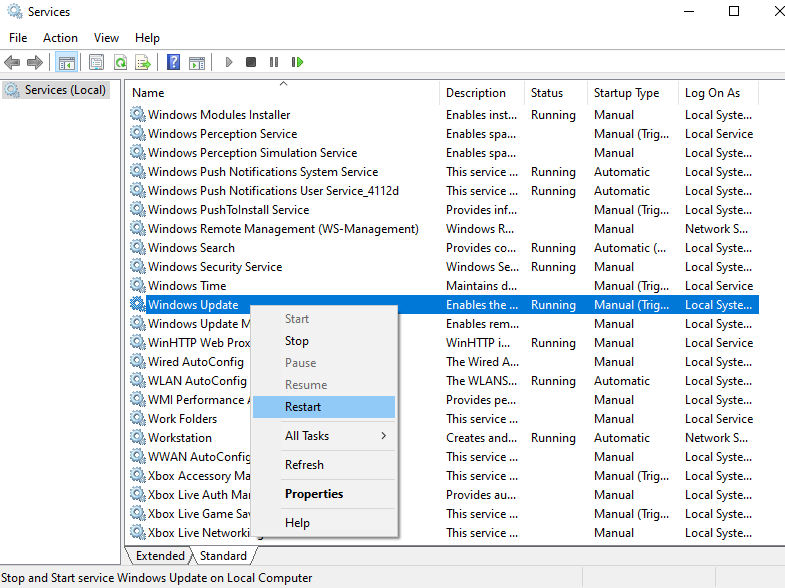
When the background intelligent transfer service (BITS), cryptographic services (CryptSvc), and Windows update services are misconfigured, DISM fails.
Solution: These services must have an Automated Startup type and Start Status to run an automatic Windows update successfully. Occasionally, restarting these services would also cure the problem:
Disabling proxy
You may use a proxy to maintain your privacy, which stops DISM from running the command.
Solution: The solution is to turn off the proxy and run the DISM tool.
Read-only access to Install.wim
Most of the time, a file install.wim is copied directly from the Windows 10 installation ISO to start the DISM offline scan. Because the install.wim file has read-only access, DISM fails.
Solution: Remove the read-only permissions by navigating to the Read-only box by selecting Properties from the context menu when you right-click the install.wim file.
How to fix DISM error 50

DISM error 50 is another typical error type. It occurs when the user is trying to run one of the following commands:
- Dism /Online /Cleanup-Image /CheckHealth
- Dism /Online /Cleanup-Image /ScanHealth
- Dism /Online /Cleanup-Image /RestoreHealth
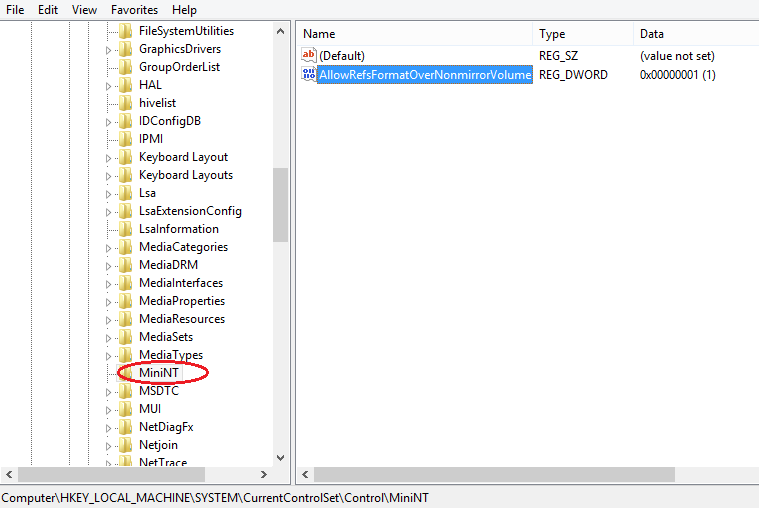
The leading cause for this error is because of a misplaced registry key.
Therefore, to correct this problem, you must delete this key as follows:
Using the command prompt, run Regedit to access the registry.
Navigate to HKEY_LOCAL_MACHINE > SYSTEM > CurrentControlSet > Control
Afterward, find the MiniNT folder and remove it, as indicated in the figure below.
Restart your Windows 10 computer after verifying your modifications.
Wrapping Up
The DISM tool is a versatile and cutting-edge tool that experts may utilize with technical backgrounds. It is ideal for system administrators. The sophisticated tool resolves component store corruption that SFC and CHKDSK cannot manage to repair operating system issues.
More on Windows
-
Best Repair Tools to Solve Windows 10 Problems
-
How to Fix Windows 0x80004005 error
-
How to Fix Windows Error Code 0x80070057
Встроенные средства восстановления системных файлов Windows 10 (FSC и DISM) позволяют быстро возвратить систему в работоспособное состояние. Сегодня Вы научитесь проводить сканирование системы на ошибки, восстановление поврежденных данных, а также исправление других проблем с ОС.
")
Содержание
- Функции SFC и DISM?
- В каких случаях следует применять SFC и DISM?
- Сканирование системных файлов
- Команда DISM
- Что делать если SFC или DISM оказались неэффективными?
- Восстановление данных
Операционная система Windows 10 оборудована специальными средствами, позволяющими проводить сканирование файлов ОС, а также их последующее восстановление. Средства SFC и DISM позволяют быстро проверять важные для работы системные файлы, а в случае нахождения неисправностей, производить замену поврежденных данных. Это очень удобно при восстановлении и очистке системы от вредоносного ПО, которое могло внести изменения в системные файлы.
Стоит отметить, что средства SFC и DISM дополняют друг друга, поэтому их следует применять комплексно. Этим можно добиться исправления большинства ошибок и нормализации работы ОС.
Функции SFC и DISM?
SFC – встроенное в систему средство проверки системных файлов. Данная утилита способна выявлять поврежденные или отсутствующие элементы, играющие важную роль в нормальной работе операционной системы Windows. Также SFC является удобным инструментом, который способен восстанавливать недостающие системные файлы.
DISM – встроенная программа, предназначенная для обслуживания и подготовки образов ОС. С её помощью можно восстанавливать систему, создавать образы текущей Windows, подготавливать среду предустановки и установки. Утилита DISM доступна для работы через командную строку или Windows PowerShell.
В каких случаях следует применять SFC и DISM?
К применению средств SFC и DISM следует прибегать в следующих случаях:
- Диагностика системы на наличие ошибок и вирусов
- Беспричинные вылеты из программ и приложений
- Частое появление синего экрана с последующей перезагрузкой
- Неработающие стандартные средства системы (не открываются папки, не работает поиск, командная строка и другие встроенные программы)
- Другие проблемы, влияющие на нормальную работоспособность операционной системы.
Данные средства позволяют исключить проблемы важных системных файлов, что может быть очень полезно при общей диагностике компьютера.
Сканирование системных файлов
Чтобы провести сканирование системных файлов при помощи встроенных средств необходимо:
Шаг 1. Открыть командную строку от имени администратора. Это можно сделать, нажав правой клавишей мыши по кнопке «Пуск» и выбрав соответствующий пункт «Командная строка (администратор)» (в нашем случае команды будут выполняться через Windows PowerShell).
Шаг 2. Вводим команду sfc /scannow и подтверждаем действие нажатием Enter.
")
После этого система запустит встроенные сервисы для проверки целостности важных системных файлов, отвечающих за нормальную работу компьютера. Проверка может занять некоторое время, поэтому строго не рекомендуется отключать компьютер или закрывать окна командной строки.
По завершению проверки пользователь сможет обнаружить один из двух возможных вариантов ее завершения:
1. Windows не нашла нарушений целостности (Windows Resource Protection did not find any integrity violations).
2. В Windows были обнаружены поврежденные файлы, которые система не в состоянии исправить.
Во втором случае следует прибегнуть к загрузке системы в безопасном режиме и попробовать вновь провести сканирование при помощи команды sfc /scannow.
Команда DISM
Если сервис SFC не смог устранить проблемы операционной системы, следует воспользоваться встроенной утилитой DISM, которая быстро устранит проблемы с SFC, мешающими нормальной работе сервиса для восстановления системных данных.
Чтобы сделать это, необходимо открыть командную строку от имени администратора и ввести: DISM /Online /Cleanup-Image /RestoreHealth.
")
После введения команды начнется процесс анализа и восстановления системных данных, поэтому строго не рекомендуется закрывать окно командной строки или выключать компьютер.
После завершения проверки достаточно перезагрузить ПК и продолжить восстановление системных данных с помощью сервиса SFC.
Что делать если SFC или DISM оказались неэффективными?
К сожалению, средства SFC и DISM могут оказаться неэффективными при восстановлении системных данных, поэтому пользователям приходится идти на более радикальные меры, вроде отката системы при помощи точек восстановления или полной переустановки операционной системы.
Помимо этого, существует способ быстрого сброса системы до изначального состояния.
Чтобы сбросить свою ОС необходимо:
Шаг 1. Нажать ПКМ по кнопке «Пуск» и выбрать «Параметры».
Шаг 2. В открывшемся окне необходимо выбрать пункт «Обновление и безопасность».
")
Шаг 3. Следом за этим выбираем пункт «Восстановление» и нажимаем кнопку «Начать».
")
Шаг 4. Теперь необходимо выбрать нужный вид восстановления и начать процесс сброса Windows.
")
Восстановление данных
Проблемы с системными данными, ошибки и поражение вирусами могут быть потенциально опасными для важных файлов. Если Вы обнаружили, что фотографии, документы, видеозаписи и другие файлы исчезли, то пришло время воспользоваться передовым программным обеспечением для восстановления данных.
Для этих целей компания Recovery Software подготовила специальный комплексный продукт — RS Partition Recovery – мощную утилиту, способную восстанавливать данные после уничтожения вирусами, случайно удаления, форматирования и т.д.
Вместе с RS Partition Recovery Вы сможете быстро восстановить:
- Фотографии, картинки, видео и другие медиафайлы.
- Текстовые документы, таблицы Excel.
- Файлы ключей, программ и другие данные.
Часто задаваемые вопросы
SFC – это специальная системная утилита, которая предназначена для анализа системы на наличие отсутствия файлов, необходимых для корректной работы операционной системы. После запуска она восстанавливает недостающие файлы в автоматическом режиме.
Чтобы восстановить целостность системы Windows используйте функции SFC и DISM. Они просканируют вашу систему и автоматически восстановят недостающие файлы. Процесс использования детально описан на нашем сайте.
Лучшим решением будет использование программы RS Partition Recovery. Программа проста в использовании и позволяет восстанавливать утерянные данные после случайного удаления файлов, форматирования накопителя, повреждений логической структуры диска и т.д.
DISM – это системная утилита, которая позволяет восстанавливать систему, создавать образы текущей Windows, подготавливать среду предустановки и установки. У нее нету графического интерфейса. Все манипуляции производятся при помощи командной строки.
Эти две утилиты стоит использовать если вы постоянно наблюдаете синие экраны смерти Windows, сбои или отсутствие системных программ, если у вас есть подозрения о наличии вредоносного ПО и в других случаях, когда нарушена целостность операционной системы.
Provide feedback
Saved searches
Use saved searches to filter your results more quickly
Sign up
Appearance settings