
DO NOT SUBMIT NEW ISSUES OR PULL REQUESTS
THIS REPOSITORY IS HERE FOR ARCHIVAL PURPOSES ONLY. THIS SOFTWARE RECEIVED IT’S LAST RELEASE ON 01/2019 AND LAST COMMIT ON 12/2020.
Someone has forked and continued the project here: https://github.com/bitlog2/DisableWinTracking
As with any fork of a project, we cannot verify the integrity of their code, so report any issues with their fork to THAT repository, not this one.
—————————
DisableWinTracking
A tool that I created to use some of the known methods of disabling tracking in Windows 10.

CYRILLIC LANGUAGES WARNING
ПРЕДУПРЕЖДЕНИЕ ДЛЯ КИРИЛЛИЧЕСКИХ ЯЗЫКОВ
Slavic languages: Belarusian, Bulgarian, Macedonian, Russian, Rusyn, Serbo-Croatian (for Standard Serbian, Bosnian, and Montenegrin), Ukrainian.
Славянские языки: белорусский, болгарский, македонский, русский, русинский, сербохорватский (для стандартного сербского, боснийского и черногорского), украинский.
This program cannot run correctly from a file path that contains Cyrillic characters. Make sure to run it from your root folder (usually C:/ ) so that you don’t get runtime errors.
Эта программа не может работать корректно, если в пути к файлу есть кириллические символы. Обязательно запустите его из корневой папки ( обычно C:/ ), чтобы вы не получали ошибок во время выполнения.
DOWNLOAD
DOWNLOAD EXE HERE
Note: Windows Defender may report the EXE as a trojan (Win32/Pocyx.C!cl), and may therefore prevent you from extracting the EXE to anywhere on your computer. Set up an exclusion in Settings > Update & Security > Windows Defender > Exclusions by adding the folder you intend to extract the EXE to.
How to Use
You can either:
A. Run the binary uploaded to the Release tab as an Administrator and select which options you’d like
B. Install Python and the dependencies listed below and run the script from an elevated command prompt and select which options you’d like
Silent
Either can be run with the -silent argument as of v3.1. This will perform all available options of the version you’re using.
You still need to run it as administrator.
Dependencies
This is only to run the script from source, download the exe here
- Tested on Python 3.7.2 since DisableWinTracking 3.2.4 (commit 9f1d2aa)
- wxPython
- PyWin32
- Windows 10 (Duh)
Methods Used
Telemetry
Set the AllowTelemetry string in HKEY_LOCAL_MACHINE\SOFTWARE\Policies\Microsoft\Windows\DataCollection to 0
DiagTrack Log
Clears and disables writing to the log located in C:\ProgramData\Microsoft\Diagnosis\ETLLogs\AutoLogger
Services
You can delete or disable the 2 services below:
DiagTrack(aka. Connected User Experiences and Telemetry) Diagnostics Tracking ServicedmwappushsvcWAP Push Message Routing Service
Action:
- Delete: Remove both services
- Disable: Set the
Startregistry key for both services to4(Disabled) Located atHKEY_LOCAL_MACHINE\SYSTEM\CurrentControlSet\Services\
HOSTS
Append known tracking domains to the HOSTS file located in C:\Windows\System32\drivers\etc
IP Blocking
Blocks known tracking IPs with the Windows Firewall. The rules are named TrackingIPX, replacing X with the IP numbers.
Windows Defender
Disables the following:
- Automatic Sample Submission
- Delivery Optimization Download Mode
WifiSense
Disables the following:
- Credential Share
- Open-ness
OneDrive
Runs C:\Windows\SysWOW64\OneDriveSetup.exe /uninstall (64 bit) or
C:\Windows\System32\OneDriveSetup.exe /uninstall (32 bit)
Also disables registry entries that keep the OneDrive Icon pinned to your Windows Explorer list:
Xbox DVR
Action:
- Disable: Set the
GameDVR_Enabledregistry key for both services to0(Disabled) Located atHKEY_CURRENT_USER\System\GameConfigStore - Disable: Set the
AllowGameDVRregistry key for both services to0(Disabled) Located atHKEY_LOCAL_MACHINE\SOFTWARE\Policies\Microsoft\Windows\GameDVR
This action requires reboot computer for completely applying.
Delete Services vs Disable Services?
Selecting «Disable» will simply stop the services from being able to run.
Selecting the «Delete» choice will completely delete the tracking services.
License
Copyright (C) 10se1ucgo 2016

This program is free software: you can redistribute it and/or modify
it under the terms of the GNU General Public License as published by
the Free Software Foundation, either version 3 of the License, or
(at your option) any later version.

This program is distributed in the hope that it will be useful,
but WITHOUT ANY WARRANTY; without even the implied warranty of
MERCHANTABILITY or FITNESS FOR A PARTICULAR PURPOSE.  See the
GNU General Public License for more details.

You should have received a copy of the GNU General Public License
along with this program.  If not, see <http://www.gnu.org/licenses/>.
Win10Debloat
Win10Debloat is a simple and lightweight powershell script that removes pre-installed windows 10/11 bloatware apps, disables telemetry and declutters the experience by disabling or removing intrusive interface elements, ads and context menu items. No need to painstakingly go through all the settings yourself, or removing apps one by one. Win10Debloat makes the process quick and simple!
You can pick and choose exactly which modifications you want the script to make, but the default settings should be fine for most people. All of the changes can be easily reverted using the registry files that are included in the ‘Regfiles’ folder, and all of the apps that are removed by default can be reinstalled from the microsoft store.
The windows 10 default settings will:
- Remove all bloatware apps from this list.
- Disable telemetry, diagnostic data & targeted ads.
- Disable bing & cortana in windows search.
- Disable tips & tricks on the lockscreen. (This may change your lockscreen wallpaper to the windows default)
- Disable tips, tricks and suggestions in the startmenu and settings, and sync provider ads in windows explorer.
- Hide the Chat (meet now) & Widget (news and interests) icons from the taskbar.
- Hide the 3D objects folder under ‘This pc’ in windows explorer.
- Disable the ‘Include in library’ from context menu.
- Disable the ‘Give access to’ from context menu.
- Disable the ‘Share’ from context menu. (Does not remove the onedrive share option)
The windows 11 default settings will:
- Remove all bloatware apps from this list.
- Disable telemetry, diagnostic data & targeted ads.
- Disable bing & cortana in windows search.
- Disable tips & tricks on the lockscreen. (This may change your lockscreen wallpaper to the windows default)
- Disable tips, tricks and suggestions in the startmenu and settings, and sync provider ads in windows explorer.
- Hide the Chat & Widget icons from the taskbar.
Or select the ‘Custom’ option in the menu to customize the script to your needs.
Donate a cup of coffee to support my work
Usage
Disclaimer: I believe this script to be completely safe to run, but use this script at your own risk!
Easy method:
- Download the latest version of the script, and extract the .ZIP file to your desired location.
- Navigate to the Win10Debloat folder
- Double click the ‘Run.bat’ file to start the script.
- Accept the windows UAC prompt to run the script as administrator, this is required for the script to function.
- Select either default, or custom setup depending on what changes you want to make. Custom setup will allow you to choose exactly which changes you want to make, and which changes you want to skip.
Advanced method:
This method gives you the option to run the script with certain arguments to tailor the behaviour of the script to your needs without requiring any user input during runtime, making it quicker and easier to deploy on a large number of systems.
- Download the latest version of the script, and extract the .ZIP file to your desired location.
- Open powershell as an administrator.
- Enable powershell execution by entering the following command:
Set-ExecutionPolicy Unrestricted -Force - In powershell, navigate to the directory where the files were extracted. Example:
cd c:\Win10Debloat - Enter this into powershell to run the script:
.\Win10Debloat.ps1To run the script without any user input you can add arguments at the end, for example:.\Win10Debloat.ps1 -RemoveApps -DisableBing
| Argument | Description |
|---|---|
| -RunDefaults | Run the script with windows 10 default settings. |
| -RunWin11Defaults | Run the script with windows 11 default settings. |
| -RemoveApps | Remove all bloatware apps from this list. |
| -DisableTelemetry | Disable telemetry, diagnostic data & targeted ads. |
| -DisableBing | Disable bing & cortana in windows search. |
| -DisableLockscreenTips | Disable tips & tricks on the lockscreen. |
| -DisableWindowsSuggestions | Disable tips, tricks and suggestions in the startmenu and settings, and sync provider ads in windows explorer. |
| -DisableChat | Hide the chat (meet now) icon on the taskbar. |
| -DisableWidgets | Hide the widget (news and interests) icon on the taskbar. |
| -DisableOnedrive | Hide the onedrive folder in the windows explorer sidepanel. |
| -Disable3dObjects | Hide the 3D objects folder under ‘This pc’ in windows explorer. |
| -DisableMusic | Hide the music folder under ‘This pc’ in windows explorer. |
| -DisableIncludeInLibrary | Disable the ‘Include in library’ option in the context menu. |
| -DisableGiveAccessTo | Disable the ‘Give access to’ option in the context menu. |
| -DisableShare | Disable the ‘Share’ option in the context menu. |
Debloat Windows 10/11
By default, this script only removes apps that most people are unlikely to ever need or use. You can of course customize which apps are removed by this script by editing the apps list found in the ‘Win10Debloat.ps1’ file.
These apps will be deleted by default:
- AdobeSystemsIncorporated.AdobePhotoshopExpress
- Clipchamp.Clipchamp
- Dolby
- Duolingo-LearnLanguagesforFree
- HULULLC.HULUPLUS
- Microsoft.3DBuilder
- Microsoft.549981C3F5F10 (Cortana)
- Microsoft.Asphalt8Airborne
- Microsoft.BingFinance
- Microsoft.BingNews
- Microsoft.BingSports
- Microsoft.BingTranslator
- Microsoft.BingWeather
- Microsoft.GetHelp
- Microsoft.Getstarted
- Microsoft.Messaging
- Microsoft.Microsoft3DViewer
- Microsoft.MicrosoftOfficeHub
- Microsoft.MicrosoftSolitaireCollection
- Microsoft.MicrosoftStickyNotes
- Microsoft.MixedReality.Portal
- Microsoft.NetworkSpeedTest
- Microsoft.News
- Microsoft.Office.OneNote
- Microsoft.Office.Sway
- Microsoft.OneConnect
- Microsoft.Print3D
- Microsoft.RemoteDesktop
- Microsoft.SkypeApp
- Microsoft.Todos
- Microsoft.WindowsAlarms
- Microsoft.WindowsFeedbackHub
- Microsoft.WindowsMaps
- Microsoft.WindowsSoundRecorder
- Microsoft.ZuneMusic
- Microsoft.ZuneVideo
- PandoraMediaInc
- Picsart-Photostudio
- Royal Revolt
- Speed test
- Spotify
- Wunderlist
- king.com.BubbleWitch3Saga
- king.com.CandyCrushSaga
- king.com.CandyCrushSodaSaga
These apps will NOT be deleted by default:
- Microsoft.GamingApp
- Microsoft.MSPaint (Paint 3D)
- Microsoft.People
- Microsoft.PowerAutomateDesktop
- Microsoft.ScreenSketch
- Microsoft.Windows.Photos
- Microsoft.WindowsCalculator
- Microsoft.WindowsCamera
- microsoft.windowscommunicationsapps (Mail & Calendar)
- Microsoft.WindowsStore (NOTE: This app cannot be reinstalled!)
- Microsoft.Xbox.TCUI
- Microsoft.XboxApp
- Microsoft.XboxGameOverlay
- Microsoft.XboxGamingOverlay
- Microsoft.XboxIdentityProvider
- Microsoft.XboxSpeechToTextOverlay (NOTE: This app cannot be reinstalled from the microsoft store!)
- Microsoft.YourPhone
Declutter Windows 10/11
This script can also make various changes to declutter windows 10/11, such as:
- Disable telemetry, diagnostic data & targeted ads.
- Disable bing & cortana in windows search.
- Disable tips & tricks on the lockscreen. (This changes your lockscreen wallpaper to the windows default)
- Disable tips, tricks and suggestions in the startmenu and settings, and sync provider ads in windows explorer.
- Hide the chat (meet now) icon on the taskbar.
- Hide the widget (news and interests) icon on the taskbar.
- Hide the onedrive folder in the windows explorer sidepanel.
- Hide the 3D objects folder under ‘This pc’ in windows explorer.
- Hide the music folder under ‘This pc’ in windows explorer.
- Disable the ‘Include in library’ option in the context menu.
- Disable the ‘Give access to’ option in the context menu.
- Disable the ‘Share’ from context menu. (Does not remove the onedrive share option)
All of these changes can be reverted with the registry files that are included in the ‘Regfiles’ folder.
¡Hola! Bienvenido a mi blog sobre uninstall apps. Hoy hablaremos de un tema crucial: disable all Windows telemetry. Aprenderás cómo proteger tu privacidad y mejorar el rendimiento de tu sistema. ¡No te lo pierdas!
Disabling All Windows Telemetry: A Comprehensive Guide to Enhancing Privacy in Uninstall Apps
Disabling all Windows Telemetry is an essential step towards enhancing privacy in uninstall apps. Windows telemetry collects and sends user data to Microsoft, enabling them to improve software and services. While this may seem beneficial, it can potentially compromise the user’s privacy. Therefore, it is crucial to disable all Windows telemetry features when using uninstall apps.
Firstly, navigate to the Settings app on your Windows computer. Click on the Privacy tab to access various settings related to user data and telemetry. Under the General category, you can disable several options involving the collection of user information.
Next, click on Feedback & diagnostics, located under the Privacy tab. Set the feedback frequency to “Never” and choose “Basic” as the diagnostic data level. This will limit the amount of shared information.
Another method to disable telemetry is by using the Group Policy Editor. Press Windows + R and type “gpedit.msc” in the Run dialog box. Navigate to Computer Configuration > Administrative Templates > Windows Components > Data Collection and Preview Builds. Double-click on “Allow Telemetry” and set it to “Disabled.”
For users running Windows 10 Home, the Group Policy Editor is not included by default. In this case, you can utilize the Registry Editor. Press Windows + R and type “regedit” in the Run dialog box. Navigate to HKEY_LOCAL_MACHINESOFTWAREPoliciesMicrosoftWindowsDataCollection. Right-click on “DataCollection,” then select “New” and “DWORD (32-bit) Value.” Name the new DWORD “AllowTelemetry” and set its value to “0.”
Finally, consider using a third-party uninstall app that prioritizes user privacy. These apps can help you manage and remove unwanted programs securely, without compromising your data.
Always remember to create a backup of your registry or system before making any changes in case any issues arise. By following these steps, you can significantly enhance your privacy when using uninstall apps and protect your personal information from being shared with Microsoft.
Microsoft Will Delete Minecraft Java.
Delete these garbage Windows files!
How do I disable all telemetry in Windows 10?
To disable all telemetry in Windows 10 in the context of uninstalling apps, follow these steps:
Step 1: Open the Settings App
Press the Windows Key and type “Settings” or click on the Settings icon in the Start Menu. Select the Settings app from the search results.
Step 2: Navigate to Privacy Settings
Click on the Privacy tab in the Settings window to access various privacy options.
Step 3: Disable General Data Collection
In the General section under Privacy settings, turn off all the options related to data collection and tracking.
Step 4: Disable App Data Collection
While still in Privacy settings, select the Speech, Inking & Typing tab, and then click on Stop Getting to Know Me button to disable data collection from typing and other inputs.
Step 5: Disable Location Tracking
In Privacy settings, click on the Location tab and turn off the location tracking for your device and individual apps.
Step 6: Block Camera and Microphone Access
Under the Camera and Microphone tabs in Privacy settings, disable access to the camera and microphone for unwanted apps.
Step 7: Manage Diagnostic and Feedback Data
In Privacy settings, switch to the Diagnostics & feedback tab, and select Basic as the feedback level. This will limit the amount of diagnostic data sent to Microsoft. Note that completely disabling telemetry is only available in Enterprise editions of Windows 10.
Step 8: Disable Background Apps
Click on the Background apps tab under Privacy settings, then toggle off any apps you don’t want running in the background.
Step 9: Use a Local Account and Adjust Sync Options
Switch to a local account without a Microsoft email address, and disable syncing settings under the Accounts tab in Settings.
Step 10: Adjust Update Settings
Go to the Update & Security section in Settings, and adjust your update preferences to limit data collection.
Please note that some of these steps might affect your overall experience with Windows 10, so be cautious when disabling certain features. Always consider the implications of turning off certain settings before proceeding.
Is disabling Windows telemetry safe?
Disabling Windows telemetry can be considered safe in the context of uninstalling apps, but it may have some consequences on your system. Telemetry is a feature that allows Microsoft to collect data about your system usage, hardware, and software performance. This information is used to improve the quality and performance of the Windows operating system.
Pros of disabling Windows telemetry include:
1. Enhanced Privacy: Disabling telemetry means that no data will be sent to Microsoft, giving users more control over their privacy.
2. Reduced System Load: Disabling telemetry can reduce the load on your system, potentially improving its overall performance.
However, there are some cons to consider when disabling Windows telemetry:
1. Lack of Customized Support: Microsoft uses telemetry data to tailor support for specific issues that users may encounter. Without this data, troubleshooting and support may be more difficult.
2. Missed Opportunities for Improvement: By not providing telemetry data, users might miss out on improvements and fixes that have been released in response to common issues discovered through telemetry. This could lead to a less stable or optimized Windows experience.
In conclusion, disabling Windows telemetry can be safe in terms of uninstalling apps and protecting user privacy, but it may also have some trade-offs when it comes to system support and updates. It is essential to weigh the pros and cons before making a decision.
How do I disable all telemetry in PowerShell?
In the context of uninstalling apps, telemetry refers to the collection and tracking of user activity data to improve the user experience or for diagnostic purposes. Disabling telemetry in PowerShell is a way to protect your privacy and prevent unwanted data collection from apps on your computer.
To disable all telemetry in PowerShell, follow these steps:
1. Press Windows key + X and choose Windows PowerShell (Admin) from the menu. This opens the PowerShell console with administrator rights.
2. Execute the following command to disable application telemetry:
“`powershell
Set-ItemProperty -Path “HKLM:SOFTWAREPoliciesMicrosoftWindowsDataCollection” -Name “AllowTelemetry” -Type DWord -Value 0
“`
This command modifies the registry setting for telemetry and disables data collection. Note that some basic telemetry data might still be collected by Microsoft even after executing this command, as it is reserved for necessary security updates and essential diagnostics.
3. To disable feedback notifications, run this command:
“`powershell
Set-ItemProperty -Path “HKLM:SOFTWAREPoliciesMicrosoftWindowsDataCollection” -Name “DoNotShowFeedbackNotifications” -Type DWord -Value 1
“`
This registry modification will prevent feedback notifications from showing up while using Microsoft products.
Remember that modifying the registry can affect the overall functioning of your system; always ensure you have a backup before making changes to the registry. Additionally, disabling telemetry may limit the support you receive from app developers, as they will not have access to diagnostic data that aids in troubleshooting issues.
How do I stop Windows 11 from spying on me?
To stop Windows 11 from spying on you, you should uninstall or disable apps and features that collect your data. Here are some steps you can follow:
1. Uninstall Pre-installed Apps: Some built-in apps on Windows 11 might collect your data by default. Uninstall them by opening PowerShell and running the following command: Get-AppxPackage [package name] | Remove-AppxPackage (replace [package name] with the app’s package name).
2. Disable Cortana: Cortana is a virtual assistant that uses your data to provide personalized assistance. To disable it, press Win+S, click on the three-dot menu, choose “Settings,” and turn off all related options.
3. Disable Tracking Services: Open Settings, go to Privacy, and disable telemetry and other tracking services to limit the amount of data collected about your activities.
4. Configure App Permissions: In Settings > Privacy, customize app permissions so that only trusted apps have access to your data.
5. Opt-Out of Ads Personalization: Go to Settings > Privacy > General, and turn off the toggle for “Let apps use advertising ID to make ads more interesting to you based on your app activity.”
6. Turn Off Location Services: In Settings > Privacy > Location, disable location services to prevent apps from tracking your location.
7. Disable Diagnostic Data Collection: Go to Settings > Privacy & Security > Diagnostics & Feedback, and set the level to “Basic” to minimize data collection.
8. Remove Unnecessary Web Browsing Data: Regularly clear your browsing data or use the private browsing mode to avoid sharing information about your browsing habits.
9. Use a VPN: Protect your online privacy and prevent websites and apps from tracking you by using a Virtual Private Network (VPN).
10. Install Privacy-focused Apps: Replace default Windows apps with privacy-focused alternatives like Mozilla Firefox, Signal, and ProtonMail.
By taking these steps, you can significantly reduce the amount of data Windows 11 collects about you, enhancing your privacy while using the operating system.
How can I uninstall or disable all Windows telemetry apps to enhance my privacy?
To uninstall or disable all Windows telemetry apps to enhance your privacy, follow these steps:
1. Block Telemetry using Group Policy Editor:
– Press Win+R to open the Run dialog.
– Type gpedit.msc and press Enter to open the Group Policy Editor.
– Navigate to Computer Configuration > Administrative Templates > Windows Components > Data Collection and Preview Builds.
– Double-click on Allow Telemetry setting.
– Select Disabled, click on “Apply”, and then click “OK”.
2. Block Telemetry using Registry Editor:
– Press Win+R to open the Run dialog.
– Type regedit and press Enter to open the Registry Editor.
– Navigate to HKEY_LOCAL_MACHINESOFTWAREPoliciesMicrosoftWindowsDataCollection.
– Create a new DWORD (32-bit) value named AllowTelemetry.
– Set the value of AllowTelemetry to 0 (zero) to disable telemetry.
3. Disable Telemetry services:
– Press Win+R to open the Run dialog.
– Type services.msc and press Enter.
– Locate the following services, double-click on each, and select “Disabled” in the Startup type dropdown menu:
– Connected User Experiences and Telemetry
– dmwappushsvc
4. Uninstall unnecessary apps:
– Press Win+X and select Windows PowerShell (Admin).
– Type the following command to remove built-in Windows apps: Get-AppxPackage | Remove-AppxPackage
– You can also remove specific apps by using their package names with the Remove-AppxPackage command.
5. Block Telemetry using Firewall:
– Open the Windows Defender Firewall with Advanced Security.
– Click on “Outbound Rules” and then click “New Rule” on the right-side panel.
– Create a custom rule to block any outbound connections for the following telemetry executables:
– CompatTelRunner.exe
– DiagTrackRunner.exe
– WaaSMedic.exe
By following these steps, you’ll be able to uninstall or disable all Windows telemetry apps and enhance your privacy.
What are the top 3 steps to follow for disabling Windows telemetry while uninstalling apps?
To disable Windows telemetry while uninstalling apps, follow these top 3 steps:
1. Open Windows Settings: Click on the Start button and then click on the Settings icon (the gear symbol). This will open the Windows Settings window.
2. Navigate to Privacy settings: In the Windows Settings window, select “Privacy” to access the privacy settings.
3. Disable Telemetry options: In the Privacy settings, click on “Feedback & diagnostics” or “Diagnostics & feedback” (depending on your Windows version). Under the “Diagnostic data” section, select “Basic” or “Required diagnostic data” to minimize the telemetry data sent to Microsoft. Additionally, disable “Improve my typing and writing” and “Tailored experiences” options for further privacy protection while uninstalling apps.
Are there any specific apps to remove in order to completely disable Windows telemetry?
To completely disable Windows telemetry, you should consider removing or disabling the following apps and services:
1. Settings App – Navigate to Privacy settings and disable the options related to data collection and telemetry.
2. Task Scheduler – Open Task Scheduler, navigate to “Microsoft” > “Windows” > “Application Experience,” and disable all tasks related to telemetry.
3. Services – Open the Services app and disable the following services related to telemetry:
– Connected User Experiences and Telemetry (DiagTrack)
– dmwappushsvc
– Compatibility Appraiser (CompatTelRunner)
4. Group Policy Editor (Windows Pro/Enterprise users only) – Open the Group Policy Editor and navigate to “Computer Configuration” > “Administrative Templates” > “Windows Components” > “Data Collection and Preview Builds”. On the right pane, double-click “Allow Telemetry” setting, set it to “Disabled,” and then click “OK.”
5. Registry Editor – Open the Registry Editor and update the values of some specific registry keys related to telemetry. Always be cautious when making any changes in the Registry Editor as it can cause system instability if not done properly.
6. Use third-party tools like O&O ShutUp10, DisableWinTracking, or Spybot Anti-Beacon to easily disable various telemetry settings.
Keep in mind that completely disabling telemetry might affect your Windows experience, as these features help Microsoft improve their operating system and ensure a better user experience. Make sure to read about each setting before making any changes to avoid unwanted consequences.
Post Views: 1,883
When you install drivers for your Nvidia graphics card on Windows, a Telemetry service and several Telemetry tasks get added as well.
We talked about disabling Nvidia Telemetry already by making manual changes to the Windows operating system.
Basically, what it involves is disabling three tasks in the Windows Task Scheduler to block these tasks from running on the Windows machine to gather and submit data.
The process may need to be repeated after driver updates, as things may be set to their default values when that happens.
Note: Windows may block the execution by default. You need to bypass Windows SmartScreen to run the program.
Disable Nvidia Telemetry
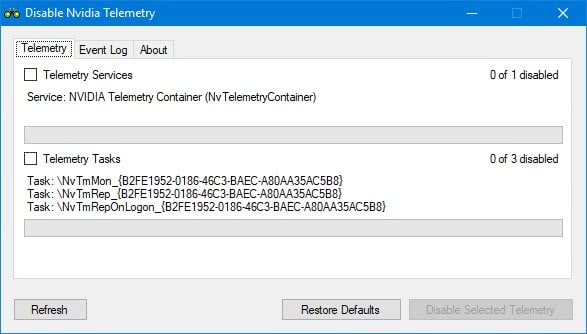
Disable Nvidia Telemetry is a free program for Windows that automates the process. The program’s project website is on GitHub, and you can check out the source of the application if you want, compile it, or download a compiled version instead.
The program does not have to be installed, and can be run from any location once you have extracted the archive it is delivered as.
The application scans the system for Nvidia Telemetry Services and Telemetry Tasks, and displays its findings in its interface. The scan should not take longer than a second to complete, and what you get is a list of these services and tasks that it identified as telemetry related.
You may use the application to disable these services or tasks. Simply check the box next to Telemetry Services or tasks, and hit the «disable selected telemetry» button afterwards to make the change.
There is a «restore defaults» button as well which you may use to restore the default status of these tasks and services.
The only other option the program offers at this point in time is a log file which lists events related to the scanning and changing of telemetry items on the Windows machine.
While you can use the program to disable Nvidia telemetry, you may use the information it provides to do so manually. It lists the name of the service and the tasks, so that you can do so without facing any greater issues doing so.
The advantages that the program offers are that it can make the relevant changes in a matter of seconds, and that you don’t have to investigate which tasks or services to disable.
Verdict
Disable Nvidia Telemetry is a handy program that relies on the author updating it whenever Nvidia changes Telemetry related tasks or services in updated driver versions. If that happens, it is probably the best tool right now for the job.
While I can see that some users prefer to manually disable these tasks and services, they may use the program to run the scan for the items to assist them with that.
Now You: What’s your take on the rise of telemetry related services?
Summary
Author Rating
Software Name
Disable Nvidia Telemetry
Operating System
Windows
Software Category
Administration
Landing Page
Advertisement
With data breaches and malware infections on the rise, taking your data privacy seriously is now more essential than ever. Without adequate protection in place, you’re leaking data about yourself to every website you visit and to every app you install—even to Microsoft itself, thanks to the Windows 10 telemetry system.
As part of its efforts to help troubleshoot the Windows 10 user experience, Microsoft logs data about the apps and features you use, your system information, your system settings, and more. If you’re worried about this data being shared, you can disable Windows 10 telemetry by following these steps.

What Is Windows 10 Telemetry?
Windows 10 isn’t the first Windows release to collect and share system data with itself, but Microsoft has certainly increased the amount of data it collects and shares in this release. Telemetry, as the practice is called, is how Microsoft does this.
Along with your general privacy settings, such as the data Windows collects to help serve advertisements or filter adult content, Microsoft also collects location data, information on your Windows usage, and other under-the-hood diagnostic information to help monitor and troubleshoot Windows across millions of PCs.
You can see the benefit for Microsoft, but there are some serious privacy concerns to be considered for the standard Windows user here. Microsoft has made it extremely hard to disable Windows 10’s telemetry settings for Windows 10 Home users, instead giving users the option to limit it to only basic data collection.

If you’re using Windows 10 Pro, Enterprise or Education, then you can disable telemetry entirely by editing the registry or using the Group Policy Editor, but this option is disabled for many users.
The choice is yours: you can leave telemetry enabled, and allow Microsoft to collect various bits of information about you, your location, and your activities. Alternatively, you can set telemetry to minimal settings (or disable it entirely) to cut Microsoft off from its data collection activities and put you back in control.
How To Limit Windows 10 Telemetry Data
As we’ve mentioned, Microsoft has prevented Windows 10 Home users from being able to completely disable telemetry data. If you want to limit your telemetry data sharing, you can do so from the Windows Settings menu.
- To access this menu, right-click the Start menu and click Settings. This will load the Windows 10 Settings menu in a new window.
- In the Windows Settings menu, click Privacy > Feedback & diagnostics to access your telemetry settings.
Under the Diagnostic and usage data section, you can change the various data collection levels. At the moment, these include options for basic data collection, which limits the information sent to Microsoft to only include system settings, hardware, and whether or not your system is working correctly.
Alternatively, you could choose full data collection, which sends all diagnostic data, including data on the websites you visit, apps and features you use, device health, and additional error data for troubleshooting.
- Select one of the options in this menu to choose between these options. The option you choose will be applied immediately.

In a future release of Windows 10, these settings will be changed to required diagnostic data (to replace basic data collection) and optional diagnostic data (to replace full data collection). The settings should remain the same, but with replaced setting names.
How To Complete Disable Telemetry In Windows 10 Pro, Enterprise and Education Editions Using GPEditor
While it isn’t an option for Windows 10 Home users, it is possible to disable telemetry data sharing for Windows 10 Pro, Enterprise and Education users.
There are two ways to do this. You can change your telemetry settings using the Group Policy Editor or by modifying the Windows Registry using the Windows Registry editor.
- To do this using the Group Policy Editor, press the Windows Key + R to open the Run command box. From there, type gpedit.msc and click OK.
- In the Group Policy Editor, use the left-hand menu to access Computer Configuration > Administrative Templates > Windows Components > Data Collection and Preview Builds. A list of settings will be visible on the right—double-click the Allow Telemetry setting.

- In the Allow Telemetry settings window, you can change your telemetry settings. Make sure to first click the Enabled option in the top-left corner to allow you to configure this here.
- Under Options, you can change your telemetry collection settings. These range from 0 (disabled) to 4 (full). Only Enterprise, Pro and Education users can set this to 0—if you have these editions, set this. Otherwise, set 0 for disable, 1 for basic or 3 for full. The 2 (enhanced) setting has been phased out, so setting this may result in Windows defaulting to a higher setting instead.

- Once your setting is applied, click OK to save. This will apply the new telemetry settings to your PC.

How To Complete Disable Telemetry In Windows 10 Pro, Enterprise and Education Editions Using Registry Editor
If you want to completely disable telemetry in Windows 10 Pro, Enterprise or Education, you can also use the Windows Registry Editor to do this.
Windows 10 Home users can also do this to change their telemetry settings, but you’ll only be able to limit data collection, rather than stop it completely. For Windows 10 Home users, it’s best to use the Windows 10 Settings menu instead.
- To start, open the Registry Editor by pressing the Windows Key + R and typing regedit into the Run command box that opens. Click OK to launch.
- In the Windows Registry Editor window, use the left-hand tree menu to access HKEY_LOCAL_MACHINE > SOFTWARE > Policies > Microsoft > Windows > DataCollection. In the right-hand panel, right-click and select the New > DWORD (32-bit) Value option.

- Name the new value as Allow Telemetry. Once it’s created, double-click the value to change the value.

- In the edit DWord (32-bit) Value box, type a value in the Value data box. These match the values used by the Group Policy Editor. You can choose 0 (disabled, for Windows 10 Pro, Enterprise and Education users), 1 (basic data collection, for all users), 2 (for enhanced collection, but no longer in use), or 3 (full data collection). Once you’ve made your choice, click OK to save.
Once the value has been edited, the telemetry setting you’ve chosen will be active. You can close the Registry Editor at this point.
Protecting Your Data On Windows 10
If you decide to disable Windows 10 telemetry, you’ll be limiting the amount of personalized support Microsoft can offer to help troubleshoot issues you come across using its operating system. There are no risks to disabling telemetry, however, so if you prefer to limit the data being shared, you should disable it.
Of course, there are other ways you can protect your data while you’re using Windows. You should first check to see if your data has been compromised online and, if it has, change your passwords immediately. If you’re really worried, consider encrypting your hard drive to stay in total control of your data.
Related Posts
- How to Fix a “This file does not have an app associated with it” Error on Windows
- How to Fix an Update Error 0x800705b4 on Windows
- How to Resolve “A JavaScript error occured in the main process” Error on Windows
- How to Fix the Network Discovery Is Turned Off Error on Windows
- How to Change Folder Icons in Windows