
Распределенная файловая система DFS ( Distributed File System) – это технология, обеспечивающая возможности упрощения доступа к общим файловым ресурсам и глобальной репликации данных. Благодаря DFS распределённые по различным серверам общие ресурсы (каталоги и файлы) можно объединить в единую логическую UNC структуру, которая для пользователя выглядит, как единый сетевой ресурс. Даже при изменении физического местоположения целевой папки, это не влияет на доступ пользователя к ней.
Реализация служб DFS в Windows Server 2012 отличается от предыдущих версиях Windows. В первую очередь отметим, что технологии DFS в Windows Server 2012 реализованы в виде двух отдельных, независимых друг от друга служб — DFS Namespaces и DFS Replication , включенных в роль файлового сервера (File and Storage Services).
- DFS Namespaces (DFSN или DFS-N) – пространство имен DFS. Позволяет объединять в единую логическую структуру общие папки, расположенные на различных серверах организации. Каждое пространство имен для пользователя выглядит как единая сетевая папка с подкаталогами. Реальная структура данного пространства имен DFS является скрытой от пользователя, и может включать в себя различные сетевые папки, расположенные на различных серверах и сайтах.
- DFS Replication (DFSR или DFS-R) — служба DFS репликации. Позволяет организовать эффективную службу репликации каталогов (в том числе включенных в пространство имен DFS) между различными серверами и сайтами AD. Данная служба для репликации использует специальный алгоритм удаленного разностного сжатия – RDC- remote differential compression. Благодаря RDC, которая отслеживает изменения в файлах, при репликации копируются не файлы целиком (как в случае с FRS репликацией), а только их блочные изменения.
Установка служб DFS в Windows Server 2012
Установить службы DFS можно с помощью консоли Server Manager или же при помощи Windows PowerShell.
Как мы уже говорили, службы DFS являются элементами роли Files and Storage Services:

Но проще и быстрее установить все DFS службы и консоль управления DFS с помощью PowerShell:
Install-WindowsFeature FS-DFS-Namespace, FS-DFS-Replication, RSAT-DFS-Mgmt-Con

Совет. Естественно, службы и консоль управления DFS можно установить и по отдельности.
, где FS-DFS-Namespace – служба DFS Namespaces
FS-DFS-Replication – служба репликации DFS Replication
RSAT-DFS-Mgmt-Con– mmc консоль управления службами DFS — DFS Management Tools (также входит в состав Remote Server Administration Tools для Windows 10)
Настройка пространства имен DFS в Windows Server 2012
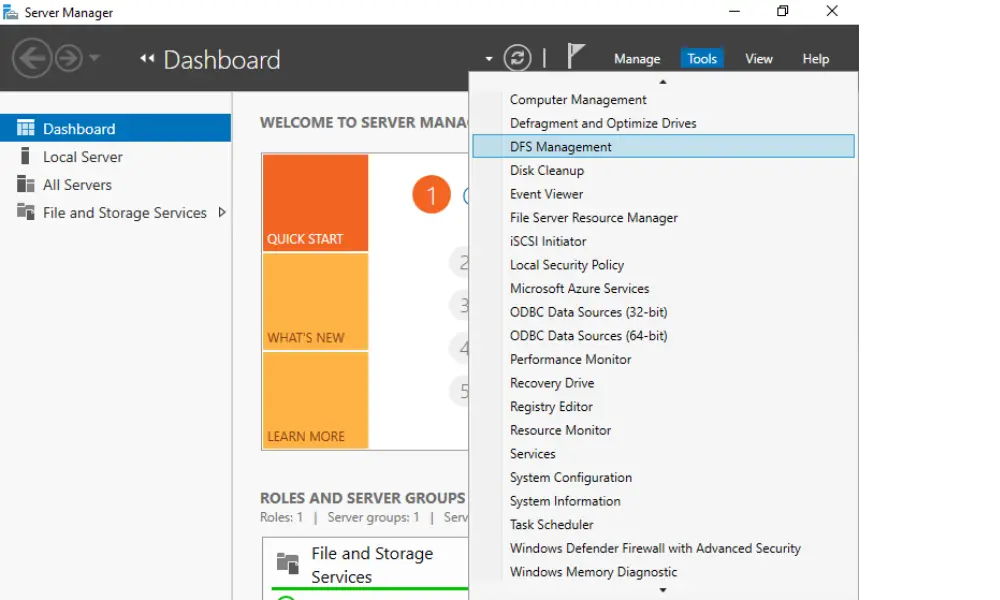
Перейдем к описанию процедуры настройки пространство имен DFS, для чего необходимо открыть панель управления DFS Management tool.
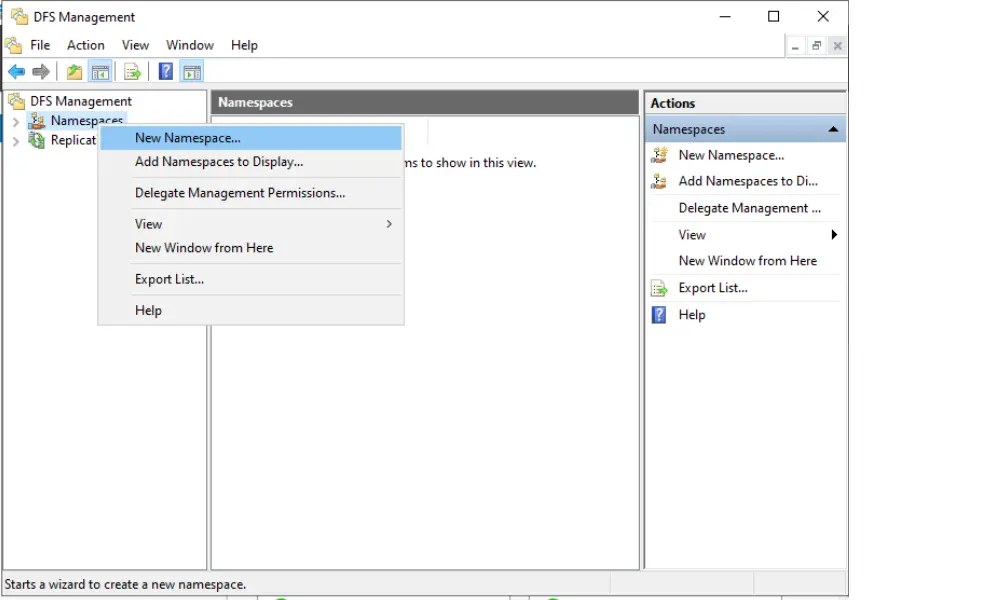
Создадим новое пространство имен (New Namespace).

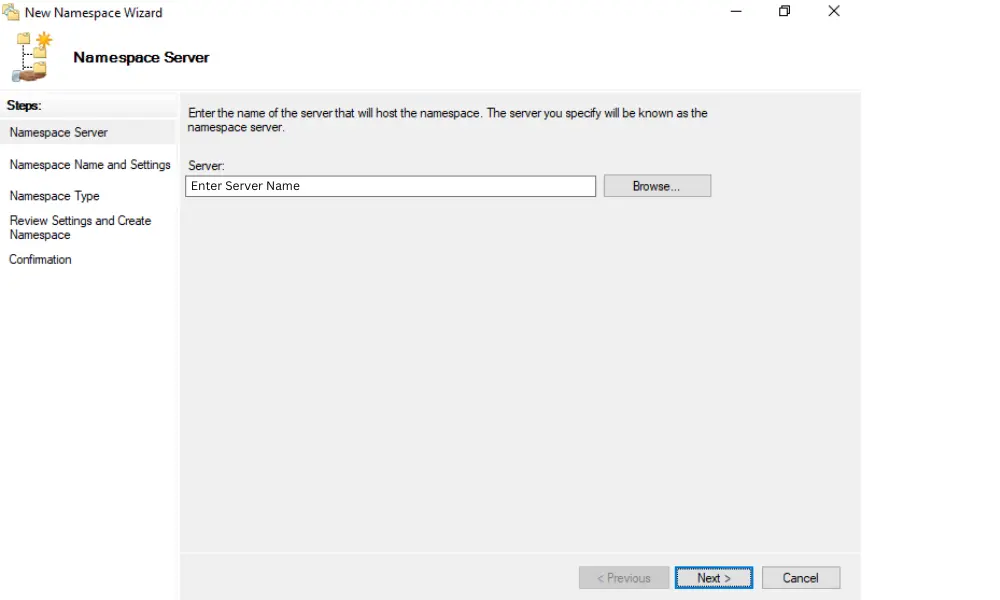
Необходимо указать имя сервера, который будет содержать пространство имен (это может быть как контроллер домена, так и рядовой сервер).

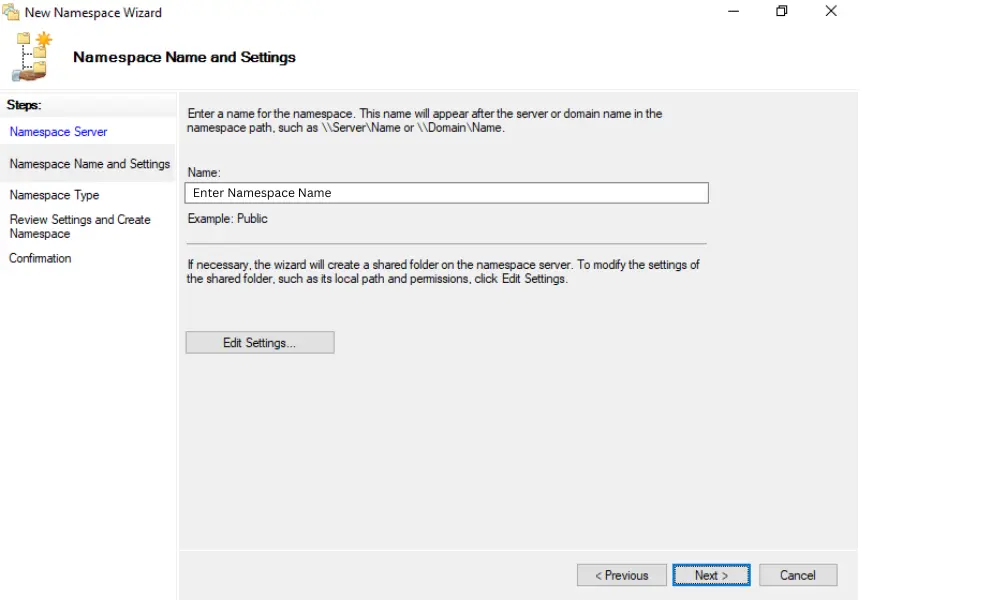
Затем следует указать имя создаваемого пространства имен DFS и перейти в расширенные настройки (Edit Settings).

Здесь следует указать имя пространства имен DFS и права доступа к данному каталогу. Обычно рекомендуется указать, что доступ к сетевой папке разрешен Всем (Everyone), в этом случае права доступа проверяются на уровне файловой системы NTFS.

Далее мастер предложит указать тип создаваемого пространства имен. Это может быть Domain-based namespace (доменное пространство имен) или Stand-alone namespace (отдельное пространство имен). Domain-based namespace обладает ряд преимуществ, но для его работы нужен, собственно домен Active Directory и права администратора домена (либо наличие делегированных прав на создание доменных пространств имен DFS).

После окончания работы мастера в ветке Namespaces консоли управления DFS появится созданное нами новое пространство имен DFS. Чтобы пользователи при доступе к DFS каталогам видели только те каталоги, к которым у них имеется доступ, включим для данного пространства DFS Access-Based Enumeration (подробнее о данной технологии в статье Access-Based Enumeration в Windows). Для этого откройте окно свойств созданного пространства имен.

И на вкладке Advanced включите опцию Enable access-based enumeration for this namespace.

Чтобы посмотреть содержимое нового пространства DFS, просто наберите в окне проводника UNC путь: \\имя_домена_или_сервера\DFS
Добавление дополнительного DFS сервера
В доменное пространство имен DFS можно добавить дополнительный сервер (пункт меню Add Namespace Server), который его будет поддерживать. Делается это для увеличения доступности пространства имен DFS и позволяет разместить сервер пространства имен в том же сайте, в котором находится пользователи.
Примечание. Отдельно стоящие пространства имен DFS поддерживают только один сервер.
Добавление нового каталога в существующее пространство имен DFS
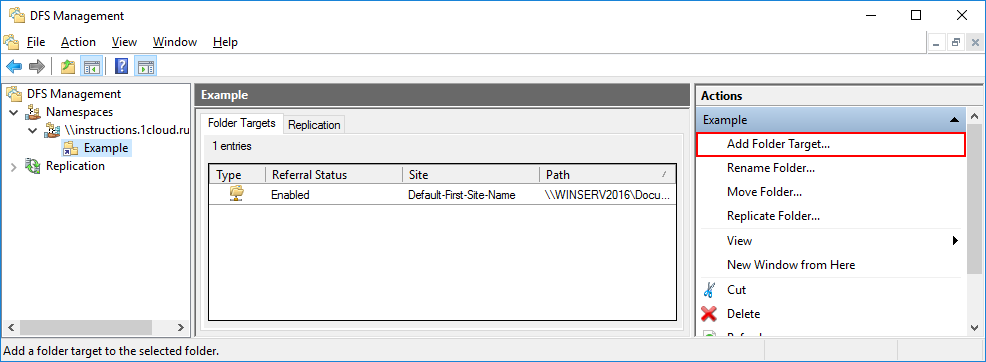
Теперь нужно добавить новый сетевой каталог в иерархию созданного нами пространства имен DFS. Нажмите кнопку Add Folder Target.

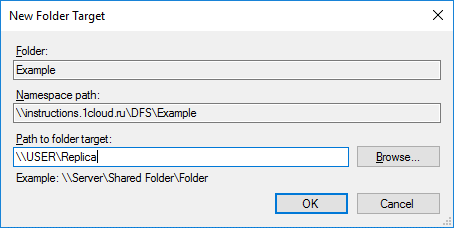
Укажите наименование каталога в DFS пространстве и его реальное местоположение на существующем файловом сервере (Folder targets).

Настройка DFS-репликации на Windows Server 2012
Технология репликации DFS-R предназначена для организации отказоустойчивости пространства имен DFS и балансировки нагрузки между серверами. DFS-R автоматически балансирует трафик между репликами в зависимости от их загрузки и в случае недоступности одного из серверов перенаправляет клиентов на другой сервер-реплику. Но прежде, чем говорить о DFS репликации и ее настройке в Windows Server 2012перечислим основные системные требования и ограничения:
- Служба DFS Replication должна быть установлена на всех серверах, которые планируется включить в группу репликации
- Все сервера в группе репликации должны находиться в одном лесу AD
- Уровень леса Active Directory должен быть как минимум Windows Server 2003 R2 (при установке первого домена контроллера на Windows Server 2012 схема обновляется автоматически).
- Функциональный уровень домена — как минимум Windows Server 2008
- Необходимо убедиться, что антивирусное обеспечение на файловых серверах совместимо с технологией репликации DFS
- Реплицируемые каталоги должны располагаться на томах с файловой системой NTFS (файловые системы ReFS и FAT не поддерживаются). Также не поддерживается репликация данных, хранящихся на on Cluster Shared Volumes
В консоли DFS Managment выберите нужный вам DFS Namespace и щелкните ПКМ по каталогу, для которого необходимо создать реплику и выберите пункт Add Folder Target.
И укажите полный (UNC) путь к сетевому каталогу другого сервера, в котором и будет храниться реплика.
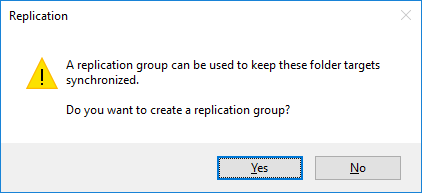
На вопрос хотите ли вы создать группу репликации отвечаем Yes.

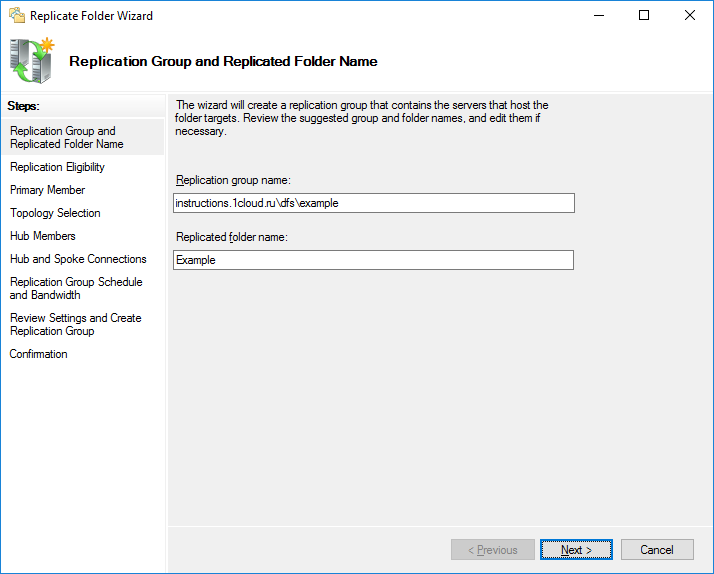
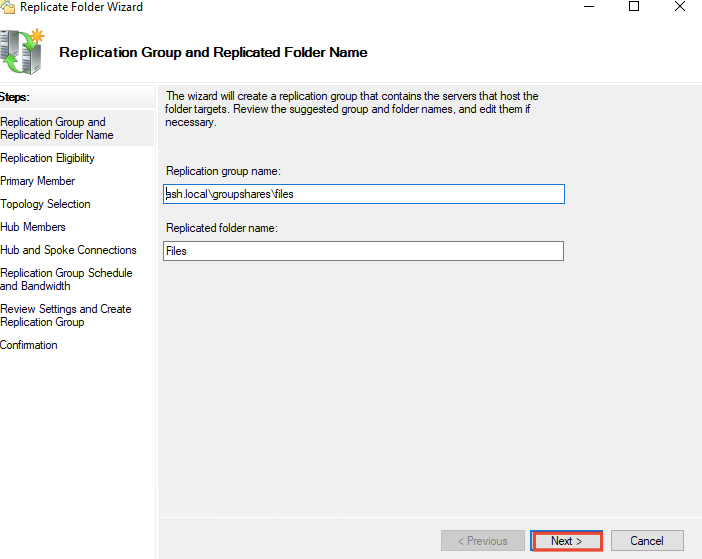
Запускается мастер настройки репликации. Проверяем имя группы репликации и каталог.


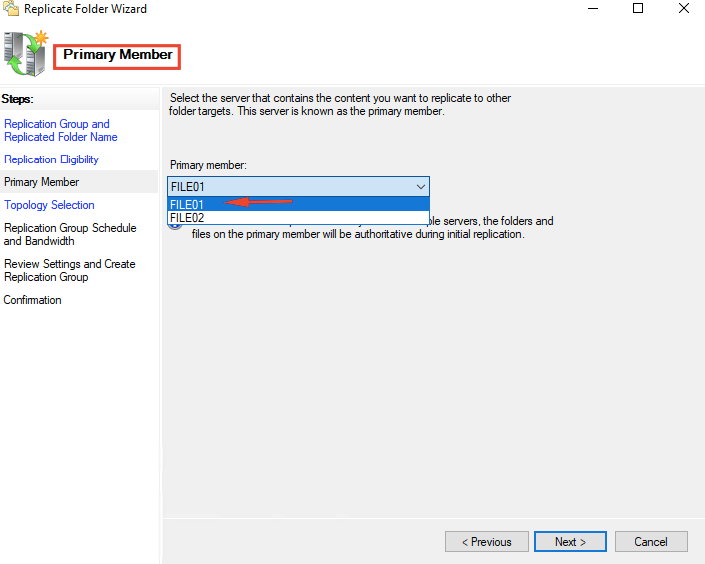
Указываем первичный (Primary) сервер. Именно этот сервер будет источником данных при инициальной (первичной) репликации.
 dfs сервер")
Затем выбираем тип топологии (соединения) между членами группы репликации. В нашем примере выбираем Full Mesh (все со всеми).

И, наконец, указываем расписание репликации и параметры bandwidth throttling – ограничение доступной для репликации полосы пропускания.

После окончания работы мастера, запуститься первоначальная синхронизация.
В случае необходимости, настройки расширенных параметры расписания репликации и максимальную полосу пропускания под данный трафик, можно задать в ветке Replication.

Click Start, point to All Programs, point to Administrative Tools, and then click Server Manager. In the console tree of Server Manager, right-click the Files Services node, and then click Add Role Services.
How do I run Dfsutil EXE?
That’s it, dfsutil is now available from Command Prompt and PowerShell; no reboot is needed.
…
So, the full answer is:
- Open Windows 10 settings.
- Search for ‘Manage optional features’
- Click on ‘Add a feature’
- Choose the package ‘RSAT: File Services Tools’ and click ‘Install’
How do I access DFS management console?
Open Server Manager, click Manage, and then click Add Roles and Features. The Add Roles and Features Wizard appears. On the Server Selection page, select the server or virtual hard disk (VHD) of an offline virtual machine on which you want to install DFS. Select the role services and features that you want to install.
How do I enable DFS in Windows 10?
Click Start, point to Administrative Tools, and then click DFS Management. In the console tree, under the Namespaces node, right-click a namespace, and then click Properties. On the Referrals tab, select the Clients fail back to preferred targets check box.
How do I check my DFS path?
Press the Windows Key + E together to open File Explorer. Expand the Quick Access in the left Navigation Pane. Locate and click DFS. The details pane will list the DFS root folders, which you can select.
How do I find my DFS server?
Go to the DFS Mangement Console, expand out Namespaces, and make sure you see the Namespace you are looking for. If you don’t, then right click Naemspaces and choose Add Namespaces to Display… , and select the Namespace you are looking for. Once you have the Namespace visible, simply click on the namespace.
Where can I find DFS path?
How do I troubleshoot DFS replication issues?
Check for bandwidth throttling.
- Start DFS Management.
- Expand Replication.
- Click on the replication group for the namespace.
- Click on the Connections tab.
- Right-click the replication group member and select Properties.
- Make sure Enable replication and RDC are checked.
- Click the Schedule tab.
- Click View Schedule.
How do I access DFS namespace?
Configuring DFS Namespaces
- Go to DFS Management.
- Right click on Namespaces in the left panel and click New Namespace.
- Enter the name of the server.
- Provide a name for the Namespace.
- You can choose to edit the local path of the shared folder.
- Choose either a Domain-based or Stand-alone Namespace.
How do I manually start DFS replication?
Click Start, point to Administrative Tools, and then click DFS Management. In the console tree, under the Namespaces node, right-click a folder that has two or more folder targets, and then click Replicate Folder. Follow the instructions in the Replicate Folder Wizard.
How do I activate DFS?
Enabling Server
- Open Server Manager, click on Manage -> Add Roles and Features.
- Click Next to start set up.
- Select role-based or feature based installation.
- Select the server.
- The next section is Server Roles under file and storage services.
- Hit next twice to confirm features and install.
What does enable Windows Server 2008 mode option do?
Also, you can choose the Enable Windows Server 2008 mode (enabled by default) which sets up the namespace with increased scalability and access-based enumeration ABE. ABE means that end users only see the files presented which they have access to.
How do I identify a DFS server?
Right-click a folder in the DFS share. Select the DFS tab. It will show the server you’re currently connected to.
How do I find my DFS root server?
However, to be certain, open the Microsoft Management Console (MMC) Dfs snap-in, and in the left pane you’ll see an icon next to the name of the root, as the figure shows. If the icon shows two servers, it’s a fault-tolerant root, which stores its information in AD.
How do I check my DFS replication status?
Get-DfsrState:
This command shows you the current replication state of DFS-R in regard to its DFS replication group partners.
What is my DFS root?
DFS root is an object in the Microsoft Active Directory system used for sharing files and folders across network. DFS root is the starting point of the DFS namespace. DFS root is an object which consolidates your network shared folders and makes them available to network users as a single entry point.
Does DFS need to be on a domain controller?
It may seem tempting, but domain controllers should never have the DFS Namespace service disabled. Clients require access to the DFS service of domain controllers to enumerate trusted domains, obtain lists of available domain controllers, and to process domain namespace referral requests.
How do I check my DFS backlog?
To check DFSR backlog, run following commands on one of your DFRS servers.
- dfsrdiag backlog /rgname:<REPLICATION_GROUP_NAME> /rfname:<REPLICATED_FOLDER_NAME> /smem:<SERVER_1> /rmem:<SERVER_2>
- dfsrdiag backlog /rgname:<REPLICATION_GROUP_NAME> /rfname:<REPLICATED_FOLDER_NAME> /smem:<SERVER_2> /rmem:<SERVER_1>
How do I fix DFS replication problem?
How do I enable DFS replication?
Configure DFS Replication
- To configure DFS, click the start menu and navigate to ‘Control Panel –> Administrative Tools –> DFS Management.
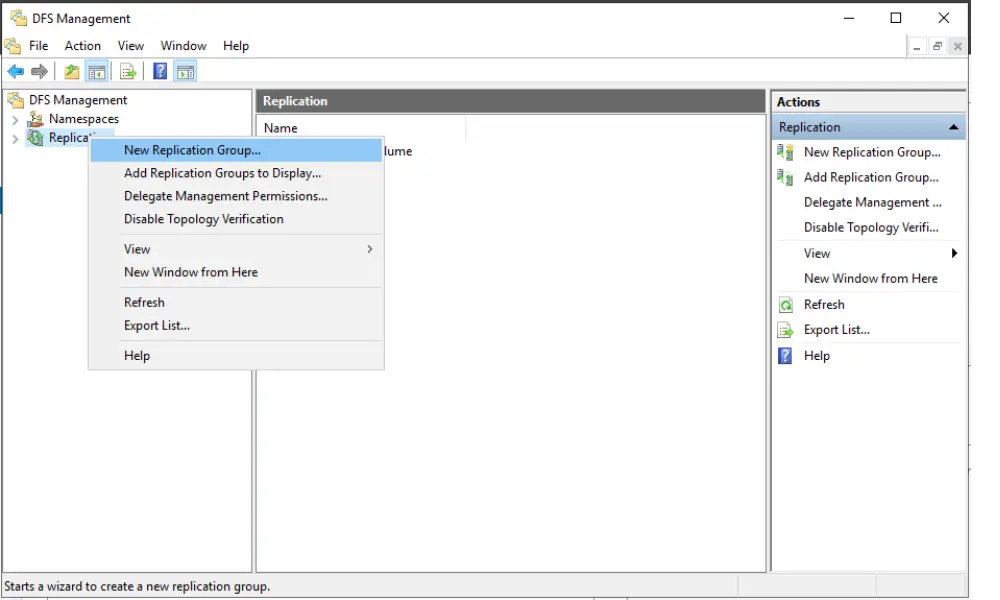
- Right click ‘Replication’ and select ‘New Replication Group…’
- Select ‘Replication group for data collection.
Where are DFS files stored?
The DFS topology data for domain-based namespaces is stored in Active Directory. The data includes the DFS root, DFS links, and DFS targets. Each DFS tree structure has one or more root targets. The root target is a host server that runs the DFS service.
How do I check DFS logs?
How to check Event Viewer Logs for DFSR errors
- Open Event Viewer.
- Expand Application and Services Logs.
- Click in DFS Replication to find all the logs related with DFSR.
- Find out lot of Warnings that i created intentionally just to see errors and not only Informational Logs.
How do I test a DFS namespace?
Five ways to check your DFS-Namespaces (DFS-N) configuration with the DFSDIAG. EXE tool
- Checking domain controller configuration.
- Checking site associations.
- Checking namespace server configuration.
- Checking individual namespace configuration and integrity.
- Checking referral responses.
What ports does DFS use?
Distributed File System Namespaces
| Application protocol | Protocol | Ports |
|---|---|---|
| LDAP Server | UDP | 389 |
| SMB | TCP | 445 |
| RPC | TCP | 135 |
| Randomly allocated high TCP ports¹ | TCP | random port number between 1024 – 65535 random port number between 49152 – 65535² |
Why is DFS not replicating?
The DFS Replication service stopped replication on volume C:. This failure can occur because the disk is full, the disk is failing, or a quota limit has been reached. This can also occur if the DFS Replication service encountered errors while attempting to stage files for a replicated folder on this volume.
DFS Replication on Windows Server is a robust solution for synchronizing data across multiple servers, ensuring high availability, and optimizing network performance. This article is a treasure trove of insights for IT professionals looking to configure DFS Replication on Windows Server 2019 or 2022. We’ll delve into the intricacies of how to configure DFS namespaces, DFS replication, set DFS shares, and the steps to set up a DFS environment that stands the test of time and scale.
Understanding DFS in Windows Server
The Distributed File System (DFS) is a set of client and server services that allow an organization using Microsoft Windows servers to organize many distributed SMB file shares into a hierarchical namespace. This system provides a tree-like structure that logically represents file data sources across the network.
At its core, DFS offers two key components: DFS Namespaces and DFS Replication. DFS Namespaces enables the creation of a single namespace that aggregates various shared folders from different servers. DFS Replication, on the other hand, synchronizes folder content across multiple servers to ensure copies of the data are consistent and up-to-date.
The implementation of DFS Replication and DFS Share brings forth numerous advantages:
- Centralized Management: Administrators can manage and structure shared folders scattered across the network from a single interface, reducing complexity and improving efficiency.
- Enhanced Accessibility: Users can access and share files as if they were located on a local drive, regardless of where the data is physically stored, which is transparent to the end-user.
- Network Optimization: DFS Replication minimizes network traffic by replicating only the changes in data, thanks to the Remote Differential Compression technology.
- Improved Data Availability: By replicating data across multiple servers, DFS ensures high availability, making it resilient to server failures.
- Disaster Recovery: DFS Replication can be part of a disaster recovery strategy, as it allows data to be stored in multiple locations, safeguarding against site-specific catastrophes.
- Load Balancing: DFS uses the nearest server concept, which can reduce the load on any single server and optimize response times for end-users.
DFS Key Terms and Concepts
- Namespace: A virtual view of shared folders in the network that appears to users as one consolidated folder structure.
- Replication Group: A set of servers, known as replication group members, that participate in the replication of one or more shared folders.
- DFS Link: A shortcut within a DFS namespace that points to one or more shared folders on the network.
- Namespace Server: A server that hosts a DFS namespace and maintains information about the namespace’s structure and the shared folders’ location within it.
- Folder Target: The shared folder in a DFS namespace to which a DFS link points.
- DFS Topology: The layout that defines how folders are replicated between servers, which can be a hub-and-spoke, full mesh, or custom topology.
- Remote Differential Compression (RDC): A compression algorithm that detects changes to data and enables DFS Replication to replicate only the changed file blocks instead of the entire file.
Prerequisites for Configuring DFS Replication
Before diving into the configuration of DFS, it’s crucial to ensure that your system meets all necessary prerequisites and that you’ve performed all compatibility checks. This preparation is the foundation upon which a reliable and effective DFS setup is built.
System Requirements and Compatibility Checks
To implement DFS, you need to have a network environment running Windows Server. Here are the specific system requirements and compatibility considerations:
- Operating System: DFS is supported on Windows Server 2008 and later versions. For the latest features and best performance, use the most recent version of Windows Server.
- File System: The volumes that host DFS replicated folders must be formatted with the NTFS file system to maintain file and folder permissions.
- Server Hardware: Ensure that the server hardware is capable of handling the expected load. This includes adequate RAM, CPU, and network bandwidth to support the replication process without degrading performance.
- Network Infrastructure: A reliable network infrastructure is required to support DFS, with sufficient bandwidth to handle peak loads and the ability to connect to all replication partners.
Necessary Roles and Features for DFS
Certain roles and features must be installed on your Windows Server to use DFS. These include:
- DFS Namespaces: This role service enables you to group shared folders located on different servers and present them to users as a single namespace.
- DFS Replication: This role service is used to replicate data across multiple servers efficiently.
- File Services: The broader role that includes DFS, which must be installed and configured before setting up DFS.
Active Directory Considerations
DFS relies on Active Directory Domain Services (AD DS) for configuration and replication. Here are some Active Directory considerations:
- Domain Membership: All servers participating in DFS Replication must be members of the same Active Directory domain or trusted domains.
- Site Configuration: Active Directory sites should be properly set up to match the physical network topology, as DFS use site information to optimize replication traffic.
- Permissions: The account used to set up DFS on Windows must have appropriate permissions in Active Directory, including the ability to create and manage AD DS objects related to DFS.
- Schema Version: Ensure that the Active Directory schema version supports DFS. For instance, if you’re using features specific to Windows Server 2016 or 2019, the schema must include these versions.
Installing DFS Namespaces and DFS Replication Roles
Installing DFS roles is a straightforward process, it can be installed utilizing the user-friendly Server Manager with its graphical interface or using PowerShell.
Installing DFS Roles Using Server Manager
This section involves using Server Manager to add necessary roles and features. Here’s how to do it:
Adding DFS Namespaces and DFS Replication Roles
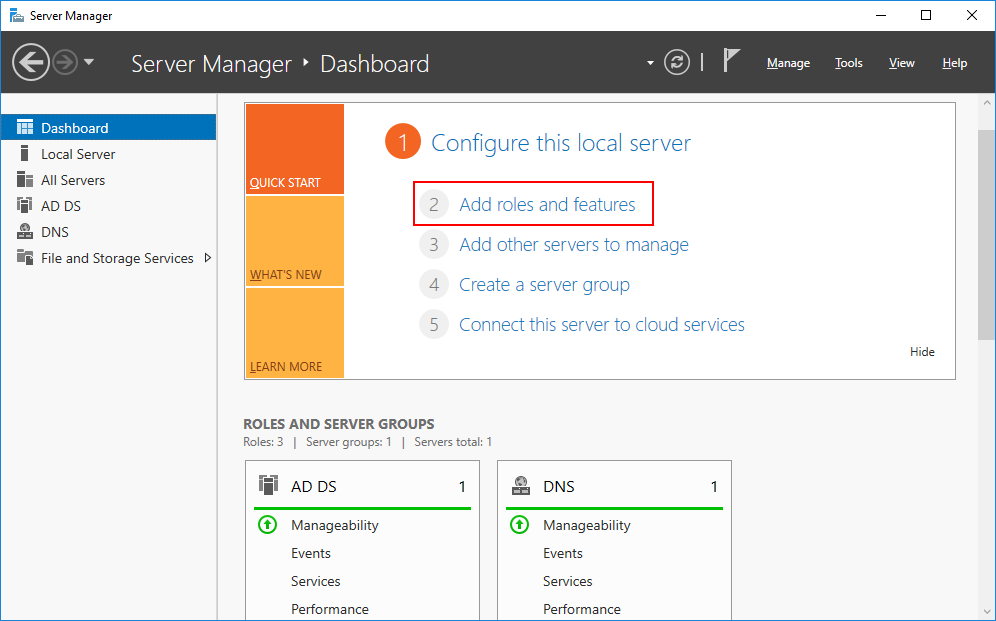
- Launch the Add Roles and Features Wizard: From the Server Manager dashboard, click on “Add roles and features” to start the wizard.
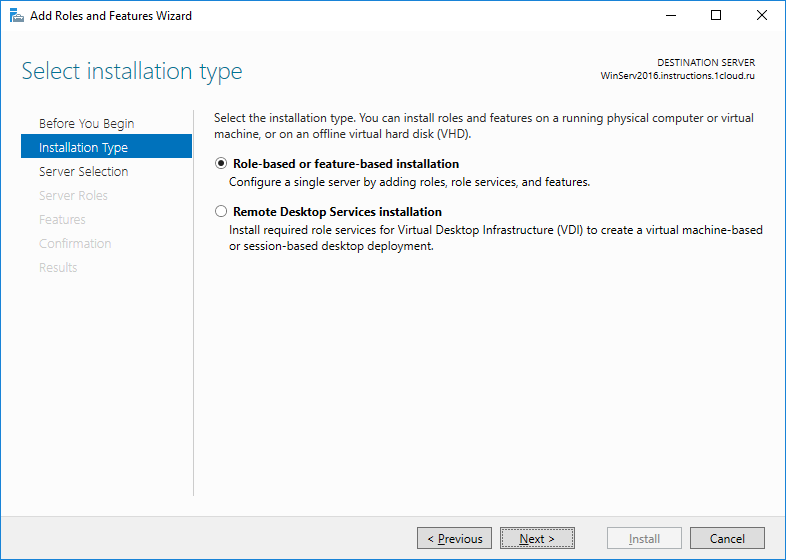
- Installation Type: Select “Role-based or feature-based installation” and click “Next.”
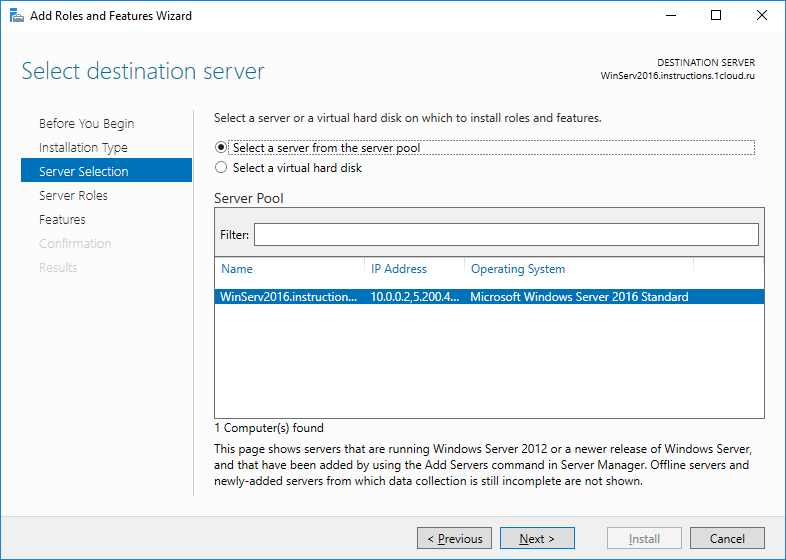
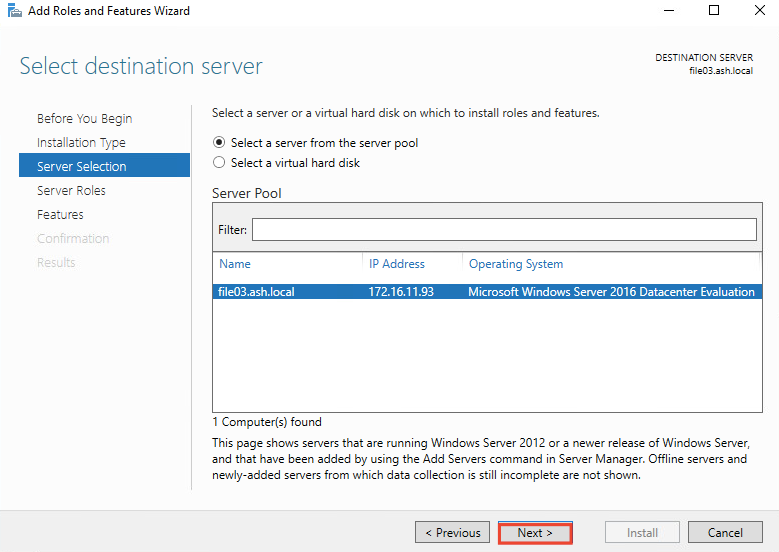
- Select Destination Server: Choose the server you want to install DFS roles from the server pool and click “Next.”
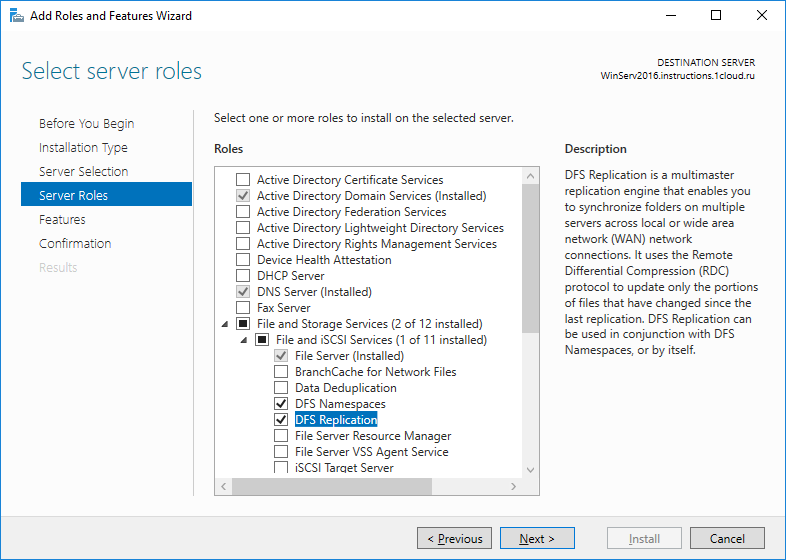
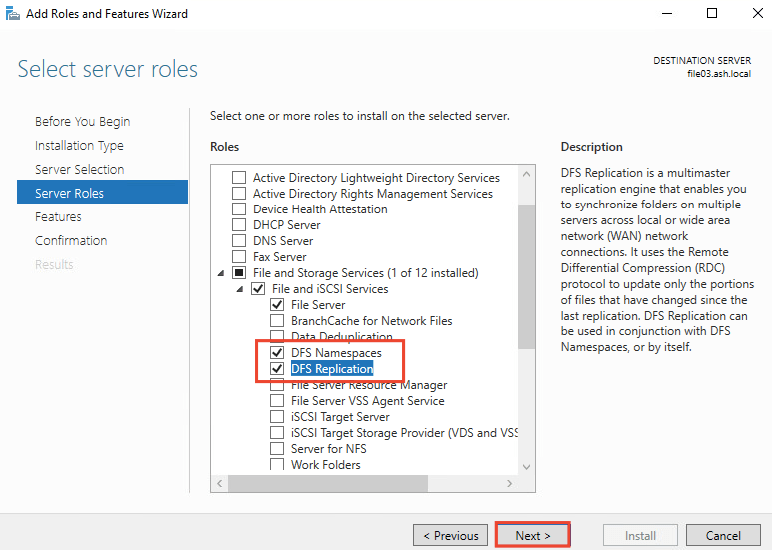
- Select Server Roles: In the list of roles, find and expand the “File and Storage Services” section. Then, expand “File and iSCSI Services.”
- Choose DFS Roles: Select “DFS Namespaces” and “DFS Replication.” You may receive a prompt to add features that are required for DFS; accept these prompts to proceed.
- Additional Features: The wizard may suggest additional features necessary for DFS. Review these and add any that are appropriate for your setup.
- Confirmation: Review your selections on the confirmation page. You can also choose to restart the server automatically if needed after the installation. It’s recommended to check this option to ensure a complete setup.
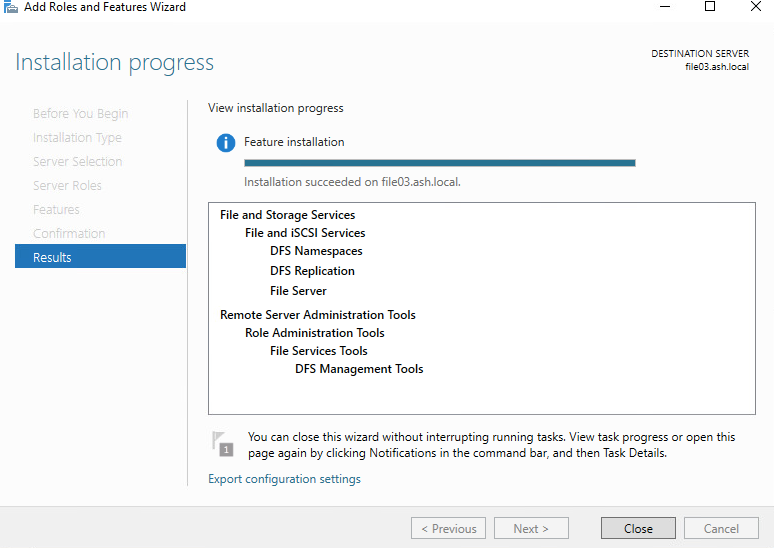
- Install: Click “Install” to begin the installation process. The wizard will display the installation progress.
Installing DFS Roles Using PowerShell
To use PowerShell to install DFS Replication and the DFSR RSAT management tools, use the following cmdlet:
#
# PowerShell CmdLet to install DFS Namespace and DFS Replicaiton Roles
#
Install-WindowsFeature "FS-DFS-Namespace","FS-DFS-Replication","RSAT-DFS-Mgmt-Con"
#
Creating a DFS Namespace
Creating a DFS Namespace is a strategic process that involves careful planning and execution. A well-thought-out namespace serves as the framework for your organization’s file storage and access strategy. Here’s how to create a DFS Namespace effectively.
Planning Namespace Structure
Before you jump into configuring DFS, it’s vital to plan your namespace structure. Consider the following:
- Assess Current and Future Needs: Understand the current file storage needs and anticipate future growth. This will help determine the number and type of namespaces required.
- Design the Namespace Hierarchy: Decide on a hierarchy that reflects your organization’s structure or workflow. A logical and intuitive structure makes it easier for users to find the files they need.
- Choose a Namespace Type: Decide between a domain-based namespace and a stand-alone namespace. Domain-based namespaces offer greater scalability and are stored within Active Directory, allowing for easier management and redundancy.
- Naming Conventions: Establish clear naming conventions for namespaces and folder targets to maintain consistency and avoid confusion.
Steps To Create a Domain-Based DFS Namespace
Once you have a plan in place, follow these steps to create a domain-based DFS Namespace:
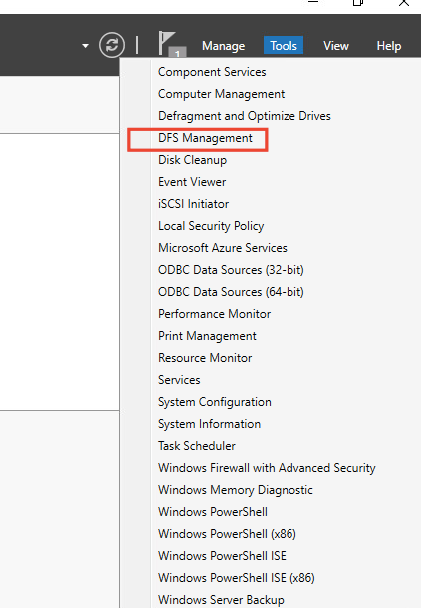
1. Launch DFS Management Console:
On your server, open the DFS Management console from the Server Manager or by searching for it in the start menu.
2. Create New Namespace
In the DFS console, right-click on ‘Namespaces’ and select ‘New Namespace’ to launch the New Namespace Wizard.
3. Enter the Namespace Server
Provide the name of the server that will host the namespace. This server should be a domain controller or a member server.
4. Define the Namespace
Enter a name for the namespace that adheres to your naming conventions.
5. Namespace Settings
Choose the domain-based namespace option and set the desired settings. Enable Windows Server 2008 mode for additional features like access-based enumeration and increased scalability.
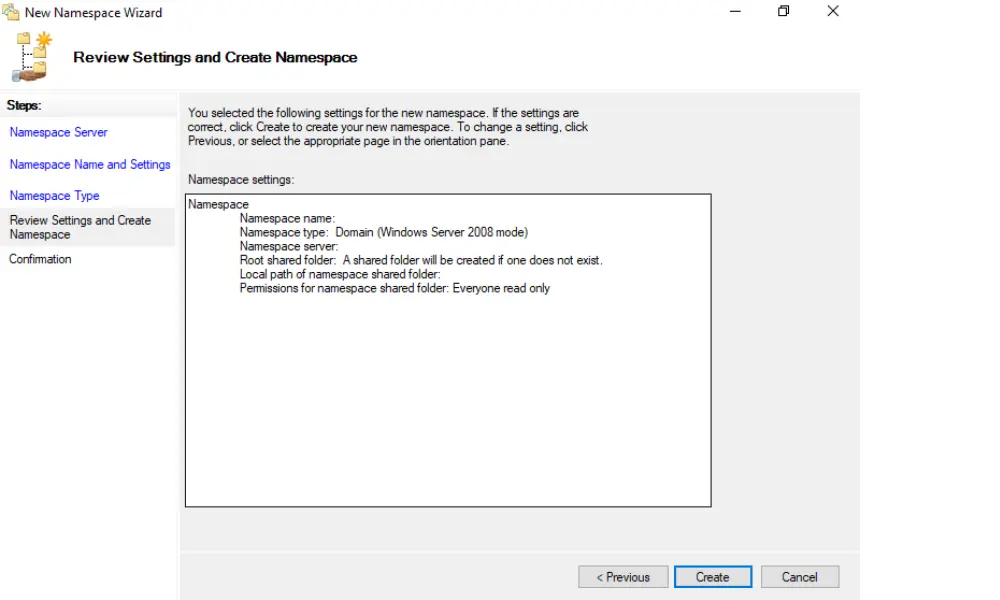
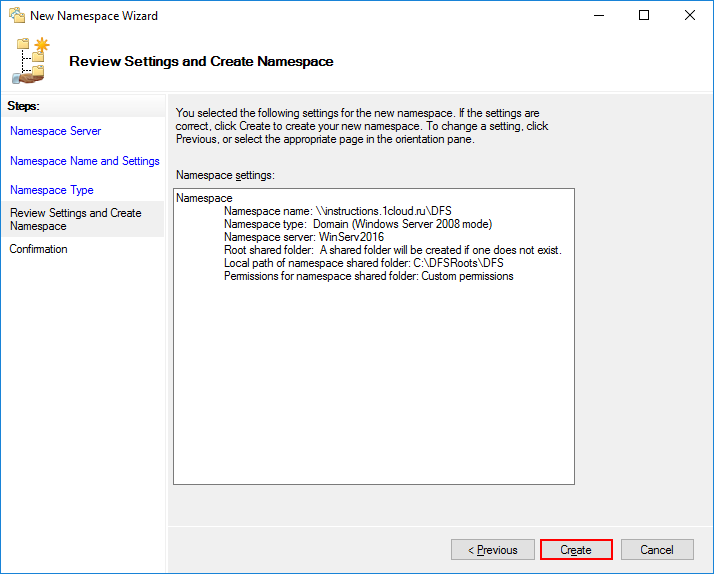
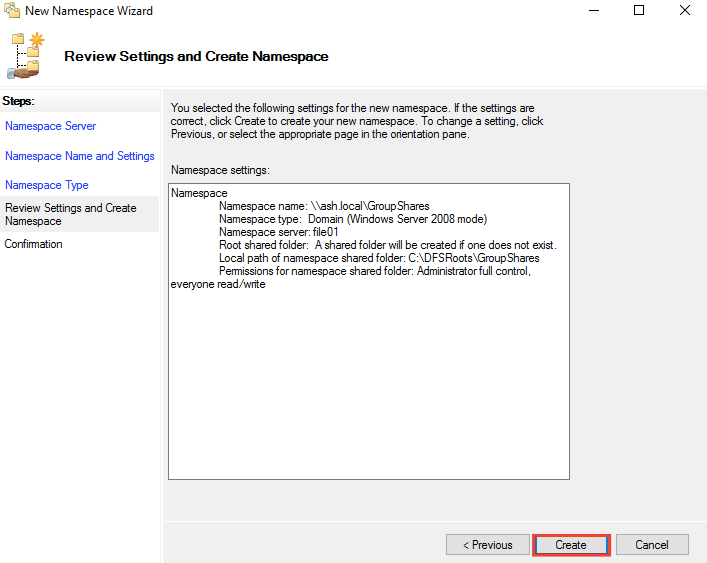
6. Review and Create
Review your settings and click ‘Create’ to deploy your new namespace.
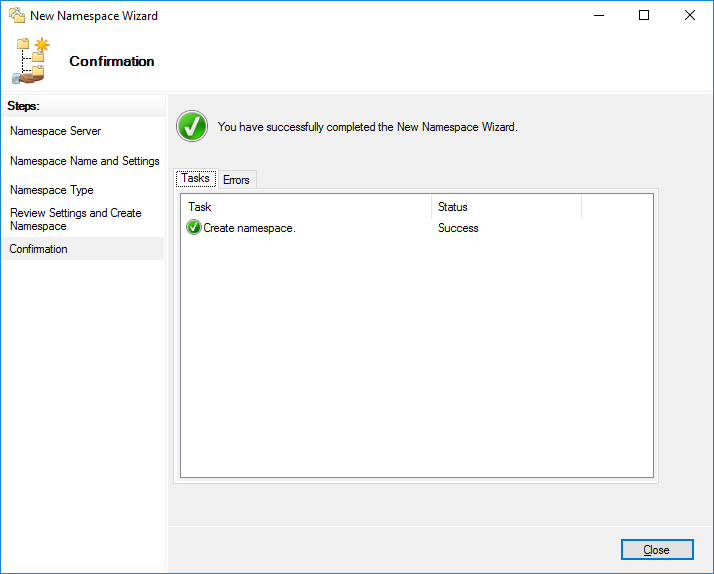
7. Confirmation of Successful DFS Namespace Creation
Once you have successfully created DFS Namespace, proceed by clicking the [Close] button.

Configuring Namespace Properties and Permissions
After creating the namespace, you need to configure its properties and permissions:
- Configure Namespace Properties: Right-click on the namespace you created and select ‘Properties.’ Here, you can set various properties, such as enabling access-based enumeration, which allows users to see only the files and folders they have permission to access.
- Set Folder Targets: Add folder targets to your namespace by right-clicking on the namespace in the DFS Management console and selecting ‘New Folder.’ Provide a name for the folder and the path to the shared folder it should point to.
- Set up Permissions: Use the ‘Security’ tab in the properties of each namespace folder to configure NTFS permissions. Ensure that you grant permissions according to the principle of least privilege, providing users with only the access levels they need to perform their jobs.
- Replication (Optional): If you want to replicate the folder targets, you can set up replication by creating a new replication group and adding the folder targets as replicated folders within the group.
Setting Up DFS Replication
Distributed file system replication is a key feature that allows for the synchronization of files across multiple servers, ensuring that the same data is available across different geographic locations. This process is crucial for businesses that require high availability and consistency of data.
Overview of the DFS Replication Process
DFS Replication uses a multi-master replication model, which means that any member of the replication group can receive updates and replicate those changes to other members of the group. This model is efficient and reliable, ensuring that if one server goes down, the others can continue to provide access to the shared data. The replication is based on the Remote Differential Compression (RDC) protocol, which transfers only the changed portions of files, reducing the amount of data sent across the network and improving replication efficiency.
Creating a Replication Group
To set up DFS Replication, you first need to create a replication group, which is a collection of file servers that will synchronize data among themselves. Here’s how to create one:
1. Open DFS Management:
Launch the DFS Management console from the Server Manager or by searching for it in the start menu.

2. Create a New Replication Group
Right-click on ‘Replication’ and select ‘New Replication Group’ to start the New Replication Group Wizard.
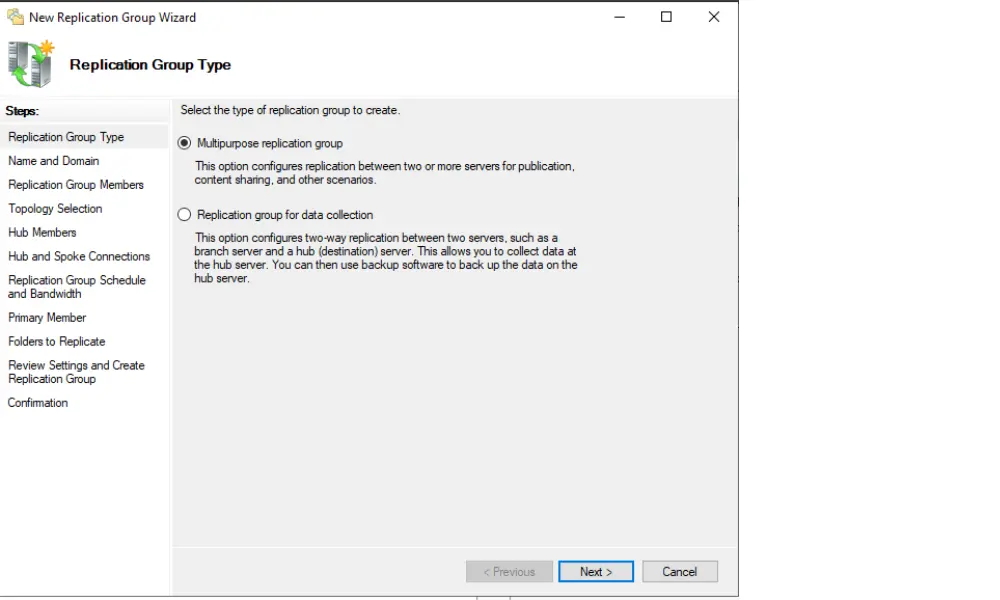
3. Select Group Type
Choose the ‘Multi-purpose replication group’ option for the most flexibility and enter a name for the group.
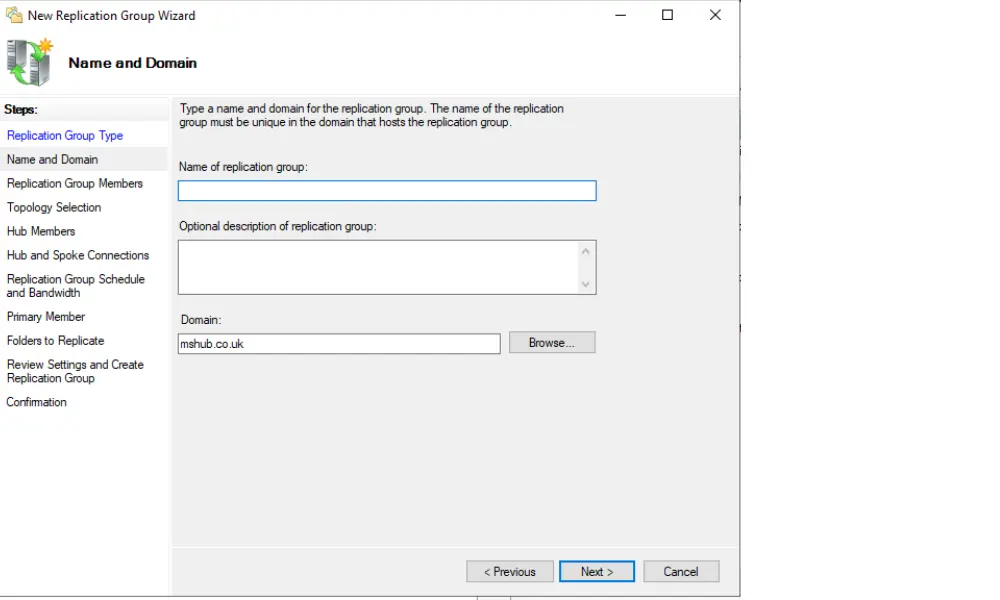
4. Name the Replication Group
Enter a name for the replication group that adheres to your naming conventions.
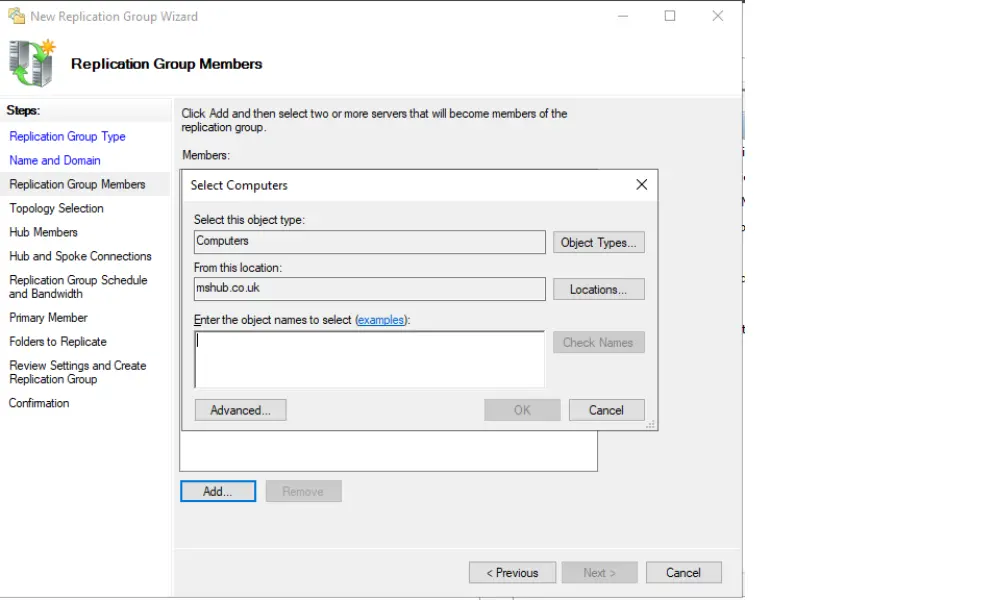
5. Add Replication Group Members
Add server names that will become members of the replication group.
6. Configure Replication Topology
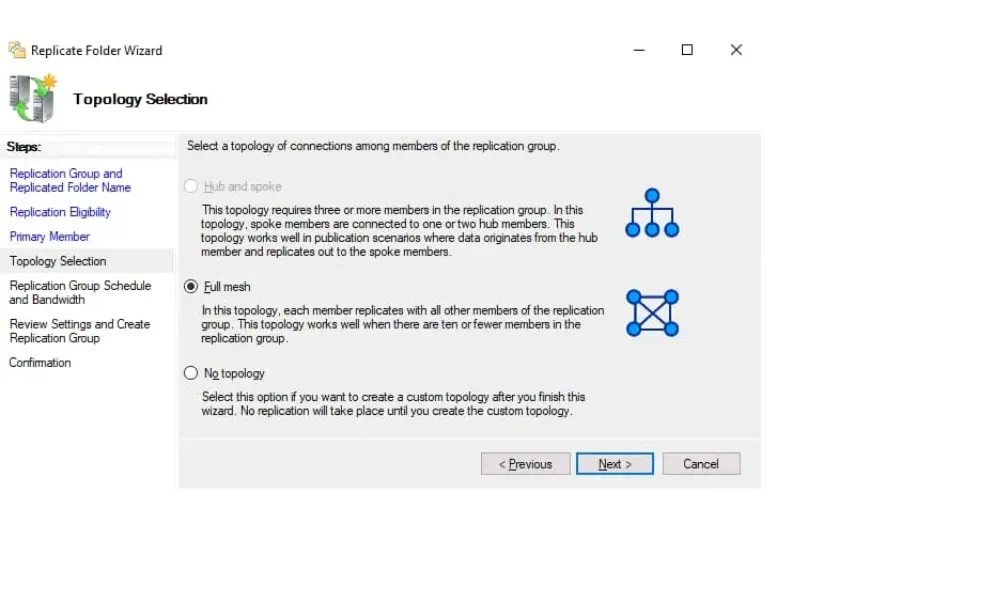
Decide on the topology for replicating data. You can choose from hub-and-spoke, full mesh, or a custom topology based on your network’s needs.
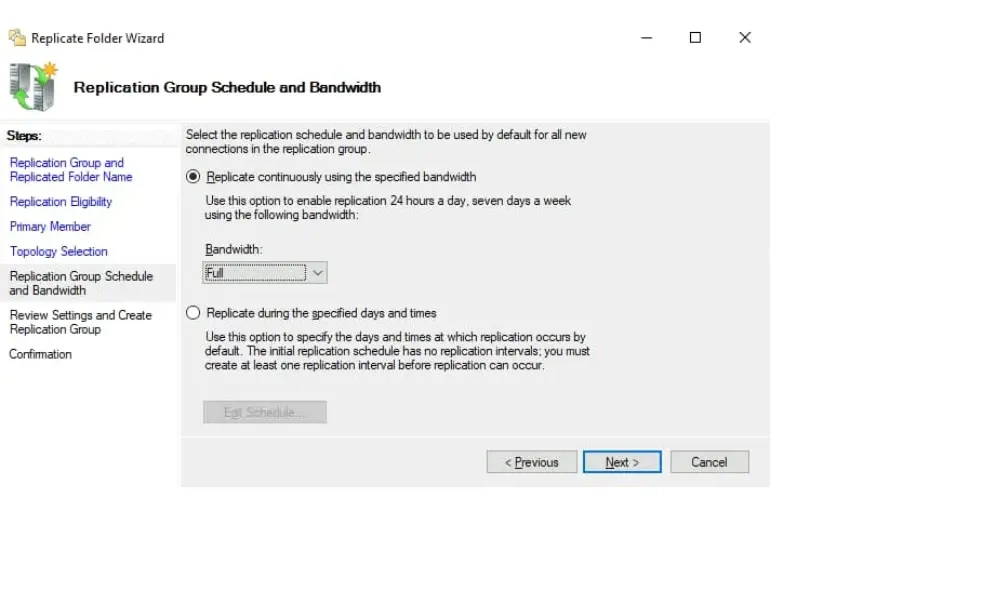
7. Replication Group Schedule and Bandwidth
Choose between “replicate continuously using the specific bandwidth” and “Replicate during specific days and times”
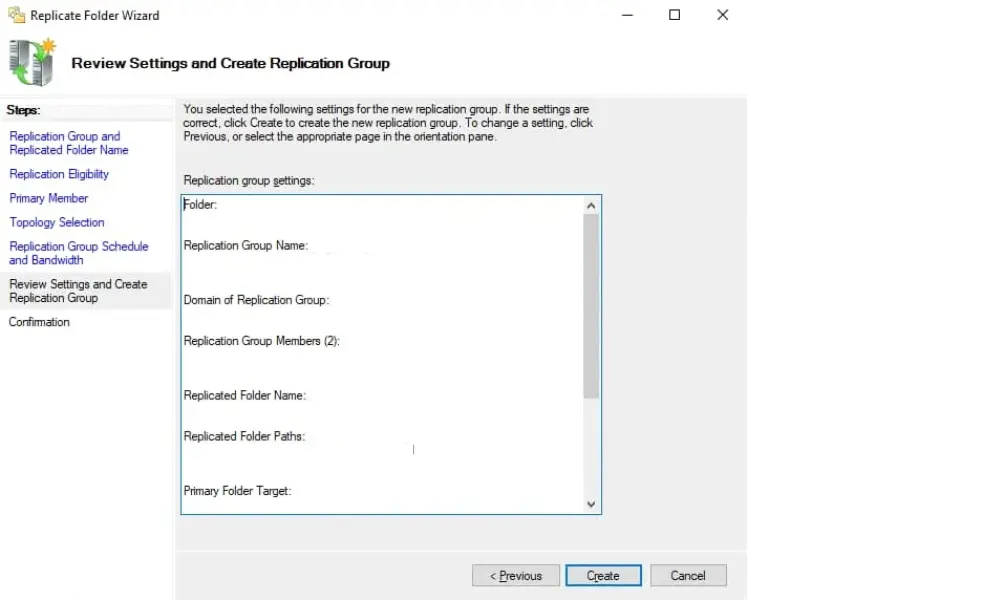
8. Review and Create Replication Group
Review all the settings for the replication group and the replicated folders. Once confirmed, finish the wizard to create the replication group.
Adding Folders to the Replication Group
After creating the replication group, you need to add the folders you wish to replicate: 2019
- Specify the Local Path of the Replicated Folder: For each member server, you’ll need to provide the path to the local folder that you want to replicate.
- Set Primary Member: Designate a primary member for the initial replication. This server will be the reference point from which all other members will replicate the data initially.
- Configure Folder Permissions: Ensure that the replicated folders have the correct NTFS permissions set to control access to the data.
- Scheduling and Bandwidth: Configure the replication schedule and bandwidth usage to optimize replication times and minimize impact on network performance.
- Review Settings and Finish: Review all the settings for the replication group and the replicated folders. Once confirmed, finish the wizard to create the replication group.
Once you have set up DFS Replication, the next step is to configure a DFS Share, which is the process of sharing a folder on the network and integrating it with DFS. This allows for centralized management of shared folders and ensures that users have access to the data they need.
Sharing a Folder on the Network
Before a folder can be added to a DFS Namespace, it must be shared on the network. Follow these steps to share a folder:
- Choose or Create a Folder: Select an existing folder or create a new one that you want to share on the network. This folder will be the target for DFS.
- Share the Folder: Right-click on the folder and select ‘Properties.’ Navigate to the ‘Sharing’ tab and click on ‘Advanced Sharing.’
- Advanced Sharing Settings: Check ‘Share this folder’ and assign a share name that network users will use to access the folder.
- Permissions: Click on ‘Permissions’ to set share permissions. It’s advisable to give ‘Change’ and ‘Read’ permissions for groups that need to modify files and ‘Read’ permission for groups that only need to view files.
- Apply and Close: After configuring the share permissions, click ‘Apply’ and then ‘OK’ to close the sharing dialogues.
Integrating Shared Folders with DFS
With the folder shared on the network, you can now integrate it into your DFS Namespace:
- Open DFS Management: Access the DFS Management console.
- Add Folder to Namespace: Navigate to the namespace where you want to add the shared folder. Right-click on the namespace and select ‘New Folder.’
- Enter Folder Details: Provide a name for the folder within the DFS Namespace. This name is what users will see and use to access the shared folder.
- Add Folder Target: In the ‘New Folder’ dialogue, click ‘Add’ to specify the folder target. Enter the path to the shared folder you created earlier.
- Finish: Click ‘OK’ to add the folder to the namespace. The shared folder is now part of the DFS Namespace and can be accessed using the DFS path.
Setting Permissions for DFS Shared Folders
Proper permissions are crucial to secure the data within the shared folders and to control access:
- NTFS Permissions: In addition to the share permissions, set NTFS permissions on the actual folder by right-clicking the folder, selecting ‘Properties,’ and navigating to the ‘Security’ tab.
- Access: Assign appropriate NTFS permissions based on user roles and responsibilities within your organization. This might include read, write, modify, or full control permissions.
- Access-Based Enumeration: Consider enabling Access-Based Enumeration (ABE) on the namespace to ensure that users only see the folders to which they have access.
- Propagation of Permissions: If you have a nested folder structure, ensure that permissions are properly propagated to subfolders and files as necessary.
- Testing: After setting permissions, test access with user accounts with different permission levels to ensure access controls work as intended.
Managing DFS Replication Group Settings
Effective management of DFS Replication group settings is essential to ensure that the replication process aligns with organizational requirements and network capacity. This includes configuring replication schedules, adjusting bandwidth, and selecting an appropriate replication topology, as well as monitoring the health and performance of replication.
Configuring Replication Schedule
The replication schedule determines when data replication occurs and can be configured to minimize the impact on network resources during peak hours:
- Access Replication Group Settings: In the DFS Management console, right-click the replication group and select ‘Properties.’
- Schedule Tab: Navigate to the ‘Schedule’ tab where you can configure the availability of replication. You can set a full schedule or a more granular one based on specific hours and days.
- Bandwidth Throttling: Within the schedule settings, you can also throttle the bandwidth used for replication. This is useful for controlling network traffic during business hours to ensure that replication does not interfere with other network operations.
Adjusting Bandwidth and Replication Topology
Bandwidth and topology settings are critical for managing how data is replicated across the network and ensuring efficient use of resources:
- Bandwidth Allocation: Allocate bandwidth for DFS Replication by considering the total available bandwidth and the importance of replication traffic relative to other network activities.
- Topology Configuration: Choose a replication topology that suits your network’s design and replication needs. Options include a full mesh topology, ideal for environments where any server can replicate to any other server, and a hub-and-spoke topology, which centralizes replication through a hub server.
Monitoring Replication Health and Performance
Regular monitoring of DFS Replication is necessary to identify and resolve issues promptly:
- Health Reports: Generate health reports for replication groups by using the ‘Diagnostics’ section in the DFS Management console. These reports provide insights into the current state of replication and identify any potential issues.
- Performance Counters: Use performance counters in Windows Performance Monitor to track the performance of DFS Replication. Look for counters related to DFS Replication to assess the latency, backlog, and transactional success of replication activities.
- Event Logs: Check the DFS Replication event logs for warnings or errors that could indicate problems with replication. The event logs can be accessed through the Event Viewer and provide detailed information about replication events.
- Real-time Monitoring: For real-time monitoring, use the ‘Replication’ tab in the DFS console to view the status of replication folders, including the size of the replication queue and the rate of replication.
Advanced DFS Namespace and Replication Features
DFS Replication offers a suite of advanced features that can optimize and refine the replication process. These features include using replication filters, leveraging Remote Differential Compression (RDC), and managing conflict resolution and pre-seeding of data. Understanding and implementing these features can significantly enhance the efficiency and reliability of DFS.
Implementing Replication Filters
Replication filters allow you to include or exclude certain files and file types from replication. This can help in conserving bandwidth and ensuring that only relevant data is replicated:
- Setting Up Filters: To implement filters, access the properties of the replication group and navigate to the ‘Replicated Folders’ tab. Select a folder and click ‘Edit’ to modify its properties.
- Exclude and Include Files: In the ‘Filter’ tab of the replicated folder properties, you can specify file extensions to exclude from replication. For example, you might exclude temporary files by adding an exclusion for
*.tmpfiles.
Using Remote Differential Compression
RDC is a key feature of DFS Replication that optimizes the replication of file changes across the network:
- Understanding RDC: RDC detects changes to the data within files and replicates only the changed file blocks instead of the entire file. This is particularly beneficial for large files where changes are relatively small.
- Configuring RDC: RDC is enabled by default for DFS Replication, but you can adjust its settings. In the ‘Replicated Folders’ properties, under the ‘Advanced’ tab, you can configure the RDC settings to fine-tune performance based on the types of files being replicated and the available bandwidth.
Handling Conflict Resolution
In a multi-master replication model, conflicts can occur when the same file is modified on different servers between replication intervals. DFS Replication handles this by:
- Conflict and Deleted Items: Using a ‘Conflict and Deleted’ folder to store the pre-conflict versions of files. This ensures that no data is lost during conflict resolution.
- Automatic Resolution: DFS Replication automatically resolves conflicts by keeping the latest version of the file and moving the older versions to the ‘Conflict and Deleted’ folder.
- Customizing Conflict Policies: You can customize how conflicts are handled by setting policies within the ‘Replicated Folders’ settings. This includes specifying the retention period for files in the ‘Conflict and Deleted’ folder.
Pre-seeding Data
Pre-seeding is the process of manually copying data to replication partners before the initial synchronization. This can greatly reduce the time and bandwidth required for the initial replication:
- Manual Copy: Before setting up a new replication group, copy the data to all group members manually or by using other synchronization methods.
- Robocopy or Backup Restore: Use tools like Robocopy or restore from backup to pre-seed data. Ensure that the file attributes and timestamps are preserved during the copy.
- Initial Synchronization: When DFS Replication performs the initial synchronization, it will detect the pre-seeded data and only replicate the differences, which speeds up the process and reduces network load.
By utilizing these advanced features, administrators can ensure that DFS is tailored to a specific environment, providing a more controlled and efficient replication process. These optimizations can lead to better use of network resources, faster replication times, and improved overall performance of the DFS infrastructure.
When implementing and managing DFS Replication and DFS Shares, adhering to best practices is crucial for maintaining security, optimizing performance, and ensuring data integrity. Here’s a guide to the best practices you should follow.
Security Best Practices
Security is paramount when setting up DFS Replication and Shares. Here are some security best practices:
- Use Strong ACLs: Implement strong Access Control Lists (ACLs) for both NTFS and share permissions to ensure that only authorized users can access the data.
- Least Privilege Principle: Grant users the minimum level of access necessary for their role. This minimizes the risk of unauthorized access or changes to files.
- Secure Replication Topology: Use a secure replication topology that reflects your organization’s structure and minimizes the risk of data interception or leakage.
- Encrypt Sensitive Data: If you are replicating sensitive data, consider using encryption methods, such as IPSec, to protect data in transit.
- Regularly Update Systems: Keep your Windows Server systems updated with the latest security patches to protect against vulnerabilities.
Performance Optimization Tips
To ensure DFS Replication performs optimally, consider the following tips:
- Optimize Schedules: Schedule replication during off-peak hours to reduce the impact on network performance.
- Bandwidth Throttling: Use bandwidth throttling to limit the amount of network bandwidth replication can consume.
- Staging Quota Size: Adjust the staging area quota to be large enough to handle the largest files being replicated to prevent replication failures.
- Use RDC Wisely: Remote Differential Compression (RDC) should be used judiciously, especially if the replication involves many small files, where the overhead might not be justified.
- Pre-seed Data: Pre-seed large files on new replication partners to minimize the initial sync time and bandwidth usage.
Regular Maintenance and Monitoring
Maintaining and monitoring your DFS setup is key to its long-term stability and efficiency:
- Monitor Replication Health: Regularly check the health of replication using the DFS Management console and generate health reports to identify any issues.
- Review Event Logs: Keep an eye on DFS Replication event logs for errors or warnings that need to be addressed.
- Plan for Capacity: Monitor storage trends and plan for capacity accordingly. Ensure that there is always enough free space on the servers to handle the replicated data.
- Regularly Test Failover: Periodically test failover to backup DFS servers to ensure high availability in case of server failure.
- Keep Documentation Updated: Maintain up-to-date documentation of your DFS infrastructure, including namespace structure, replication topology, and server roles.
Troubleshooting Common DFS Issues In Windows Environment
DFS is a robust and reliable service, but like any complex system, issues can arise. Knowing how to diagnose and resolve common replication errors, recover from failures, and utilize the right tools is essential for maintaining a healthy DFS environment.
Diagnosing and Resolving Common Replication Errors
When faced with replication issues, start with the following steps:
- Check Replication Health Reports: Use the DFS Management console to generate health reports for replication groups. These reports can identify common issues such as replication backlogs, file conflicts, and other errors.
- Verify Replication Topology: Ensure that the replication topology is correctly configured and that all servers can communicate with each other.
- Inspect Event Logs: Look at the DFS Replication event logs in the Event Viewer for any warning or error messages. These logs can provide specific error codes and descriptions that are useful for troubleshooting.
- Ensure Adequate Staging Area Quota: A common cause of replication errors is an inadequate staging area quota. Increase the quota to accommodate the size of the files being replicated.
- Resolve File Conflicts: Check for file conflicts in the ‘Conflicts and Deleted’ folder and resolve them by determining which version of the file should be kept.
Recovering from DFS Replication Failures
If DFS Replication fails, follow these steps to recover:
- Identify the Failure Point: Determine which part of the file replication process fails. Is it a server issue, a network problem, or a configuration error?
- Restart DFS Services: Sometimes, simply restarting DFS file replication services on the affected server can resolve transient issues.
- Reinitialize Replication: If there is a persistent issue with a replication group, consider reinitializing replication for that group. This can be done by removing and re-adding the replication group or using the ‘dfsrdiag syncnow’ command.
- Restore from Backup: If replication issues have led to data loss or corruption, restore the affected files from the backup.
Tools and Resources for Troubleshooting
Several tools and resources can aid in troubleshooting DFS issues:
- DFS Management Console: The primary tool for managing DFS Replication and Namespaces, which includes features for creating reports and monitoring the replication state.
- Dfsrdiag: A command-line tool that provides information about DFS Replication and can be used to force immediate replication, poll for replication status, and more.
- Robocopy: Useful for pre-seeding data in replication folders and for verifying the integrity of replicated data.
- Windows Server Performance Monitor: Monitor the performance of DFS Replication by using specific DFS Replication counters.
- Microsoft Support: For unresolved issues, Microsoft Support can assist. The knowledge base articles and forums are also valuable resources for finding solutions to common problems.
Conclusion
DFS environment can significantly impact business operations, offering improved data redundancy, disaster recovery capabilities, and seamless user access to shared files. Implementing DFS on a Windows server with best practices in mind enhances security, optimizes performance, and ensures a robust setup. For further insights and guidance on maximizing the potential of Active Directory and DFS, explore additional articles on Active Directory to stay informed and maintain a competitive edge in evolving technology.
Распределенная файловая система DFS ( Distributed File System) – это технология, обеспечивающая возможности упрощения доступа к общим файловым ресурсам и глобальной репликации данных. Благодаря DFS распределённые по различным серверам общие ресурсы (каталоги и файлы) можно объединить в единую логическую UNC структуру, которая для пользователя выглядит, как единый сетевой ресурс. Даже при изменении физического местоположения целевой папки, это не влияет на доступ пользователя к ней.
Реализация служб DFS в Windows Server 2012 отличается от предыдущих версиях Windows. В первую очередь отметим, что технологии DFS в Windows Server 2012 реализованы в виде двух отдельных, независимых друг от друга служб — DFS Namespaces и DFS Replication , включенных в роль файлового сервера (File and Storage Services).
- DFS Namespaces (DFSN или DFS-N) – пространство имен DFS. Позволяет объединять в единую логическую структуру общие папки, расположенные на различных серверах организации. Каждое пространство имен для пользователя выглядит как единая сетевая папка с подкаталогами. Реальная структура данного пространства имен DFS является скрытой от пользователя, и может включать в себя различные сетевые папки, расположенные на различных серверах и сайтах.
- DFS Replication (DFSR или DFS-R) — служба DFS репликации. Позволяет организовать эффективную службу репликации каталогов (в том числе включенных в пространство имен DFS) между различными серверами и сайтами AD. Данная служба для репликации использует специальный алгоритм удаленного разностного сжатия – RDC- remote differential compression. Благодаря RDC, которая отслеживает изменения в файлах, при репликации копируются не файлы целиком (как в случае с FRS репликацией), а только их блочные изменения.
Установка служб DFS в Windows Server 2012
Установить службы DFS можно с помощью консоли Server Manager или же при помощи Windows PowerShell.
Как мы уже говорили, службы DFS являются элементами роли Files and Storage Services:
Но проще и быстрее установить все DFS службы и консоль управления DFS с помощью PowerShell:
Install-WindowsFeature FS-DFS-Namespace, FS-DFS-Replication, RSAT-DFS-Mgmt-Con
Совет. Естественно, службы и консоль управления DFS можно установить и по отдельности.
, где FS-DFS-Namespace – служба DFS Namespaces
FS-DFS-Replication – служба репликации DFS Replication
RSAT-DFS-Mgmt-Con– mmc консоль управления службами DFS — DFS Management Tools (также входит в состав Remote Server Administration Tools для Windows 10)
Настройка пространства имен DFS в Windows Server 2012
Перейдем к описанию процедуры настройки пространство имен DFS, для чего необходимо открыть панель управления DFS Management tool.
Создадим новое пространство имен (New Namespace).
Необходимо указать имя сервера, который будет содержать пространство имен (это может быть как контроллер домена, так и рядовой сервер).
Затем следует указать имя создаваемого пространства имен DFS и перейти в расширенные настройки (Edit Settings).
Здесь следует указать имя пространства имен DFS и права доступа к данному каталогу. Обычно рекомендуется указать, что доступ к сетевой папке разрешен Всем (Everyone), в этом случае права доступа проверяются на уровне файловой системы NTFS.
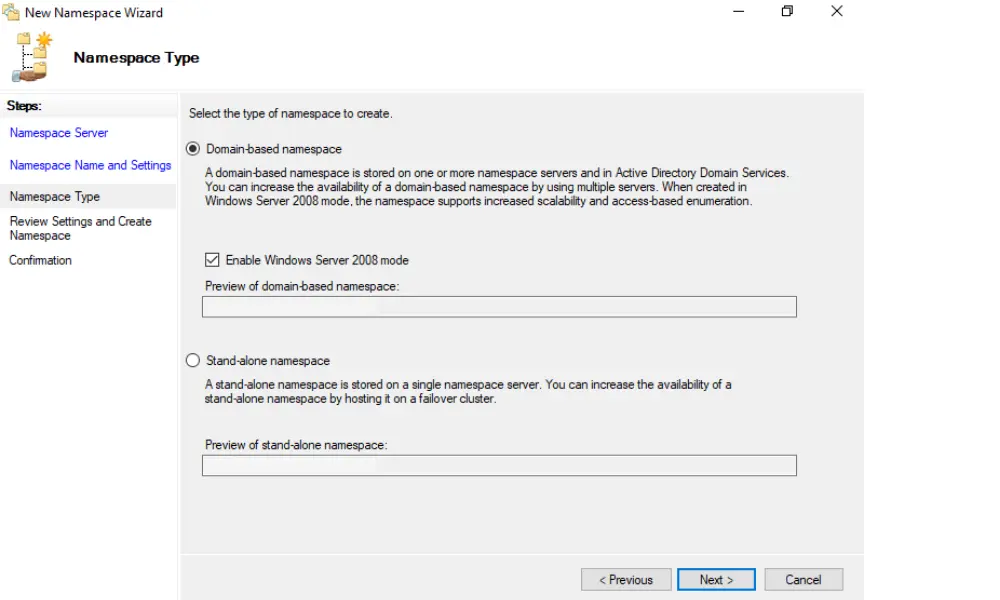
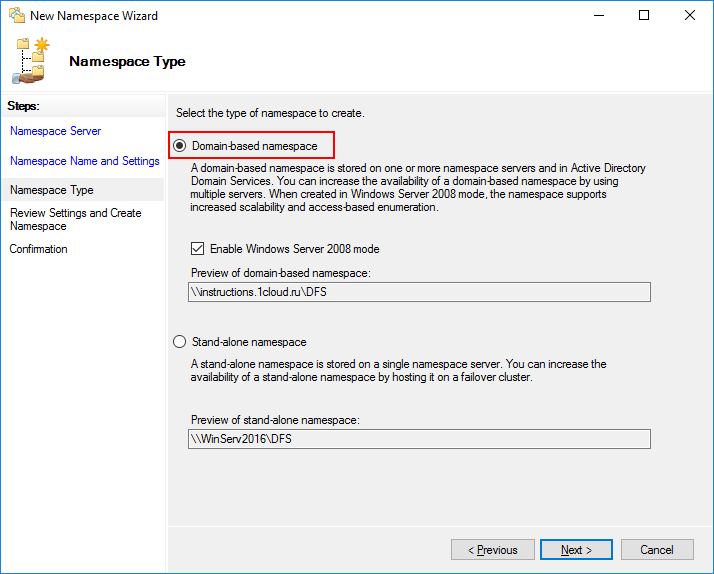
Далее мастер предложит указать тип создаваемого пространства имен. Это может быть Domain-based namespace (доменное пространство имен) или Stand-alone namespace (отдельное пространство имен). Domain-based namespace обладает ряд преимуществ, но для его работы нужен, собственно домен Active Directory и права администратора домена (либо наличие делегированных прав на создание доменных пространств имен DFS).
После окончания работы мастера в ветке Namespaces консоли управления DFS появится созданное нами новое пространство имен DFS. Чтобы пользователи при доступе к DFS каталогам видели только те каталоги, к которым у них имеется доступ, включим для данного пространства DFS Access-Based Enumeration (подробнее о данной технологии в статье Access-Based Enumeration в Windows). Для этого откройте окно свойств созданного пространства имен.
И на вкладке Advanced включите опцию Enable access-based enumeration for this namespace.
Чтобы посмотреть содержимое нового пространства DFS, просто наберите в окне проводника UNC путь: \\имя_домена_или_сервера\DFS
Добавление дополнительного DFS сервера
В доменное пространство имен DFS можно добавить дополнительный сервер (пункт меню Add Namespace Server), который его будет поддерживать. Делается это для увеличения доступности пространства имен DFS и позволяет разместить сервер пространства имен в том же сайте, в котором находится пользователи.
Примечание. Отдельно стоящие пространства имен DFS поддерживают только один сервер.
Добавление нового каталога в существующее пространство имен DFS
Теперь нужно добавить новый сетевой каталог в иерархию созданного нами пространства имен DFS. Нажмите кнопку Add Folder Target.
Укажите наименование каталога в DFS пространстве и его реальное местоположение на существующем файловом сервере (Folder targets).
Настройка DFS-репликации на Windows Server 2012
Технология репликации DFS-R предназначена для организации отказоустойчивости пространства имен DFS и балансировки нагрузки между серверами. DFS-R автоматически балансирует трафик между репликами в зависимости от их загрузки и в случае недоступности одного из серверов перенаправляет клиентов на другой сервер-реплику. Но прежде, чем говорить о DFS репликации и ее настройке в Windows Server 2012перечислим основные системные требования и ограничения:
- Служба DFS Replication должна быть установлена на всех серверах, которые планируется включить в группу репликации
- Все сервера в группе репликации должны находиться в одном лесу AD
- Уровень леса Active Directory должен быть как минимум Windows Server 2003 R2 (при установке первого домена контроллера на Windows Server 2012 схема обновляется автоматически).
- Функциональный уровень домена — как минимум Windows Server 2008
- Необходимо убедиться, что антивирусное обеспечение на файловых серверах совместимо с технологией репликации DFS
- Реплицируемые каталоги должны располагаться на томах с файловой системой NTFS (файловые системы ReFS и FAT не поддерживаются). Также не поддерживается репликация данных, хранящихся на on Cluster Shared Volumes
В консоли DFS Managment выберите нужный вам DFS Namespace и щелкните ПКМ по каталогу, для которого необходимо создать реплику и выберите пункт Add Folder Target.
И укажите полный (UNC) путь к сетевому каталогу другого сервера, в котором и будет храниться реплика.
На вопрос хотите ли вы создать группу репликации отвечаем Yes.
Запускается мастер настройки репликации. Проверяем имя группы репликации и каталог.
Указываем первичный (Primary) сервер. Именно этот сервер будет источником данных при инициальной (первичной) репликации.
Затем выбираем тип топологии (соединения) между членами группы репликации. В нашем примере выбираем Full Mesh (все со всеми).
И, наконец, указываем расписание репликации и параметры bandwidth throttling – ограничение доступной для репликации полосы пропускания.
После окончания работы мастера, запуститься первоначальная синхронизация.
В случае необходимости, настройки расширенных параметры расписания репликации и максимальную полосу пропускания под данный трафик, можно задать в ветке Replication.
Рано или поздно системные администраторы задаются вопросом о децентрализованном хранении информации или хотя бы об объединении нескольких существующих файловых серверов в единый. Параллельно этому поднимается вопрос о безопасности хранимой информации. Относительно простым, менее затратным и популярным среди администраторов AD (Active Directory) является использование DFS. Рассмотрим что это и как настроить.
DFS — Distributed File System — распределенная файловая система. Является продуктом компании Microsoft, предназначенный для упрощения доступа пользователей к файлам. Что примечательно, файлы могут быть разнесены территориально.
Выделяют два типа DFS:
1. Namespace DFS (Пространство имен DFS). Данный тип реализует виртуальное дерево, которое объединяет общие каталоги сети в единое пространство имен. Существует возможность настройки нескольких пространств имен.
2. Replication DFS (Репликация DFS) — репликация уже существующего каталога с отслеживанием содержимого и внесенных изменений.
Установка (DFS Installation)
Сразу заострим внимание, что установку, в рамках данного примера, будем выполнять на уже настроенный контроллер домена.
Открываем диспетчер серверов. В основной части окна кликаем по «Добавить роли и компоненты»:

В новом окне переходим к пункту «Тип установки», выбираем параметр «Установка ролей и компонентов», нажимаем кнопку «Далее»:

В обновленном окне выбираем текущий сервер и кликаем по кнопке «Далее»:

Следующим шагом, в списке доступных ролей находим «Файловые службы и службы хранилища» и раскрываем список, в котором необходимо отыскать «Файловые службы и службы iSCSI». Также раскрываем список параметров. Отмечаем галочками «Пространства имен DFS» и «Репликация DFS». В появившемся окне кликаем «Добавить компоненты». Нажимаем кнопку «Далее» несколько раз и дожидаемся окончания установки:

Создание пространства имен DFS
Перед тем, как приступить к созданию пространства имен DFS, необходимо создать хотя бы одну сетевую директорию на любом из серверов входящих в домен. В нашем случае будем использовать директорию созданную на том же контроллере домена.
Для того чтобы папка стала доступна из сети, кликаем по ней правой кнопкой мыши, в контекстном меню выбираем «Поделиться», затем «Отдельные люди»:

В поле ввода указываем «Пользователи домена», нажимаем кнопку «Добавить», затем «Поделиться»:

Общий доступ к папке готов. Кликаем по кнопке «Готово»:

Теперь сервер доступен по пути:
WINSERVER2019net_share
Создадим пространство имен DFS.
Для этого в меню «Пуск» выбираем «Средства администрирования Windows». Также можно через Панель управления ➝ Система и безопасность ➝ Администрирование.
В открывшемся окне, выбираем «Управление DFS»:

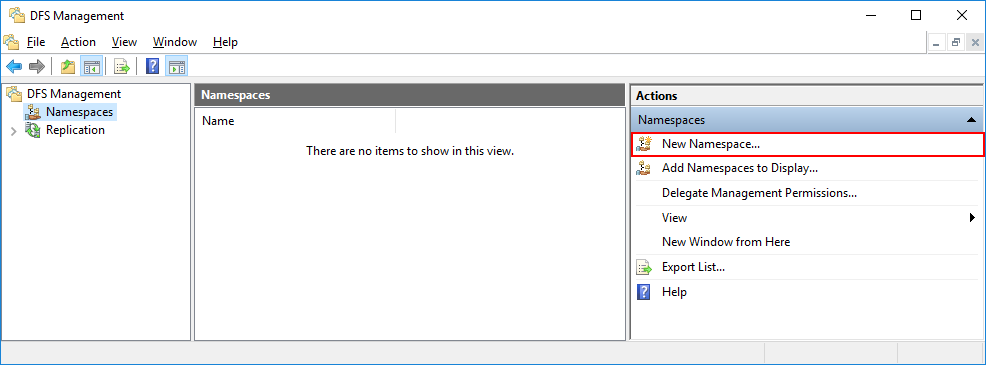
В новом окне «Управление DFS», в правой части кликаем по «Новое пространство имен …»:

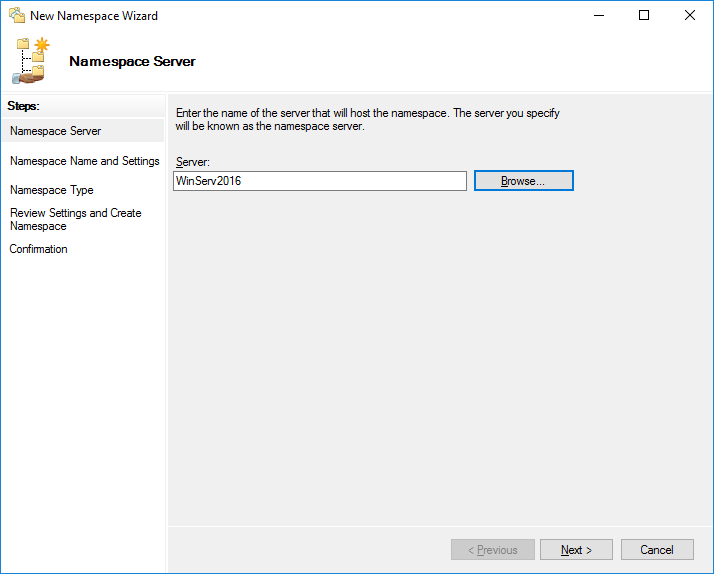
В окне мастера указываем имя сервера. Его можно отыскать как в окне, которое откроется при клике по кнопке «Обзор», так и в свойствах системы на вкладке «Имя компьютера». Нажимаем «Далее»:

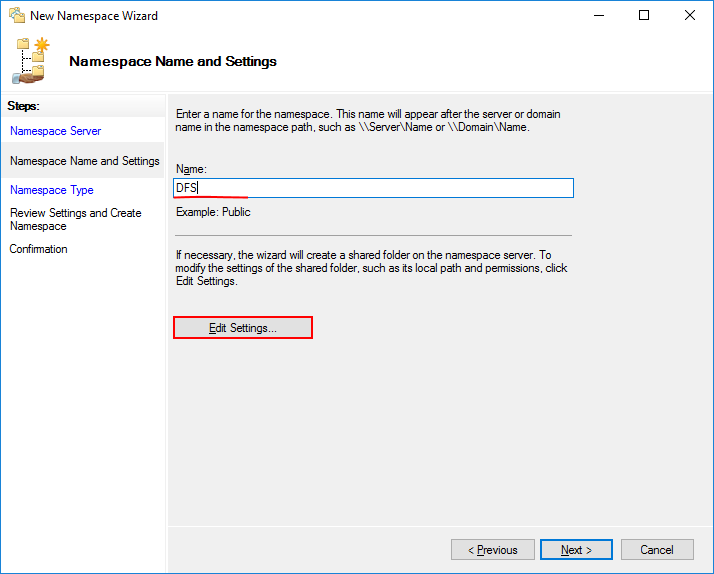
Следующим шагом указываем имя пространства имен. В нашем случае, пусть будет «MyDFS». Нажимаем кнопку «Изменить настройки…». В новом окне следует обратить внимание на строку «Локальный путь общей папки», при необходимости измените его. В том же окне установим переключатель на значение «Использовать пользовательские разрешения» и кликаем кнопку «Настроить»:

В открывшемся окне разрешаем полный доступ для всех и нажимаем кнопку «OK»:
Окно изменения настроек закрываем кликом по кнопке «OK», в окне мастера нажимаем кнопку «Далее»:

На новом этапе выбора типа пространства имен устанавливаем переключатель на значение «Доменное пространство имен», нажимаем кнопку «Далее».
Внимательно просматриваем настройки. Все устраивает — нажимаем «Создать»:

В случае успеха мастер покажет следующее окно:

Нажимаем кнопку «Закрыть».
Добавляем новый каталог в существующее пространство имен
Смысла в проделанном выше нет, если не добавить каталоги к уже существующему пространству имен. В примере процесс будет выполнен на том же сервере, однако, метод применим ко всем серверам в домене.
В окне управления DFS, в левой его части, разворачиваем дерево управления DFS до существующего, кликаем по необходимому. В правой части окна, в разделе действий, выбираем «Создать папку…»:

В открывшемся окне «Создание папки» указываем имя, в нашем случае «Test» и нажимаем кнопку «Добавить»:
В новом окне необходимо добавить путь к существующей сетевой папке. Список доступных каталогов можно посмотреть кликнув по кнопк «Обзор…». По окончании, нажимаем «OK»:

Результат будет таким:
Нажимаем «OK».
Доступ к DFS можно получить из любой адресной строки (Пуск->Выполнить, или из адресной строки любой папки) по шаблону:
<доменное_имя_сервера><имя_пространства_имен_DFS>
Например:
laa.testMyDFS
Результат таков:

Настройка DFS-репликации
Для выполнения репликации данных необходимо добавить второй сервер в этот же домен и установить на нем роль сервера «Репликация DFS» с помощью диспетчера серверов:

На этом же сервере создаем папку и разрешаем общий доступ к ней. В эту папку будут реплицироваться данные из директории, расположенной на сервере контроллера домена:

При открытии доступа и позже, в меню свойств папки можно увидеть сетевой путь до каталога:

Возвращаемся к контроллеру домена и развернутому на нем пространству имен DFS. Открываем уже знакомое из примеров выше окно «Управление DFS». В левой части окна, разворачиваем дерево до созданного пространства имен. В правой части окна выбираем «Добавить конечный объект папки…». В новом окне вводим адрес до общего каталога на другом сервер (который создали ранее). Нажимаем кнопку «OK»:

Система задаст вопрос желании создать группу репликации. Нажимаем кнопку «Да»:

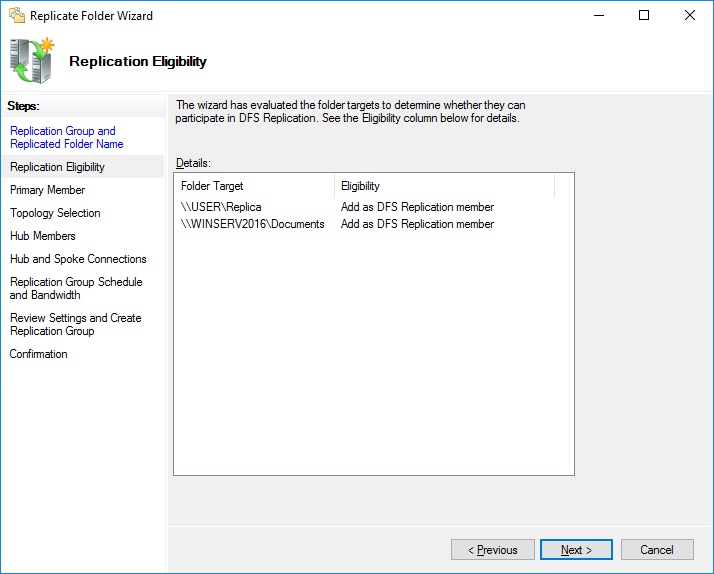
Дожидаемся окончания хода выполнения. Итогом будет открытое окно «Мастера репликации папок». Необходимо проверить имя группы репликации, а также имя каталога, который будет реплицирован. Переходим к следующему шагу кликнув по кнопке «Далее»:

На данном этапе проверяем пути до сетевых каталогов и нажимаем «Далее»:

Следующим шагом предстоит выбрать основной узел из выпадающего списка. Это тот узел с которого данные будут реплицироваться. В случае с примером, основной член репликации сервер с именем WINSERV2016 — это сервер, на котором поднят контроллер доменов. Конкретный пример, лишний раз напоминает о необходимости определения понятных имен для серверов и прочих узлов сети. Нажимаем «Далее»:

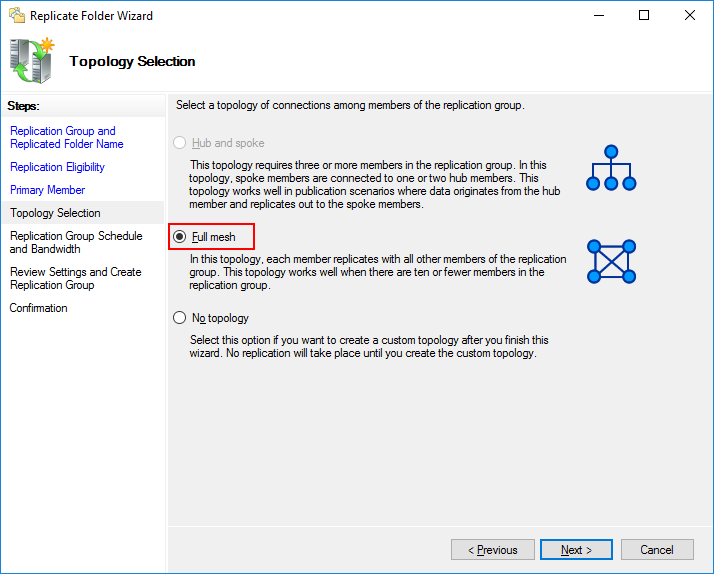
Теперь предстоит выбрать топологию подключений между членами репликации. Выбираем доступную — «Полная сетка», однако если вы желаете создать свою топологию репликации позже, то выбирайте «Нет топологии». Нажимаем «Далее»:

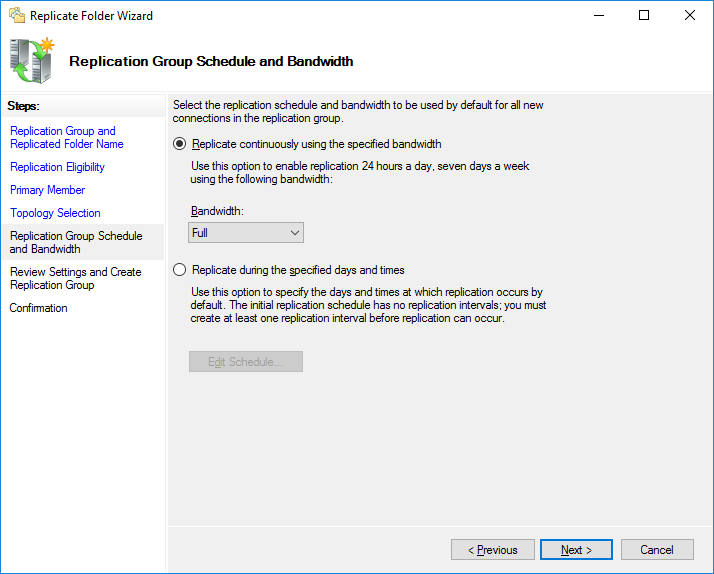
Настройка подходит к концу и на этом шаге следует определиться с периодичностью репликации данных. Выбираем вариант с постоянной репликацией. Преимущества этого метода в том, что данные будут дублироваться сразу. Недостаток — нагружает локальную сеть при больших объемах информации, а также нагрузка на жесткий диск.
Второй вариант, предлагает настроить репликацию по расписанию. Минус этого способа в том, что данные будут синхронизированы «потом». Выбираем желаемый вариант и нажимаем «Далее»:

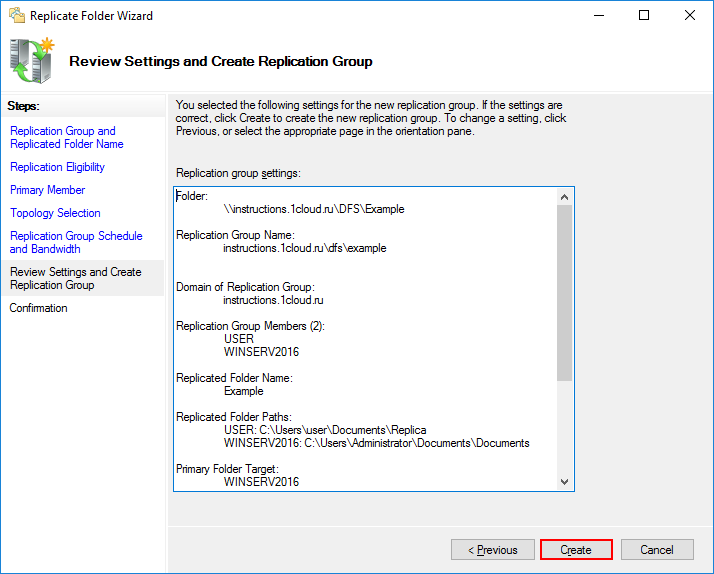
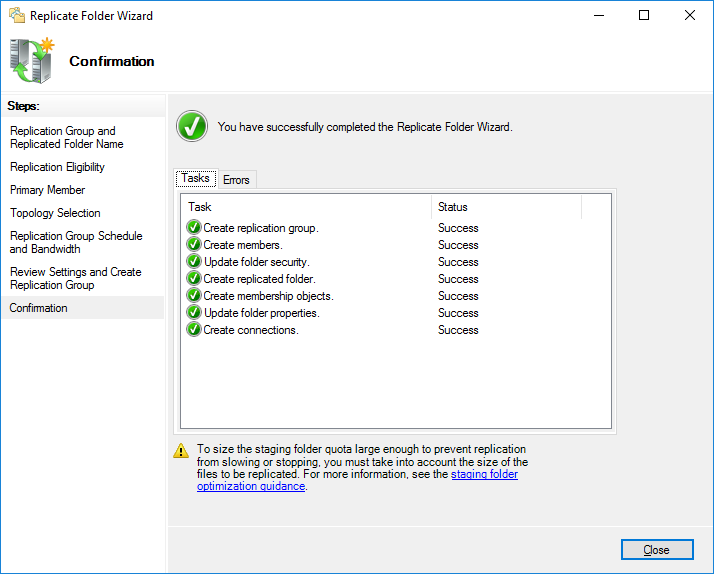
Программа предлагает просмотр выбранных параметров. Если все устраивает — нажимаем кнопку «Создать»:

В случае успеха результат будет таким:

Нажимаем кнопку «Закрыть».
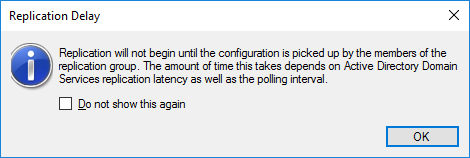
Система напомнит о задержках репликации. Чтобы не получать это сообщение вновь, при желании, следует установить галочку в соответствующем месте. Нажимаем кнопку «OK»:

Настройку распределенной файловой системы, а также репликацию данных можно считать оконченной.
220140
Минск
ул. Домбровская, д. 9
+375 (173) 88-72-49
700
300
ООО «ИТГЛОБАЛКОМ БЕЛ»
220140
Минск
ул. Домбровская, д. 9
+375 (173) 88-72-49
700
300
ООО «ИТГЛОБАЛКОМ БЕЛ»
-
Home
-
Knowledge Base
- What Is DFSR and How to Install It on Windows 10?
By Daisy | Follow |
Last Updated
This post focus on DFSR (Distributed File System Replication). You can know what DFSR is and how it works. Besides, there is some information about the requirements for DFSR. What’s more, you can know how to install it. Now, you can continue to read this post.
What Is DFSR
Distributed File System Replication (DFSR) service is a new multi-master replication engine. It is used to keep folders synchronized on multiple servers, which can improve data availability and enable the people in remote sites to access files quickly and reliably. Now, you can continue to read this post from MiniTool to get more information about DFSR.
Although DFSR has been widely used, it has some disadvantages. The main disadvantage is that it usually lacks visibility into the copying process. It does not display any information about the current status of the service.
How Does It Work
Then, let’s see how Windows DFS replication works. DFSR uses a new compression algorithm called Remote Differential Compression (RDC). RDC is a protocol that can be used to efficiently update files on a network with limited bandwidth. RDC detects the data’s insertion, deletion, and rearrangement in the file so that DFSR only copies the increment when updating the file.
To use DFS replication, you must create a replication group and add the replicated folder to the group. The following figure illustrates the replication group, replicated folders, and members. This figure shows that a replication group is a group of servers, called members, they participate in the replication of one or more replication folders.
Requirements for DFSR
There are some requirements for DFSR. Before you can deploy DFSR, you need to follow the steps below to configure your servers: The details are as follow:
- You need to update Active Directory Domain Services (AD DS) architecture to include Windows Server 2003 R2 or higher architecture. You cannot use a read-only copy folder with Windows Server 2003 R2 or older architecture. Maybe you need this post – Full Fix: Active Directory Domain Services Unavailable.
- You should make sure that all servers in the replication group are in the same forest. You cannot enable replication between servers in different forests.
- You should install DFSR on all servers that will serve as the replication group’s members.
- Please contact your antivirus software vendor to check if your antivirus software is compatible with DFSR.
- Find all the folders to be copied on the volume to be formatted with the NTFS file system.DFS replication does not support the Resilient File System (ReFS) or FAT file system.
How to Install DFSR on Windows
You can know how to install DFS replication on Windows in this section. There are two methods for you.
Use Server Manager to Install DFSR
You can use the Server Manager to install DFSR. Here is how to do that:
Step 1: Open Server Manager and click Manage. Then, click Add Roles and Features.
Step 2: On the Server Selection page, select the server or virtual hard disk (VHD) of an offline virtual machine on which you want to install DFSR.
Step 3: Then, you need to select the role services and features that you want to install. Select DFS Replication on the Server Roles page.
Step 4: On the Features page, expand Remote Server Administration Tools and Role Administration Tools. Then, expand File Services Tools to select DFS Management Tools.
The DFS Management snap-in will be installed by DFS Management Tools. The DFS Replication and DFS Namespaces modules for Windows PowerShell, and command-line tools, but DFS services will not be installed on the server.
Use Windows PowerShell to Install DFSR
You can also use Windows PowerShell to install DFSR. To do that, you need to open Windows PowerShell with administrators right. Then, type the following command – Install-WindowsFeature <name>.
| Role service or feature | Name |
| DFS Replication | FS-DFS-Replication |
| DFS Management Tools | RSAT-DFS-Mgmt-Con |
For example, if you want to install the Distributed File System Tools portion of the Remote Server Administration Tools feature, you need to type Install-WindowsFeature “RSAT-DFS-Mgmt-Con”.
If you want to install the DFS Replication, and the Distributed File System Tools portions of the Remote Server Administration Tools feature, you need to type Install-WindowsFeature “FS-DFS-Replication”, “RSAT-DFS-Mgmt-Con”.
Final Words
What is DFS replication? You may have answers after reading the post. Based on that, you also obtain some extra information about Distributed File System Replication. Here comes the end of the post.
About The Author
Position: Columnist
Having been an editor at MiniTool since graduating college as an English major, Daisy specializes in writing about data backups, disk cloning, and file syncing as well as general computer knowledge and issues. In her free time, Daisy enjoys running and going with friends to the amusement park.
В этой инструкции мы разберем процесс настройки распределенной файловой системы и репликации данных в домене Active Directory на серверах под управлением Windows Server.
Что такое Distributed File System и Replication в Active Directory?
Наличие общих каталогов для доступа к определенным документам и файлам является важной проблемой в бизнес-среде. Системным администраторам необходимо найти удобное решение для обмена общими данными.
Distributed File System — это продукт Microsoft для упрощенного доступа пользователей к географически распределенным файлам. DFS позволяет создавать деревья виртуальных каталогов, объединяющих общие папки по всей сети.
Существует два типа DFS:
- Namespace DFS (Пространство имен DFS) — виртуальное дерево, объединяющее общие папки из всей сети. Возможно настроить несколько пространств имен DFS.
- Replication DFS (Репликация DFS) — создает реплицированную общую папку и отслеживает изменения в файлах.
Установка Distributed File System
В нашем случае установка производится на контроллер домена.
Откройте панель управления сервером Windows и найдите Add roles and features (Добавить роли и компоненты).
В качестве типа установки укажите Role-based or feature-based installation (Установка ролей и компонентов).
Выберете ваш сервер из пула серверов.
В следующем окне отметьте DFS Namespaces и DFS Replication.
Затем установите выбранные компоненты.
Настройка пространства имен Distributed File System
В меню Start выберете Windows Administrative Tools -> DFS Managment.
Или в поиске введите команду dfsmgmt.msc.
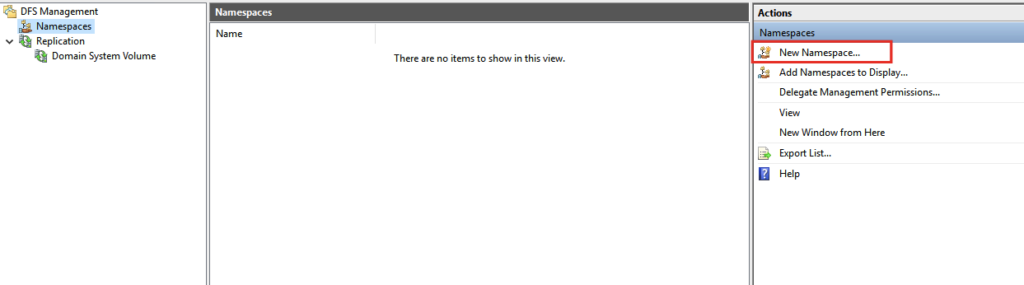
Для создания нового пространства имен выберете в правой части экрана New Namespace.
Введите название сервера.
Введите любое удобное для вас название. Нажмите кнопку Edit Settings.
В открывшемся окне необходимо настроить права доступа к пространству имен для пользователей сети. Чтобы предоставить полный доступ, нажмите кнопку Customize.
Выберете полный контроль с помощью галочек и нажмите Apply -> Ok.
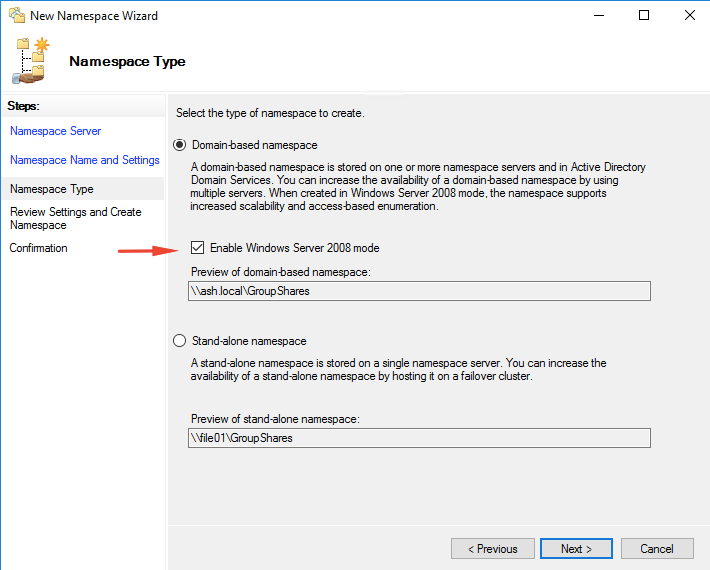
На следующем шаге выберете Domain-based namespace, т.к. используются доменные службы Active Directory (AD DS).
Примечание:
Domain-based namespace — обладает преимуществами, позволяет обеспечить доступность пространства имен с помощью нескольких серверов пространств имен, скрывает имя сервера пространства имен от пользователей, упрощает замену сервера пространства имен или перенос пространства имен на другой сервер.
Stand-alone namespace — позволяет создать распределенную файловую систему не используя доменные службы Active Directory (AD DS), увеличивает доступность namespace с помощью отказоустойчивого кластера.
Проверьте конфигурацию и нажмите Create.
В результате вы увидите сообщение об успешном создании пространства имен.
Чтобы создать каталог в созданном namespace, откройте DFS Management, выберете нужное пространство и справа в вертикальном меню нажмите New Folder.
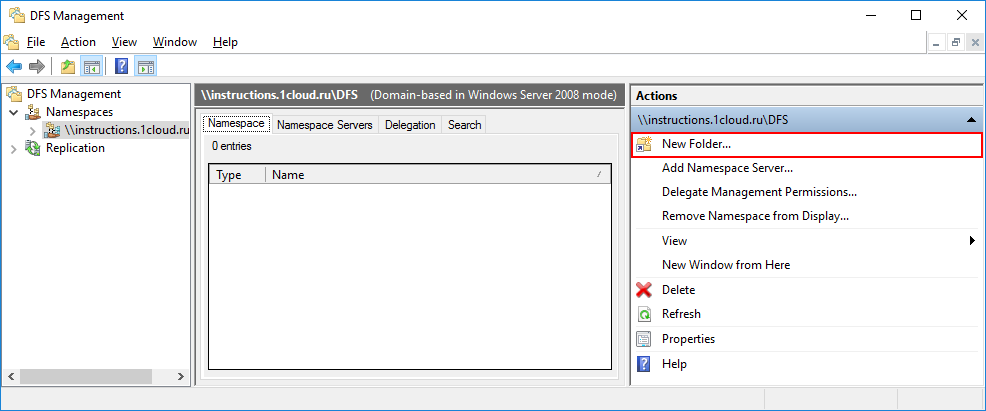
Введите удобное имя каталога и нажмите Add, для того чтобы связать созданный каталог с сетевым каталогом на вашем сервере.
Примечание: каталог должен быть сетевым, это можно сделать в свойствах каталога на вкладке Sharing.
Введите имя сетевого каталога и кликнете OK.
Нажмите OK для сохранения изменений.
Подключиться к данному пространству с другого сервера можно набрав в проводнике следующий адрес:
\\<доменное имя>\<имя пространства имен>
Например:
\\instructions.1cloud.ru\DFS
Настройка DFS-репликации на Windows Server
Чтобы настроить репликацию данных необходимо иметь сетевую папку на другом, включенном в домен, сервере. Откройте DFS Management, выберете нужное пространство и справа в вертикальном меню кликните Add Folder Target.
Введите имя сетевого каталога и нажмите OK.
Откроется окно с вопросом о создании новой группы репликаций. Нажмите Yes.
Откроется настройщик Replication DFS. Проверьте имя группы репликации и каталога, который вы собираетесь реплицировать.
На следующем шаге проверьте пути сетевых директорий.
Выберете основной узел, с которого будет производиться первичная репликация данных.

В качестве типа топологии выбираем Full mesh — чтобы изменения на одном узле, сразу же появлялись и на остальных.
На последнем шаге необходимо настроить расписания реплицирования данных. В первом случае репликация производится моментально, во втором можно настроить удобное расписание.
Проверьте настройки и нажмите Create.
В результате вы увидите сообщение об успешном создании группы репликаций.
На данное системное сообщение кликните OK левой кнопкой мыши.
Откройте каталог, в который будет происходить первоначальная репликация данных и нажмите Continue. Произойдет первоначальная репликация данных.
На этом настройка распределенной файловой системы и репликации данных в ней окончена. Ознакомиться с другими полезными статьями вы можете в нашей базе знаний, а кликнув по кнопке ниже — заказать виртуальный сервер на Windows.
In this blog, we will learn to deploy a DFS server on Windows 2022.
A Microsoft Windows DFS server works on the principle of sending changed (delta) files across the network to keep files on our file servers in sync using the remote Differential Compression Algorithm (RDC). DFS shouldn’t be taken as a disaster recovery solution but it’s a solution meant for full HA of your files. If you delete a file on a write capable DFS server, it’s just replicated across
Thus DFS Replication allows you to synchronize directories with files (replicated folders) between servers that are part of a DFS replication group keeping all files in sync.
Summary of DFS Deployment
The following are the high-level steps required for our DFS deployment.
- DFS replication service to be installed on particpating servers.
- Folders chosen for Replication should be volumes with formatted with the NTFS file system. ReFS, FAT, and Cluster shared volumes are not supported with DFS.
- Servers in the replication group must belong to same AD forest
- Verify if AV Scanners need to allow the folders being replicated to exception lists.
- Install FS-DFS-Namespace,FS-DFS-Replication –IncludeManagementTools roles on file servers
- Create DFS NameSpace
- Add Shared Folders to Root Namespace
DFS VM Sizing Requirements
| VM | OS | vCPU | Memory GB | Storage | Folder to replicate |
| FILE01 | Win 2022 | 2 | 10 | 100GB | C:“`\FIles |
| FILE02 | Win 2022 | 2 | 10 | 60 GB | C:“`\FIles |
| FILE03 | Win 2022 | 4 | 4 | 25GB | C:“\FIles |
Replication Modes on DFS
Stand-alone DFS namespaces – doesn’t use Active Directory services and HA of this namespace is achieved using the usual failover clusters.
Standalone based DFS namespaces will be accessible as

Domain-based DFS namespace – If you have an active directory setup, you should go with a domain-based DFS namespace.
Domain-based DFS namespaces will be accessible as
Types of Distributed File Systems
- Namespace DFS — DFS allows you to create virtual directory trees that unite shared folders across the corporate network. It is possible to configure multiple DFS namespaces. It uses simplified user access to geographically distributed files;
- Replication DFS — creates a replicated shared folder and tracks changes in files.
Install Distributed File System (DFS) with PowerShell
1- Verify if the File server role is installed on the server by running the command below;
“Get-Windowsfeatures -name fs*” -computername file01
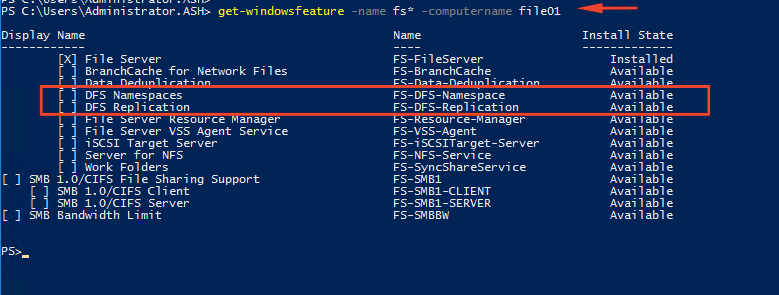
2- A DFS Server can be installed on a Windows Server will just one quick PowerShell command
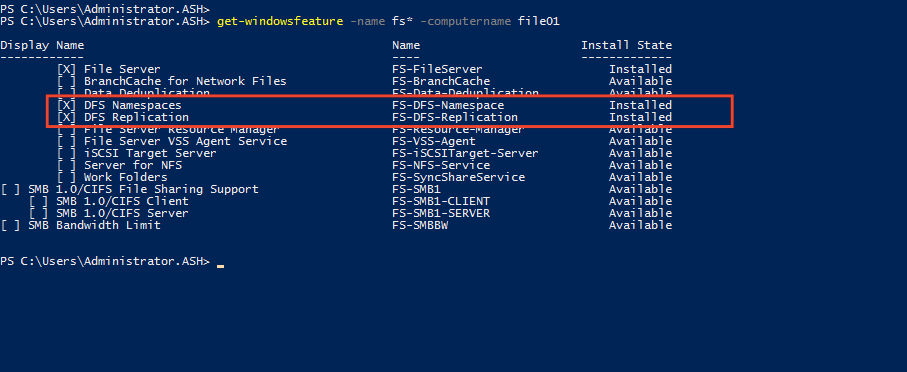
Install-WindowsFeature -Name FS-DFS-Namespace,FS-DFS-Replication –IncludeManagementTools -ComputerName File01

3- Verify if the DFS role is installed on the server by running the below Powershell command.
“Get-Windowsfeatures -name fs*” -computername file01
4- Click Manage then click Add Roles and Features. select Rule-based or feature-based installation and click Next.
5- Under Server Roles Choose Files and Storage Services then expand File and iSCSI Services and choose DFS Namespace, DFS Replication and Cick Next
6- Choose Install to begin installation

7- Click Close when the installation process has finished,
Create DFS NameSpace
8 – Launch DFS Management to create a domain-based namespace or stand-alone namespace.
9- On the DFS Management console click New Namespace on the Actions menu to open the New Namespace Wizard.
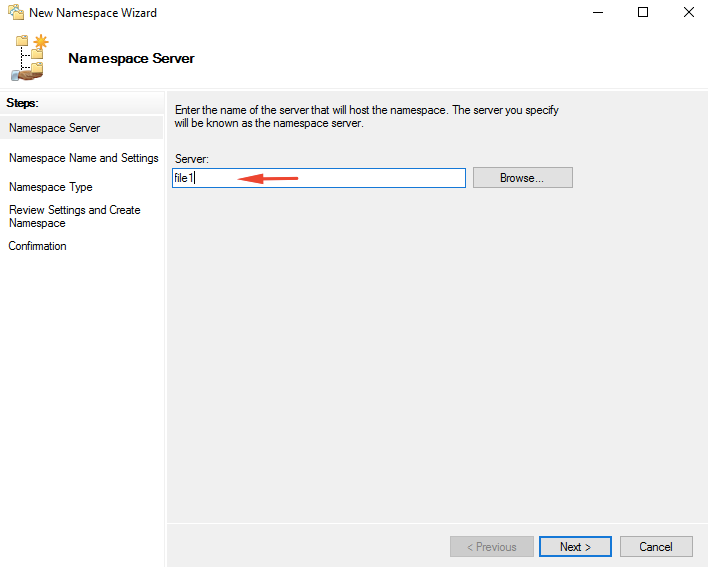
10- Type the server name you want to use as a namespace host and click Next. We will choose file1 server here
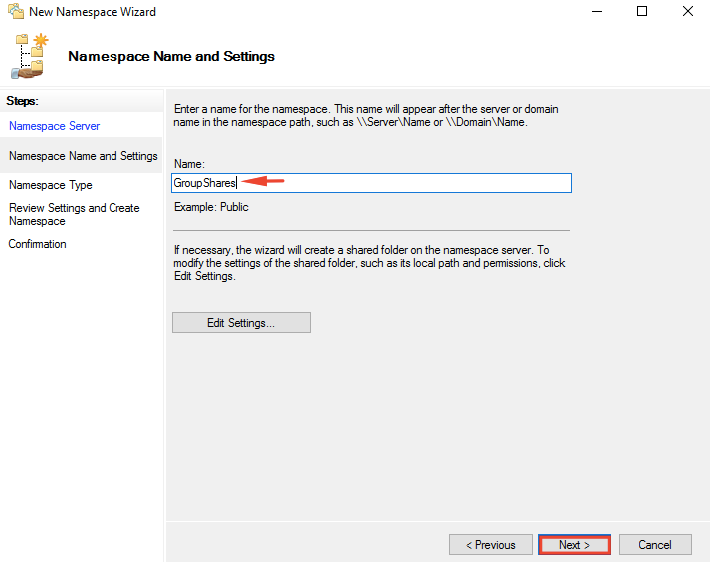
11- On the Namespace Name and Settings page, type a name as shown then click Edit Settings.
12- Select Administrators have full access: other users have read and write permission on the Edit namespaces settings page
13 – Choose Domain-based namespace on the Namespace Type page and then click Next.
14- Click Create to create the namespace and click Close to close the namespace processing wizard page.
15- The namespace was created successfully. Now we will add another namespace server to replicate with each other.
Add a Namespace Server
Let’s add the second file server in order to replicate the shared resources between file servers.
16- Go to the DFS Management page, expand Namespaces then select the created namespace and Namespace Servers tab. Click add a namespace server from the action menu. Type the name of the second file server and click Edit Settings.
17- Select the Administration have full access: other users have read and write permission on the edit permission settings page
18- Click OK to add the namespace server without any erros.
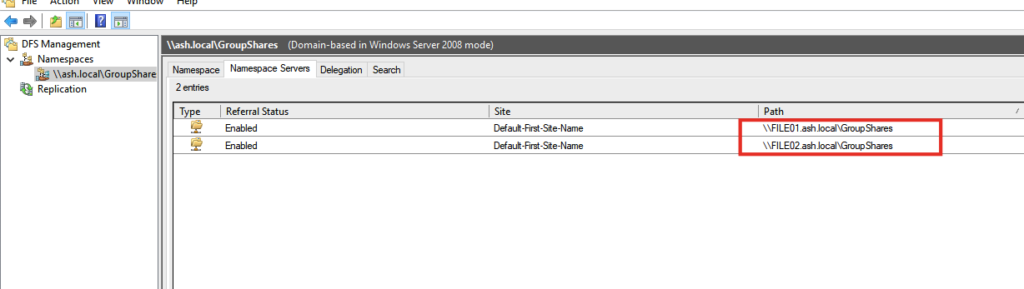
The result should be like the screenshot.
Add Shared Folders to Root Namespace
We need a shared folder within both file servers to replicate data between them. These shared folders keep the shared files and resources so let’s create the folders and share them.
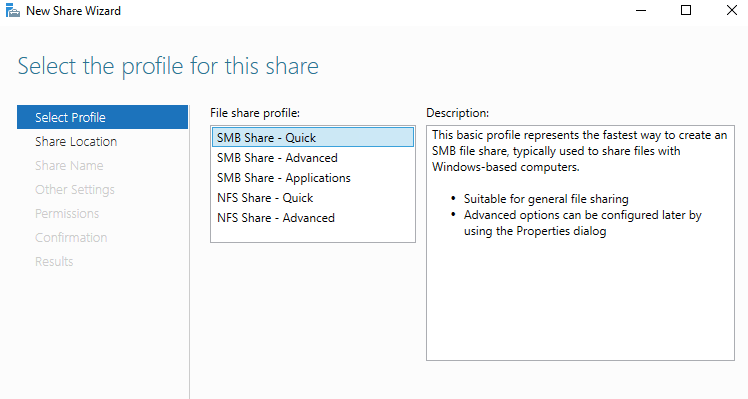
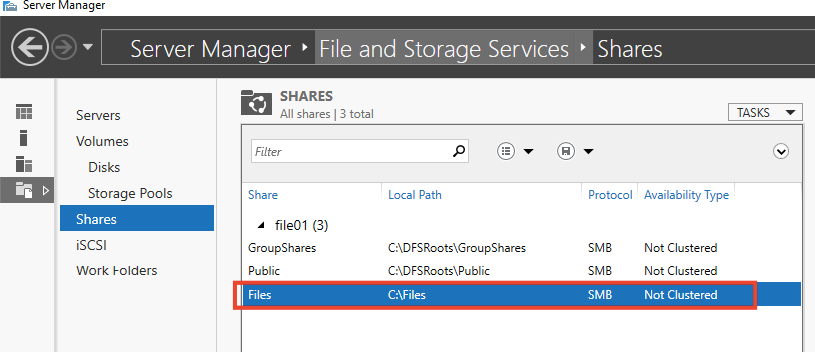
19- From File and Storage Services on Server Manager dashboard, right-click on the main page and click New Share to create a shared folder.

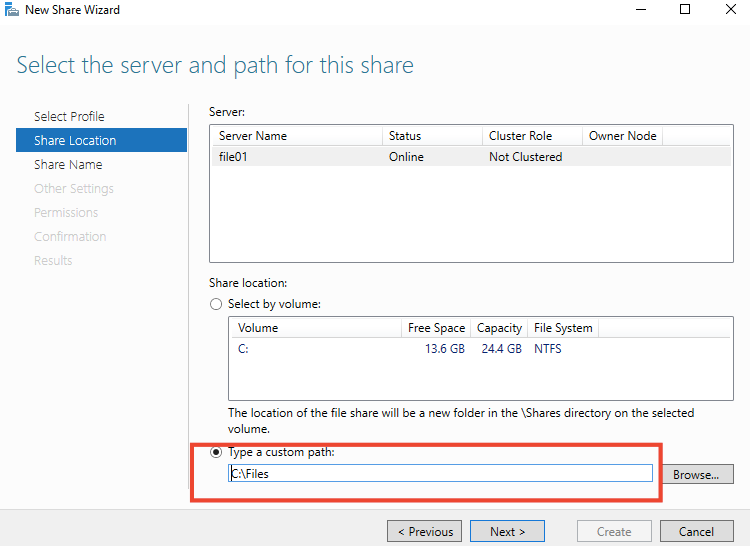
20- Select the Type a custom path on the Share Location page and type the location of the folder in which you want to share it then hit Next.
21- I’m creating a new folder named as files on fileserver1
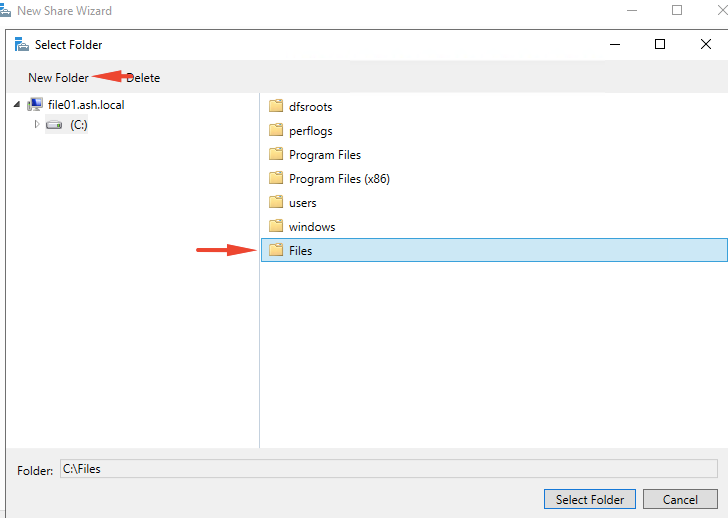
22-Choose the folder we created
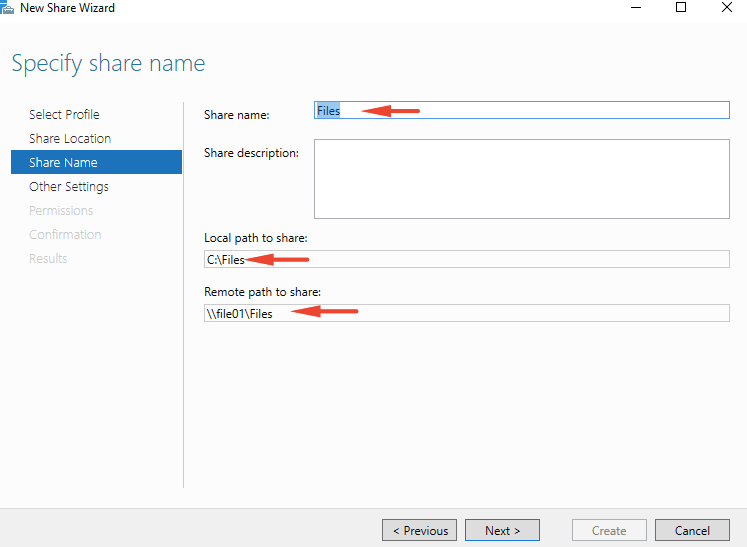
23- Specify the share name and description then click Next. If ask you the path does not exist,
24- Select Enable access-based enumeration option and click Next.

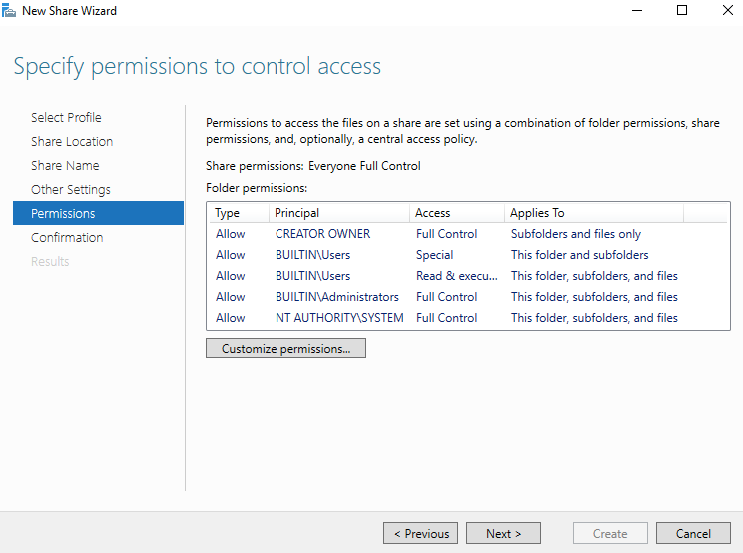
25- On the Permission page click Next. If you want to set permission to a domain user, click customize permissions and set permission for domain users group and domain admins group.
26- Click Next on the Management Properties page. On the Quota page set a quota for the path if you want then click Next. On the Confirmation page click Create then click Close to complete the task.
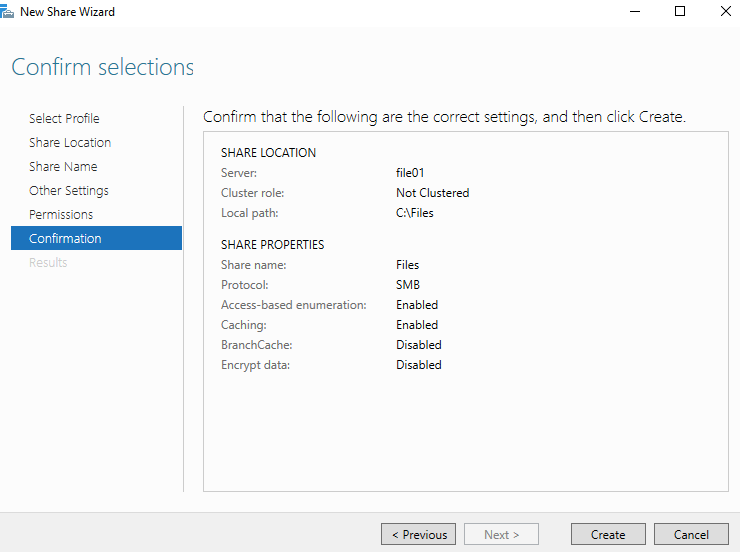
27- Our Share is thus created
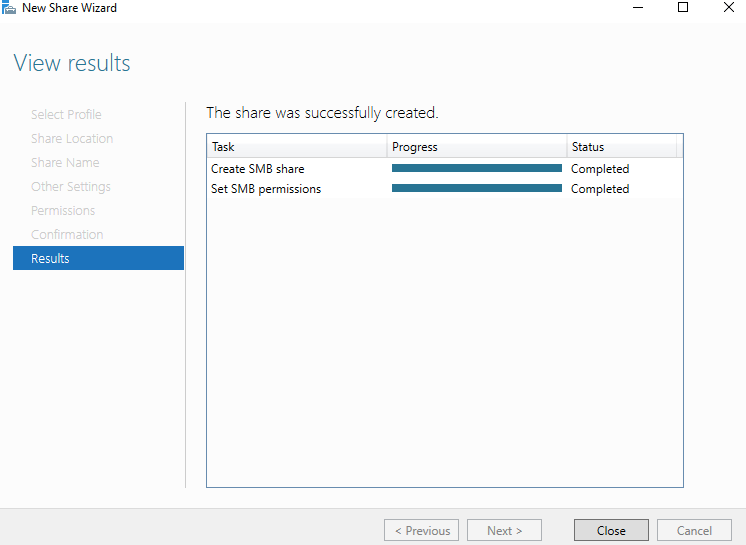
28- The Summary tab shows you have successfully created a share folder for our first file server
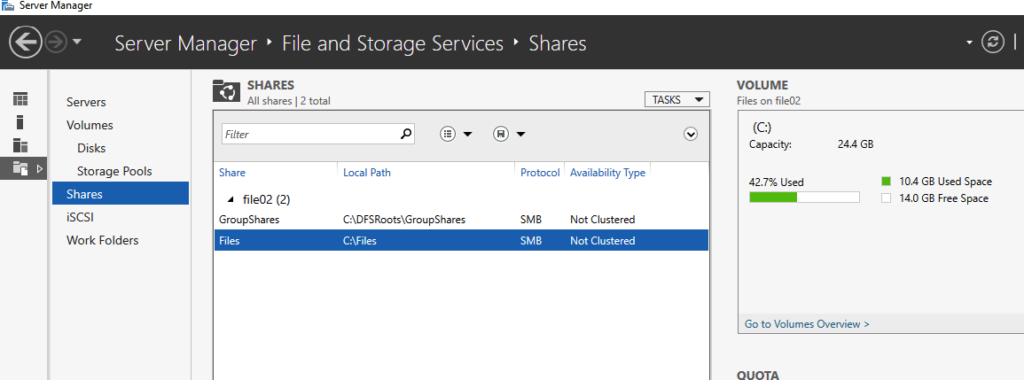
29- We now need to create the same folder for the second file server as well. I’ve repeated the above steps to create an SMB share.
Add Folder to DFS-N and Configure Replication
A replication group is a set of servers (members) that participate in the replication of one or more folders. DFS Replication allows you to synchronize directories with files (replicated folders) between servers that are part of a DFS replication group.
We will now need to add the two shared folders we created to the DFS namespace server for them to keep the shared resources and replicate data between them.
30- From the DFS Management console, click New Folder from the action menu and add the shared folders of both file servers like the screenshot.
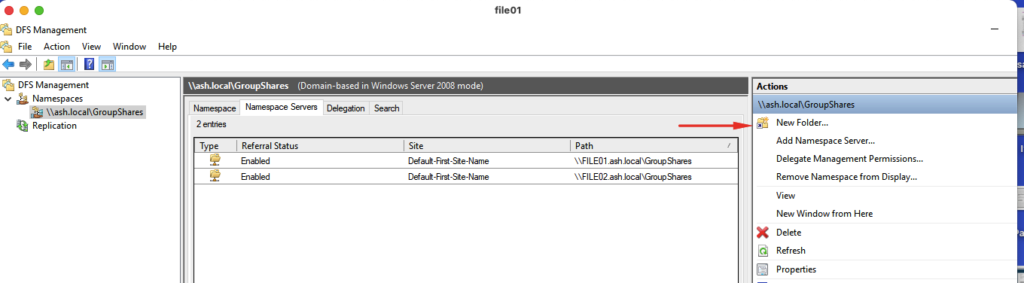
31- Add both the folders we created under the file servers
32- Choose to create the replication group
33- Click Next on the Replication Group and Replication Folder Name page.
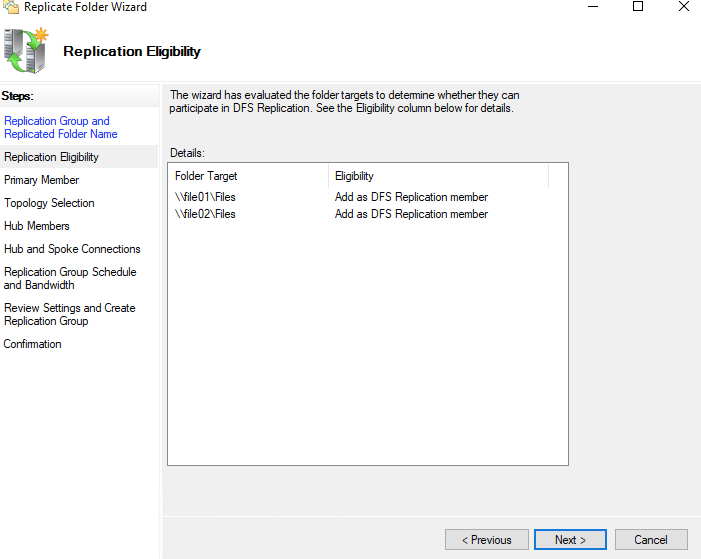
34- On the Replication Eligibility page click Next.
35- Select the first server (file1) as the primary member server and click Next.
36- Select the Full Mesh topology on the Topology Selection page and hit Next.

37- Leave the default setting on the Replication Group Schedule and Bandwidth then click Next.

38- Review Settings and Create Replication Group only click Next to go to the next page.
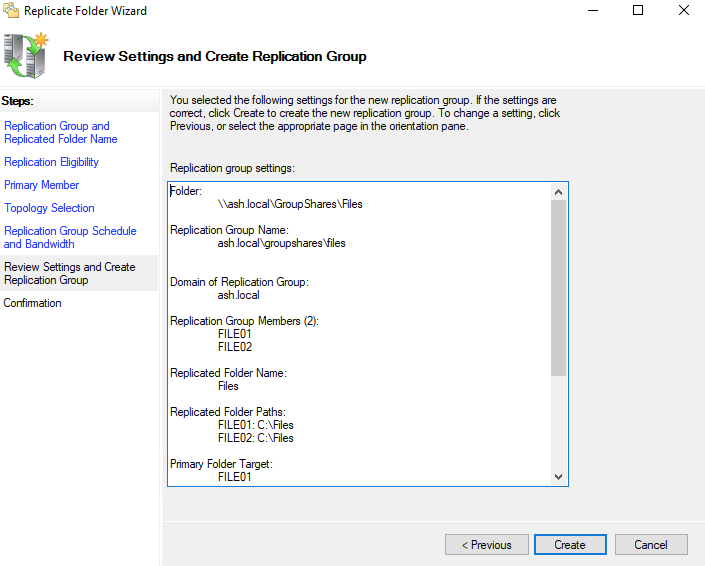
39- On the Confirmation page. Click Close and close the page.

40- Finally, the configuration should finish successfully. Expand namespace to Files and see the result.
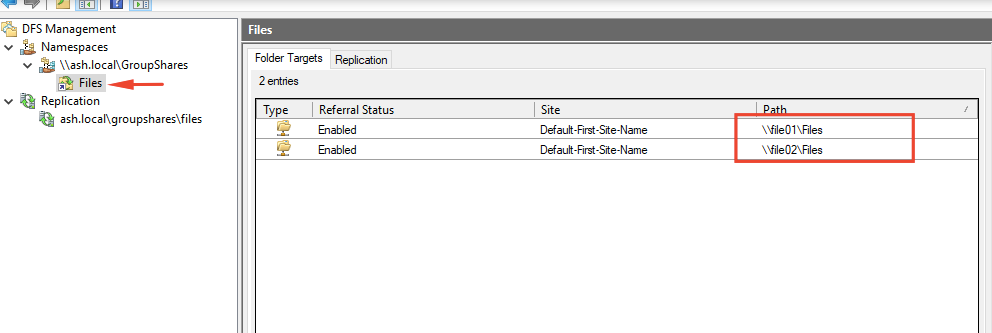
41- To test the replication between the first file server and the second file server, just copy a file to the shared folder (Files) from the first server and see the file should be on the second server as well.
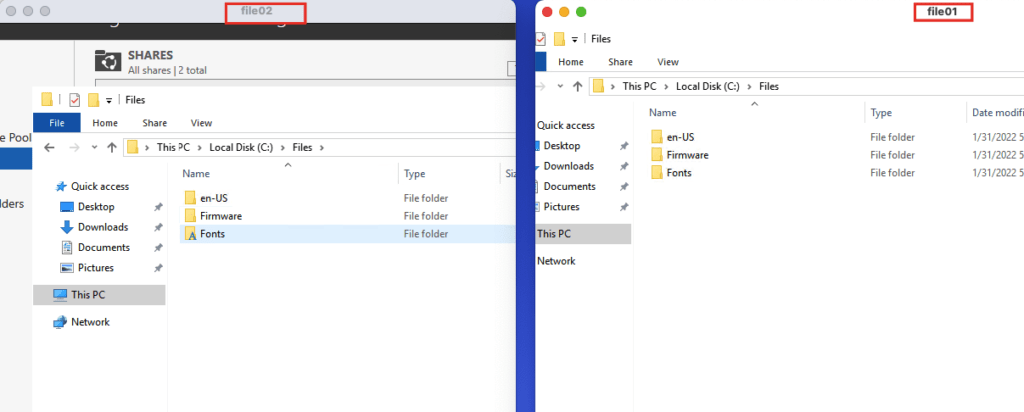
42- The replication status can be viewed from the Status dashboard

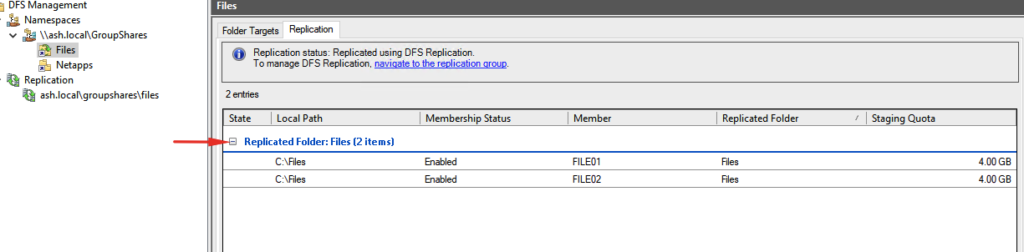
That is it, is a simple practice to install and configure Distributed File System on Windows Server 2022
(Visited 988 times, 1 visits today)
DFS stands for Distributed File System, and it provides the ability to consolidate multiple shares on different servers into a common namespace. Whether or not there are multiple locations providing easy access to that data is something that we and IT are charged with. If we can provide easy access, one that consolidates the different locations where data can exist under a single store in a single path, that makes things a lot easier for our users, which in turn makes it easier for us as admins. It is attempting to resolve both of these situations that is the reason why DFS exist and indeed has existed for a number of OS versions.
Let’s take a look at on example where DFS is useful. I am talking here about standalone DFS namespace and not the domain DFS namespace. I will talk about differences so that you know what to choose. Imagine you have the following share setup in your organization. What is “wrong” with the left side?

Well, imagine you were to move the software data or any other share to a new file server. You’re going to have to update all the user drive mappings to redirect them to the new server share. Now this might be a simple case of updating a logon script, but what about all those users that have mapped it manually. You’re going to have to let them know that you’ve made this change and then you’ll have to go through the process of fixing it, and explain to them why this IT change broke their share access. If you take a look at the right side, DFS will allow us to simplify this by presenting a common namespace to the users, whilst in the background transparently redirecting them to the various share locations. So we can update these locations in the background without affecting the UNC path. So for a standalone DFS namespace it would look something like this. We would have the server name (DFS01), we would have the DFS namespace name(Shared Files), and then we would have subfolders representing project Organization, Home, UserFiles, and Software, etc. So now we’ve got a single drive mapping, in this case S, which is mapping to all these shares in the background, and as I say, if you wanted to redirect or move those shares, then you can do that using the DFS namespace without having to go through and update all the user client drive mappings.
Now, if we were doing this using a Domain DFS namespace, then instead of using the server, DFS01, as as the server name, you actually use the Active Directory domain name, and like before, the user will see the shares presented as subfolders.
STANDALONE VS DOMAIN NAMSPACE
Tthe key difference is the referral server and where the DFS information is stored. On a standalone DFS implementation, the referral information is stored locally on the single DFS referral server that you choose when you configured DFS. Now this type of configuration is useful if you don’t have an Active Directory domain or if for some reason you don’t want to integrate with Active Directory, but the downside is that you can only have a single referral server, and if that server is offline then you’re not going to be able to access the DFS namespace. The more common and generally preferred approach is to use Domain DFS. In Domain DFS you can have multiple DFS namespace referral servers, perhaps spread out amongst your core sites, and we use Active Directory to direct the clients to the closest referral server.
DFS Replication
DFSR is the component of DFS that allows you to duplicate the DFS data and replicate copies of that data across multiple locations. DFSR enables you to take file data and keep the data synchronized across two or more locations, and that’s an important differentiation from BranchCache as BranchCache maintains a single master copy with only a local read-only cache. When you have multiple copies of the same data, there are inherent risks from people updating that data in multiple locations at the same time. Therefore, before setting up DFSR, ask yourself, will people, or maybe processes, be likely to be updating the files simultaneously in multiple locations? If this is expected to happen a lot, then DFSR may cause you issues and you may want to consider using BranchCache or perhaps just keeping a single copy of the data.
DFSR is very powerful, and it enables you to create really any type of replication topology that you can think of, and a useful feature of any replication mechanism is the ability to schedule and throttle the replication. If your WAN link is constrained, then you can protect it by only enabling replication in the evenings. Anytime you’re going about replicating content from two different locations, there’s always the chance that those two locations could get manipulated or changed at the same time. And so, for that reason, it can be important for us to configure staging or essentially a temporary location where data goes before it ends up replication from one site to the other. And finally, it also supports remote differential compression. This enables it to officially replicate only the changes to files, and not have to replicate the whole file itself when perhaps only a few bytes of data has changed. We will see how this works a little bit later.
DFSR Topologies
- One – to – One Replication –> This is where data is synchronized between two servers. This is an easy to understand topology, and relatively easy to troubleshoot, and it’s good if you have two main locations dispersed over a WAN link.
- One – to – Many Replication –> This is useful if you have a main central site and you want your branch sites to have local copies of the data. A great use case for this could be a software distribution share or maybe you have read-only reference information that you want to make available to your branch users. It’s worth highlighting that the shares on DFS within your branch sites or even your central site, can be made read-only, and the standard NTFS file permissions apply.
- Many – to – One Replication –> This, as the name suggests, is where multiple sites all replicate their data into a central location. So where might this be used? Well, it could be used for backup, where you have all the data replicated from your branch site, replicated into a single central site, and we have the backup software running on that central site.
- Hub – Spoke Replication –> this is similar to many-to-one replication, however, it’s bidirectional. This means that there would be two replication hubs between the branch sites because the branch sites would need to send data to the central site, and then the central site would replicate it out to the other branch sites.
- Full Mesh –> full mesh is where any server can potentially replicate with any other server. Now this can speed up the replication of changes, as there is a direct connection between sites, but it can also cause excessive replication, and it can also be very complicated to troubleshoot.
So, as you can see, you can configure replication pretty much as you wish, and as a rule of thumb I’d recommend aligning your replication topology to match your underlying physical network topology. So if all your branch sites connect via the central hub site, then the hub-spoke replication topology might make sense. However, like most design decisions, always strive to keep things as simple as possible, and always be able to justify why you’ve configured something in a particular way.
INSTALL AND CONFIGURE DFS NAMESPACE (STANDALONE)
The first thing we’re going to do is configure a standalone DFS namespace. A standalone DFS namespace is useful when you don’t want to integrate with Active Directory, but you want to store the DFS information locally.
The first thing we need to do is install the DFS namespace’s role within Windows

Once done click on Tools –> DFS Management
DFS Management Console will open and we can see both halves of DFS (Namespaces and Replication) We will talk about replication later.

For the first step in this process, let’s actually go through for the configuration of a namespace, which will point to our share location that we wanna make available. To create a new Namespace, right-click on Namespaces and select New Namespace

Now we need to select or tell DFS what server is going to be the Namespace Server. In my case that will be DFS. Click Next
(IF YOU NOTICE THAT YOU ARE NOT ABLE TO USE BROWSE IN WINDOWS SERVER 2016 DFS, UNINSTALL KB3186568 AND REBOOT THE SERVER.
The issue is connected to update Microsoft .NET Framework 4.7 (KB3186539 for 2012R2 and KB3186568 for 2016 and Win10)

Now we need to create a name for the namespace that we’re interested in. Now, this name for the namespace does not necessarily need to be the same thing as the share name. Instead, what we wanna create is a location that users can go to where subfolders of which, at least from their perspective will be the variety of different folders or shares that already exist. You can call it everything, or software or Shared Documents etc, I will call mine Data
Now, just like any old share, we also need to configure the permissions on that share as well as the location as to where it goes. Click on Edit Settings

Here you can change the permission of the share folder according to your requirements. Remember, this is not yet the company shared location. We’ll plug that in after we configure this DFS route. Our local path currently is C:\DFSRoots\Data and then you can also configure some permissions on this shared folder as well. will leave the defaults and click OK and next
Now we have important distinction here because on one hand, you have what’s called a domain-based namespace where the namespace in pathing itself exists in Active Directory. On the other side, you have what’s called a standalone namespace, which correspond to the file server on which we’ve installed DFS. Now, in the case of a standalone namespace, you’re effectively creating a share just like you would a traditional share that collects and aggregates all the links of the share folders. Short of hosting this share on top of a fail over cluster, as you can see down in the description, this doesn’t provide you any height availability for the share. Now, this stands in contrast with the domain based namespace where when the namespace itself exists in Active Directory, any Active Directory domain controller can point that user to the correct location as long as you just have an Active Directory in place for them to reference against. Now, the biggest difference here is the idea that with the domain based namespace, you’re actually referring to the name of the domain itself as the source location for that share. So here we’re doing \mehic.se\data is the root for the namespace we’re creating. This is different from down in the bottom where again, it’s just the file server itself.
We will first create a standalone namespace so that you see how it looks like and then we will create domain-based namespace. Click Stand-alone namespace and click next and Create


Now we can see that the namespace has been created. So the first part of the namespace, because it’s a standalone one, is the DFS name that we selected, followed by the namespace name.

Now a namespace without any targets is not much use to anyone, so the next thing we need to do is create a referral target. We will create a new folder which becomes the first in that series of links that we want to aggregate under the namespace. Right click on the namespace and choose New Folder

I will call it UserFiles –> Click ADD –> Browse and then for the folder target, we will set up the path of the folder target on our server DFS and we’ll associate it with that shared UserFiles.
Click OK 2 times.


Now let’s just go add a couple more, but now I’m going to add a share or a folder path that is on a different server. Right-Click on the Namespace and select New Folder
I will call it IPAM Share 1 ( This is just a friendly name that the users are going to see under the Data path within the namespace so you can type in whatever you want).

So this is just to demonstrate that even though it’s a standalone namespace you can still point to Folder Targets, or folder shares, on different servers. The standalone namespace just means that the referral information is stored on one server.

And you can see if I go to the Namespace again, you can see the IPAM path is present even though that’s on a different server.

INSTALL AND CONFIGURE DFS NAMESPACE (DOMAIN-BASED NAMESPACE)
This is very similar to what we do in the standalone namespace, but this time the information is going to be stored within Active Directory. I will use my servers FILESRV01 and FILESRV02 for this and for the DFSR part as well.
I already installed DFS Namespace and DFS Replication role on both servers.

Open DFS Management Console and right click on Namespace and select new namaspace

This time server will be filesrv01, click next

Now we need to give it a name and this time I will call it UserData and I will leave the permissions as default, click next

This time we will select the option Domain-Based namespace. Enable Windows Server 2008 mode will give us support for scalability as a function of Active Directory and also, so you to be able to use access base enumeration. Be aware that if you should choose the non-server 2008 mode and you later need to enable it, the only way to do that is to actually remove and then recreate the namespace in order to turn on this extra functionality like access based enumeration. So unless you’ve got an old server, it’s best to select that. Click next and create

Now, the difference you’ll notice is that now the namespace path is actually \, my domain name, which is mehic.se\UserData, whereas on a standalone namespace it would have been \, and then the server name, so that’s the obvious difference between domain and standalone from a user’s perspective.
Let’s add some target folders to this. Right-Click on the namespace and select New Folder

Give it a name and browse to the shares. You will need to add the one by one.


CONFIGURE NAMESPACE REFERRAL SERVER
The referral servers are the servers that refer the DFS client requests for either a domain or a standalone DFS namespace, and redirects them to the target shares. Right now I have only one referral server and we can see that by clicking on DFS namespace –> Namespace Servers

However, we don’t have any backup servers, so if this server goes offline we’re going to lose our namespace. Just to point to be able to add second server you will need to have DFS Namespace role installed on that server. I will use my FILESRV02 for this. When that is done we can click on Add Namespace server in DFS Management Console –> Actions Pane –> Add Namespace server

Add your server and click on OK

You will notice in the middle it’s actually telling us what Active Directory site this server is in as well. DFS is Active Directory site aware, which basically means that if you have folder targets in different sites, then it’s going to try and allocate the client to the closest folder target based on the client site.
That’s it. Next part will focus on DFSR and how we can configure it. We will take a look at replication targets, scheduling, staging etc.
Thanks for reading!
Cheers,
Nedim