
What is a desktop wallpaper? When you boot your computer, there is an initial screen that comes up, in which your folders, documents, and software shortcuts are placed. The background of this screen can be a single colour, multiple colours, or some other graphical representations. A desktop wallpaper is highly customizable, and you can give yours a personal touch by adding your images (including your photos from a camera) or download beautiful pictures from the internet. What you need to know is that these images that you add will neither increase nor decrease the speed of your computer.
What is the use of a desktop wallpaper? Well, adding a wallpaper to your desktop is not mandatory. In fact, you can decide to use a dark colour, and life will move on as usual. However, this element comes with a sense of beauty. They add glamor to your computer and make it look aesthetically appealing and highly presentable. Sometimes, people display their feelings through the use of desktop wallpapers. Interesting, huh? You can add an image that shows how you feel or one that means something to you. Adding a quote will act as a reminder of what inspires you in your day-to-day life. That said, desktop wallpapers cannot be ignored, they mean different things to different people.
Can I design desktop wallpapers? Yes, you can! You do not need to be a graphic designer for you to do this. All you need to do is to know how to save images as wallpapers, and there you go! You will have a wallpaper that suits your needs and preferences.
How do I make an image my desktop wallpaper? You can do this by following a simple process: 1. Select a photograph from your collection. 2. Right-click the image and select the option to set it as your background. Once you are done, you can play around with an array of 3D, screen resolution, and tiling options available, and choose one that befits you.
UHD 16:9
3840×2160
HD 16:9
960×540
1024×576
1280×720
1366×768
1600×900
1920×1080
2048×1152
2400×1350
2560×1440
2880×1620
3554×1999
UltraWide 21:9
2560×1080
3440×1440
UltraWide 24:10
2880×1200
3840×1600
UltraWide 32:10
2880×900
Widescreen 16:10
960×600
1152×720
1280×800
1440×900
1680×1050
1920×1200
2560×1600
2880×1800
Widescreen 5:3
800×480
1280×768
Fullscreen 4:3
800×600
1024×768
1152×864
1280×960
1400×1050
1440×1080
1600×1200
1680×1260
1920×1440
2048×1536
2560×1920
2800×2100
Fullscreen 5:4
1280×1024
1920×1536
2560×2048
Fullscreen 3:2
960×640
1152×768
1440×960
1920×1280
2000×1333
2160×1440
2736×1824
2880×1920
3000×2000
Tablet 1:1
1024×1024
1280×1280
2048×2048
Mobile 9:16
360×640
480×854
540×960
720×1280
1080×1920
Mobile 2:3
320×480
640×960
768×1152
Mobile 3:5
240×400
480×800
768×1280
Mobile 3:4
240×320
480×640
600×800
768×1024
2X Widescreen 16:10
1920×600
2304×720
2560×800
2880×900
3360×1050
3840×1200
2X Widescreen 5:3
1600×480
2560×768
2X HD 16:9
1920×540
2048×576
2560×720
2732×768
3200×900
3840×1080
2X Fullscreen 4:3
1600×600
2048×768
2304×864
2560×960
2800×1050
2880×1080
3200×1200
3360×1260
3840×1440
2X Fullscreen 5:4
2560×1024
2X Fullscreen 3:2
2304×768
2880×960
3840×1280
3X Fullscreen 4:3
3072×768
3456×864
3840×960
3X Fullscreen 5:4
3840×1024
Description: Windows 10 original wallpaper in red in 4K resolution.
If you’re a Windows 10 user, you are probably familiar with Blue Screen of Death, but some users have reported red screen on Windows 10.
After the red screen shows, you won’t be able to do anything, and you’ll be forced to manually restart your computer. What is the cause of the red screen and how to fix it?
In most cases, a red screen on Windows 10 is caused by a hardware error, especially if you overclock your computer. Sometimes a red screen can be caused by incompatible drivers or BIOS issues, so let’s see how to fix that.
What does a red screen of death mean?
A red screen is an unusual problem that can occur on Windows 10. Speaking of red screen issues, users reported the following problems as well:
- Windows 10 red screen startup – Sometimes red screen can appear right on system startup. This issue might be caused by third-party software or by outdated drivers.
- Blank red screen Windows 10 – This is most likely caused by overclocking, so be sure to remove all overclock settings.
- Windows 10 red screen loading – Your PC can get stuck while loading on a red screen. This is an unusual problem, but you might be able to fix it using one of our solutions.
- Red screen on laptop – Can appear on desktop PCs as well as laptops. If you have this issue on your laptop, the problem might be with your graphics card.
- Red screen Windows 10 with cursor, audio – This is most likely caused by your graphics card or your drivers.
- Red screen Windows 10 explorer.exe, Excel – This issue can appear while using Windows Explorer or Excel. Try reinstalling your graphics card drivers or the problematic applications.
- Red screen Windows 10 two monitors – If this happens, the cause is most likely your configuration or a graphics card driver.
- Red screen Windows 10 just flashes – If the red screen keeps flashing on your Windows PC, the problem might be caused by your overclock settings. In some cases, the issue might be faulty hardware.
- Red screen Windows 10 Nvidia – Can appear while using Nvidia graphics. Be sure to remove overclock settings and update your drivers.
How can I fix the Red Screen of Death errors on Windows 10?
1. Use a repair tool
Using a third-party repair tool can be the best and fastest solution to solve the Red Screen of Death errors on Windows 10.
2. Remove the overclocking settings
In order to get the best performance out of their hardware, users often overclock their CPU or GPU. Overclocking means changing the hardware clock rate, multiplier, or voltage.
Although this gives you increased performance, it also increases the heat that your CPU or GPU produces.
Due to increased heat, your CPU or GPU might become unstable, or in the worst-case scenario, you can permanently damage your hardware if you’re not careful.
As you can see, overclocking isn’t for basic users, and if you’re getting a red screen on Windows 10, you might want to remove any overclocking settings.
Removing overclocking settings is usually done through BIOS, and it’s different for each type of BIOS. If you haven’t overclocked your CPU or GPU, you can skip this solution.
3. Update your BIOS/UEFI
Sometimes a Red screen on Windows 10 might be caused by your BIOS/UEFI, and in order to fix it, you need to update it.
This isn’t a procedure intended for basic users, and if you don’t do it properly, you can cause permanent damage to your computer.
In order to update your BIOS/UEFI, you need to visit your motherboard manufacturer’s website and download the latest version.
Most motherboard manufacturers have instructions on their website on how to update BIOS, so if you’re planning to update your it, make sure that you read those instructions first in order to avoid any unnecessary damage.
If you don’t know how to update BIOS properly, here’s an excellent guide to learn all about it.
4. Update your graphic card driver
- In the Search bar type Device Manager and select it from the list of results.
- Find the Display adapters section and expand it. Right-click your device in the Display adapters section and choose Uninstall from the list.

- Check Delete the driver software for this device and click on Uninstall.
- After the current driver has been removed, restart your computer.

In addition, you might want to update your graphics card drivers. If you use a desktop PC, go to your graphics card manufacturer’s website and download the latest drivers for your graphics card.
If you use a laptop, go to your laptop manufacturer’s website, find your laptop model, and download the latest drivers for it.
Updating the drivers manually can create additional problems on your PC if you install the wrong version of them.
As a result of that, we recommend you update your drivers automatically using third-party software. Thus, you will prevent file loss and even permanent damage to your PC.
On the same note, you might consider a suitable driver solution from the best driver update software for your Windows 10 PC.
5. Check for hardware malfunctions
Sometimes a red screen can be caused by faulty hardware, and users have reported that a faulty graphics card can cause this problem.
If your computer is under warranty, it wouldn’t be a bad idea to take it to the repair shop to have it checked for hardware malfunctions.
Few users have reported that a red screen was caused due to a faulty graphic card, and after replacing the problematic card, everything went back to normal.
There are also reports that CD/DVD readers may cause this issue in some rare cases, so you might want to temporarily remove your CD/DVD reader.
6. Remove recently installed software
- Click the Start button and choose Settings.
- Click on Apps.

- In the left pane choose Apps & features. Find the recently installed software on the list, click it, and then click the Uninstall button.


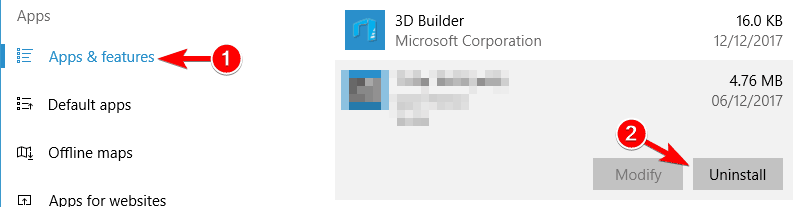
Sometimes in order to fix this problem, you need to remove all files associated with the software you uninstalled. The fastest and most effective way to do that is to use an uninstaller application.
If you need an uninstaller app, we strongly recommend you try the following software solution. It’s extremely simple to use thanks to its clean and friendly user interface.
Hence, you can find many uninstaller solutions that remove problematic apps from your PC, but you should choose from the best uninstaller software to fix this issue properly.
7. Reinstall AMD drivers without Catalyst Control Center
- Remove your currently installed graphic card driver.
- Download the latest AMD drivers.
- Run the setup and extract files to a specific folder on your computer (remember where you extract these files because you’ll need them later).
- If the setup automatically starts, cancel it.
- Open Device Manager and expand the Display adapters section. Find your graphics adapter and right-click it. Choose Update driver.
- Choose to Browse my computer for driver software.

- Find the folder where AMD drivers are extracted and click Next to install the drivers but make sure that the Include subfolders option is checked.

- Restart your PC.


For a faster process, you can also rely on the software recommended in the solution above.
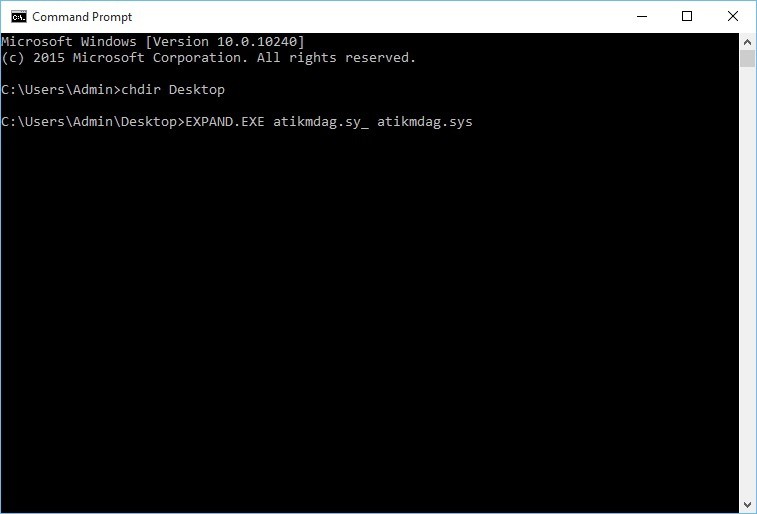
8. Recover the atikmdag.sys file
- Open the AMD driver folder and find atikmdag.sy_ file. Copy it to your Desktop.
- Search for cmd and click on Run as administrator to run Command Prompt.

- In Command Prompt, change your current folder to Desktop. You can do that by typing the following line and pressing Enter on your keyboard:
chdir Desktop
- Type the following and press Enter to run it:
EXPAND.EXE atikmdag.sy_ atikmdag.sys
- Go to the following folder and find atikmdag.sys: C:WindowsSystem32Drivers
- Rename the file to atikmdag.sys.old.
- Now move the atikmdag.sys file from your Desktop to C:WindowsSystem32Drivers
- Restart your PC.


- Fix: Green Screen of Death on Windows 10/11 [Crash]
- ERROR_OPLOCK_SWITCHED_TO_NEW_HANDLE [BSoD Fix]
9. Change the settings.ini file
- Open Documents, go to the BFBC2 folder, and find the settings.ini file.
- Find the following line:
- DxVersion=auto
and change it to: - DxVersion=9
- DxVersion=auto
- Save the changes, and try to run the game again.
Note: Users report that the red screen affects Battlefield: Bad Company 2, and in order to fix this issue, you need to change the game’s settings.ini file.
10. Underclock your graphic card
Sometimes underclocking your device can fix the red screen issues on Windows 10. Few users have reported that lowering the original takt rate on AMD 7870X graphic card has fixed the red screen issues for them.
Once again, if you don’t know how to underclock your graphic card, ask a professional to do it for you.
Red screen issues in Windows 10 can be quite serious, and in most cases, these issues are related to your hardware, so while fixing this problem on Windows, be careful to avoid any potential damage.
Some users might confuse red tint on a laptop screen with this issue, but the two aren’t related.
As always, make sure to leave your comments in the section below.
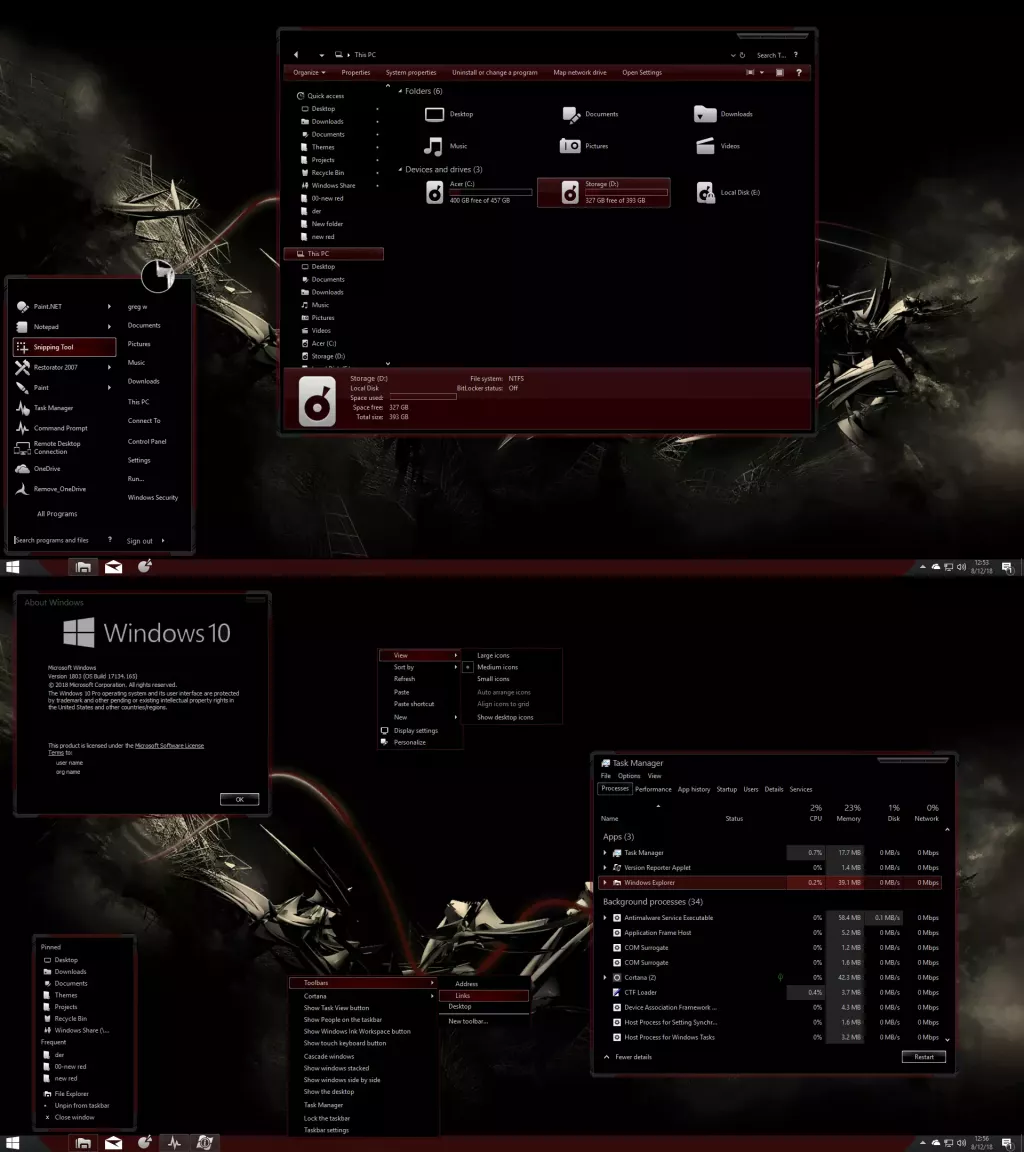
The Red — это целый комплекс для оформления внешнего вида Windows 10. Тема полностью лишена привычной прозрачности, однако это не мешает сделать интерфейс более оригинальным и модным. Прямые углы, ровные границы окон, меню и панелей делают это оформление строгим. В цветовой схеме в качестве основного использован черный цвет. За исключением нескольких кнопок и панели, все элементы интерфейса темные. А вот иконки здесь серые. С общей темой оформления их объединяет антуражный, градиентный стиль. Дополнительным цветов является красный.
Поддержка версий Windows 10: 1809, 1803, 1709, 1703
Как поставить оформление Windows 10
- Скачайте и распакуйте 1539441460_red_2.zip с помощью WinRar.
- Если Вы устанавливаете темы первый раз: пропатчите систему с помощью UltraUXThemePatcher.
- Переместите файлы *.theme, а также папку с содержанием ресурсов *.msstyles по адресу: C:\Windows\Resources\Themes.
- Нажмите в пустой области на рабочем столе и выберите пункт «Персонализация» в контекстном меню.
- Перейдите в раздел «Темы» и примените добавленную тему.
Внимание! Чтобы узнать версию системы, нажмите сочетание клавиш «Win+R» (где «win» — это кнопка с логотипом windows на клавиатуре), а затем в окне «Выполнить» введите команду «winver» и нажмите Enter (или кнопку «ОК»). Кроме того, для установки кнопки пуск, панели быстрого доступа и других ресурсов Вам потребуются специальные программы. Ссылки на них указаны в блоке «Дополнения», в правой колонке.
Список файлов
- der
- Wall
- 1.png978.46 Kb
- der.msstyles1.24 Mb
- shell
- NormalColor
- en-US
- shellstyle.dll.mui120.5 Kb
- shellstyle.dll1.64 Mb
- en-US
- NormalColor
- Wall
- der.theme561 b
Установить наше приложение