
Notifications in Windows are designed to keep you informed about important updates, messages, and alerts. Whether it’s a new email, a calendar reminder, or a system update, notifications help you stay on top of things without constantly checking your apps.
To help you manage these notifications and minimize distractions, Windows offers a feature called Do Not Disturb. This feature allows you to silence notifications during specific times or activities, ensuring uninterrupted focus.
How notifications work
Notifications in Windows can appear as bannerson your screen and are also accessible in the notification center. You can customize which applications can send you notifications, the priority and the style of these alerts.
When you have new notifications, the notification bell icon on the taskbar lights up.
For notifications that display as banners, you can select the quick action buttons within the banner to perform specific tasks, such as dismissing a reminder or snoozing an alarm.

To check the notifications you missed, open the notification centerusing one of the following options:
-
Select the clock or the notification bell icon on the taskbar
-
Press the Windows key + N
-
Swipe from the side of the screen
Actions on notifications in the notification center
In the notification center, you can take different actions on notifications:
-
Read more details or take an action, such as replying to a message without opening the related app
-
If a notification has an arrow next to the time, select the arrow to expand it and check more details or additional actions
-
Select the close button on a notification to clear it. You can also select the close button next to the app name to clear all notifications from a specific app
-
Turn off all notifications for a specific app: select the more button > Turn off all notifications
-
Select the Clear all button to remove all notifications from the notification center
Configure notifications
Managing notifications is essential to avoid being overwhelmed by constant alerts. By customizing your notification settings, you can ensure that you only receive the most important updates, allowing you to stay focused and productive without unnecessary interruptions.
Expand each section to learn more:
-
In the Settings app on your Windows device, open System > Notifications or use the following shortcut:
Notifications
-
Toggle the switch next to Notifications On or Off
To adjust notification settings for each app on your Windows device:
-
In the Settings app on your Windows device, open System > Notifications or use the following shortcut:
Notifications
-
Select the app under Notifications from apps and other senders. Adjust the notification preferences, here are the available options:
-
Turn notifications on or off: disable notifications for specific apps if you no longer want to receive them
-
Show notification banners: enable or disable pop-up banners for notifications
-
Show notifications in notification center: choose whether notifications should appear in the notification center
-
Hide content when notifications are on lock screen: prevent sensitive notifications from showing on the lock screen
-
Play a sound: toggle the sound for incoming notifications
-
Priority of notifications: Set the priority to Top, High, or Normal. Only one app can be set as Top priority, and High priority notifications will appear above Normal ones in the notification center
-
Adjust these settings to ensure important alerts are highlighted and less critical ones are minimized.
There are two additional notification settings that you might want to review.
In the Settings app on your Windows device, open System > Notifications and expand Additional settings or use the following shortcut:
Notifications
-
Show the Windows welcome experience after updates and when signed in to show what’s new and suggested: enable this checkbox to get a welcome screen with new features and suggestions after updates or when you sign in
-
Get tips and suggestions when using Windows: enable this checkbox to receive helpful tips and suggestions while using Windows
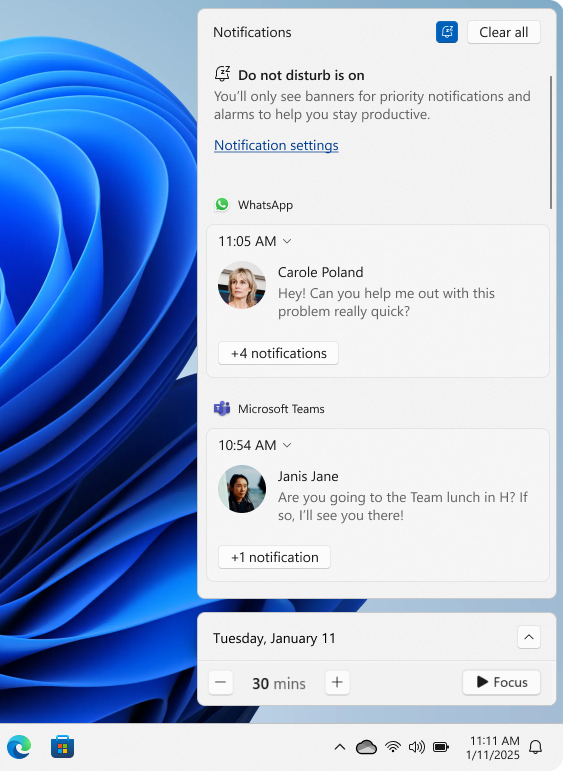
Do not disturb
Do not disturb in Windows is designed to help you stay focused by silencing notifications during critical times. This feature can be activated manually or set to turn on automatically with Focus or under specific conditions.
To manually turn on do not disturb, open the notification center and select the bell icon with zZ on it. This will silence all notifications until you manually turn it off.
When you are ready to receive notifications again, return to the notification center and select the same button to disable do not disturb. You can then review any notifications you missed while do not disturb was active.
With do not disturb on, you will only receive banners for alarms, reminders, and apps of your choice. Other notifications are sent directly to the notification center until you turn it off.
Configure do not disturb
You can configure do not disturb by setting the conditions to turn it on automatically and by adjusting priority notifications. Expand each section to learn more:
-
In the Settings app on your Windows device, open System > Notifications or use the following shortcut:
Notifications
-
Expand Turn on do not disturb automatically and configure the conditions, which include:
-
During certain time of the day
-
When duplicating the display
-
When playing a game
-
When using an app in full-screen mode
-
For the first hour after a Windows feature update
-
With priority notification settings, you can configure if calls, reminders, and certain app notifications are allowed while do not disturb is on:
In the Settings app on your Windows device, open System > Notifications > Set priority notifications or use the following shortcut:
Notifications
-
Under Calls and reminders, select the checkboxes to allow incoming calls or reminders while do not disturb is on
-
Under Apps, select which apps are allowed to send notifications while do not disturb is on by selecting the button Add apps
Related articles
Focus: Stay on Task Without Distractions in Windows
Всплывающие уведомления с новостями или сообщениями — штука удобная, но не когда вы пытаетесь сосредоточиться на работе или смотрите кино. Многие пользователи Windows 10 со временем начинают недолюбливать правый нижний угол экрана, где то и дело что-то вылезает, или нервно вздрагивать от системных звуков. К счастью, это легко поправить — сейчас расскажем как.
Важно: в этой инструкции мы приводим советы только для Windows 10. Предыдущие версии системы перестали получать обновления, а значит, стали уязвимы для вирусов, троянов и других угроз. Поэтому, если у вас все еще стоит Windows 7, 8.1 или более ранние версии, постарайтесь поскорее обновиться. А уже потом вы сможете спокойно и в безопасности настроить уведомления.
- Какие уведомления лучше оставить
- Настройка уведомлений в Windows 10
- Как отключить все уведомления сразу
- Настройка уведомлений для отдельных программ
- Режим «Фокусировка внимания»
- Тишь и благодать
Какие уведомления лучше оставить
Средства Windows 10 позволяют отключить практически все уведомления, но есть две их категории, которые мы рекомендуем оставить. Они могут влиять на безопасную работу всего компьютера.
- Антивирусная защита. О любой подозрительной активности на вашем компьютере лучше узнать вовремя. Ради этого можно даже поставить сериал на паузу.
- Обновление системы. Обновления операционной системы важны для безопасности: они устраняют уязвимости, которые злоумышленники могут использовать, чтобы заразить ваш компьютер чем-нибудь неприятным. Иногда их выпускают в срочном порядке, если какой-нибудь зловред активно распространяется через неизвестную ранее уязвимость, поэтому устанавливать их нужно как можно оперативнее.
Настройка уведомлений в Windows 10
Остальные уведомления вы можете смело заглушать и скрывать, если они доставляют неудобства. Вот как это сделать.
Как отключить все уведомления сразу
- Откройте меню Пуск и перейдите в раздел Параметры, нажав на шестеренку.
- Перейдите в группу Система.
- В меню слева выберите Уведомления и действия.
- Прокрутите вниз и нажмите на переключатель Получать уведомления от приложений и других отправителей. Он должен стать серым.
Уведомления об обновлении системы и сообщения от Защитника Windows при этом останутся — для их настройки есть отдельное меню. Зато никаких сообщений от Outlook или новостей о новом сезоне в PUBG вы больше не увидите.
Рядом с описанным выше переключателем есть еще несколько полезных опций. Здесь можно:
- Запретить системе показывать уведомления на экране блокировки — чтобы случайные люди не прочитали ваши личные сообщения из VK.
- Отключить советы, подсказки и рекомендации от Windows, которые появляются после установки обновлений, новых устройств или просто во время работы в системе.
Настройка уведомлений для отдельных программ
Допустим, вы хотите отключить не все уведомления, а только те, что приходят от некоторых программ — например, Skype или Facebook. Для этого:
- Откройте Пуск -> Параметры -> Система -> Уведомления и действия.
- Прокрутите вниз до пункта Получать уведомления от этих приложений.
- Найдите в списке нужные приложения и отключите переключатели рядом с ними.
Если вас донимают уведомления от важной программы — например, рабочей почты или мессенджера для связи на удаленке — и вы не можете позволить себе отключить их целиком, попробуйте сделать их комфортнее для себя.
Некоторых людей главным образом раздражает звук, а других — мельтешение перед глазами. Если убрать основной раздражитель, важные уведомления перестанут действовать вам на нервы. В Windows 10 вы можете выборочно отключить для программы звуковые сигналы или всплывающие оповещения. Для этого нажмите на иконку приложения в списке и рассмотрите расширенное меню.
- Чтобы отключить звуковой сигнал, но оставить всплывающие оповещения, передвиньте переключатель Звуковой сигнал при получении уведомления в положение Откл.
- Чтобы избавиться от всплывающих сообщений, но оставить звук, уберите галочки в пунктах Показывать баннеры уведомлений и Отображать уведомления в центре уведомлений.
Отдельная история — уведомления от сайтов, которым вы когда-то их разрешили. Обычно это новости с сайтов СМИ, специальные предложения от интернет-магазинов и так далее. Если один-два источника еще можно вынести, то после пары десятков разрешений браузер начнет выплевывать новые сообщения каждую минуту. Узнайте, как это исправить, из нашей инструкции по отключению уведомлений браузера.
Режим «Фокусировка внимания»: поставьте уведомления на паузу
В Windows 10 есть режим «Фокусировка внимания», который позволяет поставить уведомления (все или только некоторые) на паузу, — например, чтобы не отвлекаться на социальные сети, пока вы заняты срочным отчетом, или вечером не вздрагивать от уведомлений о новых письмах на рабочую почту. Чтобы включить режим фокусировки внимания:
- Откройте меню Пуск и перейдите в раздел Параметры.
- В группе Система откройте раздел Фокусировка внимания.
Теперь настройте ограничения:
- Выберите Только будильники, чтобы запретить все уведомления, кроме сигналов будильника или таймера с обратным отсчетом.
- Выберите Только приоритет, если хотите в определенное время, например в рабочее, получать уведомления только от приложений или контактов из приоритетного списка, который вы создаете сами.
Как настроить приоритетный список программ и контактов:
- Под пунктом Только приоритеты нажмите на ссылку Настройте список приоритетов.
- Выберите типы разрешенных уведомлений — сообщения об SMS и входящих вызовах или напоминания.
- В меню Люди при необходимости настройте список контактов, уведомления от которых будут показываться в приложениях Звонки, Почта или Skype. Обратите внимание: эта настройка не подойдет тем, кто по работе должен получать сообщения от незнакомых людей.
- В меню Приложения можно изменять список программ, которым разрешено присылать уведомления в режиме фокусировки, — например, оставить в нем только почтовый клиент или приложения для удаленной работы и больше ни на что не отвлекаться. Чтобы убрать лишнее приложение из списка, нажмите на его иконку, а затем — нажмите Удалить.
У режима фокусировки есть дополнительные настройки — автоматические правила. Здесь вы можете:
- Настроить время автоматического включения режима — например, на час ежедневной летучки.
- Запретить все уведомления, кроме сигналов таймеров или сообщений от приоритетных программ и контактов, когда вы проводите презентацию, играете в игру или используете любое другое приложение в полноэкранном режиме.
«Фокусировка внимания» не уничтожает лишние уведомления, а лишь скрывает их до того момента, пока вы этот режим не отключите. При желании вы можете в любой момент просмотреть их в Центре уведомлений, это кнопка внизу справа от часов.
Если читать их все нет желания, в настройках режима поставьте галочку Показать сводные данные о том, что я пропустил во время включения фокусировки внимания. Когда время для режима фокусировки внимания истечет, система предоставит вам краткую справку о том, что вы пропустили.
Тишь и благодать
Теперь никакие раздражители не помешают вам работать, учиться или отдыхать. Помните, что пропущенные уведомления всегда можно прочесть в Центре уведомлений справа от часов. Не отключайте их для действительно важных вещей — средств защиты и обновления системы, — благодаря которым ваш компьютер продолжает работать штатно.
У нас есть инструкции по отключению уведомлений для Android, для iPhohe и iPad, а также для macOS. А о том, как достичь еще большего цифрового комфорта, читайте в нашем блоге.
А вы знали, что можно легко настроить под себя оповещения, которые вы получаете на компьютере под управлением Windows 10? Благодаря этому вы сможете сфокусироваться на том, что действительно важно для вас.
Все настройки можно найти в меню Параметры/Settings > Система/System > Уведомления и действия/Notifications & actions (а если вы читаете с ПК на Windows 10, можно просто кликнуть здесь).
Если вы хотите, чтобы вас не беспокоили всплывающие напоминания, уведомления и будильники, включите тихий режим, кликнув правой кнопкой мыши по иконке Центра уведомлений на панели задач в правом нижнем углу и выбрав в контекстном меню Включить режим «Не беспокоить»/Turn on quiet hours.
Чтобы ничего лишнего не появлялось во время ваших презентаций, активируйте опцию Скрыть уведомления при дублировании моего экрана/Hide notifications when I’m duplicating my screen. Также может быть полезно запретить отображение оповещений на экране блокировки (Отображать уведомления на экране блокировки/Show notifications on the lock screen).

Если вам надоели уведомления от какого-то конкретного приложения, просто выключите их в разделе Получать уведомления от этих отправителей/Get notifications from these senders.

Можно выключить все оповещения на вашем ПК, деактивировав тумблер Получать уведомления от приложений и других отправителей/Get notifications from apps and other senders.

Возможно, вам будет интересен предыдущий пост из серии Советы по Windows 10.
Советы по Windows 10: превратите текст во временную шкалу в PowerPoint
You are here:
Home » Windows 10 » Disable Desktop Notifications For Specific Apps In Windows 10
In Windows 10, desktop notifications appear at the bottom right area of the desktop. Default apps as well as apps installed from Windows Store display notifications. You see a desktop notification when you receive an email message, for instance.
If you have installed all social media apps, you probably often see desktop notifications. While these notifications are great, many users often feel notifications as distractions and want to disable them.

While you can disable desktop notifications entirely (for all apps), you might want to disable notifications for apps that often show notifications or for apps that are not so important. For instance, you might want to disable Twitter and Facebook notifications. You can always open up the app to see all the notifications.
Luckily, Windows 10 allows you to disable notifications for specific apps as well. Complete the given below directions to turn off or disable desktop notifications for specific apps in Windows 10.
Step 1: Open the Settings app. To do so, either click the Settings icon in the Start menu or use Windows logo and I hotkey.
Step 2: In the Settings app, click System, and then click Notifications and actions.
Step 3: First, in the Notifications section, make sure that Get notifications from apps and other senders option is turned on. If you turn off this option, notifications for all apps will be disabled. Since we want to disable notifications for specific apps only, it’s important to keep the option turned on.

Step 4: Now, in the Get notifications from these senders section, turn off the option next to apps that you don’t want to see notifications for. For instance, if you don’t want to see notifications (all kind of notifications) for the Mail app, turn off the option next to it.
Again, don’t turn off this option if you want to disable only desktop notifications and want to see notifications for the app in the Action Center.

To turn off only desktop notifications and see notification in the Action Center for the app, click on the app in the list to see more notification actions. Here, turn off Notification banners option only.

That’s it! From now on, desktop notifications will not appear for these apps. To see desktop notifications for these apps again, please follow directions given above again and turn on the option next to them.
Notifications on Windows 10 indeed help us keeping ourselves up to date with our Mails, system updates, or any other activities by third-party apps. However, this can be distracting at times reminding us of unnecessary pop-ups or cluttering the taskbar.
Windows 10 includes a one-click switch that can disable all such notifications from the system or third-party apps. If you are constantly getting notifications from some specific programs, you may turn them Off individually as well. In case you get distracted by the number of notifications or the badges appearing on the Taskbar, you may turn off them separately.
Here’s how to turn off all the notifications on Windows 10 PC –
- Use WinKey + I to start the Settings UI.
- Click
System > Notifications & Actions. - On the right pane, scroll down to the Notifications section.
- Now, turn off the “Get notifications from apps and other senders” toggle switch.

That’s it, system apps or other 3rd-party apps will no longer push any notifications into the Action Center.
Turn off Action Center
Since you have already stopped any notifications appearing on Windows 10, there’s no point keep displaying the Action center. Here’s how to disable the whole Action Center on your device –
- Navigate to
Settings (Win + I) > Personalization > Taskbar. - Jump to the right side, scroll down, and click “Turn system icons On or Off“.
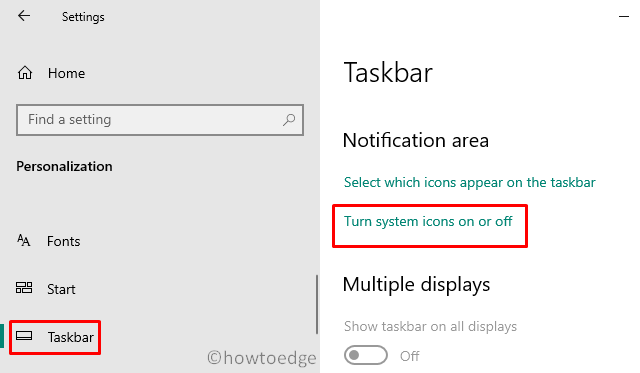
- On the succeeding window, locate and disable the Action Center toggle switch.

Doing so will remove the Action Center icon appearing at the bottom-right corner.
How to Enable All Notifications on Windows 10
You need to first enable the Action Center. If you haven’t turned off the Action Center previously, skip these steps –
- Reach out to the
Settings > Personalization > Taskbar > Turn system icons On or Off. - Next, slide the Action Center toggle switch to the right.
Now that you have enabled the Action Center, use these steps to turn On all the notifications on Windows 10 PC –
- First of all, browse to
Settings > System > Notifications & Actions. - On the right pane, slide the “Get notifications from apps and other senders” toggle switch to the right.
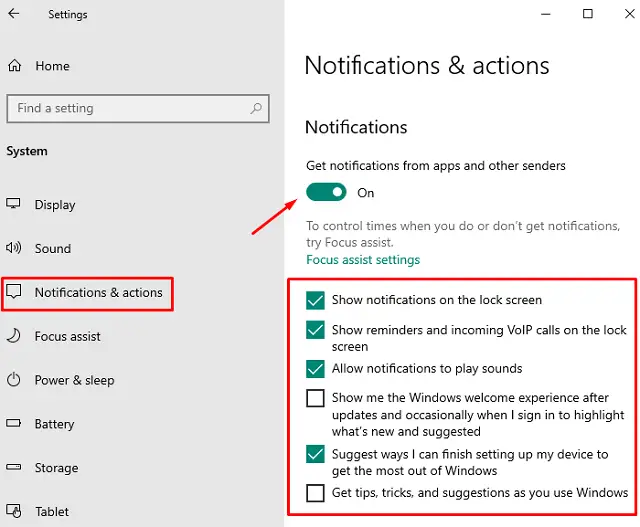
- Besides, you may also tick all the checkboxes available under the Notifications section.
- That’s it, the new notifications will start appearing on your device.
Turn Off Action center Notification Badge
The Action Center also displays a badge featuring all of the missed notifications from the system or third-party apps. Since these notifications bear the name of the applications from where it is collecting missed data, this becomes much easier to hide them. Here’s how to disable the Action Center Notification badge –
- Make a right-click on the Action Center and select “Don’t show apps icons “.
- Next, right-click again on the Action center and hit “Down show number of new notifications”.
That’s it, turning off the above two options will no longer show any notifications at the Action Center.
Tip: You can still know whether there lie any new notifications or not by seeing the color change. Usually, this appears white and turns black when there comes a new notification. If you use Dark Mode, the color change would be from black to white.
To turn back On the Action Center notification badges, just undo the changes that you performed earlier.
How to Disable Taskbar Notification Badge
In case you don’t like the cluttered taskbar and simply want to disable such badges, use these steps –
Note: Proceeding this way, you won’t be compromising with some useful notifications by Microsoft.
- Press WinKey + I to launch the Settings window.
- Click
Personalization > Taskbar. - On the right pane, turn off the “Show badges on Taskbar buttons” toggle switch.
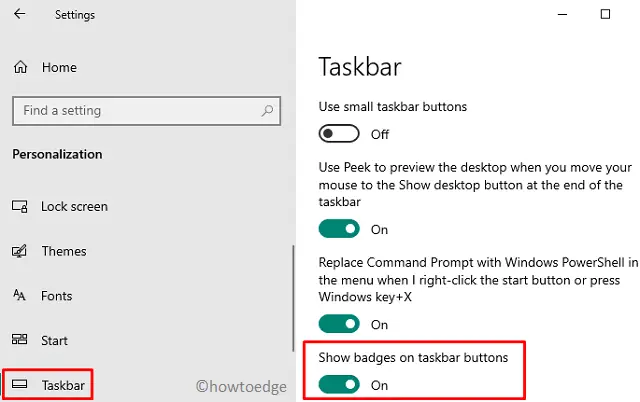
In case you are currently using the small app icons on the taskbar, you won’t be able to perform any changes. This is because the “Show badges on Taskbar buttons” option gets greyed out once you start using the smaller taskbar buttons. In order to make this work, you need to first stop using the smaller taskbar buttons.