
If you’re facing Limited Connectivity or No internet connection error, then you won’t be able to access the internet until you fix this issue. The problem can be anywhere be it the router or your system, and therefore we will need to troubleshoot the issues with both the router and your Windows PC. Don’t worry as today we are going to see How to Fix WiFi not Working in Windows 10 with the help of the below-listed guide.
Table of Contents
Many parameters can cause WiFi not to Work, first being software updates or new installation, which might change the registry value. Sometimes your PC can’t obtain IP or DNS address automatically while it can also be a driver issue.
- The limited connectivity error does not mean that your WiFi adapter is disabled; it only means a communication problem between your system and the router.
- If you cannot connect any device to the internet, then this means that the issue is with your WiFi router and not with your PC.
Method 1: Restart your WiFi router/modem
1. Turn off your WiFi router or modem, then unplug the power source from it.
2. Wait for 10-20 seconds and then again connect the power cable to the router.
![Restart your WiFi router or modem | Fix WiFi not Working in Windows 10 [100% Working]](https://techcult.com/wp-content/uploads/2019/01/Restart-your-WiFi-router-or-modem.jpg)
3. Switch on the router, connect your device and see if this Fix WiFi is not working in Windows 10 issue.
Method 2: Change your WiFi Router
It’s time to check if the problem is with the Router or Modem itself instead of the ISP. To check if your WiFi has some hardware issues, use another old modem or borrow the router from your friend. Then configure the modem to use your ISP settings, and you are good to go. If you can connect with this router, then the problem is definitely with your router, and you may need to buy a new one to fix this problem.
If you can connect to WiFi using your mobile or another device, then it means that your Windows 10 has some problem due to which it isn’t able to connect to the Internet. Anyway, don’t worry this can be easily fixed, follow the below troubleshooting steps.
Method 3: Turn Off Airplane Mode and Enable WiFi
You may have accidentally press the physical button to switch off WiFi, or some program may have disabled it. If this is the case, you can easily fix the WiFi not working with just a button press. Search your keyboard for the WiFi icon and press it to enable WiFi again. In most cases it’s Fn(Function key) + F2.

1. Right-click on the network icon in the notification area and select “Open Network and Internet settings“.
2. Click Change adapter options under Change your network settings section.

3. Right-click on your WiFi adapter and choose Enable from the context menu.

4. Again try to connect to your wireless network and see if you’re able to Fix WiFi not Working in Windows 10.
5. If the problem persists, then press Windows Key + I to open the Settings app.
6. Click on Network & Internet than from the left-hand menu select Wi-Fi.
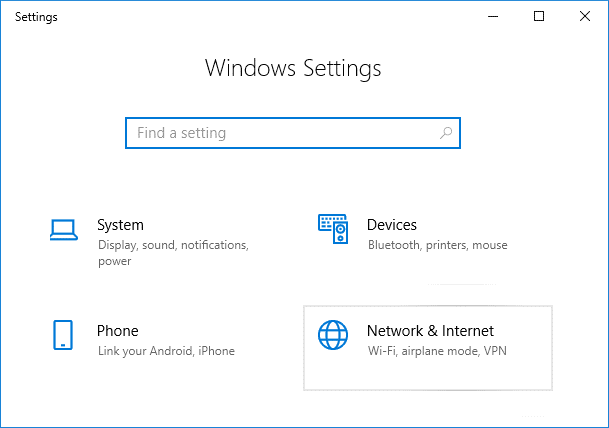
7. Next, under Wi-Fi, make sure to Enable the toggle, which will enable the Wi-Fi.

8. Again try to connect to your Wi-Fi network, and this time it just might work.
Method 4: Forget your WiFi Network and Reconnect
1. Click on the Wireless icon in the system tray and then click Network & Internet Settings.
2. Then click on Manage Known networks to get the list of saved networks.

3. Now select the one which Windows 10 won’t remember the password for and click Forget.

4. Again click the wireless icon in the system tray and try to connect to your network, it will ask for the password, so make sure you have the Wireless password with you.

5. Once you have entered the password, you will connect to the network, and Windows will save this network for you.
6. Reboot your PC and see if you’re able to fix WiFi not working issue.
Method 5: Enable WiFi from BIOS
Sometimes none of the above steps would be useful because the wireless adapter has been disabled from BIOS, in this case, you need to enter BIOS and set it as default, then log in again and go to “Windows Mobility Center” through Control Panel and you can turn the wireless adapter ON/OFF.

Method 6: Enable WLAN AutoConfig service
1. Press Windows Key + R then type services.msc and hit Enter.
2. Scroll down and find the WLAN AutoConfig service in the list (press W on the keyboard to find it easily).
3. Right-click on WLAN AutoConfig and select Properties.
4. Make sure to select Automatic from the Startup type drop-down and click on Start.

5. Click Apply, followed by OK.
6. Reboot your PC to save changes and try to connect to your WiFi network to see if your WiFi works.
Method 7: Update WiFi Drivers
1. Press Windows key + R and type devmgmt.msc and hit Enter to open device manager.
![devmgmt.msc device manager | Fix WiFi not Working in Windows 10 [100% Working]](https://techcult.com/wp-content/uploads/2016/06/devmgmt.msc-device-manager.png)
2. Expand Network adapters, then right-click on your Wi-Fi controller(for example Broadcom or Intel) and select Update Drivers.

3. On the Update Driver Software window, select “Browse my computer for driver software.”

4. Now select “Let me pick from a list of device drivers on my computer.”

5. Try to update drivers from the listed versions.
Note: Select the latest drivers from the list and click Next.
6. If the above didn’t work then go to the manufacturer’s website to update drivers: https://downloadcenter.intel.com/
7. Reboot to apply changes.
Method 8: Run Network Troubleshooter
1. Press Windows Key + I to open Settings then click on Update & Security.
2. From the left-hand menu, select Troubleshoot.
3. Under Troubleshoot, click on Internet Connections and then click Run the troubleshooter.
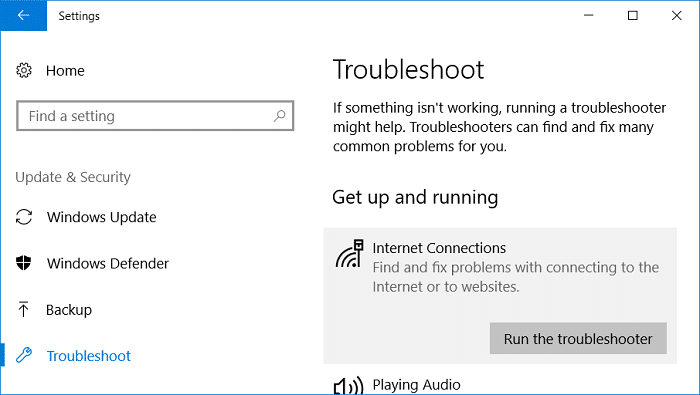
4. Follow further on-screen instructions to run the troubleshooter.
5. If the above didn’t fix the issue then from the Troubleshoot window, click on Network Adapter and then click on Run the troubleshooter.
![Click on Network Adapter and then click on Run the troubleshooter | Fix WiFi not Working in Windows 10 [100% Working]](https://techcult.com/wp-content/uploads/2019/01/Click-on-Network-Adapter-and-then-click-on-Run-the-troubleshooter.png)
6. Reboot your PC to save changes.
Method 9: Disable Microsoft Wi-Fi Direct Virtual Adapter
1. Press Windows Key + R then type devmgmt.msc and hit Enter to open Device Manager.
2. Expand Network adapters then click on View and select Show hidden devices.
3. Right-click on Microsoft Wi-Fi Direct Virtual Adapter and select Disable.

4. Reboot your PC to save changes.
Method 10: Reinstall Network Adapter
1. Press Windows Key + R then type devmgmt.msc and hit Enter to open Device Manager.
2. Expand Network Adapters and find your network adapter name.
3. Make sure you note down the adapter name just in case something goes wrong.
4. Right-click on your network adapter and select Uninstall.

5. If ask for confirmation, select Yes.
6. Restart your PC and Windows will automatically install the default drivers for the Network adapter.
7. If you cannot connect to your network, then it means the driver software isn’t automatically installed.
8. Now you need to visit your manufacturer’s website and download the driver from there.

9. Install the driver and reboot your PC.
By reinstalling the network adapter, you can get rid of this WiFi not Working in Windows 10 issue.
Method 11: Reset Network Settings
1. Press Windows Key + I to open Settings then click on Network & Internet.
2. From the left-hand menu, select Status.
3. Now scroll down and click on Network reset at the bottom.

4. Again click on “Reset now” under Network reset section.

5. This will successfully reset your network adapter, and once it is complete, the system will be restarted.
Method 12: Reset TCP/IP Autotuning
1. Open Command Prompt. The user can perform this step by searching for ‘cmd’ and then press Enter.

2. Type the following commands:
netsh int tcp set heuristics disabled
netsh int tcp set global autotuninglevel=disabled
netsh int tcp set global rss=enabled

3. Now enter this command to verify that previous functions were disabled: netsh int tcp show global
4. Reboot your PC.
Method 13: Use Google DNS
You can use Google’s DNS instead of the default DNS set by your Internet Service Provider or the network adapter manufacturer. This will make sure that the DNS your browser is using has nothing to do with the YouTube video not loading. To do so,
1. Right-click on the network (LAN) icon in the right end of the taskbar, and click on Open Network & Internet Settings.
2. In the settings app that opens, click on Change adapter options in the right pane.
3. Right-click on the network you want to configure, and click on Properties.
![Right-click on your Network Connection and then click on Properties | Fix WiFi not Working in Windows 10 [100% Working]](https://techcult.com/wp-content/uploads/2019/11/Right-click-on-your-Network-Connection-and-then-click-on-Properties.png)
4. Click on Internet Protocol Version 4 (IPv4) in the list and then click on Properties.

Also Read: Fix Your DNS Server might be an unavailable error.
5. Under the General tab, choose ‘Use the following DNS server addresses’ and put the following DNS addresses.
Preferred DNS Server: 8.8.8.8
Alternate DNS Server: 8.8.4.4

6. Finally, click OK at the bottom of the window to save changes.
7. Reboot your PC and once the system restart, see if you’re able to Fix WiFi not Working in Windows 10.
Method 14: Disable IPv6
1. Right-click on the WiFi icon on the system tray and then click on “Open Network and Sharing Center.”
2. Now click on your current connection to open Settings.
Note: If you can’t connect to your network, then use an Ethernet cable to connect and then follow this step.
3. Click the Properties button in the window that just open.
![wifi connection properties | Fix WiFi not Working in Windows 10 [100% Working]](https://techcult.com/wp-content/uploads/2016/08/wifi-connection-properties.png)
4. Make sure to uncheck Internet Protocol Version 6 (TCP/IP).
5. Click OK, then click Close. Reboot your PC to save changes.
Method 15: Uncheck Proxy Option
1. Press Windows Key + R then type inetcpl.cpl and hit enter to open Internet Properties.
2. Next, Go to the Connections tab and select LAN settings.
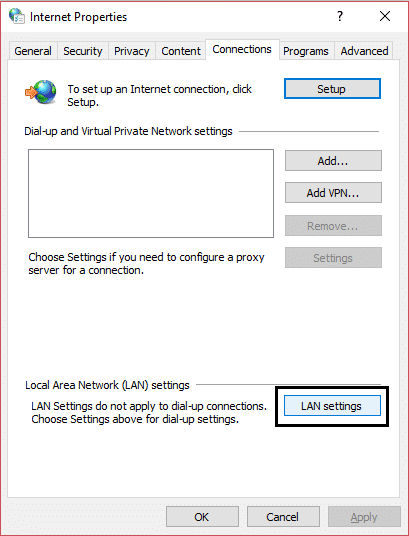
3. Uncheck Use a Proxy Server for your LAN and make sure “Automatically detect settings” is checked.
4. Click Ok then Apply and reboot your PC.
Method 16: Disable Intel PROSet/Wireless WiFi Connection Utility
1. Press Windows Key + R then type control and hit Enter to open Control Panel.
2. Then click on Network and Internet > View network status and task.

3. Now on the bottom left corner, click on Intel PROset/Wireless Tools.
4. Next, open settings on Intel WiFi Hotspot Assistant then uncheck “Enable Intel Hotspot Assistant.”

5. Click OK and reboot your PC to Fix WiFi, not Working Issue.
Method 17: Delete Wlansvc Files
1. Press Windows Key + R then type services.msc and hit Enter.
2. Scroll down till you find WWAN AutoConfig then right-click on it and select Stop.

3. Again press Windows Key + R then type “C:\ProgramData\Microsoft\Wlansvc\” (without quotes) and hit Enter.
4. Delete everything (most probably the MigrationData folder) in the Wlansvc folder except for profiles.
5. Now open the Profiles folder and delete everything except the Interfaces.
6. Similarly, open the Interfaces folder then delete everything inside it.

7. Close File Explorer, then in services window right-click on WLAN AutoConfig and select Start.
Method 18: Temporarily Disable Antivirus and Firewall
Sometimes the Antivirus program can cause an error. To verify this is not the case here, you need to disable your antivirus for a limited time so that you can check if the error still appears when the antivirus is off.
1. Right-click on the Antivirus Program icon from the system tray and select Disable.
2. Next, select the time frame for which the Antivirus will remain disabled.

Note: Choose the smallest amount of time possible, for example, 15 minutes or 30 minutes.
3. Once done, again try to connect to open Google Chrome and check if the error resolves or not.
4. Search for the control panel from the Start Menu search bar and click on it to open the Control Panel.
![Type Control Panel in the search bar and press enter | Fix WiFi not Working in Windows 10 [100% Working]](https://techcult.com/wp-content/uploads/2020/08/Type-Control-Panel-in-the-search-bar-and-press-enter.png)
5. Next, click on System and Security then click on Windows Firewall.

6. Now from the left window pane click on Turn Windows Firewall on or off.

7. Select Turn off Windows Firewall and restart your PC.

Again try to open Google Chrome and visit the web page, which was earlier showing the error. If the above method doesn’t work, please follow the same steps to turn on your Firewall again.
Method 19: Change 802.11 Channel Width
1. Press Windows Key + R then type ncpa.cpl and hit Enter to open Network Connections.

2. Now right-click on your current WiFi connection and select Properties.
3. Click the Configure button in the Wi-Fi properties window.
4. Switch to the Advanced tab and select the 802.11 Channel Width.

5. Change the value of 802.11 Channel Width to 20 MHz then click OK.
Method 20: Change the Wireless Network Mode to Default
1. Press Windows Key + R then type ncpa.cpl and hit Enter to open Network Connections.
2. Now right-click on your current WiFi connection and select Properties.
3. Click the Configure button in the Wi-Fi properties window.
4. Switch to the Advanced tab and select Wireless Mode.
5. Now change the value to 802.11b or 802.11g and click OK.
Note: If the above value doesn’t seem to fix the problem, try different values to fix the issue.

6. Close everything and restart your PC.
Recommended: Fix WMI Provider Host High CPU Usage [Windows 10]
That’s it, you have successfully Fix WiFi not Working in Windows 10 [SOLVED] but if you still have any questions regarding this tutorial then feel free to ask them in the comment’s section.
Все способы:
- Способ 1: Ручное разрешение доступа к сети
- Способ 2: Отключение брандмауэра
- Способ 3: Сброс настроек брандмауэра
- Способ 4: Удаление правил блокировки
- Вопросы и ответы: 0
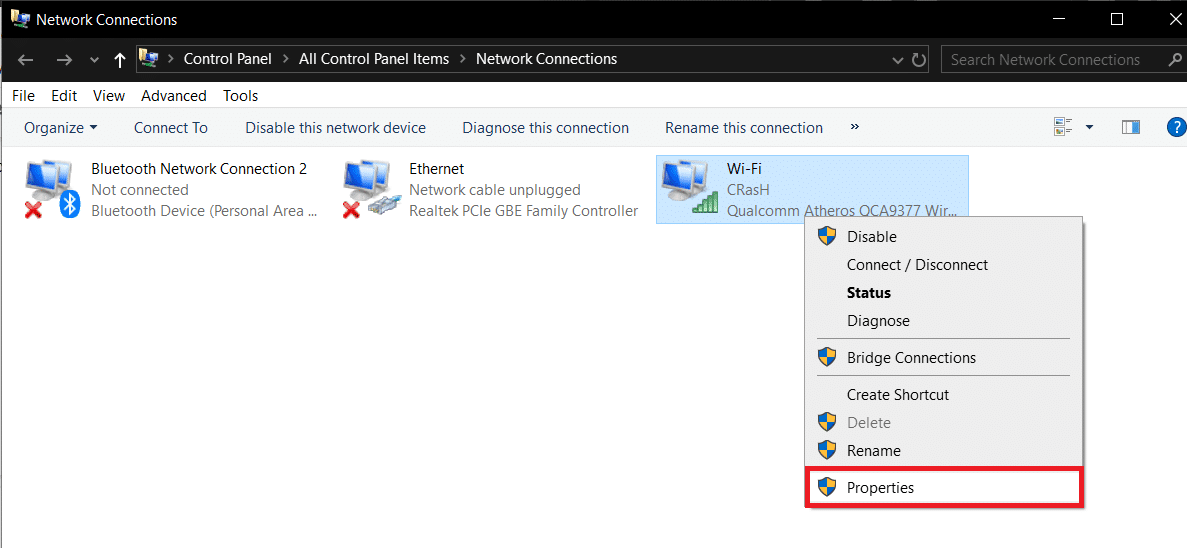
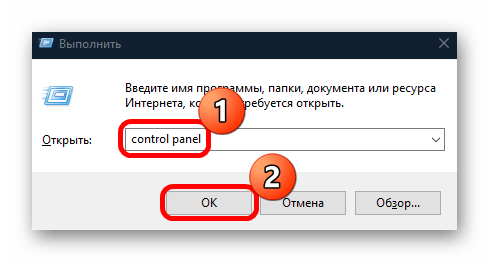
Способ 1: Ручное разрешение доступа к сети
Обычно при первом запуске программы, работающей через интернет, отображается системное окно, где нужно подтвердить доступ к сети. Если этого не произошло или ранее вы запретили этот самый доступ, исправить ситуацию можно через раздел «Панели управления» с настройками встроенного брандмауэра:
- Нажмите на клавиши «Win + R» и введите команду
control panel, затем кликните по кнопке «ОК». - Щелкните по выпадающему списку в верхнем правом углу и выберите «Крупные значки», а потом перейдите в «Брандмауэр Защитника Windows».
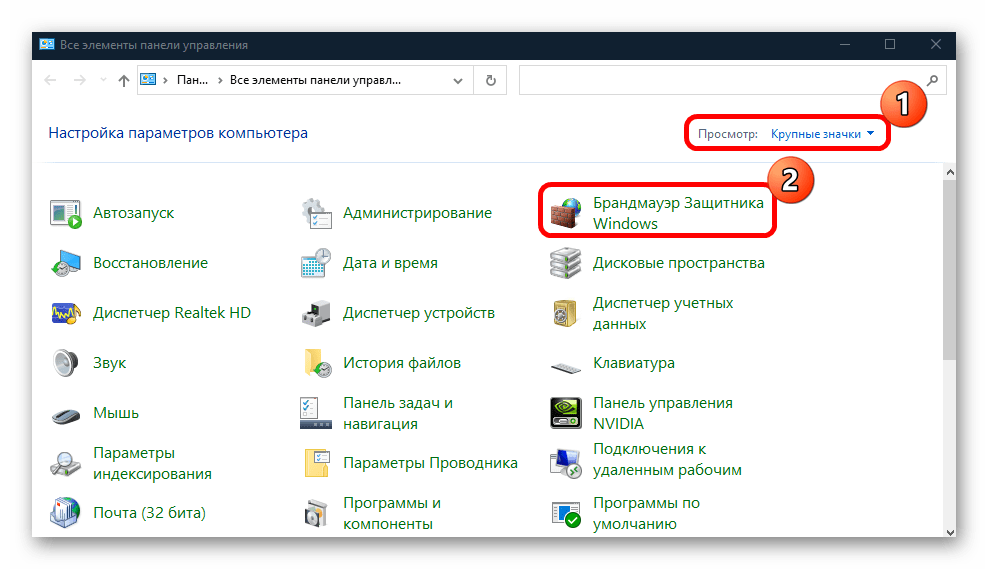
- В появившемся окне щелкните по строке «Разрешение взаимодействия с приложением или компонентом в брандмауэре Защитника Windows», расположенной на панели слева.
- Кликните по кнопке «Изменить параметры», и тогда список ниже станет доступным. Отыщите программу, для которой нужно изменить настройки, например браузер, затем отметьте его и нажмите на кнопку «ОК».
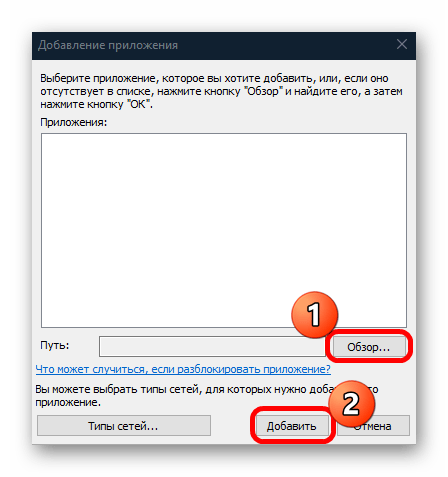
- Если в перечне нет искомого приложения, выберите «Разрешить другое приложение».
- В новом окне щелкните по «Обзор», после чего останется указать путь к исполняемому файлу проблемного приложения, затем нажать на кнопку «Добавить», после чего подтвердить действие в предыдущем окне.

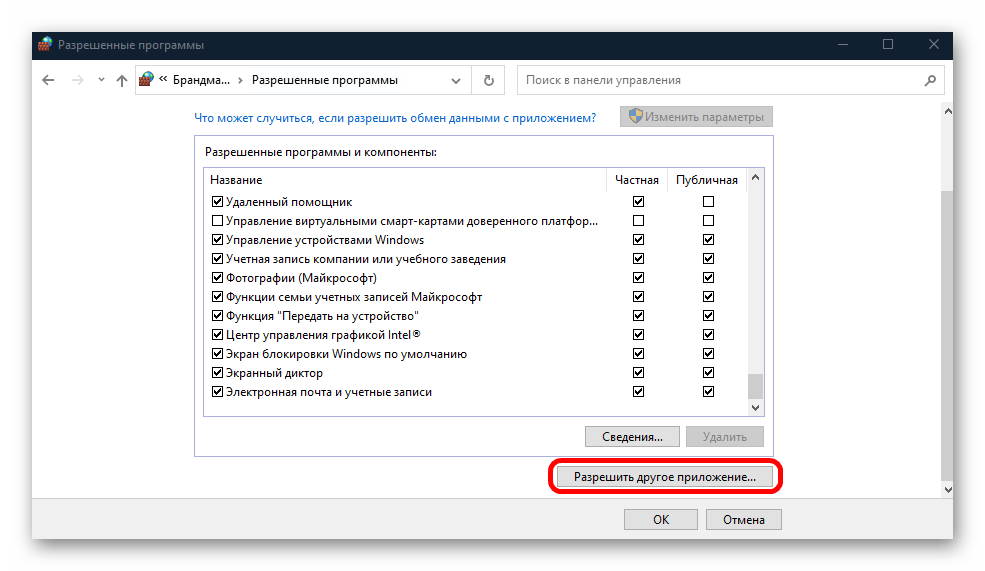
Таким образом, мы отключили блокировку брандмауэром доступа к сети для выбранной программы.
Способ 2: Отключение брандмауэра
Этот метод является не решением, а, скорее, проверкой, поскольку насовсем отключать брандмауэр не стоит. Временно отключив межсетевой экран, можно узнать, пропала ли блокировка доступа в интернет. Если да, то можно сбросить настройки средства защиты к дефолтным или же настроить правила блокировки. Мы разбирали, как отключить брандмауэр в Windows 10, в отдельном материале.
Подробнее: Отключаем брандмауэр в Windows 10
Способ 3: Сброс настроек брандмауэра
Чтобы решить проблему с блокировкой интернета, попробуйте вернуть настройки брандмауэра, которые были по умолчанию. Возможно, вы или кто-то другой вносили изменения, которые стали причиной такой ситуации.
Сброс настроек способен убрать правило блокировки для исходящих и входящих соединений, а также избавиться от всех разрешений доступа. Но тогда учтите, что после запуска программ в Windows 10, которым необходимо подключение к сети, придется снова подтверждать доступ. Чтобы восстановить первоначальные значения, нужно будет использовать раздел в «Панели управления»:
- Проделайте Шаги 1 и 2 из Способа 1, но в окне с настройкой брандмауэра нажмите по строке «Восстановить значения по умолчанию» на левой панели.
- Далее кликните по кнопке с таким же названием в появившемся окне.
- В системном окне подтвердите действие, выбрав кнопку «Да».
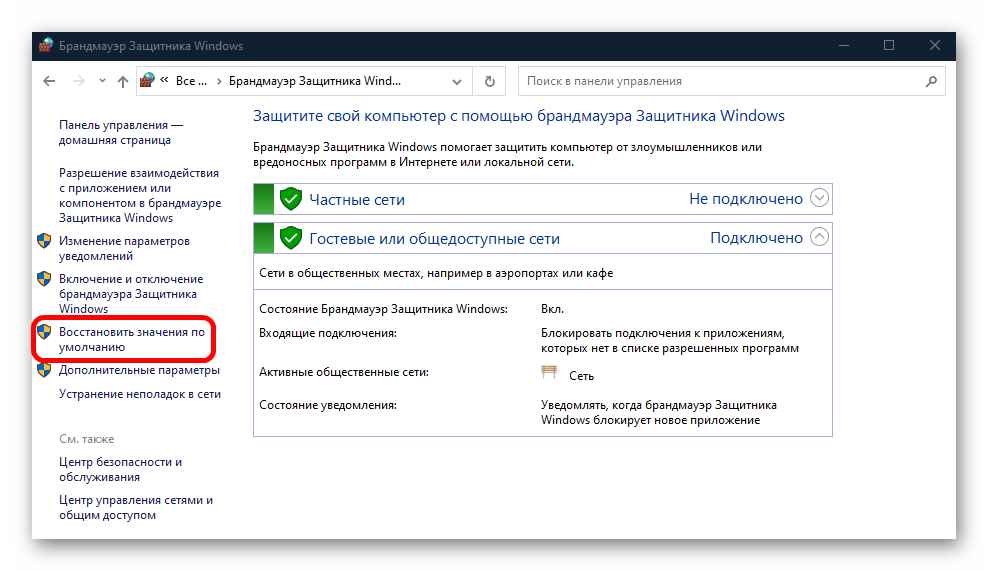
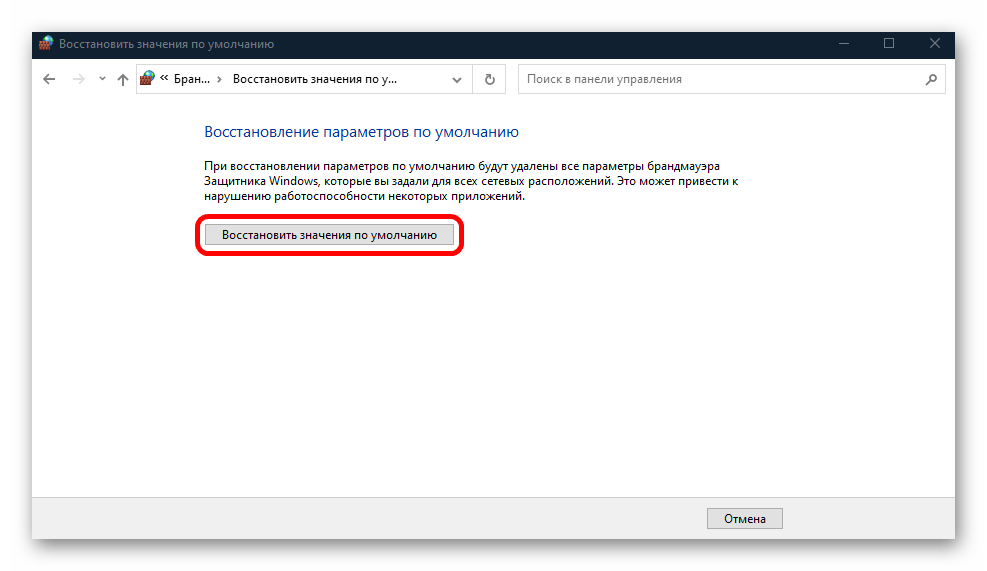
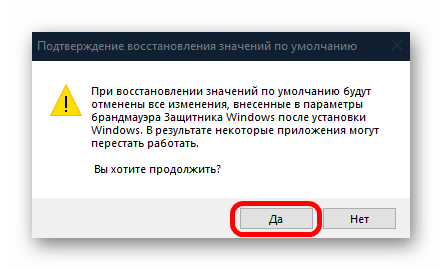
После этого все настройки средства вернутся к исходному состоянию – можете проверять доступ к интернету.
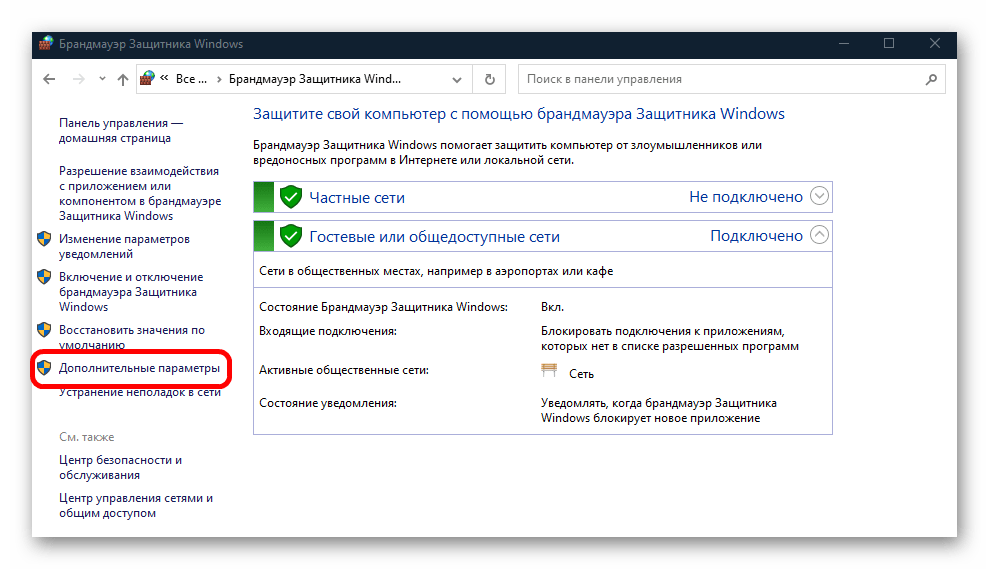
Способ 4: Удаление правил блокировки
В качестве альтернативного варианта можно попытаться настроить правила блокировки. Может быть, кто-то создал их, из-за чего доступ к интернету был заблокирован. В этом случае придется самостоятельно изучить их, чтобы деактивировать либо полностью удалить:
- В окне с настройками брандмауэра в «Панели управления» щелкните по пункту слева «Дополнительные параметры».
- Отобразится новое окно со всеми правилами исходящих и входящих соединений. Выбрать их можно на панели слева. Нажмите сначала на первый тип подключения, после чего в центральной части окна появится список созданных правил. Вам нужно найти те, которые блокируют подключение программ к сети. Щелкните по заголовку столбца «Действие», чтобы отсортировать пункты. То правило, напротив которого отображается значение «Заблокировать», можно отключить или удалить. Для этого кликните по нему правой кнопкой мыши и выберите нужный вариант.
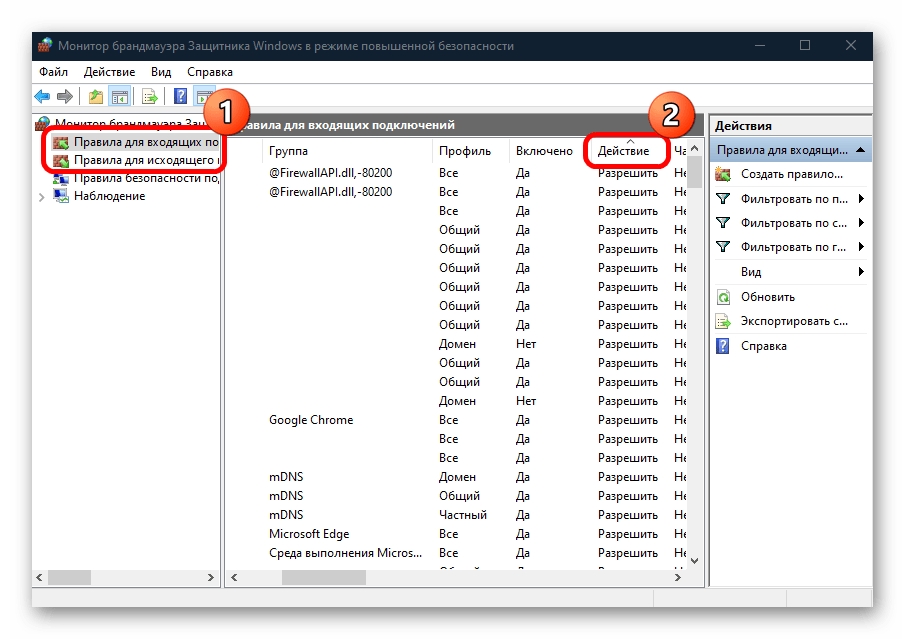
Чтобы посмотреть более подробную информацию о правиле блокировки, достаточно дважды кликнуть левой кнопкой мыши по пункту. Тогда откроется окно со свойствами и дополнительными настройками.
Наша группа в TelegramПолезные советы и помощь
Since the advent of Windows 10, a considerable number of users are confronting somehow issues with Windows Defender. In this article, you will read an elaborated guide to fix Windows Defender not Working in Windows 10 comprising almost every variety of extrication and minute tweaks.
How to Fix Windows Defender Not Working in Windows 10
1. Restart
At first, Restart your system. There are certain services that need to work perfectly for Windows Defender, but somehow they get stuck and hence hinder the anti-threat program from working. Restarting the machine reboots all the components or services that are required for the Defender to trigger on. After attempting a restart, Windows Defender not working nevertheless continues, see the next one.
2. Get Rid of the Third Party Anti-Threat Software
With the presence of third party anti-threat software, there always arises a conflict between the third party programs which results in nothing good. These conflicts slow down your machine, applications get crashed, frequent freezing, and lot more issues take place.
So, Windows Defender deactivates itself after it discovers the presence of other security programs. In the same way, if the outside program includes Firewall in it, then Windows Firewall also refuses to work.
Hence, to make Windows Defender perform correctly, get rid of the third party anti-threat software and restart the machine. After the restart, try to operate Windows Defender.
3. Scan for Malware
Another significant source behind not working of Windows Defender is the presence of any malware on your computer. A proper and thorough scan is required to find out them. The most used tools are the MalwareBytes Anti-Malware and Microsoft Safety Scanner.
Download the tool from their respective pages and make it run to search the malware. If you find some, remove the infections and reboot the system. See Windows Defender and if starts performing no issues, but if it refuses to not working look at the next step.
4. System File Checker Scan
Accidently or suddenly some files might get damaged on your computer which leads to the disturbance of Windows Defender. In order to ensure that your machine does not hold any of the destructed files, run the System File Checker Scan / SFC and when you find some, get them fixed. See how it is done:
- Jointly press Windows and X keys and from the appeared bar pick up Command Prompt (Admin).
- Say Yes to UAC.
- In the newly visible window, proceed ahead by typing this command: sfc /scannow
- Hit Enter key to run the command.
- Wait until it exhibits you the results.
If the System File Checker discovers any damaged stuff, it thoroughly fixes it. Now, reboot the system and then try to start Windows Defender. And if nothing is found, try out the next one.
5. Confirm Whether Windows Defender is Not Disabled Through A Registry Key
Because of any previous mishandling of the registry keys, it might happen that Windows Defender was turned off or maybe its related keys have gone missing. The best advice is to check that in case of Windows Defender went off with the registry key or not –
- On the Cortana text area, write regedit and she will present you the same as a result. Click on it.
- Once the Registry Editor window arrives, travel this way – HKEY_LOCAL_MACHINE => SOFTWARE => Policies => Microsoft => Windows Defender
- Now on the right pane look for the DWORD DisableAntiSpyware.
- See if the Value of the DWORD is set to 0 or not. If not, make a double click on it and upon the new Edit box, set the number to 0 and save the changes.
- If the right pane doesn’t show up any DWORD, make one then. Do a right-click on the empty area in the opposite pane of Windows Defender and opt for New, DWORD.
- Assign it a name DisableAntiSpyware and put its value as 0 only.
6. Set Date & Time Settings Accurately
Many Programs function accordingly Date & Time on Windows. So anything wrong in it could trigger the mess up. Ensure whether you have put its values accurately.
7. Ensure to download the latest update
Windows update is often proving to be a big factor when you confront Windows Defender Not Working in Windows 10. So continuously set to automatically update your System. Apart from this check when you encounter the issue.
8. Check for wrong Zone settings and update Proxy Server in Internet Explorer
Inaccurate Zone entry on Internet Explorer produces flaw when Windows Defender from functioning. The only and straightforward process to overcome this problem is the resetting of the browser. Hence reset Internet Explorer.
But Proxy Server could not be updated. For this purpose, you will have to go manually. Follow the underneath steps:
- Jointly press Winkey+X. Move off with the choice on the 8th position from lowermost which says Command prompt (Admin).
- Copy the underneath codes and paste
NETSH WINHTTP SET PROXY 1.1.1.1:8080 or NETSH WINHTTP SET PROXY MYPROXY.NET:8080
- Hit Enter.
With these many steps, we are connived to fix Windows Defender not working. Based on diverse machines, the causes tend to be different. One step might resolve your machine’s Windows Defender and the other one might work well for another’s system.
Одна из самых частых проблем при подключении к Wi-Fi в Windows 10 — сообщение «Не удается подключиться к этой сети». Информации о причинах проблемы это уведомление не даёт, а потому пользователю подчас сложно разобраться, в чём дело и как решить проблему.
В этой инструкции подробно о том, почему Windows 10 пишет, что не удается подключиться к этой сети и различные способы исправить ситуацию. На схожую тему: Что делать, если не работает Wi-Fi на ноутбуке.
- Простая и частая причина ошибки подключения
- Способы исправить проблему
- MAC-адрес адаптера
- Забыть сеть Wi-Fi и снова подключиться к ней
- Режим полета и отключение беспроводного соединения
- Драйверы Wi-Fi адаптера
- Отключение IPv6
- FIPS
- Другие варианты решения
- Видео инструкция
Одна из самых простых и распространенных причин ошибки при подключении к сети Wi-Fi
Самый простой способ получить ошибку «Не удается подключиться к этой сети» при подключении — ввести неправильный пароль (ключ безопасности сети) от Wi-Fi (иногда при этом сообщается, что введен недопустимый ключ безопасности, а иногда — выводится сообщение, рассматриваемое в статье).
Даже если вы уверены, что всё введено правильно, учитывайте следующие моменты:
- Перепроверьте раскладку клавиатуры при вводе пароля, учитывайте, что заглавные и строчные буквы нужно вводить именно так, как они были заданы в пароле.
- Если вы установили пароль Wi-Fi, содержащий кириллицу или какие-либо спец-символы, это может являться причиной проблемы: попробуйте изменить пароль Wi-Fi на роутере таким образом, чтобы он состоял только из латиницы и цифр.
- Если кто-то из членов семьи мог поменять пароль на Wi-Fi без вашего ведома, уточните этот вопрос у него.
И, наконец, бывает и такое, что очень начинающий пользователь, нажимая по значку Wi-Fi, видит, что там доступно множество сетей, и предполагает, что он ими может пользоваться для доступа в Интернет, хотя это не так: это не ваши сети и вы не можете к ним просто так (не зная пароля) подключиться.
Способы исправить проблему «Не удается подключиться к этой сети»
Если с паролем Wi-Fi гарантированно нет никаких проблем (или он сохранен в системе), попробуйте использовать следующие варианты решения проблемы.
Внимание: прежде чем приступать, проверьте, а сохранится ли проблема, если перезагрузить ноутбук и роутер (выключить роутер из розетки и включить через 10-15 секунд). Если проблема появляется после завершения работы (а также после режима сна или гибернации) и включения ноутбука, но всё работает исправно после перезагрузки, попробуйте отключить быстрый запуск Windows 10 (и выполнить перезагрузку после этого).
Отключите «Случайные аппаратные адреса» в параметрах Wi-Fi, помните о блокировке по MAC-адресу
Если в настройках роутера включена блокировка подключения устройств по их MAC-адресу в настройках Wi-Fi роутера, вы можете получить рассматриваемую ошибку подключения. Также на её появление может повлиять включение опции «Случайные аппаратные адреса» в Windows 10.
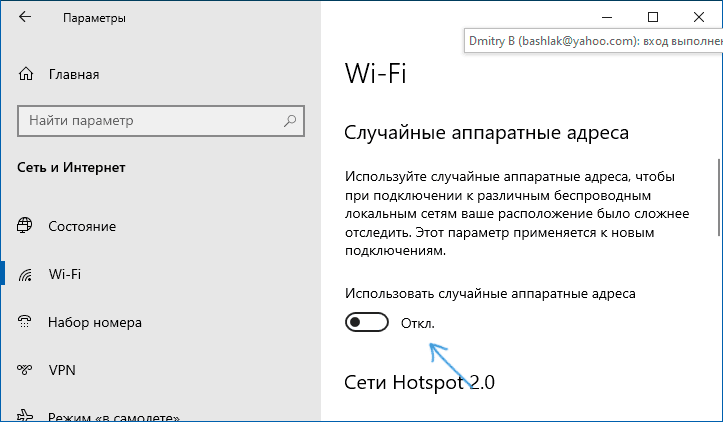
Чтобы проверить, не включена ли эта функция, зайдите в Параметры — Сеть и Интернет — Wi-Fi и, при наличии раздела «Случайные аппаратные адреса» (есть не во всех версиях ОС), отключите эту опцию.
Попробуйте «забыть» сеть Wi-Fi и снова подключиться к ней
Если пароль сети сохранен (не запрашивается при подключении), попробуйте «забыть» сеть, а затем снова подключиться к ней. При использовании этого метода необходимо, чтобы вы помнили пароль вашей сети Wi-Fi. Также его можно посмотреть на другом устройстве: Как посмотреть пароль Wi-Fi в Windows 10, Как посмотреть пароль Wi-Fi на Android.
Чтобы забыть сеть в последних версиях Windows 10, достаточно нажать по её имени в списке подключений и выбрать пункт «Забыть». После этого попробуйте заново подключиться к сети.
Включение и повторное отключение режима полёта, отключение беспроводного соединения
Если на вашем ноутбуке есть клавиша включения режима полёта попробуйте включить режим полета с помощью неё, а затем снова отключить его, а затем проверить подключение. Если такая клавиша отсутствует, включите «Режим в самолете» в области уведомлений Windows 10.
А после включения режима снова выключите его и вновь попробуйте подключиться к сети Wi-Fi. Если это не помогло, попробуйте следующий вариант:
- Нажмите клавиши Win+R на клавиатуре, введите ncpa.cpl и нажмите Enter.
- В списке найдите ваше беспроводное соединение, нажмите по нему правой кнопкой мыши и выберите пункт «Отключить».
- После того, как оно будет отключено, снова нажмите по нему правой кнопкой мыши и выберите пункт «Подключить».
Далее можно попробовать вновь подключиться к беспроводной сети.
Драйверы Wi-Fi адаптера
Если до недавнего времени проблем с подключением не было, попробуйте такой вариант:
- Зайдите в диспетчер устройств (можно через меню по правому клику на кнопку «Пуск»).
- Перейдите в свойства вашего Wi-Fi адаптера (находится в разделе «Сетевые адаптеры», для перехода в свойства можно дважды нажать по имени адаптера или использовать контекстное меню).
- Посмотрите, активна ли кнопка «Откатить». Если да, используйте её для отката драйвера.
Также можно попробовать использовать точки восстановления Windows 10.
Если же проблема появилась после установки Windows 10 или крупного обновления системы, попробуйте скачать драйвер вашего Wi-Fi адаптера с официального сайта производителя ноутбука (внимание: я понимаю, что у вас не работает Интернет, но вы можете скачать его и на телефон, а потом скопировать на проблемный компьютер) и установить его. Если на сайте производителя драйверы только для предыдущих версий ОС, помните: они обычно прекрасно работают и под Windows 10.
Отключение IPv6 в свойствах подключения
По некоторым отзывам этот метод также иногда оказывается работоспособным:
- Откройте список подключений (Win+R — ncpa.cpl), нажмите правой кнопкой мыши по беспроводному подключению (обычно «Беспроводная сеть») и выберите пункт «Свойства».
- Снимите отметку с IP версии 6 (TCP/IPv6) и примените настройки.
Включение или отключение FIPS
Попробуйте включить или отключить FIPS-совместимые алгоритмы шифрования, для этого в Windows 10 Pro или Enterprise:
- Нажмите клавиши Win+R, введите gpedit.msc и нажмите Enter.
- Перейдите к разделу Конфигурация компьютера — Конфигурация Windows — Параметры безопасности — Локальные политики — Параметры безопасности.
- Найдите пункт «Системная криптография: использовать FIPS-совместимые алгоритмы для шифрования, хэширования и подписывания» и дважды нажмите по нему.
- Установите значение «Включен», если он отключен или наоборот.
После этого сохраните настройки, закройте редактор локальной групповой политики и перезагрузите ваш ноутбук или ПК.
В случае Windows 10 Домашняя запустите редактор реестра (Win+R — regedit) и перейдите к разделу
HKEY_LOCAL_MACHINE\System\CurrentControlSet\Control\Lsa\FipsAlgorithmPolicy\
В правой части окна реестра обратите внимание на значение параметра Enabled.

Если оно равно 0, измените на 1 (после двойного клика по параметру) и наоборот. Затем закройте редактор реестра и перезагрузите систему.
Другие варианты решения проблемы
Среди прочих причин и методов решения проблемы «Не удается подключиться к этой сети» в Windows 10 можно выделить следующие:
- Помните, что плохой прием сети Wi-Fi может также вызывать эту ошибку. Проверьте, сохраняется ли она, когда подключаемый ноутбук находится в непосредственной близости к роутеру. Иногда может помочь выбор свободного канала Wi-Fi.
- Если проблема актуальна для всех устройств, подключающихся к этой Wi-Fi сети, возможно, что-то было изменено в параметрах роутера, возможно, даже кем-то посторонним (изменен пароль Wi-Fi, включена блокировка по MAC-адресу). Решение — попробовать заново выполнить настройку роутера, предпочтительно — с предварительным сбросом на заводские настройки (если для вас это не сложно).
- Если вы устанавливали сторонние антивирусы или файрволлы, попробуйте отключить их, а лучше попробовать полностью удалить с компьютера и выполнить его перезагрузку.
- Если вы отключали какие-либо службы Windows 10 в целях оптимизации, это может оказаться причиной проблемы: попробуйте вновь включить их.
- Попробуйте использовать встроенное средство устранения неполадок сети Windows 10. Даже если оно не исправит ошибку, оно может сообщить о каких-то проблемах, решение для которых удастся найти в Интернете.
- Попробуйте выполнить сброс параметров сети средствами Windows 10.
- Теоретически, причиной проблемы могут быть вирусы на вашем ноутбуке или компьютере. Если есть подозрения на это, попробуйте выполнить соответствующую проверку. Также рекомендую воспользоваться AdwCleaner.
Среди прочих советов часто можно встретить рекомендацию запустить командную строку от имени администратора, затем по порядку использовать следующие команды
netsh winsock reset
netsh int ip reset
ipconfig /release
ipconfig /renew
ipconfig /flushdns
С последующей перезагрузкой. Это может помочь, но, на мой взгляд, излишне: встроенный сброс сети Windows 10 выполняет все указанные действия.
Видео инструкция
Если вы сможете поделиться в комментариях информацией о том, какой именно способ вам помог, это может оказаться полезным для получения статистики по проблеме.
It is always a delight to access free public WiFi when you visit a cafe, a hotel, or a library. However, all the excitement could go down in a second if you cannot access the public internet connection login page. Without accessing the login page, it is impossible to use the internet on most public Wi Fi networks. What would you do if you are stuck in such a situation and wish to access the internet on your Windows 10 PC?
Take a look at the solutions we talk about to get rid of the “public Wi Fi login page not showing” issue on your Windows 10 computer.
Before moving further, make sure to read: How to Stay Safe on Public WiFi
Table of Contents
How to fix Public WiFi Login page not opening in Windows 10
1 – Try a Different Browser
It is quite possible that the default browser that you have set on your PC is not letting the login page load. The first thing that you can try to get rid of this issue is to use a different browser.
If you can access the login page URL on the browser but cannot open the page itself, copy the URL and paste it into another browser and try to access the page. For example, if you are using Chrome as the default browser, you can access the login page in Edge or Firefox.
If you are unable to access the URL, you can change the default web browser. This way, the login page will open in the newly set default web browser in Windows. Here are the steps for the same:
Step 1: Open Control Panel on your PC. For this, press Win + R. The run box will open. Here, type the control panel and hit the Enter button.
Step 2: In the Control Panel window, select the Programs option.
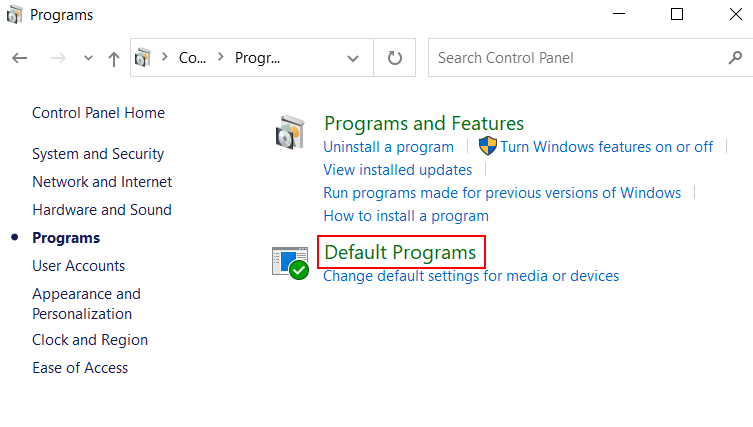
Step 3: In the next window, select the Default Programs option.
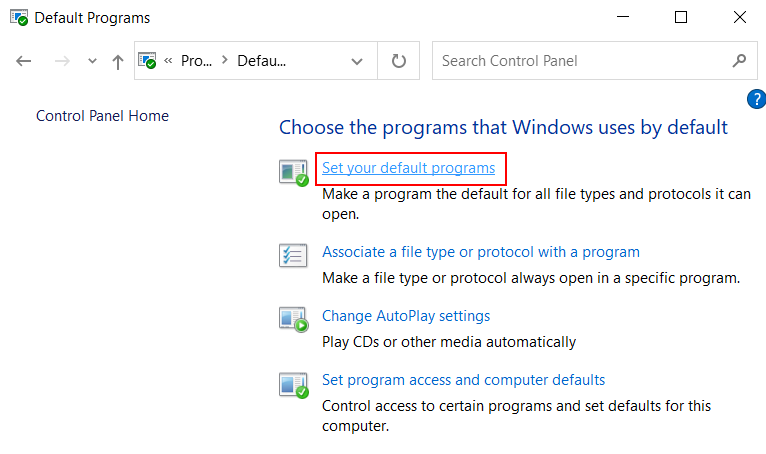
Step 4: Select the Set your default programs option from the next screen.
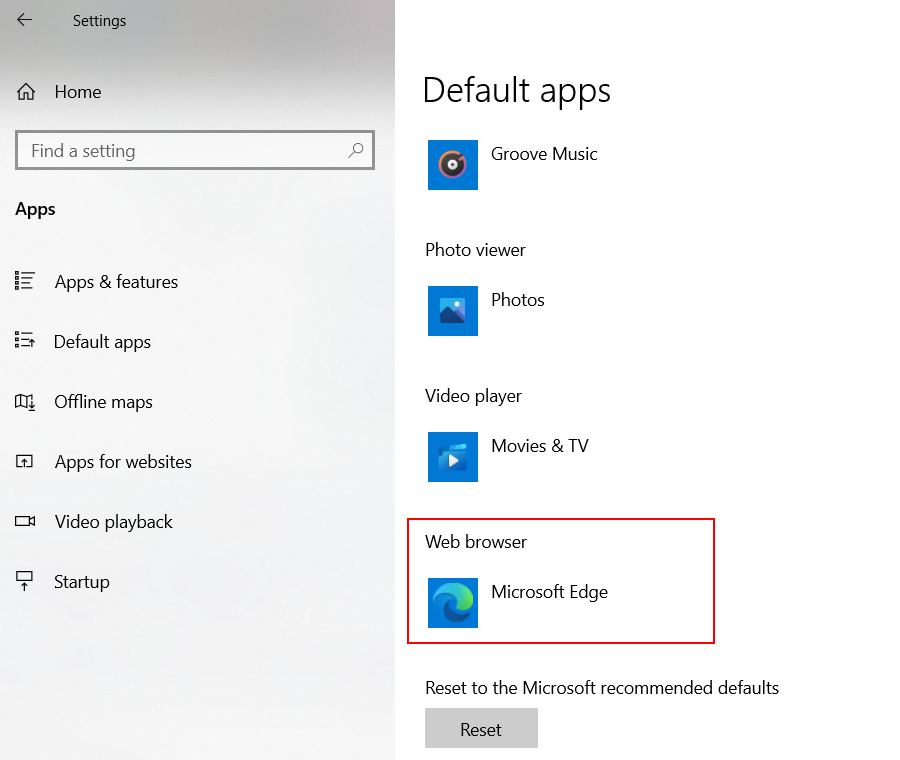
Step 5: A separate window will open now. Here, look for the Web browser option. Directly change it to some other browser from what is set currently.
Now, see if you can access the public wifi login page in Windows 10.
2 – By Restarting PC
Another simple solution that may help you is restarting your PC. Close down all the applications running on your PC and try to connect to the public Wi Fi network on your Windows PC.
If this did not work, go ahead and try the next solution.
3 – By Disabling Pop-up Blocker
Popup blocker is a feature in almost all web browsers. This feature stops popups from opening up on your browser. Popups tend to show unwanted advertisements while browsing, hampering the browsing experience. Disabling popups also saves data. However, this comes with its own set of demerits, such as this.
To access the public wi-fi login page, you should check whether the popup blocker is active. If yes, go ahead and deactivate it. The process of disabling popup blockers varies according to browsers. We will check out the same steps for some of the most used browsers, like Chrome, Edge, and Firefox.
Disable Popup blocker in Chrome
Step 1: Go to the top right corner of Chrome and click on the three-dot menu. From the menu that opens, select the Settings option.
Step 2: Go to the Privacy and Security section and select the Site settings option.
Step 3: On the next screen, select the Pop-ups and redirects option.
Step 4: Here, you will see the Blocked (recommended) toggle switch. Could you set it to Blocked?
Disable Popup blocker in Firefox
Step 1: Make a selection on the three-dot button present on the browser’s top right section.
Step 2: On the Settings window, go to the Preferences section and select Content.
Step 3: There, you will find an option named Block pop-up windows. Uncheck the checkbox present along with the opportunity.
Disable Popup blocker in Edge
Step 1: Click on the three-dot button present on the Edge’s top right corner and select the Settings option.
Step 2: On the Settings page, go to the Privacy and Security option.
Step 3: On the next screen, go to the Security section and turn off the Block pop-ups option switch.
After disabling the pop-up blocker on your browser, restart it. After restarting the browser, try to connect to the public Wi-Fi and see if the login page opens up.
4 – Perform a DNS Cache Flush
You can fix the public WiFi log-in page not showing up by flushing the DNS cache on your PC. How to perform this solution; follow these steps:
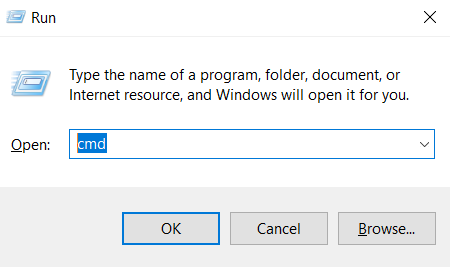
Step 1: Open the Command Prompt tool on your PC. To do so, press the Win + R keys at a time. In the Run window that will open, type cmd and select the Ok button.
Step 2: In the Command Prompt window, type the following command, then press the Enter key:
ipconfig /release
After the command has run successfully, type in the following command and press Enter.
ipconfig /flushdns
Now, close Command Prompt and restart your computer. Now try to connect to the internet. Did this work? If not, try the next solution.
5 – Change DNS Address
Usually, your PC is set to obtain a DNS address automatically. However, you may need to manually set the DNS address to get rid of internet issues. Here, we will be using the Network Connection window to make the changes. Follow these steps:

Step 1: Open the Network Connections window on your PC. In this window, you will be able to view all the network connections available on your Windows 10 PC. You can access it through the Control Panel when you open Network and Sharing Center. But you can skip going here through the Network and Sharing Center and use the Run window to access it directly. For this, press the Win + R keys. The Run window will open. In the Run window, type ncpa.CPL and hit the Enter key.
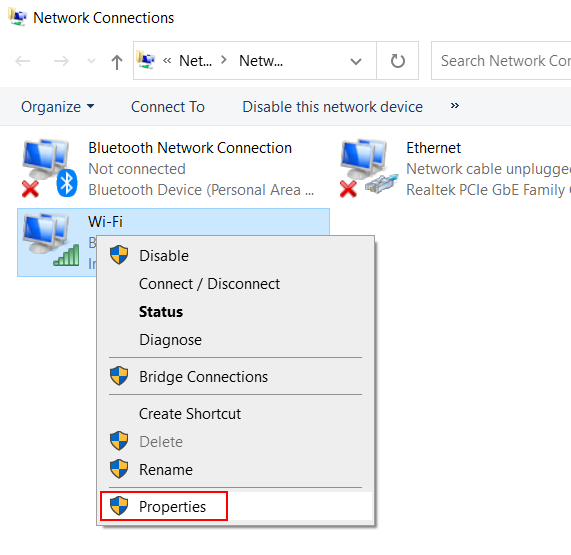
Step 2: The Network Connection window will open. Here, look for the wireless network adapter. When found, make a right-click on the wireless network adapter and select the Properties option.
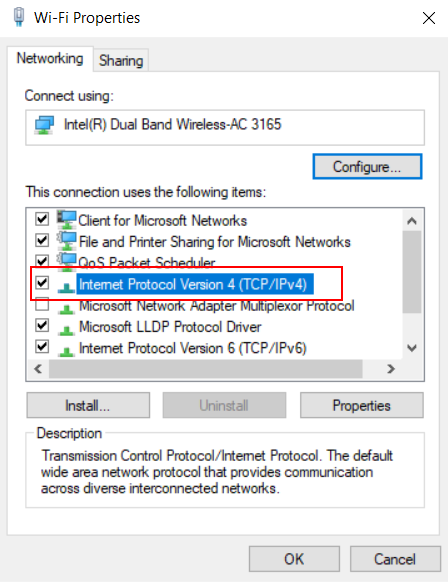
Step 3: In the wireless network adapter properties window, make a double click on the Internet Protocol Version 4 (TCP/IPv4) option.
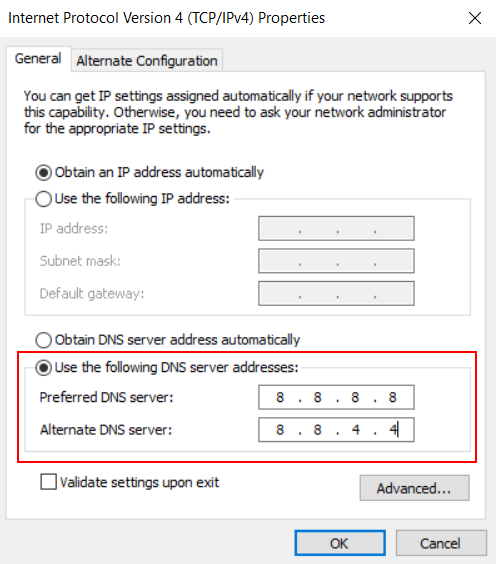
Step 4: Here, you will get the options to change IP address and DNS servers. Go to the DNS section and select the radio button present and Use the following DNS server address, as shown in the screenshot above. Input the following values in the respective fields of DNS servers:
Preferred DNS server: 8.8.8.8
Alternate DNS server: 8.8.4.4
Click on the Ok button once done. After this, restart your computer once and see if the public network connection works in Windows 10.
6 – Reconnect to the Public Network
Here’s another simple workaround that you can use to open the public Wi-Fi login page. Go ahead and try to reconnect to the public Wi-Fi network.
For this, check out the Taskbar at the bottom right corner of the screen. Click on the Internet access icon present here. The wifi connection pop-up will open. Now, go to the Wi Fi network you are connected to and select the Disconnect button.
After disconnecting from the open Wi-Fi network, reconnect to it. Now see if you can load the login page of the Wi-Fi network on your Windows 10 computer.
7 – Use Incognito Mode
It might be possible that the browser that you are using has some settings that are not letting the public Wi-Fi network’s login page load. In such a case, you can try to access the login page in Incognito Mode.
Unlike normal browsing mode, the incognito mode does not use cookies, saved data, cache, and other settings. These browser data can, at times, interfere with the browsing experience. It is suggested to use incognito mode to access the login page of the public Wi-Fi network.
To do this, copy the URL of the login page from the browser, paste it in the incognito window’s address bar and press the Enter button. Now, you will be able to access the login page on your Windows 10 PC.
To open the incognito window, you can press the Ctrl + Shift + N keys simultaneously.
8 – Turn off Firewall (Temporary)
Windows Firewall is supposed to protect your PC from external threats that may be emerging from the internet. However, in some cases, the Firewall may cause your PC issues, prohibiting you from performing specific actions. This, in certain instances, may also stop your PC from opening the public Wi Fi login page.
If you really feel the need of accessing the internet on your Windows 10 PC, you can try this solution. Go ahead and disable the Firewall on your PC temporarily. Although it is not recommended, you can go along with this for a short while. However, do not forget to enable the Firewall once you are done accessing the public WiFi network.
Follow the steps provided below to disable the Firewall on your PC:
Step 1: Open the Run box by pressing Win + R keys. In the text box, enter firewall.cpl and press the Enter button.
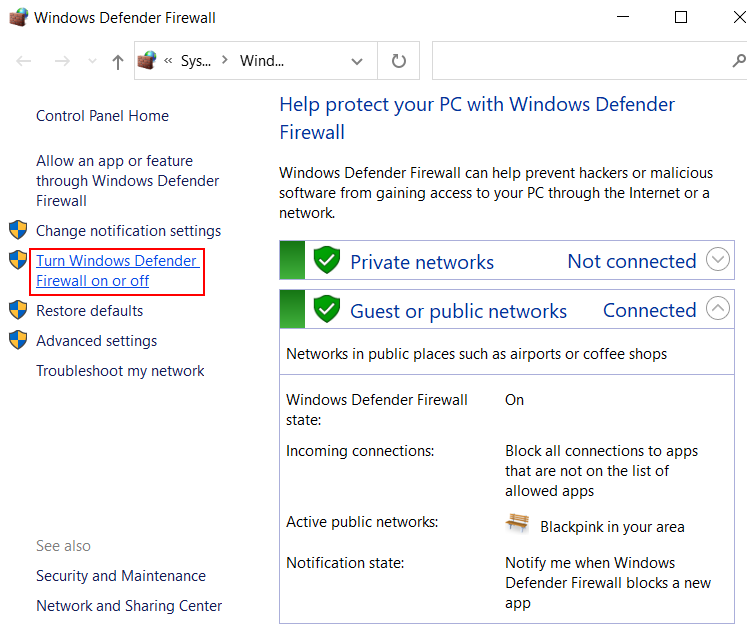
Step 2: The Firewall window will open in the Control Panel. Go to the left pane of this window and click on the Turn Windows Defender Firewall on or off option.
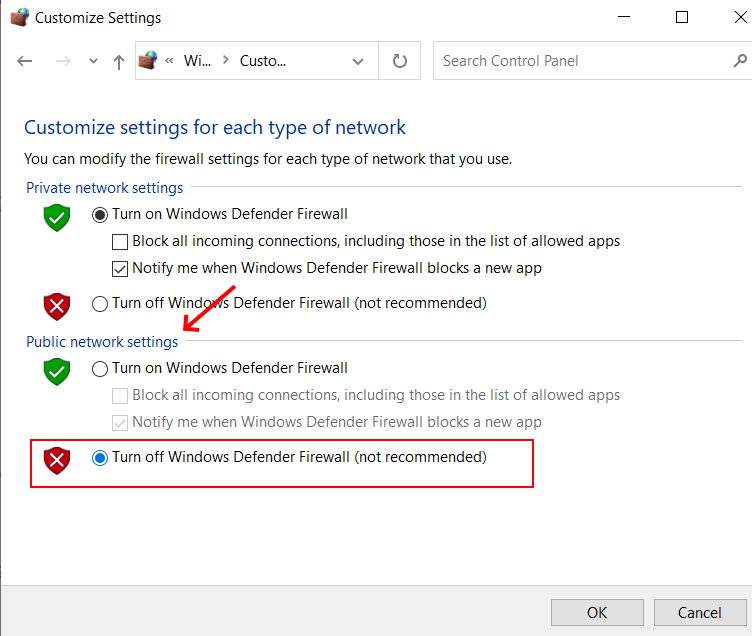
Step 3: A window with new options will open. Here, go to the Public network settings section. Now, select the radio button next to the Turn off Windows Defender Firewall (not recommended) option. After making the selection, click on the Ok button.
After disabling the Firewall, go ahead and try to reconnect to the public Wi-Fi network on your Windows 10 device.
9 – Update WiFi Device Driver
If the Wi Fi Network Adapter driver on your PC is not up to date, it may cause network issues on your PC. These issues also include you being unable to access the login page of a public Wi Fi connection. To make sure this is not the case, access Device Manager on your PC and see whether the network adapter driver is up to date. If not, you will need to update it. Let us find out how in the steps provided below:
Step 1: Press the Win + R leys on the keyboard. As the Run window opens, type devmgmt.msc and press Enter.
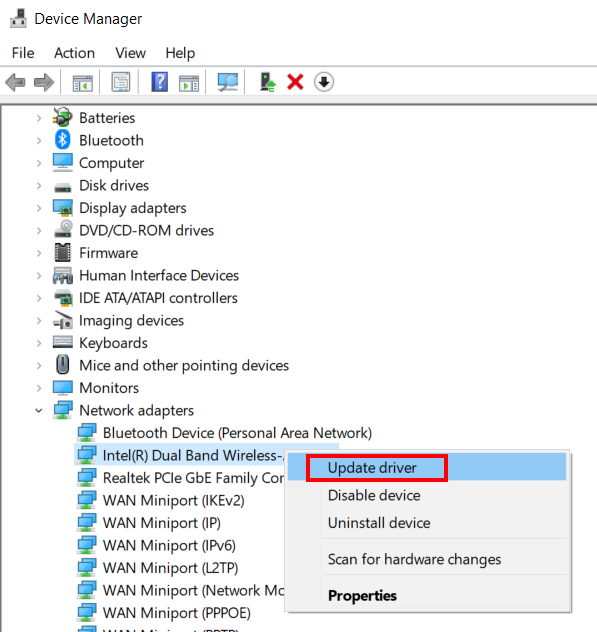
Step 2: In the Device Manager, look for the option named Network adapters. Click on it. This will expand the list of network adapter drivers. Make a right-click on the wireless driver. A context menu will open. Select the Update driver option.
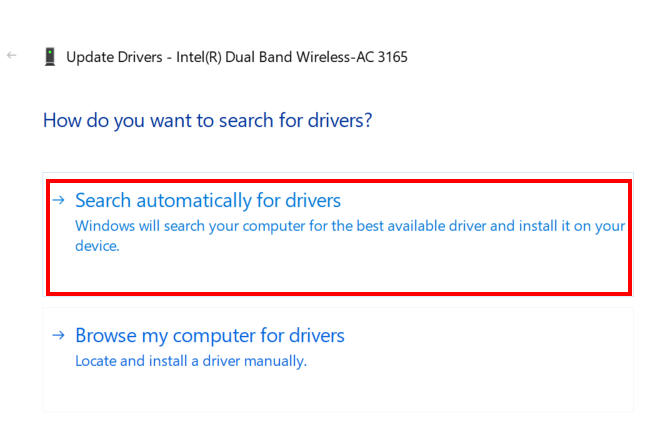
Step 3: A new window will open where you will get a couple of options to update the device driver. Select Search automatically for drivers option.
If a new version of the wireless device driver is available, the PC will update the driver automatically. If the device driver update is successful, the issue will be fixed most probably.
Close the device manager and reboot your Windows 10 device. After the reboot, connect to the internet and check if that works for you.
Closing Words
Although the solutions provided above will help you out with accessing the login of the public Wi Fi connection in Windows 10 device, if you aren’t, there could be reasons that could be out of your control. The issue could probably be with the Wi Fi connection itself, so make sure about that too.
Recommended for You:
Solved: Can’t See My WiFi Network in Windows 10
How to Connect to Hidden WiFi in Windows 10
Hp Laptop Won’t Connect to WiFi on Windows 7 – Easy Fix
Solved: Windows 10 Wifi Keeps Disconnecting