
How many processors does Windows 10 support? It’s a simple question, but the correct answer is surprisingly hard to come by.
What led me to ask this question was curiosity: I wondered whether it would be possible to run Windows 10 on a Supermicro 7089P-TR4T – a single-node server with eight Intel Xeon Scalable sockets in an S8S configuration.
Windows Server licenses come with a baseline limit of 16 physical processor cores. If you want to use more cores, you have to buy additional core licenses. For example, on an 8-socket system filled with Xeon 8280 CPUs, you’ve got 8 * 28 = 224 physical cores, which would require the purchase of thirteen additional 16-core licenses. There’s one exception here: each CPU socket must be licensed for at least 8 cores. This restriction means that you couldn’t, for example, run four quad-core CPUs on a base license – you’d need an additional 16-core license for that, to make up 8 licensed cores per socket. It’s also worth noting that only physical cores count; SMT cores (or “threads”) are not included in the licensing. Those additional licenses aren’t cheap. At time of writing a Windows Server 2019 Datacenter Additional 16 Core license costs in excess of 4000 GBP.
Windows Desktop is much less restrictive. Each edition of Windows 10 has an associated maximum number of allowed CPU sockets:
- Windows 10 Home supports 1 socket
- Windows 10 Pro and Windows 10 Education support 2 sockets
- Windows 10 Pro for Workstations supports 4 sockets
(quick terminology aside: a specific version and edition of Windows is usually referred to as a SKU, and it is common to refer to groups of related versions/editions of Windows as a set of SKUs, e.g. “Windows Desktop SKUs” means any desktop edition of Windows)
But where do these numbers come from? I could not find any official Microsoft documentation that details these limits.
At time of writing, the Wikipedia article for Windows 10 editions lists the above socket count limits, plus core count limits, for each Windows 10 edition:
| Feature | Home | Pro | Education | Pro for Workstations | Enterprise |
| Maximum CPU sockets | 1 | 2 | 2 | 4 | 2 |
| Maximum CPU cores | 64 | 128 | 128 | 256 | 256 |
So, according to these numbers, we could run Windows 10 on a four socket server, but we can’t run it on an eight socket server. Of course “unsupported” just means “a challenge”, so I started looking into how I could get around the limit.
The first thing I did was throw the ntoskrnl.exe binary from my Windows 10 Pro for Workstations install into Ghidra, and started looking for query/helper functions that determine the number of CPUs or CPU sockets on the system. My plan was to find out how the kernel keeps track of this count, then look for associated code that initialises the count during boot, and use that to find where the socket count limitation is applied. After a bunch of digging, and some help from prior work by other reverse engineers, I got a good grasp of how this all works.
Just to get everyone on the same footing, it helps to understand some terminology around cores and processors:
- A physical CPU, package, or socket refers to a whole physical CPU, i.e. a physical device that you can touch.
- A physical core or physical processor refers to an actual physical core inside a CPU, not an SMT core/thread.
- A logical core, logical processor, or processor thread refers to any logical processor that code can be executed on, including SMT threads.
- A NUMA node is a concept in non-uniform memory access (NUMA) topology referring to a set of logical processors that share the same memory controller. You usually have one NUMA node per CPU socket, but some AMD CPUs have multiple NUMA nodes per socket. Memory accesses across NUMA nodes require coordination between nodes, leading to increased latency.
With that all out of the way, let’s dig in.
In the Phase1InitializationDiscard function, the maximum number of licensed sockets is read from the Kernel-RegisteredProcessors license value and written into the KeRegisteredProcessors exported variable. This happens around the same time that BCD OSLOADER variables are read. The code looks something like this:
ULONG licenseValueType = 0;
ULONG resultSize = 0;

// get the socket count limit from the license
RtlInitUnicodeString(&krpName, L"Kernel-RegisteredProcessors");
status = ZwQueryLicenseValue(
  &krpName,                  /* license value name */
  &licenseValueType,         /* value type (0=ANY, 4=DWORD) */
  &KeRegisteredProcessors,   /* buffer */
  4,                         /* buffer size */
  &resultSize                /* output size */
);
// if getting the socket limit failed, default to 1 socket max
if (status != STATUS_SUCCESS || resultSize != 4 || licenseValueType != 4)
{
  KeRegisteredProcessors = 1;
}

// handle boot args
if (bootArgs != NULL)
{
  char* bootProcStr = strstr(bootArgs, " BOOTPROC=");
  if (bootProcStr != NULL)
  {
    char* bootProcVal = strstr(bootProcStr, "=") + 1;
    KeBootprocSpecified = atol(bootProcVal);
  }

  char* numProcStr = strstr(bootArgs, " NUMPROC=");
  if (numProcStr != NULL)
  {
    char* numProcVal = strstr(numProcStr, "=") + 1;
    KeNumprocSpecified = atol(numProcVal);
  }

  char* hvNumProcStr = strstr(bootArgs, " HYPERVISORNUMPROC=");
  if (hvNumProcStr != NULL)
  {
    char* hvNumProcVal = strstr(hvNumProcStr, "=") + 1;
    KeHypervisorNumprocSpecified = atol(hvNumProcVal);
  }

  if (KeRootProcNumaNodeLpsSpecified == 0)
  {
    char* hvRootProcNodeStr = strstr(bootArgs, " HYPERVISORROOTPROCPERNODE=");
    if (hvRootProcNodeStr != NULL)
    {
      char* hvRootProcNodeVal = strstr(hvRootProcNodeStr, "=") + 1;
      KeRootProcPerNodeSpecified = atol(hvRootProcNodeVal);
    }
    char* hvRootProcCoreStr = strstr(bootArgs, " HYPERVISORROOTPROCPERCORE=");
    if (hvRootProcCoreStr != NULL)
    {
      char* hvRootProcCoreVal = strstr(hvRootProcCoreStr, "=") + 1;
      KeRootProcPerCoreSpecified = atol(hvRootProcCoreVal);
    }
  }

  // if MAXPROC is specified, KeMaximumProcessors gets set to 1280
  // this is kinda weird! it'll come up later, though.
  if (strstr(bootArgs, " MAXPROC") != NULL)
  {
    KeMaximumProcessors = 0x500;
  }
}
(Side-note: you may notice the lack of validation on KeRegisteredProcessors here. This is not due to my own simplification of the code; at this point the KeRegisteredProcessors value is taken directly from the license. It is later capped to 0x500 in the KeStartAllProcessors function, right after the boot processor IDT is allocated.)
The ZwQueryLicenseValue function is undocumented, but Geoff Chappell saves the day as always. The license values are fetched from the following binary registry value:
HKLM\System\CurrentControlSet\Control\ProductOptions\ProductPolicy
Geoff also helpfully provides a description of the ProductPolicy data format. It’s a pretty simple structure – a header followed by an array of value entries. Each entry is comprised of a header, a UTF-16 entry name, and the entry value. I wrote a C# script to dump ProductPolicy data if you want to take a look inside the contents of your own system’s ProductPolicy.
Can this policy be edited? Yes, as it turns out! The process is roughly as follows:
- Disable the
sppsvcservice. - In
HKLM\SYSTEM\Setup, change theSetupTypeREG_DWORD value to 1. - In
HKLM\SYSTEM\Setup, change theCmdLineREG_SZ value to “cmd.exe” - Reboot the system.
- Modify the
Kernel-RegisteredProcessorsentry inProductPolicy. - Revert the registry changes in
HKLM\SYSTEM\Setupfrom steps 2 and 3. - Reboot the system.
Step 5 can be done directly in the Registry Editor. The dump script I linked above will tell you the offset of each entry, its name string, and its value. In my case the Kernel-RegisteredProcessors entry header is at 0x0000269E, its name is at 0x000026AC, and the value at 0x000026E2.

Note that sppsvc (the Software Protection Service) must remain disabled for this edit to work; if the service is allowed to run, the license tamper state will be set and the system will deactivate. This also means you can’t run Windows Update or other similar operations while you’ve got this hack in place. Cracked copies of Windows that bypass the license tampering check might work, but I haven’t tried for obvious reasons.
That being said, what fun is there in hacking octa-socket support in to Windows 10 if you can’t use all the cores? Eight 28-core / 56-thread CPUs would make for a whopping 448 logical processors – way beyond the supposed 256-core maximum. Looking through the ProductPolicy entries, though, I couldn’t find anything related to cores or logical processors. This got me intrigued – Wikipedia lists different core count limits for different editions, but nothing in the license data appears to actually restrict the core count. Where do those quoted numbers come from?
First up, I decided to check the citations. The table on Wikipedia generically cites some Microsoft comparison tables that do not contain any information on CPU limits, along with a Groovypost article as a source for socket count limits. That article does not cite any sources, nor does it document any core count limit, but it does talk about socket count limits.
Looking around online, the closest thing to an official source I could find is a Microsoft Community forum post in which a Microsoft MVP (not an employee) says:
Windows 10 supports maximum memory configurations that were formerly available only in the realm of servers. Windows 10 Home supports up to 128GB of RAM on the x64 platform. Windows 10 Pro and Enterprise both support up to 512GB on the x64 platform. The x86 versions of Windows 10 support a maximum of 4GB of RAM. Windows 10 supports a maximum of two physical CPUs, but the number of logical processors or cores varies based on the processor architecture. A maximum of 32 cores is supported in 32-bit versions of Windows 8, whereas up to 256 cores are supported in the 64-bit versions.
– Andrea Da Costa (July 9th 2015)
The eagle-eyed among you might notice two things. The first is that “a maximum of two physical CPUs” doesn’t match the socket counts in the Groovypost article, nor does it match the Wikipedia page. The second is the forum poster’s name – the Groovypost article was written by the same person.
As such, it appears that the three most authoritative sources on socket and core count limitations in Windows 10 SKUs – the Wikipedia article, the article it cites as a source, and the Microsoft Community forum post that appears right at the top of search results – are all effectively sourced to one person writing in an unofficial capacity. That doesn’t necessarily mean the numbers are wrong (ominous foreshadowing heavily implied) but it does mean they’re unreliable.
I was also confused by the values given for Windows 10 Enterprise. Why would it only support two sockets, but still support 256 cores? The Groovypost article is the source of the two sockets claim, but I was able to find lots of examples online of people running Enterprise on systems with four sockets. In the end I found concrete evidence that Kernel-RegisteredProcessors is set to 4 on Windows 10 Enterprise, in a forum post where someone dumped the default product policy data from a Windows 10 Enterprise install:
<sl:policyInt attributes="override-only" name="Kernel-RegisteredProcessors">4</sl:policyInt>
So where are these core count limits coming from?
Thinking back a little, we saw that KeMaximumProcessors gets set to 1280 by the kernel when the MAXPROC directive is set in the BCD options. This BCD value is a boolean, and is also known as BcdOSLoaderBoolean_ForceMaximumProcessors (entry ID 0x26000062). It causes the system to report the maximum possible number of CPUs as existing, presumably for debug purposes. This implies that the kernel technically supports up to 1280 logical processors! But where does that number come from? The answer is processor groups.
Multiprocessor builds of Windows have the concept of affinity for threads, i.e. a set of logical processors upon which a thread can be scheduled. The kernel tracks thread affinity in the KTHREAD structure, and each process has a default affinity for new threads which is tracked in the KPROCESS structure. Prior to NT6.1, affinity was tracked using a ULONG type (via the KAFFINITY typedef), where each bit corresponded to a logical processor. A set bit meant that the thread was free to be scheduled on the corresponding processor, and a zero bit meant that the thread should not be scheduled on that processor. This is generally referred to as an affinity mask. On 32-bit builds you had a hard limit of 32 logical processors on the system, and on 64-bit builds you had a hard limit of 64, because the affinity mask was a ULONG. You simply could not have more than 64 logical processors on the machine because the affinity mask didn’t extend any further. To get around this, Microsoft introduced the concept of processor groups in the NT6.1 kernel.
A processor group is a collection of logical processors. Each group can have up to 64 logical processors assigned to it. Each thread is assigned to a processor group, and the thread’s affinity mask applies to processors in that group. The old affinity mask behaviour still applies, but the exact logical core that each bit applies to is mapped through the thread’s assigned processor group instead of just directly referring to a logical processor by index. The processor grouping is optimised based on NUMA topology. For example, if you’re running a pair of 28-core SMT-enabled CPUs (i.e. 56 threads per socket), you’ll get two processor groups with 56 logical processors in each, rather than one group with 64 logical processors and another with 48 logical processors. This prevents threads from being scheduled on different NUMA nodes, which would harm performance due to memory accesses being performed across sockets.
The KiMaximumGroups exported variable tracks the maximum number of processor groups. In NT6.1 this was 4, but as of NT6.2 it’s 20.

If you multiply 20 groups by 64 logical processors, you get 1280. That’s where the number we saw with MAXPROC in the BCD came from earlier.
This is a hard-coded limit. The reason for hard-coding it is that the KAFFINITY_EX structure used for tracking processor affinities uses a fixed-size array of KAFFINITY masks. Altering the size would alter structure offsets. You’ll notice that KiMaximumGroups is written to in three functions, which might imply that it can dynamically change to more than 20. I thought so too, but after investigation I discovered that 20 is indeed the hard limit.
Phase1InitializationDiscard first calls into KiPerformGroupConfiguration. This function sets up groups based on the NUMA proximity of nodes. When running directly on hardware, it enumerates through the NUMA topology, figures out where to assign each logical processor, tracks how many processors have been inserted into each group, and then counts how many groups have at least one processor assigned to them. KiMaximumGroups is then set to that count. When running in a hypervisor the enumeration is done differently, and in certain cases KiAssignAllNodesToGroup0 is called, which sets KiMaximumGroups to 1. After KiPerformGroupConfiguration returns, Phase1InitializationDiscard carries on, and later calls KeStartAllProcessors. If dynamic hardware partitioning is not supported, KiMaximumGroups is set to KiActiveGroups, which is necessarily no greater than 20 in the first place.
It’s possible that custom builds of Windows exist with more than 20 groups supported, for example in some of Microsoft’s clustered hypervisors, but the Windows Server and Windows Desktop builds available in general release are limited to 20 processor groups.
Taking a look at the Wikipedia numbers again, you’ll notice that (if you correct Enterprise to supporting 4 sockets) each edition’s reported maximum core count matches the maximum socket count multiplied by 64. This starts to make some sense: if each CPU socket is one NUMA node, and each NUMA node gets a processor group, and each processor group can have 64 logical processors assigned to it, then the logical processor limit would be your socket count multiplied by 64. In addition, on NT 6.1, the processor group limit was 4 anyway, which is where the older hard limit of 256 logical processors came from.
According to Microsoft’s documentation on NUMA support, the mapping between physical CPUs/sockets, NUMA nodes, and processor groups isn’t as rigid as the above paragraph might imply:
Starting with Windows 10 Build 20348, the behavior of this and other NUMA functions has been modified to better support systems with nodes containing more that 64 processors.
Creating “fake” nodes to accommodate a 1:1 mapping between groups and nodes has resulted in confusing behaviors where unexpected numbers of NUMA nodes are reported and so, starting with Windows 10 Build 20348, the OS has changed to allow multiple groups to be associated with a node, and so now the true NUMA topology of the system can be reported.
Prior to build 20348, Windows would modify its representation of the system’s NUMA topology to ensure that each processor group was associated with a NUMA node, even if that meant faking the existence of additional NUMA nodes. For example, if you installed a CPU that reported a single NUMA node consisting of 48 physical cores and 96 logical processors, Windows would represent that as two NUMA nodes since the processor group implementation required that each group was directly tied to a NUMA node. Why is this relevant? Well, if Windows went out of its way to support more than 64 logical processors per physical socket (by faking extra NUMA nodes), then that means any purported limit derived from multiplying the maximum socket count by 64 cannot possibly be correct.
Further, as of build 20348, the concepts of groups and NUMA nodes were uncoupled so that multiple processor groups can be assigned to one NUMA node. The only remaining question is “wait, there’s a Windows 10 build 20348?” – that build number seems to be associated with Windows Server 2022 and Windows 11, so it’s not clear where 20348 fits into Windows 10. The article was last updated in August 2021, before the Windows 11 announcement, so it’s possible that 20348 was planned to be a Windows 10 build release but it was pushed into Windows 11 instead.
So what does all of this mean? I’m pretty certain that it means per-edition core count limits simply don’t exist in Windows 10, and probably didn’t in previous versions either. Most likely, Windows 7 supported a maximum of 4 groups of 64 logical processors, whereas Windows 8 and later support a maximum of 20 groups of 64 logical processors.
To wrap it all up, here are the actual limits:
- Sockets:
- 1 socket on Windows 10 Home (due to ProductPolicy)
- 2 sockets on Windows 10 Pro / Education (due to ProductPolicy)
- 4 sockets on Windows 10 Pro for Workstations / Enterprise (due to ProductPolicy)
- 64 sockets on Windows Server 2016, 2019, and 2022 (due to ProductPolicy), although this is effectively capped at 20 due to the processor group limit.
- Physical Cores:
- Physical cores must be licensed on Windows Server SKUs, with a minimum of 8 cores licensed per socket, but there is no upper limit on the number of supported cores.
- There is no specific maximum physical core count on Windows 10.
- Logical Processors:
- Processor groups are unsupported on Vista and prior, meaning a hard limit of 32 logical processors on 32-bit and 64 logical processors on 64-bit is set by the affinity mask.
- 32-bit builds of Windows 7 and later are limited to 32 logical processors.
- 4 processor groups are supported on Windows 7 (NT 6.1) on 64-bit builds. Each group can contain up to 64 logical processors. Each group must be associated with a single NUMA node.
- 20 processor groups are supported on Windows 8 (NT 6.2) and later, on 64-bit builds. This leads to a theoretical limit of 1280 logical processors. Each processor group must be associated with a single NUMA node, and the kernel will create fake NUMA nodes if a single socket has more than 64 logical processors.
- As of build 20348, groups no longer require a 1:1 mapping with NUMA nodes, so fake NUMA nodes are no longer created when a socket has more than 64 logical processors. One group cannot span multiple NUMA nodes, but each NUMA node can have multiple processor groups assigned to it. This has no affect on the maximum counts.
I am unaware of any commercially available x86_64 system, at time of writing, that can get close to the 1280 logical processor limit. An S8S board with Xeon 8280 processors gets as high as 448 logical processors. Higher core count Xeon Scalable Gen2 processors are available (9 series) but they are not for general sale and only support 2S configurations. Xeon Scalable Gen3 processors are documented as only supporting 2S scaling, even on the Xeon 8380. AMD EPYC offers higher core counts per socket, but so far we haven’t seen Infinity Fabric scaling beyond 2S. One can approximate the limit using CPU overcommitting in a hypervisor (KVM supports this), which basically involves lying about how many processors you have, but that’s cheating. It’s possible that specialised hypervisors operating on top of compute clusters can host a virtual machine with 1280 logical processors actually backed by hardware, but those processors would be on physically separate compute nodes interconnected by RDMA networking, and you don’t tend to run vanilla Windows 10 installs on that kind of platform.
Thanks for reading this post! If you enjoyed it and want to say thanks, consider purchasing some of my amusing warning stickers. They’re 100% guaranteed to be tangible objects.
[yasr_overall_rating] [yasr_visitor_votes]
This tutorial explains how to limit number of CPU cores for an application in Windows 10. By default, a running or suspended application or Windows 10 app runs with all CPU cores (both physical and virtual cores). But, it is not necessary that an application needs all CPU cores to perform well. So, instead of letting an application use all CPU cores, you can manually set or assign the number of cores for an application. It will help to improve PC performance a bit as your PC can utilize CPU processors for other programs.
To limit the number of CPU cores for an application in Windows 10, you need to use Task Manager and ‘Set affinity‘ (helps to set CPU cores) for any application and Windows 10 app. This tutorial covers all the steps to help you do that.
Before we get started, do note this CPU cores limit works only till the specified application is running. As soon as you close the application and start it again, it runs with all CPU cores. So, in that case, you need to set CPU cores limit again. Also, if an app needs all CPU cores and you have set cores limit, then it won’t work as it should do and might crash. So, be careful before you set cores limit for some application.
Step 1: Use “Ctrl+Shift+Esc” hotkey to open Task Manager. Or else, you can right-click on Windows 10 taskbar and select ‘Task Manager‘ option to open it. Also, make sure that the app or application is already running whose CPU cores limit you want to set.
Step 2: Task Manager opens with “Processes” tab. There you will see the list of all running apps and other applications. In that list, right-click on the application, whose CPU core usage you want to set, and then click on “Go to details” option.

Step 3: Now Details tab of Task Manager will open highlighting that particular application. You can also jump to Details tab directly and look for the application, but that would be time consuming because the list of running applications under Details tab is huge. Therefore, step 2 is needed to quickly select an application in Details tab. Now right-click on the highlighted application and select “Set affinity” option.

Step 4: A small window will open where you will see that all processors (virtual and actual CPU cores) are selected for that particular application. Uncheck CPUs and then save it.
That’s all you have to do. Now the application will run with the number of CPU cores set by you.
You may also check How To Hide Specific Pages In Settings App of Windows 10 and How To Auto Restore Opened Folders After PC Restart In Windows 10.
The Conclusion:
Settings the CPU cores limit can help you gain control over the CPU usage by apps. You can check the list of applications that don’t need all CPU cores as per your needs and then set the limit for those applications. You need to do this everytime you close and restart an application, which might bother you, but this native feature is helpful.
Огромное количество инструкций в Интернете среди прочих адекватных и сомнительных шагов по оптимизации Windows 11 и 10, 8.1 и 7 предлагают, помимо прочего, «снять ограничения с максимума оперативной памяти и разблокировать все ядра процессора» в окне msconfig — «Конфигурация системы».
В этой статье о том, полезен ли совет или, напротив, не очень: стоит ли настраивать включать максимум ядер процессора и на что повлияет установка вручную значения в поле «Максимум памяти». Если вы уже столкнулись с проблемами, после изменения настроек, их можно сбросить даже если Windows не запускается.
Назначение настроек «Число процессоров» и «Максимум памяти»
Сначала о том, где находятся рассматриваемые параметры количества ядер CPU и максимума памяти в Windows 11, Windows 10 и предыдущих версиях ОС:
- Откройте окно «Конфигурация системы», для этого можно нажать клавиши Win+R, ввести msconfig и нажать Enter.
- Перейдите на вкладку «Загрузка» и нажмите кнопку «Дополнительные параметры».

- В результате вы увидите настройки, о которых идёт речь.


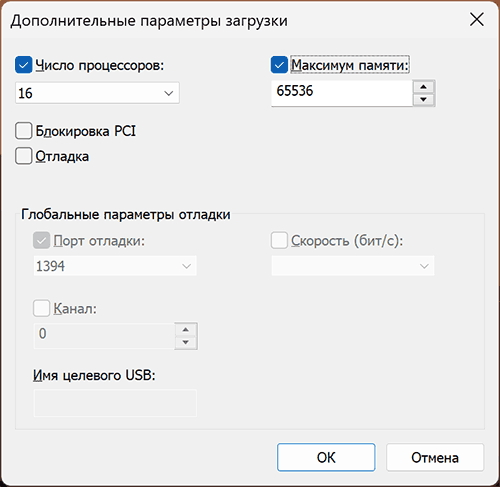
А теперь главное: эти параметры не предназначены для ускорения системы, их цель — не задействовать все ядра процессора и всю доступную память (а некоторые пробуют ввести и большие значения, чем фактически присутствует на ПК).
Назначение этих параметров — заставить систему использовать меньшее количество оперативной памяти и ядер процессора, когда это нужно. Зачем? Цели могут быть разными, среди типичных:
- Протестировать разрабатываемую программу в другой конфигурации. То есть разработчик создает свой софт на очень производительной машине, где всё работает отлично, но не уверен, что ситуация будет такой же, если запустить её на более распространённых у пользователей конфигурациях ПК.
- Диагностика каких-то проблем с оборудованием, когда есть предположение, что ограничение задействованных ядер или памяти может повлиять на поведение системы.
- Теоретически может быть старое ПО, которое неправильно работает на современных компьютерах с 16 ядрами процессора или огромным объемом оперативной памяти.
Таким образом, если вы выставляете в поле «Число процессоров» фактическое число ядер вашего ЦП, а в поле «Максимум памяти» — фактический объем оперативной памяти, в работе системы не изменится ничего: распределять ресурсы она будет точно так же, как если бы ни одна из отметок в окне выставлена не была.
Когда изменение параметров может быть полезным, а когда — вредным
Когда может быть полезным зайти в окно настроек числа процессоров и максимума памяти:
- Если вы хотите проверить работу чего-либо в ограниченной конфигурации.
- В ситуации, когда «доброжелатель» или вы сами ограничили используемые системой аппаратные ресурсы компьютера в этом окне и нужно вернуть всё в исходное состояние.
А вот в случае, если вы установили новенький многоядерный процессор, а число ядер, отображаемое в системе — меньше, вероятнее всего это окно не поможет (если только ранее там не были выставлены какие-либо значения вручную), скорее всего потребуется изучить параметры БИОС/UEFI.
В остальных случаях изменение этих настроек для рядового пользователя либо бесполезно, либо вредно.
Почему могут быть негативные последствия: нередко случается, что начинающий пользователь случайно установил не то число процессоров, например, 1. Либо памяти: ввёл число 8, 16, 32 — предполагая, что указывается число в Гб, оно при нажатии кнопки «Ок» будет изменено на 256 — это минимум в этом окне параметров, но всё равно мало для нормальной работы.
В результате получает не загружающуюся систему и синие экраны. А в случае, если Windows всё-таки запустилась — работа с ней становится невозможной. Но я всё-таки умудрился запустить, чтобы показать вам скриншот ниже.

Итог: значения параметров по умолчанию в окне настройки числа ядер процессора и максимума памяти (отсутствие отметок, 0 в обоих полях) равнозначны вручную выставленным на максимум значениям — как-то иначе системные ресурсы после изменения этих настроек Windows использовать не будет.
Существуют и другие похожие настройки: при желании вы можете изменить приоритет процессов в Windows (но ваша активная в настоящий момент игра и так по умолчанию работает с максимальным), или вручную указать, какие и сколько ядер процессора должен использовать процесс (но здесь мы тоже можем лишь ограничить его, а не предоставить больше возможностей), но это также никак не прибавит FPS и не ускорит работу ваших игр и программ по сравнению со значениями по умолчанию.

The CPU usage in Windows 8, 8.1, and 10 can sometimes be a problem. For users on older PCs, it can render a computer useless.
In the case that you have programs, services, and other factors spiking your CPU usage in Windows 10, there are some steps you can take to help limit it so that you can use your computer normally.
Let’s look at how to limit CPU usage in Windows 10 with a few different methods.
Limiting CPU Usage in Windows 10
Find the Culprit for High CPU Usage

The first way to limit CPU usage in Windows 10 is to find the culprit and eliminate it. In many cases, anti-virus and anti-malware programs are the biggest issues in Windows 10.
Avira, Avast, and Baidu had issues on launch day with Windows 10, causing an overload of CPU resources and rendering PCs useless. All three have released patches to fix the issue, but sometimes switching software is the quickest way to limit CPU usage in Windows 10.
Normally, when you first install software, the first few instances of it running will overload your CPU, memory and disk usage as your system adjusts to it being on the PC. Once this calms down, a few minutes after booting, you’ll find the levels running at normal. If not, you’ll want to look at alternatives to accomplish the same thing on your Windows 10 computer.
Clean Your Fans
The majority of PC owners, desktop and laptop alike, never blow out their fans. Over time, the dust, debris, and build up that covers your fans can cause your CPU to overheat which then causes it to max out.
Turn off your PC, blow your fans out with a can of compressed air, let it sit for 30 minutes, then boot up your computer and see if it helps.
Change Your Power Options
Power options can cause issues with system performance in general.
Open the Advanced settings for Power Options in Windows 10. You’ll need to look at these settings for each plan to maximize the impact.
Look for Processor power management, then change the minimum processor state to: 70 percent for minimum and maximum processor state.

Click “Apply” then “OK” to save the settings.
Change Program Affinity
In the Task Manager, under the Details tab, you can change which processor programs are assigned to. You’ll need to do this every time you log in to Windows 10, which can be a bother, but it can be a way to limit certain processes and cut down on their CPU usage.
Open the “Task Manager,” then go to “Details.”
Right-click on any program or service, and click “Affinity.”
You’ll be able to limit a program to service to certain core processors.
Third-Party Solutions
If you still can’t figure out where the CPU issues lie, consider third party software.
Three of the best software solutions for Windows 10 include:
- BES
- ProcessTamer
- Process Lasso
BES is considered one of the best Window-based CPU programs out there to manage CPU issues. It’s easy to use and can change the way you use Windows 10 forever.
Conclusion
It takes some troubleshooting to figure out what’s causing issues with your CPU and how to limit it in Windows 10. The above steps should help you figure it out without wasting too much of your time.
If you’re still having issues with your CPU maxing out, we recommend contacting Microsoft tech support for them to get into some advanced level troubleshooting to fix the issue permanently.
On your Windows 11 or Windows 10 computer, you may be experiencing high CPU usage caused by an app or game, of which you want to reduce or limit how much CPU resource the process for the app or game can use. In this post, we will show you how to limit CPU usage for apps with a single process or apps with multiple processes.

In simple terms, CPU utilization is the current percentage of CPU resources consumed by all programs. If you notice that some programs are using more of your CPU cores and hogging system resources, you can limit CPU usage for the process or multiple processes of the game/app using the methods below.
- Set Process Priority and CPU Affinity
- Use third-party app
- Lower Maximum Processor State
Let’s see these methods in detail.
1] Set Process Priority and CPU Affinity
Process Priority enables Windows OS to allocate and de-allocate resources required by all the active processes. PC users can alter the process priority of any process/sub-process via Task Manager, but it should be done only for non-system processes. The process priority settings of the core system processes are best left unaltered.
CPU Affinity simply restricts the processes to use fewer CPU cores of your system. PC users can set for each process to control how many CPU cores a process is allowed to use. By changing CPU affinity, you can free up CPU cores which will become available to other processes.
To set Process priority, do the following:

- Press Ctrl + Shift + Esc key to launch Task Manager.
- In Task Manager, identify the process whose priority you want to alter.
- You can also click on the CPU column to arrange the processes in descending order of their consumption.
- Now, right-click on the process and select the Go to details option from the context menu. Alternatively, click the Details tab and look for the process you want to alter.
- On the Details section, right-click on the process and select the Set priority from the context menu.
- Then, select Below Normal (allocates slightly fewer resources when they are available) or Low (allocates the least amount of system resources when they become available).
- A warning window will pop up informing you about the effects of changing the process priority.
- Click on the Change Priority button to apply changes.
- Exit Task Manager.
To set CPU (Processor) affinity, do the following:
 affinity")
Note: For apps that has multiple processes such as msedge.exe, you will have to set the CPU affinity for each of the processes since each executable represents a different tab, window or plugin.
- Open Task Manager.
- In the Task Manager window, click on More details to expand if you can’t see any tab but only a few apps with little to no information.
- Under Processes tab, click on the app you want to limit its CPU usage to expand the list of processes the app is running.
- Next. right-click on the process you want to limit, and select Go to details. to be redirected to the Details tab.
- In the Details section, right-click on the highlighted process and select Set affinity.
- In the Processor affinity window, by default, for most processes, you should see all processors are selected, which means all processor cores are allowed to run the process.
- Now, simply uncheck the boxes of CPU cores that you don’t want the process to use.
- Click on the OK button.
- Exit Task Manager.
Remember that you can limit only one or multiple CPU cores for a process, but at least one core has to be selected. Also, with this method, Windows will reset the configuration after you close and open the program to its default which is to use all CPU cores. So, to force an app or game to always retain the allowable CPU cores (CPU affinity), you can use the workaround below.
Read: Can’t set Process Priority in Task Manager of Windows
Permanently set CPU Affinity and Priority by creating a shortcut for the process

- You begin by determining the hex value of the CPU(s) you want to use for CPU Affinity parameter by getting the binary number of the CPU cores you want to use for a process.
The length of the binary number is determined by how many CPU cores you have. In the CPU binary number, 0 means “off” and 1 means “on”. For each CPU core you want to use for the process, change 0 to 1.
For this post, we are demonstrating with 7-core CPU and will be using only CPU 0 for the application; the binary number to be used will be 0000001.
- Next, we need to convert the binary to a hexadecimal number using the converter at rapidtables.com/convert.
- Once you have the hex number, proceed to create a desktop shortcut.
- In the Create shortcut window, enter the syntax below in the Type the location of the item field.
cmd.exe /c start "ProgramName" /High /affinity # "ProgramPath"
- In the syntax, substitute the ProgramName placeholder with the actual name of the program (can be empty or any name), Low with any CPU priority (Realtime, High, Above Normal, Normal, Below Normal, Low), # with the Hexadecimal value obtained earlier, ProgramPath with the full path of the game or application.
Now, after you have created the shortcut, if you want to run the program, run this shortcut instead, and Windows will automatically launch the program with the CPU affinity and Priority you’ve set in the shortcut’s command parameters. But, keep in mind that this method will only work for apps and games that run on only one process. For apps that run on multiple processes, such as chrome.exe, firefox.exe, or msedge.exe, you need to force set the priority and CPU affinity by following the workaround below.
Read: Change Process Priority for running processes using Command line
Permanently set CPU Affinity and Priority by creating PowerShell script for the process

- You begin by creating a PowerShell script.
- Create a text file and name it any name you like but with an extension of .ps1.
- Once created, open the .ps1 file with Notepad or any other compatible text editor.
- Enter the syntax below in to the text editor:
Get-WmiObject Win32_process -filter 'name = "chrome.exe"' | foreach-object { $_.SetPriority(64) }
- Substitute chrome.exe with the name of the process you want to set priority for, and the priority value (Realtime 256, High 128, Above Normal 32768, Normal 32, Below Normal 16384, Low 64) in the SetPriority(value).
- Now, you need to determine the decimal value of the CPU core(s) you want to use for a process. As you’re using the same CPU cores above, check the decimal value in the converter above.
- Now, if you want to set the CPU affinity for only one process, enter the command line below into the PowerShell script.
$Process = Get-Process Messenger; $Process.ProcessorAffinity=1
- To set the CPU affinity for all processes with the same name, for example, chrome.exe, firefox.exe or msedge.exe, enter the command line below into the PowerShell script.
ForEach($PROCESS in GET-PROCESS chrome) { $PROCESS.ProcessorAffinity=1}
- Substitute the value 1 with the decimal value you obtained from the converter, chrome with the name of the process you want to set the CPU affinity for.
- Save the text editor.
- To run the script, right-click the file and select Run with PowerShell.
By default, Windows does not allow any script to run on the system. To allow your script to run, tsp Y when prompted. The script will then run and exit after executing all the commands. If you encounter any problem running the script due to execution policy, you can turn on PowerShell script execution or you can create a desktop shortcut pointing to the ps1 script you’ve created earlier with parameter that bypass the execution policy using the command below in the Type the location of the item field:
C:\Windows\System32\WindowsPowerShell\v1.0\powershell.exe -noexit -ExecutionPolicy Bypass -File "FullPathToPowerShellScript"
- Substitute the FullPathToPowerShellScript placeholder with the actual path to your PS1 script file. If your Windows is not in C: drive or your powershell is installed elsewhere, replace the C:\Windows\System32\WindowsPowerShell\v1.0\powershell.exe with the path to the powershell.exe on your system.
Read: Configure Processor Scheduling for better performance in Windows
2] Use third-party app

This method also solves the drawback of using Task Manager to limit CPU usage, which is, it resets your preferences after the program restarts. So, If you want a more comprehensive solution to manage the resource usage on a program, you can try third-party apps like Process Lasso, Bill2 Process Manager, and Process Tamer.
To limit the CPU usage of a process using Process Lasso, do the following:
Note: If you plan on making major tweaks with this utility or any other mentioned, we suggest you create a restore point before you proceed.
- Download and install the appropriate version of the utility on your system.
- Next, launch the application with elevated permissions.
- Right-click on the desired process and change its priority and affinity as per your requirement.
- Make changes by selecting the Always option from the context menu. If you choose the Current option, it will only be applicable until the program restarts.
- Once done, you can exit the app.
Read: How to Enable or Disable CPU Core Parking in Windows
3] Lower Maximum Processor State

This method is not as invasive as the two methods described above. This setting allows you to limit the maximum speed your CPU can attain which will consequently put less task on your processor and can potentially prevent your PC overheating.
To lower the Maximum processor state of your CPU, do the following:
- Open Control Panel.
- Click Power Options.
- Click on the Change plan settings option located next to the active power plan of your system.
- Then click on the Change advanced power settings. A new Power Options window will launch.
- Find and expand the Processor Power Management option.
- Click on the Maximum processor state option and edit the values.
- By default, the value is set at 100 percent. Change it to 80 percent for both the On Battery and Plugged in options.
- Click Apply > OK to save changes and exit the window.
With the above configuration, your CPU will run at 80 percent of its capacity during peak loads.
That’s it!
Related post: How to Check, Lower or Increase CPU usage in Windows
How to allocate more CPU to a program in Windows 11/10
CPUs are not allocated to programs. Programs create threads of execution that run simultaneously. Different CPUs support a different number of threads they can execute simultaneously. If the program creates several threads same or more as a maximum number of threads supported by the CPU it may consume more CPU.
Can I limit CPU usage of a process?
The easiest way to limit CPU usage of a process on a Windows 11/10 computer is to limit Processor power. Go to Control Panel. Maximum Processor State and lower it to 80% or whatever you want. Using software that measures CPU temperatures like ‘Speed fan’, you will see that temperatures drop.
Why is Task Manager CPU usage so high?
The worst scenario for high CPU usage when nothing pops up in Task Manager is a virus infection or malicious software that runs in the background. To stay safe from any ransomware or other type of viruses that can lead to computer damage, make sure Windows Defender is updated and running or you can install any reputable third-party AV.
Read: CPU usage spikes to 100% when opening Task Manager
Should I enable all cores in Windows 11?
They are only used when required to speed up the tasks. However, you can manually enable some or all of them. If you think that your computer is performing slow and can do better, you can manually enable all cores so the workload between them is divided, resulting in faster performance.
What does 400% CPU usage mean?
On a multi-core Unix / Linux computer, 100% utilization indicates that only one of the cores is maxed out. 150% utilization indicates that only 1.5 cores are at capacity. So, for example, on an 8-core box, 400% utilization leaves you with twice the headroom that you are actually using.
What is a good CPU usage percentage?
The best CPU usage would most likely be around 80-80% max. This means you are utilizing more of your CPU’s capabilities while giving it some leeway to handle a spike in CPU usage.