
FTP (File Transfer Protocol) представляет собой протокол удаленной передачи файлов. С его помощью можно загрузить на сервер и скачивать с него же данные любого типа и размера, создавать или удалять файлы и папки.
В Windows, Linux и macOS подключиться к FTP-серверу можно с помощью встроенных средств и сторонних программ разного назначения. Полноценная работа со всеми средствами возможна только через специальные приложения, называемые FTP-клиентами. Теперь подробнее расскажем обо всех этих способах.
Данные для доступа к FTP-серверу
При подключении к FTP-серверу очень важно вводить правильные данные. Возьмем в качестве примера Timeweb. После регистрации на почту приходят два письма. Письмо с данными выглядит вот так:

Теперь о том, какие данные необходимо иметь под рукой:
- логин,
- пароль,
- ссылка на FTP-сервер (указывается в том же письме),
- порт (по умолчанию устанавливается значение 21).

Комьюнити теперь в Телеграм
Подпишитесь и будьте в курсе последних IT-новостей
Подписаться
Как подключится к FTP через Проводник Windows
Сначала рассмотрим, как подключиться к FTP-серверу через программу «Проводник» в Windows 10. Здесь ничего дополнительно устанавливать не надо, просто открываем системный файловый менеджер. В левой панели находим значок «Этот компьютер» и жмем по нему правой кнопкой мыши для вывода контекстного меню. В списке выбираем элемент «Добавить новый элемент в сетевое окружение».

В результате откроется окно мастера добавления сетевого расположения. В начальном окне просто нажимаем «Далее».

Следом надо выбрать его дальнейшее местоположение, но в этом окне нам доступен только один вариант. Для продолжения снова нажимаем на кнопку «Далее».

В этом окне понадобится указать ссылку на сетевой ресурс, к которому планируется провести подсоединение. Важно соблюдать предписанный формат (чуть ниже есть несколько примеров). В поле вводим адрес/ссылку и вновь идем дальше.

Теперь понадобится ввести в поле имя пользователя. Пароль заранее вводить не нужно, он будет запрашиваться только при подключении. Если на вашем хосте есть такая возможность, вход можно осуществить анонимно, отметив соответствующую галочку.

В самом конце даем название новому сетевому окружению.

На этом настройка завершена. При необходимости можно поставить галочку, чтобы сразу после нажатия на кнопку «Готово» открыть указанный сервер и приступить к работе.

Новое подключение теперь находится в «Сетевых расположениях» в разделе «Этот компьютер».

Теперь подключаемся – открываем только что созданное соединение. Открывается маленькое окошко, где мы вводим пароль, затем жмем на кнопку «Вход».

Если все данные введены успешно, откроется папка сервера. Можно приступать к работе.

Читайте также


Подключение через командную строку Windows
Теперь расскажу, как подключиться к FTP-серверу в Windows с помощью командной строки. Этот способ многим может показаться не очень удобным, потому что вручную придется вбивать команды на загрузку документов, открытие папок и их скачивание. А для входа следуем указанной ниже последовательности.
- Вводим команду ftp и жмем на клавишу Enter для подтверждения.
- Задаем команду open наименование_ftp_хоста.
- Вводим логин пользователя. Можно осуществить анонимный вход, просто введя Anonymous.
- Вбиваем пароль. В случае с анонимом оставляем это поле пустым и жмем снова Enter.

Теперь подробнее по командам:
- dir – просмотр содержимого сервера.
- cd «имя_папки» – открытие указанной папки.
- put «путь_к_файлу» – загрузка этого документа с компьютера на сервер.
- get «наименование_файла.формат» – скачивание с хоста на компьютер.
- quit – отключение от FTP-сервера.
FTP-подключение через любой браузер
Подключиться к FTP-серверу можно и через браузер на любых операционных системах. В таком случае будет доступна лишь часть функций. Необходимо ввести в адресной строке IP-адрес хоста, только с добавлением приставки «ftp://». Нажимаем на клавишу Enter. Дальше потребуется ввести имя пользователя и пароль, а потом нажать на кнопку «Вход».

Как подключиться к FTP с помощью FileZilla
FileZilla – наиболее востребованный и рекомендуемый FTP-клиент, бесплатный и простой в использовании. Подключиться к FTP-серверу через FileZilla можно вне зависимости от операционной системы, установленной на компьютере.
Сперва потребуется скачать приложение на официальном сайте. Есть версии для Linux, Windows (портативная и установочная) и macOS. Просто выбираем нужный вариант и жмем по нему для начала закачки.

Устанавливаем приложение и открываем его. В верхней панели вводим следующую информацию:
- Хост. Это может быть IP-адрес или ссылка.
- Логин пользователя, предварительно высланный на почту сервисом.
- Пароль.
- Порт. Оставляем пустым или устанавливаем значение 21.
После того как все нужные поля будут заполнены, нажимаем на кнопку «Быстрое соединение».

После открытия каталога можно приступать к загрузке и скачиванию необходимых данных. Чтобы не вводить каждый раз данные для подключения, следует воспользоваться менеджером сайтов, который доступен в меню «Файл».
Подключаемся с помощью Total Commander
Вам потребуется скачать и установить приложение Total Commander. Рекомендуем делать это с официального сайта. После завершения установки открываем приложение. Переходим во вкладку «Сеть» и выбираем там пункт «Соединиться с FTP-сервером». Для этого действия, кстати, предусмотрена комбинация горячих клавиш – Ctrl + F.

В новом окне нажимаем на кнопку «Добавить». Дальше вводим имя нового соединения, адрес хоста, учетную запись и пароль. Нажимаем на кнопку ОК, чтобы сохранить всю введенную информацию.

Новое подключение отразится в списке. Остается только соединиться с сервером, нажав на соответствующую кнопку.

Как подключиться к FTP-серверу через терминал Linux
В Linux к FTP можно подключиться через системное приложение «Терминал». Это очень похоже на использование командной строки в Windows. Последовательность абсолютно та же – набираем команду ftp и активируем ее нажатием на кнопку Enter. Потом пишем open ссылка_на_хост. Не забываем, что затем надо указать логин и пароль.
Вот примеры доступных опций:
- Is – отображение списка файлов и папок.
- get – скачивание файла.
- mget – скачивание документов определенного формата. Например, mget * – все данные в каталоге, mget *, php – файлы формата php.
- put – загрузка файла на ресурс.
- mput – загрузка нескольких документов единого формата.
- mkdir – создание нового каталога.
- rmdir – удаление каталога.
- delete – удаление файла.
- bye – завершение работы.
- close – выход из текущего сеанса и возврат в контекст командной строки FTP.
- status – отображение статуса FTP клиента.
В Linux предусмотрен и другой вариант подключения к FTP. Сначала надо установить нужный пакет, дав вот такой запрос:
sudo apt-get install curlftpfs
Следом нужно предоставить права на определенную папку:
sudo chmod 777 ~/ftp
Теперь производится монтирование ftp-директории:
sudo curlftpfs -o allow_other ftp://user: password@server.ru /home/virtdiver/ftp/
Если работать необходимо от имени пользователя, то вводится вот такая опция:
-o allow_other
Для размонтирования FTP-папки используем такую команду:
sudo umount ~/ftp
Подключение к FTP через сайт хостинга
В этом случае достаточно лишь войти на сайт хостинга и перейти в соответствующий раздел. Покажу на примере Timeweb.
В правой части окна есть панель управления. Находим в ней пункт «Файловый менеджер» и жмем по нему. Перед нами предстанет веб-интерфейс FTP-сервера. Работать с ним очень просто, переносить файлы можно посредством drag-n-drop.

Заключение
Подключиться к FTP-серверу очень просто, и сделать это можно несколькими способами. Многие из них актуальны для всех популярных операционных систем. Но все зависит от цели, ведь функционал некоторых программ весьма ограничен.
Did you know that Windows 10 includes a built-in FTP client? It might come as a surprise, but we’re talking about File Explorer! One of the lesser-known features available in File Explorer is that it can handle connections to FTP servers. You can use File Explorer to do all the file and folder management operations you would expect on an FTP server: copy, move, delete, create, rename, and so on. In this guide, we show you how to use Windows 10’s FTP client — File Explorer — to quickly access any FTP server:
How to connect to FTP servers with File Explorer in Windows 10
Open File Explorer and, in the address bar, type ftp:// followed by the IP address of the FTP server to which you want to connect. Here’s one dummy example of how it should look like: ftp://192.168.1.50. Of course, you can use its domain name as well, if you know it. That looks something like this: ftp.digitalcitizen.life or ftp.example.com.
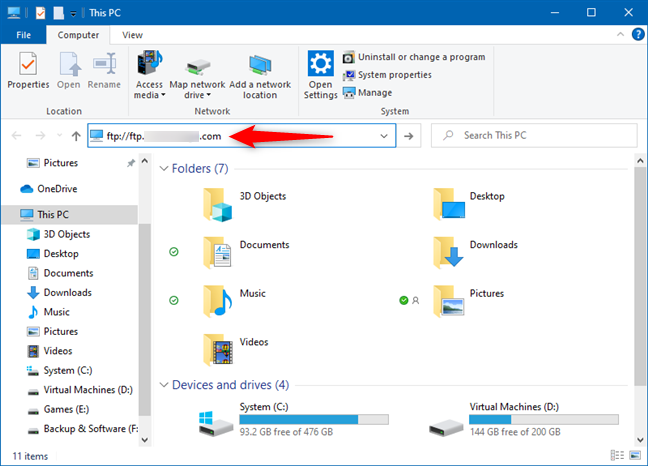
Entering the address of an FTP server in Windows 10’s File Explorer
You are then asked to fill in details such as the username and password used to connect to the FTP server. Type the username, the password, and, if you plan to log in more than once to this server, check the “Save password” box. That makes Windows 10 remember it for future connections so that you don’t have to type it again.
When you’re done entering all the details, press “Log On.”
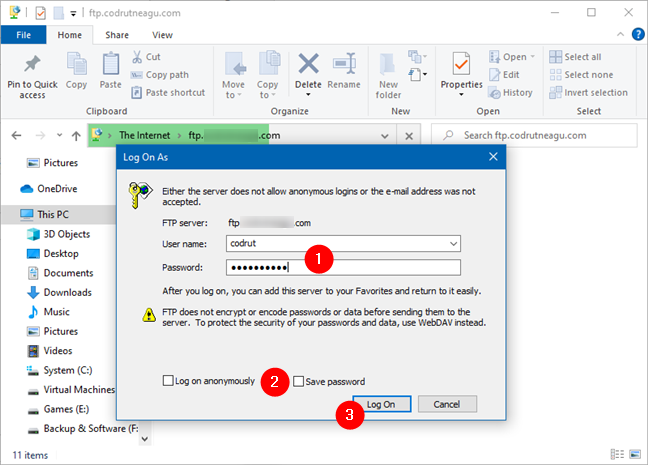
Entering the username and password for an FTP account in Windows 10
NOTE: If your FTP server supports and is configured to allow anonymous connections, check the box which says “Log on anonymously.” Then type your email address instead of a username and a password because they are no longer required in this case.
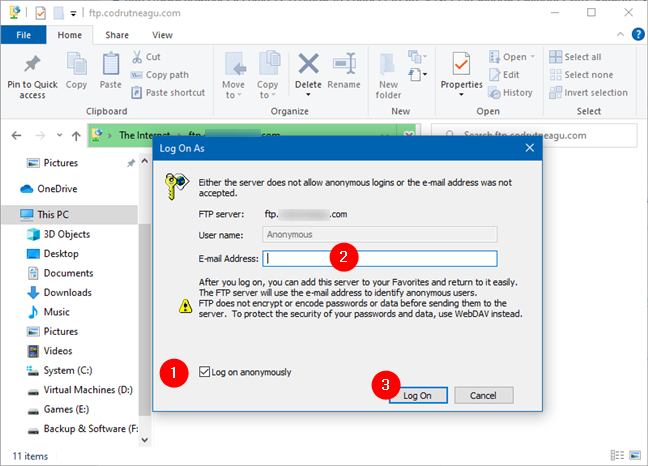
Using File Explorer to connect to an FTP server anonymously
Windows 10’s FTP client — File Explorer — now attempts to connect to the FTP server. If the connection is established without problems, you get to see all the folders on the server, as if they were folders on your Windows 10 PC.
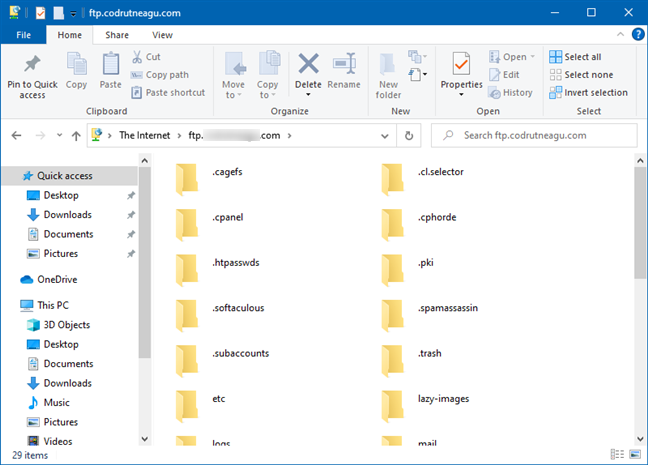
Using Windows 10’s File Explorer to browse through an FTP server
How to use Windows 10’s File Explorer to work with an FTP server
You can now work on the FTP server as if it was your own computer. Depending on the connection speed, while you browse through files and folders, it may take a while for things to be displayed.
It would be best if you remember that, as long as you keep the File Explorer window open, the one in which the connection was established, the FTP connection remains active. To disconnect, close that File Explorer window.
TIP: If you want to always be able to quickly access a particular FTP server, you might want to map it to File Explorer. Here’s how to do that: How to map FTP drives, network drives, and web shares in Windows 10.
You can browse folders from your computer in a new File Explorer window or the same window. However, there won’t be any shortcut to take you back to the FTP server. To go back to it, you need to click or tap on the small arrow found near the Back and Forward buttons. There, you’ll see a list with all the places you’ve browsed, and you can quickly go back to your FTP server without starting a new connection.
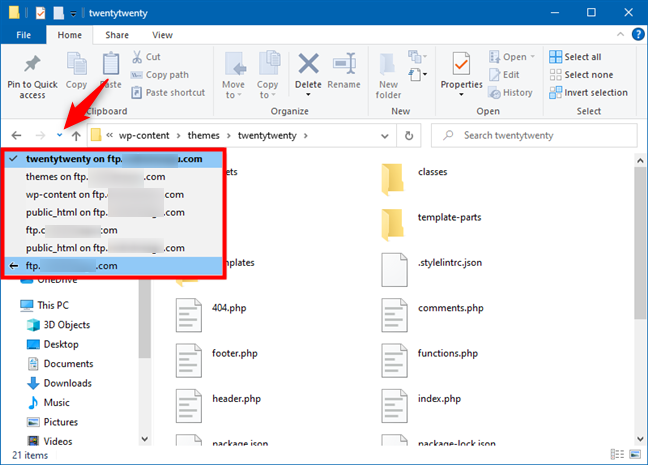
Going back to the FTP server in File Explorer
File & folder management operations, such as copying, pasting, or deleting files, are done as usual. File Explorer translates all your clicks/taps and keyboard commands into the appropriate FTP commands.
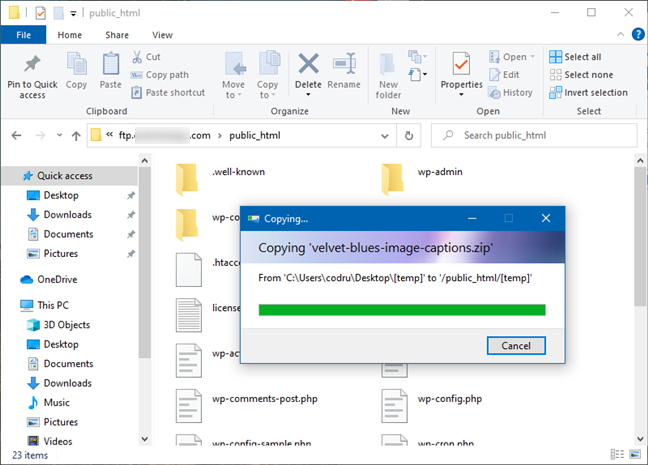
File and folder management on an FTP server is done as usual
One significant difference, though, is that you can’t see previews of the files found on the FTP server. You can only see thumbnails representative for each file type.
Did you know that Windows 10 has its own “FTP Explorer”? 🙂
Even though it does not compare in terms of features and usability with dedicated applications for handling FTP connections, Windows 10’s File Explorer does a decent job at it. If you regularly work with specific FTP servers, we recommend you create a drive mapping in File Explorer or to use specialized apps like Core FTP or FileZilla for this purpose.
Рассмотрим настройку и использование встроенного в «Проводник» FTP-клиента на примере Windows 10
Сейчас у нас уже нет нужды в полноценном FTP-клиенте, как было несколько лет назад. Отчасти это объясняется тем, что теперь мы чаще обращаемся к каким-либо объектам в Интернете через веб-сайты, а не путем загрузки из FTP-серверов. Помните те времена, когда вы получали крупные обновления от какой-нибудь компании, загружая их с FTP-сервера?
В любом случае, хотя существует много полнофункциональных FTP-клиентов для загрузок, иногда требуется быстро подключиться, чтобы получить несколько файлов — в моем случае для обслуживания веб-сайта.
Знаете ли вы, что в «Проводнике Windows» есть встроенный FTP-клиент?
На самом деле он присутствовал в нескольких последних версиях Windows. Его очень просто настроить и использовать для нечастых сеансов работы по протоколу FTP.
Эта служба отличается высокой надежностью, дает возможность работать с файлами через FTP и выполнять такие операции, как отправка, загрузка, удаление, переименование, изменение разрешений файлов (CHMOD), а также позволяет закреплять папки и целые сайты в пользовательском интерфейсе «Проводника».
Далее в статье показан этот процесс на примере Windows 10, но последовательность действий очень похожа на Windows 7 и 8.1.
- Щелкните в строке адреса «Проводника», чтобы выделить поле (экран 1).
- Введите ftp-адрес, к которому хотите обратиться. Замечу, что указатель протокола ftp:// на данном этапе не обязателен, но может использоваться (экран 2).
- Введите свое имя пользователя FTP (экран 3).
- Введите пароль FTP.
- Установите флажок, если обращаетесь к FTP-серверу анонимно.
- Установите флажок, чтобы сохранить пароль в диспетчере учетных данных Windows.
- Щелкните Log On («Войти в систему») для доступа к FTP-серверу. FTP-сайт откроется во втором экземпляре «Проводника», и вы сможете получить доступ к сайту, как показано на экране 4.
- Вы можете закрепить папку в области быстрого доступа «Проводника» в любое время для выделенной папки (экран 5).
- Щелкая правой кнопкой мыши файл или папку на FTP-сервере, вы можете настроить разрешения на чтение, запись и выполнение для содержимого. Они широко известны как CHMOD (экран 6).
- Если щелкнуть правой кнопкой мыши This PC («Этот ПК»), можно выбрать команду Map network drive («Подключить сетевой диск»), чтобы добавить FTP-сайт на вкладке «Проводника», как показано на экране 7.
- Выберите ссылку внизу диалогового окна, чтобы начать процесс подключения (экран 8).
- Нажмите кнопку Next («Далее») для продолжения (экран 9).
- Выбрав один вариант в этом диалоговом окне, нажмите для продолжения кнопку Next (экран 10).
- Введите адрес FTP-сайта. Замечу, что на этом шаге обязателен указатель протокола ftp:// (экран 11).
- Установите флажок для анонимного доступа к FTP-серверу (экран 12).
- Введите свое имя пользователя. Если ранее вы обращались к этому FTP-сайту в «Проводнике», как было показано выше, и предпочли сохранить пароль, то вы не получите запроса для ввода пароля при доступе к этому новому ресурсу, так как пароль уже сохранен.
- Вы можете использовать полное имя сервера, как показано по умолчанию, или выбрать собственное уникальное имя для подключенного ресурса (экран 13).
- Если вы хотите получить немедленный доступ к FTP-серверу, то оставьте соответствующий флажок установленным, в противном случае снимите его (экран 14).
- Нажмите кнопку Finish («Готово»), чтобы завершить процесс.
- Подключенный FTP-сервер теперь будет доступен, когда вы откроете «Проводник» и перейдете на вкладку This PC, как показано на экране 15.

|
| Экран 1. Пользовательский интерфейс «Проводника» |
|
|
| Экран 2. Ввод ftp-адреса |
|
|
| Экран 3. Ввод имени пользователя на сервере FTP |
|
|
| Экран 4. Доступ к сайту |
|
|
| Экран 5. Закрепление папки в области быстрого доступа |
|
|
| Экран 6. Настройка разрешений |
|
|
| Экран 7. Подключение сетевого диска |
|
|
| Экран 8. Запуск процесса подключения к сетевому диску |
|
|
| Экран 9. Экран приветствия |
|
|
| Экран 10. Один вариант в диалоговом окне |
|
|
| Экран 11. Ввод адреса FTP-сайта |
|
|
| Экран 12. Флажок для анонимного доступа к FTP-серверу |
|
|
| Экран 13. Можно использовать полное имя сервера |
|
|
| Экран 14. Флажок для немедленного доступа к FTP-серверу |
|
|
| Экран 15. FTP-сервер в «Проводнике» |
Пользуйтесь быстрым и простым FTP-доступом непосредственно из «Проводника».
Quick Links
-
How to Access FTP Servers in Windows 10 File Explorer
-
How to Access FTP Servers from Windows 11 File Explorer
-
How to Access FTP Servers in the Command Prompt
Summary
- Windows File Explorer allows you to connect to FTP servers by adding a network location and entering the server address, username, and password.
- In Windows 11 File Explorer, right-click on «This PC» and choose «Add a Network Location,» then follow the steps to add an FTP server.
- You can also access FTP servers using the ftp command in Command Prompt or PowerShell, using the «open» command followed by the server address and entering the username and password. Use commands like «dir» to view directories and «get» or «put» to download or upload files.
If you need to access an FTP server, you can install dedicated FTP clients with lots of features — but you don’t necessarily have to. Windows itself offers several ways for connecting to an FTP server, allowing you to download and upload files in a pinch.
What is an FTP Server?
A File Transfer Protocol Server — usually just called an FTP Server — is a server running special software designed specifically to send and receive files. FTP servers used to be quite common, and many companies hosted them to allow people to download files from the Internet. FTP servers are less prevelant than they used to be, but you can host your own. Plain old FTP is pretty insecure, so you should treat FTP servers you find with some caution.
How to Access FTP Servers in Windows 10 File Explorer
The Windows file manager — known as File Explorer on Windows 10, and Windows Explorer on Windows 7 — allows you to connect to FTP servers.
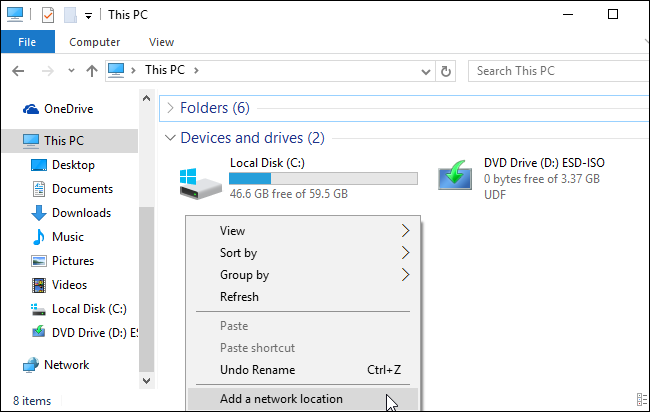
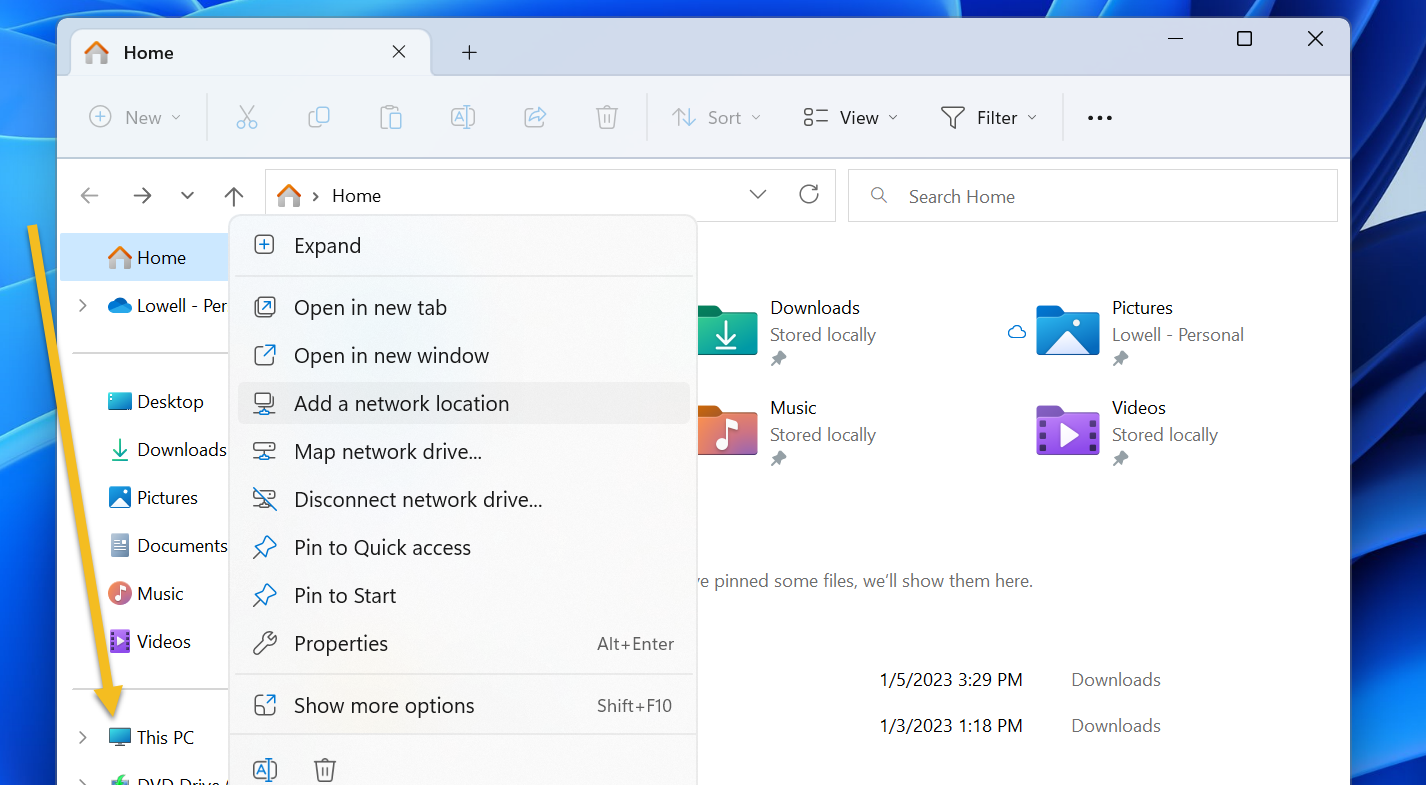
To connect to an FTP server, open a File Explorer or Windows Explorer window, click the «This PC» or «Computer». Right-click in the right pane and select «Add a network location».
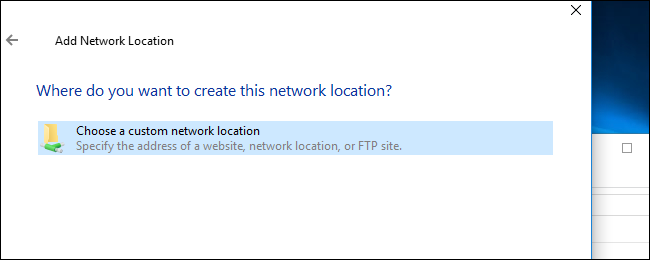
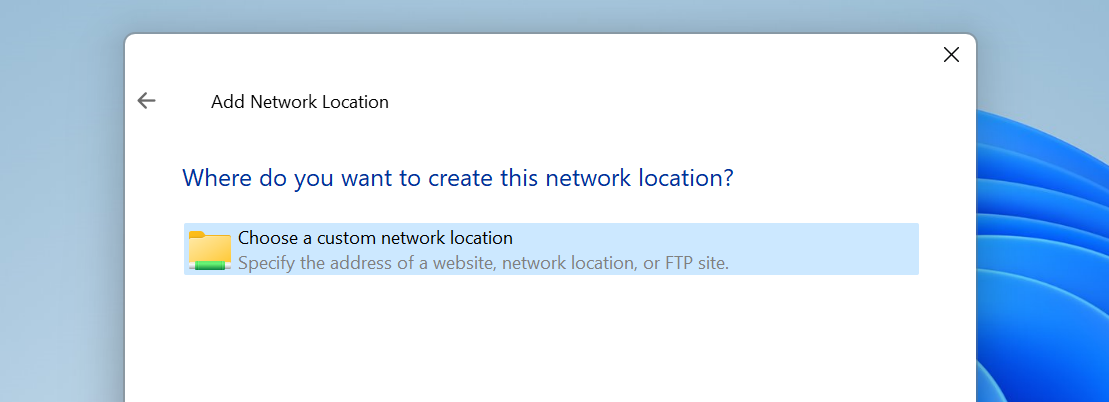
Go through the wizard that appears and select «Choose a custom network location».
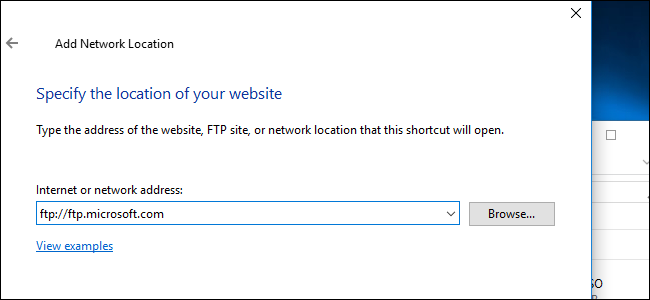
In the «Specify the location of your website» dialog, enter the address of the ftp server in the form ftp://server.com .
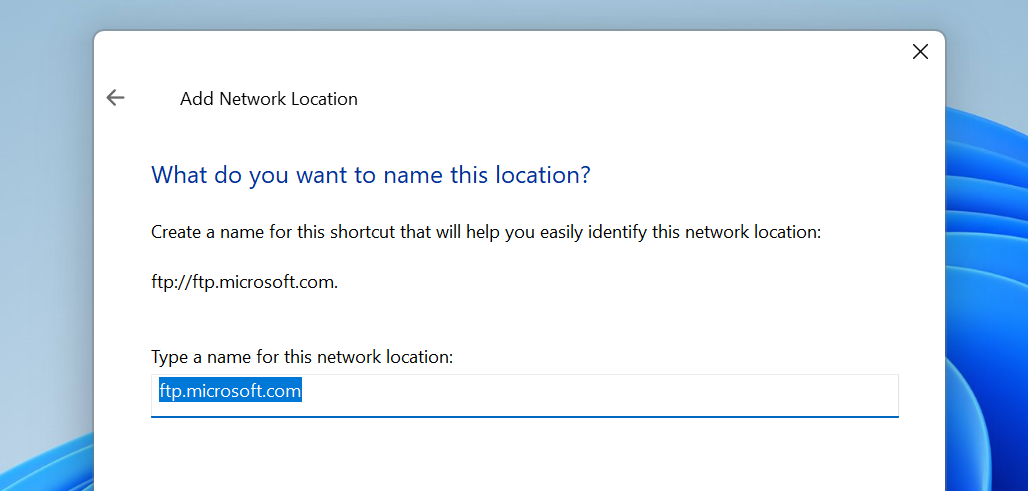
For example, Microsoft’s FTP server used to be ftp.microsoft.com, so we’d enter ftp://ftp.microsoft.com here if we wanted to connect to that particular server. It doesn’t actually work anymore, but since there are essentially no trustworthy public FTP servers out there anymore, we’re going to still use it as our example here.
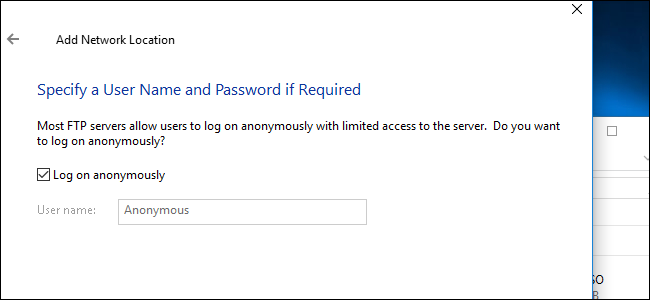
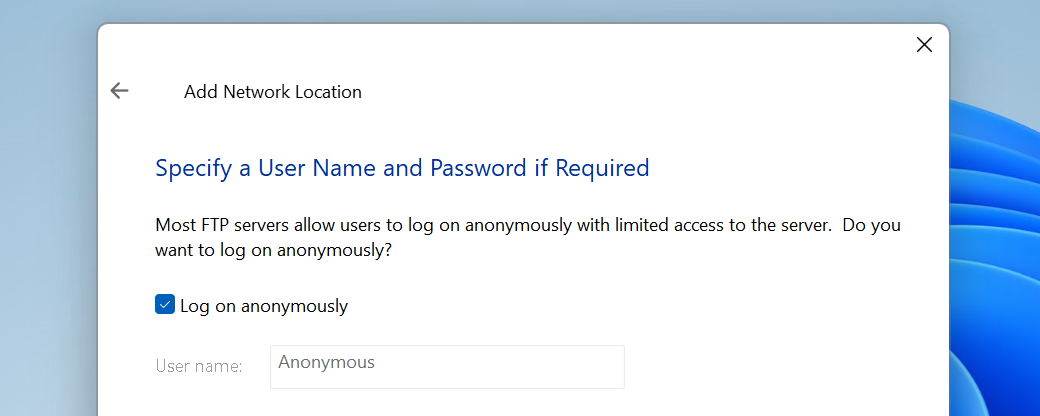
If you don’t have a username and password, you can often check the «Log on anonymously» box and sign into the server without a username and password. This gives you limited access to the server — you can generally download publicly available files but not upload files, for example.
If you do have a username and password, enter your username here. The first time you connect to the FTP server, you’ll be prompted to enter your password.
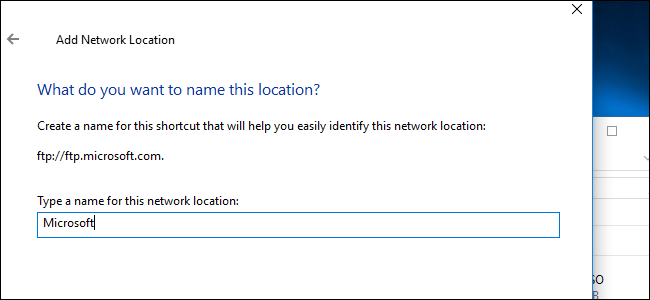
You’ll now be asked to enter a name for the network location. Enter whatever name you like — the FTP site will appear with this name so you can easily remember which is which.
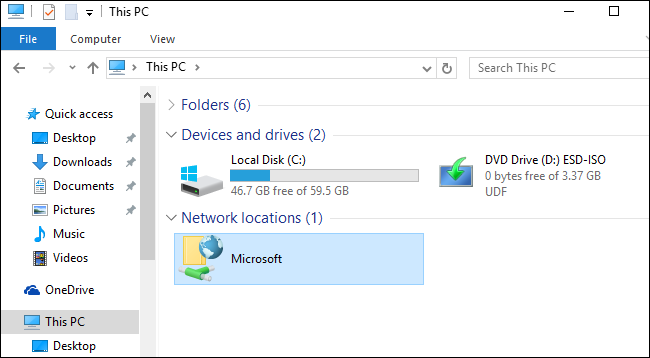
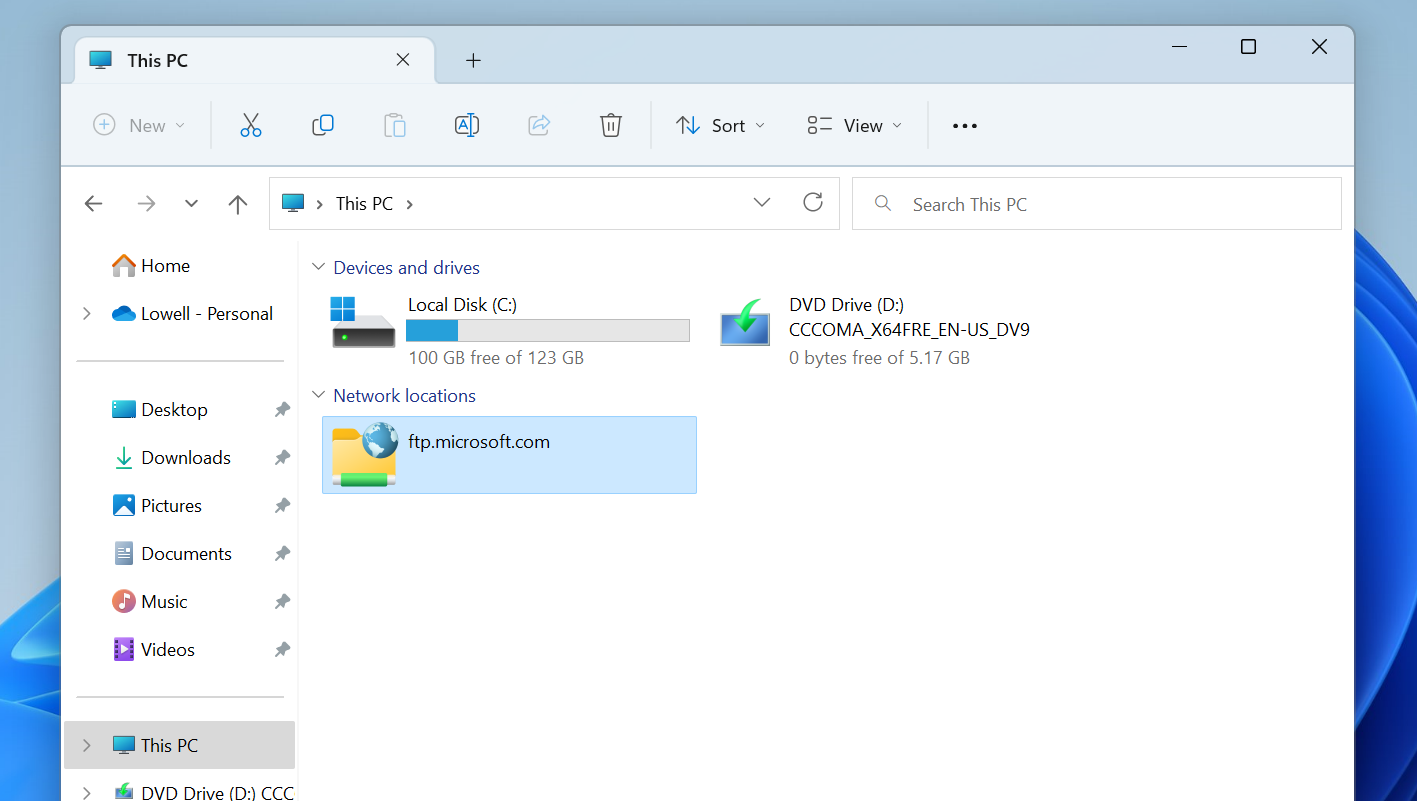
When you’re done, the FTP site will appear under «Network locations» in the This PC or Computer pane. Download files and upload files by copying and pasting them to and from this folder.
How to Access FTP Servers from Windows 11 File Explorer
To access an FTP server from Windows 11’s File Explorer, you’ll need to right-click on the «This PC» icon and choose Add a Network Location from the popup dialog.
You’ll be presented with the Add Network Location wizard. You’ll want to select the «Choose a custom network location» option, which is the only option to choose from anyway. Once you do, you will be able to click the Next button.
On the next screen you’ll put the location of your FTP server, which should generally be in the format of:
ftp://<domain>

On the next screen you’ll put your user name and password, or you can leave the «Log on anonymously» option checked if it’s a public FTP server for some reason. Do those still exist?
On the last screen you’ll be asked to give a name to your location, which could be literally anything you feel like.
Once you’re all done with creating the network location, you can find it by browsing to «This PC» in File Explorer, and you’ll see a brand-new location to choose.
It’s worth noting that Microsoft’s FTP server doesn’t seem to work anonymously anymore, so if you follow along with these instructions you won’t actually be able to access anything.
How to Access FTP Servers in the Command Prompt
You can also do this with the ftp command in a Command Prompt or PowerShell window. This command is comes built into Windows.
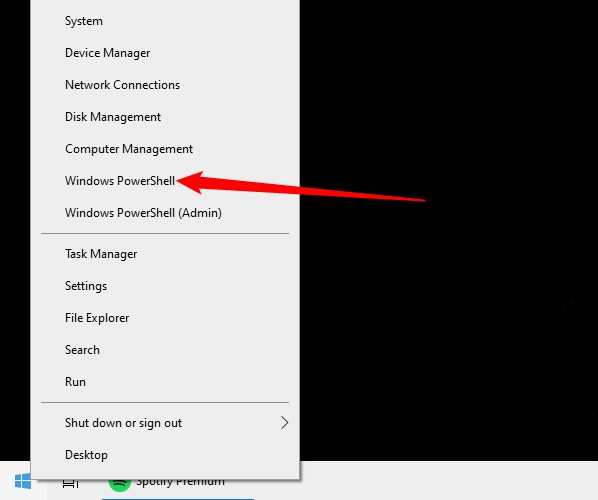
To do this, open a Command Prompt or PowerShell window. On Windows 10, right-click the Start button or press Windows+X on your keyboard and select «PowerShell». On Windows 7, search the Start menu for «Command Prompt».
If you’re using Windows 11, you can search for «Command Prompt» in the Start Menu, or you can use the Terminal, which is PowerShell, but FTP will work fine there as well.
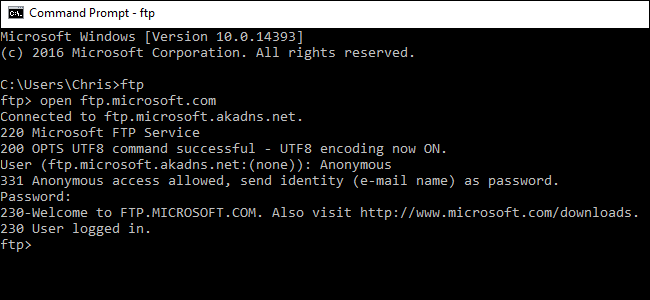
Type ftp at the prompt and press Enter. The prompt will change to an ftp> prompt.
To connect to a server, type open followed by the address of the FTP server. For example, to connect to Microsoft’s FTP server, you used to be able to type:
open ftp.microsoft.com
You’ll then be prompted for a username. Enter the username and password to connect to the site. If you don’t have one, you can enter «Anonymous» followed by a blank password to see if the FTP server allows anonymous access.
Microsoft doesn’t have an FTP server anymore, but these screenshots were taken back when they did. Since there aren’t a lot of trustworthy public FTP servers out there, we’re leaving the screenshots alone for illustration purposes.
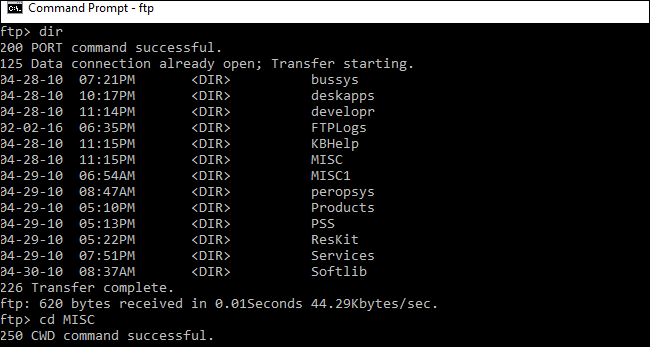
Once you’re connected, you can navigate the FTP server with the dir and cd commands. To view the contents of the current directory, type:
dir
To change to another directory, type the cd command followed by the name of the directory. For example, you’d type the following command to change to a directory named «example»:
cd example
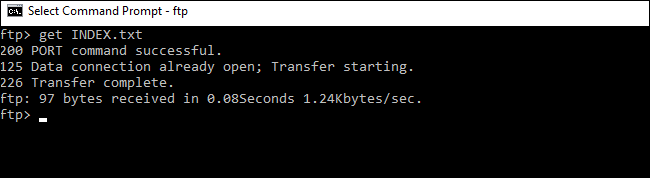
To upload or download files, use the get and push commands.
For example, to download a file named example.txt in the current FTP folder, you’d type:
get example.txt
To upload a file stored on your desktop named example.txt to the FTP server, you’d type:
put "C:\Users\YOURNAME\Desktop\example.txt"
When you’re done, just type the following command and press Enter to close the connection:
quit

While apps like Cyberduck or FileZilla offer plenty of advanced features that Windows’ built-in options don’t, the above are great options for basic FTP browsing, uploading, and downloading. If you want to get more complicated, you can even automate FTP from the command line.
Accessing an FTP server in Windows 10 is a straightforward process. You’ll need to open File Explorer, type the FTP server address in the address bar, and log in with your credentials. This simple method allows you to manage files over a network efficiently.
In the following steps, you’ll learn how to connect to an FTP server using Windows 10’s built-in tools. This process will let you upload, download, and manage files on the server directly from your PC.
Step 1: Open File Explorer
Open File Explorer by clicking on the folder icon in the taskbar or by pressing the Windows key + E.
File Explorer is where you can browse through your computer’s files and folders. You’ll need it to enter the FTP server details.
Step 2: Type the FTP Server Address
In the File Explorer address bar, type the FTP server address (e.g., ftp://yourserver.com) and press Enter.
The address bar is located at the top of the File Explorer window. Make sure to use the correct format for the FTP address.
Step 3: Enter Your Credentials
A prompt will appear asking for your username and password. Enter your FTP credentials and click ‘Log On’.
Your credentials are necessary for accessing files on the server. Ensure you have the correct username and password, as an incorrect entry will deny access.
Step 4: Navigate the FTP Server
Once logged in, you can navigate the FTP server just like any other folder on your computer.
You can now upload, download, and manage files on the server. Drag and drop files as needed to move them between your PC and the FTP server.
Step 5: Close the Connection
When you’re done, simply close the File Explorer window to disconnect from the FTP server.
Closing File Explorer ends the FTP session. Reopen File Explorer and enter the FTP address again if you need to reconnect.
Completing these steps will establish a connection between your PC and the FTP server, allowing you to manage files seamlessly.
Tips for Accessing FTP Server in Windows 10
- Save Credentials: Consider saving your credentials for quicker access next time.
- Use FTP Client: Utilize FTP clients like FileZilla for advanced features.
- Check Permissions: Ensure you have the right permissions to read/write on the FTP server.
- Secure Connection: Use FTPS or SFTP for a secure connection.
- Firewall Settings: Adjust your firewall settings if you’re having trouble connecting.
Frequently Asked Questions
What is an FTP server?
An FTP server is a computer that allows users to upload and download files over a network.
Why can’t I connect to the FTP server?
Check your internet connection, firewall settings, and ensure the FTP server address and credentials are correct.
Can I use a browser to access an FTP server?
Yes, simply type the FTP address into the browser’s address bar, but using File Explorer or an FTP client is recommended.
Is it safe to use FTP?
FTP itself is not encrypted, so use FTPS or SFTP for secure file transfers.
What if I forgot my FTP credentials?
Contact the FTP server administrator to reset your username and password.
Summary
- Open File Explorer.
- Type the FTP server address in the address bar.
- Enter your credentials.
- Navigate the FTP server.
- Close the connection.
Conclusion
Accessing an FTP server in Windows 10 is a quick and easy way to manage your files over a network. By following the steps outlined, you can effortlessly connect and start transferring files immediately. If you frequently use FTP, consider saving your credentials or using an FTP client for more advanced features. Remember to prioritize security by opting for encrypted connections like FTPS or SFTP.
For those looking to dive deeper, explore additional resources on secure file transfer protocols or advanced FTP features. Now that you’re equipped with the knowledge to access an FTP server, managing files remotely will be a breeze. Enjoy the seamless integration of FTP access in Windows 10 and the efficiency it brings to your workflow!
Kermit Matthews is a freelance writer based in Philadelphia, Pennsylvania with more than a decade of experience writing technology guides. He has a Bachelor’s and Master’s degree in Computer Science and has spent much of his professional career in IT management.
He specializes in writing content about iPhones, Android devices, Microsoft Office, and many other popular applications and devices.
Read his full bio here.