
В этой статье мы поговорим о каталоге WinSxS в Windows, причинах его постоянного роста и способах очистки. Каталог C:\windows\WinSxS является хранилищем компонентов Windows. В этом каталоге хранятся dll библиотеки, бинарные и xml файлы, необходимые для установки и работы различных ролей и компонентов Windows. Каждый раз когда вы устанавливаете обновления Windows (это происходит ежемесячно), новая версия обновляемого компонента устанавливается в систему, а старая сохраняется в хранилище компонентов WinSxS (это необходимо для обеспечения совместимости и возможности “отката“ к старым версиям компонентов при удалении проблемного обновления).
Со временем размер каталога WinSxS постоянно увеличивается. Причем его размер ничем не ограничен (хотя на практике размер папки WinSxS в Windows 10 редко превышает 15-20 Гб.)
В этой статье мы рассмотрим наиболее безвредные способы очистки папки WinSxS в Windows 10 и Windows Server.
- Оптимизация хранилища компонентов и удаление старых версий компонентов, оставшихся после установки обновлений Windows;
- Технология Features on Demand (функции по требованию), позволяющая удалить неиспользуемые компоненты Windows с диска;
- Сжатие файлов в папке WinSxS – способ уменьшить размер каталога WinSxS за счет включения NTFS компрессии.
У многих пользователей возникает естественный вопрос можно ли вручную удалить файлы из папки WinSxS. Ответ на этот вопрос – категоричное НЕТ! Такими действиями с большой долей вероятности вы сломаете свою Windows. И хотя отдельные попытки удаления конкретных файлов из папки WinSxS могут быть удачными, рекомендовать этот способ нельзя.
Содержание:
- Как узнать реальный размер папки WinSxS в Windows 10?
- Очистка хранилища компонентов WinSxS в Windows
- Удаление неиспользуемых компонентов Windows (Windows Server)
- Включаем NTFS сжатие на папке WinSxS в Windows
Как узнать реальный размер папки WinSxS в Windows 10?
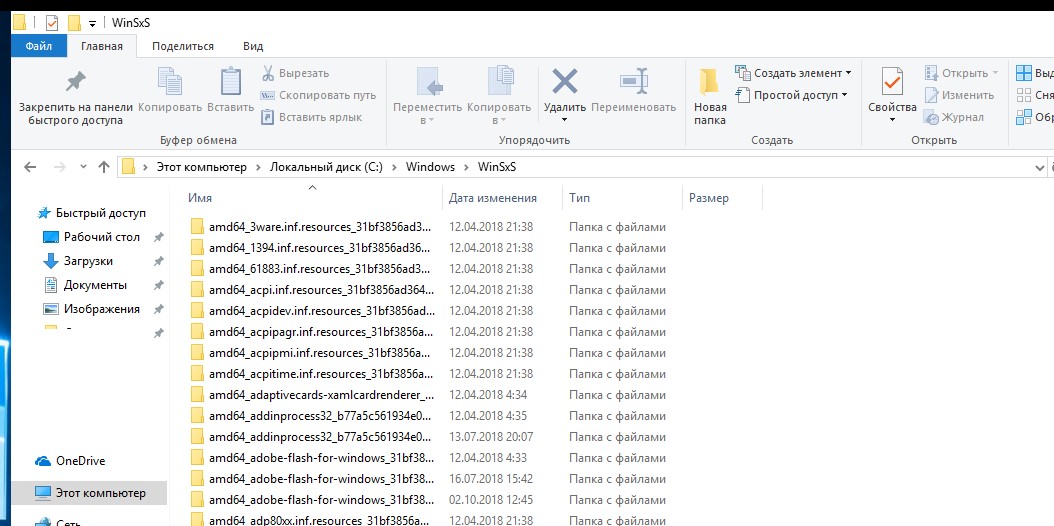
Самый простой способ получить текущий размер каталога WinSxS в Windows, запустить проводник File Explorer и открыть свойства папки %windir%\WinSxS (или воспользоваться скриптом PowerShell). Но имейте в виду, что большинство файловых менеджеров (в том числе File Explorer) показывают несколько больший размер каталога WinSxS, чем он занимает на диске.
Дело в том, что в каталоге WinSxS есть большое количество hard links (жестких символических ссылок) на файлы в других системных каталогах. Файловые менеджеры при подсчете размера папки WinSxS учитывают объем файлов, на которые ссылаются жесткие ссылки, а это не корректно.
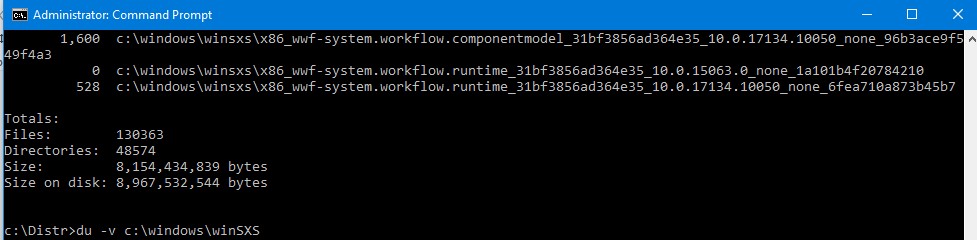
Чтобы реальный (без учета жестких ссылок) размер папки WinSxS, воспользуйтесь утилитой SysInternal du:
du -v c:\windows\winSXS
Но проще всего проанализировать размер хранилища компонентов в папке WinSxS с помощью команды DISM:
Dism.exe /Online /Cleanup-Image /AnalyzeComponentStore
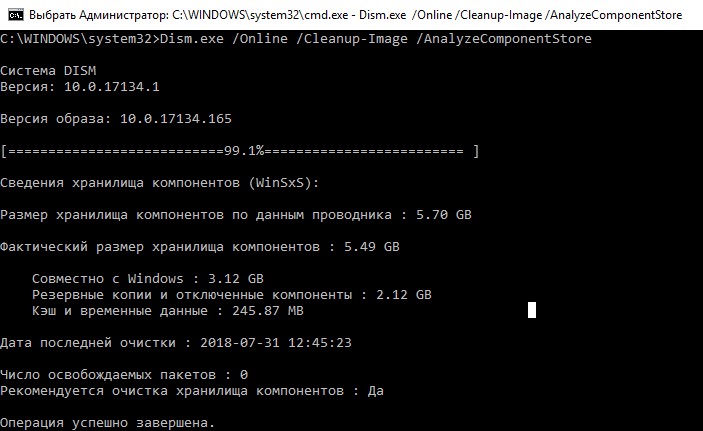
Разберемся, что возвращает данная команда:
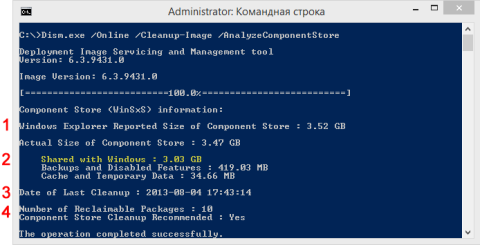
Размер хранилища компонентов по данным проводника : 5.70 GB (это размер хранилища с учета жестких ссылок, который отображается в проводнике)
Фактический размер хранилища компонентов : 5.49 GB (реальный размер хранилища компонентов за исключением жестких ссылок)
Совместно с Windows : 3.12 GB (обязательные файлы системы, не могут быть удалены)
Резервные копии и отключенные компоненты : 2.12 GB (устаревшие файлы компонентов, которые нужны на случай проблем с установленными обновлениями)
Кэш и временные данные : 245.87 MB (файлы используются для ускорения работы системы обслуживания)
Дата последней очистки : 2018-07-31 12:45:23
Число освобождаемых пакетов : 10 (файлы, которые обновились после установки обновлений Windows, они будут удалены при очистке хранилища)
Рекомендуется очистка хранилища компонентов : Да
Как вы видите, в данном случае можно уменьшить размер каталога WinSxS на 2.1 Гб + 250 Мб.
Очистка хранилища компонентов WinSxS в Windows
Самый быстрый и простой способ освободить место в хранилище компонентов Windows (т.е. очистить папку WinSxS) – оптимизация хранилища командой:
Dism.exe /Online /Cleanup-Image /StartComponentCleanup
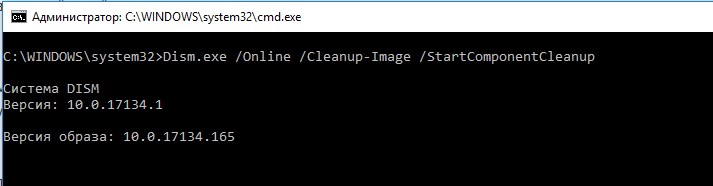
Опция Dism /StartComponentCleanup поддерживается во всех версиях Windows, начиная с Windows 8/Windows Server.
После окончания очистки проверьте текущий размер хранилища компонентов:
Dism.exe /Online /Cleanup-Image /AnalyzeComponentStore
В моем примере это помогло уменьшить размер папки WinSxS на 2,5 Гб.
С помощью еще одного параметра /ResetBase вы можете удалить все предыдущие версии компонентов, оставшиеся после установки обновлений Windows. После этого вы не сможете удалить установленные обновления или Service Pack, а в панели обновлений
appwiz.cpl
у обновлений пропадет кнопка «Удалить»).
Чтобы очистить старые версии компонентов, выполните:
Dism.exe /Online /Cleanup-Image /StartComponentCleanup /ResetBase
В Windows 7 и Windows Server 2008 R2 для очистки старых версий компонентов, оставшихся после установки сервис пака, использовался еще один параметр DISM:
dism /online /Cleanup-Image /spsuperseded
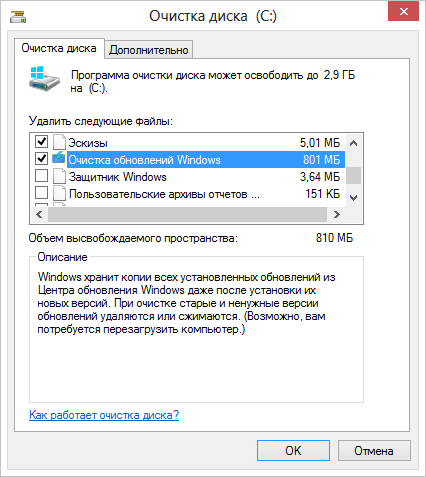
Также вы можете удалить устаревшие обновления с помощью мастера очистки диска. Выполните команду cleanmgr c правами администратора.
В окне утилиты выберите диск и в следующем окне нажмите кнопку «Очистить системны файлы».
Далее выберите опцию “Файлы журнала обновления Windows» и нажмите ОK. Утилита очистки диска покажет сколько места вы можете освободить, удалив файлы журнала старых обновлений Windows. В моем примере это 427 Мб.
После окончания очистки хранилища с помощью DISM проверьте сколько освободилось места на диске.
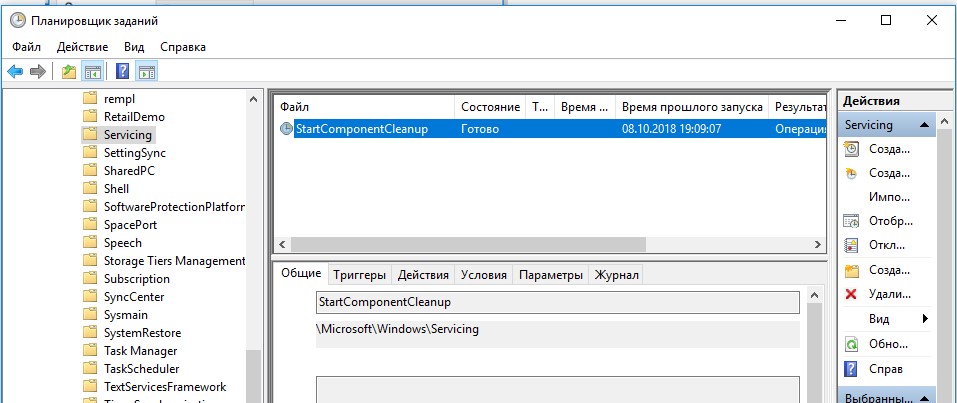
В планировщике задания Windows 10 и Windows Server 2016 есть специальное задание автоматического обслуживания, которое регулярно выполняет оптимизацию и очистку каталога WinSxS (выполняется действия, аналогичные команде dism с ключом StartComponentCleanup). Это задание StartComponentCleanup находится в разделе \Microsoft\Windows\Servicing. Данное задание запускается в фоновом режиме и автоматически удаляет версии компонентов старше 30 дней, которое были заменены более новыми версиями.
Можно запустить это задание вручную так:
schtasks.exe /Run /TN "\Microsoft\Windows\Servicing\StartComponentCleanup"
Удаление неиспользуемых компонентов Windows (Windows Server)
В статье Безопасная очистка папки WinSxS в Windows Server 2016/2012 мы рассмотрели функцию Features on Demand (функции по требованию), предоставляющую возможность удаления с диска бинарных файлов неиспользуемых ролей и компонентов из каталога WinSxS. Для этого в Windows Server используется командлет PoweShell Uninstall-WindowsFeature.
В Windows 10 командлет Uninstall-WindowsFeature отсуствует, и для удаления компонентов Windows из образа нужно использовать DISM.
DISM в отличии от Uninstall-WindowsFeature не удаляет зависимые компоненты.
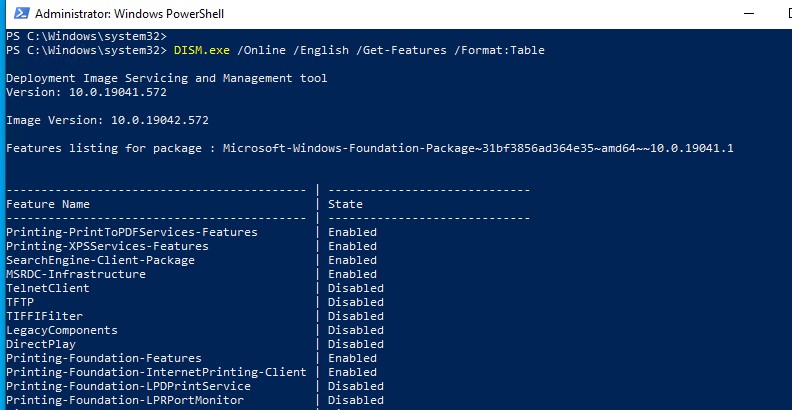
Полный список доступных функций в образе Windows 10 можно получить с помощью команды:
DISM.exe /Online /English /Get-Features /Format:Table
Чтобы удалить, например компонент TelnetClient с диска (из каталога WinSxS), выполните команду:
DISM.exe /Online /Disable-Feature /Featurename:TelnetClient /Remove

Если еще раз вывести список всех доступных функций по требованию в Windows, вы увидите, что статус компонента изменится на Disabled with Payload Removed.
Таким образом в Windows можно существенно уменьшить размер папки WinSxS, удалив с диска неиспользуемые компоненты. Единственный нюанс, это вариант очистки каталога WinSxS подойдет для достаточной продвинутых пользователей, которые разбираются в компонентах Windows 10 и их назначении.
Включаем NTFS сжатие на папке WinSxS в Windows
Еще один способ уменьшить размера каталога WinSxS в Windows 10 – сжать содержимое каталога на уровне файловой системы NTFS.
- Откройте командную строку с правами администратора;
- Остановите и отключите службы Windows Installer и Windows Module Installer:
sc stop msiserver

sc stop TrustedInstaller

sc config msiserver start= disabled

sc config TrustedInstaller start= disabled
- Создайте резервную копию списков доступа (ACL) назначенных на файлы и папки в каталоге WinSxS с помощью утилиты icacls. Резервная копия ACL представляет собой обычной текстовый файл, в котором указаны все файлы и каталоги и назначенные на них NTFS разрешения (в дальнейшем этот файл понадобиться для восстановления оригинальных ACL):
icacls "%WINDIR%\WinSxS" /save "%WINDIR%\WinSxS_NTFS.acl" /t

- Назначьте себя владельцем папки WinSxS и всех вложенных каталогов:
takeown /f "%WINDIR%\WinSxS" /r
- Предоставьте своей учетной записи полные права на каталог WinSxS:
icacls "%WINDIR%\WinSxS" /grant "%USERDOMAIN%\%USERNAME%":(F) /t
- Теперь можно выполнить сжатие файлов в каталоге WinSxS с помощью команды compact. Т.к. часть файлов может использоваться Windows, нужно указать параметр /i. Иначе сжатие будет остановлено на первом же занятом файле (в Windows 10 можно использовать более прогрессивное LZX сжатие):
compact /s:"%WINDIR%\WinSxS" /c /a /i *

- Теперь нужно восстановить TrustedInstaller как владельца каталога WinSxS:
icacls "%WINDIR%\WinSxS" /setowner "NT SERVICE\TrustedInstaller" /t
- И вернуть оригинальные NTFS разрешения на каталог WinSxS из резервной копии ACL:
icacls "%WINDIR%" /restore "%WINDIR%\WinSxS_NTFS.acl" - Измените типа тип запуска служб Windows Installer и Windows Module Installer:
sc config msiserver start= demand

sc config TrustedInstaller start= demand


Проверьте текущий размер каталога WinSxS.
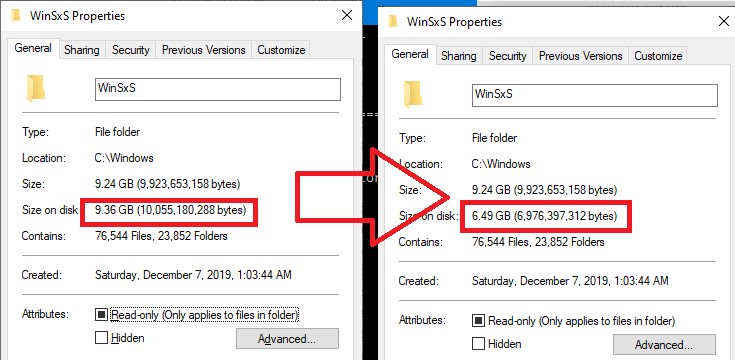
Как вы видите, в нашем примере размер папки WinSxS за счет сжатия уменьшился с 9,36 Гб до 6,5 Гб (примерно на треть). Неплохо, особо для небольшого по размеру SSD-диска.
Указанные команды можно выполнять по отдельности (так проще контролировать успешность выполнения каждой из них), либо можно объединить все операции в один файл скрипт. Вы можете скачать готовый bat файл для сжатия WinSxS здесь compress_winsxs.bat
Данный скрипт нужно запускать периодически, т.к. в каталоге WinSxS будут появляться новые «несжатые» файлы после установки новых обновлений Windows и программ.
На что может повлиять сжатие каталога WinSxS? Windows работает со сжатыми файлами в прозрачном режиме, однако при обработке таких файлов, ей может понадобиться дополнительное время на их декомпрессию/компрессию. Это может вызвать небольшое замедление при установке компонентов Windows или обновлений. Однако для современных процессоров (CPU) операция компрессии/декомпрессии файлов выполняется практически мгновенно, так что реального уменьшения скорости пользователь даже не заметит.
In this article we will talk about the WinSxS folder in Windows, the reasons for its constant growth, and ways to clean up it. The C:\Windows\WinSxS directory is the repository of Windows components. This directory contains DLLs, binary, and XML files necessary for the installation and operation of various Windows roles or features. When installing the Windows updates (usually this happens every month), the new version of the updated component is installed on the system, while the old one is saved to the WinSxS folder (it is necessary to provide compatibility and make it possible to rollback to the previous versions of the components when you uninstall the Windows update).
The WinSxS directory has grown in size over time. Moreover, its size is not limited by anything (although in practice the size of the WinSxS folder in Windows 10 rarely exceeds 15-20 GB).
Contents:
- How to Check the Actual Size of WinSxS Folder on Windows 10?
- How to Clean Up the Component Store (WinSxS folder) on Windows?
- Remove Unused Roles and Features from Windows 10/Windows Server
- How to Enable NTFS Compress on WinSxS Folder on Windows 10?
In this article, we’ll go over the safest ways to clean up the WinSxS folder on Windows 10 and Windows Server 2016/2019:
- Optimize the component store and remove old versions of Windows component files left after installing Windows updates;
- Features on Demand – allows you to remove unused Windows components from the disk;
- Enable NTFS compression on the WinSxS folder – a way to reduce the size of the WinSxS directory using the built-in compression of the NTFS file system.
Many users often ask: if it’s possible to manually delete files from the WinSxS folder. The answer is categorically NO! These actions can damage your Windows image. Though some attempts to remove files from the WinSxS folder can be successful, this method cannot be recommended.
How to Check the Actual Size of WinSxS Folder on Windows 10?
The easiest way to get the current size of the WinSxS folder on Windows is to open the properties of the %windir%\WinSxS folder in File Explorer (or use a PowerShell script). But keep in mind that most file managers (including File Explorer) show a slightly larger WinSxS folder size than it takes on disk.
The fact is that the WinSxS directory contains a large number of hard links (symbolic links) to system files in other folders. File managers, when calculating the size of the WinSxS folder, take into account the size of files referenced by hard links, but this is not correct.
You can find out the real size of the WinSxS folder on disk using the du tool from Sysinternals:
du -v c:\windows\winSXS

You can also analyze the size of the component store (WinSxS folder) using the DISM command:
Dism.exe /Online /Cleanup-Image /AnalyzeComponentStore
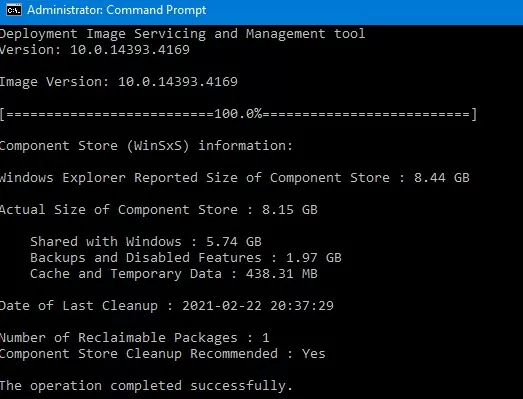
Deployment Image Servicing and Management tool
[==========================100.0%==========================]
Component Store (WinSxS) information:
Windows Explorer Reported Size of Component Store : 8.44 GB
Actual Size of Component Store : 8.15 GB
Shared with Windows : 5. 74GB
Backups and Disabled Features : 1.97 GB
Cache and Temporary Data : 438.31 MB
Date of Last Cleanup : 2021-02-22 20:37:29
Number of Reclaimable Packages : 1
Component Store Cleanup Recommended : Yes
The operation completed successfully.
As you can see, in this case, I can reduce the size of the WinSxS folder by (1,97 + 0,44) Gb.
How to Clean Up the Component Store (WinSxS folder) on Windows?
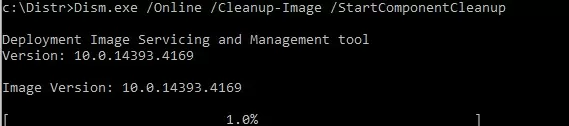
The fastest and easiest way to clear the Windows Component Store (the WinSxS folder) is to optimize the storage with the command:
Dism.exe /Online /Cleanup-Image /StartComponentCleanup
The StartComponentCleanup DISM option is supported on all Windows versions starting from Windows 8 and Windows Server 2012.
After cleaning is complete, check the current size of the component store:
Dism.exe /Online /Cleanup-Image /AnalyzeComponentStore
In my example, this reduced the size of the WinSxS folder by 2.4 GB.
The /StartComponentCleanup option has an additional /ResetBase option that allows you to remove all previous versions of components left after installing Windows updates. After that, you won’t be able to remove installed updates or Service Packs, and the Uninstall button will disappear from the Uninstall an Update Control Panel item). To clean up old versions of components, run:
Dism.exe /Online /Cleanup-Image /StartComponentCleanup /ResetBase
In Windows 7 and Windows Server 2008 R2, an additional DISM option was used to clean up old versions of components that were left over after installing service packs.
DISM /online /Cleanup-Image /spsuperseded
You can also remove old update files using the “Disk Cleanup” wizard:
- Run the
cleanmgrcommand as an administrator; - Select the disk and in the next window, click the “Clean up system files” button;
- Then select the “Windows update cleanup” option. The Disk Cleanup tool will show how much space you can free up by deleting old Windows update files. In my example, this is 324 MB. Click OK to start the cleanup.
After you finish cleaning up the component store using DISM, check how much disk space has been freed.
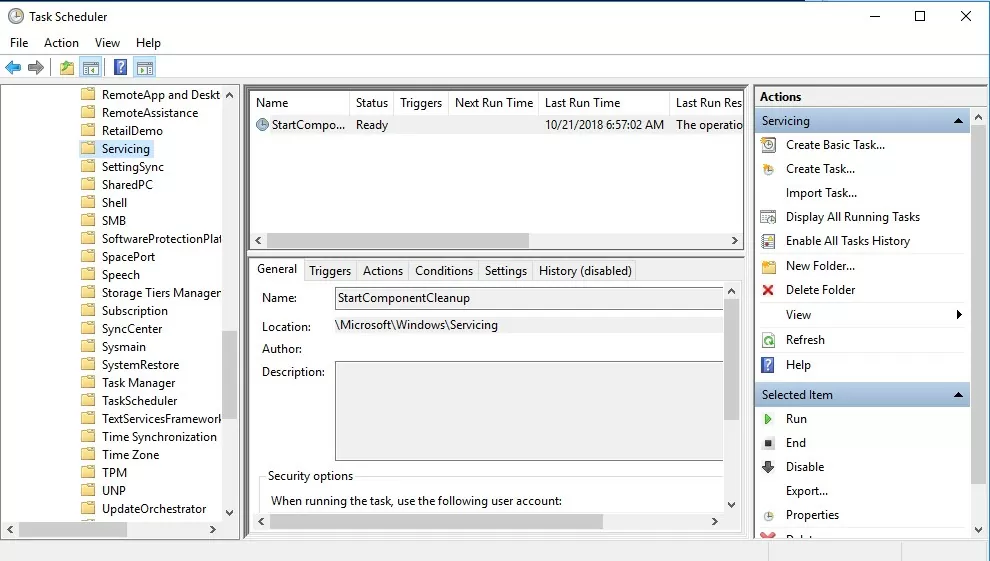
In addition, Windows 10/Windows Server 2016 Task Scheduler has a special automatic maintenance task that regularly optimizes and cleans up the WinSxS folder (same operation as DISM with StartComponentCleanup parameter). This StartComponentCleanup task is located under the \Microsoft\Windows\Servicing section of the taskschd.msc. This task runs in the background and automatically removes component versions older than 30 days that have been superseded by newer files.
You can start this task manually like this:
schtasks.exe /Run /TN "\Microsoft\Windows\Servicing\StartComponentCleanup"
Remove Unused Roles and Features from Windows 10/Windows Server
Features on Demand on Windows allows to remove binary files of the unused roles from the WinSxS folder. You can remove role and feature binaries on Windows Server using the Uninstall-WindowsFeature PowerShell cmdlet.
Windows 10 does not have the Uninstall-WindowsFeature cmdlet, and you must use DISM.exe to remove features from the Windows image.
Note that DISM, unlike the Uninstall-WindowsFeature PowerShell cmdlet doesn’t remove dependent features.
A complete list of available features in Windows 10 image can be obtained using the command:
DISM.exe /Online /English /Get-Features /Format:Table
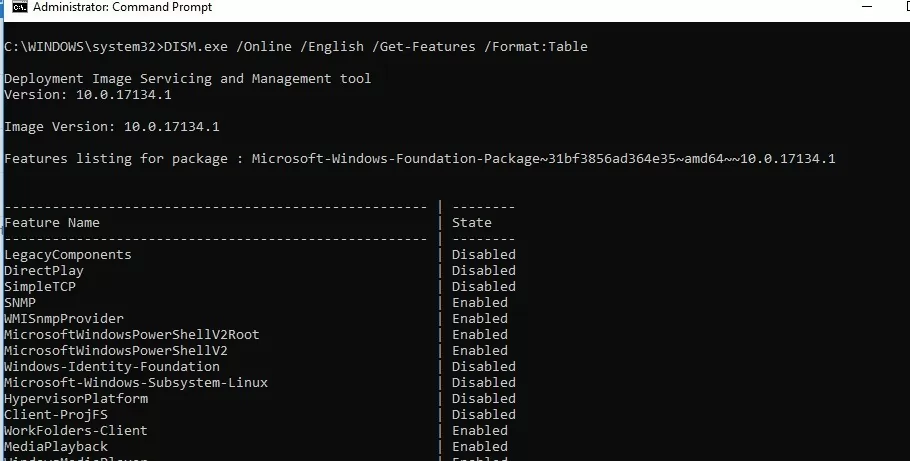
To remove, for example, the TelnetClient feature from the Windows image (from the WinSxS folder), run the command:
DISM.exe /Online /Disable-Feature /Featurename:TelnetClient /Remove
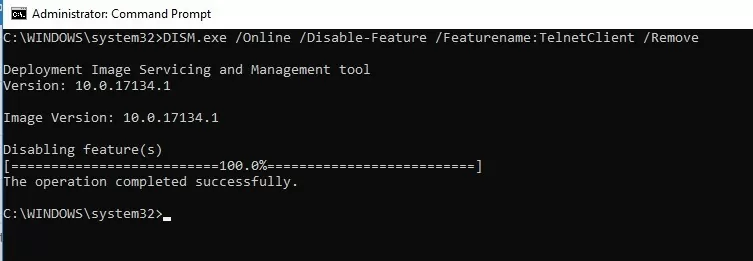
If you display the list of all on-demand features available in Windows, you will see that the component status has changed to Disabled with Payload Removed.
Thus, Windows allows to significantly reduce the size of the WinSxS folder by removing the unused components from the disk. The only thing is that this cleanup method suits only advanced users, who are familiar with the Windows 10 features and their purpose.
How to Enable NTFS Compress on WinSxS Folder on Windows 10?
Another way to reduce the size of the WinSxS directory on Windows 10 is to compress the directory contents on the level of the NTFS file system.
Note. As in case of any non-standard intervention into the system configuration, you are strongly recommended to create a full backup of your Windows 10 image.
- Open the command prompt as administrator;
- Stop and disable Windows Installer and Windows Module Installer services:
sc stop msiserver
 sc stop TrustedInstaller
 sc config msiserver start= disabled
sc config TrustedInstaller start= disabled - Let’s backup the Access Control Lists (ACLs) assigned to the files and folders in the WinSxS directory using the built-in icacls tool. A backup copy of an ACL is a plain text file that lists all files and directories and the NTFS permissions assigned to them (later this file will be needed to restore the original ACLs):
icacls "%WINDIR%\WinSxS" /save "%WINDIR%\WinSxS_NTFS.acl" /t

- Assign yourself as an owner of the WinSxS folder and all its subfolders:
takeown /f "%WINDIR%\WinSxS" /r - Grant your account full control permissions on the WinSxS directory:
icacls "%WINDIR%\WinSxS" /grant "%USERDOMAIN%\%USERNAME%":(F) /t - You can now compress files in the WinSxS directory using the compact command. Because some of the files can be used by Windows, you need to specify the
/ioption. Otherwise, compression will stop at the first locked file (in Windows 10, you can use more advanced LZX compression):
compact /s:"%WINDIR%\WinSxS" /c /a /i *

- Restore the owner of the WinSxS directory back to TrustedInstaller:
icacls "%WINDIR%\WinSxS" /setowner "NT SERVICE\TrustedInstaller" /t - Restore the original ACLs for the WinSxS folder items using the ACL backup file you created earlier:
icacls "%WINDIR%" /restore "%WINDIR%\WinSxS_NTFS.acl" - Restore the default startup type for the Windows Installer and Windows Module Installer services:
sc config msiserver start= demand
 sc config TrustedInstaller start= demand


Now check the current size of the WinSxS folder:
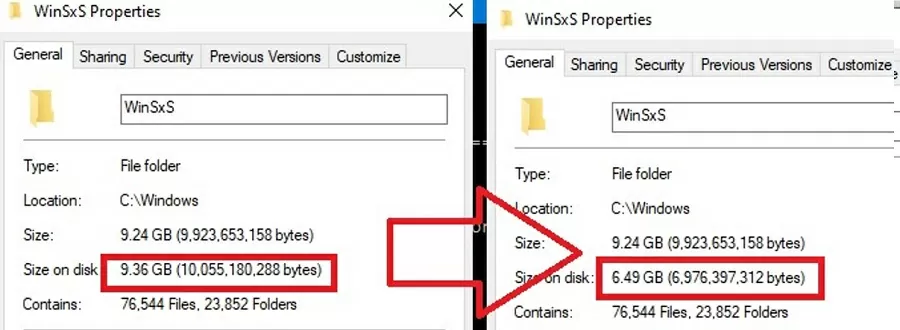
As you can see, in our example the size of the WinSxS folder after the compression has reduced from 9.4GB to 6.5GB (about a third). Not bad, especially for a small-sized SSD drive.
These commands can either be run separately (then it is much easier to track the results of each of them) or used in a single script file. If you run it, the described compression procedure for items in the WinSxS folder will start. You can download the ready-to-use batch file to enable NTFS compression on WinSxS here: winsxs_ntfs_compress.bat
You can use this script regularly because new uncompressed files will appear in the WinSxS folder after you install new Windows updates or apps.
What can be affected by compressing the WinSxS folder? Windows works transparently with compressed files. However, when processing such files, it may take additional CPU time to decompress/compress them. This may cause a slight slowdown when installing Windows components or updates. However, on modern CPUs, the file compression/ decompression operations are performed almost instantly, so the user may not even notice the real impact on performance.

On Windows 10, «WinSxS» (Windows Side by Side) is an essential folder within the «Windows» folder, which houses most of the components to customize and update the current setup. For example, inside the WinSxS folder are the files to add or remove features, switch editions, recover damaged or missing system files, and pretty much everything else that makes up the operating system.
Also, when installing quality updates, the new components will store in the WinSxS folder, and the previous version of the components in case rolling back to an earlier build is necessary to deal with a buggy update. As a result, the folder will continue to increase its size over time without a set limit.
While the WinSxS folder is expected to grow over time, the actual size on the disk isn’t as big as it may seem. The problem is that most people would use File Explorer to calculate its size. Because the folder uses «hard linking,» a technique that allows the creation of pointers of an original file with entirely different names and locations in the same partition, they’ll appear as separate files to applications (such as File Explorer) reporting the wrong size.
If you try to free up space, you won’t be able to delete the WinSxS folder. However, it’s possible to reduce its size by deleting those files that are no longer required for Windows 10. You can accomplish this task using Command Prompt, Storage Sense, and even the legacy Disk Cleanup tool.
This guide will walk you through the steps to properly clean up the WinSxS folder to reclaim storage space on Windows 10.
How to reduce size of WinSxS folder using Command Prompt
Checking WinSxS folder size
To determine the actual size of the WinSxS folder, use these steps:
All the latest news, reviews, and guides for Windows and Xbox diehards.
- Open Start.
- Search for Command Prompt, right-click the top result, and select the Run as administrator option.
- Type the following command to determine the size of the WinSxS folder and press Enter: dism /Online /Cleanup-Image /AnalyzeComponentStore
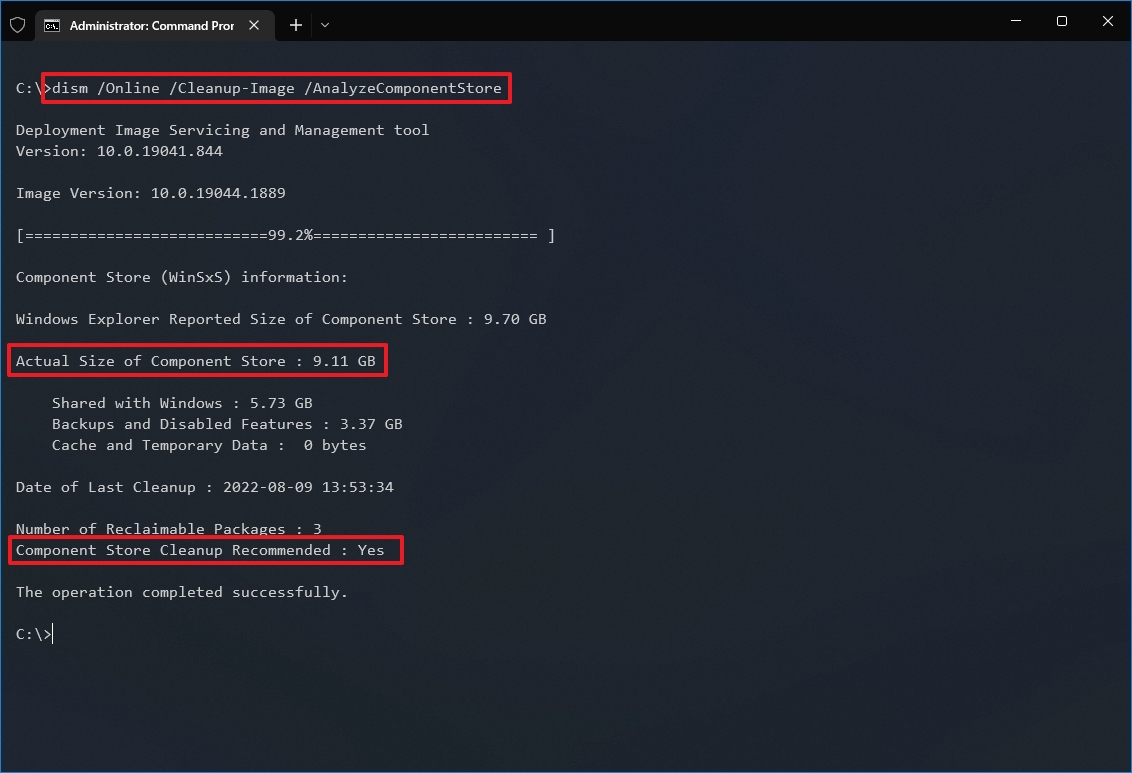
- Confirm the reported size of the component store to see how much space the WinSxS folder is taking.
- Check the «Component Store Cleanup Recommended» information to determine whether cleanup is necessary.
Once you complete the steps, you’ll be able to determine the size of the Windows Side by Side folder and whether cleanup is recommended.
In addition, the command will return other useful information, such as how much of the components are shared with Windows 10 as well as the size for backups and disabled features, and the last time you used the cleanup tool.
Cleaning up WinSxS folder
To reduce the size of the WinSxS folder using Command Prompt, use these steps:
- Open Start.
- Search for Command Prompt, right-click the top result, and select the Run as administrator option.
- Type the following command to determine the size of the WinSxS folder and press Enter: dism /online /Cleanup-Image /StartComponentCleanup
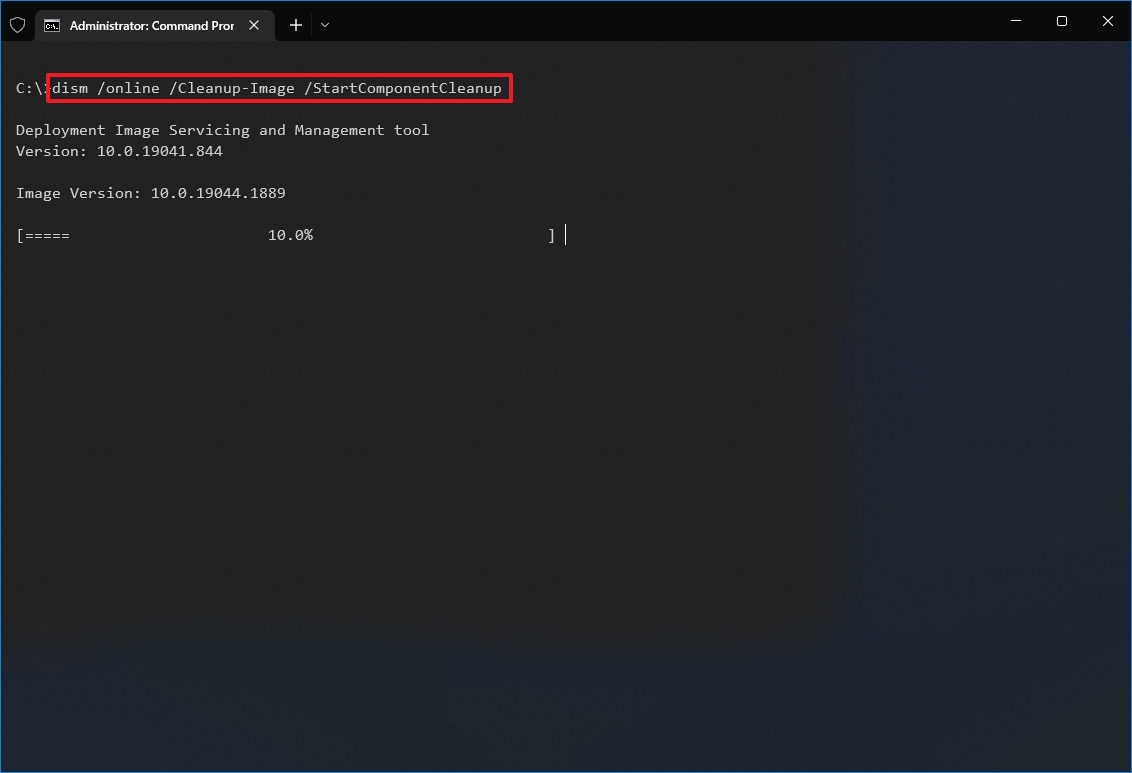
After you complete the steps, the command will run to delete those components wasting space on the hard drive. However, once the WinSxS is clean, you won’t be able to roll back to a previous build until the next update.
If you want to determine how much space you have reclaimed using Command Prompt, you can re-run the command to analyze the folder and compare the «Actual Size of Component Store» values with the previous result.
How to reduce size of WinSxS folder using Storage Sense
To clean up the WinSxS folder with Storage sense, use these steps:
- Open Settings.
- Click on System.
- Click on Storage.
- Under the «Local Disk» section, click the Temporary files option.
- Quick tip: If you don’t see the item, click the Show more categories option to find it.

- Clear the default selection.
- Check the Windows Update Cleanup option.
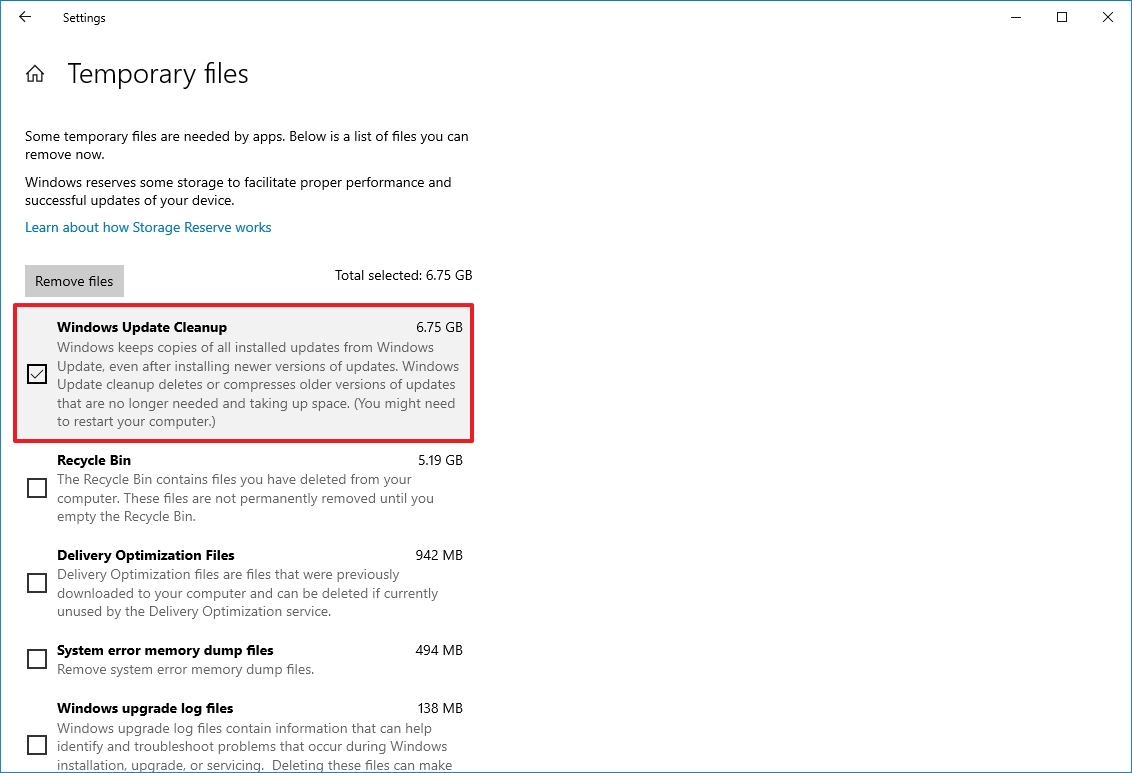
- Click the Remove files option.
Once you complete the steps, the Windows Update Cleanup item will disappear from Storage sense, but it doesn’t mean that the WinSxS folder is no longer available. It’ll still be part of the «Windows» folder, but without the files that may unnecessarily be using space on the primary hard drive.
How to reduce size of WinSxS folder using Disk Cleanup
Alternatively, you can also shrink the size of the WinSxS folder with the legacy Disk Cleanup tool using these steps:
- Open File Explorer.
- Click on This PC from the left pane.
- Under the «Devices and drives» section, right-click the «Local Disk» drive and select the Properties option.
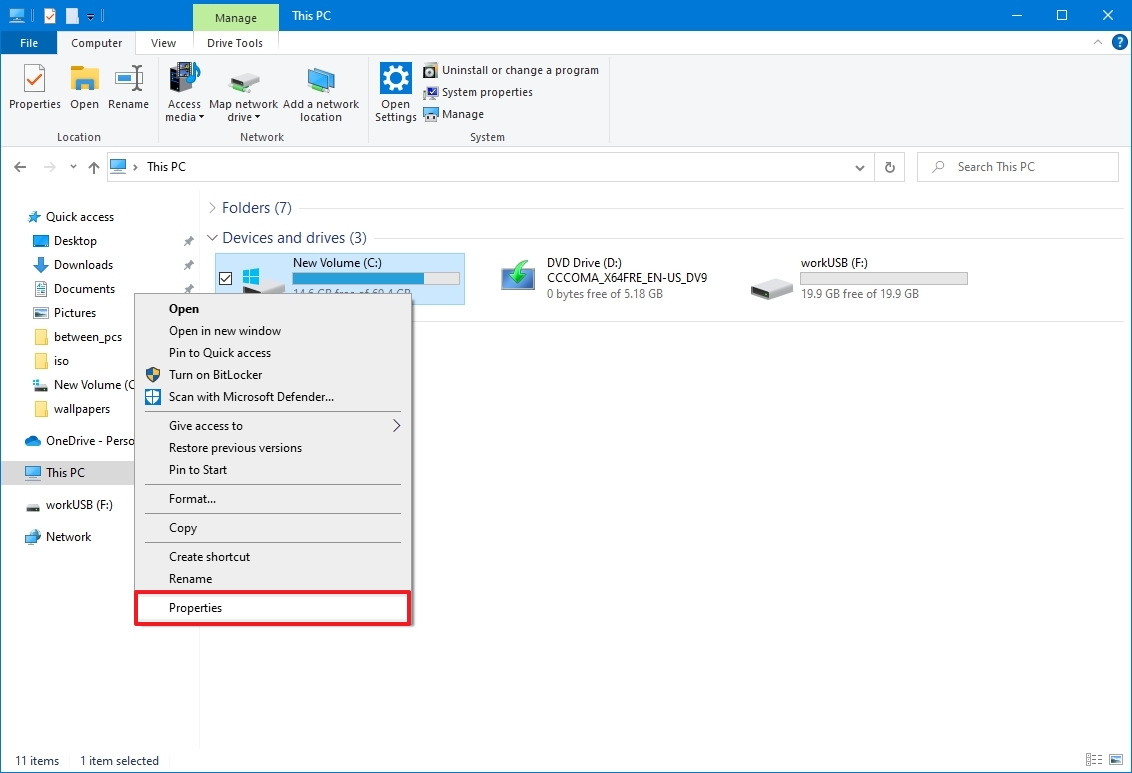
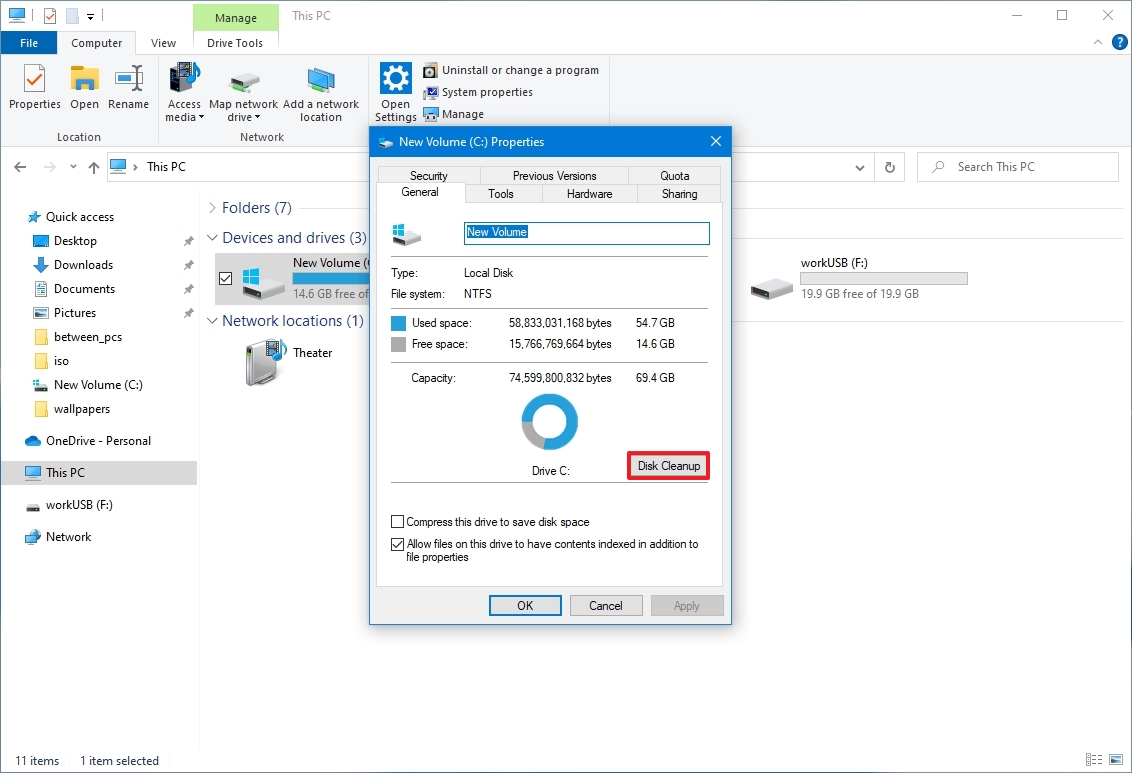
- Click the General tab.
- Click the Disk Cleanup button.
- Click the Clean up system files button.
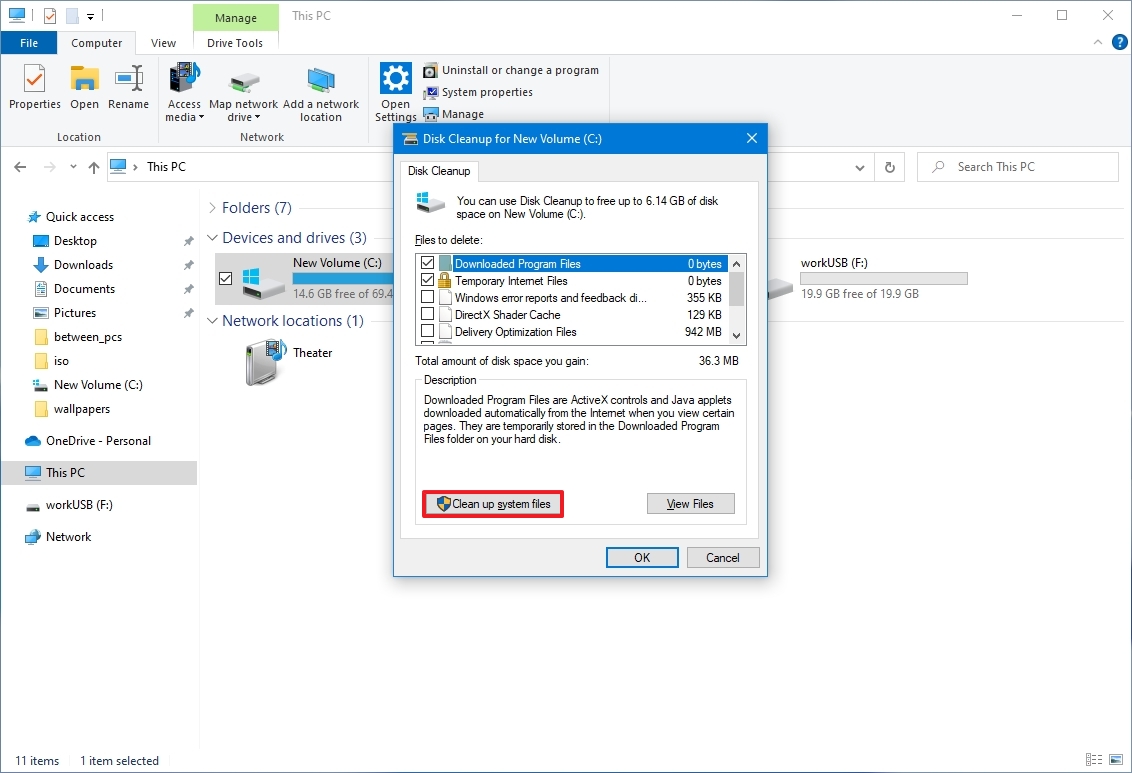
- Clear the default selection.
- Check the Windows Update Cleanup option.
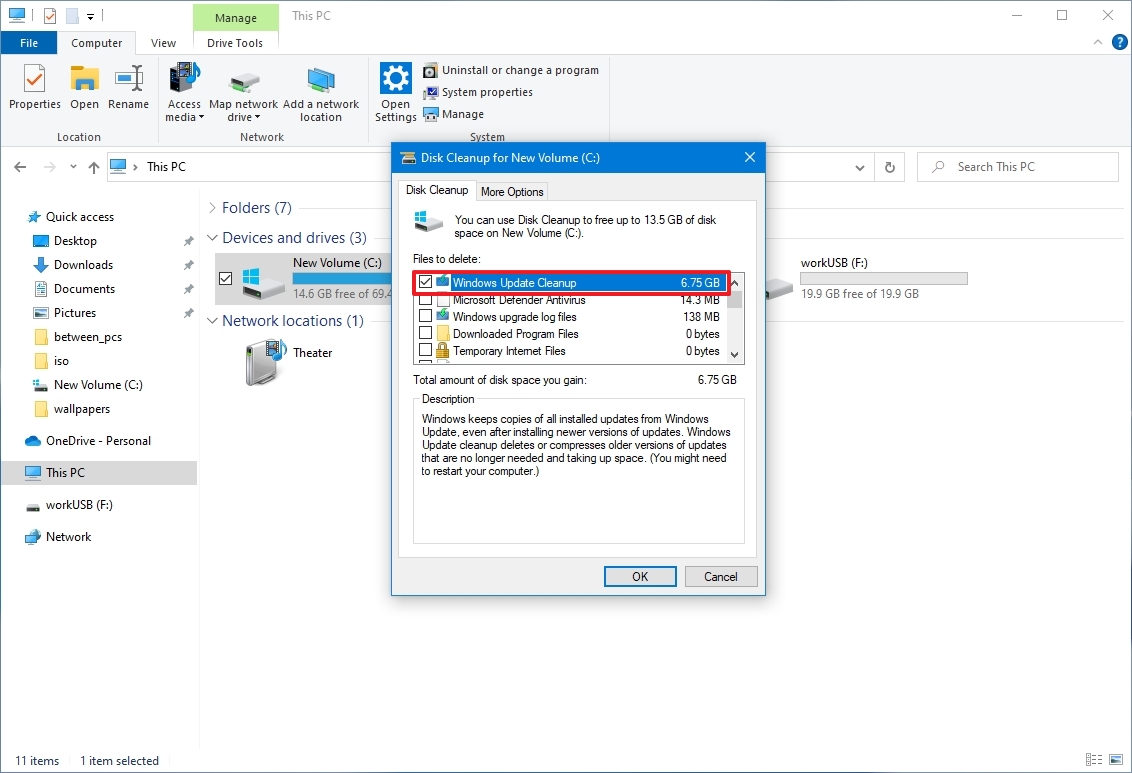
- Click the OK button.
After you complete the steps, the Disk Cleanup tool will delete all the temporary files found inside WinSxS, but without removing the folder.
While these instructions will help to reduce the footprint of WinSxS, the folder will eventually increase in size again as new updates and components become available. As part of the maintenance process, Windows 10 will reduce the folder size automatically, but you can always repeat the steps regularly to keep it as small as possible.
If you’re looking for other ways to free up space on Windows 10, check out this comprehensive guide with the best tips to delete temporary files from your computer.
More resources
For more helpful articles, coverage, and answers to common questions about Windows 10 and Windows 11, visit the following resources:
- Windows 11 on Windows Central — All you need to know
- Windows 10 on Windows Central — All you need to know
Mauro Huculak has been a Windows How-To Expert contributor for WindowsCentral.com for nearly a decade and has over 15 years of experience writing comprehensive guides. He also has an IT background and has achieved different professional certifications from Microsoft, Cisco, VMware, and CompTIA. He has been recognized as a Microsoft MVP for many years.
The WinSxS folder, also known as the Component Store, contains system repositories and is a crucial part of the Windows environment. With time, this folder keeps growing without any limit and can take up a heap of unnecessary space on your hard drive.
This article discusses how you can save up that space without affecting the critical system files by safely deleting the unwanted files within the WinSxS folder.
Table of Contents
What is the WinSxS folder
The WinSxS folder contains files such as DLLs, binaries, and other XML files that are used by the device. It also contains the information and files required to install Windows features. Each time your Windows gets an update, it is installed on your computer while the old ones are shifted to the WinSxS folder. This is also important to prevent the system from crashing by providing compatibility or to revert to old files in case of a system restore.
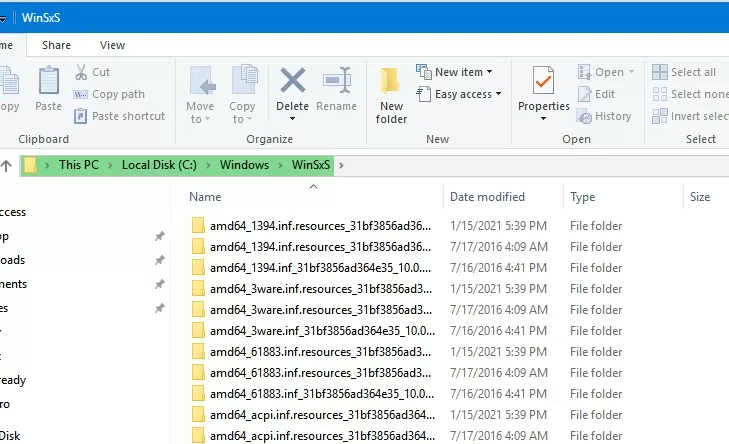
This is why the WinSxS folder keeps increasing in size over time. This folder can be found on the following path:C:\Windows\WinSxS
As you may find, the folder has a list of sub-folders and files that are used by the system.

How to check the size of the WinSxS folder
You can check the size of the folder through its properties in File Explorer. However, that is the actual size of the folder and not the one you can make available, since everything in the folder cannot be deleted to make space.
Along with cache, temporary files, backup and restore data, other critical files are also present. The properties bar does not indicate each individual category of the files within the WinSxS folder.
To check the size of each component storage within this folder, perform the following:
- Open Command Prompt as an Administrator.
- Enter the following command:
Dism.exe /Online /Cleanup-Image /AnalyzeComponentStore - Now let the system scan the WinSxS folder and it will then display a list of the components and their sizes on the command-line interface.


You now have complete information on what WinSxS contains and what the size of each component is. We can now use this information to free up 1.14 GB (Backups and Disabled features) of unnecessary files and folders within WinSxS.
WinDirStat is a wonderful program that can calculate and show the folder structure and size of each drive in a visual way. To check the size of WinSxS, please run WinDirStat as administrator.
How to clean up WinSxS folder using Disk Cleanup
The Disk Cleanup tool is built into Windows 10 which can be used to perform safe operations to remove unnecessary system files. No critical system files are affected by using this utility, as opposed to deleting the WinSxS sub-folders manually using File Explorer, which poses a significant threat to Windows functionality.
Follow the guide below to perform this operation:
- Search for Disk Cleanup in the Start Menu and run it. (Note: Do not run as an Administrator)
- On the Drive Selection popup, select C: from the drop-down menu and click Ok.
- On the next screen, click on Clean up system files.
- The Drive Selection window will pop up again. Select C: again and click Ok.
- Now select the files you wish the tool to clean by checking the boxes next to them, and then click Ok.
- On the confirmation dialog box, click Delete files. The operation will then begin and safely remove all unnecessary files.
Although some of the unwanted files have been removed from the WinSxS folder, there is still a possibility to increase the available space even further. If required, move onto the next step.
How to clean up the WinSxS folder by removing Optional Features
Since the WinSxS folder also contains repositories for the optional features, you can create more space by removing the ones that are disabled, and you think you would not need it.
Perform the following to remove one feature at a time.
- Open Command Prompt as an Administrator.
- To find out the names and statuses of the current Optional Features in Windows 10, enter the following command:
DISM.exe /Online /English /Get-Features /Format:Table
- Now scan through the list and note the ones you think you do not need, and then enter the following command:
DISM.exe /Online /Disable-Feature /Featurename:TFTP /Remove
You may replace TFTP with a choice of your selected feature to delete it.
- Repeat the last step to remove all the repositories from the system relating to the Optional Features.


If you check the Optional Feature status again by running the same command, you will see that the Status has changed from Disabled to Disabled with payload removed.

How to compress the WinSxS folder to save space
The WinSxS folder can also be compressed, if not deleted. The compression of the folder would save a significant amount of space while having everything available. This method would not involve removing or deleting anything. However, a con of the compression method would be that the system would perform an additional step or compression and decompression each time it needs to access the folder.
This would also affect the time it takes to perform these functions. Nonetheless, the time difference is not much as Windows 10 performs these functions quite fast.
The process involves starting and stopping some services, as well as changing the ownership of certain files and folders. Therefore it is recommended to create a system restore point before proceeding any further.
- Launch the Command Prompt as an Administrator.
- Enter the following commands one after the other to stop the associated services and disable them from automatically rebooting:
sc stop msiserversc config msiserver start= disabledsc stop TrustedInstallersc config TrustedInstaller start= disabled
- Now we must back up the Access Control Lists (ACLs) of all the files and folders. Enter the following command:
icacls "%WINDIR%\WinSxS" /save "%WINDIR%\WinSxS_NTFS.acl" /t
This will generate a text file with plain text, which will later be used to restore the default ACLs. This step might take a few seconds as there are a number of files to scan. - Now assign the current user as the owner of WinSxS:
takeown /f "%WINDIR%\WinSxS" /r
This will assign ownership recursively, meaning that all sub-folders and files will also be affected. - Now assign the current user full control of the WinSxS folder with the following command:
icacls “%WINDIR%\WinSxS” /grant “%USERDOMAIN%\%USERNAME%”:(F) /t - Now enter the following command to compress all files and folders within WinSxS. Note that this will only compress the ones that are not in use by any other programs or processes:
compact /s:”%WINDIR%\WinSxS” /c /a /i *
This might take a few minutes to compress each file. - Once the compression has been completed, we must now return ownership and permission to default. Enter the following commands one by one:
icacls "%WINDIR%\WinSxS" /setowner "NT SERVICE\TrustedInstaller" /ticacls "%WINDIR%" /restore "%WINDIR%\WinSxS_NTFS.acl" - Enter the following commands to restart the services we had earlier shut down:
sc config msiserver start= demand<br>sc config TrustedInstaller start= demand
You may now check the size of the WinSxS folder and notice that it has shrunk significantly, by almost a third.

Closing words
The WinSxS file might be one of the most important ones in the system, but it’s also the biggest one, with an appetite for more storage space. However, no matter the amount of volume you allow for the system drive, it will become insufficient at one point.
Compressing or deleting unnecessary files and folders can aid a great deal in the available storage, especially when it can be performed safely, without harming the Windows environment.
Вы тут: Главная → Popular → Как грамотно уменьшить размер папки WinSxS в Windows 10, 8.1 и 8
Уже 7 лет папка WinSxS является бельмом в глазу у ряда пользователей. Все эти годы Microsoft потихоньку улучшала систему обслуживания Windows, и в прошлом году я рассказывал о тонкостях управления компонентами Windows 8. Выгоду от тех нововведений получили администраторы серверных ОС, а на улицу домашних пользователей настоящий праздник пришел только в Windows 8.1.
Перейти к инструкциям по очистке
Сегодня я расскажу вам о ключевых изменениях в системе обслуживания Windows 8 и 8.1, которые помогут вам эффективнее распорядиться дисковым пространством и наконец-то очистить папку WinSxS, не рискуя при этом нарушить работу системы.
У вас Windows 7? Читайте Как грамотно уменьшить размер папки WinSxS в Windows 7 SP1
[+] Сегодня в программе
Животрепещущие вопросы
Сначала я обозначу два вопроса, которые сильнее всего волнуют людей в контексте папки WinSxS.
Почему папка WinSxS такая большая
На самом деле, она занимает значительно меньше места, чем кажется. Множество файлов из папки Windows проецируется в нее с помощью жестких ссылок именно из папки WinSxS. Да, файловые менеджеры могут показывать размер папки WinSxS в 10GB и более, но лишь потому, что они принимают за чистую монету объем жестких ссылок. В Windows этому есть очень наглядное подтверждение.
Почему папка WinSxS постоянно растет
Каждый раз, когда вы устанавливаете обновления, системные файлы заменяются новыми. Их старые версии сохраняются в папке WinSxS, чтобы обеспечить возможность отката в случае проблем с новыми версиями, т.е. устойчивое обслуживание системы. Это приводит к увеличению объема папки WinSxS, хотя на практике ее максимальный размер редко превышает 15GB. Кстати, именно этого аспекта коснулось одно изменение в Windows 8.1, как вы увидите ниже.
Новые возможности системы обслуживания
Вездесущая утилита DISM обзавелась в 8.1 новыми параметрами командной строки, которые я разберу в этой статье. Но сначала – несколько примечаний:
- В моем распоряжении находится английская Windows 8.1 Preview, в которой результаты команд DISM не локализованы, несмотря на русский языковой пакет. Фанатичным приверженцам локализованных ОС придется потерпеть

- Поскольку Windows 8.1 Preview установлена недавно, размер папки WinSxS невелик, равно как и выгода от описанных в статье манипуляций. Однако, чем дольше установлена ОС, тем заметнее польза от изменений в системе обслуживания.
- Все команды нужно выполнять от имени администратора, а после очистки — перезагружаться для более аккуратного измерения экономиии дискового пространства.
Готовы? Давайте пойдем от простого к сложному!
Как определить реальный размер папки WinSxS в Windows 10, 8.1 и 8
С помощью одного из новых параметров DISM вы можете проанализировать хранилище компонентов, т.е. папку WinSxS.
Dism.exe /Online /Cleanup-Image /AnalyzeComponentStore
Результат команды будет примерно таким:
Увеличить рисунок
Здесь по порядку:
- Размер хранилища компонентов, каким его видит проводник, т.е. без учета жестких ссылок внутри WinSxS.
- Реальный размер хранилища компонентов с учетом жестких ссылок (за исключением ссылок на папку Windows), в том числе:
- Общие файлы с папкой Windows. Эти файлы необходимы для работы системы и ни в коем случае не являются лишними. В моем примере они составляют 87% от размера хранилища, но чем больше обновлений устанавливается, тем ниже этот процент.
- Резервные копии и отключенные компоненты. Эти файлы хранятся на случай проблем с обновленными компонентами или для включения ролей или компонентов. Их можно условно считать лишними, поскольку они не критичны для текущей работы системы.
- Кэш и временные файлы. Эти файлы нужны для быстрой работы системы обслуживания, но не являются абсолютно необходимыми для функционирования Windows.
- Дата последней очистки хранилища. Об очистке во всех подробностях ниже.
- Число пакетов, замененных более новыми, и рекомендация по очистке. Фактически, это – файлы, которые обновились после работы Windows Update. Их можно удалить очисткой хранилища.
Я прямо вижу, как у вас руки чешутся очистить хранилище и высвободить место 
Как очистить папку WinSxS в Windows 10, 8.1 и 8
Начиная с Windows 8, в ОС заложено три способа очистки.
Команда DISM (рекомендую)
Вы можете очистить хранилище компонентов вручную одной командой.
Dism.exe /Online /Cleanup-Image /StartComponentCleanup
Это самый быстрый путь к выполнению оптимизации (после него двумя следующими способами вы уже ничего не добьетесь).
Утилита «Очистка диска»
Andrey Bayatakov, спасибо за напоминание об этом способе!
Наберите cleanmgr в командной строке, запущенной от имени администратора. Встроенная в Windows утилита для очистки диска покажет, сколько места вы сэкономите, удалив файлы обновлений Windows.
В принципе, утилита делает то же самое, что и ключ /StartComponentCleanup. Однако она весьма фривольна в оценках освобождаемого пространства, и в моих экспериментах ошибка измерялась сотнями мегабайт, причем в обе стороны.
Запланированное задание
Windows выполняет очистку папки winsxs по расписанию с помощью задания Microsoft – Windows – Servicing – StartComponentCleanup.
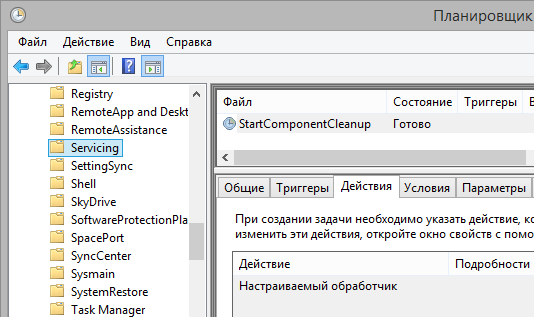
Конкретной команды не видно, поскольку очистка реализована обработчиком COM-объектов. А отсутствие триггеров свидетельствует о том, что задание работает в рамках вездесущего автоматического обслуживания. Запустив задание из планировщика или командной строки, вы достигаете почти того же эффекта, что и командой DISM с ключом /StartComponentCleanup. Различия таковы:
- Игнорируются обновления, установленные в последние 30 дней.
- Выдерживается часовая пауза, очистки всех файлов может не произойти.
Выполнив очистку, вы можете снова проанализировать хранилище и оценить изменения.
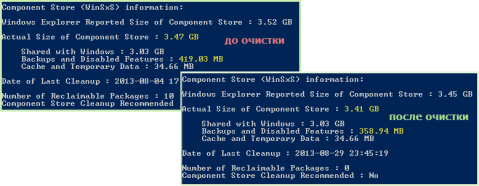
Увеличить рисунок
Как видите, в моем случае очистка 10 пакетов позволила сэкономить 60MB, что не так уж и много в масштабах папки. Однако можно почистить еще
Как удалить все старые версии компонентов из папки WinSxS в Windows 10 и 8.1
Во времена Windows XP был очень популярен вопрос, можно ли удалять папки $NTUninstallKBxxxxxx$ из папки Windows. Помните такое?
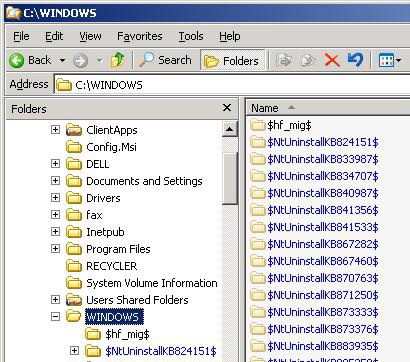
В Windows 8.1 появилась аналогичная возможность, хотя реализована она совсем иначе ввиду глобальных различий в системах обслуживания 8.1 и XP.
Команда для удаления
Начиная с Windows 8.1, у параметра /StartComponentCleanup есть дополнительный ключ /ResetBase, с помощью которого можно удалить все предыдущие версии компонентов. Этот ключ не задействован в запланированном задании.
Внимание! Удаление предыдущих версий компонентов лишает вас возможности удалить установленные обновления и пакеты исправлений (Service Packs), но не блокирует установку будущих обновлений.
Это предупреждение вовсе не дежурное, если вспомнить недавнюю ошибку 0xc0000005 после KB2859537, от которой плакал горючими слезами Рунет. Так или иначе, волшебная команда:
Dism.exe /Online /Cleanup-Image /StartComponentCleanup /ResetBase
Очевидно, выигрыш дискового пространства зависит как от количества зачищаемых обновлений, так и от объема замененных ими компонентов. В моем примере удалось высвободить еще около 24MB.

Увеличить рисунок
Что происходит при удалении всех предыдущих версий компонентов
Рассказ об этом перенесен в статью, которая раскрывает подноготную оптимизации папки WinSxS.
Описанные выше нововведения в Windows 8.1 не являются секретом, поскольку задокументированы в библиотеке TechNet (пока только на английском языке). Причем объяснения там выгодно отличаются от типичной сухой документации — чувствувется перо Джозефа Конвея (Joseph Conway), главнoго источника сведений системе обслуживания Windows, который, к сожалению, недавно объявил о прекращении публикаций в своем блоге.
Сжатие компонентов в папке WinSxS (тайное знание)
Однако в официальной документации практически нет информации о том, что с целью экономии дискового пространства для хранилища компонентов в Windows 8 и выше применяется сжатие. Я выделю несколько известных мне моментов:
- Сжатие применяется к файлам, которые не использует операционная система. К ним относятся предыдущие версии компонентов и отключенные компоненты. Этим, видимо, и объясняется не столь существенный выигрыш от удаления предыдущих версий с параметром /ResetBase.
- Используется разностное сжатие. По неподтвержденной пока уже подтвержденной информации в Windows 8.1 для компрессии замененных компонентов применяется разностное сжатие.
- Экономия дискового пространства может быть весьма существенной в некоторых сценариях. Так, на установке Windows Server Core 2012 R2 Preview благодаря сжатию высвобождается около 20% места, если исключить из уравнения файлы подкачки и гибернации. Экономия достигается за счет сжатия компонентов отключенных ролей сервера.
В статье, где собраны все технические тонкости, я описал разные механизмы сжатия Windows 8 и 8.1+.
Конечно, точный ответ на этот вопрос может дать только Microsoft, поэтому я просто поделюсь своим видением ситуации.
Серверные ОС
Современную инфраструктуру трудно представить без технологий виртуализации, выгода от использования которых напрямую связана с эффективным использованием системных ресурсов. Это в полной мере относится к дисковому пространству, которого много никогда не бывает.
Удаление неиспользуемых ролей сервера в Windows Server 2012 помогает ИТ-специалистам эффективнее распоряжаться дисковым пространством. Тем, кто не знает об этой возможности или не считает целесообразным ее применять, поможет сжатие компонентов неиспользуемых ролей в Windows Server 2012 R2.
Клиентские ОС
К моменту выхода Windows 7 стоимость 1GB на жестких дисках была столь невелика, что папка WinSxS вызывала головную боль только у товарищей с маленьким сами знаете, чем. Однако на сцену уже выходили SSD, и система обслуживания Windows не очень хорошо сочеталась с их скромным объемом.
Казалось бы, к выходу Windows 8 твердотельный накопитель объемом 128GB уже не был чем-то из ряда вон выходящим, но на разработчиков системы обслуживания свалилась новая беда – планшеты, в том числе свой же Surface.
Действительно, все современные планшеты на Clover Trail в лучшем случае комплектуются диском в 64GB. А в более популярных младших моделях после вычета раздела восстановления остается около 25GB, чего недостаточно для более-менее долгосрочной работы Windows.
В Windows 8 очистка резервных копий компонентов нацелена на более эффективное использование пространства маленьких дисков планшетов, а в Windows 8.1 удаление предыдущих версий предоставляет запасной аэродром в самых тяжелых случаях.
Дискуссия и опрос
Эта запись является хорошим поводом для вас высказать все, что наболело по поводу хранилища компонентов Windows Опрос призван выявить количественный расклад, а в комментариях напишите, создает ли вам проблемы рост размера папки WinSxS. Если создает, опишите их и предоставьте ссылку на полноэкранный скриншот оснастки diskmgmt.msc.
Эта запись знаменует возобновление публикаций в блоге после летнего перерыва. Надеюсь, вы хорошо отдохнули Мой отпуск еще только грядет в сентябре, но вас уже ожидают несколько интересных запланированных записей
Результаты голосования утеряны в связи с прекращением работы веб-сервиса опросов.