
- Topics
- Windows 10, Insider, Arm
- Item Size
- 9.1G
This is an expired Windows 10 insider iso, which is the last version of Windows 10 to support Windows 10 Arm For Mac/Parallels
- Addeddate
- 2023-10-31 05:14:34
- Identifier
- windows-10-insider-preview-client-arm-64-en-us-21354
- Scanner
- Internet Archive HTML5 Uploader 1.7.0
plus-circle Add Review
plus-circle Add Review
comment
Reviews
There are no reviews yet. Be the first one to
write a review.
Несколько часов назад Microsoft выпустила новую инсайдерскую сборку Windows 10 под номером 21354 для канала Dev, которая принесла с собой ряд изменений. Прежде всего, этой сборке вновь доработали виджет «Новости и интересы», сделали новые настройки для камер и добавили новые опции для дисплеев. Более подробную информацию вы найдёте в нашей статье по этой ссылке.
Одновременно с этим Microsoft опубликовала официальные ISO-образы сборки Windows 10 Build 21354, которые пригодятся, если вы хотите сделать чистую установку системы на своём устройстве. Отметим, что предыдущие ISO-образы компания выпускала для сборки 21286 в январе 2021 года.
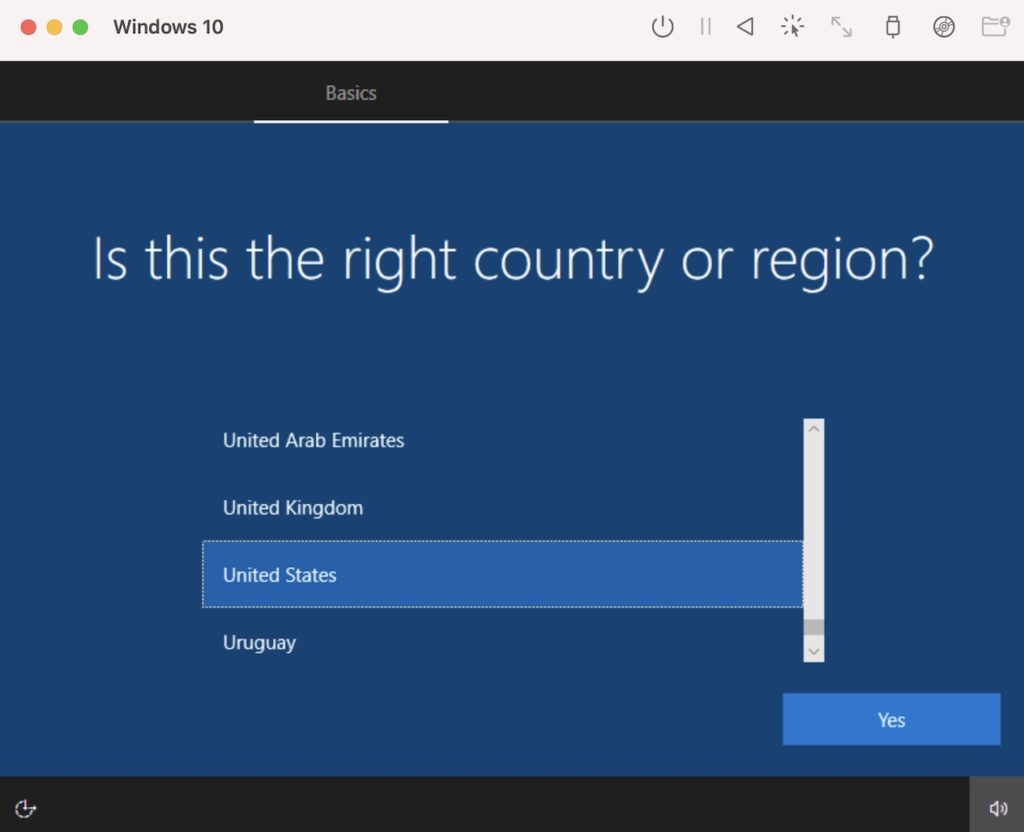
Как обычно, для загрузки доступны Windows 10 Insider Preview, Windows 10 Insider Preview Enterprise и Windows 10 Insider Preview Home China. Скачать новые ISO-образы вы можете с официального сайта: https://www.microsoft.com/. А если вам необходим VHDX для Windows 10 Client ARM64 Insider Preview, то вы можете найти его по этой ссылке.
In 2020, Apple introduced Mac computers with Apple silicon, with the first chip being the Apple M1.
This was a major change, and it affected many third party applications to the point where they simply don’t run on the M1 Mac.
One application that doesn’t run on M1 Macs is VirtualBox. Prior to the M1 Mac, we could use VirtualBox to install Windows on our Mac. VirtualBox is a free virtualisation application that enables you to install virtual machines (with other operating systems) on your Mac.
Fortunately, there’s a free alternative to VirtualBox – UTM.
In this article, I install Windows 10 on an M1 Mac. The key to doing this is to use the UTM virtualisation application instead of VirtualBox.
It also involves installing the Windows 10 on ARM Insider Preview. This requires an account with the Windows Insider Program (you can register for free).
Install UTM
First step is to install UTM (it’s free). UTM employs Apple’s Hypervisor virtualization framework to run ARM64 operating systems on Apple Silicon at near native speeds.
Basically, it enables us to create virtual machines on our M1 Mac. We can use UTM to install other operating systems (such as Windows) on our M1 Mac.
So to install UTM:
- Go to the UTM website and click
Download. - Once downloaded, double click the
UTM.dmgfile to launch it. - Drag the
UTM.appicon to yourApplicationsfolder.
The program is now installed. You can open it just as you can open other applications (e.g. by double clicking on its icon).
Download Windows
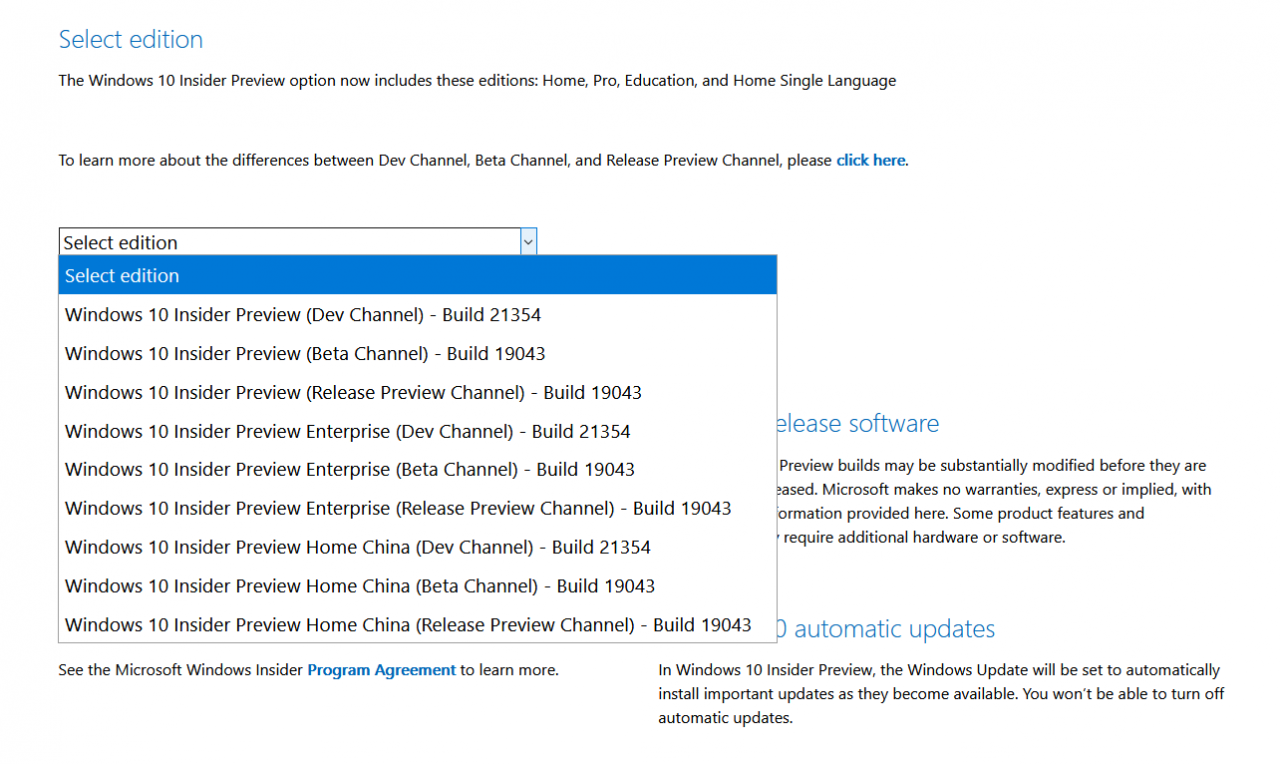
- Go to the Windows Insider Preview Downloads page.
- The instructions on the page depend on whether you’re logged in, and whether you’re part of the Windows Insider Program. If you are already logged in and you’re part of the Windows Insider Program, you’re good to go. If you’re not logged in or part of the program, follow the instructions on the page to log in and/or join the Windows Insider Program. Once done, the page will display the download link for the installation file.
- Click the button to download the installation file. In my case this blue button reads Windows 10 Client ARM64 Insider Preview – Build 21354.
It’s quite a large file (mine is 9.74 GB), so it might take a while to download.
Download the SPICE Guest Tools
- Go to the UTM Support page.
- Under the SPICE Guest Tools and QEMU Drivers (Windows) heading, click Download.
We will use this later, when we install Windows.
Convert the VHDX Image to a QCOW2 Image
According to the UTM documentation, sometimes the QEMU handling of VHDX images will result in Windows becoming corrupted. To prevent this, we’re advised to convert the VHDX file to a QCOW2 file, as follows.
The following steps require that Homebrew is installed. You can install it with the command on the Homebrew website.
With Homebrew installed, open a Terminal window and run the following:
brew install qemuIf you get an error that reads “Cannot install in Homebrew on ARM processor in Intel default prefix”, your Homebrew might not be configured for your M1 Mac. In this case, try this fix.
With QEMU now installed, run the following to convert the VHDX file to QCOW2:
qemu-img convert -p -O qcow2 ~/UTM_VM/Windows10_InsiderPreview_Client_ARM64_en-us_21354.VHDX ~/UTM_VM/Windows10_InsiderPreview_Client_ARM64_en-us_21354.qcow2In my case, I’d placed both the Windows file and the SPICE guest tools into a folder called ~/UTM_VM. You can put them elsewhere if you prefer, but be sure to replace ~/UTM_VM with your own path to the file.
Also, you may need to rename the Windows file (for example, replace 21354 with the applicable number on your file).
We can now use the QCOW2 image when creating the virtual machine below. It is recommended you do this with a fresh VHDX from Microsoft in case your image was already corrupted.
Create a Virtual Machine
Now we can go ahead and use UTM to create a virtual machine with which we will install Windows 10.
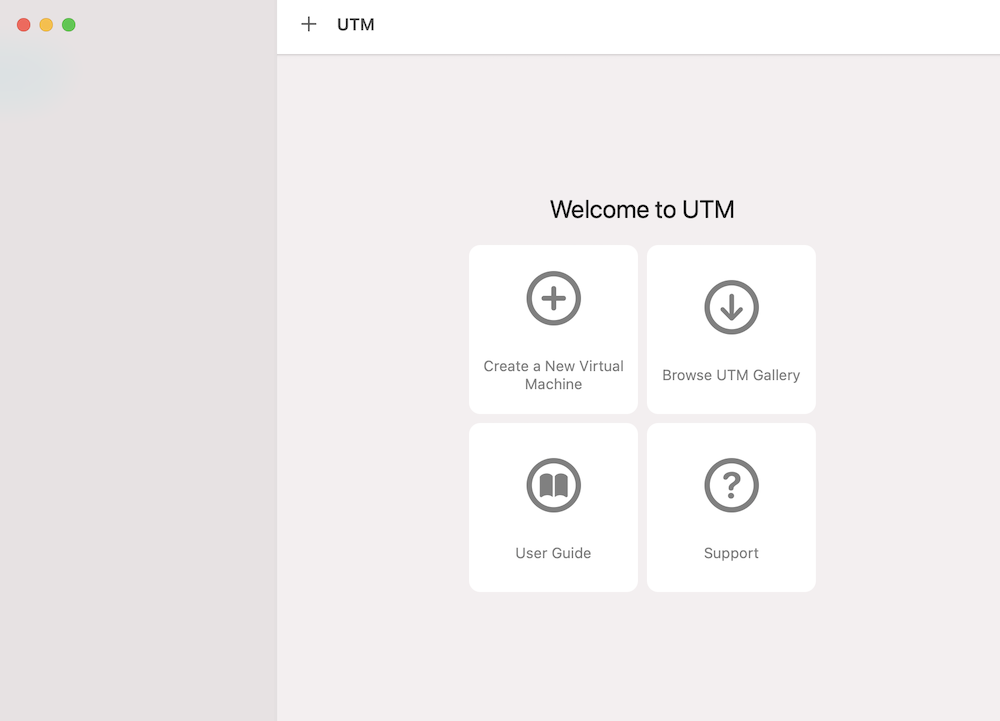
Open UTM and click Create a New Virtual Machine:
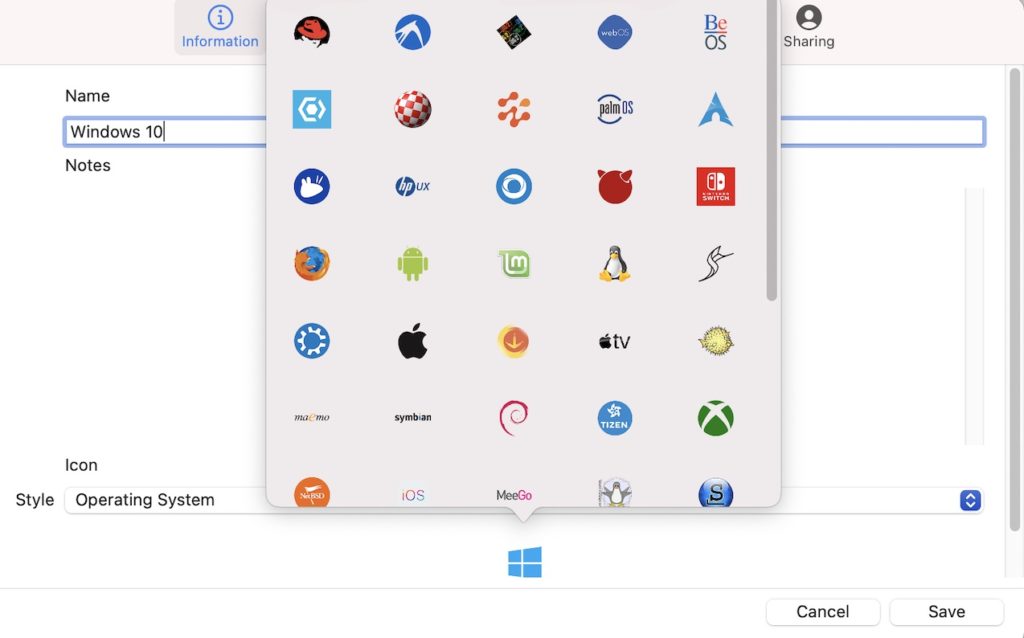
Enter a name for the VM. You can optionally choose an icon by selecting Operating System in the bottom drop down menu. This makes an icon appear below it. If its not the right icon, click it (which brings up a menu of other icons), and select the Windows icon:
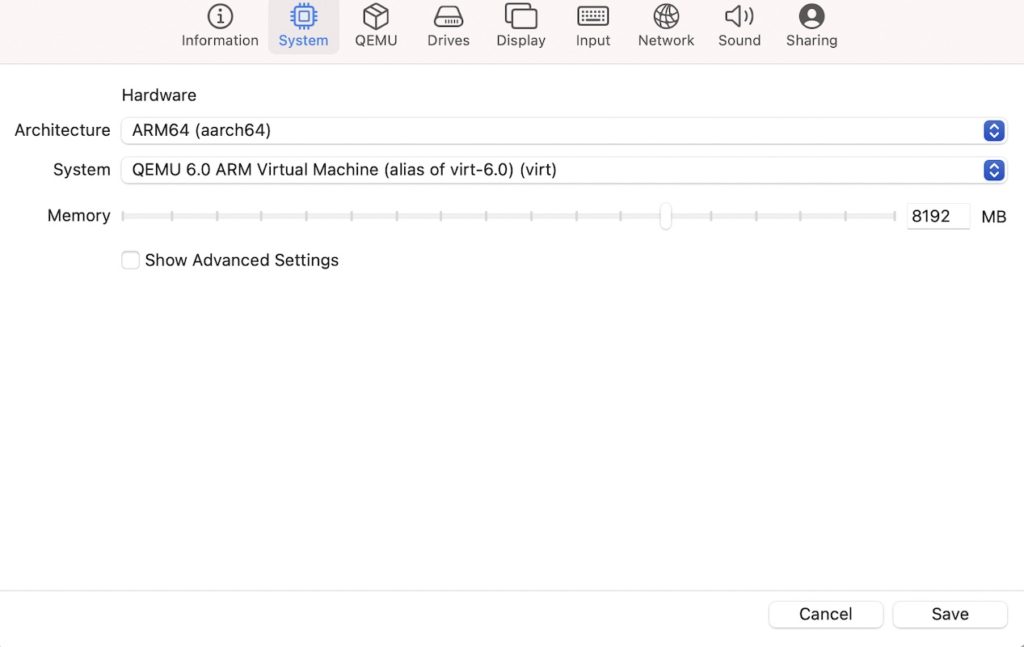
Now click the System button in the top menu and select ARM64 (aarch64) architecture. Also specify the amount of memory. At least half of your computer’s total memory is recommended for performance:
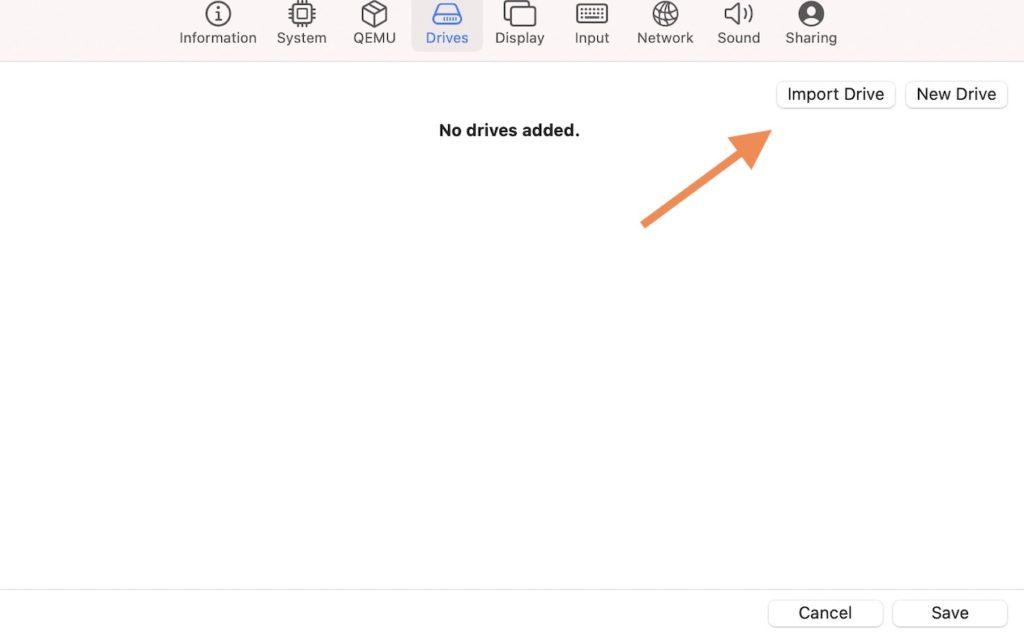
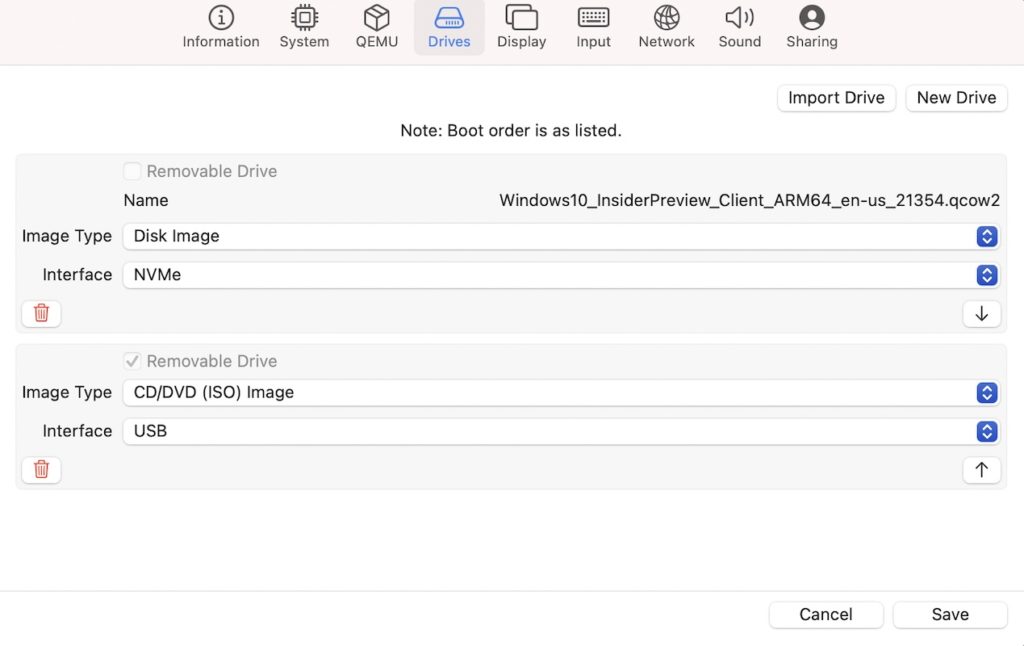
Click Drives from the top and then click Import Drive:
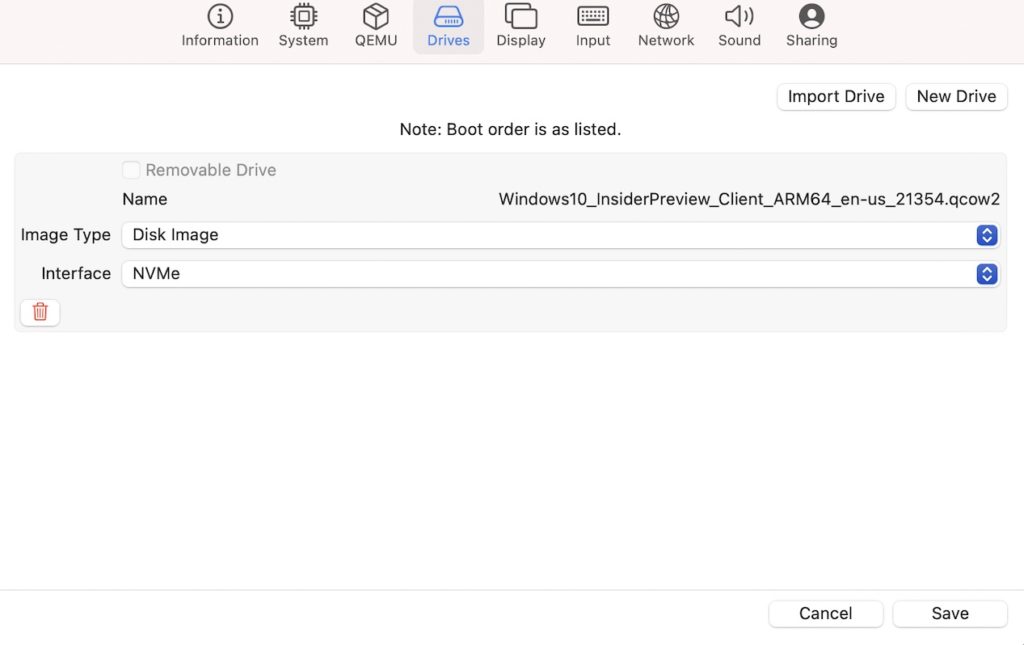
Browse to, and select the Windows 10 QCOW2 that you converted from the VHDX file previously. Once selected, set the interface to NVMe:
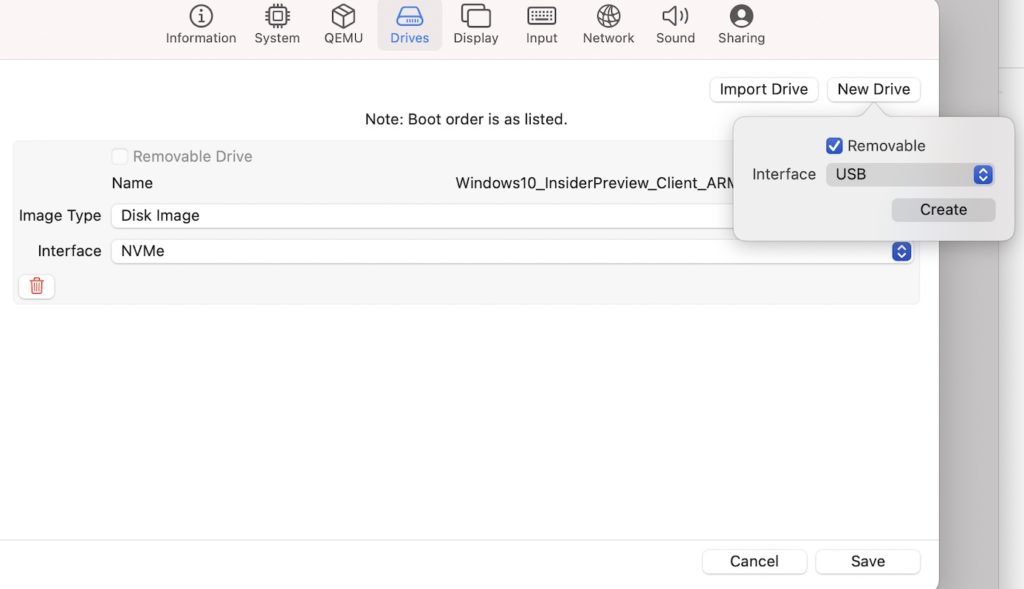
Now click New Drive and check Removable and click Create to add a CD drive:
It should now look like the following screenshot. Click Save:
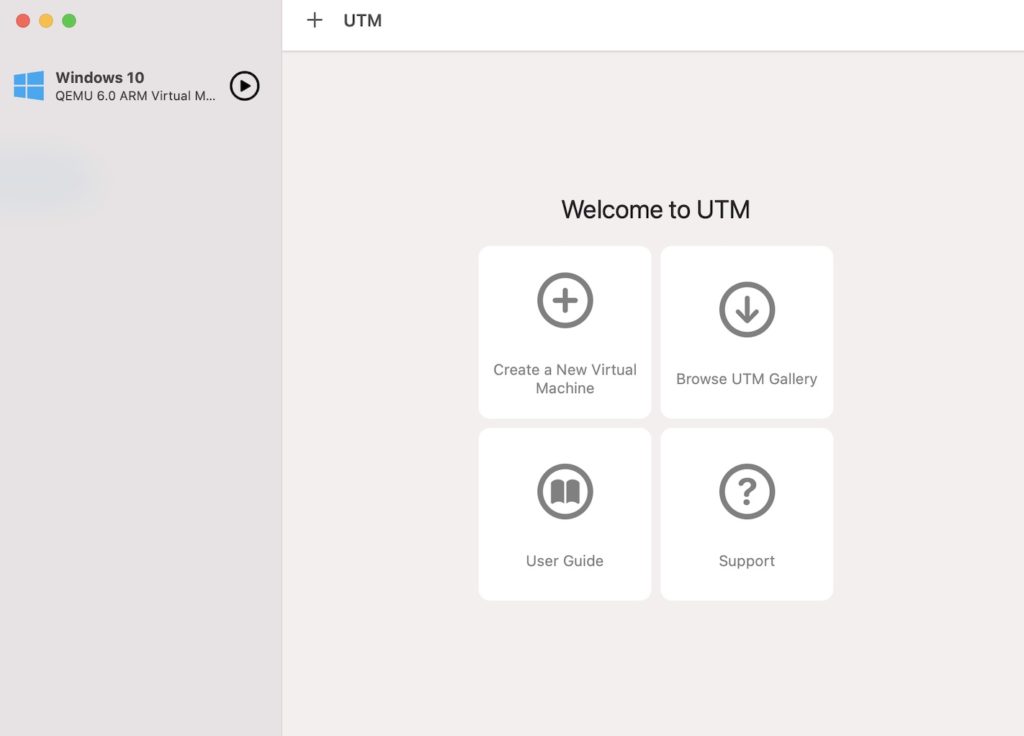
The VM now appears in the sidebar:
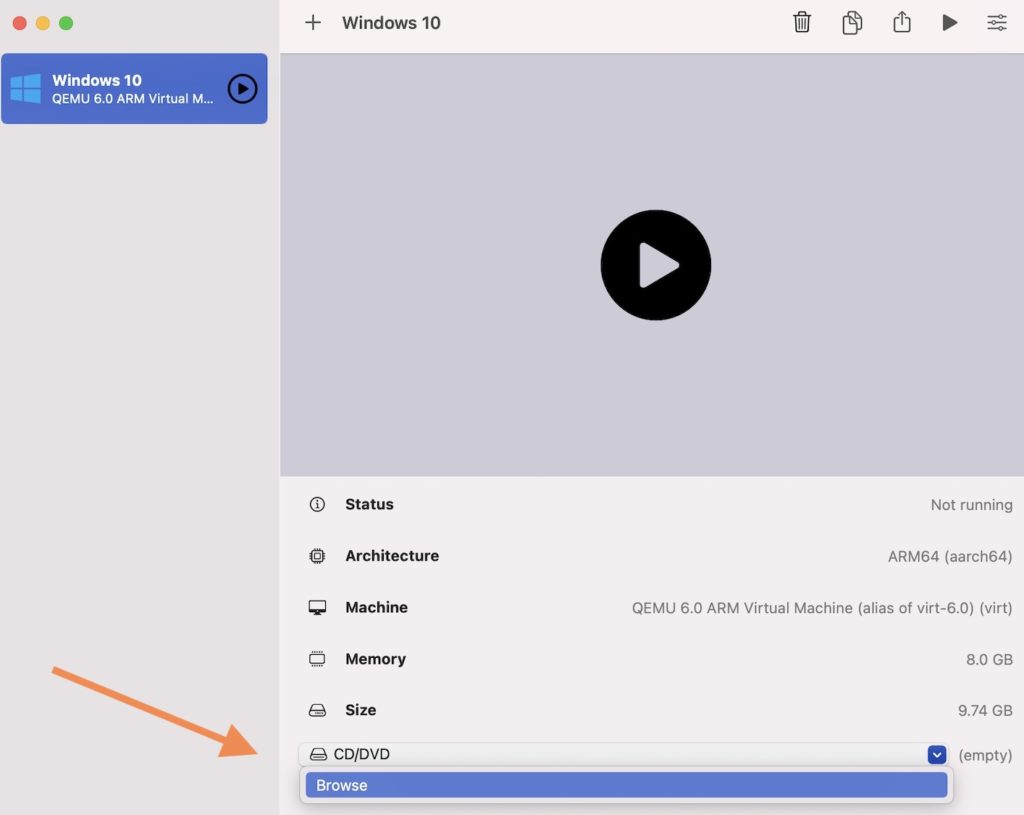
Click on the Windows 10 option in the left menu, and then select Browse (at the bottom of the right pane):
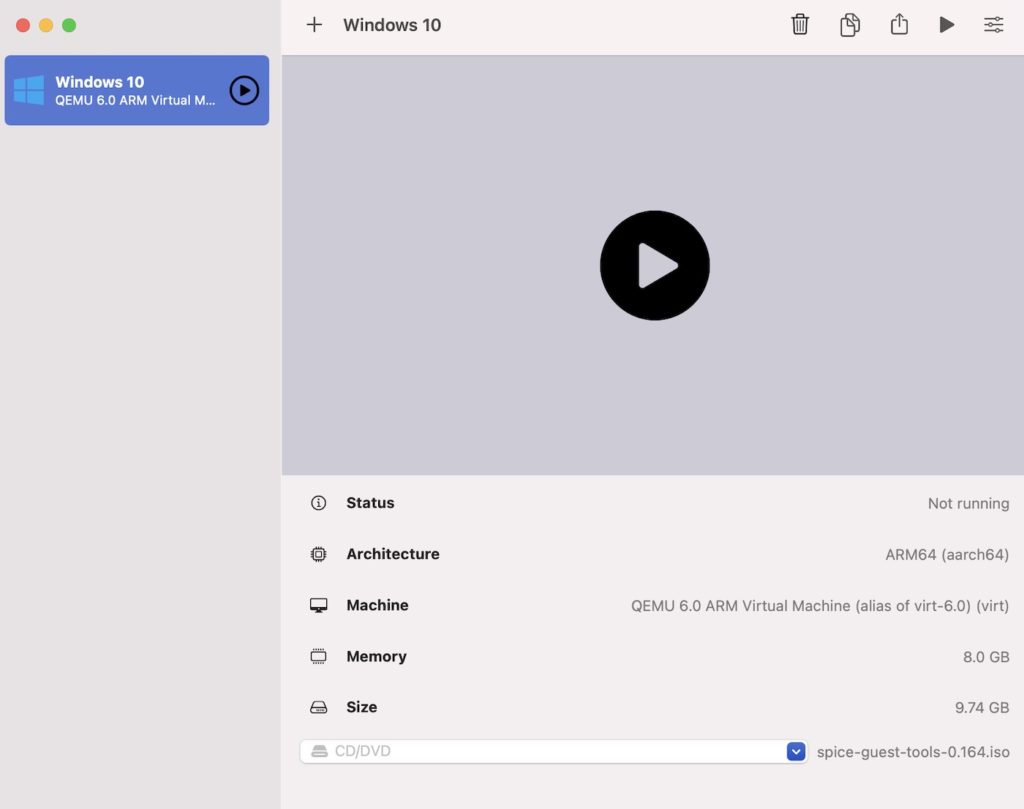
Browse to the SPICE guest tools ISO and click Open:
The name of the file now appears at the bottom of the screen, to the right of the dropdown.
The virtual machine is ready to use. If you need to change/check any of the settings, you can right click on the machine and select Edit.
We’re now all set to install Windows.
Click the big “Play” button in the middle of the screen to start the installation:
This launches a new window that boots up the Windows installation wizard:
Follow the prompts to install Windows.
If you get a “no bootable device” error, check that you selected ARM64 (aarch64) architecture on your virtual machine. From the UTM main screen, right click on the the virtual machine in the left and select Edit and select the System tab.
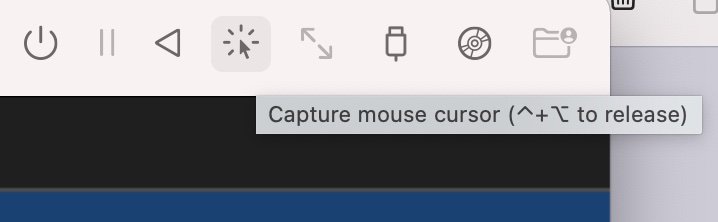
If your cursor suddenly seems to disappear, click the mouse capture button in the toolbar to send mouse input directly. Press Control+Option together to exit mouse capture mode.
When asked to connect to the internet, select I don’t have internet. This is because we won’t have internet until we install the SPICE guest tools (next).
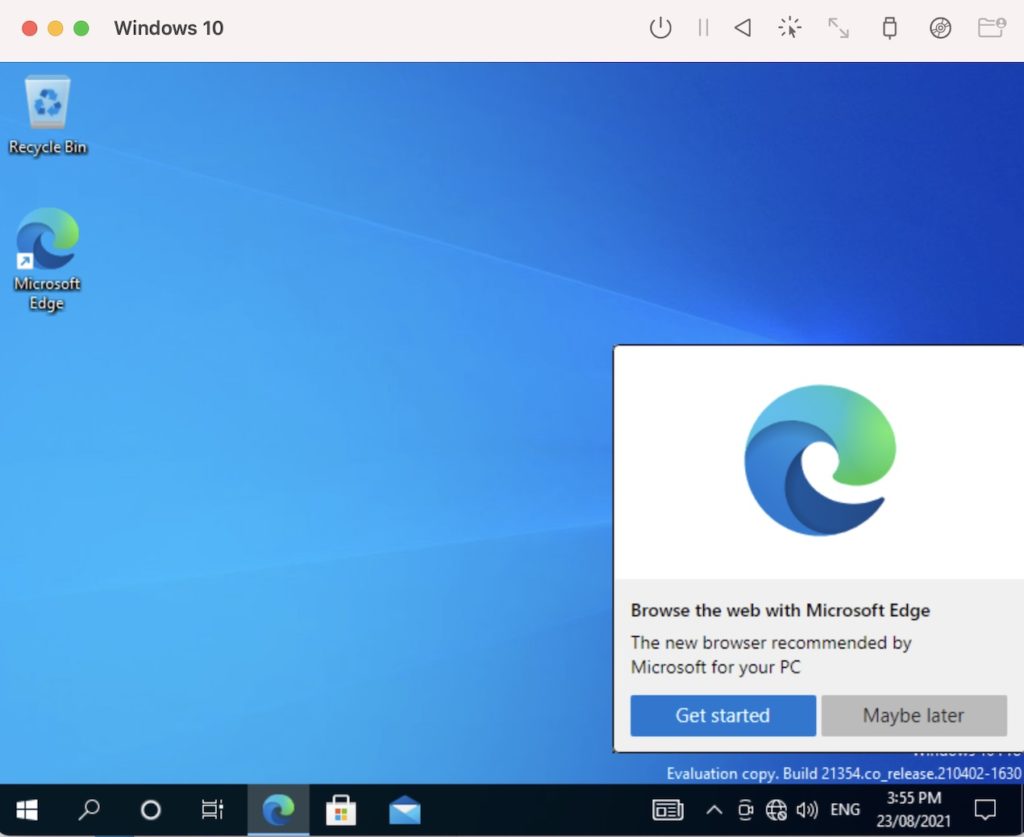
Once the installation is complete, the Windows desktop appears:
Install SPICE Guest Tools
There’s one more thing we need to do – install the SPICE guest tools.
From within our freshly installed Windows machine (i.e. in the guest machine), open the File Explorer and select the D drive. From there, double click the SPICE guest tools executable file (in my case, this is called spice-guest-tools-0.164.exe):
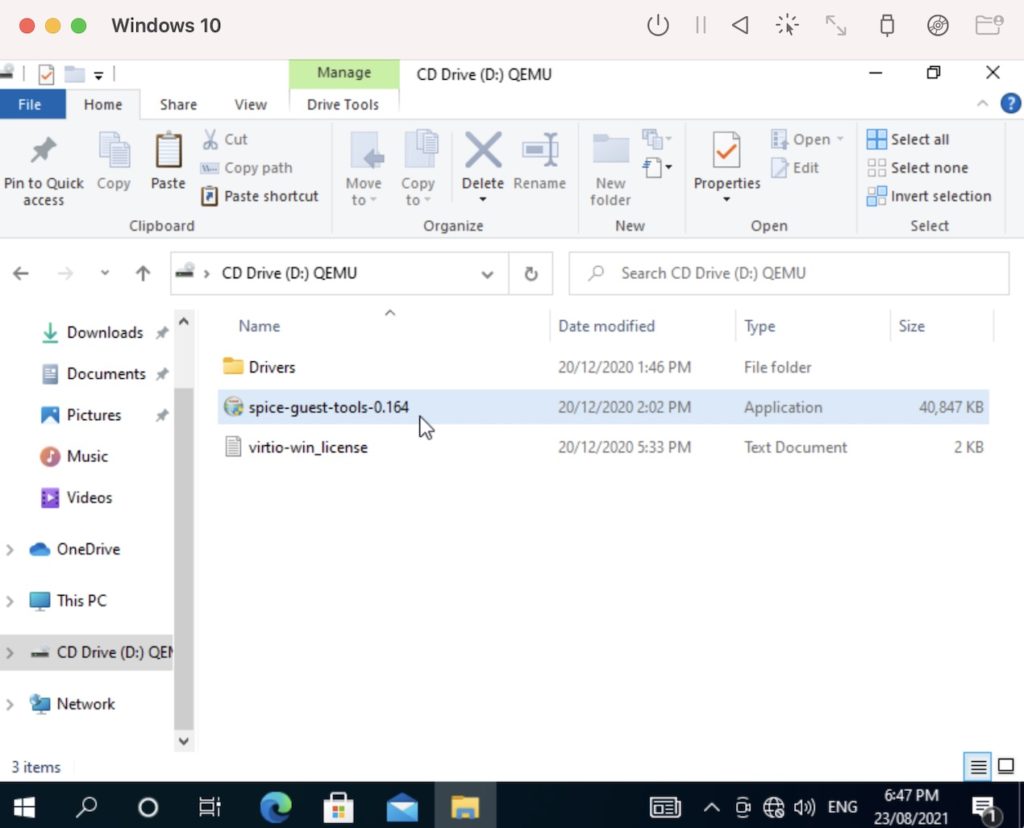
This launches the installation wizard. Follow the prompts to install the SPICE guest tools. This installs various drivers, including one that enables an internet connection.
Windows 10 is now installed on our M1 Mac and ready to use.
Written By
published
April 7, 2021
Hello Windows Insiders, today we are releasing Windows 10 Insider Preview Build 21354 to Windows Insiders in the Dev Channel.
Starting with today’s build, Windows Insiders will notice that the name of the branch we are releasing builds as shown on the desktop watermark at the lower right of the desktop from has changed to CO_RELEASE. Just like we did back in October when we released builds from the FE_RELEASE branch, we can change which branch we flight builds from. As our engineers work in development cycles internally, we may prioritize work being done in a specific branch and may need to move Insiders between branches. We are treating these builds the same as we would treat builds from the RS_PRERELEASE branch.
What’s new in Build 21354
New personalization options for news and interests on the taskbar
Thanks for your continued feedback for news and interests on the Windows taskbar! We’re continuing to develop the experience based on your suggestions. Today, we’re pleased to announce a new set of features rolling out for personalizing the feed to suit your interests.
Now, when you hover on the weather on your taskbar, you’ll see a new “Manage interests” button appear at the top of the window. This button links to a new full-page personalization experience, where you can choose the topics that you’re interested in. New users may also see a personalization card in their feed to help them get started.
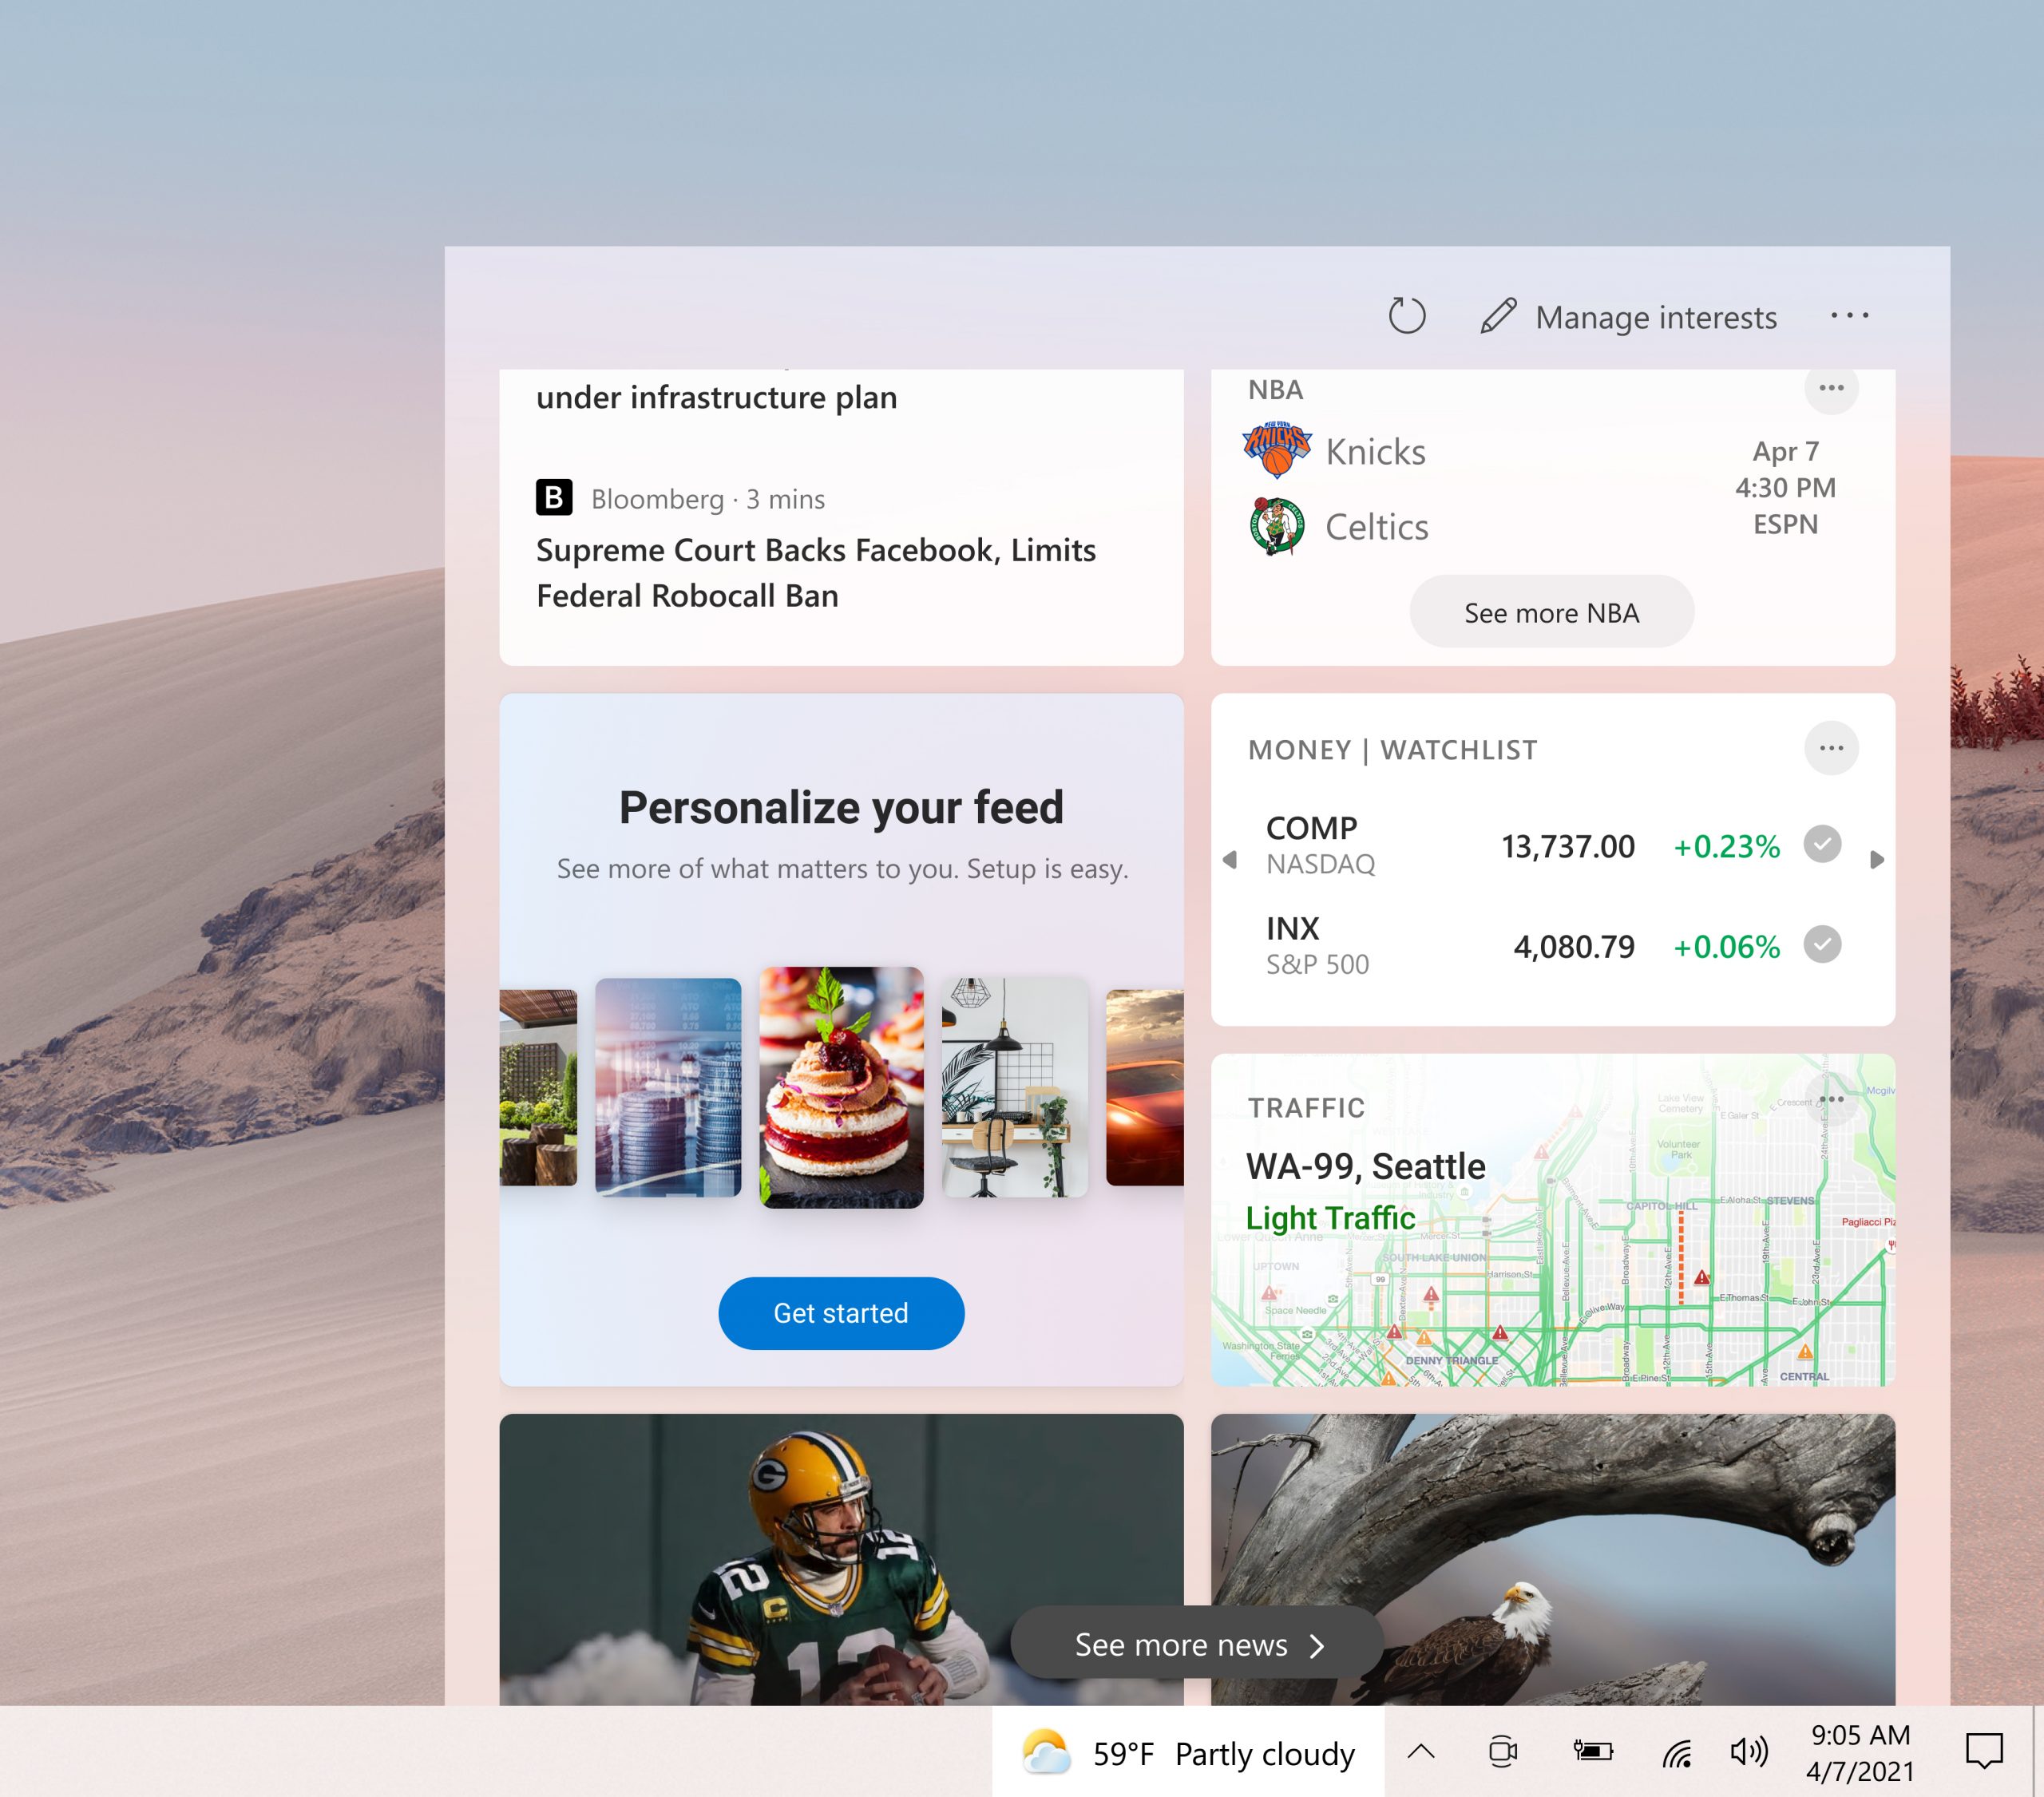
Use the search box at the top of the “My interests” page to search for the topics or publishers you want to follow. You can also discover interests by browsing over a dozen categories, including different types of news, entertainment, and sports topics. When you select a topic to follow, you’ll see more stories about it in your feed as stories become available. You can manage the topics you’re following by selecting “Followed interests” in the left navigation.
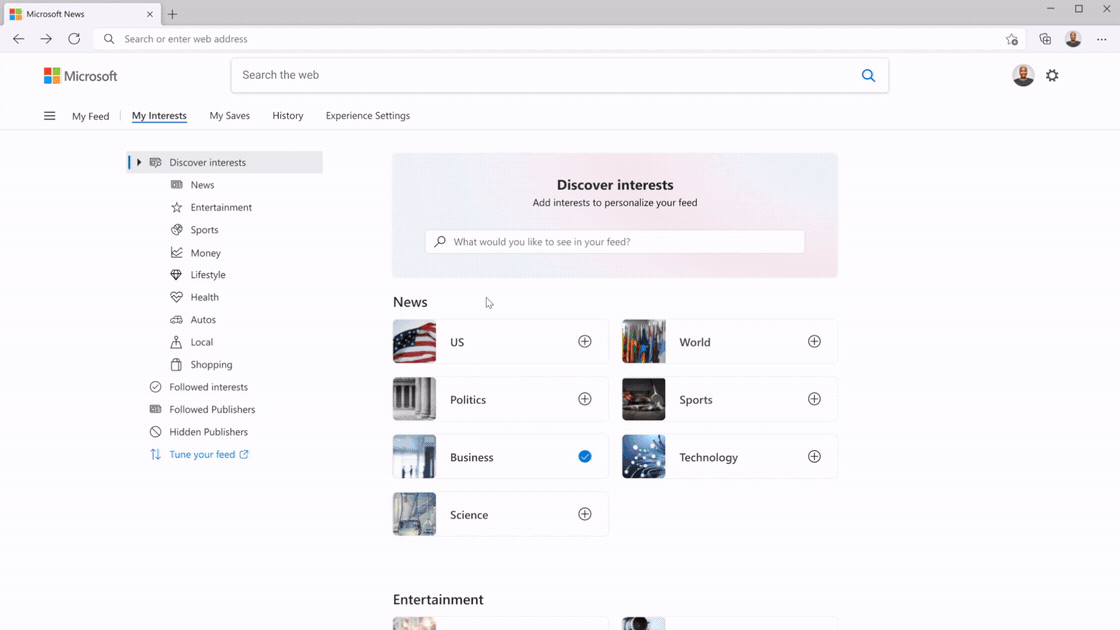
We’re also excited to announce, “Tune your feed”, available from the left navigation on the “My interests” page. This experience makes it easy to explore and follow publishers from our partner ecosystem and select example articles that pique your interest. Select a couple of publishers and stories to get started or scroll to see more. You can see and manage the publishers you’re following by clicking “Followed Publishers” on the left navigation. You can also tune your feed wherever you see a story. Click the “X” on the top right of the card to remove the article and provide feedback: “Not interested in this story”, “Don’t like the source”, or “Report an issue”. We’ve refined this experience based on user feedback, to give you another way to fine-tune your feed for your preferences.
These new personalization experiences are now available in several markets, including the U.S., U.K., Canada, India, and Australia, with global rollout continuing. We look forward to hearing what you think about these new options for personalizing news and interests!
Reminder: We continue to roll out news and interests to Windows Insiders, so it isn’t available to everyone in the Dev Channel just yet.
Improvements to Display Settings
Content adaptive brightness control (CABC) disabling: CABC helps improve battery performance on PCs, but with the trade-off of decreased image quality. It can result in distracting brightness changes that interfere in experiences where image quality is of high importance such as for creative professionals looking for color accuracy. The ability to turn CABC off has been a highly requested feature and Windows Insiders can now disable CABC directly in the Display settings via Settings > System > Display.
Note: Depending on your device, you may see just one (or both) of the checkboxes seen under the brightness slider below. To find out if your device has CABC support, you can look at your GPU control panel.
HDR certification: To bring awareness to high quality HDR displays and educate customers, we are bringing HDR certification to Settings > System > Display under “Advanced display settings” with the latest Insider Preview builds. Under this settings page, a display’s HDR certifications will be shown.
We will be rolling out this feature over time and are starting with select Dolby Vision and VESA DisplayHDR models, so please don’t be alarmed if in the Advanced display settings, you see that your display has no HDR certification even though it is certified.
New Camera Settings page
We are extremely excited to introduce a new Camera Settings page we’ve been working on, giving users the ability to add/remove cameras and configure the default image settings of each one.
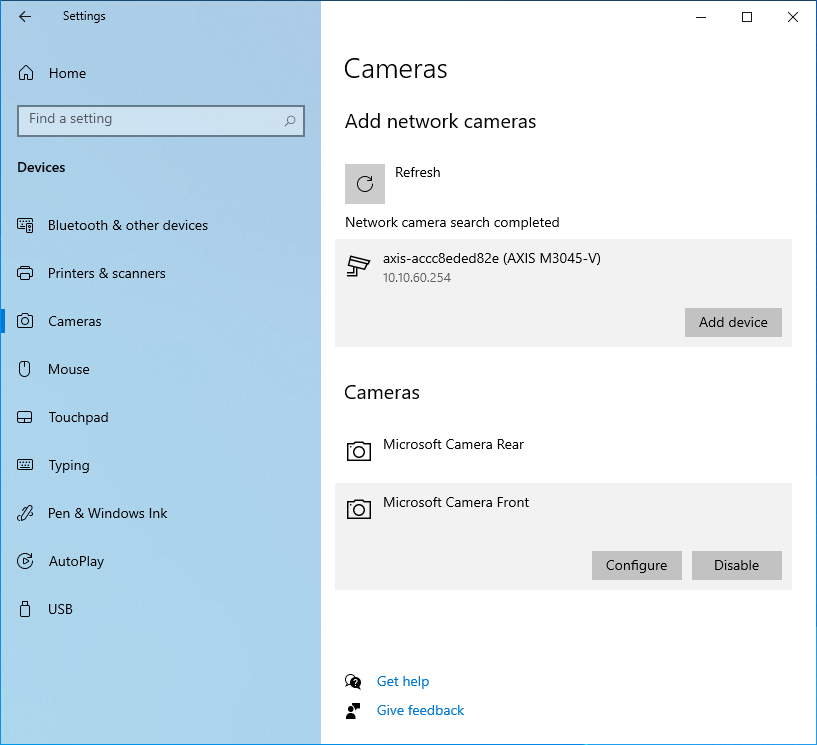
This page allows you to manage cameras through the Settings app, whether they’re connected directly to the device (like a webcam) or are ONVIF IP cameras on your local network (for more info on ONVIF support in Windows, see this blog post). This new Settings page can be found at Settings > Devices > Camera. Each camera has a “Configure” button that lets you make changes to the default brightness and contrast – letting you get rid of the pesky backlight that always shadows your face in your video calls. Depending on what features are supported by your camera, you can configure brightness and contrast, enable Video HDR or Eye Contact, or correct for camera rotation.
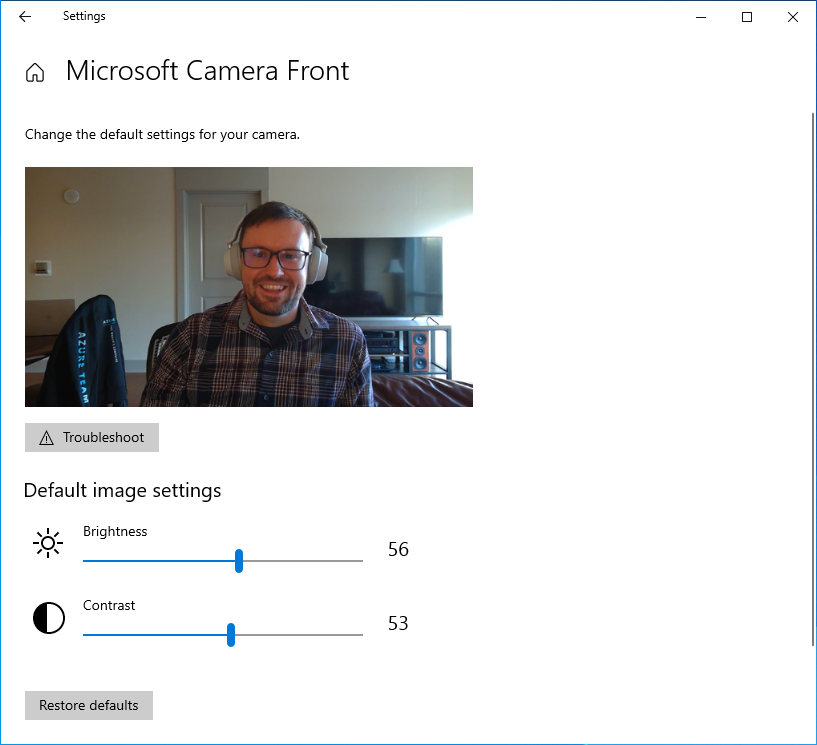
We look forward to hearing your feedback about this new feature. Please try out the Configure default image settings for your camera Quest on Feedback Hub and then send us your feedback at the end – we’d love to hear what other features you’d like to see, and if you run into any issues with your specific PC, camera and/or video app.
Inbox app updates
MSPaint is now updated via the Microsoft Store:
MSPaint is now updateable via the Microsoft Store outside major OS updates. It also has a new icon and has been promoted out of the Windows Accessories folder to its own place in the Start menu.
Snipping Tool is now updated via the Microsoft Store:
Snipping Tool is now updateable via the Microsoft Store outside major OS updates. It has been packaged together with Snip & Sketch so we can deliver updates for both at the same time. It has also been promoted out of the Windows Accessories folder to its own place in the Start menu.
NOTE: Because we’re combining both Snip & Sketch and Snipping Tool, Insiders who previously did not have Snip & Sketch installed will see Snipping Tool removed after updating to this build and will have to go and install Snip & Sketch from the Store to get it back.
Organizing all the admin and system tools under Windows Tools:
In Build 21343, we announced we changed the name of the Windows Administrative Tools folder in Start to Windows Tools as part of an effort to better organize all the admin and system tools in Windows 10. In Build 21354, we are continuing that effort. The Windows Accessories, Windows Administrative Tools, Windows PowerShell, and Windows System folders have now been removed from Start and the apps within these folders can now be accessed via the Windows Tools entry point that directs to the full apps list in File Explorer. All these apps will still appear in via search, launch via any method, can be pinned to Start or taskbar, and any customized shortcuts in the folder paths will remain intact. Also, File Explorer has been moved into its own place in the Start menu as part of this work.
Changes and Improvements
- [News and interests] As mentioned previously, we have enabled the ability to deselect “Open on hover” in the “News and interests” taskbar options. This is based on your feedback.
- The default path to access Linux files from Windows using the Windows Subsystem for Linux has been changed from `\\wsl\\` to `\\wsl.localhost\\` to improve performance and reliability. You will still be able to access Linux files using `\\wsl$\\`.
- Under Settings > Update & Security > Change active hours, you will find the toggle turned on for “Automatically adjust active hours for this device based on activity”, if you have never adjusted this feature. We are starting a roll out a change for Insiders that makes this setting on by default. With this setting turned on, Windows Update will be able to schedule automatic restarts when you are typically not using your device more accurately.
- As of the latest versions of Microsoft Edge, all pinned sites (regardless of what version you were using when you pinned them), should now use the taskbar behavior described here without you first having to unpin and re-pin the site.
- On ARM64 devices, you can now toggle compatibility settings for x64 applications.
- Under Settings > Personalization > Device usage, you can select all the ways you plan to use your device to get customized suggestions for tips, tools, and services.
Fixes
- [Gaming] We fixed an issue where certain games may crash, will not sync save data when a game is played on a different device, or will not save when a new game is installed.
- [File Explorer] We fixed an issue resulting in all folders pinned to Quick Access in File Explorer disappearing if you installed Build 21343. Please note that this fix prevents the issue from occurring going forward, it will not bring back the ones that were unpinned if you installed the impacted build previously.
- [File Explorer] We fixed an issue resulting in some Insiders experiencing that the entire folders section of Quick Access was missing after installing the previous flight.
- We fixed an issue impacting Search reliability in the previous flight.
- [News and interests] Fixed an issue where news and interests could occlude other content on the taskbar especially on smaller screens.
- We fixed an issue where the tooltip text for items in Start’s Power button menu wasn’t displaying correctly.
- We fixed an issue resulting in a crash if you entered WinPE and tried to enable Narrator using WIN + CTRL + Enter.
- We fixed an issue resulting in some Insiders experiencing a bug check with error SYSTEM_THREAD_EXCEPTION_NOT_HANDLED when rebooting or shutting down in the previous flight.
- We fixed an issue that could result in a bugcheck when starting WSL.
- We fixed an issue that could result in the Windows Update Settings page showing progress dots but never loading.
- We fixed an issue where navigating to Power and Sleep in Settings would crash Settings.
- We fixed the issue where a random toggle that didn’t do anything was appearing under Settings > Personalization > Lock screen.
- We fixed an error resulting in some Insiders recently seeing an error when trying to add a password to a local account that was created without a password.
- We fixed an issue where if you opened the Pinyin IME settings via Search, the Settings page would be unexpectedly blank.
- We fixed an issue that could result in your desktop background going black after snapping an app to the side of your screen.
- We fixed an issue where some of the text in Snipping Tool wasn’t displaying correctly.
- We fixed an issue causing the Handwriting Input Panel to not work for pen input on ARM64 PCs.
- We fixed an issue impacting clipboard history reliability.
- We fixed an issue resulting in characters being duplicated in certain apps when typing with the Korean IME.
- We fixed an issue resulting in not being able to insert composition strings when typing with an IME after copying and pasting a text box in PowerPoint.
- We fixed an issue resulting in key events being lost when renaming files in File Explorer while typing with an IME.
- We fixed an issue where when typing with the Japanese or Chinese IMEs in certain apps that have their own UI for IME candidates, the IME candidates were not displayed in the app’s UI.
- The fix we mentioned in Build 21327 to address an issue where a toggled key on the touch keyboard had the wrong background color is now rolling out to all Insiders in the Dev Channel.
- We fixed an issue causing an increase in login time in the previous flight.
- We fixed an issue resulting in some Insiders finding that boot time was longer in the previous flighting.
- We fixed an issue resulting in the network button on the login screen not working and potentially crashing.
- We fixed an issue causing some logins to hang on a black screen. If you continue to see a similar problem, please file a new feedback in Feedback Hub.
- We fixed an issue that could result in freezes when watching videos in Chromium-based browsers in recent Dev Channel builds.
Known issues
- We’re looking into reports of the update process hanging for extended periods of time when attempting to install a new build.
- [News and interests] Pressing ESC key to dismiss an opened context menu in the flyout dismisses the whole flyout instead.
- [News and interests] Sometimes the news and interests flyout cannot be dismissed with pen.
- [ARM64] Insiders who installed the preview version of the Qualcomm Adreno graphics driver on the Surface Pro X may experience reduced brightness of the display. This issue is fixed with an updated version of the preview graphics driver at https://aka.ms/x64previewdriverprox. If you are experiencing this issue, please see the feedback collection for more information.
- We’re investigating an issue where elements of Search (including the search box in File Explorer) are no longer displaying correctly in dark theme.
- We’re working on a fix for an issue introduced in the previous flight impacting WSUS users where the “Check online for updates from Microsoft Update” option is greyed out. If you are impacted, you can run the following command from an elevated Command Prompt to set the reg key so that scan will check Microsoft servers:
- reg add “HKLM\Software\Microsoft\WindowsUpdate\UX\Settings” /f /v ScanMicrosoftOnly /t REG_DWORD /d 0x01
Then click the regular “Check for updates” button in Windows Update Settings. Please note, if the scan needs to be done repeatedly the reg key will need to be re-added each time, as scanning reads and erases the key.
- Due to an issue with migrating the shortcuts into the new Windows Tools location, This PC shows up with the display name “computer.” We already have a bug fix on the way to address this issue.
- Some non-administrative apps, such as 3D Viewer and Print 3D, that were previously in the Windows Accessories folder are now in Windows Tools. These app shortcuts will be moved back into Start with an upcoming bug fix. They are still searchable and accessible via Windows Tools in the meantime.
- The Windows Camera App currently does not respect the default brightness setting set via the new Camera Settings page.
- Some cameras currently may not support adjustment in the Camera Settings App when the camera is also in use by another app.
- Accessing the virtual GPU is broken for Windows and Linux guests, adding a vGPU to a VM will have no effect and the VM will continue running with software rendering.
- [ADDED] Theme-aware splash screens have disappeared in this build. A fix is coming to re-enable this in a future flight.
- [ADDED] In some cases, Auto HDR might not correctly enable for all eligible titles. To ensure that Auto HDR is enabled for all eligible titles, please visit Settings > Display > HDR settings and confirm that Auto HDR is turned on. If you still run into trouble, please reach out to us via the Feedback Hub, on our Twitter (@DirectX12), or on the DirectX Discord.
- [ADDED 4/9] Split screen mode for Auto HDR does not work in this build; please look to the next build for a fix.
- [ADDED 4/12] We’re working on a fix for an issue where in some cases user accounts will be migrated during the upgrade, but the user profile was not. This may occur if a device is abruptly restarted during the upgrade process. The user profile can be recovered from the Windows.old folder, or by simply rolling back to the previous version.
Important Insider Links
You can check out our Windows Insider Program documentation here, including a list of all the new features and updates released in builds so far. Are you not seeing any of the features listed for this build? Check your Windows Insider Settings to make sure you’re in the Dev Channel. Submit feedback here to let us know if things weren’t working the way you expected.
If you want a complete look at what build is in which Insider channel, head over to Flight Hub. Please note, there will be a slight delay between when a build is flighted and when Flight Hub is updated.
Thanks,
Brandon
(Amanda is enjoying some much-needed time off this week!)
21H2
|
Скачать Windows 10 Insider Preview 21354 |
|||||
|
|||||
|
|||||
|
|||||
|
|||||
|
|||||
|
|||||
|
|||||
|
|||||
|
|||||
|
|
|
В связи с введением в действие Постановления Правительства Российской Федерации от 14.11.2023 № 1905 т.н. «о запрете популяризации VPN» с 1 марта 2024 года — любое обсуждение способов обхода блокировок и VPN на портале запрещено!
| Windows 8.1 |
|
| Популярное |
|