
Некоторые пользователи могут столкнуться с тем, что иконки (значки) файлов, папок и ярлыков в Проводнике и на рабочем столе Windows отображаются неправильно или с иными проблемами: например, показ одинаковых значков по умолчанию для различных типов файлов. В этом случае может помочь очистка их кэша.
В этой инструкции подробно о том, как очистить кэш иконок в Windows 11 или 10 и дополнительная информация на тему, которая может оказаться полезной.
Ручное удаление файла IconCache.db
Кэш значков Windows 11/10 и предыдущих версий ОС для текущего пользователя хранится в файле базы данных IconCache.db. Соответственно, для его очистки достаточно удалить этот файл, после чего он будет автоматически создан вновь.
Сделать это можно вручную в Проводнике, используя следующие шаги:
- В Параметрах Проводника на вкладке «Вид» (перейти в параметры можно в меню Проводника или с помощью команды Win+R — control folders) отключите опцию «Скрывать защищенные системные файлы» и включите опцию «Показывать скрытые файлы, папки и диски», примените настройки (подробно про включение показа скрытых и системных файлов).
- Введите
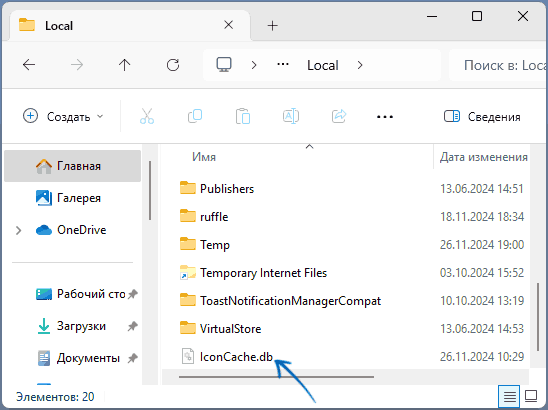
%userprofile%\AppData\Local
в адресную строку Проводника и нажмите Enter.
- В открывшейся папке вы найдёте файл IconCache.db, удалите его.

- Перейдите в папку
%userprofile%\AppData\Local\Microsoft\Windows\Explorer
и удалите все файлы, имена которых начинаются с iconcache в этой папке. Если при этом вы увидите сообщения об ошибках, используйте метод с командной строкой, описанный далее.
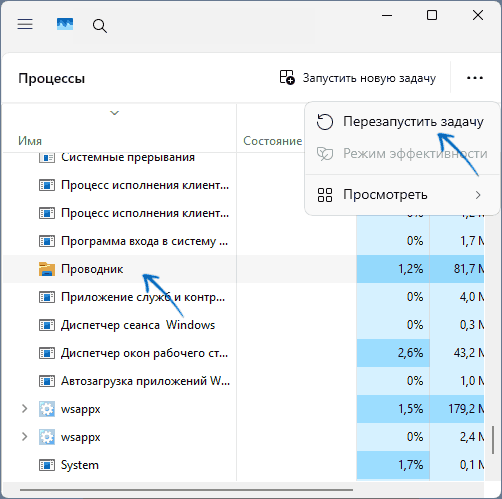
- Перезапустите Проводник (explorer.exe) — сделать это можно в диспетчере задач (или перезагрузите компьютер).

Готово, кэш значков будет очищен и создан заново.
Командная строка
Возможно, более простым способом будет использование командной строки или же создание bat-файла для очистки кэша иконок. В случае с командной строкой достаточно запустить её от имени администратора, после чего по порядку ввести команды (после второй команды пропадёт рабочий стол, но последняя его вернёт):
cd /d %userprofile%\AppData\Local
taskkill /f /im explorer.exe
attrib -h iconcache.db
del iconcache.db
cd /d %userprofile%\AppData\Local\Microsoft\Windows\Explorer
attrib -h iconcache_*.db
del iconcache_*.db
start %windir%\explorer.exe
Если эти же команды прописать в командный файл .bat, то очистку кэша значков и перезапуск Проводника будет выполнять простой запуск этого файла, лучше от имени администратора.
Некоторые дополнительные нюансы в контексте темы очистки кэша иконок:
- Если проблемы возникли с отображением миниатюр (эскизов), очистить их можно в утилите «Очистка диска» (Win+R — cleanmgr)
- Очистка эскизов также возможна в командной строке:
cd /d %userprofile%\AppData\Local\Microsoft\Windows\Explorer
taskkill /f /im explorer.exe
attrib -h thumbcache_*.db
del thumbcache_*.db
start %windir%\explorer.exe
- Существуют сторонние программы для очистки кэша иконок, например, IconsRefresh (разработка более не ведётся, но утилита исправно работает и в Windows 11).
В случае, если у вас остаются вопросы, касающиеся кэша значков Windows, вы можете задать их в комментариях ниже, я постараюсь помочь.
При отображении иконок различных программ или типов файлов в проводнике File Explorer, Windows вместо обращения к исходным файлам с иконками, получает копии картинок значков из специальных файлов с кэшем иконок. За счет того, что операционной системе не нужно каждый раз загружать оригинальные файлы иконок, ускоряется работа и прорисовка объектов в проводнике Windows.
В некоторых случаях, при повреждении файла с кэшем иконок, в проводнике (и на рабочем столе) могут отображаться белые иконки ярлыков и файлов, или вместо иконок приложений отображаются стандартные иконки Windows. В этом случае рекомендуется выполнить сброс системного кэша иконок.
На скриншоте ниже видно, что в макете стартового меню Windows 10 вместо значков некоторых приложений отображаются стандартные иконки папок.
Примечание. Некоторые пользователи при появлении такого бага пытаются переустановить проблемное приложение, что помогает далеко не всегда.
Кэш иконок в различных версиях Windows представляет собой один или несколько db файлов, хранящихся в профиле пользователя.
- В Windows 7 это файл IconCache.db в каталоге %userprofile%\AppData\Local
- В Windows 10 и Windows 8.1 – это множество файлов, имя которых начинается с iconcache_ (iconcache_16.db, iconcache_32.db, iconcache_48.db и т.д. в соответствии с размерами иконки в пикселях) и хранятся в каталоге %userprofile%\AppData\Local\Microsoft\Windows\Explorer
Не путайте файлы кэша иконок с файлами thumbs.db, которые содержат кэш эскизов изображения и видео в папке.

Сброс кэша иконок в Windows с помощью утилиты ie4uinit
В Windows есть специальная встроенная утилита ie4uinit (IE Per-User Initialization Utility), которую можно использовать для быстрого сброса кэша иконок.
- В Windows 10:
ie4uinit.exe -show - Для Windows 7:
ie4uinit.exe -ClearIconCache
Эту команду нужно выполнить через меню Win+R -> команда -> Enter.
Команды абсолютно безопасные, но помогают восстановить нормальное состояние кэша иконок далеко не во всех случаях.
Скрипт удаления файлов с кэшем иконок в Windows
Чтобы сбросить кэш иконок, достаточно удалить db файлы с кэшем. Но предварительно нужно завершить процесс проводника File Explorer, чтобы он не блокировал доступ к файлам iconcache. Рассмотрим, как сбросить базу данных кэша иконок без перезагрузки Windows.
- Закройте все запущенные приложения;
- Откройте окно командной строки (
cmd.exe
или
powershell.exe
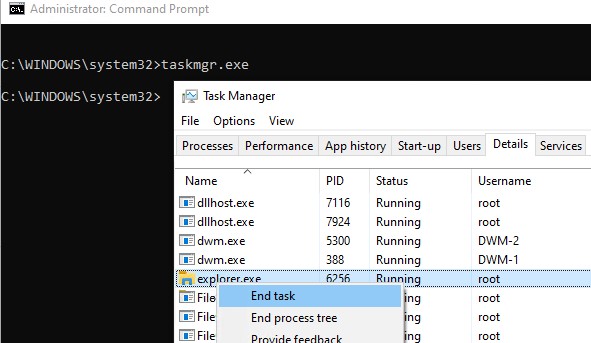
) с правами администратора; - Запустите диспетчер задач
taskmgr.exe - В окне Task Manager перейдите на вкладку Details, найдите процесс explorer.exe и завершите его (End Task);

- Также вы можете завершить процесс из командной строки:
taskkill /f /im explorer.exe - Затем последовательно выполните следующие команды для удаления кэша иконок в профиле пользователя (в зависимости от версии ОС):
Для Windows 10/ 8.1 (просто скопируйте этот код в окно командной строки или сохраните как текстовый файл reset_icon_windows.bat).
taskkill /f /im explorer.exe
cd /d %userprofile%\AppData\Local\Microsoft\Windows\Explorer
 attrib -h iconcache_*.db
del /f IconCache*
del /f thumbcache*
cd /d  %userprofile%\AppData\Local\
attrib -h  IconCache.db
del /f IconCache.db
start C:\Windows\explorer.exe
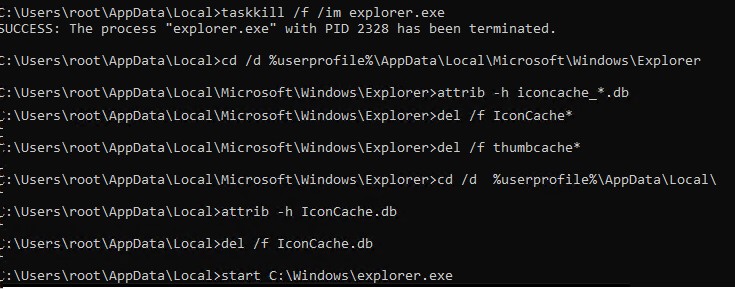
В моем случае скрипт не смог удалить только файл
iconcache_idx.db
(Access is denied), но это не повлияло на итоговый результат. Кэш иконок был успешно сброшен.
Для Windows 7:
cd /d %userprofile%\AppData\Local
del /f /a s IconCache.db
start C:\Windows\explorer.exe<
Последняя команда в обоих случаях перезапустит процесс проводника Windows (
explorer.exe
), который при запуске пересоздаст файлы с кэшем иконок (в соответствии с заданными файловыми ассоциациями).
If your icons appear blank or look corrupted or do not refresh correctly, when they should, then it is quite possible that your icon cache database may have become corrupted on your Windows 11/10 PC. The same thing applies to Thumbnails too. If they do not display correctly, then they may have become corrupted. In such a scenario, you may need to delete the cache files to rebuild the Icon cache and clear the Thumbnail cache.
This post will show you the location of these cache files so that you can delete IconCache.db and thumbcache.db files, in order to rebuild the Icon cache and clear the Thumbnail cache in Windows 11/10.
The Icon Cache or IconCache.db is a special database file that Windows utilizes to keep copies of each icon handy. When Windows needs to draw an icon, it uses the copy from the cache instead of retrieving the icon image from the original application file. This helps in making Windows draw the icons faster. Things were different in Windows XP, and they are different in Windows 7/8. Things changed again from Windows 8.1 onwards. In Windows 11/10, you need to do the following.
If you needed to rebuild the Icon Cache in Windows 7/8, you needed to do the following:
- Open File Explorer > Folder Options > Views to show Hidden System Files.
- Next, go to C:\Users\%username%\AppData\Local folder
- Delete the hidden IconCache.db file. Reboot.
- This action would purge and rebuild the icon cache.
But this is not enough in Windows 11, Windows 10 or Windows 8.1. You will have to navigate to the following folder:
C:\Users\%username%\AppData\Local\Microsoft\Windows\Explorer
Here you will see a lot of files like iconcache_32.db, iconcache_48.db, iconcache_96.db, iconcache_256.db, iconcache_1024.db, iconcache_1280.db, iconcache_1600.db, iconcache_1920.db, iconcache_2560.db, iconcache_exif.db, iconcache_idx.db, iconcache_sr.db, iconcache_wide.dd, iconcache_wide_alternate.db, etc.
Delete them all to purge and rebuild your icon cache in Windows. If you were to be able to delete some of them, you would now be able to see a new folder created named IconcacheToDelete, which will disappear when you reboot your computer or restart Windows File Explorer.
If you find that you are unable to delete these files, do the following.
First, close all open programs. Next, open Task Manager, look for the process Windows Explorer, right-click on it and select End process. Next, from the File menu > select Run new task. Type cmd.exe, check the Create this task with administrative privileges box and press Enter.
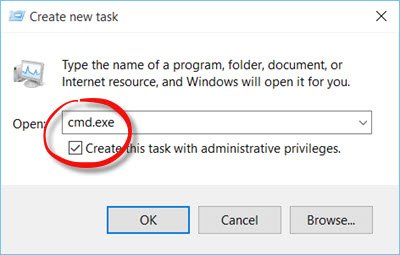
This will open an elevated command prompt window.
Now type the following commands one after the other and hit Enter:
cd /d %userprofile%\AppData\Local\Microsoft\Windows\Explorer
attrib –h
iconcache_*.db
del iconcache_*.db
start explorer
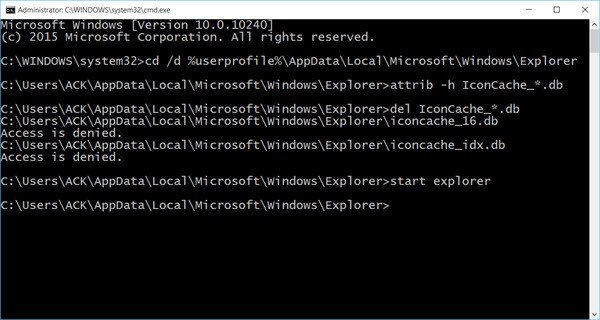
This will rebuild your icon cache in Windows 11/10.
If the above does not work, execute the following commands one after the other:
taskkill /IM explorer.exe /F
CD %userprofile%\AppData\Local
del iconcache.db /a
CD %localappdata%\Microsoft\Windows\Explorer\
del iconcache* /a /f /q
start explorer.exe
TIP: See how you can stop Windows from deleting the Thumbnail cache on every shutdown, restart or boot.
Clear Thumbnail cache in Windows 11/10
Windows Thumbnail cache or Thumbs.db files are hidden data-files in the Windows operating system, which contain small images, displayed when you view a folder in “thumbnail” view, as opposed to tile, icon, list, or detail view. Windows keeps a copy of all your pictures, video and document thumbnails so that they can be displayed quickly when you open a folder. In Windows XP you see these ‘hidden’ files thumbs.db files scattered all over the place. In Windows Vista and later, the thumbnails ‘thumbcache’ are stored at C:\Users\Owner\AppData\Local\Microsoft Windows\Explorer – which is the same where the icon cache files are stored.
If you want to delete and clear the Thumbnail cache, you will have to follow the same procedure as mentioned above, but finally, use these commands:
cd /d %userprofile%\AppData\Local\Microsoft\Windows\Explorer
attrib –h
thumbcache_*.db
del thumbcache_*.db
start explorer
Please let us know if this worked for you and helped you fix Broken Icons in Windows 11.
TIP: FixWin 11 for Windows 11/10 lets you reset the thumbnail cache. You will find the fix under the System fixes tab.
Windows 10 users may want to use Thumbnail and Icon Cache Rebuilder, which lets you purge and rebuild Thumbnail & Icon Cache in a click.
If your desktop or explorer icons load slowly when they start the Windows PC, you may want to increase Icon Cache size and see if it helps you. See this post if your Desktops icons are slow to load.
Clearing the icon cache in Windows 10 is a simple task that can help resolve issues where icons are not displaying correctly or are missing. By following a few straightforward steps, you can refresh the icon cache and restore your desktop and file icons to their proper state. Here’s how to do it.
Clearing the icon cache in Windows 10 involves deleting the cache file that stores the icon images. This forces Windows to rebuild the cache and can solve many common issues with icons. Follow these steps to clear the icon cache.
Step 1: Close All Open Programs
Before you begin, make sure to close all open programs to avoid any conflicts.
This step is crucial because open programs might interfere with the process of deleting the icon cache file. Closing everything ensures a smooth and error-free operation.
Step 2: Open File Explorer
Open File Explorer by pressing the Windows key + E on your keyboard.
File Explorer is your gateway to accessing the necessary folder where the icon cache file is stored. It’s like the map you need to find the treasure.
Step 3: Show Hidden Files and Folders
Click on the ‘View’ tab in File Explorer, then check the box that says ‘Hidden items.’
By showing hidden files and folders, you’ll be able to see the IconCache.db file that is normally hidden from view. Think of it as lifting a veil to reveal what’s underneath.
Step 4: Navigate to the Icon Cache Folder
Go to the following path: C:Users[YourUsername]AppDataLocal.
This path leads you to the folder where the icon cache file resides. Replace [YourUsername] with your actual username to get to the right directory.
Step 5: Delete IconCache.db
Find the file named IconCache.db in the folder and delete it.
Deleting the IconCache.db file is like hitting the refresh button on your browser. It gets rid of the outdated or corrupted cache so that Windows can create a new one.
Step 6: Restart Your Computer
Restart your computer to complete the process.
Restarting your computer finalizes the cache clearing process. It’s like rebooting your brain after a good nap—everything will be fresh and ready to go.
Once you’ve completed these steps, Windows will automatically create a new icon cache file. This should resolve any issues you were having with icons not displaying correctly.
Tips for Clearing Icon Cache Windows 10
- Make sure to back up important files before starting the process.
- If you can’t find the IconCache.db file, double-check that you have enabled ‘Show hidden items.’
- Consider running a system scan to ensure there are no underlying issues causing icon problems.
- Regularly clearing the icon cache can help keep your system running smoothly.
- If problems persist, updating your graphics driver might help.
Frequently Asked Questions
What is an icon cache?
The icon cache is a special file where Windows stores icon images so that they can be displayed quickly without having to load them each time from scratch.
Why should I clear the icon cache?
Clearing the icon cache can resolve issues where icons are not displaying correctly or are missing. It refreshes the cache and can improve performance.
What happens if I don’t clear the icon cache?
If you don’t clear the icon cache, you might continue to experience problems with icons not displaying correctly, which can be frustrating and affect your productivity.
Can I automate the process of clearing the icon cache?
Yes, you can create a batch file to automate the deletion of the icon cache file. However, you will still need to restart your computer manually.
Will clearing the icon cache delete my files?
No, clearing the icon cache will not delete any of your personal files. It only removes the cache file that stores icon images, which Windows will recreate automatically.
Summary
- Close all open programs.
- Open File Explorer.
- Show hidden files and folders.
- Navigate to the Icon Cache folder.
- Delete IconCache.db.
- Restart your computer.
Conclusion
Clearing the icon cache in Windows 10 is an effective way to resolve common issues with icons not displaying correctly. By following the steps outlined above, you can easily refresh the icon cache and improve your computer’s performance. This process doesn’t delete any of your personal files, so you can do it with peace of mind.
If problems persist even after clearing the cache, consider running a system scan or updating your graphics driver. Regular maintenance like this can keep your system running smoothly and prevent minor issues from becoming major headaches.
For more information on maintaining your Windows 10 system, check out our other articles on system optimization and troubleshooting. Remember, taking a few minutes for regular maintenance can save you a lot of time and frustration in the long run. Happy computing!
Kermit Matthews is a freelance writer based in Philadelphia, Pennsylvania with more than a decade of experience writing technology guides. He has a Bachelor’s and Master’s degree in Computer Science and has spent much of his professional career in IT management.
He specializes in writing content about iPhones, Android devices, Microsoft Office, and many other popular applications and devices.
Read his full bio here.
/Guides /Clear Icons Cache – Guide for Windows XP, Vista, 7, 8, 8.1, 10
This guide shows you how to clear the icons cache for the following Windows versions: Windows XP, Vista, 7, 8, 8.1 or 10.
How to clear the icons cache in Windows XP
To clear the icons cache in Windows XP, follow these steps:
- Open any folder so you have Windows Explorer available
- Click Tools
- Select Folder Options
- The Folder Options window should now appear
- Click the View tab
- Under the Hidden files and folders section, check the Show hidden files and folders option
- Then click OK
- Go to
C:\Documents and Settings\User\Local Settings\Application Data, whereUseris the username of your profile account - Select the IconCache.db file found in the Application Data folder
- Right-click on this file and click Delete.Alternatively, press the Shift + Delete keys on your keyboard to delete the file
- Empty the Recycle Bin
Clearing icon cache in Windows XP
How to clear the icons cache in Windows Vista
To clear the icons cache on a Windows Vista computer, follow these instructions:
- At Windows Explorer, click Organize.To have Windows Explorer open, open any folder or open My Computer.
- Click Folder and search options
- The Folder Options window appears
- Click the View tab
- Under Hidden files and folders section, check Show hidden files, folders, and drives
- Then click OK
- Go to
C:\Users\User\AppData\Local, whereC:\is the drive where Windows Vista is installed andUseris the username of your account profile - Find the IconCache.db file
- Select the file and right-click to click Delete.You can also press the combination of Shift + Delete keys to delete the file.
- Then empty the Recycle Bin
Clearing icon cache in Windows Vista
How to clear the icons cache in Windows 7
To clear the icons cache in Windows 7, follow these instructions:
- Click Organize in Windows Explorer (open My Computer and click Organize)
- Select the Folder and search options item
- Go to View
- Under the Hidden files and folders section, check the Show hidden files, folders, and drives, then click OK
- Go to the
C:\Users\User\AppData\Local folder, whereC:\is where you installed Windows 7 andUseris the username of your account profile - Find a IconCache.db file listed in the Local folder
- Right-click on the IconCache.db file and click Delete
- Empty the Recycle Bin
Clearing icon cache in Windows 7
How to clear the icons cache in Windows 8 or 8.1
To clear the icons cache in Windows 8 or Windows 8.1, follow these instructions:
- Open Windows Explorer
- From the View tab, select Hidden items
- Then select Show selected items
- Go to
C:\Users\User\AppData\Local\Microsoft\Windows\Explorer, whereC:\is the drive where you installed Windows 8 or 8.1 andUseris the username of your account profile - Select all files that begin with
iconcache - Right-click on these files
- Click Delete.To delete these files faster, press the Shift + Delete keys.
- Empty the Recycle Bin
Clearing icon cache in Windows 8
How to clear the icons cache in Windows 10
To clear the icons cache in Windows 10, follow these instructions:
- Open Windows Explorer
- From the View tab, select Hidden items
- Then select Show selected items
- Go to
C:\Users\User\AppData\Local\Microsoft\Windows\Explorer, whereC:\is the drive where you installed Windows 8 or 8.1 andUseris the username of your account profile - Select all files that begin with
iconcache - Right-click on these files
- Click Delete.To delete these files faster, press the Shift + Delete keys.
- Empty the Recycle Bin

Clearing icon cache in Windows 10
More Information
Support Links
- Easy Recovery Essentials for Windows – our repair and recovery disk.
It’s an easy-to-use and automated diagnostics disk. It’s available for Windows 8, Windows 7 and Windows Vista. It’s also available for Windows XP and Windows Server.
Read more at Windows Recovery Disks.
- The NeoSmart Support Forums, member-to-member technical support and troubleshooting.
- Get a discounted price on replacement setup and installation discs: Windows XP, Windows Vista, Windows 7, Windows 8, Windows 10.
Applicable Systems
This Windows-related knowledgebase article applies to the following operating systems:
- Windows XP (all editions)
- Windows Vista (all editions)
- Windows 7 (all editions)
- Windows 8 (all editions)
- Windows 8.1 (all editions)
- Windows 10 (all editions)
Propose an edit
Related Articles
-
Disable Legacy Boot Mode and Enable UEFI
-
How To Reinstall Windows 10
-
Remove Dual Boot Menu – Fix for Windows
-
Windows won’t start – Guide for Windows XP, Vista, 7, 8, 10
-
Fix slow boot – Guide for Windows XP, Vista, 7, 8, 10
-
How to Reset PC BIOS/CMOS