
Файлы ISO часто встречаются в нашем компьютерном опыте. Файл ISO или образ ISO аналогичен цифровой копии компакт-диска, DVD или Blu-ray. На нем хранится все с оригинального диска. Их можно использовать для установки операционной системы, запуска программного обеспечения, доступа к сохраненным данным и т. д. Но как смонтировать ISO в Windows 10 и macOS для доступа к содержимому внутри?
В этом руководстве представлены простые инструкции по установке файлов ISO на обеих платформах. Независимо от того, являетесь ли вы пользователем Windows или Mac, вы узнаете, как заставить файлы ISO работать на вас, упрощая ваши вычислительные задачи. Кроме того, мы порекомендуем лучший инструмент для создания DVD для создания ваших DVD.
Windows 8 и более поздние версии имеют встроенный инструмент для монтирования файлов ISO. Это позволяет вам получить доступ к содержимому ISO без необходимости использования стороннего программного обеспечения. У вас есть два способа смонтировать ISO в Windows.
Способ 1. Смонтируйте ISO-образ с помощью проводника.
В Windows 11, 10 или 8.1 есть удобный встроенный инструмент под названием «Проводник Windows», который можно использовать для легкого открытия и монтирования файлов ISO.
Шаг 1Найдите ISO-файл, который хотите смонтировать.
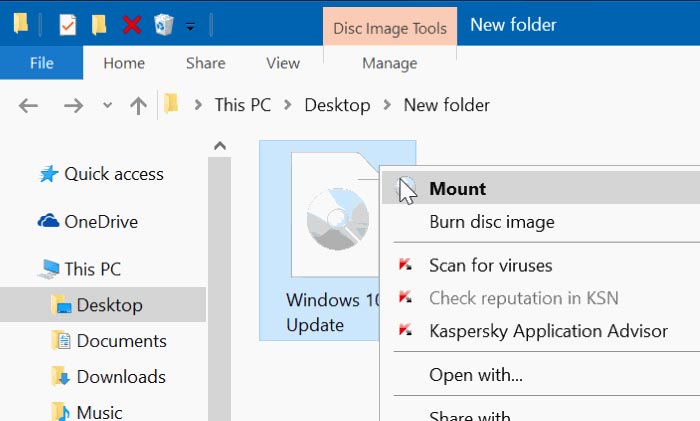
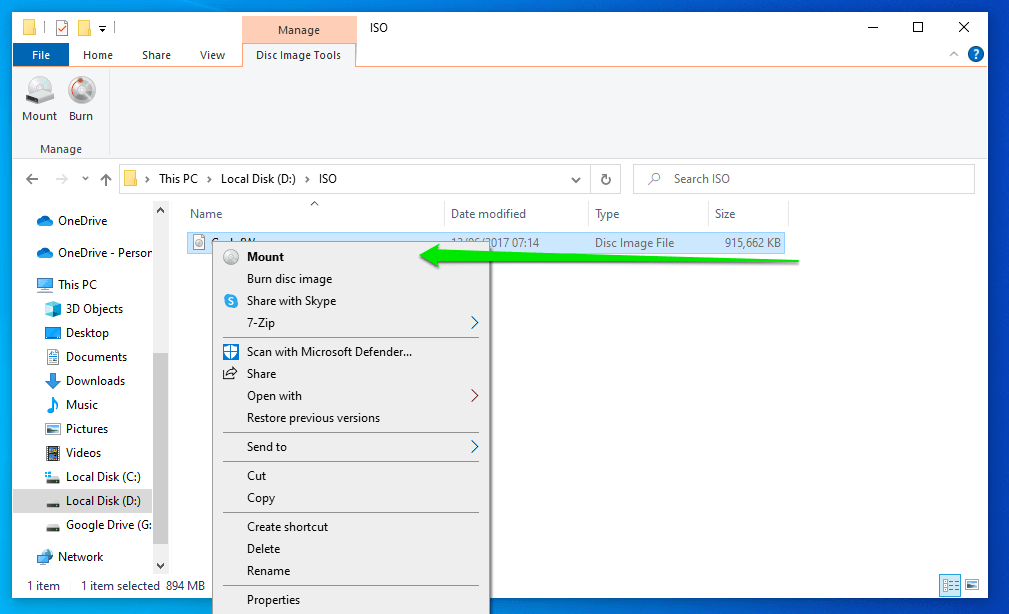
Шаг 2Щелкните правой кнопкой мыши файл ISO.
Шаг 3В контекстном меню выберите Устанавливать. Вы также можете дважды щелкнуть по нему, чтобы открыть. Windows создаст виртуальный диск и автоматически откроет содержимое ISO, сделав его доступным, как если бы это был физический компакт-диск или DVD.
Способ 2. Смонтируйте ISO с помощью Windows PowerShell.
PowerShell — это инструмент, созданный Microsoft, который предоставляет широкий спектр команд и утилит, позволяющих пользователям выполнять различные задачи, включая открытие файла ISO. Он уже установлен в вашей Windows, поэтому вы можете получить доступ к содержимому ISO и воспроизводите фильмы Blu-ray или DVD на своем ноутбуке без труда.
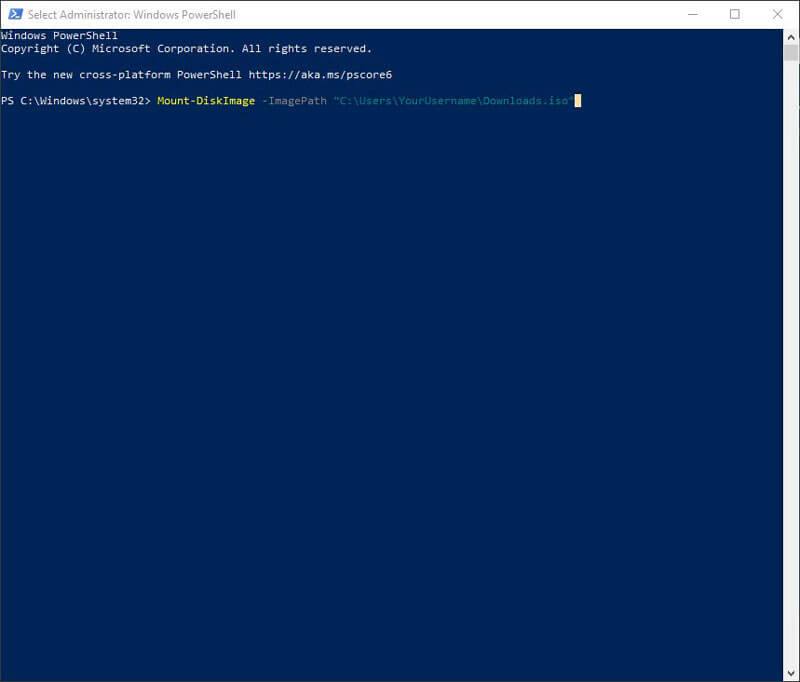
Шаг 1Откройте Windows PowerShell (найдите его в меню «Пуск»).
Шаг 2Выберите параметр «Запуск от имени администратора».
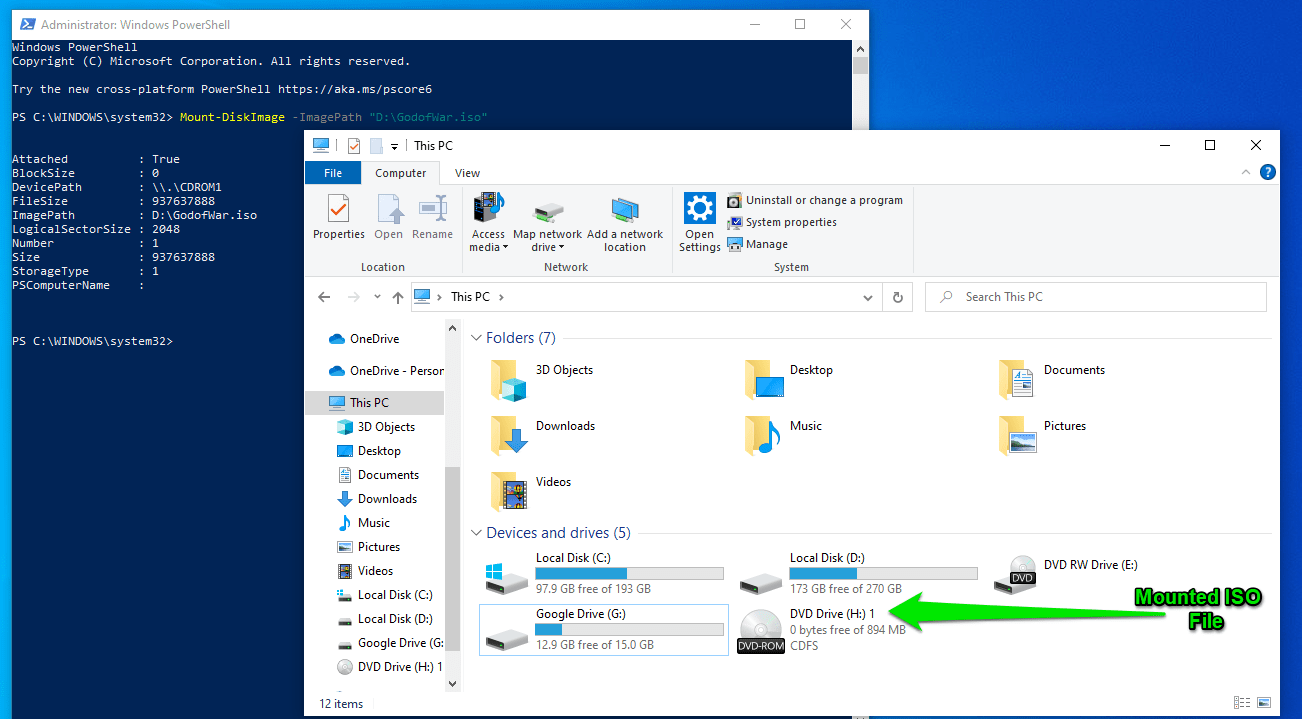
Шаг 3Входить Mount-DiskImage -ImagePath «путь имя_файла.iso» (замените фактический путь и имя вашего ISO-файла)
Шаг 4Нажимать Входить для монтирования файла ISO.
Часть 2. Как смонтировать ISO на Mac
Способ 1. Смонтируйте файлы ISO с помощью DiskImageMounter.
DiskImageMounter — удобный инструмент для открытия файлов образов дисков, таких как файлы ISO или DMG. Он позволяет вам просматривать содержимое этих файлов, рассматривая их так, как если бы они были настоящими дисками. Этот инструмент встроен в вашу MacOS, поэтому дополнительные загрузки не требуются.
Шаг 1Найдите ISO-файл.
Шаг 2Дважды щелкните файл ISO.
Шаг 3MacOS автоматически использует DiskImageMounter, чтобы смонтировать его как виртуальный диск и открыть содержимое.
Шаг 4Получите доступ к смонтированному ISO.
Способ 2. Смонтируйте ISO с помощью Дисковой утилиты.
Вы также можете использовать Дисковую утилиту. Это предустановленное программное обеспечение в macOS, позволяющее легко открывать файлы ISO и управлять ими. Дисковая утилита — мощный инструмент для управления устройствами хранения данных. Он может форматировать, разделять, исправлять и очищать диски и даже создавать или изменять образы дисков. В отличие от DiskImageMounter, который в основном открывает образы дисков, Дисковая утилита имеет удобный визуальный интерфейс для эффективного управления вашими дисками.
Шаг 1Открыть Дисковую утилиту
Найдите Дисковую утилиту в папке «Утилиты» в папке «Приложения». Если вы не можете его найти, воспользуйтесь поиском Spotlight (Command + пробел, затем введите «Дисковая утилита» и нажмите Enter), чтобы быстро найти и открыть его.
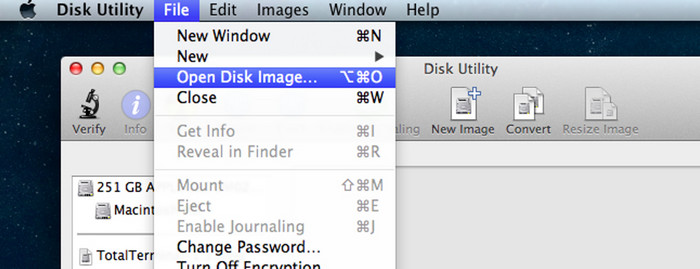
Шаг 2Выберите ISO-файл
В окне Дисковой утилиты нажмите на значок Файл меню. Выбирать Открыть образ диска… из раскрывающегося меню и выберите файл ISO.
Шаг 3Установите ISO
Дисковая утилита теперь смонтирует файл ISO, и он появится на левой боковой панели окна Дисковой утилиты.
Шаг 4Доступ к смонтированному ISO
После успешного монтирования ISO вы сможете получить доступ к его содержимому. А когда вы закончите использовать файл ISO, вы можете просто щелкнуть правой кнопкой мыши, чтобы извлечь и размонтировать его.
Часть 3. Дополнительный совет: лучший создатель DVD
Если вы знаете, как открывать файлы ISO на Windows 10 и Mac, вы сможете сделать что-то еще более крутое. Пытаться Типард Создатель DVD. Это лучший DVD-рекордер программное обеспечение, которое поможет вам легко создавать DVD или Blu-ray. Вы можете превратить свои цифровые данные в физические диски. Объединив монтирование ISO и создание DVD, вы получите более простой и творческий опыт работы с цифровыми технологиями.
Используя Tipard DVD Creator, вы можете создавать свои DVD-диски всего за несколько простых шагов.
Шаг 1Загрузить и установить
Вы можете бесплатно загрузить Tipard DVD Creator на его официальном сайте. Затем установите и запустите его.
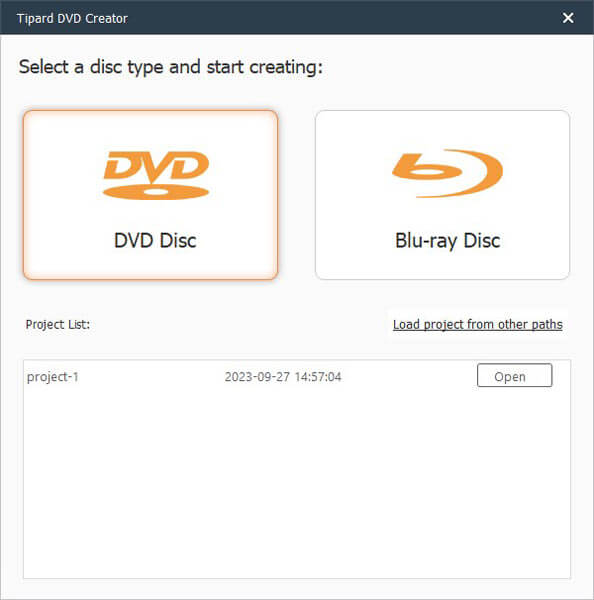
Шаг 2Выберите тип диска
Выберите тип диска, который вы хотите записать: DVD или Blu-ray.
Шаг 3Добавить медиафайл(ы)
Щелкните значок Добавить медиафайл(ы) Кнопка для импорта файла ISO. У вас также есть возможность добавлять или редактировать аудио и субтитры по мере необходимости.

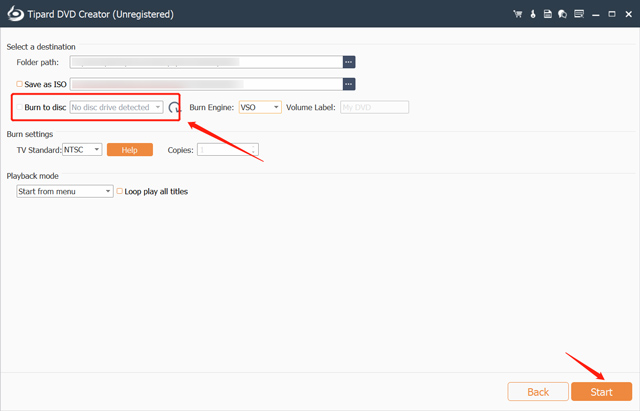
Шаг 4Записать на диск
Нажмите Следующий, и вы можете выбрать шаблон, добавить фоновую музыку и просмотреть его. Затем нажмите Гореть, выбирать Записать на диски нажмите Начинать. Через мгновение вы получите свой DVD.
Часть 4. Часто задаваемые вопросы по монтажу ISO
Как смонтировать и размонтировать ISO в Windows 10?
Чтобы смонтировать ISO в Windows 10, дважды щелкните файл ISO или щелкните правой кнопкой мыши и выберите Устанавливать.
Чтобы отключиться, откройте проводник, найдите виртуальный диск, представляющий смонтированный ISO, щелкните его правой кнопкой мыши и выберите Извлечь.
Почему я не могу смонтировать файл ISO?
Возможно, вам не удастся смонтировать файл IOS, если он поврежден или неполный.
Убедитесь, что файл ISO связан с правильной программой. Щелкните правой кнопкой мыши ISO, выберите Открыть си выберите Выбрать другое приложение чтобы убедиться, что он установлен правильно.
Убедитесь, что ваша операционная система Windows обновлена.
Если вы попробовали эти решения, но по-прежнему не можете смонтировать файл ISO, вы можете обратиться за помощью к техническому эксперту.
Могу ли я записать ISO на жесткий диск?
Нет, вы не можете записать файл ISO на жесткий диск, поскольку под записью обычно понимается процесс записи данных на оптический диск, например CD, DVD или Blu-ray. Однако вы можете скопировать или извлечь содержимое файла ISO на жесткий диск или устройство хранения данных.
Вывод
В заключение мы показали вам, как легко монтировать файлы ISO как на Windows 10, так и на Mac, что упрощает доступ к вашим цифровым материалам. Будь то программное обеспечение, игры или другой контент, полезно знать, как это сделать. Кроме того, мы предлагаем попробовать инструмент для создания DVD. Он позволяет создавать собственные DVD-диски с особыми воспоминаниями или творческими проектами.
Если эта статья оказалась для вас полезной, не стесняйтесь поделиться ею со своими друзьями, семьями и коллегами.
Here in this article, you will learn how to mount the ISO images in windows 10/11 and the significant problems faced by people mounting ISO images in Windows 10 and 11. Here, you will also get to know how to restore your deleted iso files safely.
So without further ado, dive into the details described below and benefit yourself.
ISO Image Overview
First of all, before proceeding with the methods of mounting ISO images, you should know what an ISO image is.
An ISO image is a disc image that serves as that of an archive file for all sector data included on an optical disc, along with the file system. The ISO file extension is obtained from the ISO 9660 file system, used in CD-ROM medium. Despite these, the ISO image also consists of the Universal Disk Format (UDF) system of files which you can comfortably use on the Blu-Ray disks and DVDs.
Here are the various methods to help you mount ISO images in Windows 10/11 without any problems.
How to Mount ISO Windows 10 to USB with File Explorer
The first method to mount an iso file is through File Explorer. Here using file explorer, there come out three distinct ways. So we have described all these three methods in detail, so we look forward and letting the ISO image be mounted successfully.
1. Use the Context Menu to Mount a Picture
The easiest way to mount the iso file with File Explorer is through the context menu. Its steps are given below.
Step 1. Go to File Explorer. Search for the folder containing the ISO image file.
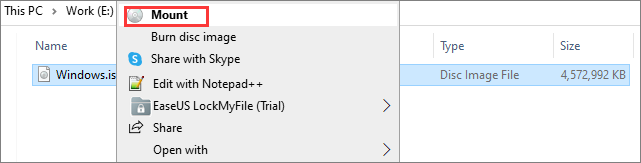
Step 2. Once you find the folder, click right on the ISO file.
Step 3. Now click the «Mount» option from the context menu.
Step 4. Select a virtual drive from the panel on the left side.
2. Double Click to Mount the Image
The second easiest way to mount an iso file with File Explorer has been explained underneath in easy steps.
Step 1. Press the Win + E keys to open File Explorer.
Step 2. Now, search for the folder which contains the ISO image file.
Step 3. Once you find the folder, and then double-click the iso file.
Step 4. After double-clicking, the File will open in the form of a separate folder. Then there, you can extract and access the content as per your requirement.
3. Mount ISO File by Using the Mount Option Located in the Ribbon Menu
Apart from the above two steps, if you want to mount an ISO image or File from the ribbon menu, follow the steps below.
Step 1. Go to File Explorer.
Step 2. Now, search for the folder which contains the ISO image file. Then, choose the ISO file.
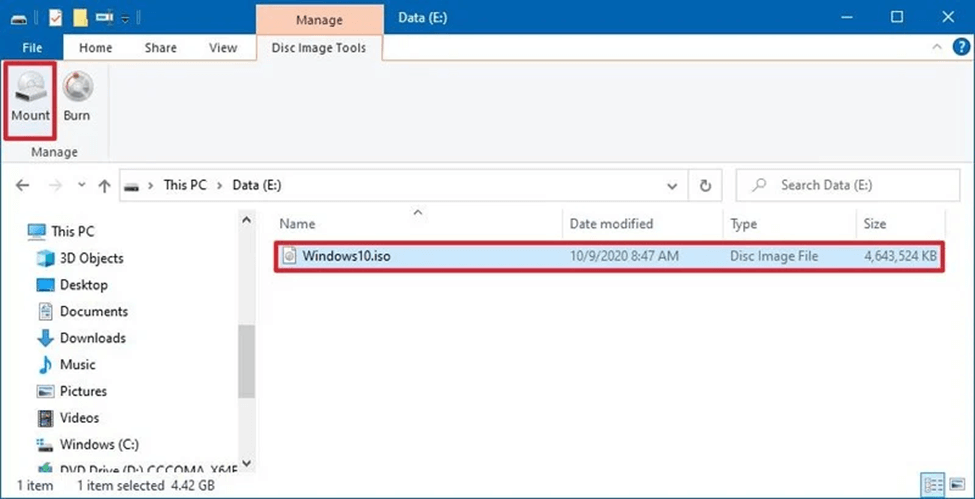
Step 3. At the top of the screen, there is an option «Disc image tools.» Just click on it.
Step 5. Select the «Mount» option, which can be found in the top left corner of the screen.
Users mostly do not see the «Mount» option on the menu bar due to having third-party tools employed to open and run the compressed files. These tools are set to default for opening iso images in such cases. Hence if you do not see the mount option in the ribbon menu, follow up on the other two ways to mount the iso image with File Explorer.
How to Mount ISO Image Using Windows PowerShell
Some users want to use a pre-installed application in Windows 10 and 11 called Command Line Interface. In this situation, you can mount iso with Powershell. Accordingly, see the following steps to mount the iso file with the PowerShell command.
Step 1. Click the «Start» option on your computer/laptop. Search for Powershell.
Step 2. Now click right on it to run it as an administrator.
Step 3. Paste the following command and hit Enter: Mount-DiskImage -ImagePath «CompletePathToISO.iso».
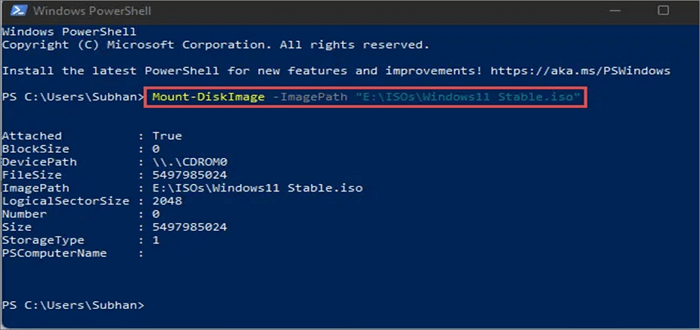
In this command, make sure to write the actual path to the iso file that you wish to mount in the place of CompletePathToISO. After that, you are all done mounting iso files in Windows 10 and 11. You can look at the example given below for your better understanding.
How to Recover Deleted or Lost ISO Image File Quickly
ISO is generally large and can be used repeatedly by users. Users who accidentally deleted their ISO files can use EaseUS data recovery program for help. This file recovery tool enables users to restore deleted files in any file type from any device like HDD, SSD, USB flash drive, external hard drive, etc.
This tool benefits you with one data recovery (from damaged, corrupted, formatted, or RAW hard drives). You can quickly get back 1000+ file types through this data recovery software in just three simple steps without using any hard and fast rules and techniques.
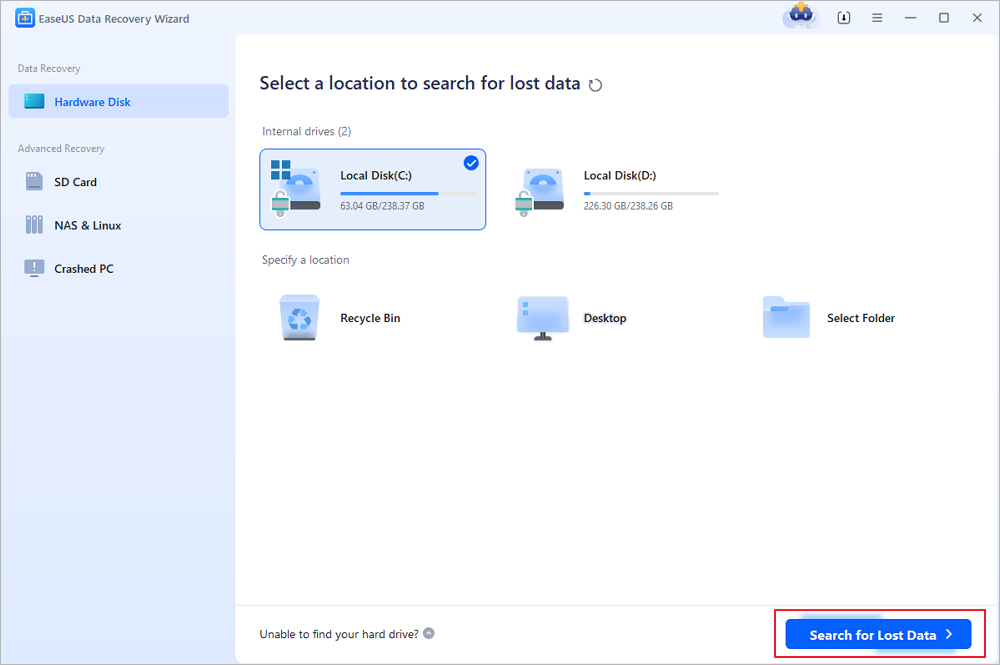
Step 1. Select the location to scan
Choose the specific device and drive where you have permanently deleted files using Shift delete or emptying recycle bin. Then, click the «Search for Lost Data» button to find lost files.
Step 2. Check the results
The software will automatically start scanning all over the selected drive. When the scan completes, select the deleted or lost folders in the left panel using the «Path» feature. Then, apply the «Filter» feature or use the search box to quickly find the deleted files.

Step 3. Recover deleted files
Select the deleted files and click «Preview». Next, click «Recover» to save them to another secure location or device. You can choose a cloud storage, such as OneDrive, Google Drive, etc., and click «Save» to save your recovered files.

Windows 10 Mount ISO Option Missing, How to Fix
Some users reported that when they right-clicked on. ISO files, the «Mount» option disappeared from the context menu. If this ever happens to you, follow up on the below-mentioned methods for restoring or adding the Mount option to the context menu.
Fix 1. Add Missing Mount Option Using Properties
If you want to quickly restore the mount option without spending too much time on the process, you should see the steps given below by using the Properties option.
Step 1. Go to the File Explorer. Navigate to the folder that contains the ISO file
Step 2. Simply right-click on the ISO file. Then, select the «Properties» > «Change».
Step 3. Choose the «File Explorer» from the list. Click OK and Apply.
After following these steps, you will see the mount option whenever you right-click on the iso file.
Fix 2. Restore the Missing Mount Option Using Settings
The mount option will directly appear in the context menu by choosing the file explorer from the settings app.
Step 1. Search and select the «Settings» app on your device.
Step 2. Click the «Apps» and then Default apps
Step 3. Click «Set Defaults by Apps.»
Step 4. Select the «Windows Disc Image Burner» and click the «Manage» option.
Step 5. Select the «File Explorer» as the default app for iso files.
Step 6. Now the mount option will be visible to you in the context menu.
Fix 3. Add Mount ISO Option Using Control Panel
You can also use the control panel for restoring the mount option by carrying out the below steps.
Step 1. Go to «Control Panel > Programs > Default Programs».
Step 2. Click «Set your default programs».

Step 3. Click «Choose defaults for this program».
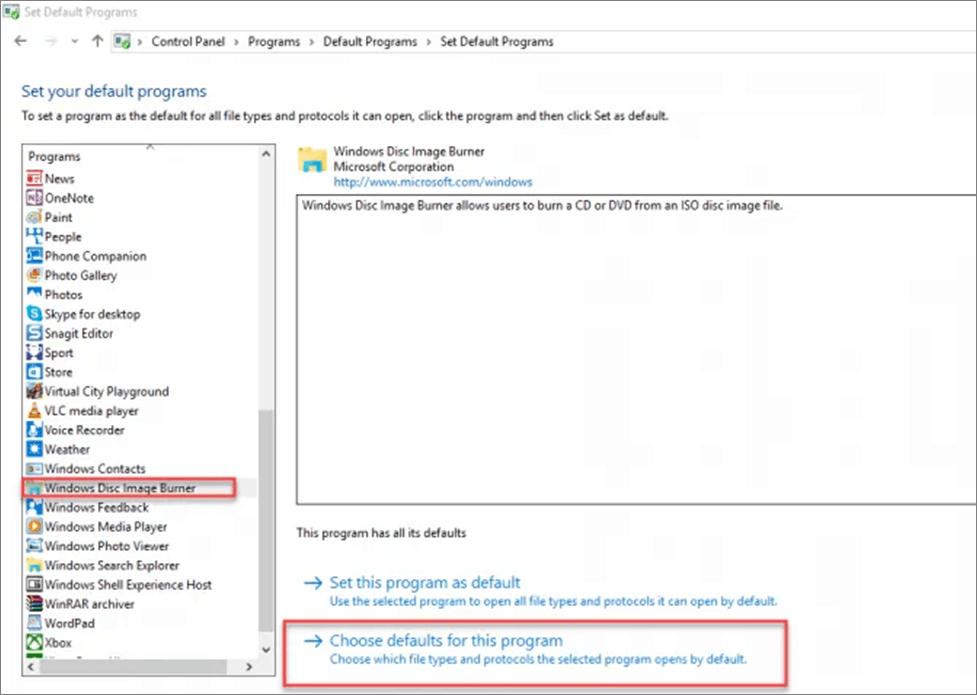
Step 4. Click on the «Check all» and «Save» in the list which appears.
The mount option will have been added to the context menu, which you can assure by right-clicking on the iso file.
The Bottom Line
Consequently, that was the simplest and easy-to-understand guide about mounting an iso file to Windows 10/11, which was divided into two main methods of either doing it through File Explorer or the PowerShell Command. You can also find this article helpful for solving the problems that come your way when you mount an iso file in Windows 10/11.
The most important aspect of this article was to help you retrieve your deleted iso files by using an affordable and easy-to-use tool called EaseUS data recovery software. So this single article contains a solid solution for your multiple iso issues.
If you’re using Windows 10, it includes the ability to natively mount ISO files without software. Also, if your Windows 10 Mount ISO is missing, we provide step-by-step solutions to fix it. If you’re wondering how to mount an ISO file as a drive and see what files and folders it contains, this post will show you several ways to learn how to mount/extract/open ISO files on Windows 10.
- Part 1–How to Mount an ISO File on Windows 10
- Part 2–Alternative Ways
- Method 1: Double-click the ISO File to Mount It
- Method 2: Mount the ISO File from Context Menu
- Method 3: via Windows PowerShell
Method 1: Double-click the ISO File to Mount
Double-click the ISO file to mount it is the easiest and shortest for Windows 10 users.
Step 1: Browse the folder with the ISO image.
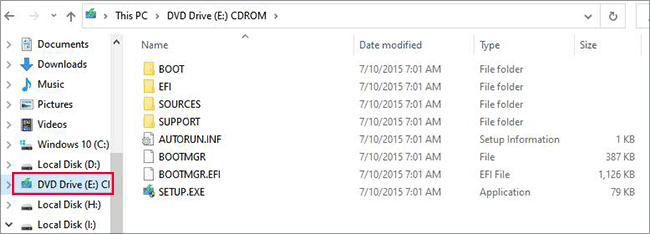
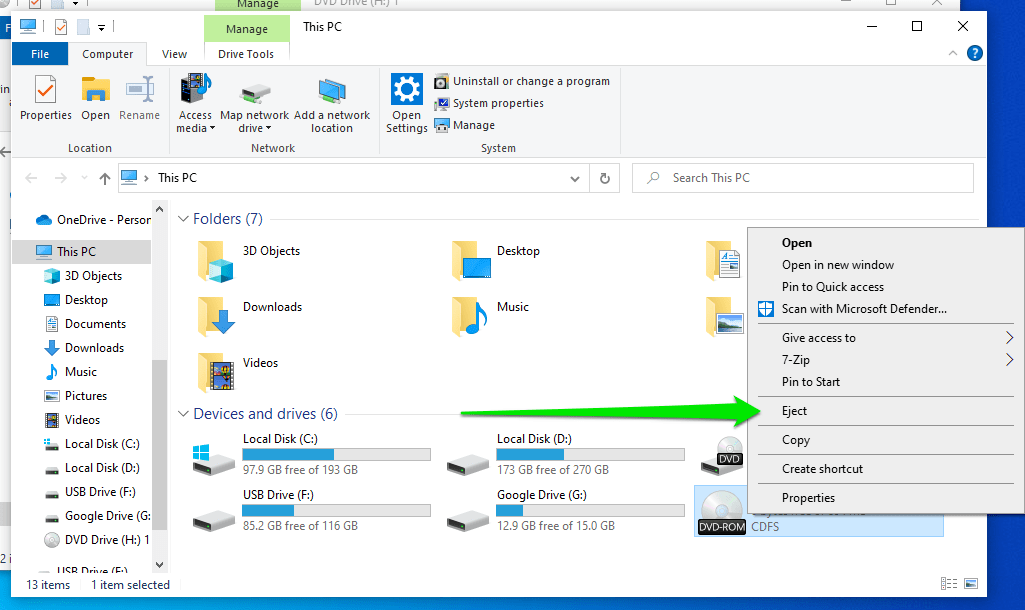
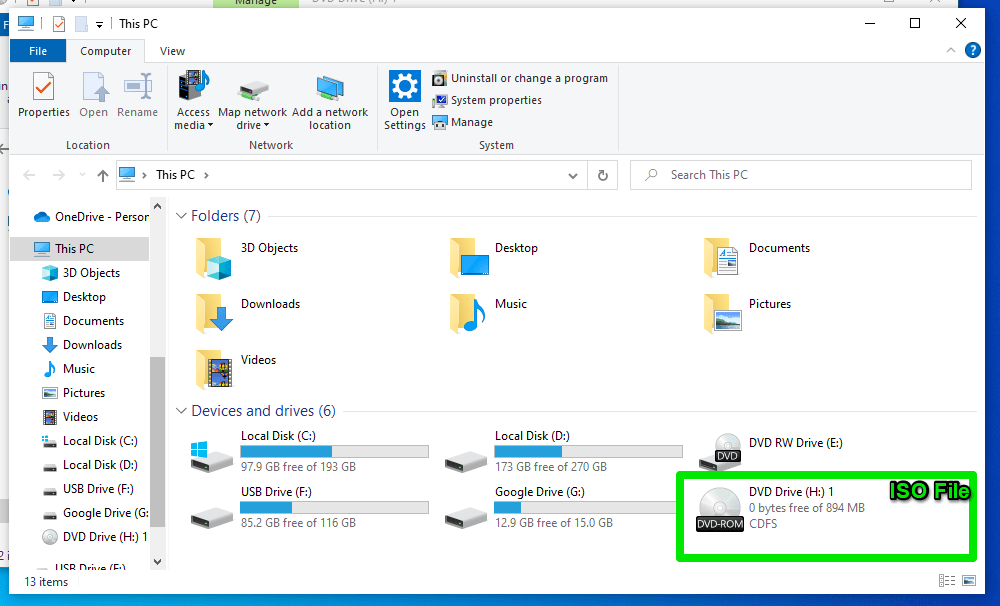
Step 2: Double-click the .iso file to mount it. You will then see it is a DVD Drive that includes the contents of the ISO image under This PC.
Step 3: If you don’t wish to mount the ISO file anymore, you can right-click the DVD Drive and select the Eject option to exit.
Method 2: Mount the ISO File from Context Menu
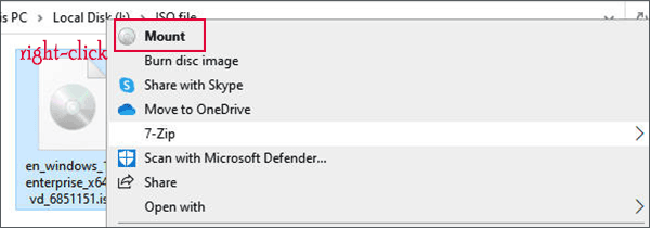
Step 1: Open File Explorer, navigate to the .iso file and right-click on it to select the Mount option.
Step 2: Once mounted, a new drive (DVD drive) appears under This PC, then you can access and view the contents of the ISO file on this drive.
Method 3: via Windows PowerShell
Step 1: Type Windows PowerShell to search on the Search box, then click on Run as administrator to open it.
Step 2: Type Mount-DiskImage -ImagePath “full path to the ISO file”, one thing you need to remember is that you need to replace “full path to the ISO file” with a real path to the ISO file, including the ISO file extension. For example:
Mount-DiskImage -ImagePath "I:\isunshare.iso"
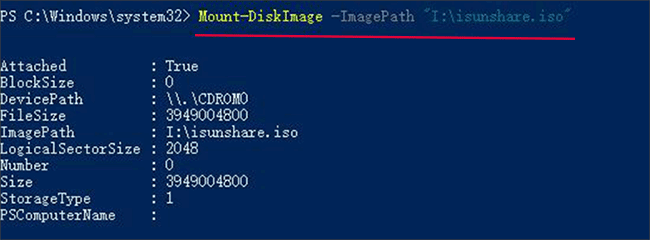
Step 3: Now you can see there is a DVD Drive under This PC, allowing you to access and extract the contents as necessary.
Part 2–Alternative Ways
Alternatively, you can extract and view the contents of ISO files with some free third-party tools. Follow the methods below to learn how to open an ISO file with software for free.
- Method 1:Extract an ISO File with iSunshare ISO Genius
- Method 2: Extract an ISO File using 7-Zip
Method 1:Extract an ISO File with iSunshare ISO Genius
iSunshare ISO Genius is a powerful and completely free ISO processing tool that helps you easily mount ISO images to open and view files stored on it. The software includes five simple steps on how to extract ISO files in Windows 10. Please try the following steps:
Step 1: Free download and install this program.
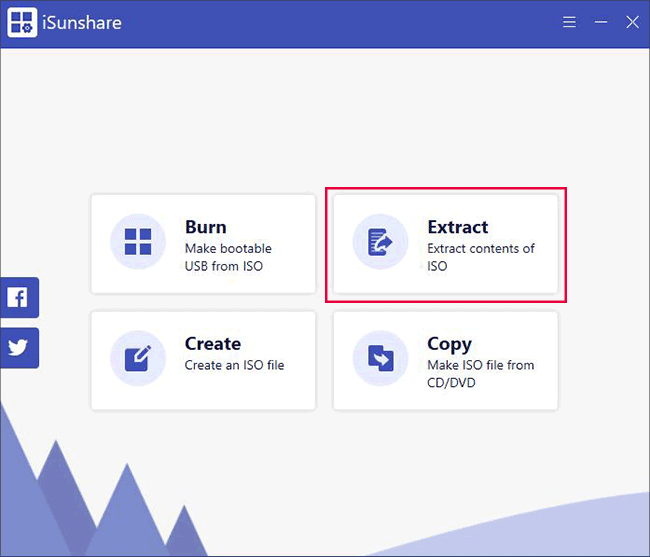
Step 2: Click the Extract button in the neat main interface.
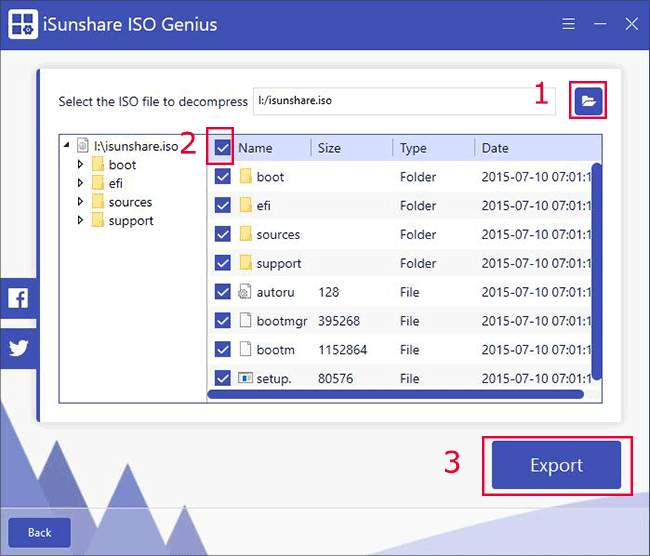
Step 3: Click the “Folder” icon to select an existing ISO file to extract. You will see the files and folders inside the ISO file, then click the Export button in the lower right corner.
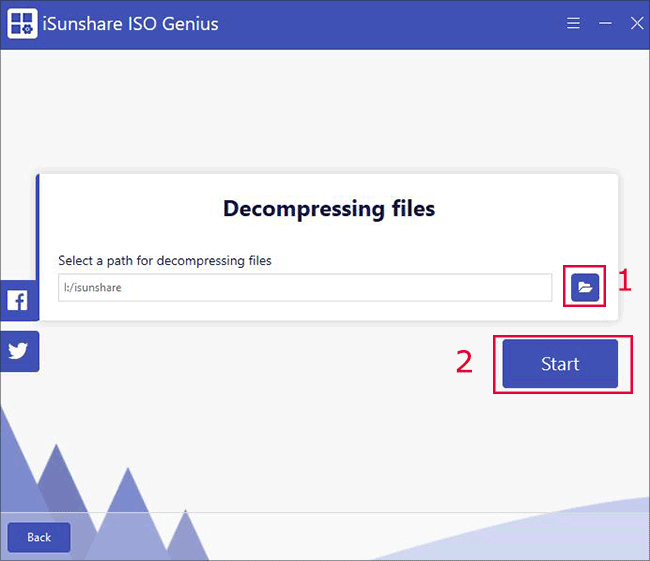
Step 4: Select the destination file to which you want to extract the ISO file and click “Start” to start the extraction.
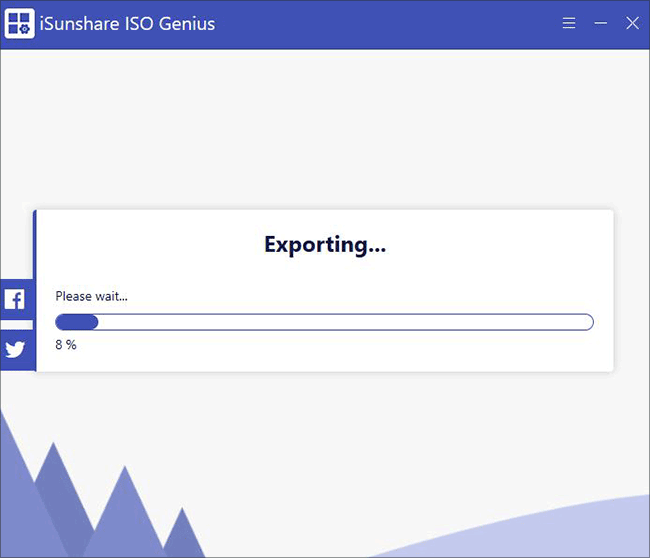
Step 5: Wait for iSunshare ISO Genius to extract the ISO file.
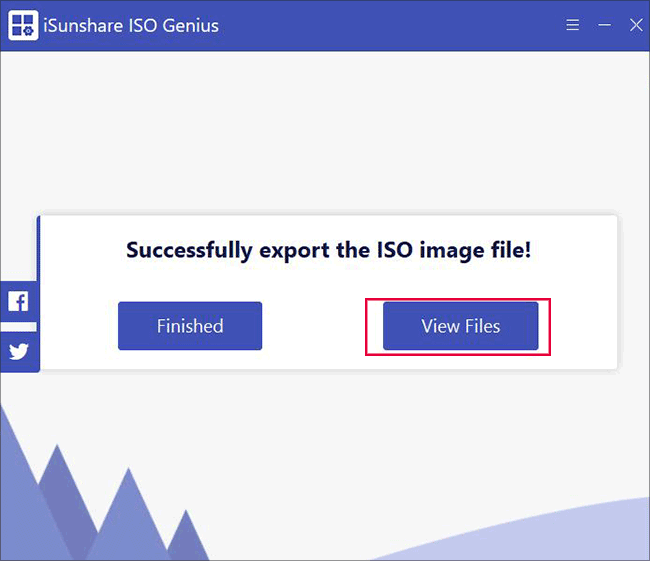
Step 6: Click on View File to access and view the content of the ISO file after the operation is successful.
Method 2: Extract an ISO File using 7-Zip
Additionally, you can use the open-source and free extraction app 7-Zip as well. Read the steps below:
Step 1: Free download 7-Zip and install it on your Windows 10 PC.
Step 2: Navigate to the .iso file on Windows Explorer and right-click on it.
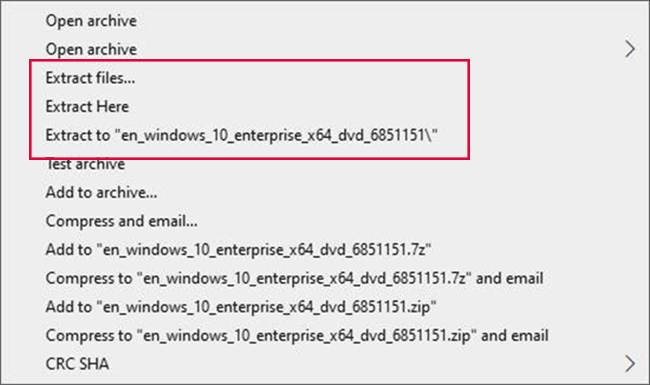
Step 3: From the context menu, choose Extract files, or Extract Here, or Extract to “…\”.
Conclusion:
As mentioned earlier, you can mount ISO files without software on Windows, or you can extract/open ISO files easily on Windows with freeware. The freeware 7-Zip and iSunshare ISO Genius are easy to use and helpful for Windows users. By the way, iSunshare ISO Genius is also free software for burning and creating ISO files, which makes the software more user-friendly.
Related Articles:
How to Open and Extract ISO Files on Windows 10
How to Extract ISO Files in Windows 10
How to Burn ISO File to USB Drive on Windows 11/10/8/7 For Free
how to Create ISO File in Windows 10
How to Create a Windows 10 Bootable USB
Table of contents
- Mounting ISO Files on Windows 10
- Using the Windows Explorer
- Using PowerShell
- Troubleshooting Common “Mount ISO Windows 10” Errors
- Method 1: Updating Your Windows And Device Drivers
- Method 2: Make Windows Explorer the Default Program for Opening ISO Files in Windows 10
- Method 3: Unmounting All Drives
- Method 4: Change the Drive Letter of a Removable or Virtual Drive
- Method 5: Investigate Third-party Software
- Method 6: Use System Restore
- Conclusion
- FAQ
One of the great features of later versions of the Windows operating system is that they can mount ISO files without the need for a third-party application. This is quite useful, especially when you’re dealing with large software downloads. These days, a lot of files are available for download in the .iso format. It is basically the easier option over burning the files to a disk. However, several users have reported issues when they tried mounting ISO files. If you’re one of the people who encountered such errors and you want to know how to fix ISO issues on Windows 10, then you’ve come to the right place. We will show you the steps to take to ensure you don’t encounter errors when mounting your ISO files.
Mounting ISO Files on Windows 10
When you mount an ISO file, Windows 10 treats it as a virtual drive. You’ll see it as a DVD ROM on This PC, allowing you to view and use its files and burn them to a physical DVD.
Microsoft made sure mounting ISO files on Windows 10 wouldn’t be a technical process, although there are advanced methods. Now, let’s show you the basic and geeky techniques of mounting ISO files.
Using the Windows Explorer
There are different ways to mount the file within Windows’ native File Explorer. You can do the following after opening the File Explorer window and navigating to the ISO file:
- Right-click the file and select Mount.
- Click the file once, go to the ribbon menu of the File Explorer window, select Disc Image Tools under Manage, and then click Mount.

- Double-click the ISO file.
Note that the last method may not work if an ISO mounting software application is currently the default program for opening ISO files.
Using PowerShell
You can also enter the Windows PowerShell mount ISO command line to create the virtual drive. Follow these steps:
- Right-click your Start button, or press
Win+X, and click Windows PowerShell (Admin) in the Power User menu.

- Click Yes in the User Account Control prompt.
- Now, type this command and hit the
Enterkey (follow explanations):
Mount-DiskImage -ImagePath "ISO/FILE/LOCATION"
- Replace
ISO/FILE/LOCATIONwith the path to the file you want to mount. So, the command should look like this when we try to mount a God of War ISO file:
Mount-DiskImage -ImagePath "D:\GodofWar.iso"
- After hitting
Enter, the command may take a few seconds to a minute to execute, so do not panic.

- Once you use the command to successfully mount the ISO file, Windows 10 will display the new virtual DVD drive in This PC.
That’s how to mount your ISO file!
If you want to unmount it, go to This PC, right-click the virtual DVD Drive, and select Eject from the context menu.
Troubleshooting Common “Mount ISO Windows 10” Errors
If you’re encountering any problem, such as “Couldn’t mount the file,” the steps that follow will help you get rid of it.
Method 1: Updating Your Windows And Device Drivers
Updating your operating system and your computer’s drivers is one of the best ways to ensure you can mount ISO files without problems.
Windows 10 updates are designed to enhance your user experience, improve your system’s functions, and fix bugs that occur from time to time. The issue here might be related to a glitch that an update might fix.
For example, this Windows user posted a message on a Microsoft Forums thread narrating how they couldn’t mount ISO files after a major Windows 10 update (which they performed after mounting the installation ISO).
As it turned out, installing another update got rid of the problem for good.
Follow these steps to update your OS and drivers using the Windows Update Client:
- Punch the
Windows keyto open the Start menu. - Type
updateand click Check for Updates.
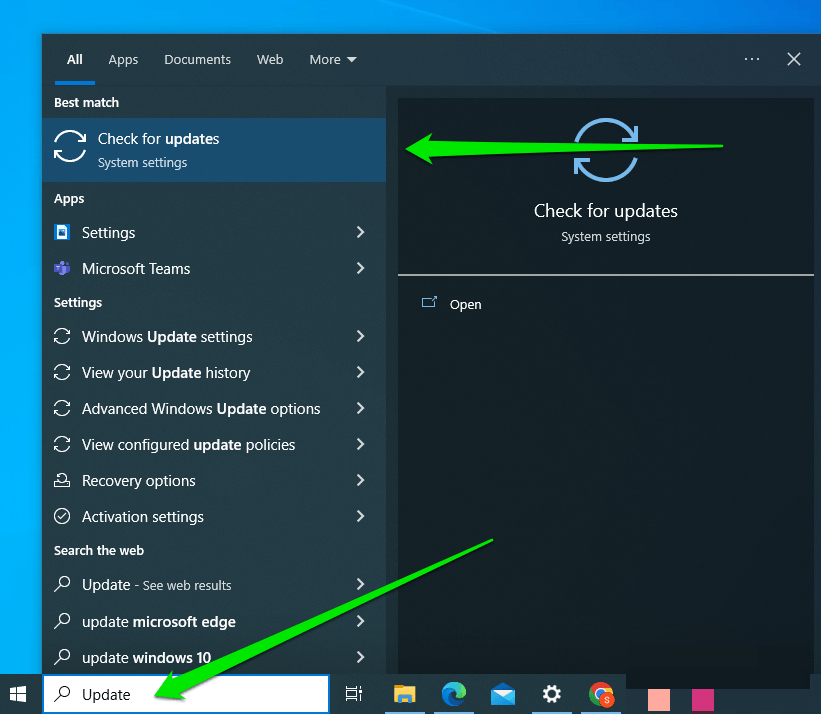
- The Windows Update Client will now open and begin to check for available updates.
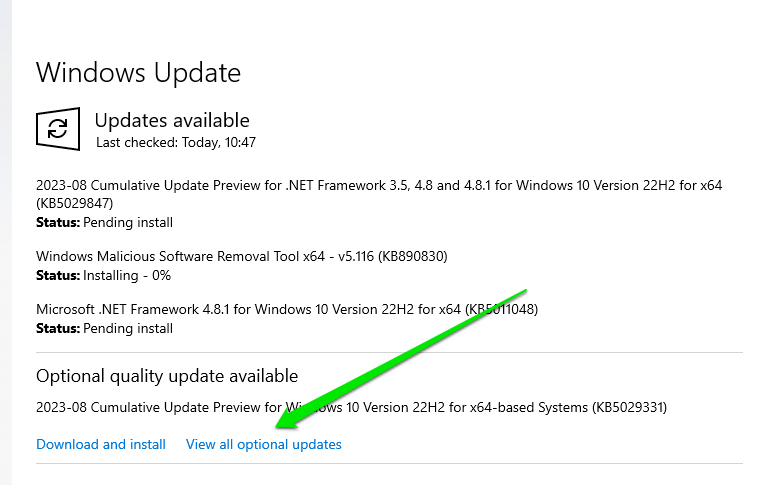
- Allow it to download the updates it finds and restart your PC when required.
- Next, go to View all Optional Updates, expand the Driver Updates section, and install available driver updates.
PRO TIP
You can automate the driver-updating process using Auslogics Driver Updater. We always recommend this method for many good reasons.
For instance, if you manually update your drivers, you’d have to spend a significant amount of time searching for compatible and updated versions on the manufacturer’s website.
On the other hand, when you use Auslogics Driver Updater, you only have to click a button, and you can update all your drivers to their latest manufacturer-recommended versions.
You do not have to worry about installing incorrect drivers because this reliable tool can automatically recognize your system! Once the process is complete, you can now mount ISO files from a DVD or CD.
What’s more, you will notice a significant improvement in your computer’s speed and performance.
Method 2: Make Windows Explorer the Default Program for Opening ISO Files in Windows 10
As we’ve mentioned, Windows 10 allows users to open ISO or Image (IMG) files without the help of a third-party application.
In some cases, a bug from a recent update can affect file association features on a Windows operating system. It is also possible that your system is having trouble recognizing ISO files.
Consequently, it does not automatically set a default application for mounting or accessing the files. You can make sure Windows’ File Explorer is the default application for mounting ISO files before you start. Follow these steps:
- Go to the ISO file you want to open.
- Right-click the file, then select Open With.
- Another menu will show up. Select Windows Explorer.

This process allows you to mount the file by double-clicking it if all goes well.
Method 3: Unmounting All Drives
Please unmount any ISO you may have mounted on a virtual drive. Because of the auto-replace function, you might be prevented from mounting the new ISO file over the existing one.
Follow the instructions below:
- On your keyboard, press
Windows Key+E. This should open File Explorer. - Go to the left bar menu and click This PC.
- Right-click a virtual drive, then click Eject. Do this for every virtual drive available on your computer.
- Restart your computer.
- Try mounting the ISO file on any available slot.
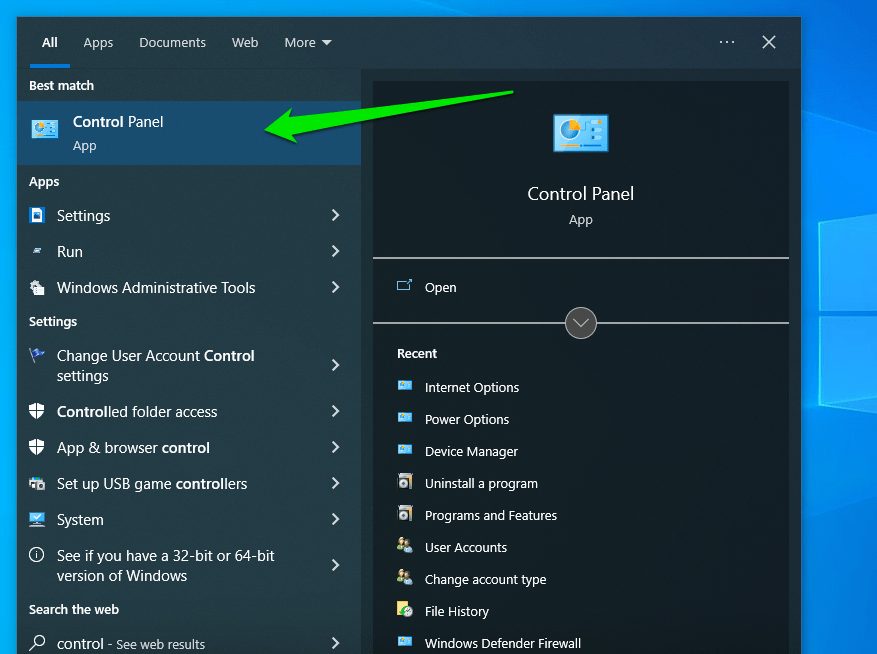
- Click Uninstall a Program under Programs after the Control Panel window opens.

- Now, search for the unwanted ISO application, click it, and select Uninstall at the top of the window.
- Follow the subsequent prompts to complete removing the program.
If you’ve already uninstalled the third-party virtual drive program and the error persists, it is possible that its entries are still in the registry. You can resolve this problem by cleaning the registry and removing entries related to the ISO file association.
PRO TIP
You can manually roam through the Registry Editor, but we strongly advise that you use a reliable tool like Auslogics Registry Cleaner instead.
It is worth noting that the registry is a sensitive database. Just misplacing a comma can prevent you from properly booting your computer! So, before you decide to clean your registry, you have to be certain that you can perform the changes correctly. Here are the steps you should follow:
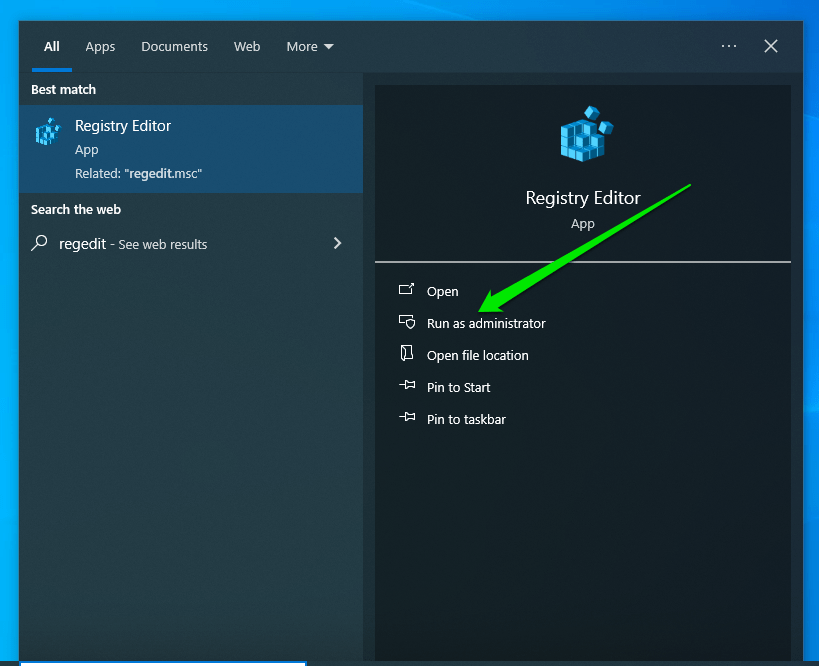
- Click the Search icon.
- Type
regedit. - Select Run as Administrator on the right side.
- Navigate to the following path: Computer\HKEY_CLASSES_ROOT\.iso.
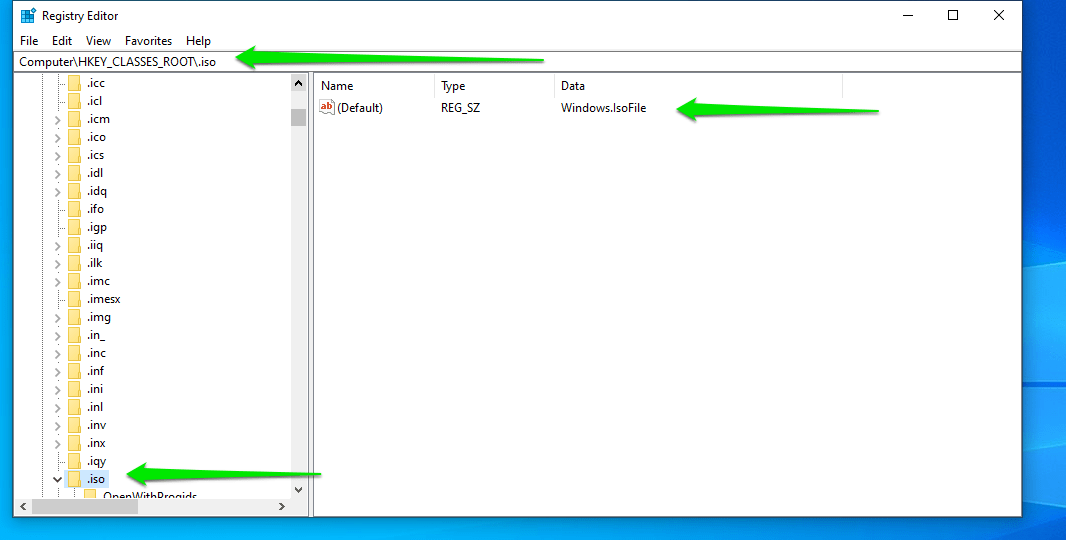
- Create a backup of your registry.
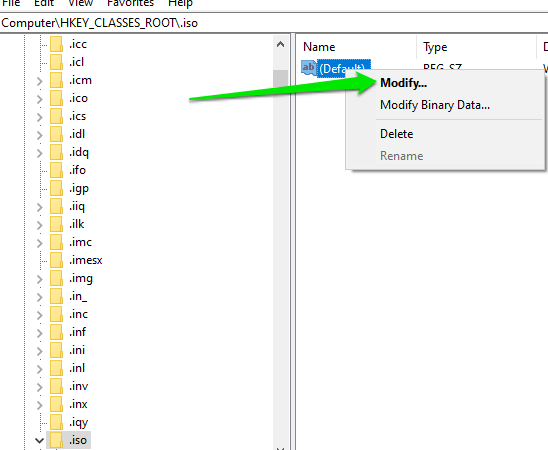
- Check if a third-party ISO tool is still associated with your ISO extension. If so, right-click the Default entry and click Modify.
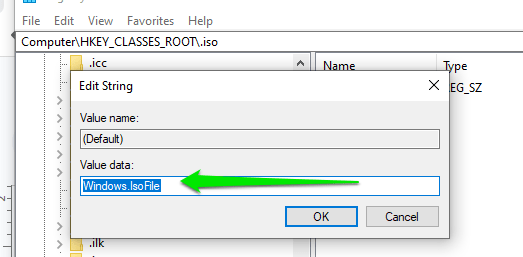
- Replace the entry under Value Data with
Windows.IsoFile, then click OK.
- Restart your computer and check if this resolves the issue.
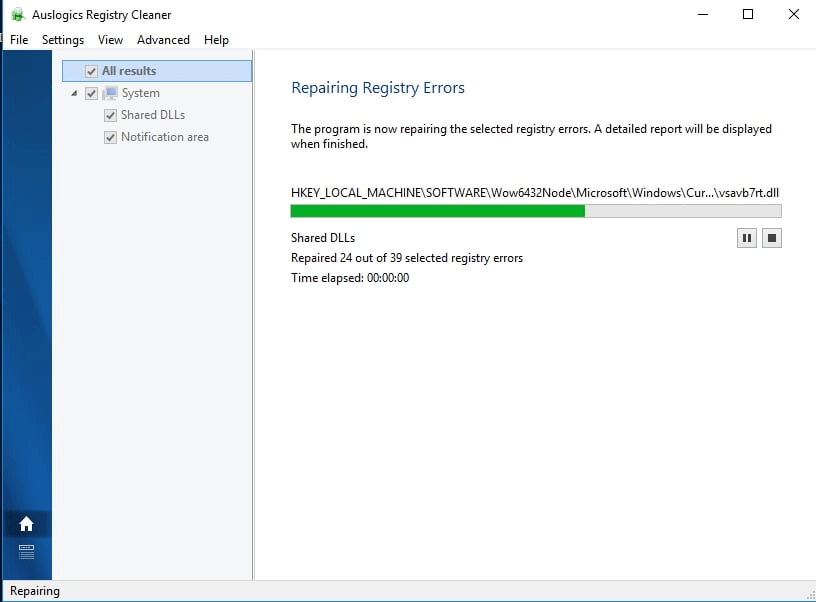
Learning how to fix ISO issues on Windows 10 is easier when you opt to use Auslogics Registry Cleaner
.
This tool automatically scans corrupted, duplicate, and outdated registry entries. With a click of a button, you can remove old ISO-related entries and resolve the issue. The best part is this tool is absolutely free!
Method 4: Change the Drive Letter of a Removable or Virtual Drive
How your computer assigns drive letters may be the problem. If you check and see that the ISO shows up in This PC, but you still see the error, take a closer look at its drive letter. The error tends to occur when its driver letter serially follows that of another drive. Let’s say you have five drives: C, D, E, F, G, and the ISO is H. This arrangement could be the likely culprit.
You can resolve the matter by breaking up the serial pattern. To do that, change the drive letter of a virtual or removable media. Follow these steps:
- Connect the removable media, such as a USB flash drive or external hard drive, to your computer (if it isn’t already connected).
- Right-click the Start button (or press
Win+X) and select Disk Management from the Power User menu.
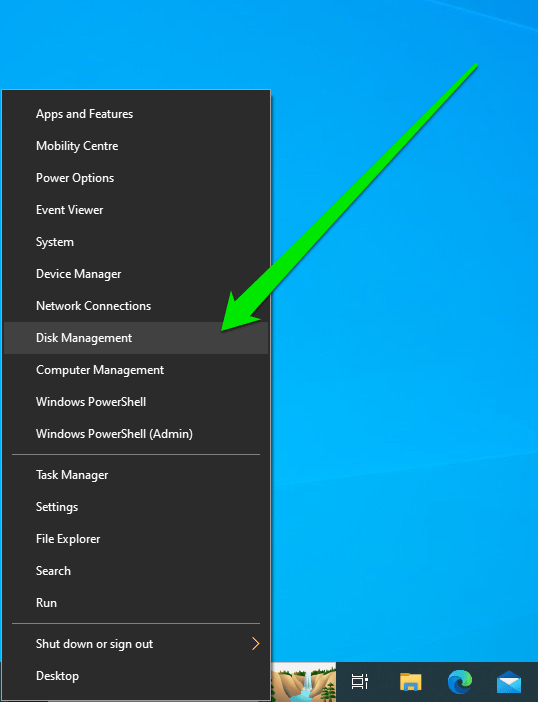
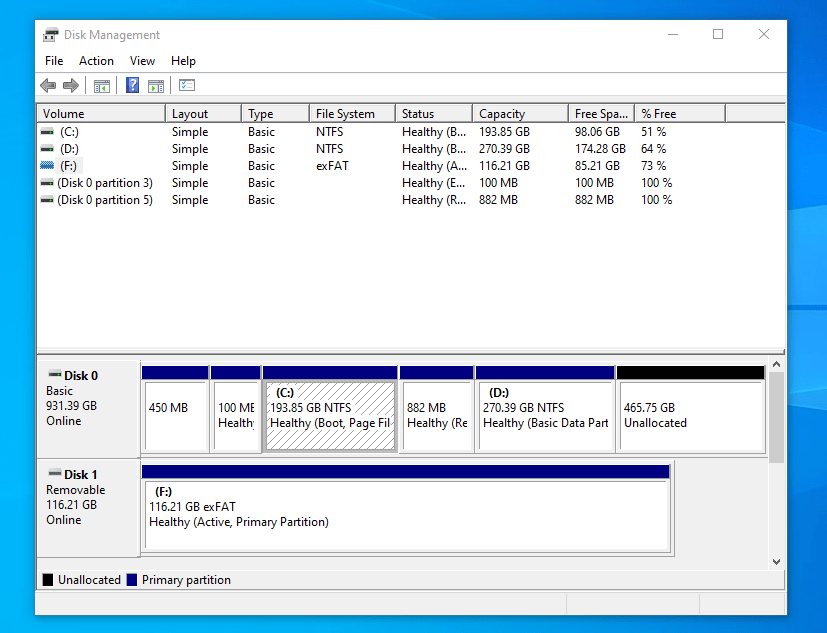
- After the Disk Management window opens, you will see a list of every drive connected to your PC, including the removable media.
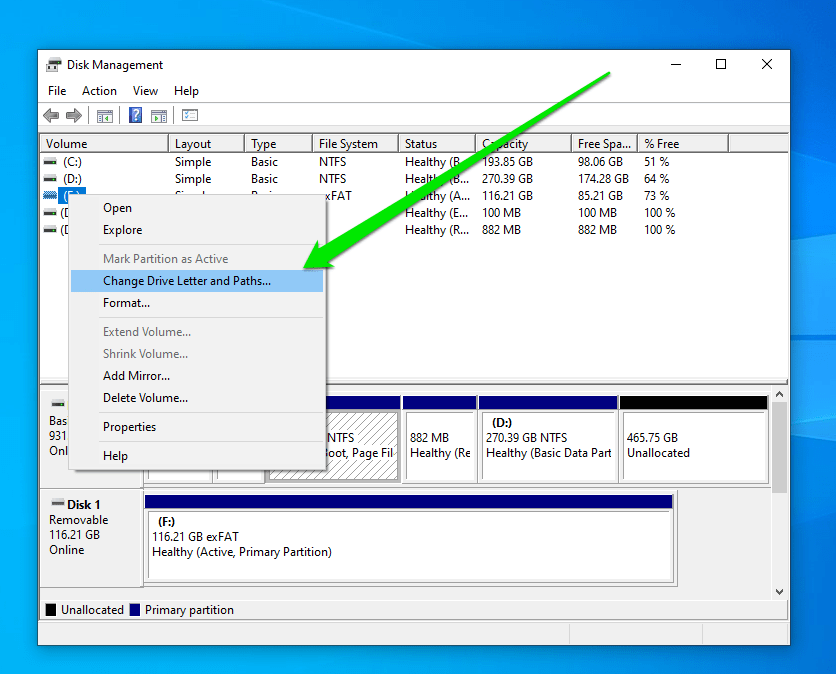
- Right-click on the partition or volume of the removable media whose drive letter you want to change.
- Click Change Drive Letter and Paths when the context menu opens.
- Click Change in the Next dialog window.
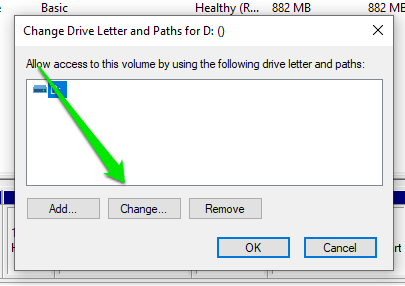
- Choose a new, available drive letter from the drop-down list.

Ensure it’s a drive letter that allows Windows to assign a preceding letter to the removable drive.
For example, if the drive’s current letter is F, assign G or H to it so that Windows will automatically assign F to the ISO.
- Click OK to confirm the change.
- A dialog box might warn that programs that rely on drive letters might not work correctly. Click Yes if you’re sure.
Now, mount the ISO again and check if reassigning drive letters did the trick.
Method 5: Investigate Third-party Software
The ISO mounting problem may be occurring due to software conflicts. You can troubleshoot this particular issue by taking some steps.
Try mounting the file in Safe Mode. Since Safe Mode runs Windows without most third-party applications, you can try running and mounting the ISO in that environment. Follow these steps to Start your PC in Safe Mode:
- Press
Win+Rto launch the Run dialog box. - After Run appears, type
msconfiginto the text box and hit theEnterkey.
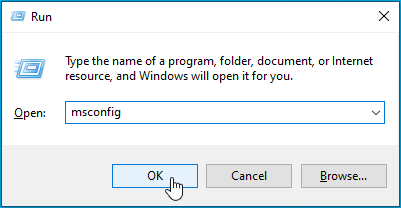
- That action will open the System Configuration dialog window.
- Go to the Boot tab.
- Head to the Boot Options area and check the box next to Safe Boot.
- Select Minimal and click OK.

- Restart your computer.
- Try mounting the ISO file after your computer boots in Safe Mode.
Move on to the next method if the error still appears. On the other hand, if you can now mount the ISO file successfully, try looking at the software applications you recently installed.
Method 6: Use System Restore
If you are suddenly seeing the error appear after being able to mount such files without any hitch in the past, restoring your OS to a previous state may be the right fix.
Thankfully, Windows often sets restore points automatically when your system goes through significant changes, such as a major driver or Windows update.
Follow these steps to restore your PC:
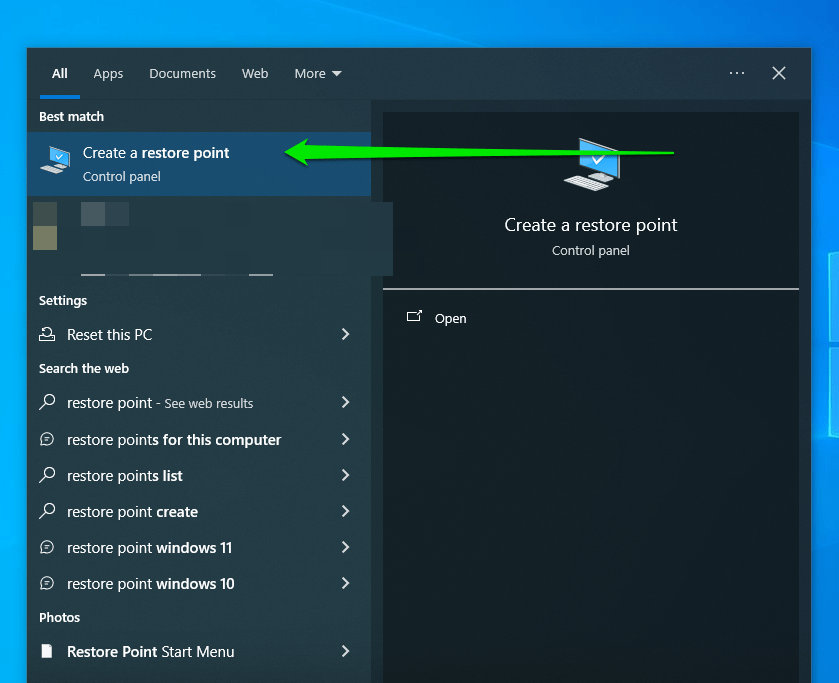
- Go to the Start menu and type
restore point. - Click Create a Restore Point in the results.
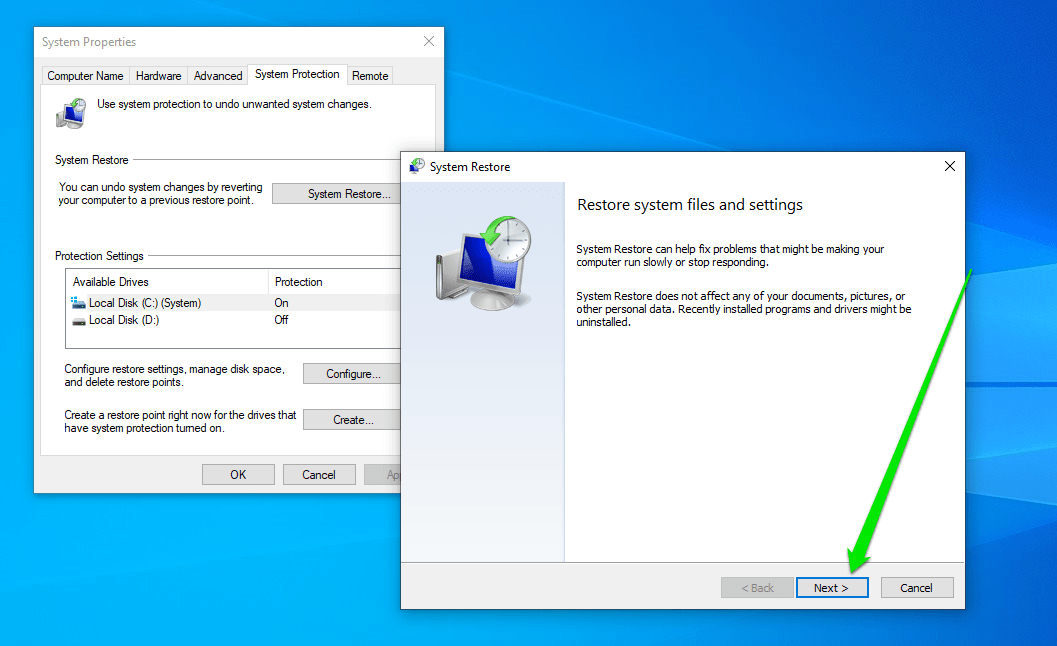
- After the System Properties window opens, click System Restore.

- Select Next in the System Restore window.
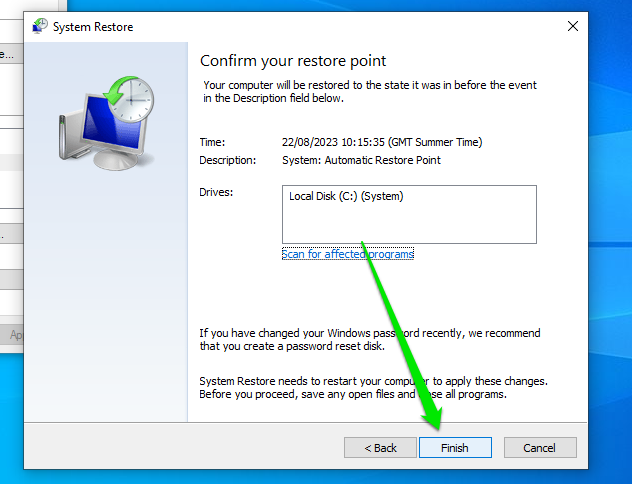
- Select a System Restore point and click Next.

- Click Finish.
Conclusion
Do you have other suggestions for mounting ISO files? We’re looking forward to hearing your ideas in the comments below!
FAQ
The .ISO extension follows the ISO 9660 standardized naming format used for CD-ROM media. The format was the natural choice since ISO image files typically contain everything in a traditional DVD or CD.
An ISO image in computers is a file that contains an exact copy of the data and structure found on optical discs, such as a CDs, DVD, and Blu-ray Discs. So, you can call it a CD or DVD, but without the physical disc.
You can open an ISO file on Windows 10 by right-clicking the file and selecting Mount in the context menu.
Open the ISO file (right-click and click Mount), then locate and run the program’s installation package.
Mounting an ISO file is Windows’ process of recognizing the data structure of the file and reading its content. Since the file is a virtual optical drive, Windows has to treat it as such.
Running an ISO file is the same as opening and “Mounting” it. All you have to do is double-click the file or right-click it and select Mount.