
Если сбои системы, синие экраны BSoD или иные проблемы при работе Windows 10, 8.1 или Windows 7 наводят вас на мысли о том, что имеются какие-либо проблемы с оперативной памятью компьютера, может иметь смысл выполнить её проверку, а начать можно со встроенного средства диагностики проверки памяти Windows.
В этой инструкции подробно о способах запустить средство проверки памяти средствами Windows, причём даже в тех случаях, когда вход в систему невозможен, а также о возможных вариантах действий в случае, если в результате теста средство диагностики памяти сообщает о том, что были обнаружены проблемы оборудования. На схожую тему: Устранение неполадок Windows 10.
- Способы запуска средства проверки памяти
- Использование средства и просмотр результатов
- Обнаружены проблемы оборудования в средстве диагностики памяти
- Видео инструкция
Как запустить средство проверки памяти в Windows 10 и предыдущих версиях системы
В случае, если операционная система запускается, вход в неё и работа возможны, вы можете использовать один из следующих вариантов запуска средства проверки памяти:
- Найти нужный пункт в разделе «Средства администрирования Windows» меню «Пуск».
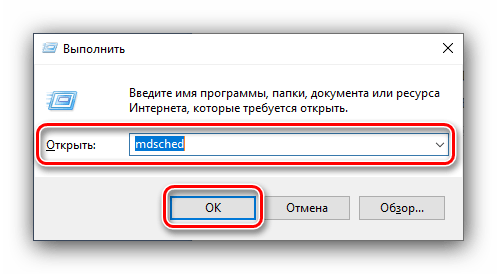
- Нажать клавиши Win+R на клавиатуре, ввести mdsched.exe и нажать Enter.

- Открыть панель управления, выбрать пункт «Администрирование» и запустить «Средство проверки памяти Windows».
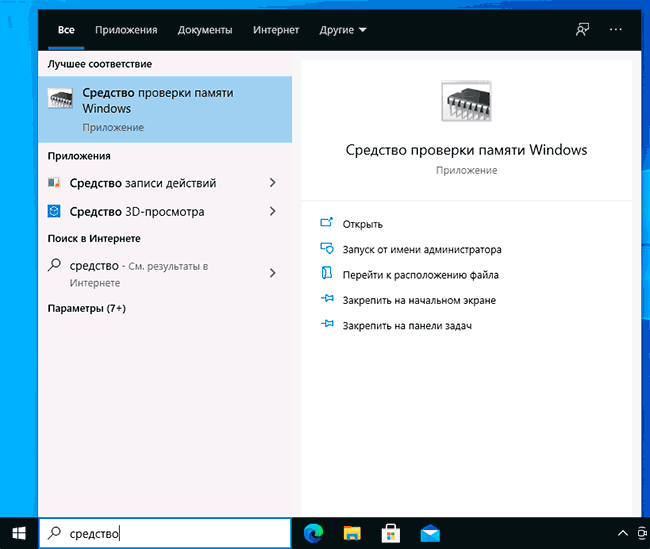
- Использовать поиск в панели задач Windows 10, начав вводить «Средство проверки памяти». Или встроенные средства поиска в предыдущих версиях ОС.

- Вручную запустить файл C:\Windows\System32\MdSched.exe

Если же ситуация осложняется тем, что Windows не запускается, вход в неё невозможен, либо сразу после него происходят сбои, можно использовать следующие способы запуска средства диагностики оперативной памяти:
- Загрузить компьютер или ноутбук с загрузочной флешки с Windows 10 или другой версией Windows, можно и с загрузочного диска. На экране программы установки нажать клавиши Shift+F10 (Shift+Fn+F10 на некоторых ноутбуках), ввести mdsexe в открывшейся командной строке и нажать Enter. После выбора в утилите проверки пункта «Выполнить перезагрузку и проверку», загружайте компьютер не с флешки, а с обычного загрузочного HDD или SSD.

- Средство проверки памяти можно запустить из среды восстановления Windows 10 — нажав кнопку «Дополнительные параметры» на синем экране с ошибкой или, находясь на экране блокировки Windows 10 (с выбором имени пользователя) нажать по изображенной справа внизу кнопке «Питания», а затем, удерживая Shift, нажать «Перезагрузка». В среде восстановления выбираем «Поиск и устранение неисправностей» — «Дополнительные параметры» — «Командная строка». А в ней, как и в предыдущем случае используем команду mdsched.exe.

- Если у вас есть подготовленный диск восстановления Windows, запуск можно осуществить, загрузившись с него.


Использование средства проверки памяти Windows и просмотр результатов

После запуска средства проверки памяти вам будет предложено перезагрузить компьютер, после согласия, процесс будет выглядеть следующим образом:
- Начнётся проверка оперативной памяти, которая может занять продолжительное время. Может показаться, что средство диагностики зависло: на всякий случай подождите в такой ситуации 5-10 минут. Если же действительно произошло зависание, не исключено что есть проблемы с оборудованием, вероятно — с оперативной памятью, но не обязательно.

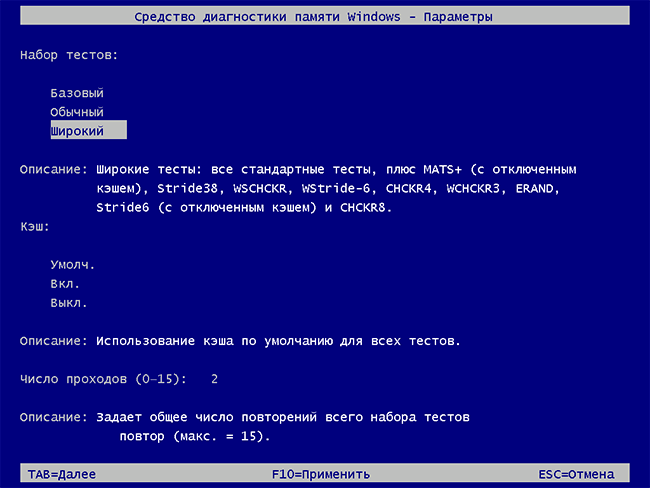
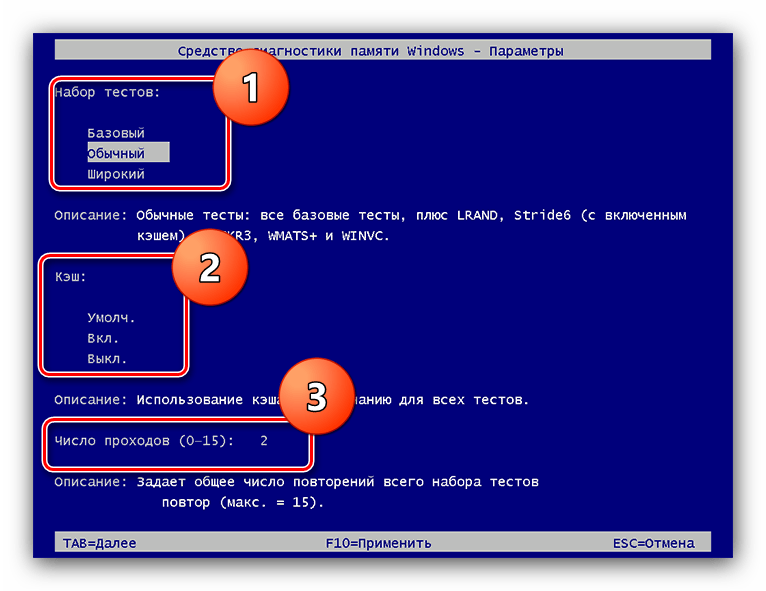
- Если в ходе проверки нажать клавишу F1 (или Fn+F1, если F1 не срабатывает), вы попадёте в настройки средства диагностики памяти Windows. Здесь можно выбрать набор тестов (по умолчанию — обычный), использование кэша, и число проходов. Переключение между разделами настроек выполняется клавишей Tab, изменение параметров — стрелками и вводом цифр (для числа проходов), применение параметров — клавишей F10. После изменения настроек тест перезапускается.
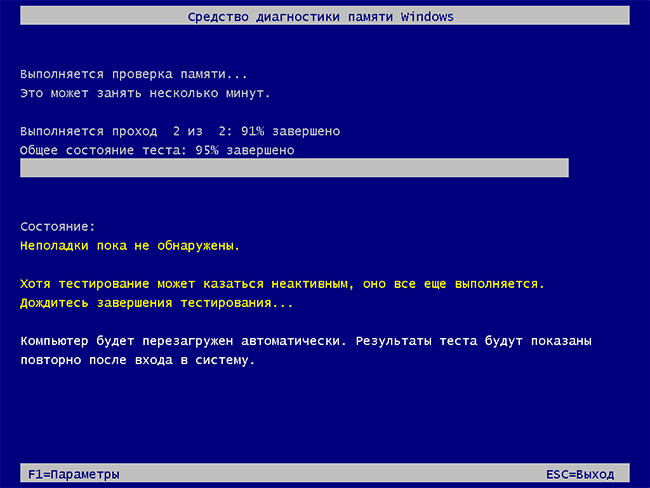
- В ходе проверки вы будете видеть информацию вида «Неполадки пока не обнаружены» или «Были обнаружены проблемы оборудования».
После завершения проверки компьютер будет автоматически перезагружен. Дальнейшие шаги — просмотр результатов.
- После перезагрузки в случае Windows 10 вы можете увидеть уведомление в области уведомлений, сообщающее о результате проверки памяти. Но оно отображается не всегда.
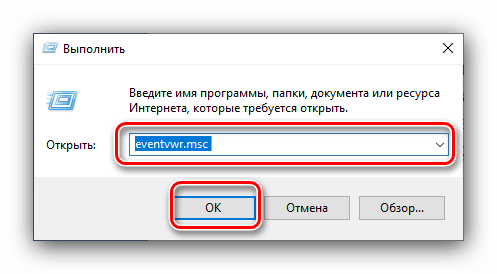
- Можно зайти в просмотр событий, для этого нажимаем Win+R, вводим eventvwr.msc и нажимаем Enter. Там открываем раздел «Журналы Windows» — «Система», находим пункты, где в столбце «Источник» указано MemoryDiagnostics-Results и просматриваем результаты.


Учитывайте, что ошибки, «вылеты», синие экраны и зависания не всегда связаны с проблемами оперативной памяти: если средство диагностики показывает, что всё в порядке, есть и иные возможные причины: отключенный файл подкачки, проблемы с HDD или SSD (или с их подключением, например — неисправный кабель), сторонние антивирусы или, наоборот, вредоносные программы, неправильная работа драйверов оборудования.
Что делать, если были обнаружены проблемы оборудования в средстве диагностики памяти
К сожалению, средство диагностики не сообщает о том, какие именно проблемы были обнаружены в ходе проверки, а лишь рекомендует обратиться к производителю оборудования. Что можно сделать:
- Отключить любые опции ускорения памяти (изменение частоты, таймингов и другие) при наличии соответствующих опций в БИОС или ПО производителя материнской платы или ноутбука.
- Попробовать проверить планки памяти по одной, в других слотах на материнской плате для того, чтобы выяснить, появляются ли проблемы только с одним конкретным модулем памяти или в одном конкретном разъеме.
- Использовать другие утилиты для проверки оперативной памяти при необходимости.
- Прочитать документацию к материнской плате ПК — возможно, это какая-то несовместимость с памятью с конкретными характеристиками (если вы недавно добавили новые модули памяти или только что самостоятельно собрали компьютер).
- Иногда может помочь обновление БИОС.
Видео инструкция
Если вы разобрались, чем была вызвана именно ваша проблема, буду благодарен комментарию к статье: возможно, для кого-то он окажется полезным.
Все способы:
- Проверка оперативной памяти в Виндовс 10
- Способ 1: Стороннее решение
- Способ 2: Системные средства
- Заключение
- Вопросы и ответы: 1
Работоспособность как операционной системы, так и компьютера в целом, зависит в том числе и от состояния оперативной памяти: в случае неисправностей будут наблюдаться проблемы. Проверку ОЗУ рекомендуется делать регулярно, и сегодня мы хотим познакомить вас с вариантами проведения этой операции на компьютерах под управлением Windows 10.
Читайте также:
Проверка ОЗУ на Windows 7
Как проверить работоспособность оперативной памяти
Проверка оперативной памяти в Виндовс 10
Множество диагностических процедур Windows 10 можно проделать как с помощью штатных средств, так и с задействованием сторонних решений. Тестирование RAM не является исключением, и начать хотим с последнего варианта.
Обратите внимание! Если вы осуществляете диагностику ОЗУ для определения сбойного модуля, процедуру следует проводить отдельно для каждого компонента: демонтируйте все планки и вставляйте их в ПК/ноутбук по одной перед каждым «прогоном»!
Способ 1: Стороннее решение
Существует достаточно много приложений для тестирования оперативной памяти, но наилучшим решением для Виндовс 10 будет MEMTEST.
Скачать MEMTEST
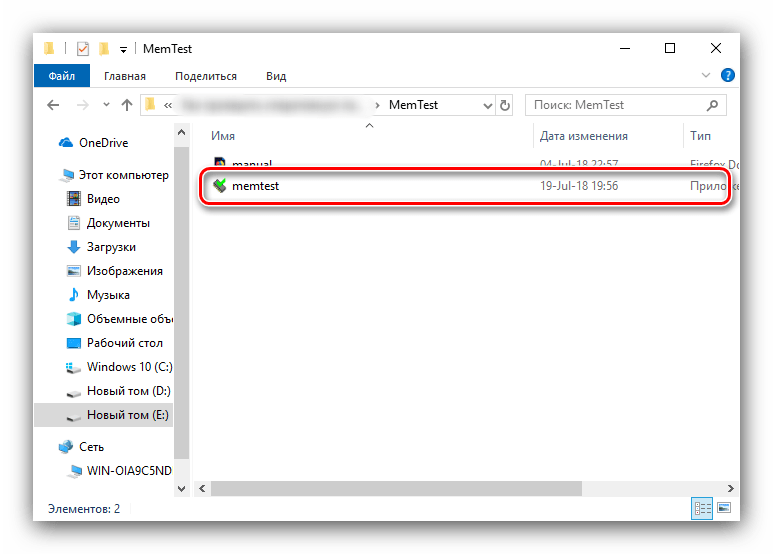
- Это маленькая утилита, которую даже не требуется устанавливать, поэтому распространяется она в виде архива с исполняемым файлом и нужными библиотеками. Распакуйте её любым подходящим архиватором, перейдите в полученный каталог и запустите файл memtest.exe.

Читайте также:
Как открыть файлы ZIP на Windows - Доступных настроек здесь не так уж много. Единственная настраиваемая функция – количество проверяемой оперативной памяти. Впрочем, рекомендуется оставлять значение по умолчанию — «All unused RAM» — поскольку в этом случае гарантируется самый точный результат.
Если же объём оперативной памяти компьютера составляет более 4 Гб, то этой настройкой придётся воспользоваться в обязательном порядке: в силу особенностей кода МЕМТЕСТ не может за раз проверять объём больше 3,5 Гб. В таком случае нужно запустить несколько окон программы, и в каждом вручную прописать нужное значение.
- Прежде чем приступать к проверке, запомните две особенности программы. Первая – точность процедуры зависит от времени тестирования, поэтому проводить её следует не менее чем несколько часов, а потому сами разработчики рекомендуют запускать диагностику и оставлять компьютер на ночь. Вторая особенность вытекает из первой – в процессе тестирования компьютер лучше оставить в покое, поэтому вариант с диагностикой «на ночь» является лучшим. Для начала тестирования нажмите на кнопку «Start Testing».
- Если потребуется, проверку можно остановить досрочно – для этого воспользуйтесь кнопкой «Stop Testing». Кроме того, процедура автоматически останавливается, если в процессе утилита столкнулась с ошибками.
Программа помогает обнаружить большинство проблем с оперативной памятью с высокой точностью. Само собой, есть и недостатки – отсутствует русская локализация, да и описания ошибок не слишком подробные. К счастью, у рассматриваемого решения есть альтернативы, предложенные в статье по ссылке ниже.
Подробнее: Программы для диагностики ОЗУ
Способ 2: Системные средства
В ОС семейства Windows присутствует инструментарий для базовой диагностики оперативной памяти, который перекочевал и в десятую версию «окон». Данное решение не предоставляет таких подробностей, как сторонняя программа, однако подойдёт для начальной проверки.
- Проще всего вызвать нужную утилиту через инструмент «Выполнить». Нажмите сочетание клавиш Win+R, впишите в текстовое поле команду mdsched и нажмите «ОК».
- Доступны два варианта проверки, выбирать рекомендуем первый, «Выполнить перезагрузку и проверку» – кликните по нему левой кнопкой мыши.
- Компьютер перезагрузится, и запустится средство диагностики RAM. Процедура начнётся немедленно, однако изменить некоторые параметры можно прямо в процессе – для этого нажмите клавишу F1.

Доступных опций не слишком много: настроить можно тип проверки (варианта «Обычный» достаточно в большинстве случаев), задействование кэша и число проходов теста (ставить значения больше 2 или 3 обычно не требуется). Перемещаться между опциями можно нажатием клавиши TAB, сохранить настройки — клавишей F10.
- По завершении процедуры компьютер перезагрузится и отобразит результаты. Иногда, впрочем, этого может и не произойти. В таком случае нужно открыть «Журнал событий»: нажмите Win+R, введите в окошко команду eventvwr.msc и нажмите «ОК».

Читайте также: Как просмотреть журнал событий Windows 10
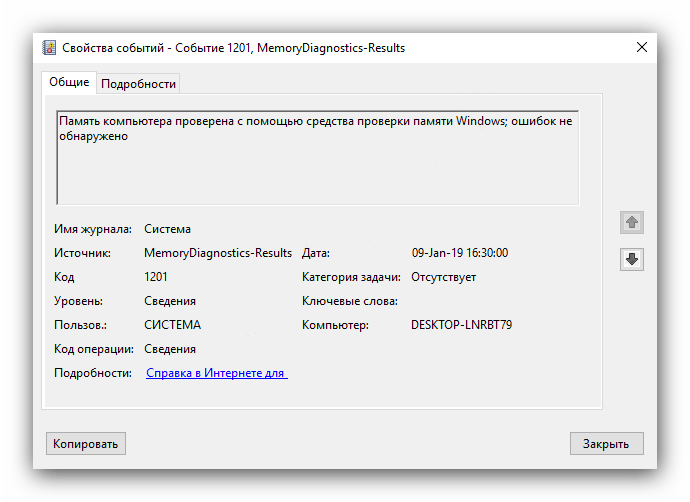
Дальше найдите информацию категории «Сведения» с источником «MemoryDiagnostics-Results» и ознакомьтесь с результатами внизу окна.

Данное средство, возможно, не столь информативно, как сторонние решения, однако недооценивать его не стоит, особенно начинающим пользователям.
Заключение
Мы рассмотрели процедуру проверки оперативной памяти в Windows 10 сторонней программой и встроенным средством. Как видим, методы не слишком отличаются друг от друга, и в принципе их можно назвать взаимозаменяемыми.
Наша группа в TelegramПолезные советы и помощь
Updated
September 09, 2024
in
About Memory
If your PC is running slowly or giving you “low memory” error messages, you may need more PC memory. Or perhaps you are just curious about the specs of your PC? Read on to learn how to check RAM on Windows 10.
(Please note, checking RAM in a Mac is different and is not covered within the scope of this tutorial.)
What is RAM?
Random access memory (RAM) is an important and fast type of short-term storage your computer uses to hold data that is in-use. This short-term storage is used for whatever applications your computer is running, such as browsing or word processing. RAM clears when you shut down your computer. RAM is different from a hard disk drive or a solid state drive, which holds files and applications on a permanent basis.
How to check how much RAM you have on Windows 10 & 11
Checking RAM on Windows 10 operating systems is simple. Following the steps below should tell you how much memory you currently have installed.
Step 1: Click “Start”
Begin by clicking on the “Start” menu, located in the bottom left of your screen.
Step 2: Find “About Your PC”
Next, type “About Your PC” and press enter when the correct result appears.
Step 3: Navigate to “Device Specifications”
A window should appear called, “About.” Scroll down using the navigation bar on the right side of the window until you see a section titled, “Device Specifications.”
Step 4: Find out how much RAM you have
Look for a line titled, “Installed RAM.” This will tell you how much RAM your PC currently has installed.
If your computer has bogged down and you want to know how your RAM is being used, you can always check the “Windows Task Manager.”
How to check RAM usage in Windows Task Manager
Many modern computers are sold with 8GB of RAM pre-installed. Some higher-end computers, including gaming computers, may come with 16GB of RAM or more pre-installed. In general, the more RAM your computer has, the better ability it has to handle multi-tasking (running multiple programs at the same time and potentially switching between them).
However, not everyone needs more RAM or has a computer capable of handling more RAM. One way to check RAM on Windows 10 and find out your usage is via the “Windows Task Manager.” To consult the Windows Task Manager about your memory usage, use the following steps:
Method 1– ctrl, shift, esc
- Press the following keys: Ctrl + Shift + Esc
- The Task Manager should appear
- Click on the “Performance” tab and check the section titled “Memory”
Method 2 – ctrl, alt, del
- Press the following keys: Ctrl + Alt + Del
- Click on “Task Manager”
- Click on the “Performance” tab and check the section titled “Memory”
Method 3 – start, task manager, performance
- Select the “Start” menu, located in the bottom left of your screen
- Next, type “Task Manager” and press enter when the correct result appears
- Click on the “Performance” tab and check the section titled “Memory”
After you have followed any of these three methods on Windows 10, you should see a graph that presents the current performance and usage of your RAM. If the graph indicates your RAM usage is above 70% and you are only performing simple tasks or are not doing anything at all, you may need additional RAM to prevent sluggish performance. However, sometimes high RAM usage shown on the Task Manager can be due to having too many programs running in the background.
Once you have checked your memory usage, you can start to work out how much RAM your computer needs.
Upgrading your RAM
If you have checked both your installed RAM amount and the Task Manager and have determined you need more RAM, finding compatible memory for your system is a relatively simple process. Whether you’re upgrading RAM on a laptop or desktop, there will be an option available for you.
The Crucial System Scanner is an easy-to-use tool that will look in your BIOS for information about your complete PC system and then search Crucial.com for compatible memory upgrades. The video below explains more about the tool and how it works.
FAQs
-
To find out how much RAM your Windows computer can support, you can use tools like the Crucial System Scanner. This tool analyzes your system and provides detailed information about the maximum RAM capacity and compatible memory upgrades. It’s a straightforward way to ensure you’re purchasing the right type and amount of RAM for your specific computer model.
-
If you’re looking to identify which applications are consuming the most RAM, you can open the Task Manager by pressing Ctrl + Shift + Esc. Once there, navigate to the “Processes” tab where you can see a list of running applications and their RAM usage. This can help you pinpoint any programs that are using an excessive amount of memory, allowing you to manage or close them to free up resources.
-
Signs that your computer might need a RAM upgrade include frequent slowdowns, lag when switching between applications, and error messages indicating low memory. If you notice these symptoms, upgrading your RAM can significantly improve overall performance and multitasking capabilities, making your computer run more smoothly and efficiently.
(Image credit: Mauro Huculak)
On Windows 10, the ability to check the tech specs of the RAM (Random Access Memory) installed on your computer can come in handy in many situations. For example, when troubleshooting hardware and software-related problems, and details like the manufacturer name, part number, and serial number can be useful when contacting technical support.
If your device’s performance is degrading due to memory-demanding apps or games, upgrading the memory can improve it, and knowing the RAM specs can help determine the right size, speed, and brand to purchase a compatible upgrade kit.
In addition, when adjusting the memory settings in the Unified Extensible Firmware Interface (UEFI) or Basic Input/Output System (BIOS), memory information can also help you determine whether the configuration has been applied correctly.
Whatever the reason might be, Windows 10 provides the necessary information using Command Prompt without the need to open the device or install third-party tools.
In this how-to guide, I will explain the steps to find the technical specifications of the RAM installed on your computer, including part number, manufacturer, serial number, speed, capacity, form factor, memory type, etc.
How to check RAM specification from Command Prompt
While you can use Task Manager to view the memory specs information, if you want to determine more specific details, such as manufacturer, part number, serial number, and more, then you can use several commands.
Check memory manufacturer
To determine the memory modules brand installed on the computer, use these steps:
All the latest news, reviews, and guides for Windows and Xbox diehards.
- Open Start.
- Type Command Prompt, right-click the top result, and select the Run as administrator option.
- Type the following command to check the memory manufacturer name and press Enter: wmic memorychip get devicelocator, manufacturer
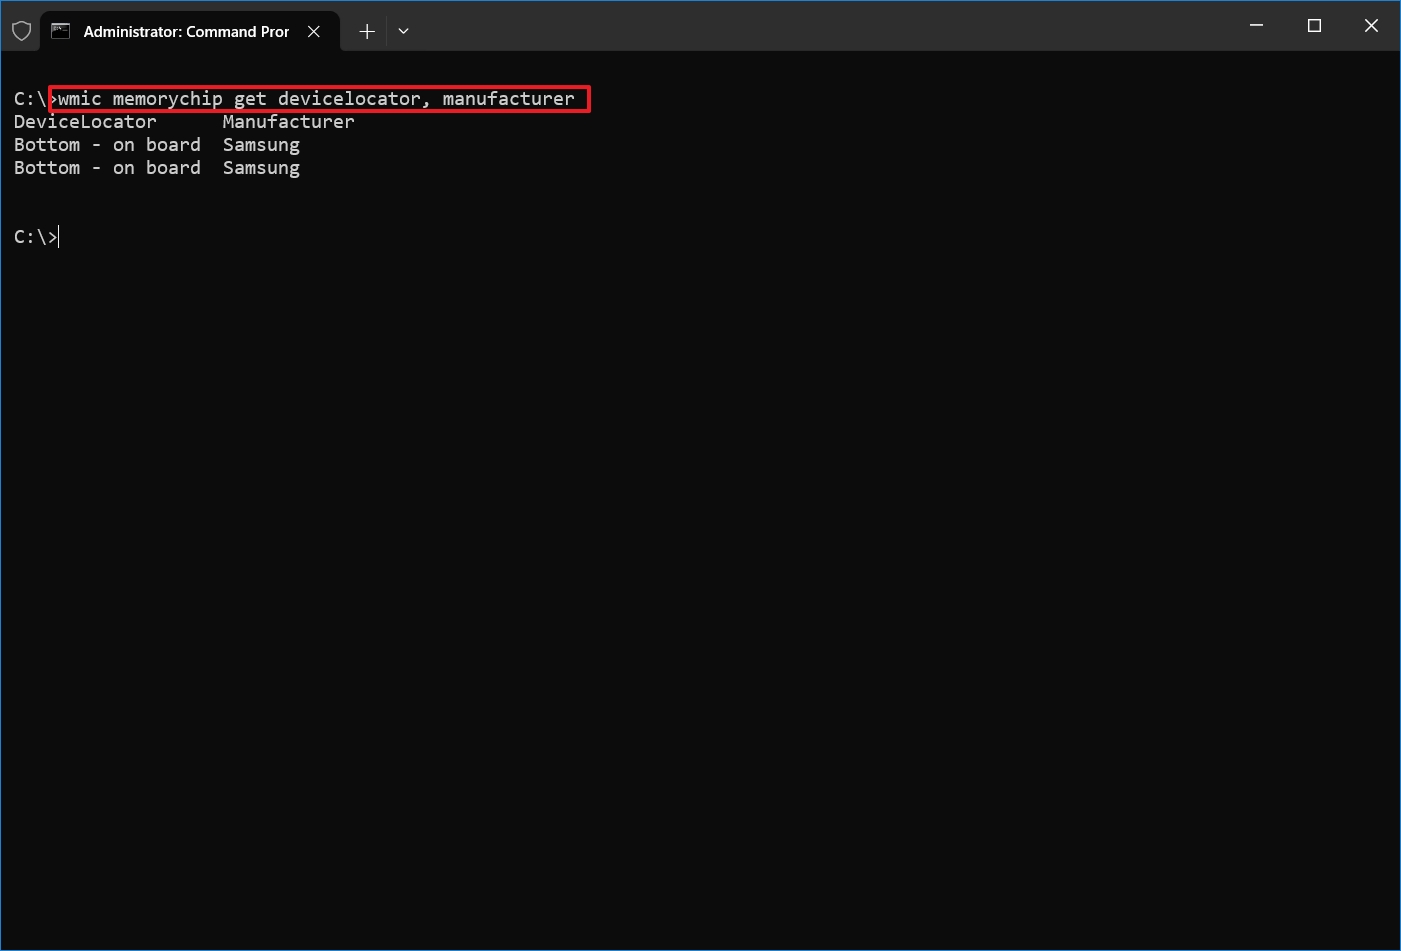
- Confirm the memory brand under the «Manufacturer» column.
Check memory part number
To find out the part number of each memory module on Windows 10, use these steps:
- Open Start.
- Type Command Prompt, right-click the top result, and select the Run as administrator option.
- Type the following command to determine the part number of the memory module and press Enter: wmic memorychip get devicelocator, partnumber
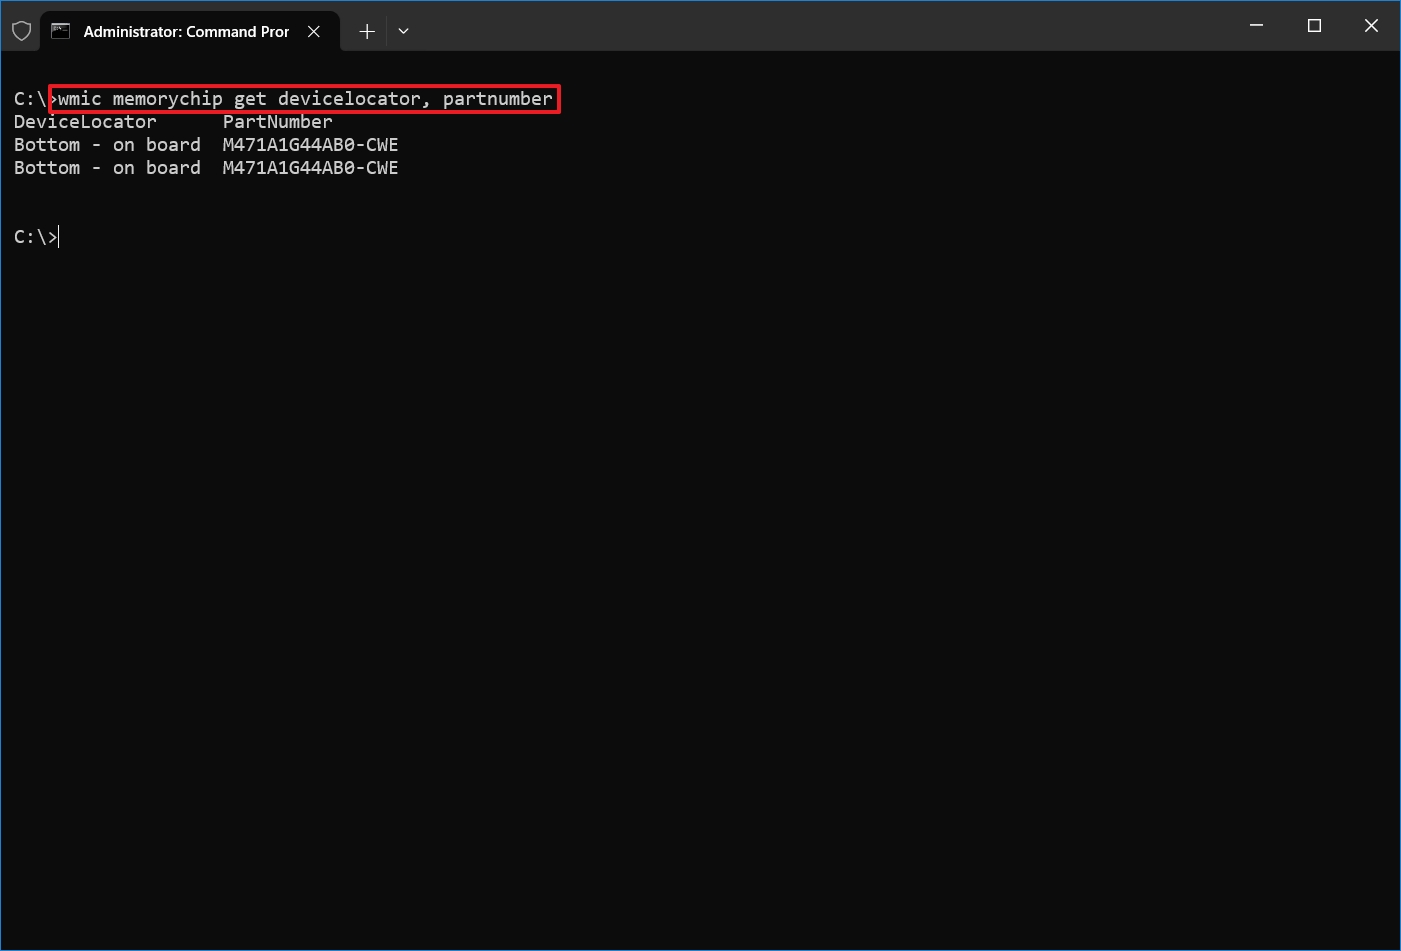
- Confirm the product number under the «PartNumber» column.
Check memory serial number
To find out the RAM serial number on your computer, use these steps:
- Open Start.
- Type Command Prompt, right-click the top result, and select the Run as administrator option.
- Type the following command to view the serial number for each memory stick and press Enter: wmic memorychip get devicelocator, serialnumber
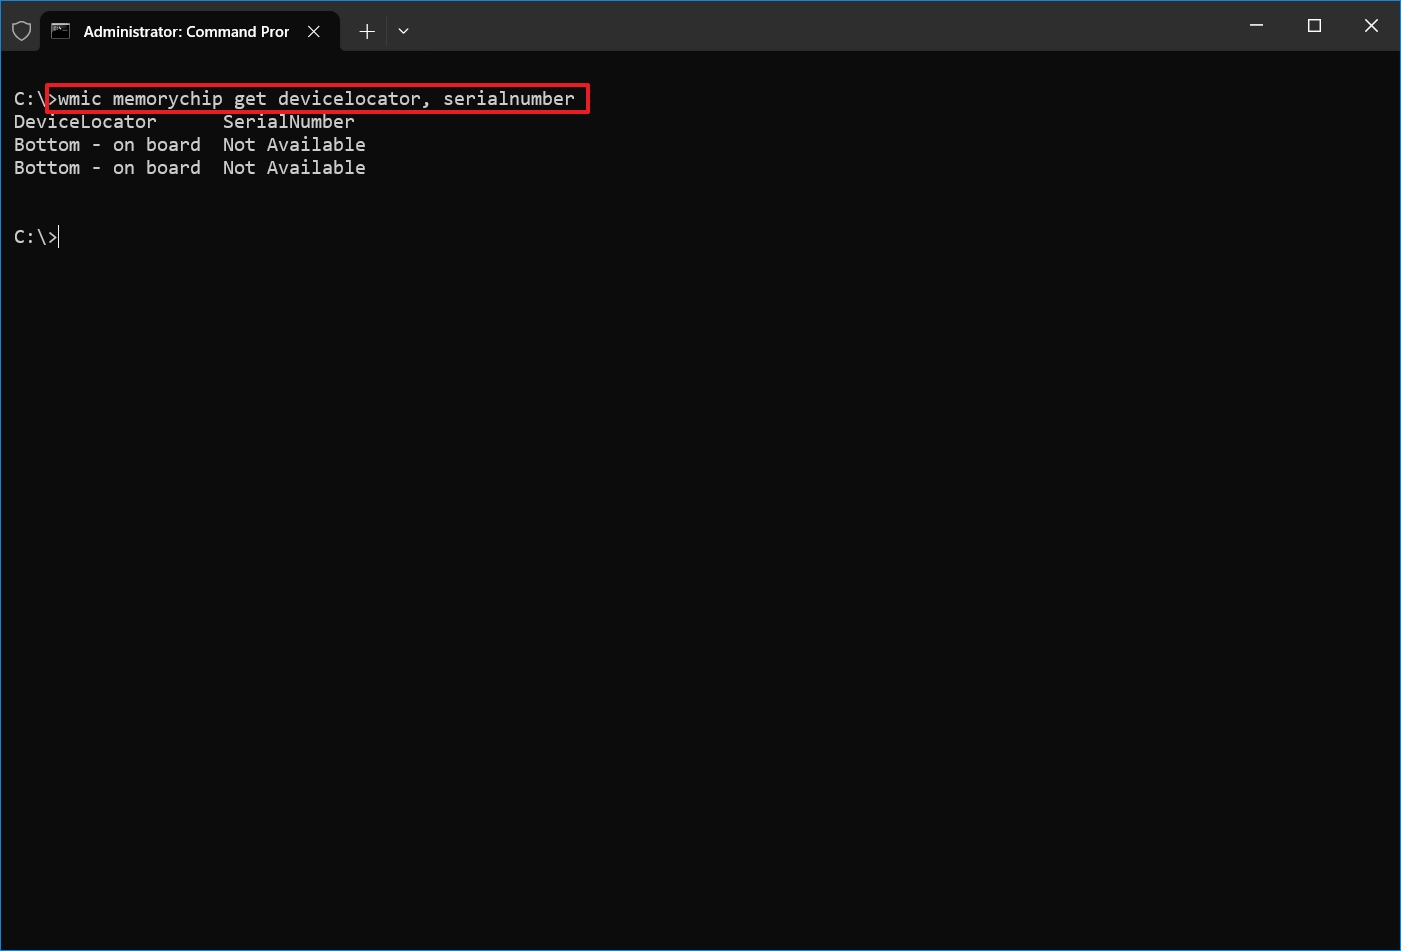
- Quick tip: In the command, you can also replace «devicelocator» with «banklabel» to list the serial number showing the bank’s physical label where the memory is located on the motherboard. For example, wmic memorychip get banklabel, serialnumber.
- Confirm the product identifier under the «SerialNumber» column.
Check memory capacity
Using Command Prompt, you can determine the total capacity per module and the entire system.
Determine capacity per memory module
To check each memory module capacity on Windows 10, use these steps:
- Open Start.
- Type Command Prompt, right-click the top result, and select the Run as administrator option.
- Type the following command to determine the memory capacity and press Enter: wmic memorychip get devicelocator, capacity
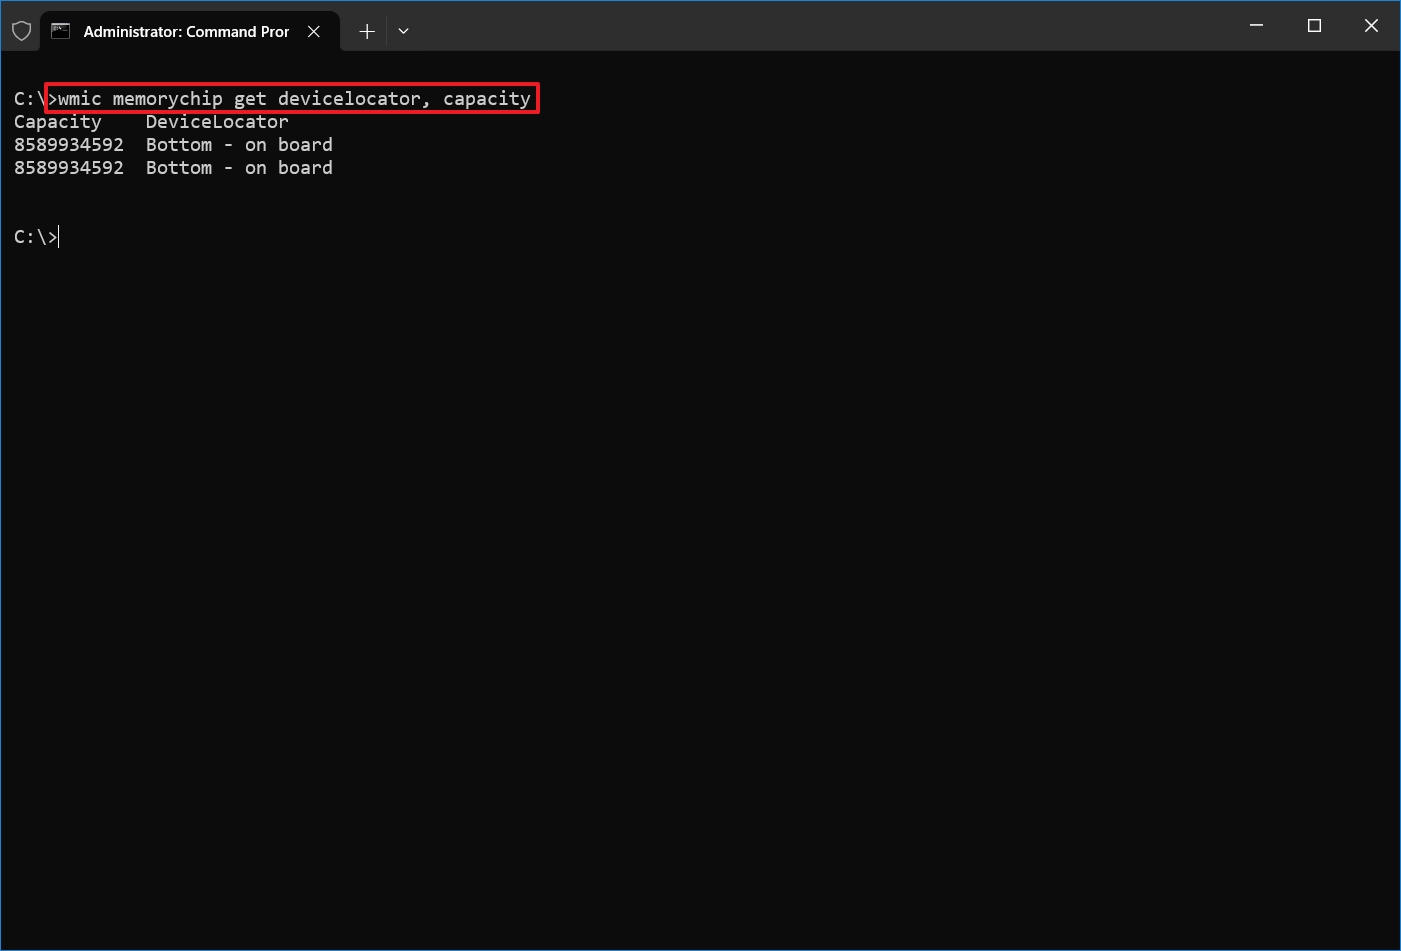
- Confirm the size of each memory module under the «Capacity» column.
- Quick tip: The capacity information is displayed in bytes, but you can divide the number by 1,073,741,824 (1 gigabyte in bytes) to convert the data into gigabytes.
Determine total system memory capacity
To find out the total amount of memory installed on the computer, use these steps:
- Open Start.
- Type Command Prompt, right-click the top result, and select the Run as administrator option.
- Type the following command to determine the total physical memory and press Enter: systeminfo | findstr /C:»Total Physical Memory»
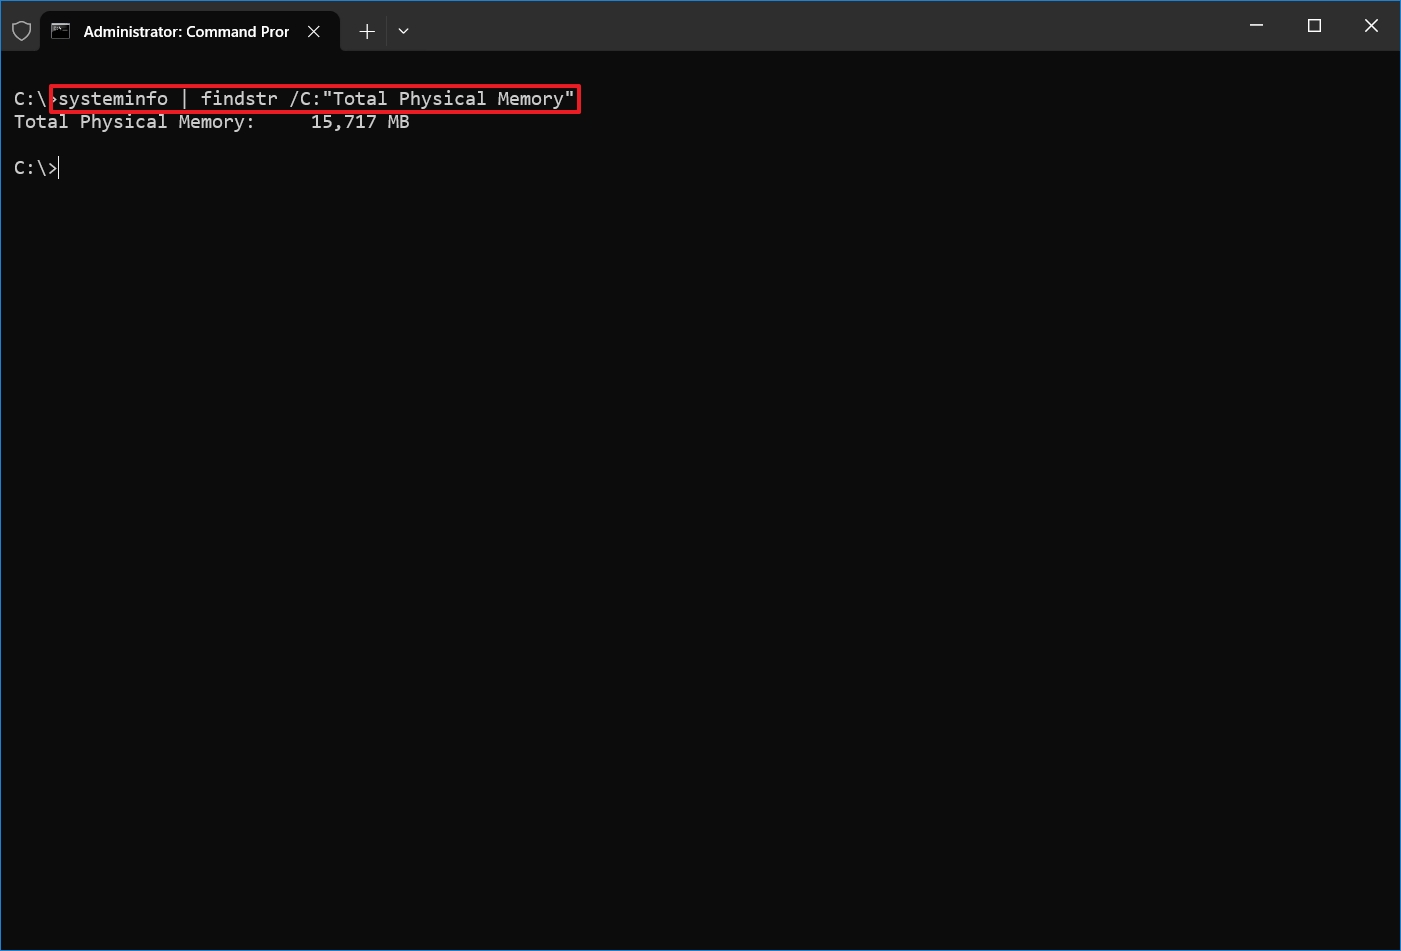
- Confirm the total amount of physical memory (in megabytes) installed on the device.
Check memory module speed
To confirm the operating module speed, use these steps:
- Open Start.
- Type Command Prompt, right-click the top result, and select the Run as administrator option.
- Type the following command to determine the memory speed and press Enter: wmic memorychip get devicelocator, speed
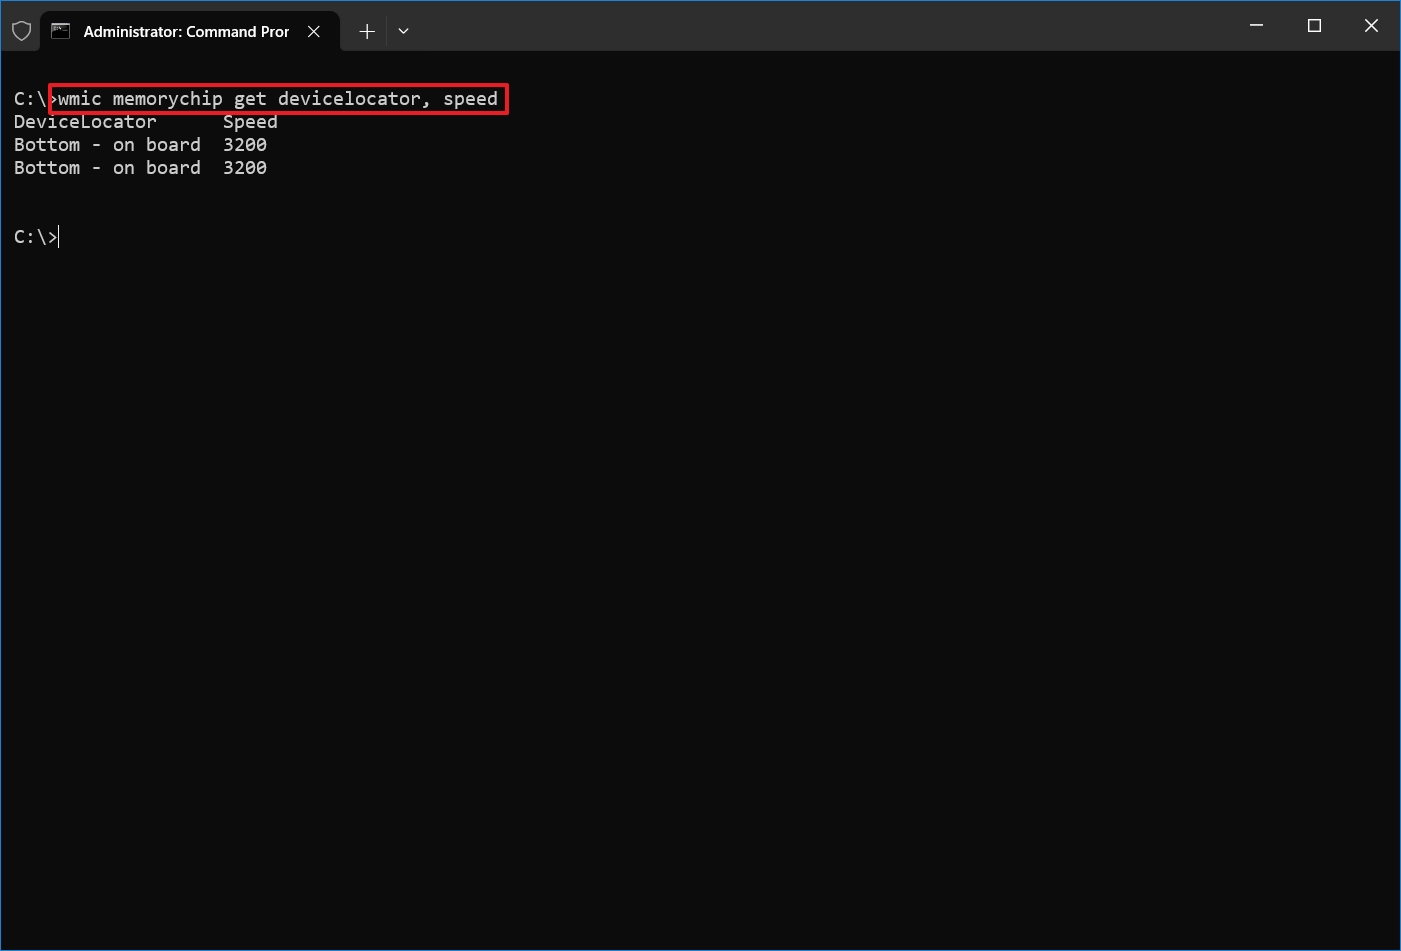
- Confirm the speed of the memory modules (in MHz) under the «Speed» column
Check memory type
To check the system memory type on Windows 10, use these steps:
- Open Start.
- Type Command Prompt, right-click the top result, and select the Run as administrator option.
- Type the following command to determine the memory type and press Enter: wmic memorychip get devicelocator, memorytype
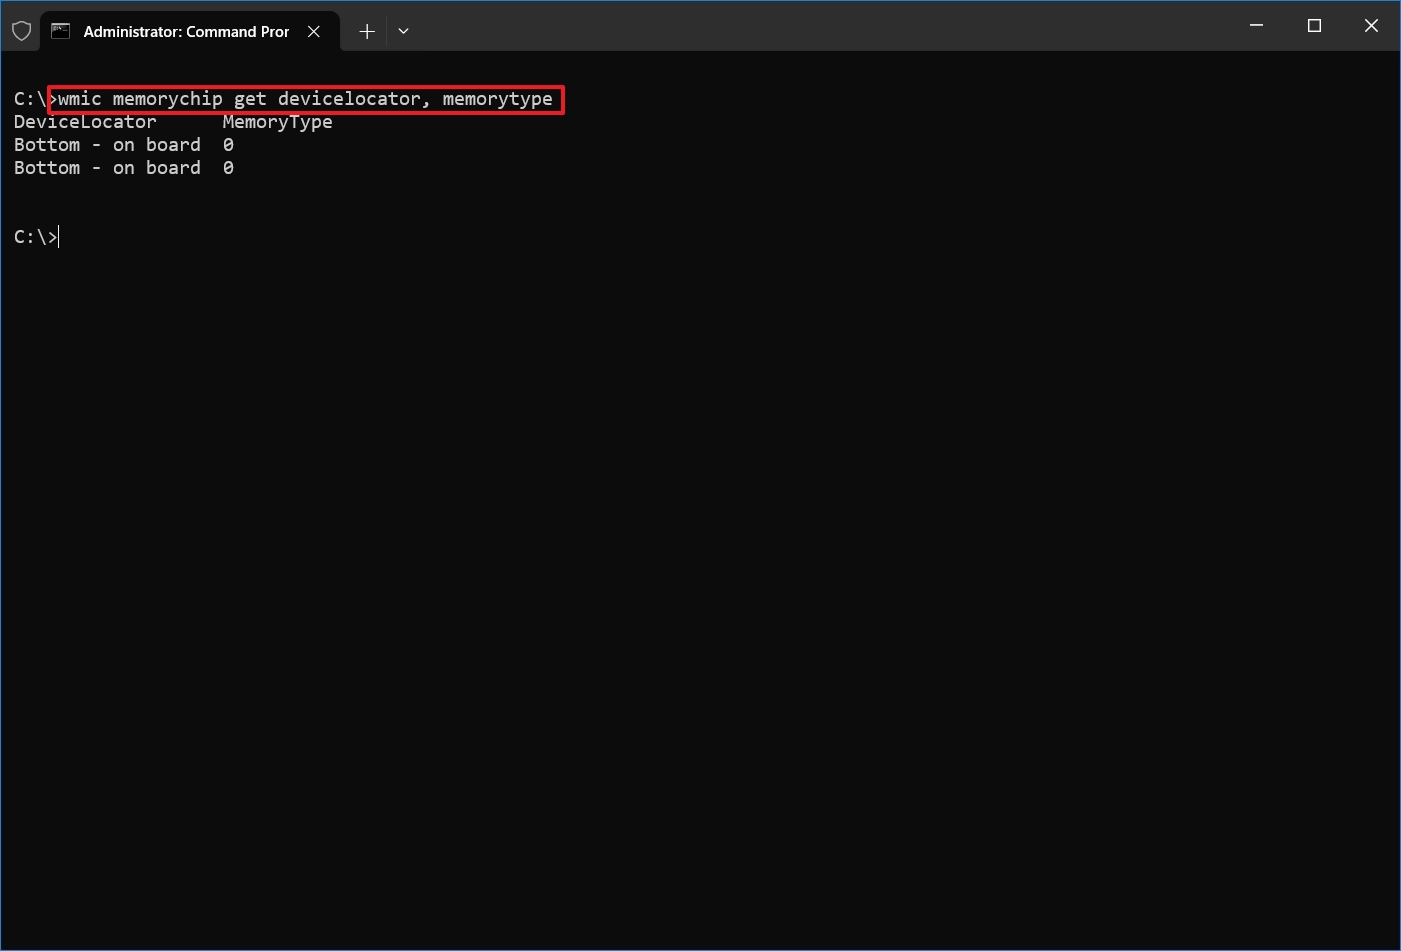
- Under the «MemoryType» column, confirm the number that identifies the type of memory. (See list below.)
Supported types
Memory types the command can identify:
- 0: Unknown.
- 1: Other.
- 2: DRAM.
- 3: Synchronous DRAM.
- 4: Cache DRAM.
- 5: EDO.
- 6: EDRAM.
- 7: VRAM.
- 8: SRAM.
- 9: RAM.
- 10: ROM.
- 11: Flash.
- 12: EEPROM.
- 13: FEPROM.
- 14: EPROM.
- 15: CDRAM.
- 16: 3DRAM.
- 17: SDRAM.
- 18: SGRAM.
- 19: RDRAM.
- 20: DDR.
- 21: DDR2.
- 22: DDR2 FB-DIMM.
- 24: DDR3.
- 25: FBD2.
- 26: DDR4.
Check memory form factor
To check whether the modules are DIMM or SODIMM, use these steps:
- Open Start.
- Type Command Prompt, right-click the top result, and select the Run as administrator option.
- Type the following command to check the memory form factor and press Enter: wmic memorychip get devicelocator, formfactor

- Under the FormFactor column, confirm the form factor information.
- Quick note: If the output is 8, the device uses DIMM modules (typically available on desktops). Otherwise, if the command output the number 12, the computer uses SODIMM modules (usually available on laptops).
Supported form factors
Form factors the command can identify:
- 0: Unknown.
- 1: Other.
- 2: SIP.
- 3: DIP.
- 4: ZIP.
- 5: SOJ
- 6: Proprietary.
- 7: SIMM.
- 8: DIMM.
- 9: TSOP.
- 10: PGA.
- 11: RIMM.
- 12: SODIMM.
- 13: SRIMM.
- 14: SMD.
- 15: SSMP.
- 16: QFP.
- 17: TQFP.
- 18: SOIC.
- 19: LCC.
- 20: PLCC.
- 21: BGA.
- 22: FPBGA.
- 23: LGA.
- 24: FB-DIMM.
Check all memory details
The above commands help you determine the most useful information about the RAM installed on your computer. However, there is another command you can use to query all the available details at the same time.
To view all the memory details on Windows 10, then use these steps:
- Open Start.
- Type Command Prompt, right-click the top result, and select the Run as administrator option.
- Type the following command to list every memory detail possible and press Enter: wmic memorychip list full
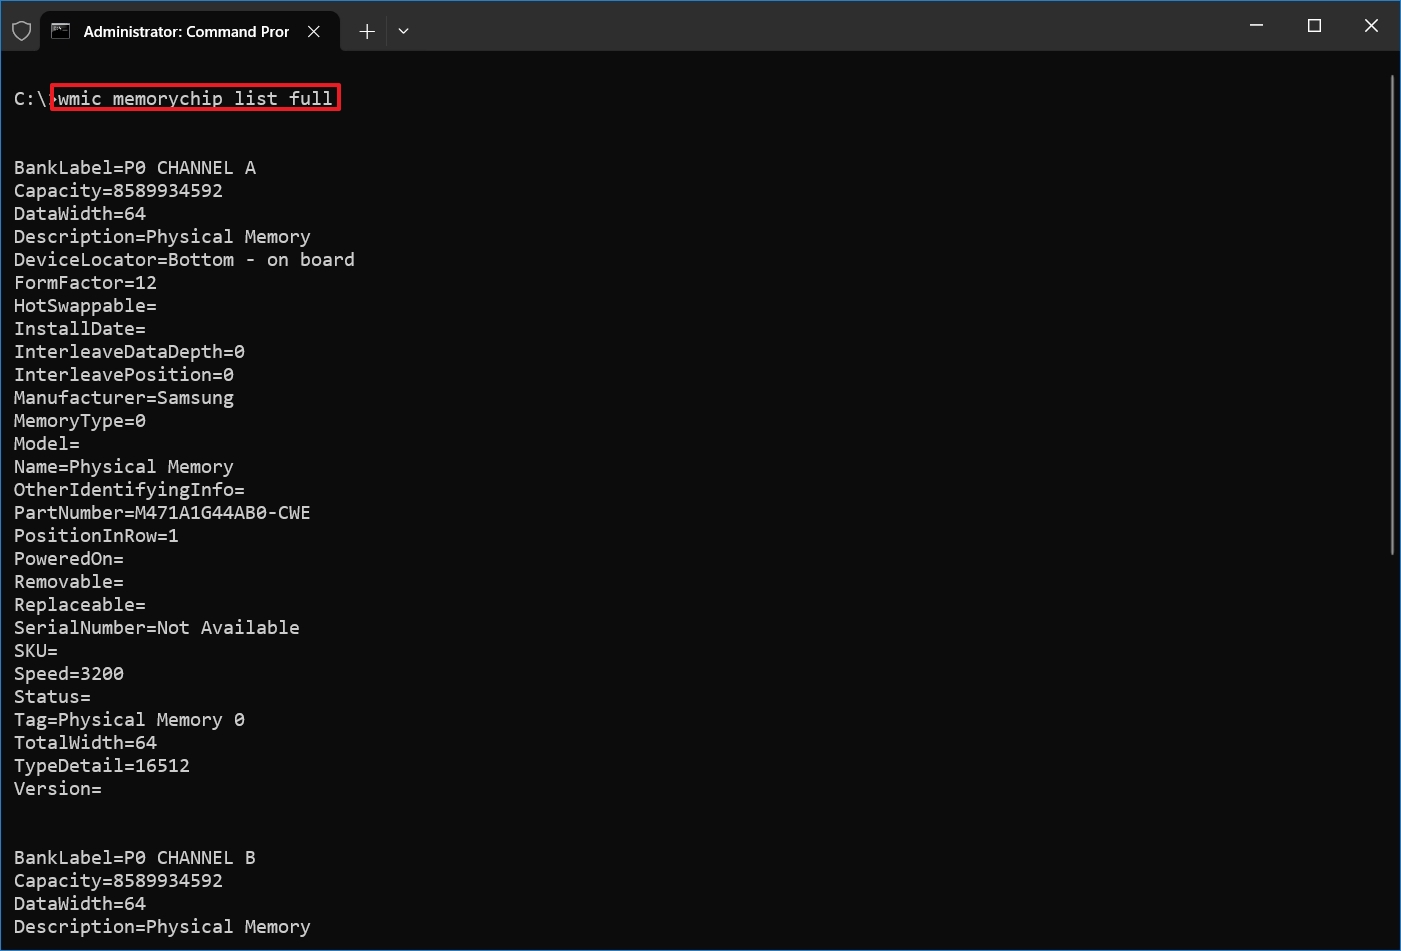
- Confirm the available information for each memory module installed on the device.
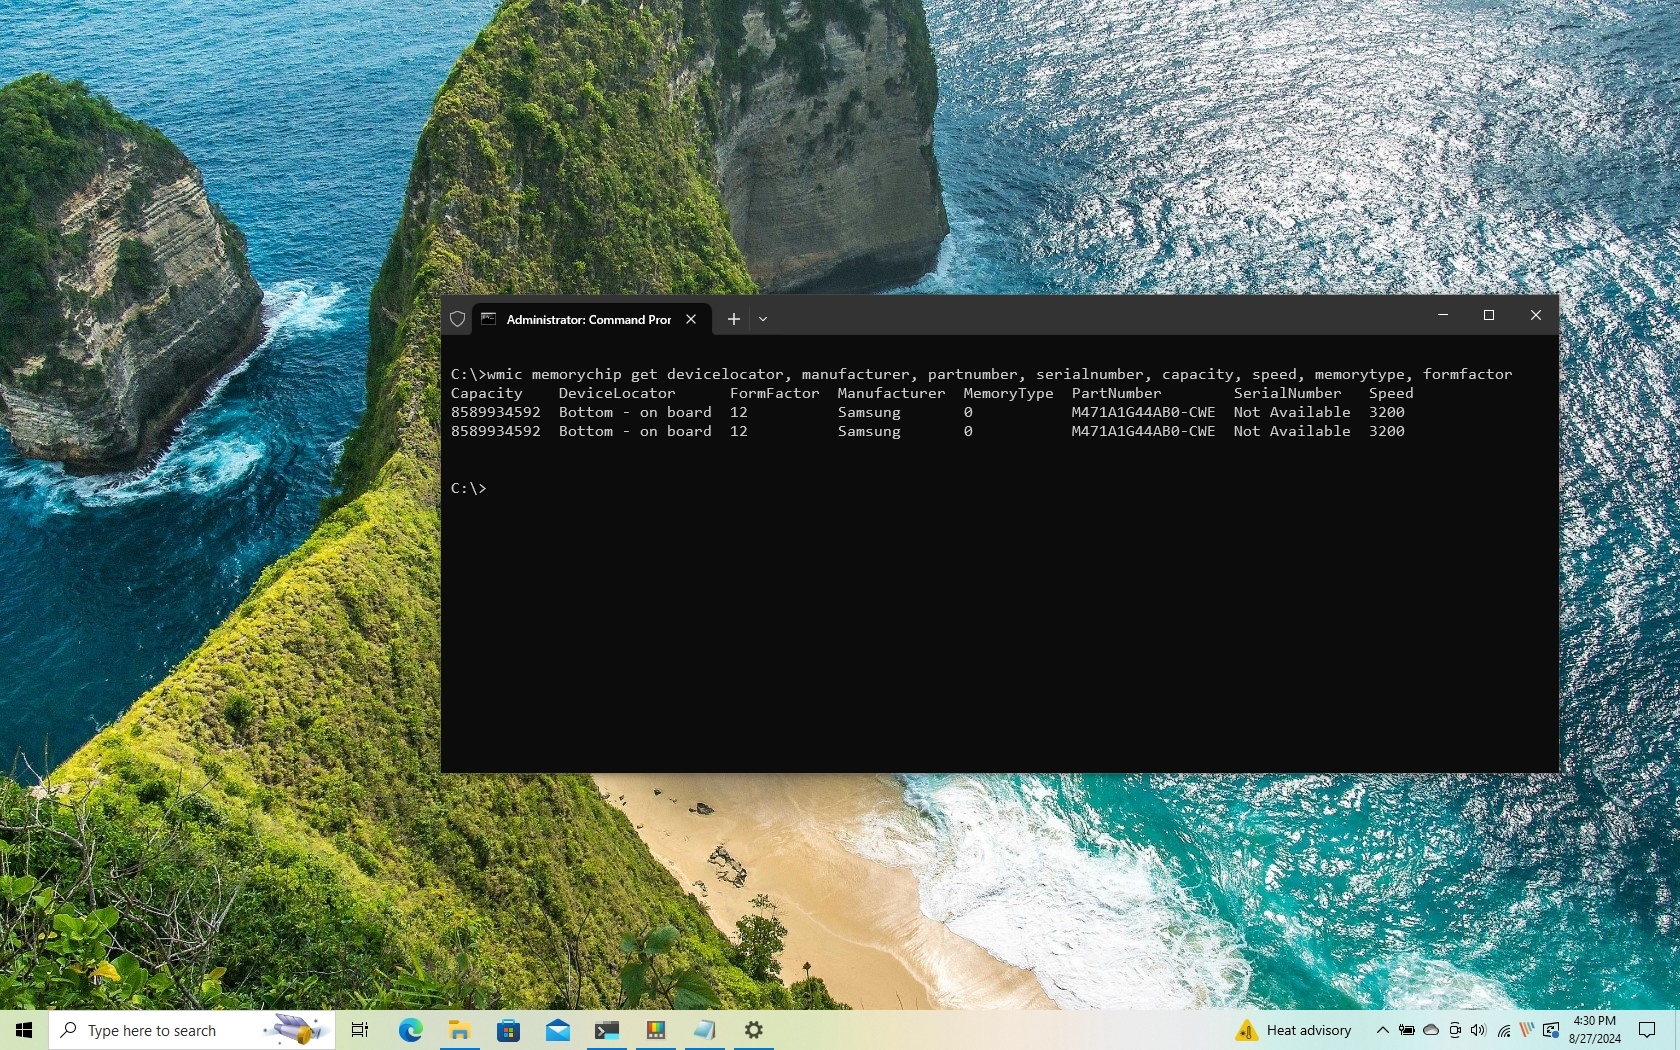
- (Optional) Type the following command to view only the specific details and press Enter: wmic memorychip get devicelocator, manufacturer, partnumber, serialnumber, capacity, speed, memorytype, formfactor
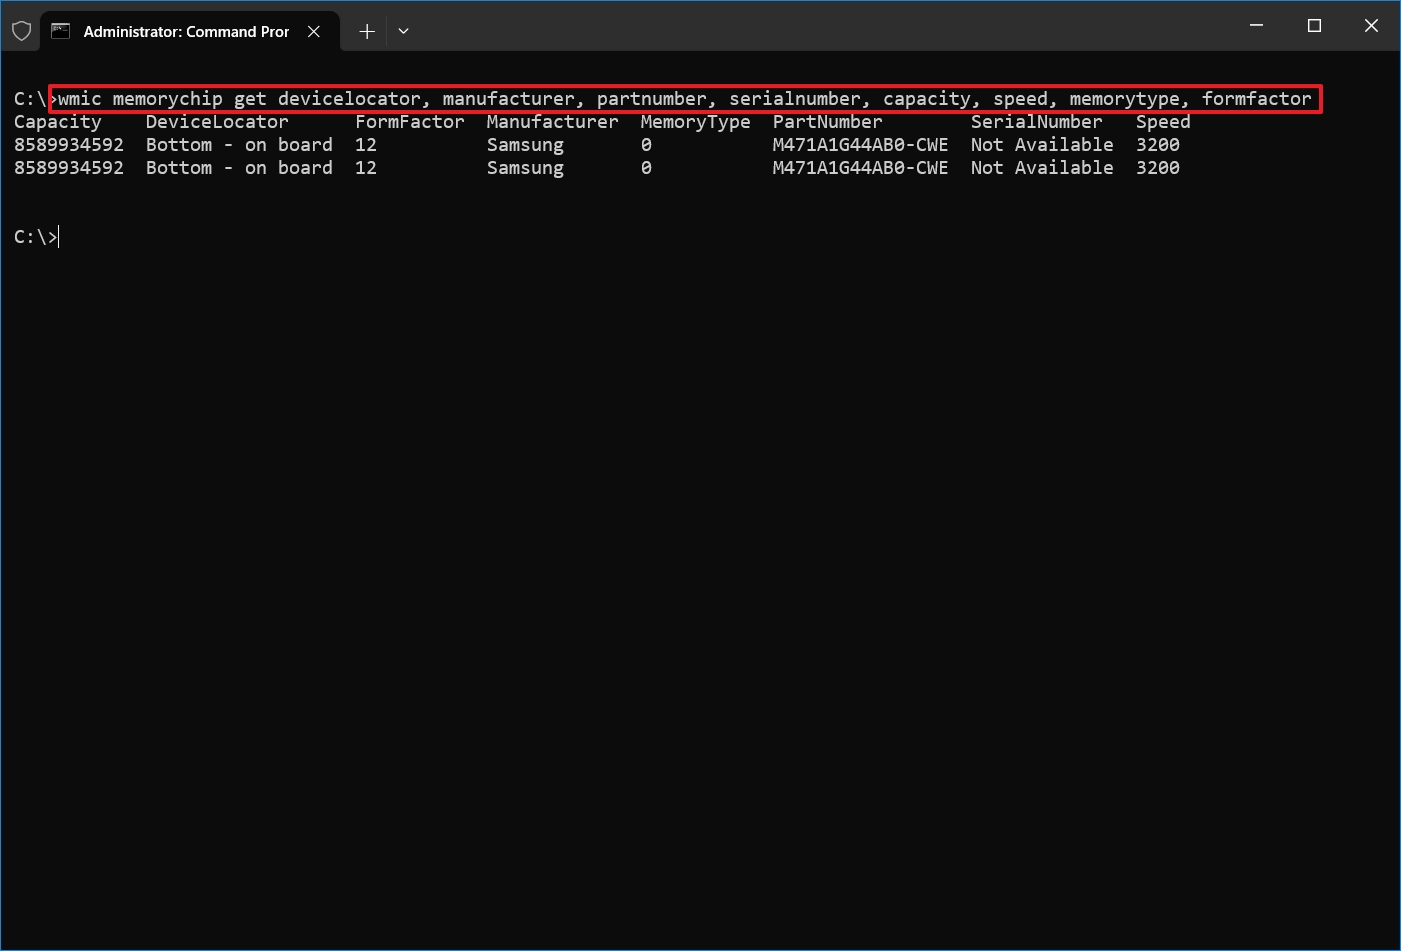
- Confirm the memory information.
Once you complete the steps, you will have many details about the memory modules installed on your Windows 10 device.
While you can use Command Prompt to query many details about your computer’s RAM specifications, some information may not be available depending on the system’s hardware.
More resources
For more helpful articles, coverage, and answers to common questions about Windows 10 and Windows 11, visit the following resources:
- Windows 11 on Windows Central — All you need to know
- Windows 10 on Windows Central — All you need to know
Mauro Huculak has been a Windows How-To Expert contributor for WindowsCentral.com for nearly a decade and has over 15 years of experience writing comprehensive guides. He also has an IT background and has achieved different professional certifications from Microsoft, Cisco, VMware, and CompTIA. He has been recognized as a Microsoft MVP for many years.
Want to check the RAM on your Windows 10 computer or laptop? You’ve come to the right place. This post will show you several methods to check RAM on Windows 10.
What is RAM?
RAM stands for Random Access Memory. It’s a type of computer memory that can be accessed randomly. RAM stores various types of information about running programs in your computer. However, RAM can only stores the data as long as the computer is on, so if the computer shuts down, it will lose the previously stored data.
There are two main types of RAM in the current market: DRAM (Dynamic Random Access Memory) and SRAM (Static Random Access Memory). Generally speaking, the more RAM your computer is, the faster it can run. If your computer is running slow to a crawl, one of the main causes can be the small RAM capacity that influences the system performance.
How to check how much RAM you have
- Check RAM via msinfo32.exe
- Check RAM via Task Manager
- Check RAM in Control Panel
- Bonus Tip
Method 1: Check RAM via msinfo32.exe
Since Windows 98, Microsoft includes a built-in tool called Microsoft System Information (msinfo32.exe), which enables you to gather information about your computer.Here’s how to use it:
1) On your keyboard, press the Windows logo keyand R at the same time to invoke the Run box.
2) Type msinfo32.exe and click OK.
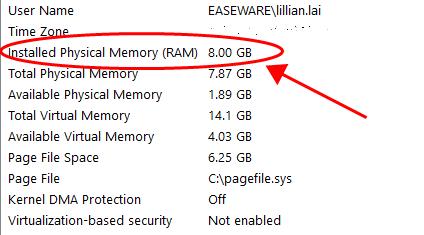
3) You can check your RAM in Installed Physical Memory (RAM). You can also browse other system information from this window.
Now you should be able to check your computer memory without problems!
If this method doesn’t work for you, don’t worry. We have other solutions for you.
Method 2: Check RAM via Task Manager
You can also check your RAM on Windows 10 from Task Manager. To do so, follow the steps below:
1) On your keyboard, press the Ctrl key, Shift key, and Esc key at the same time to invoke Task Manager.
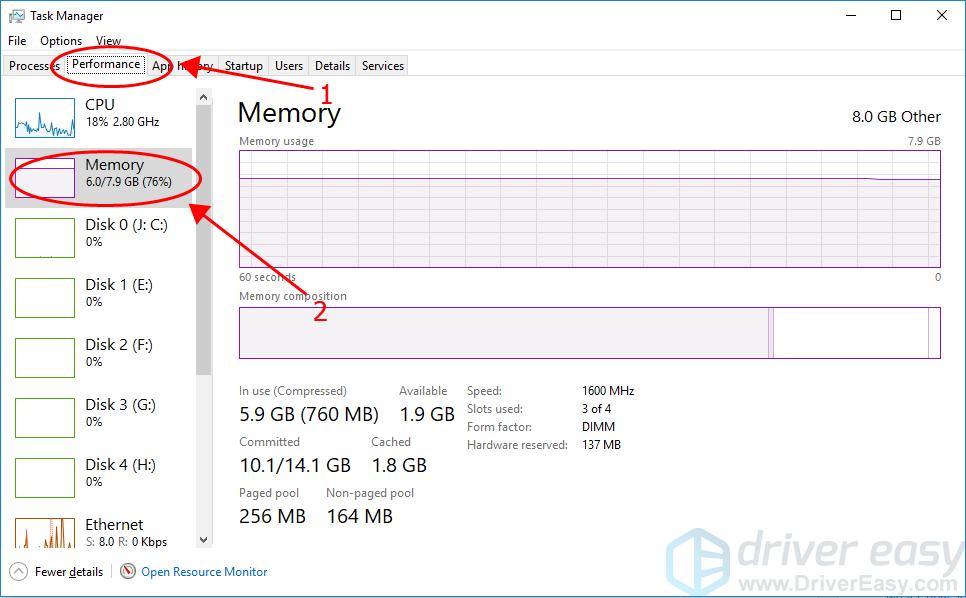
2) Click Performance, then click Memory, and you will see the RAM in use and the available memory in your Windows 10 computer.
Method 3: Check RAM in Control Panel
Control Panel is a powerful feature where you can check information and diagnose the issues in your Windows 10 computer.
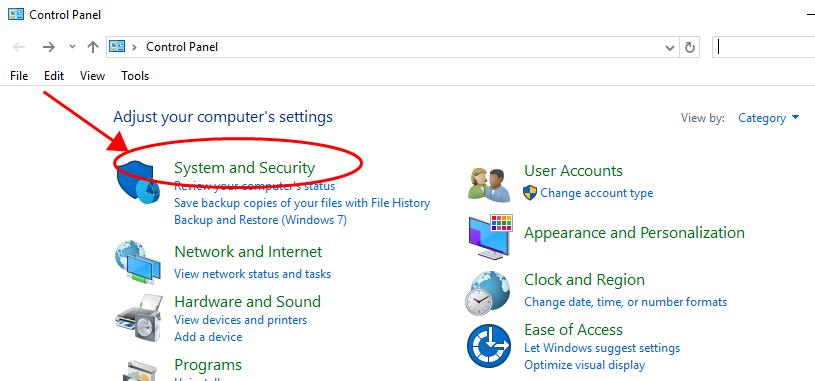
1) Type Control Panel in the search bar from the Start menu, then click Control Panel to open it.
2) View Control Panel items by category, then click System and Security.
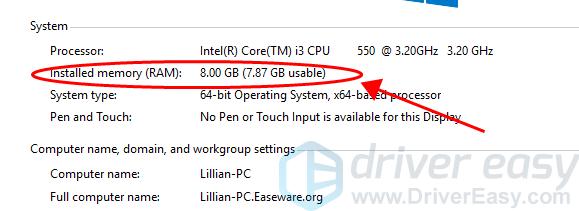
3) Click View amount of RAM and processor speed in the System section.

4) You can check your RAM information in Installed memory under the System section.
That’s it. These are the three easy methods to check RAM on Windows 10 quickly and easily.
Method 4: Bonus Tip
It requires time to manually check your computer information, including your graphics card information. If you don’t have time or computer skills, you can do it automatically with Driver Easy.
1) Download Driver Easy and run in your computer.
2) Click Hardware Info and click Yes verify UAC.
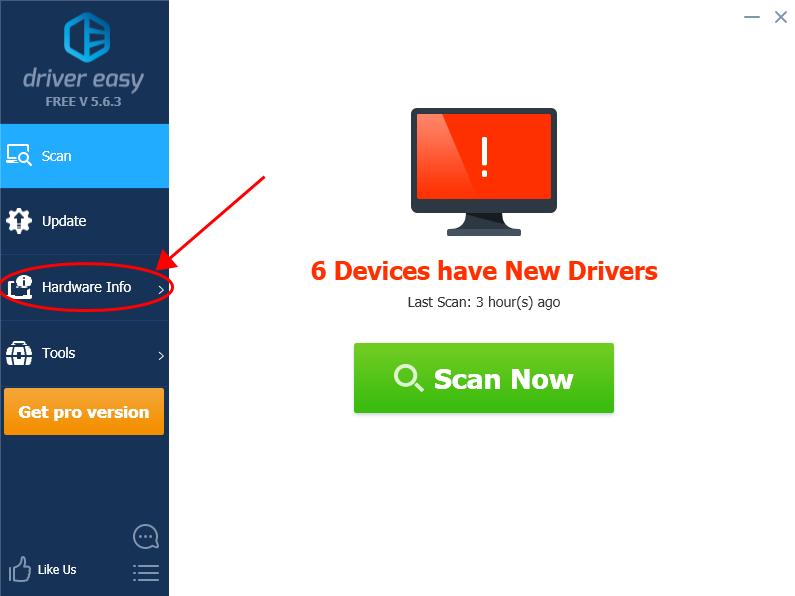
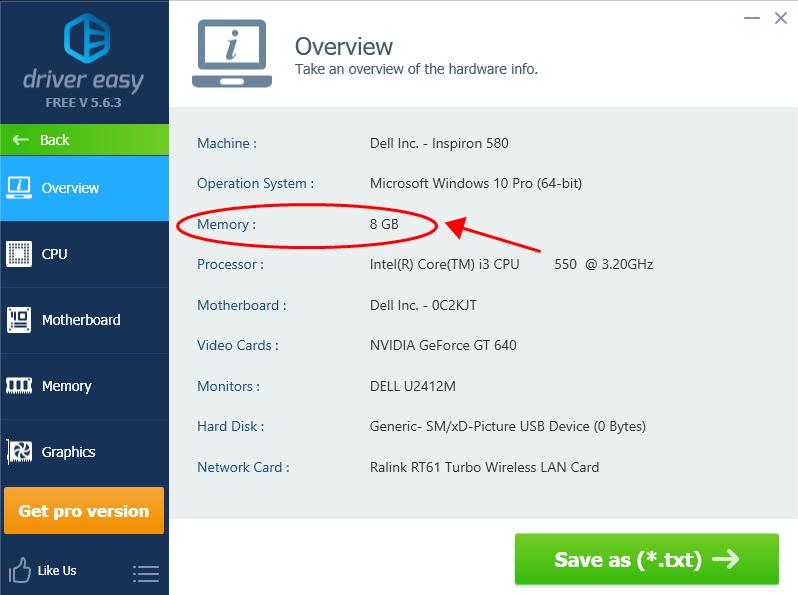
3) You can then check the memory in your Windows computer, and you can also check other system information such as Motherboard, Processor, Video cards, Networks card.
As you may have already known, Windows 10 computers usually run into various issues, and one of the possible problems is the device drivers. So it’s recommended to keep your device drivers up to date.
Driver Easy will automatically recognise your system and solve the drivers issues in Windows 10. You don’t need to know exactly what system your computer is running, you don’t need to risk downloading and installing the wrong driver, and you don’t need to worry about making mistake when installing.
You can update your drivers automatically with either the FREE or the Pro version of Driver Easy. But with the Pro version, it takes just 2 clicks (and you will get full support and a 30-day money back guarantee).
1) Download and install Driver Easy.
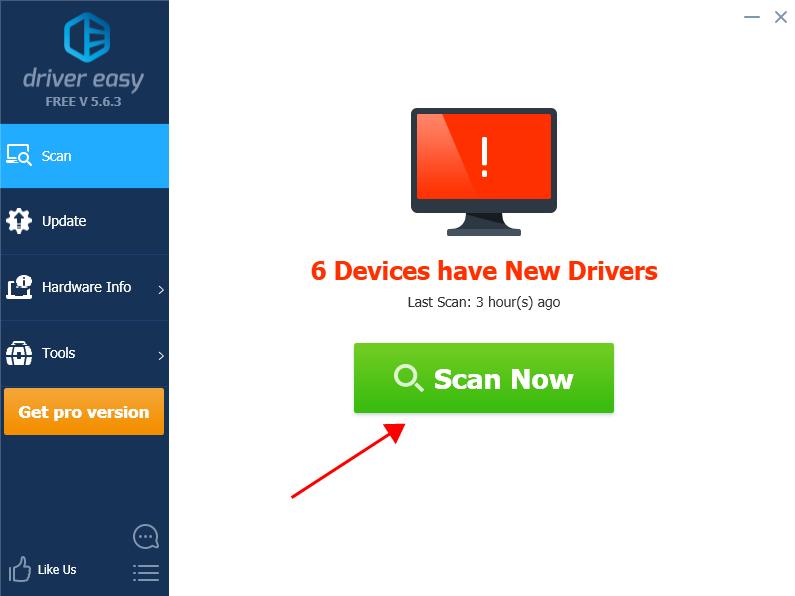
2) Run Driver Easy and click the Scan Now button. Driver Easy will then scan your computer and detect any problem drivers.
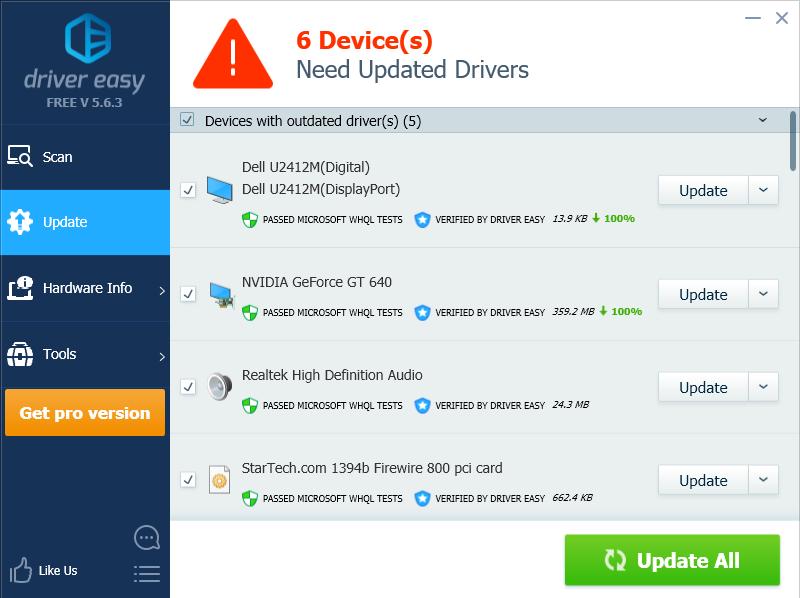
3) Click the Update button next to the flagged driver to automatically download the correct version of the driver (you can do this with the FREE version), then install it in your computer.
Or click Update All to automatically download and install the correct version of all the drivers that are missing or out of date on your system (this requires the Pro version – you’ll be prompted to upgrade when you click Update All).
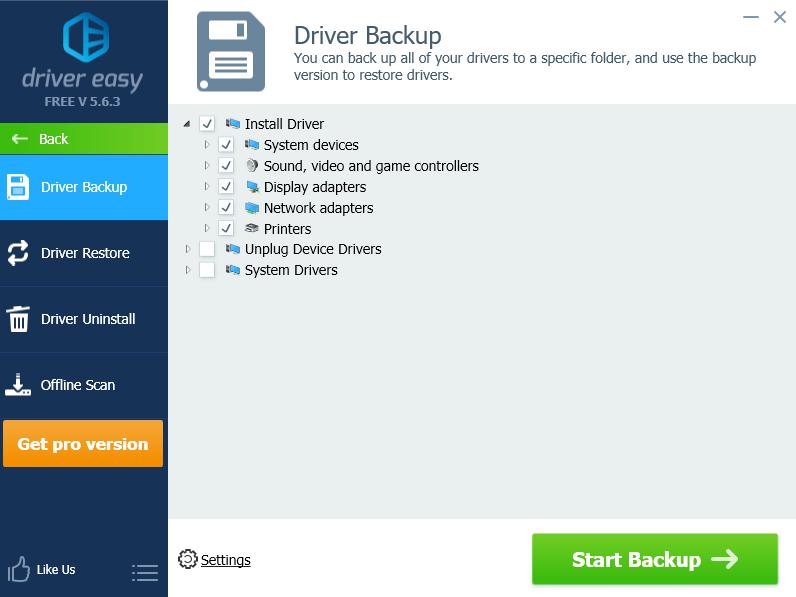
4) You can also back up your device drivers or restore drivers automatically!
31
31 people found this helpful