
Настройка MTU (Maximum Transmission Unit) знакома большинству пользователей, которые когда-либо настраивали Wi-Fi роутеры, но доступна и в Windows для Ethernet и других подключений. MTU — это максимальный размера блока данных одного пакета в байтах (без учета размера заголовка), стандартный размер — 1500 байт.
При необходимости размер MTU в Windows 11, 10 и других версий можно изменить. В этой инструкции — о том, как это сделать, а также узнать текущий размер MTU.
Способы изменения размера MTU в Windows 11 и Windows 10
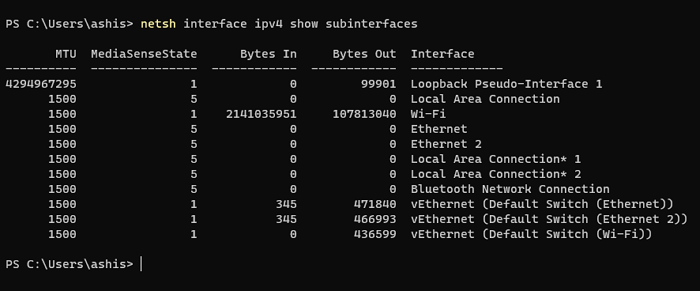
Прежде чем приступить, вы можете определить текущий размер MTU для сетевых интерфейсов, для этого достаточно запустить командную строку или Терминал от имени администратора, после чего использовать следующую команду:
netsh interface ipv4 show subinterfaces

Размеры MTU будут указаны в первом столбце в результатах выполнения команды. Если вам требуется изменить размер пакета, вы можете использовать один из следующих способов.
Включение Jumbo frame
Первая возможность — включить Jumbo Frame (Jumbo-кадр), позволяющий передавать данные в размере, превышающем стандартные 1500 байт. Для этого используйте следующие шаги:
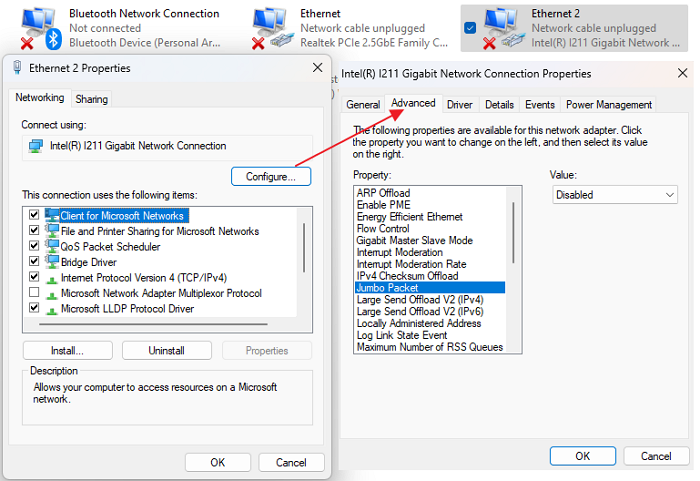
- Нажмите клавиши Win+R, введите ncpa.cpl и нажмите Enter.
- В списке подключений нажмите правой кнопкой мыши по подключению, для которого нужно включить Jumbo frame и выберите пункт «Свойства».
- Нажмите кнопку «Настроить» для настройки сетевого адаптера.
- На вкладке «Дополнительно» найдите пункт «Jumbo packet» и измените его значение, затем примените настройки.


При включении Jumbo frame соединение может быть кратковременно разорвано, но обычно затем работает исправно. Учитывайте, что настройка Jumbo packet может быть доступна не для всех сетевых карт, также её наличие может зависеть от используемых драйверов.
Изменение MTU в командной строке
Вторая возможность — использование командной строки для изменения размера MTU:
- Запустите командную строку от имени администратора и введите следующую команду, чтобы посмотреть список имен интерфейсов:
netsh interface ipv4 show subinterfaces
- В следующей команде измените ИМЯ_ИНТЕРФЕЙСА и значение MTU для изменения MTU для соответствующего подключения:
netsh interface ipv4 set subinterface ИМЯ_ИНТЕРФЕЙСА mtu=РАЗМЕР store=persistent

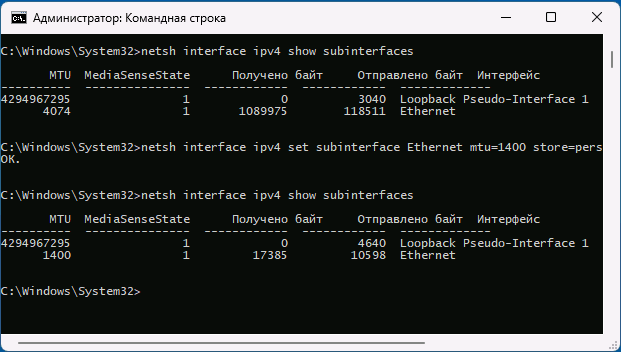
После успешного выполнения команды, размер MTU будет изменен.
Определить оптимальный размер пакета (значение MTU) для текущего Интернет-подключения можно в командной строке с помощью команды, ping адреса_сайта -f -l РАЗМЕР, например:
ping google.com -f -l 1500

Задачей будет поиск такого значения MTU, которое не приводит к сообщениям о необходимости фрагментации пакета.
Sometimes, you may have noticed that some websites don’t function well on your broadband connection. While most websites run fine, certain seem to have an issue. If you have encountered this situation, it is time to change the Maximum Transmission Unit (MTU) on Windows 11/10 computers.
How to check current MTU settings?
MTU, or Maximum Transmission Unit, is necessary or responsible for this case because it is the parameter that defines the maximum packet size that can be transmitted over a network. So by optimizing MTU, you can enhance your network performance. As a result, you can browse the internet more efficiently.
But not many are aware of how MTU functions. There are two quick ways to check the current MTU settings, these are:
Use Windows Terminal to check the current MTU value
Windows Terminal has to be the easiest way to learn about your current MTU value. To get started, follow the below steps:
- Press Windows Key + X to access the quick menu.
- Click Windows Terminal (Admin).
- Now run the following command and press enter.

netsh interface ipv4 show subinterfaces
- Once done, you should see the MTU value of different networks under the MTU tab.
Check MTU network adapter settings
There is also an alternative option which is checking through the Network adapter settings. For this, you need to follow the below steps:
- Press the Windows key + R to launch Run.
- Type ncpa.cpl and press Enter, and you should see a list of different Network adapters.
- Right-click on any of the adapters for which you want to check the MTU and then select Properties.
- Click the Configure button to open the adaptor connection properties
- Switch to the Advanced Tab and select Jumbo Frame

- Then select the higher value from the dropdown on the right.
Note: The adapter uses the default MTU value if you don’t see the Jumbo Packet option. It also means you cannot change through the control panel method.
Now that you know your MTU value, you can increase or decrease the value per your needs. To do so, there are two methods that you can follow. These are:
- Using Windows Terminal
- Changing MTU through Network Adapter settings
Let’s now look at these methods one by one below:
1] Using Windows Terminal
Changing MTU using the command prompt has to be the easiest method. All you have to do is run two commands – one to identify the interface name and the other to change the MTU value, and you are good to go. So go ahead and follow these steps:
- First, press Windows Key + X to access the quick menu and launch Windows Terminal (Admin).
- Now run the following command to list down all the network adapters:
netsh interface ipv4 show subinterfaces
- Now note down the Interface name for which you want to change the MTU.
- Next, to change the MTU value of your preferred interface, run the following command:
netsh interface ipv4 set subinterface <subinterface name> mtu=9000 store=persistent
- Over here, replace <subinterface name> with the interface name. Also, you change the mtu=9000 value to something else per your requirements.
2] Changing MTU through network adapter settings
You can do it through Network Adapter settings to change your MTU value through a visual interface. For this, follow the below steps:
- Launch Run by pressing Windows Key + X.
- Type ncpa.cpl and press Enter.
- Right-click on your preferred Network adapter and go to Properties.
- Next, click on the Configure button.
- Next, select Jumbo Packet, and from the disable dropdown menu, select any of the MTU values.

- Once done, save the changes and reboot your computer.

How to determine the optimal MTU Value?
Now you might be wondering what would be the ideal MTU value. You can quickly figure that out by running a command in Windows Terminal.
You need to run the ping command, which will send requests to the network and increase the size of the Packet till you get a message about the needed fragment of the Packet. So whichever website is not loading correctly, you can try the ping command with it by following the below steps:

Launch Windows Terminal, and run the following command:
ping [url] -f -l <packet_size>
Over here, replace [url] with your respective URL and set the <packed_size> to 1450. As you run your ping, keep increasing the size with each command until you see the Packet needs to be the fragmented message.
How to troubleshoot Common Issues around MTU?
While dealing with MTU, it is easy to mess things up. If you enter the wrong MTU value, it can impact the overall network performance.
In such a case, you can try restoring the default MTU value. The default MTU value on most computers is 1500. So you can follow the above steps to change the MTU value to 1500 and see if it helps you out.
If you still face any other internet issues, running Windows Troubleshooter might be helpful. To run it, follow the below steps:
- Press Windows Key + I to launch Settings.
- Navigate to System > Troubleshoot > Other troubleshooters.
- Over here, click on the Run button next to Internet Connections and let the troubleshooter run.
Conclusion
So that was all for how to change MTU on Windows 11/10. Changing MTU value using Windows Terminal is a much easier and straightforward process. While if you make the changes using Network adapters, you may not find the required options to make changes. So go ahead and try the above steps on your own and see if they are helpful to you.
Changing the Maximum Transmission Unit (MTU) on your Windows 10 computer can help improve network performance, especially if you’re experiencing connectivity issues. It’s a quick and straightforward process that involves using the Command Prompt to adjust the network settings.
Changing the MTU on Windows 10 can optimize how data packets are transmitted over the network, potentially reducing latency and fragmentation. Follow these steps to adjust your MTU settings.
Step 1: Open Command Prompt as Administrator
Begin by opening the Command Prompt with administrative privileges.
Right-click the Start menu and select «Command Prompt (Admin)» or «Windows PowerShell (Admin).»
Step 2: Find the Network Interface
You need to identify the network interface you wish to change.
Type netsh interface ipv4 show subinterfaces and press Enter. This command will display a list of network interfaces and their current MTU settings.
Step 3: Set the New MTU Value
Now, set the MTU value to your desired number.
Type netsh interface ipv4 set subinterface "Local Area Connection" mtu=XXXX store=persistent and press Enter. Replace «Local Area Connection» with the name of your network interface and «XXXX» with the MTU value you want to set.
Step 4: Confirm the Change
Double-check to make sure the change was successful.
Type netsh interface ipv4 show subinterfaces again and press Enter. Verify that the MTU value has been updated.
Step 5: Restart Your Computer
Finally, restart your computer to ensure the settings take effect.
After a reboot, your new MTU settings should be active. This step helps to solidify the changes made to your network configuration.
Once you have completed these steps, your network interface will operate with the new MTU value, which can lead to improved network performance and fewer connectivity issues.
Tips for Changing MTU on Windows 10
- Test different MTU values to find the optimal setting for your network.
- Always use the Command Prompt as an administrator to ensure you have the necessary permissions.
- Note down your original MTU settings before making any changes, so you can revert back if needed.
- If you experience issues after changing the MTU, try lowering the value incrementally.
- Use online tools or ping tests to determine the correct MTU value for your specific network.
Frequently Asked Questions
What is MTU?
MTU stands for Maximum Transmission Unit, and it determines the largest size of a data packet that can be sent over a network.
Why change the MTU?
Changing the MTU can help optimize network performance, reduce packet fragmentation, and resolve connectivity issues.
What is a typical MTU value?
The standard MTU value for Ethernet networks is usually 1500 bytes, but it can vary depending on the network.
How do I find the right MTU value?
You can use ping tests with the «don’t fragment» flag to discover the optimal MTU value for your network.
Can changing the MTU harm my computer?
Generally, no. However, setting an incorrect MTU value might cause connectivity issues. Always note down original settings before making changes.
Summary
- Open Command Prompt as Administrator.
- Find the Network Interface.
- Set the New MTU Value.
- Confirm the Change.
- Restart Your Computer.
Conclusion
By following these steps, you can change the MTU on Windows 10 and potentially improve your network performance. Whether you’re dealing with slow internet speeds, frequent disconnections, or other network-related issues, adjusting the MTU can make a notable difference. Always remember to note down your original settings, so you can easily revert back if needed.
Understanding your network settings is key to maintaining an efficient and fast internet experience. If you’re interested in learning more about network optimization, there are numerous resources available online to deepen your knowledge.
In the meantime, go ahead and give it a try. Sometimes a small tweak like adjusting the MTU can have a big impact on your day-to-day internet usage.
Matt Jacobs has been working as an IT consultant for small businesses since receiving his Master’s degree in 2003. While he still does some consulting work, his primary focus now is on creating technology support content for SupportYourTech.com.
His work can be found on many websites and focuses on topics such as Microsoft Office, Apple devices, Android devices, Photoshop, and more.
MTU of the Network Interface
The MTU(maximum transmission unit) refers to the largest size of the data payload that can be carried in a single frame by a network protocol at a given layer. For Ethernet Network Interface, the MTU value refers to the maximum size of the data payload, excluding the Ethernet frame’s overhead (e.g., MAC addresses, EtherType, FCS).
Ethernet Frame Structure
The frame consists of 7 key components, divided into three main sections:
- Header:
- Preamble + SFD (8 bytes, physical layer).
- Destination MAC (6 bytes).
- Source MAC (6 bytes).
- EtherType (2 bytes).
- Payload (Data): 46–1500 bytes.
- Frame Check Sequence (FCS): 4 bytes.

For standard Ethernet II frames:
- The maximum data payload size is 1500 bytes.
- This 1500-byte limit is what is commonly referred to as the Ethernet MTU, defining the largest chunk of data that can be transmitted in a single Ethernet frame without requiring fragmentation at the data link layer (Layer 2)
It’s a key parameter in network communication protocols like TCP/IP, determining how much data can be sent in one “chunk” before it needs to be broken down into smaller pieces. MTU applies to various network layers, but it’s most commonly associated with the network interface (e.g., Ethernet, Wi-Fi) you’re using.
In Windows 10 and 11, the MTU value of the network adapter(interface), decides the maximum size of IP data packets(in byte) that can be sent by the computer.
Configuring an proper value of MTU of the network interface will increase the network efficiency. It speeds up the downloading and uploading of data by the apps.
User can view or modify it via the Command Prompt, PowerShell, or sometimes through specific driver settings for your network adapter.
Relationship Between Ethernet MTU(Data link layer) and Network Layer IP Packet
The Network Layer (Layer 3), typically implemented by the Internet Protocol (IP), generates IP packets that need to be transported over a physical network. The Ethernet II frame serves as the vehicle for carrying these IP packets across the data link layer. Here’s how the Ethernet II MTU ties to the IP packet:
1. Encapsulation of IP Packet in Ethernet Payload
- The data payload of the Ethernet II frame encapsulates the entire IP packet, which includes:
- IP Header: Typically 20 bytes for IPv4 (without options) or 40 bytes for IPv6.
- IP Payload: The actual data, such as a TCP segment, UDP datagram, or other protocol data.
- The Ethernet II MTU (1500 bytes) represents the maximum size of the IP packet (IP header + IP payload) that can fit into a single Ethernet frame without requiring fragmentation.

For example:
- For an IPv4 packet:
- Maximum IP packet size = Ethernet MTU = 1500 bytes.
- If the IP header is 20 bytes, the maximum IP payload (data) is 1500 – 20 = 1480 bytes.
- For an IPv6 packet:
- If the IP header is 40 bytes, the maximum IP payload is 1500 – 40 = 1460 bytes.
IP packet size = IP header size + IP payload size
IP payload = TCP Segment = TCP header + TCP payload
Path MTU (PMTU)
Path Maximum Transmission Unit, is the smallest MTU value supported by any link along the entire path between a source and destination in a network. Unlike the MTU of a single network interface (e.g., 1500 bytes for Ethernet), Path MTU considers the full route that packets take across multiple devices—such as routers, switches, and gateways—each of which may have its own MTU limit. The goal is to determine the largest packet size that can travel from sender to receiver without being fragmented.
How Path MTU Works
When a packet travels through a network, it passes through various segments (e.g., your local network, ISP, backbone networks). Each segment has its own MTU, and if a packet exceeds the MTU of any link, it either gets fragmented (split into smaller pieces) or dropped, depending on the protocol settings. Path MTU represents the “weakest link” in this chain—the lowest MTU along the route.
Modern networks use Path MTU Discovery (PMTUD) to dynamically figure this out:
- The sender starts with its local MTU (e.g., 1500 bytes) and sends packets with the “Don’t Fragment” (DF) flag set in the IP header.
- If a router along the path encounters a packet too large for its next link’s MTU, it drops the packet and sends back an ICMP “Fragmentation Needed” message with its MTU value.
- The sender adjusts its packet size downward and retries, repeating until packets pass through without issues.
- The result is the effective Path MTU.
Path MTU Discovery (PMTUD): Windows adjusts MSS dynamically during a connection if PMTUD detects a lower Path MTU along the route, overriding the interface MTU if needed.
Why Path MTU Matters
- Avoiding Fragmentation:
- Fragmentation slows down communication because the receiving end must reassemble packets, and lost fragments require retransmission. PMTU ensures packets are sized to avoid this.
- Improved network efficiency: By avoiding fragmentation, PMTUD reduces the overhead associated with reassembling fragmented packets.
- Reliability:
- Some networks or firewalls block fragmented packets or ICMP messages, breaking connectivity. PMTU helps ensure packets fit within limits upfront.
- Reduced latency: Fragmentation can introduce delays in packet delivery, which PMTUD helps to mitigate.
- Better throughput: Efficient packet transmission leads to higher network throughput.
Example
- Your computer (MTU 1500) sends a packet to a server.
- The packet passes through:
- Your router (MTU 1500)
- ISP gateway (MTU 1492, due to PPPoE)
- Backbone router (MTU 1500)
- Server’s network (MTU 1400, due to a VPN tunnel)
- The Path MTU is 1400 bytes—the smallest MTU in the chain. Packets larger than this would be dropped or fragmented.
Path MTU in Practice
- IPv4: PMTUD is optional but widely used. If ICMP messages are blocked (common in some networks), PMTUD fails, and connectivity issues may arise.
- IPv6: Fragmentation isn’t allowed at intermediate routers; PMTUD is mandatory, and packets exceeding the path MTU are dropped with an ICMPv6 “Packet Too Big” response.
Considerations:
- ICMP blocking: If firewalls or other network devices block ICMP “Fragmentation Needed” messages, PMTUD will not function correctly.
- Dynamic paths: PMTUD is continually performed because network paths can change dynamically.
It is useful to manually find find out the path MTU of the network and use its value to configure the MTU value of the network interface in Microsoft Window.
MSS (Maximum Segment Size)
The TCP Maximum Segment Size (MSS) defines the largest amount of TCP data (payload) that can be transmitted in a single segment. MSS operates at Layer 4 (Transport layer).
The MTU (Maximum Transmission Unit) of a network interface in Microsoft Windows directly influences the MSS (Maximum Segment Size) because MSS is derived from the MTU, adjusted for the overhead introduced by the TCP/IP protocol headers.
How MTU Determines MSS
The MSS is essentially the MTU minus the size of the IP and TCP headers.
Therefore: MSS = MTU – (IP header size + TCP header size)
For a standard IPv4 Ethernet interface in Windows with an MTU of 1500 bytes:
- IPv4 Header: Typically 20 bytes (IPv4 without options).
- TCP Header: Typically 20 bytes (without options like timestamps or SACK).
- Total Overhead: 20 (IP) + 20 (TCP) = 40 bytes.
- MSS = 1500 – 40 = 1460 bytes.
- This means a TCP segment can carry up to 1460 bytes of actual data, with the remaining 40 bytes used by IP and TCP headers.
- TCP Segment = TCP Header (20) + TCP Payload (1460) = 1480 bytes
- IP Packet Size = IP Header (20) + TCP Header (20) + TCP Payload (1460) = 1500 bytes (fits within MTU)
- TCP ensures that its segments fit within the MTU, preventing IP fragmentation.
- For IPv6:
- IP Header = 40 bytes (fixed).
- TCP Header = 20 bytes (minimum).
- MSS = 1500 – 40 – 20 = 1440 bytes.

How Windows Handles MSS
- TCP Stack: Windows’ TCP implementation automatically calculates MSS during the TCP handshake. The MSS value is announced in the SYN packet, based on the interface MTU minus headers.
- Adjustment: If PMTUD detects a smaller Path MTU, Windows lowers the effective MSS for that connection without changing the interface MTU.
The Maximum Segment Size (MSS) negotiation is a critical part of establishing a TCP connection, ensuring efficient data transfer by preventing packet fragmentation. Here’s how it works:
The Role of MSS
- MSS defines the largest amount of data (payload) that a device can receive in a single TCP segment.
- It’s crucial for avoiding IP fragmentation, which can negatively impact network performance.
MSS and the TCP Three-Way Handshake:
- MSS negotiation occurs during the initial TCP three-way handshake, the process that establishes a TCP connection.
- SYN (Synchronize) Packet:
- The client initiates the connection by sending a SYN packet to the server.
- Within the TCP header of this SYN packet, the client includes an MSS option, indicating the maximum segment size it can receive.
- SYN-ACK (Synchronize-Acknowledge) Packet:
- The server responds with a SYN-ACK packet, acknowledging the client’s SYN.
- The server’s SYN-ACK also includes its own MSS option, specifying its maximum receivable segment size.
- ACK (Acknowledge) Packet:
- The client sends an ACK packet to confirm the server’s SYN-ACK, completing the handshake.
- By this point, both the client and server have each other’s MSS values.
- SYN (Synchronize) Packet:
Determining the Effective MSS:
- After the handshake, both devices know each other’s MSS.
- The effective MSS for the connection is the smaller of the two advertised MSS values.
- This ensures that neither device sends TCP segments that are too large for the other to handle.
Why This Matters
- Avoiding Fragmentation:
- By agreeing on an MSS, devices prevent IP fragmentation, which can lead to increased latency and packet loss.
- Optimizing Performance:
- Proper MSS negotiation helps optimize network throughput by ensuring that data is transmitted in efficient segment sizes.
This way by setting the value of MTU of the network interface, the effective MSS value for both sending and receiving data packets is controlled.
MSS = MTU – (IP header size + TCP header size)
Network shell (netsh)
Network shell (netsh) is a command-line utility that allows you to configure and display the status of various network communications components.
There are multiple commands to set the MTU value of the network interface.
MTU value range for IPv4 and IPv6 Interface
A network adapter can be assigned both IPv4 and IPv6 addresses. Both act as a separate network and requires separate MTU values:
- For IPv4 network interface
- For IPv6 network interface
Valid Range of MTU value in Windows OS for Network interface (without jumbo frames):
- IPv4 MTU value range: 576 to 1500
- IPv6 MTU value range: 1280 to 1500
1. Configure the MTU value of the IPv4 network interface using Interface name
- Run Command Prompt(cmd) or PowerShell in Administrator mode.
2. First you need to know the name of the IPv4 network interface.
To show the list of IPv4 network interfaces run the following command:
- netsh interface ipv4 show subinterfaces
3. Note down the name of the IPv4 network interface that connects to the internet.
4. The netsh command for configuring the MTU value of the IPv4 network interface
Syntax : netsh interface ipv4 set subinterface interface=[network interface name] mtu=[MTU value in bytes] store=persistent
In this case :
- Network Interface name: IntelWiFi
- MTU value in bytes: 14000
Netsh command to set MTU value to 1400 for the IPv4 network interface named IntelWiFi is:
- netsh interface ipv4 set subinterface interface=”IntelAX” mtu=1400 store=persistent

5. Verifying Changes. To confirm the configuration, use the command: netsh interface ipv4 show subinterfaces
2. Configure the MTU value of the IPv6 network interface using Interface name
- Run Command Prompt(cmd) or PowerShell in Administrator mode.

1. You need to find out the name of the IPv6 network interface(if it is available). To show the list of IPv6 network interfaces run the following command:
- netsh interface ipv6 show subinterfaces
2. Note down the Name of the IPv6 network interface that connects to the internet.
3. The Netsh command for configuring the MTU value of the IPv6 network interface
Syntax : netsh interface ipv6 set subinterface interface=[network interface name] mtu=[MTU value in bytes] store=persistent
In this case :
- Network Interface name: IntelWiFi
- Optimal MTU value in bytes: 1300
Netsh command to set MTU value to 1300 for the IPv6 network interface named IntelWiFi is:
- netsh interface ipv6 set subinterface interface=”IntelAX” mtu=1300 store=persistent

4. Verifying Changes.
- To confirm the active configuration, use the command: netsh interface ipv6 show subinterfaces
- To confirm the persistent configuration, use the command: netsh interface ipv6 show subinterfaces store=persistent

3. Configure the MTU value of the IPv4 network interface using interface Index number
Run Command Prompt(cmd) or PowerShell in Administrator mode.
1. First you need to know the Index number of the IPv4 network interface. To show the list of IPv4 network interfaces run the following command:
- netsh interface ipv4 show interfaces

2. Note down the Index number (Idx) of the IPv4 network interface that connects to the internet.
3. The Netsh command for configuring the MTU value of the IPv4 network interface
Syntax : netsh interface ipv4 set subinterface [interface=]<network interface Index number> [mtu=]<MTU value in bytes> store=persistent
In this case :
- Network Interface Index number: 16
- MTU value in bytes: 1300
Netsh command to set MTU value to 1300 for the IPv4 network interface index number 16 is:
⦁ netsh interface ipv4 set subinterface interface=”16″ mtu=1300 store=persistent

4. Verifying Changes. To confirm the configuration, use the command: netsh interface ipv4 show interfaces
4. Configure the MTU value of the IPv6 Network Interface using interface Index number
Run the PowerShell command line tool in Administrator mode.
- First you need to know the Index number of the IPv6 network interface. To show the list of IPv6 network interfaces run the following command:
- netsh interface ipv6 show interfaces

2. Note down the Index number (Idx) of the IPv6 network interface that connects to the internet.
3. The Netsh command for configuring the MTU value of the IPv6 network interface
Syntax : netsh interface ipv6 set subinterface [interface=]<network interface Index number> [mtu=]<MTU value in bytes> store=persistent
In this case :
- Network Interface Index number: 16
- MTU value in bytes: 1400
Netsh command to set MTU value to 1300 for the IPv6 network interface index number 16 is:
⦁ netsh interface ipv6 set subinterface interface=”IntelAX” mtu=1300 store=persistent

4. Verifying Changes
- To confirm the persistent configuration, use the command: netsh interface ipv6 show interfaces store=persistent
- To confirm the active configuration, use the command: netsh interface ipv6 show interfaces store=active
IPv6 Router Advertisement (RA)
IPv6 Router Advertisement (RA) is a critical component of the IPv6 Neighbor Discovery Protocol (NDP). Routers use RA messages to announce their presence on a network and provide essential configuration information to IPv6 hosts.
If router is advertising IPv6 MTU, then that value may override the default or manually configured MTU value of the IPv6 Network interface .
Reference
- What Is Maximum Transmission Unit (MTU)? (Huawei)
- MTU and MSS: What You Need to Know
- Network shell (netsh)
Changing the Maximum Transmission Unit (MTU) value in Windows 10 can help improve your internet connection speed and stability. By adjusting this value, you can optimize the way data packets are transmitted over your network. Here’s how you can change the MTU value in Windows 10:
1. Open Command Prompt as Administrator: To change the MTU value, you’ll need to access the Command Prompt with administrative privileges. Right-click on the Start button and select “Command Prompt (Admin).”
2. Check Current MTU Value: Before making any changes, it’s a good idea to check your current MTU value. You can do this by typing the following command in Command Prompt: “netsh interface ipv4 show subinterfaces.”
3. Determine New MTU Value: Decide on the new MTU value you want to set for your network connection. The default MTU size is typically 1500 bytes, but you can experiment with different values to see what works best for your network.
4. Change MTU Value: To change the MTU value, use the following command in Command Prompt: “netsh interface ipv4 set subinterface ‘Your Network Interface Name’ mtu= store=persistent.” Replace ‘Your Network Interface Name’ with the name of your network adapter and with the desired value.
5. Restart Your PC: After changing the MTU value, it’s recommended to restart your PC to apply the new settings.
By following these steps, you can successfully change the MTU value in Windows 10 and potentially improve your network performance.
What is MTU and why is it important?
MTU stands for Maximum Transmission Unit, which is the maximum size of a data packet that can be transmitted over a network. It is important because setting the correct MTU value can improve network efficiency and performance.
How can changing MTU value improve internet speed?
By adjusting the MTU value to match your network’s capabilities, you can reduce the likelihood of packet fragmentation and improve the overall efficiency of data transmission, resulting in faster internet speeds.
Can changing MTU value cause issues with my network?
While changing the MTU value can potentially improve network performance, setting it too high or too low could lead to connectivity issues such as packet loss or slow data transfer speeds. It’s important to find the optimal MTU value for your network.
What are common MTU values used in networking?
The most common MTU value used in networking is 1500 bytes, which is the default for Ethernet connections. However, different network types may have different optimal MTU values.
Can I revert back to the default MTU value?
If you experience any issues after changing the MTU value, you can revert back to the default MTU value by setting it back to 1500 bytes using the same Command Prompt commands.
Does changing MTU value affect all devices on the network?
No, changing the MTU value on one device only affects the network performance of that specific device. Other devices on the network will not be impacted by this change.
Is changing MTU value necessary for all users?
Not necessarily. Changing the MTU value is more commonly done by users who are experiencing network performance issues or looking to optimize their network connection. If you are satisfied with your current network speed and stability, there may be no need to change the MTU value.
Are there any risks associated with changing MTU value?
While changing the MTU value itself does not pose a significant risk, setting it too high or too low could potentially cause connectivity issues. It’s important to test different MTU values to find the optimal setting for your network.
Can changing MTU value improve online gaming performance?
Yes, adjusting the MTU value can potentially improve online gaming performance by reducing latency and packet loss. Gamers may benefit from experimenting with different MTU values to optimize their network connection.
Does changing MTU value require technical knowledge?
While changing the MTU value involves using Command Prompt, the process is relatively straightforward. As long as you follow the steps outlined above, you can adjust your MTU value even without advanced technical knowledge.
Can changing MTU value impact streaming quality?
Yes, changing the MTU value can impact streaming quality by improving data transmission efficiency and reducing buffering issues. Users who frequently stream content online may benefit from optimizing their MTU value.
By understanding how to change the MTU value in Windows 10 and considering the related FAQs, you can effectively enhance your network performance and enjoy a smoother internet experience.
Dive into the world of luxury with this video!
Your friends have asked us these questions — Check out the answers!