
Readers help support Windows Report. We may get a commission if you buy through our links.
Read our disclosure page to find out how can you help Windows Report sustain the editorial team. Read more
Blue Screen of Death errors are probably one of the most serious errors that you can encounter on Windows 10.
These errors will restart your PC every time they appear, and since they can be such a big problem, today we’ll show you how to fix BUGCODE USB3 DRIVER error.
How do I fix BUGCODE USB3 DRIVER BSoD error
- Use a third-party BSoD fixer
- Run the BSOD Troubleshooter
- Download the latest drivers
- Keep your Windows 10 updated
- Run the SFC scan
- Run DISM
- Check the hard drive
- Find and remove problematic applications
- Update your BIOS
- Use USB 2.0 port during the Windows 10 installation
- Reset Windows 10
1. Use a third-party BSoD fixer
Repair your system files and get rid of any BSoD error by using a third-party repair tool software to do it for you.
The software keeps you safe and your computer clean, getting rid of useless files, thus improving your system’s health. Moreover, it is easy to use thanks to its comprehensive UI.
2. Run the BSOD Troubleshooter
- Open the Settings app.
- Go to Update & Security > Troubleshoot.
- Select BSOD from the right pane and click Run the troubleshooter.

- Follow the instructions on the screen to complete the troubleshooter.
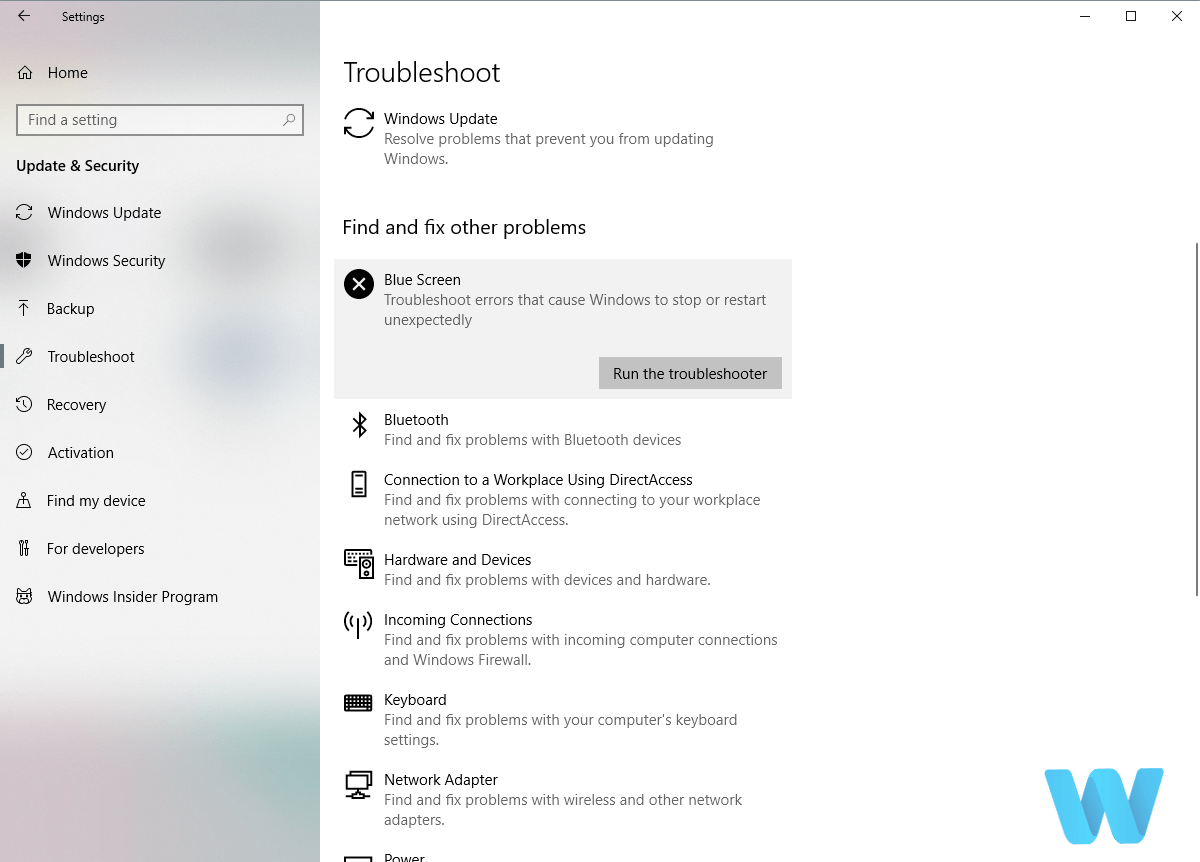
The next thing we’re going to try is Windows 10’s built-in troubleshooting tool. This tool can be used when dealing with various system problems, including the BSOD issues.
So, it’s likely to resolve the MSDN BUGCHECK bugcode_usb3_driver error. Follow the fairly simple steps above to learn how to troubleshoot using your pc.
3. Download the latest drivers
Drivers are an integral part of every operating system, and in case your drivers are corrupted or outdated, Windows 10 won’t be able to recognize or use that specific hardware.
Updating your drivers is fairly simple if you choose to use a third-party app. In fact, the software will download all the necessary drivers for you. All you need to do is click a few times and the process is automated.
Never worry about drivers and driver related problems again and install this useful and awesome software asap.
⇒ Get Outbyte Driver Updater
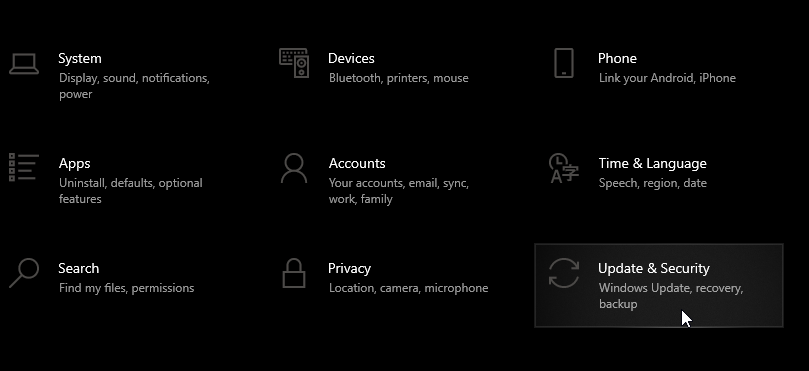
4. Keep your Windows 10 updated
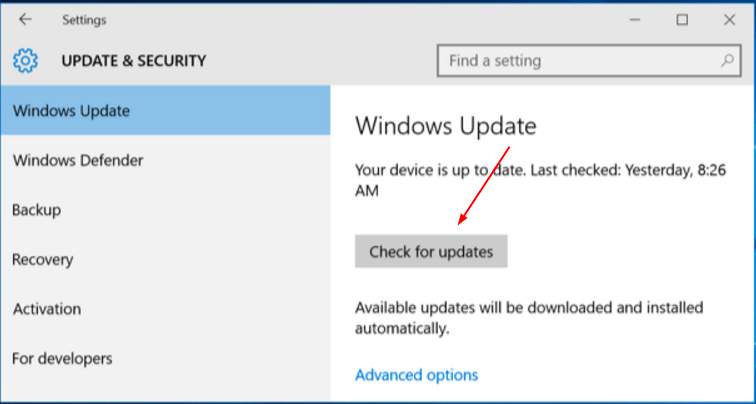
- Press the Windows search bar and type in Settings.
- Go to Update & Security.

- Then select Windows Update.
- On the right, press Check for Updates.

- Let windows check for a new version.
- If it finds one, follow the steps.

Almost every operating system has certain issues with hardware and software, and Windows 10 is not an exception.
Sometimes these issues can cause BSoD errors, such as BUGCODE USB3 DRIVER, to appear and it order to fix these errors it’s important that you download the latest updates.
Some updates bring security improvements and new features, but many of them offer both hardware and software bug fixes, therefore it’s crucial to update in order to prevent BSoD errors from appearing.
5. Run the SFC scan
- Right-click on the Start Menu button, and open Command Prompt (Admin).
- Enter the following line and press Enter:
sfc/scannow
- Wait until the process is done (it may take a while).
- If the solution is found, it will automatically be applied.
- Now, close the Command Prompt and restart your computer.
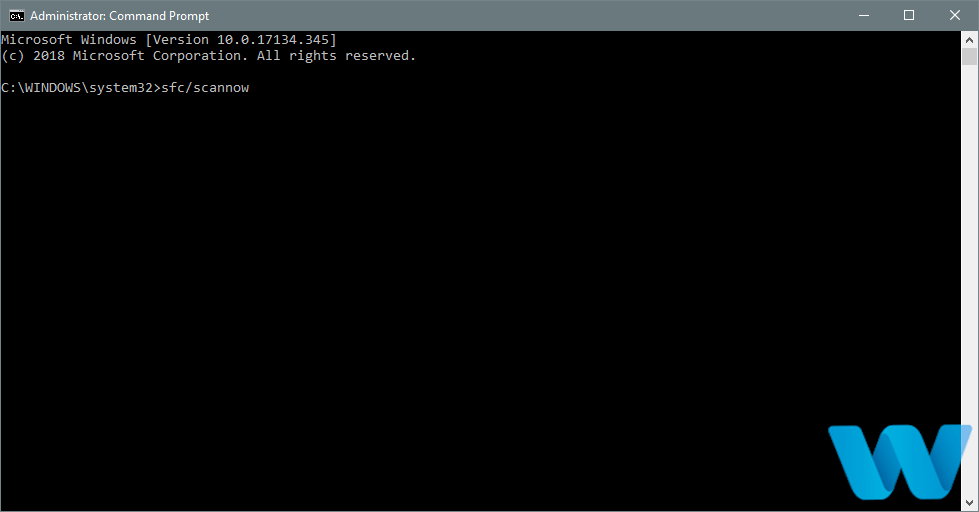
The next troubleshooting tool we’re going to try is the System File Checker. This tool scans your computer for potential issues, and resolves them automatically (if possible).
So, if the BUGCODE USB3 DRIVER error is caused by a corrupt system file, the SFC scan will deal with it.
6. Run DISM
- Right-click Start and open Command Prompt (Admin).
- Paste the following command and press Enter:
DISM/Online/Cleanup-Image/RestoreHealth
- Wait until the scan is finished.
- Restart your computer and try updating again.
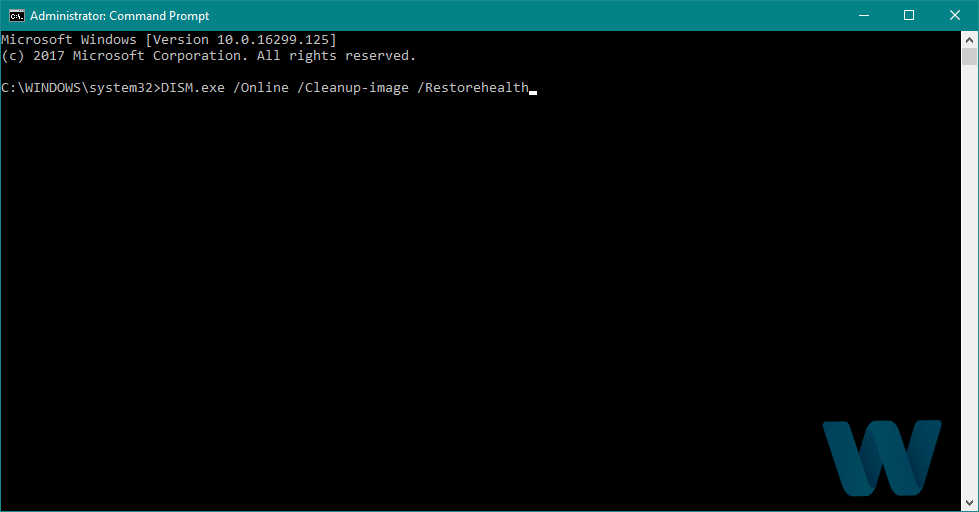
And the third troubleshooter we’re going to try here is DISM. This tool re-deploys the system image, and resolves potential issues along the way.
So, it’s possible that running DISM will also resolve the BUGCODE USB3 DRIVER error.
With the Windows installation media
- Insert your Windows installation media.
- You can create one with the Windows Media Creation Tool.
- Right-click the Start menu and, from the menu, choose the Command Prompt (Admin).
- In the command line, type the following commands and press Enter after each:
dism/online/cleanup-image/scanhealthdism/online/cleanup-image/restorehealth - Now, type the following command and press Enter:
DISM/Online/Cleanup-Image/RestoreHealth/source:WIM:X:SourcesInstall.wim:1 /LimitAccess - Make sure to change an X value with the letter of the mounted drive with Windows 10 installation.
- After the procedure is finished, restart your computer.
7. Check the hard drive
- Enter the Advanced Startup (Restart your computer while holding the Shift key).
- Choose Troubleshoot > Advanced Options.
- Select Command Prompt from the list of options.
- When Command Prompt appears, enter the following lines and press
- Enter after each line in order to run it:
bootrec.exe/rebuildbcdbootrec.exe/fixmbrbootrec.exe/fixboot
- Enter after each line in order to run it:
- Some users are also suggesting that you need to run additional chkdsk commands as well.
- To perform these commands, you need to know drive letters for all your hard drive partitions.
- In Command Prompt you should enter the following (but remember to use the letters that match your hard drive partitions on your PC):
chkdsk/r c:chkdsk/r d:
-
This is just our example, so keep in mind that you have to perform chkdsk command for every hard drive partition that you have.
- Restart your computer and check if the issue is resolved.


BUGCODE_USB3_DRIVER BSoD error can be caused by your hard drive, so it’s recommended to perform a chkdsk scan.
8. Find and remove problematic applications
- Restart your computer a few times during the boot to start the Automatic Repair.
- Alternatively, you can just press and hold Shift on your keyboard and click the Restart button.
- Choose Troubleshoot > Advanced options > Startup Settings and click the Restart button.
- When your computer restarts press 5 or F5 to enter Safe Mode with Networking.
Sometimes certain applications just aren’t compatible with your PC, and that can cause BUGCODE_USB3_DRIVER or any other Blue Screen of Death error to appear.
The common cause for these types of errors can be your antivirus software, therefore we advise you to remove all third-party antivirus programs from your PC.
9. Update your BIOS

According to users, you can fix BUGCODE_USB3_DRIVER error by upgrading your BIOS. Updating BIOS unlocks new features of your motherboard thus allowing you to use different hardware.
Note: We have to mention that updating BIOS is a somewhat dangerous procedure, therefore use extra caution and make sure to check your motherboard manual for detailed instructions.
10. Use USB 2.0 port during the Windows 10 installation
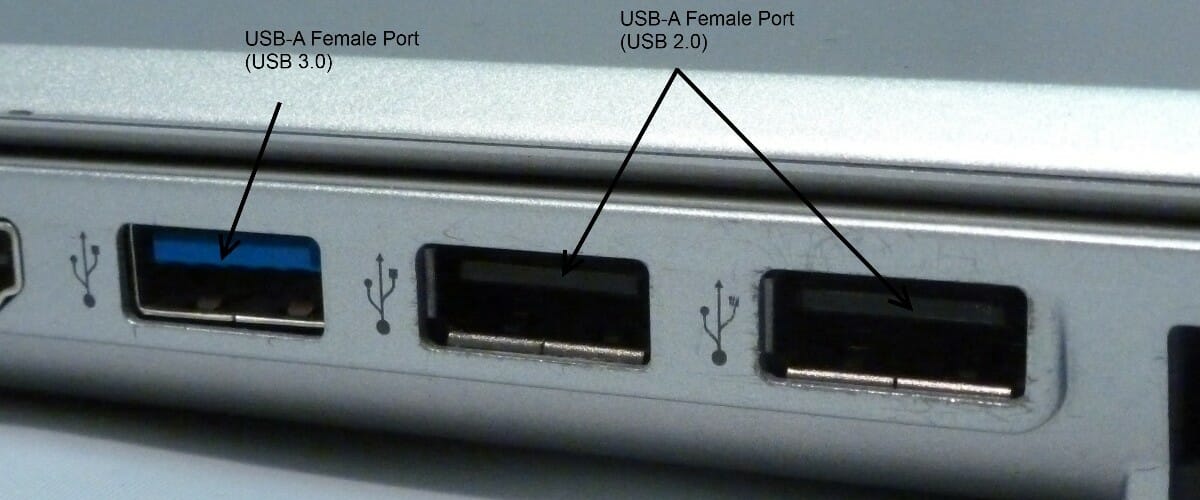
Few users reported BUGCODE_USB3_DRIVER BSoD error while installing Windows 10. According to them, Windows 10 installation has certain issues with USB 3.0 ports.
Therefore if you install Windows 10 from a USB flash drive, be sure to connect the flash drive to USB 2.0 port in order to avoid this error.
Alternatively, you can use Windows 10 DVD to install your operating system if your computer has a DVD reader installed.
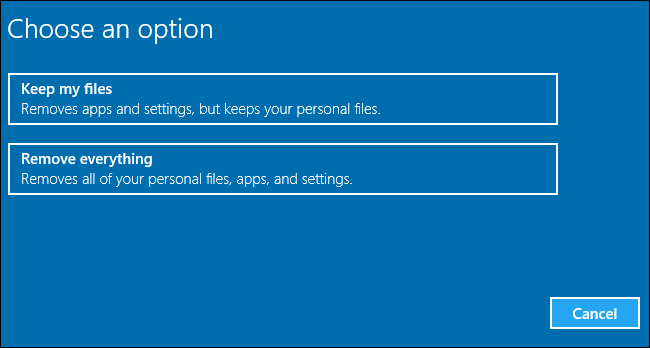
11. Reset Windows 10
- Restart your computer a few times during the boot sequence to start Automatic Repair.
- Choose Troubleshoot > Reset this PC.

- Then, select Remove everything.

- You might get asked to insert Windows 10 installation media during this step, so be ready to do that.
- Choose Only the drive where Windows is installed > Just remove my files.
- Then click the Reset button to start.
- Follow the instructions to complete the reset process.

Windows 10 reset is a similar procedure to clean install, and if this error is caused by software Windows 10 reset should be able to fix it.
Since this process will delete all files from your C drive, we strongly recommend that you create a backup. In addition to creating a backup, you might also need a bootable USB flash drive with Windows 10.
After Windows 10 reset is complete, don’t install any drivers or applications. Test your computer for a while and check if the error appears again.
If the error does appear, it means that your hardware is causing this issue, so be sure to perform a detailed hardware inspection and replace the faulty hardware.
BUGCODE_USB3_DRIVER BSoD error can cause certain problems on your PC, but we hope that you managed to fix this error by using one of our solutions.
In our latest guide we covered Bugcode Mbbadapter Driver error, so you might want to check it out for more information. We also have a guide on BUGCODE_WIFIADAPTER_DRIVER that might interest you.
Milan Stanojevic
Windows Toubleshooting Expert
Milan has been enthusiastic about technology ever since his childhood days, and this led him to take interest in all PC-related technologies. He’s a PC enthusiast and he spends most of his time learning about computers and technology.
Before joining WindowsReport, he worked as a front-end web developer. Now, he’s one of the Troubleshooting experts in our worldwide team, specializing in Windows errors & software issues.
Does this look familiar?
All of a sudden, you Windows PC turns into a blue screen and shows you this error code: BUGCODE_USB_DRIVER. You must be very annoyed and frustrated. Don’t worry. Usually this is an easy problem to fix.
5 easy & effective methods to fix BUGCODE_USB_DRIVER:
- Update your device drivers — the most successful
- Adjust the Power settings
- Install Windows update on your Windows 10
- Check your hard disk
Method 1: Update your device drivers — the most successful
A very common cause to Bugcode USB Driver is the old or broken drivers. In most cases, updating your device drivers can solve the error. It’s always the most successful method from users’ feedback.
Whether you choose to update the device drivers manually, using Windows Update, or you use a trusted third-party product, it’s essential that you have the latest correct device drivers for your operating system at all times.
If you’re not comfortable playing with device drivers, we recommend using Driver Easy. It’s a tool that detects, downloads and (if you go Pro) installs any driver updates your computer needs.
Driver Easy will automatically recognize your system and find the correct drivers for it. You don’t need to know exactly what system your computer is running, you don’t need to be troubled by the wrong driver you would be downloading, and you don’t need to worry about making a mistake when installing. Driver Easy handles it all.
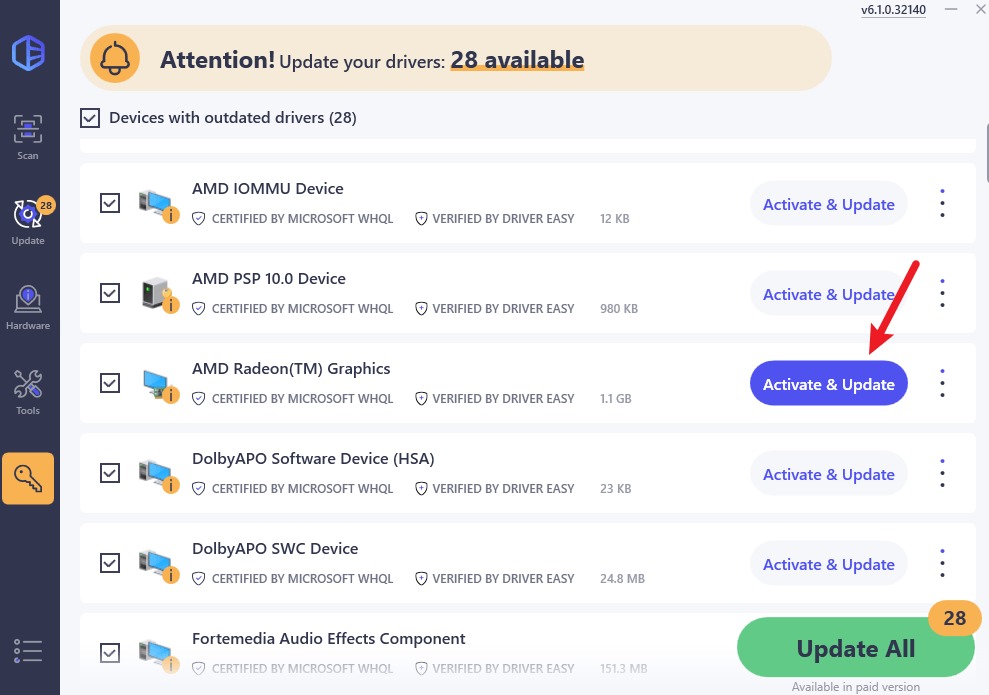
You can update your drivers automatically with either the 7 days free trial or the Pro version of Driver Easy. It takes just 2 clicks, and you get full support and a 30-day money-back guarantee with the Pro version:
- Download and install Driver Easy.
- Run Driver Easy and click the Scan Now button. Driver Easy will then scan your computer and detect any problem drivers.

- Click the Activate & Update button next to the flagged device to automatically download and install the correct version of this driver.
Or click Update All to automatically download and install the correct version of all the drivers that are missing or out of date on your system (You’ll need the Pro version for this – when you select Update All, you’ll get a prompt to upgrade. If you’re not prepared to purchase the Pro version yet, Driver Easy provides a 7-day trial at no cost, granting access to all Pro features like fast downloads and easy installation. No charges will occur until after your 7-day trial period ends.)

- Restart your computer for the change to take effect.
Method 2: Adjust the Power settings
Sometimes inappropriate power settings could also lead to the error. In such a case, you can disable the USB selective suspend setting. Follow the steps below then.
1) Type power settings in the search box from Start. Then click Power & sleep settings on the top result.
2) Click Additional power settings on the right pane.
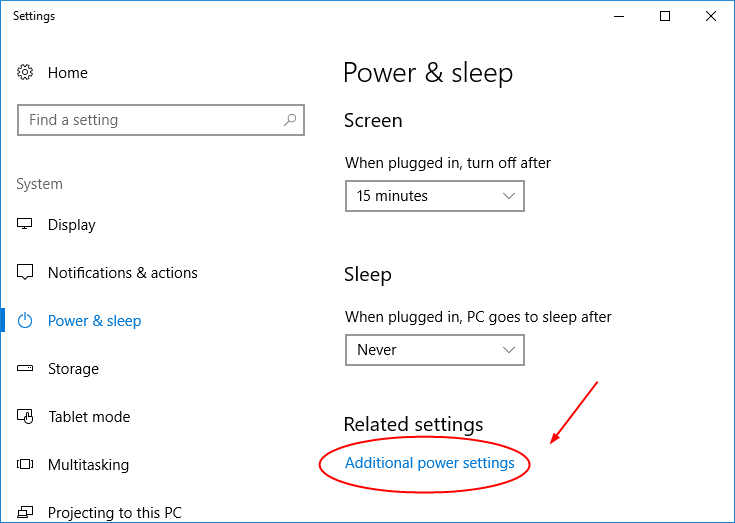
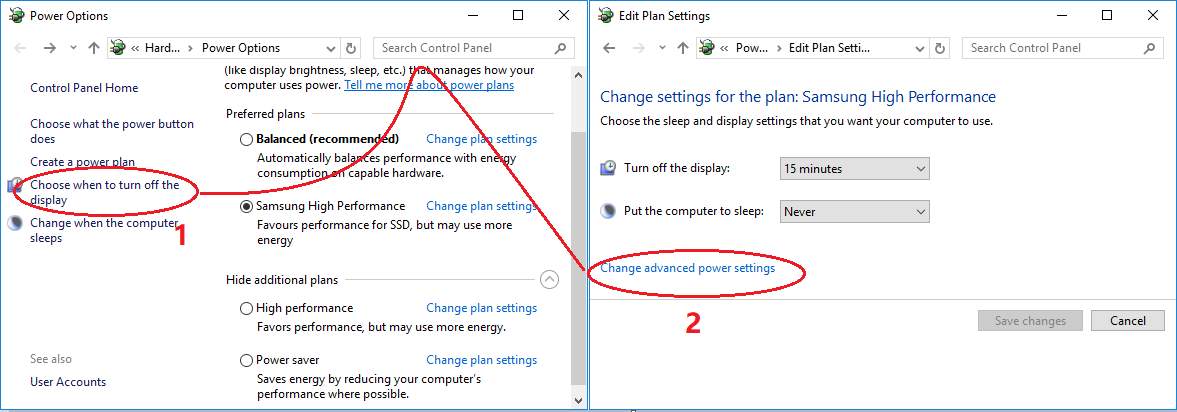
3) Click Choose when to turn off the display > Change advanced power settings.
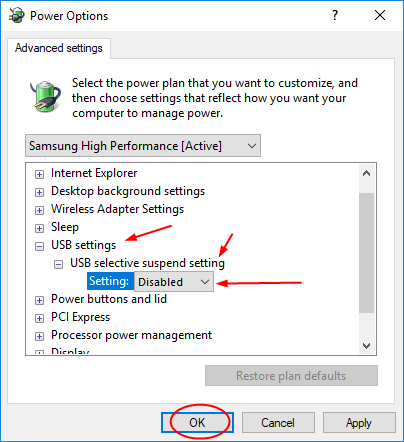
4) On the pop-up window, expand the dialog after each: USB settings > USB selective suspend setting. Then set it to be Disable from the drop-down menu. Click OK to save your setting.
Method 3: Install Windows update on your Windows 10
Windows update always includes bug fixes and adds new features. Installing the update helps some users fix the error. How to install is shown below:
1) Type update in the Search box from the Start menu. Then click Check for updates on the top result.
2) On the pop-up page, click Check for updates.
Proceed to follow the on-screen instructions to install the updates.
Method 4. Check your hard disk
Damage or corruption of your hard disk could also bring the error. You can run check disk via the command prompt to fix it.
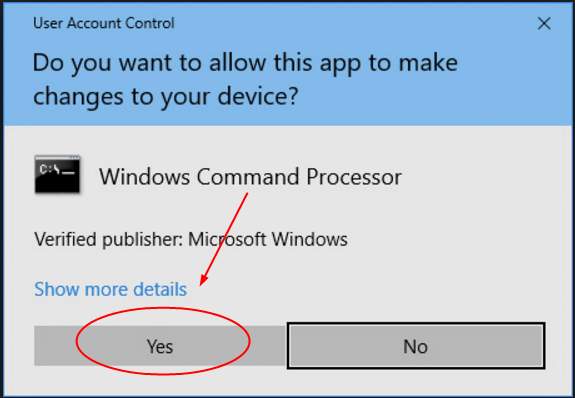
1) Type cmd in the search box from the Start menu. Then right-click on Command Prompt to choose Run as administrator.
2) Click Yes when prompted by User Account Control.
3) On the open Command Prompt window, type chkdsk /f. Then press Enter on your keyboard to run it.

Now it would start checking the hard disk for the possible issues causing the BSOD error.
Fix 5: Repair corrupted system files
Missing, corrupt, or damaged system files may be the culprit for this BSOD error. To eliminate this issue as a possible cause, you can try the below to repair possible system file issues.
System File Checker (SFC) is a handy feature in Windows that helps scan your system files and repair missing or corrupted system files(including those related to BSOD). To run the SFC scan:
1) On your keyboard, press the Windows logo key and type cmd. Then right-click on Command Prompt and click Run as administrator.
2) Click Yes when prompted to confirm.
3) In the command prompt window, type sfc /scannow and press Enter.
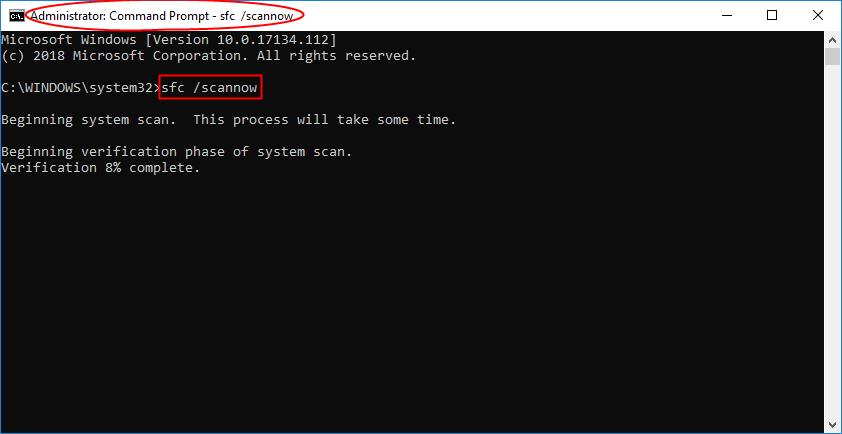
It’ll take some time for the SFC to replace the corrupted system files with new ones if it detects any, so please be patient.
4) Restart your computer for the changes to take effect.
5) Check your computer to see if the problem has been fixed.
That’s all there is to it. Have you solved the error? If you have any questions, please feel free to leave your comment below. And also if you have other methods to fix the error, share with us please, thanks.
12
12 people found this helpful
-
Home
-
News
- How to Fix USBXHCI.sys Blue Screen on Windows 10/11? [4 Ways]
How to Fix USBXHCI.sys Blue Screen on Windows 10/11? [4 Ways]
By Ariel | Follow |
Last Updated
Many users encounter the USBXHCI.sys blue screen error on Windows 10/11. Are you also troubled by the BSOD error USBXHCI.sys? Don’t worry. This post from MiniTool Partition Wizard explores several effective fixes for the error.
Error: usbxhci.sys Blue Screen on PC. Whenever I try to use one of my USH 3.0 ports, I get a BSOD error. If I start the computer with a plugged-in device, it goes straight to BSOD. If I start the computer without anything plugged into that port and then plug something in, it immediately crashes. Any advice would be appreciated.https://answers.microsoft.com/en-us/windows/forum/all/error-usbxhcisys-blue-screen-on-pc/f30e5d99-4233-476f-be4f-1f88aa1d27f1
What Causes the USBXHCI.sys Blue Screen Error
According to user reports, the USBXHCI.sys BSOD error often occurs when using one of USB ports on Windows 10/11. This error always triggers an immediate system crash and even causes data loss. The most common factor for the blue screen USBXHCI.sys is related to corrupted or outdated USB drivers. Besides, the error can be caused by corrupted system files or faulty hardware.
Before You Do
Lots of users reported that the BSOD error USBXHCI.sys can lead to system crashes and data loss. To avoid any unexpected loss due to the error, we highly recommend you back up all important data, including OS, before proceeding.
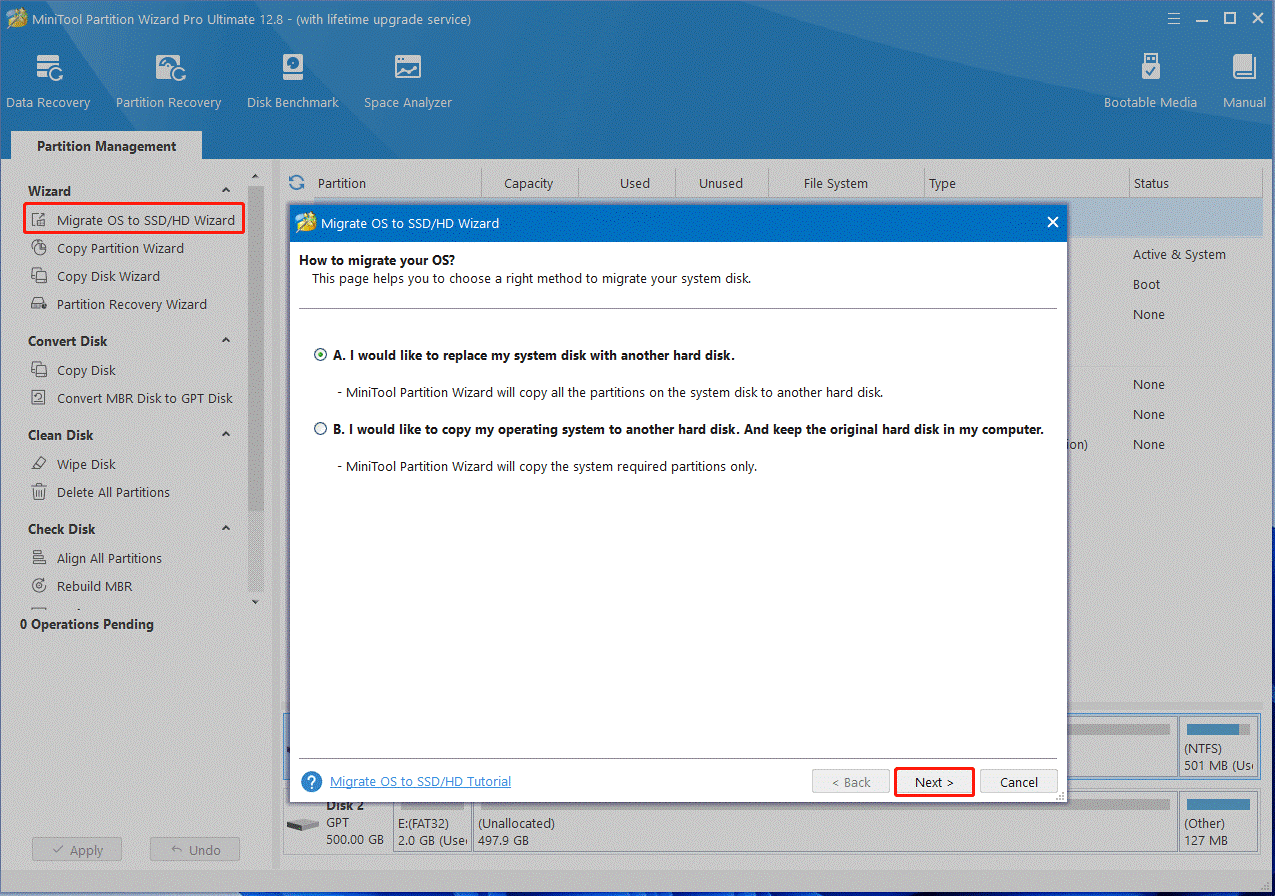
MiniTool Partition Wizard is a powerful data backup utility that can clone hard drive, migrate OS to SSD/HD, and copy a partition to another drive. Moreover, it can convert MBR to GPT without data loss, rebuild MBR, extend/resize/move partitions, change cluster size, and more.
MiniTool Partition Wizard DemoClick to Download100%Clean & Safe
Now, you can start fixing the blue screen USBXHCI.sys with the following 4 methods.
# 1. Update or Reinstall the USB Driver
As discussed above, the main reason for USBXHCI.sys BSOD error is corrupted or outdated USB driver. Here you can follow the guide below to update or reinstall the USB hub drivers on Windows 10/11.
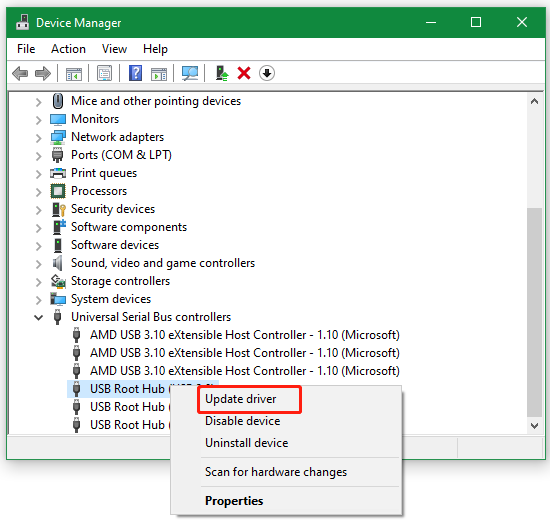
Step 1. Right-click the Start menu and select Device Manager from the context menu.
Step 2. Expand the Universal Serial Bus Controllers category, and then right-click the USB Root Hub driver and select Update driver.
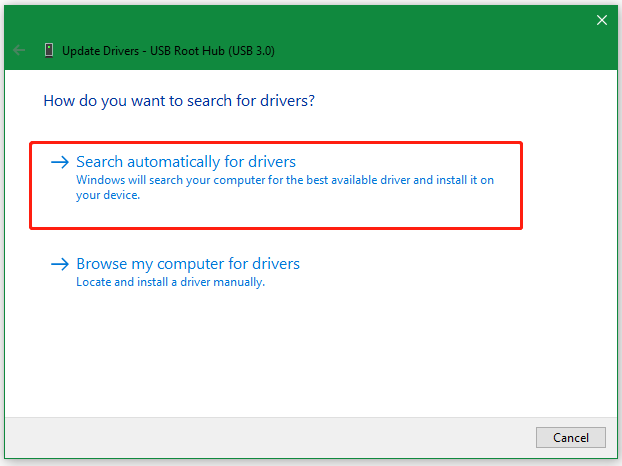
Step 3. Select the Search automatically for drivers option and wait for the system to find an updated USB driver, and follow the on-screen prompts to complete this update.
Once updated, restart the computer and plug the USB port again to see if the USBXHCI.sys error disappears. If not, continue to reinstall the USB driver.
Step 1. Select the Uninstall device option like Step 2 as we just showed above.
Step 2. Tick the checkbox next to “Delete the driver software for this device” and click on Uninstall.
Step 3. Restart your PC and the default USB driver will install back automatically.
# 2. Repair the System Files
If some system files related to the USB driver get corrupted, you may encounter the BSOD USBXHCI.sys error. In this case, you can run an SFC or DISM scan to repair them.
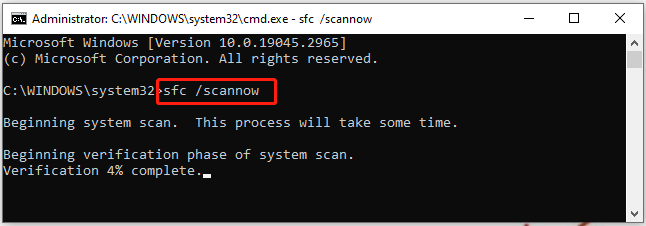
Step 1. Type cmd in the search box, and then right-click Command Prompt and select Run as administrator option.
Step 2. Type the sfc /scannow command in the elevated command prompt and hit Enter. Then wait for the SFC scan to complete.
Step 3. If no corrupted system files were found, you can try running the DISM.exe /Online /Cleanup-image /Scanhealth and DISM.exe /Online /Cleanup-image /Restorehealth commands to go on the repair.
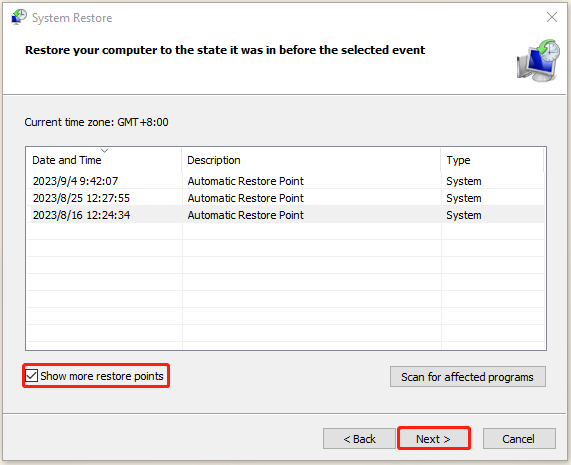
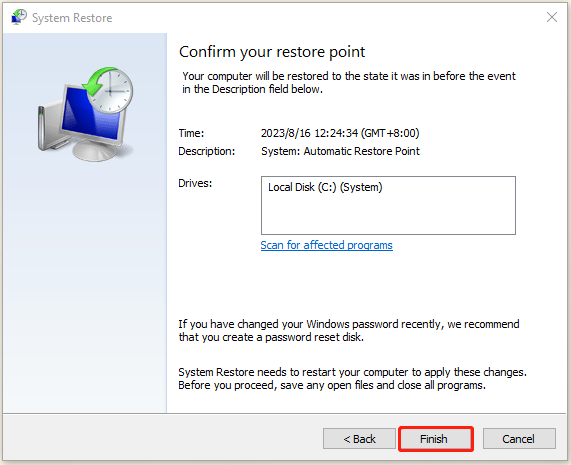
# 3. Perform a System Restore
Some users reported that they got rid of the USBXHCI.sys blue screen by performing a system restore. This will undo the recently changed settings and restore your system to an earlier state where the error doesn’t occur.
Step 1. Press the Win + R keys to open the Run dialog box, and then type rstrui.exe in it and press Enter.
Step 2. The System Restores window will pop up and click Next to continue.
Step 3. In the list of all system restore points, select the Restore point that you want to use and click the Next button. Here you can tick the checkbox next to Show more restore points.
Step 4. Then confirm your restore point by clicking the Finish button. After that, your computer should be restored to an earlier state, and the blue screen error should be fixed.
# 4. Reset Your PC
If none of the above methods can fix the USBXHCI.sys BSOD error, you may consider resetting this PC to its default settings. But this will delete everything on your hard disk. So, make sure to back up all necessary files beforehand. Then you can refer to this post “How to Reset Windows 11” to reset your PC.
About The Author
Position: Columnist
Ariel has been working as a highly professional computer-relevant technology editor at MiniTool for many years. She has a strong passion for researching all knowledge related to the computer’s disk, partition, and Windows OS. Up till now, she has finished thousands of articles covering a broad range of topics and helped lots of users fix various problems. She focuses on the fields of disk management, OS backup, and PDF editing and provides her readers with insightful and informative content.
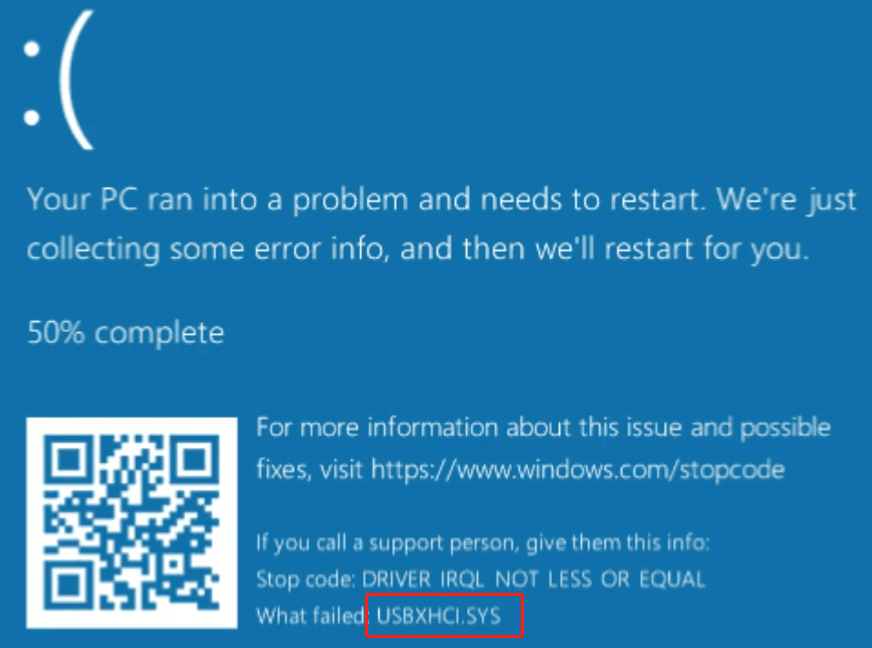
Blue Screen Of Death or BSODs emerges in a computer after the Operating System detects a very complex drawback in Windows which is mostly irrecoverable. The system shuts down and restarts itself as to avoid the necessary data from permanent damage. Often the vulnerability resembles as Stop error or simply a system crash which the device will encounter after being unable to repair automatically. BUGCODE_USB3_DRIVER Blue sreen error in Windows 10 usually occurs when the USB driver crashes abnormally. The error doesn’t really crash the Operating system; instead it will force the USB host process to restart automatically. The error has a significant bug check code of 0x00000144 and it shows up on desktop after a USB device is connected to the computer or at the time of Windows initialization.
BUGCODE_USB3_DRIVER Blue Screen error is mostly caused when a USB device driver renders faulty operation. A Few invalid factors play roles like URB (USB Request Block) which has been derived to core stack or sending Close Static Streams URB in an invalid state. Stop error are usually complex in nature and they may often rooted from Windows feature update, incompatible software, stubborn hardware issues as well as buggy drivers. Though such errors are generally much destructive for the system, we have pointed out quality fixes to resolve it. Follow the below write up to ensure your system is free from Blue Screen Error.
BUGCODE_USB3_DRIVER Blue Screen Error in Windows 10
Here is how to Fix BUGCODE_USB3_DRIVER Blue Screen Error in Windows 10 –
1] Disable Automatic Restart
Blue Screen error is a critical failure of the system which forces the Windows to crash abnormally and it stops working immediately. Windows can carry out is to restart the device which often causes huge loss of data as most programs don’t have a chance to save their open components. In the case of BUGCODE_USB3_DRIVER BSOD, automatic restarting may not be common depending upon devices. But when it starts doing that, you cannot deploy any of the workarounds. Therefore, disable this feature if you face before it gets too late using the below steps –
- First of all, save all the ongoing tasks and close them if possible.
- Head over to Desktop area by pressing Win+D at once.
- When in the place, do a right-click on This PC icon.
- Select Properties option from context menu.
- From the succeeding window, click the Advanced system settings located at the left pane.
- After the System Properties Window unrolls, enter into the Advanced tab.
- Move out for Startup and Recovery area and click the Settings option.
- Wait for another wizard to show up, and reach the System failure area.
- Scroll down and clear off the tick mark from box that reads “Automatically restart”.
- Lastly, select the Ok button at the bottom in order to save these changes.
Carrying out the above steps will disable the Automatic Restarting of Windows and the changes will put into immediate effect. As the system is ready, check out the below resolution processes listed.
Now, let’s try deploying these workarounds one after another until the BUGCODE_USB3_DRIVER Blue Screen Error resolves.
2] Update the BIOS Firmware
BIOS is the the abbreviation of Basic Input/Output System and it’s a ROM chip located on Motherboards. The firmware is an integral part of the computer that comes pre-installed with the OS and it allows you to access moreover set up the commuter from the most basic level. It’s a part of Microprocessor which will energize the system when you turn it On for the first time. Furthermore, BIOS is intended to control the data flow among the Windows 10 and adjoining accessories such as video device, keyboard, mouse, printer, hard drive, etc. It’s a volatile Firmware where any settings are restorable even the BIOS is removed from the device.
BIOS has access to Microprocessor on EPROM aka Erasable Programmable Read-Only Memory. When a device starts for the first time, CPU passes control to BIOS program which stays at the same place on EPROM. Outdated BIOS throws many of the complications, one of which may be BUGCODE_USB3_DRIVER Blue Screen Error. You must keep the firmware updated always in order to keep the system away from unwanted trouble, bugs & issues. Here are the steps to update the BIOS Firmware –
- Open the Taskbar search clicking magnifying icon from Taskbar.
- In the blank text box, type “System” followed by choosing System Information app from results.
- In the newly opened window, move out for BIOS Version/Date on the right side panel.
- Note the information written against this category and preserve it for next use.
- Leave the System Information window and open any web browser.
- Use the previously noted information regarding BIOS and visit it’s maker’s web page.
- Download the latest BIOS file complying with the specification from here.
- Run the downloaded file to install the latest version of BIOS.
3] Boot the device in Safe Mode
Booting in the Safe Mode is an outstanding Troubleshooting utility that starts the computer with a minimal set of drivers and services. It narrows down the programs in computer and allows only the essential ones to start up while booting. Safe Mode has a main intend to fix most of the problems evolving in the system within the periphery. Devices affected by malware, buggy drivers, and crashing frequently, need to restart in the safe mode for solutions.
When you will boot Windows 10 Into Safe, none of the third party software or driver will be loaded except the built-in and fundamental ones in a limited number. There are two kinds of this Startup method i.e. Safe Mode and Safe Mode with Networking. The second one allows the system to boot with network drivers and services aiming to enable the internet facility. So you need to try booting Windows 10 in safe mode to resolve the BUGCODE_USB3_DRIVER Blue Screen Error. If the issues don’t fix, we can focus on the third party options from next. Here is how to proceed –
- In the beginning, save all the processes you are working on so that no data is lost.
- Press the Win+D hotkeys at once in order to load the Desktop area directly.
- Now, press the combination of keys Alt and f4 together.
- Choose Restart option clicking the dropdown menu located under What do you want the computer to do?
- After the computer completes the first cycle of restarting, you will see a blue screen holding a few options.
- Click Troubleshoot from the menu.
- After a new context menu appears, choose Advanced Options and then Startup Settings in the process.
- Head over to the right bottom corner of this page and click the Power cog.
- Select the Restart option and let the computer reboot for the second time.
- When a new session starts, a new menu will open up with options to boot the computer in Safe Mode.
- Choose Boot in Safe Mode to enter into it
4] Re-adjust the Power Settings of Computer
Adjusting Power Settings can be a great idea to fix the BUGCODE_USB3_DRIVER Blue Screen Error in Windows 10. Nevertheless the workaround seems pretty unusual to most of the BSODs, this one is really helpful for USB related issues. Inappropriate Power distribution is harmful and you can disable the USB selective suspend setting in order to fix the blue screen error. Follow the below instructions to tweak the settings –
- Open the Windows Settings app pressing Win+I hotkeys at once.
- Click System tile when the UI loads fully.
- From the following settings page, click Power & sleep settings located at the left pane.
- Jump to adjacent pane on the right and click the ‘Additional power settings’ under Related settings area.
- In a few seconds, “Power Options” will open up from Control Panel and you need to click Choose when to turn off the display from left side.
- From succeeding window, click Change advanced power settings link.
- When a new popup opens, move out for USB settings.
- Click to expand the category and split up options for USB selective suspend setting.
- Click the options beside On battery and Plugged in and set to Disabled.
- Finally click Ok button and save the changes.
5] Update the Driver Software
Driver is Software responsible for communication as well as interaction between Windows 10 and outbound devices. Each function in computer needs a driver and in a few cases, it is more than one. When drivers are outdated in a system, it will be unstable, less efficient, and sluggish. In many cases, users may experience Hardware issues along with unusual Blue Screen Errors.
Updating all the drivers may work as a hotfix for BUGCODE_USB3_DRIVER Blue Screen Error as it has been one of the most successful workarounds over the past. You may think of a third party program in order to update them but nothing comes so efficient than the Device Manager. It’s a Windows built-in tool where outdated drivers are presented with identification marks. Follow the below steps now to update the drivers from your system –
- Invoke the Run dialog pressing Win and R hotkeys at the same time.
- Fill up the empty text space with “devmgmt.msc”.
- Press Enter key and let the Windows Device Manager open.
- Look carefully for any mark of exclamation beside a device in this console.
- If found, expand its devices’ list by double clicking the same.
- Right click the driver with yellow indication.
- Select Update Driver option from the appearing menu.
- When the popup shows, click Search automatically for updated driver software option.
- The process will commence if the device has got an active internet connection.
- When the downloading finishes, installation will take place automatically.
- Complete the same procedure for all outdated drivers.
- Finally, restart the computer for bringing these changes into effect.
See – Tips to Update Driver Software on Windows 10 Step by Step
6] Run the default Blue Screen troubleshooter
Troubleshooting Blue Screen was never been an easy task for us even after trying a bunch of workarounds. Microsoft dealt with the issue devotedly and came up with a massive fix for the BSOD. You need to run the troubleshooter in order to fix BUGCODE_USB3_DRIVER Blue Screen Error now. Here are the instructions to follow –
Using Direct Online Tool:
- Launch any web browser from your windows.
- Click this link and make a Visit to the webpage dedicated to Microsoft’s online troubleshooting.
- When new page loads completely, scroll down to When did you get the error? area.
- Click one of the radio buttons from here.
- When the page unrolls the walkthrough tasks to resolve existing issue, follow them and fix the Blue Screen issue.
Another prominent way to run the troubleshooter is from Control Panel. For that, check out the below steps –
- Press Windows key and type Control Panel.
- Choose the app to open in a separate window.
- Re-adjust the page by clicking Small/Large icons beside View by.
- Now, click Troubleshooting from first column.
- Moving to the next window, choose View all option located at the left pane.
- When the subsequent page unfolds, make a double click the Blue Screen option from second place.
- From the Troubleshooter wizard appearing next tap Advanced link from the left bottom end.
- In the upcoming page, put tick mark on the little box before Apply repairs automatically
- Hit the Next button to initiate the process.
- Upon finishing the troubleshooting, the utility will present guidelines to resolve Blue Screen if detected.
7] Update Windows 10
Blue Screen error is a versatile drawback having mystery about the root cause of its origin. In this case, Windows Update is one of the most successful ways to resolve the error as during the process, many of the potential bugs from earlier builds leave the system. Again, the update files released by Microsoft in a frequent interval always come up in a package form of security patches, pragmatic features, and the fixes for bugs. The complete process includes driver updating as well which you can avoid if you have already carried out the task.
Windows Updating Process is automatic; the device will commence downloading the new files if it is connected to internet. If that doesn’t happen, you can still progress manually to carry out this task and try fixing BUGCODE_USB3_DRIVER Blue Screen Error. The steps to follow are these –
- Open the Start menu pressing Windows key and click the cog.sign.
- When Windows Settings app opens up, click the Update & Security tile.
- From the next page, click on Windows Update located at the left pane.
- Shift to alongside right and click on Check for updates link.
- Upon searching, the update patches will be downloaded.
- Click Install now after finishing the downloading.
8] Run SFC scan to recover system components
Each file in a system has a definite structure and specific contents which are operated normally when all the information stays in the right place. When the file is corrupted, the written information in it will be in wrong place and it will not open normally. System Files possess similar character and with them, Windows cannot operate in usual mode. Hence, plenty of vulnerabilities show up one of which is BUGCODE_USB3_DRIVER Blue Screen Error.
System Files in Windows may be corrupted because of sudden power surge, full system crash, updating faults, malware infection, “power outage”, and mismatched version. Corrupted System files will not open at all and appear as unreadable. To fix the Blue Screen error, you need to make these files normal and for that, System File Checker is the only tool. The utility opens only in the Elevated Command Prompt executing a specific command. Here are the guidelines to use this utility –
- Open up Power user menu pressing Win and X hotkeys in combination.
- Choose Run from the list and invoke wizard.
- Type “cmd.exe” in the provided text box provided of it.
- Now press Ctrl + Shift + Enter keys at one time.
- Click Yes when the User Account Control floats up for asking permission.
- In the Elevated Command Prompt window, enter the below text at the base of blinking cursor –
Sfc/ Scannow
- Press the Enter key to activate System file checker.
- The default tool will start looking for corrupted and missing system components in the device.
- It will also resolve the dreadful system files automatically.
- Reboot the Windows once done.
9] Keep the System free from Malware
Malware is the worst enemy till today over internet and these bugs are always at a lookout for some weak areas in your security system. They are no dissimilar to a usual file and stays in disguise in various links throughout the web. They disperse swiftly using media like USB drives, spam e-mails even in some webpages. The primary intention to create malware is simply to hack personal information about user. Coming across malware is very frequent, to be honest especially while surfing over the web. To keep the system out of risk, you need to strengthen our security shield so that, these bugs fail to get through.
Once they manage to get access, the viruses will damage the system files apart from stealing sensitive data. We have already mentioned earlier that, corrupted or damaged system file can cause BUGCODE_USB3_DRIVER Blue Screen Error very easily. Windows Security is the latest inclusion in Microsoft’s shield mechanism replacing any third-party anti-virus program. This is a default program and provides real-time protection against Trojans, Spywares, and any kind of malware. Use the tool to clean up virus from your system using the below instructions –
- Open the Taskbar Search pressing Win+Q hotkeys.
- Type Windows Security in the blank text field and press Enter.
- When the app opens up, Choose Virus & threat protection from the left pane
- Shift to alongside pane and make a click on Scan options link.
- When all methods are visible here; click radio button set for Full scan option.
- Hit Scan now button and begin malware search in the system.
- If the utility trace out some bugs, you will see the list on display. Click the Clean Threat option to get rid of them.
- Once moved to the succeeding page, click Remove followed by tapping Start actions to clean up all the threats.
10] Check the Hard Disk for bad areas and fix them
Hard Drive, sometimes, has Bad areas which consist of small clusters or sectors that appear as faulty. It may happen in both magnetic hard drivers used traditionally or in modern solid state ones as well. There are two types of bad sectors that may exist in hard drives viz hard and soft alternatively physical and logical. Physical hard drive bad areas formed when the device is actually damaged or from a production fault. The soft bad areas of the logical one are bit software oriented. It may happen due to sudden power shut off, forcibly pulling power cable or even some malware issues creating mess.
Bad areas in the hard disk are very much likely to cause a BUGCODE_USB3_DRIVER Blue Screen Error very easily. To fix these areas, Disk Checking tool is the best utility and it’s a default tool from Microsoft. This is a powerful freeware tool intended for detecting as well as repairing the disk errors. Here is how to run the tool –
- Open the Start menu and click the Power icon.
- Select Restart option holding the Shift button and let’s carry out Automatic Repair.
- When the device powers up, click Troubleshoot from available context menu.
- Choose Advanced Options next followed by tapping Command Prompt from the list.
- In the following black window, enter below commands at the base of blinking cursor –
bootrec.exe /rebuildbcd
- Press Enter key and then proceed for executing below commands –
bootrec.exe /fixmbr
bootrec.exe /fixboot
- Press Enter key after entering each command to execute them.
- Lastly, enter the below command
chkdsk C: /f /r /x
- Press Enter key to run the Disk Checking tool in the system.
- Once done, Restart Windows 10 and make all changes effective.
11] Remove unnecessary programs mostly the duplicate ones
Software programs reduce human efforts while doing computer tasks and also save time. Therefore, plenty of applications get approval and enter into the store every day where many come with a different name but same functionality. While installing the applications we need to keep in mind that, disk space reduces when you install a large number of them unnecessarily.
When similar types of programs are installed in the same system, they may engage in conflict leading to clear off some system files. As soon as the system files and DLL components go missing, BUGCODE_USB3_DRIVER Blue Screen Error evolves in Windows 10. Therefore, you need to remove some of the duplicate or unnecessary programs using below steps –
- Open up Power user menu pressing Win+X hotkeys at once.
- Choose Apps and Features option listed.
- When the App Settings will open up, move to the right side pane.
- Find out the application causing trouble and click the same.
- Select Uninstall option from the extended pane.
- For confirmation of the task, click Uninstall button.
- Follow the few more guidelines available on display to complete the process.
- We recommend restarting the device once to make the changes into effect.
12] Use USB 2.0 while installing Windows 10
BUGCODE_USB3_DRIVER Blue Screen Error may also evolve in the Operating system after installing the Windows 10. The reason is not quite sure but Windows 10 may have some conflicts with USB 3.0 ports. Hence while installing the Windows 10 freshly using a Flash drive, try using USB 2.0 ports in order to avoid any further issues. There is another way out, you can simply use a DVD while installing and the error may not appear in the system.
13] Run the DISM tool and fix corrupted Windows image files
Windows image files are released by Microsoft before any major release and these are the snapshots of layout of a CD/DVD saved in the drive in ISO-9660 format. The main use of these files to write a blank CD-R or DVD-R in order to make an identical copy of files. Often these files are found in corrupted condition due to third party applications or corruption in the windows components. The ultimate result comes up, for this reason,BUGCODE_USB3_DRIVER Blue Screen Error appears.
If you like to fix the BSOD error caused by image files, you need to run the DISM command in the Elevated Command Prompt. Deployment Image Servicing and Management tool can capture, manage, or split the .wim files. To complete the process, follow the below steps –
- Open the Taskbar Search and type cmd in the blank test area.
- Right click the Command Prompt and choose Run as Administrator.
- Tap Yes when UAC prompts for permission.
- When the black window arrives, type the below command at the blinking cursor –
DISM.exe /Online /Cleanup-image /Restorehealth
- Activate the tool pressing Enter key.
- As the process will search through the components in the system, and try detecting the defective image files, it may take longer than usual.
- When finished fixing, restart Windows 10 to make these changes effective.
14] Disable the Fast Startup method
Fast Startup initiates rapid booting of new startup collecting information from a previous session. It’s a combined feature of computer’s two traditional power options – Shut down and hibernate. The feature when enabled restricts the computer from getting a usual shutting down process. Furthermore, it can cause some compatibility setbacks with the devices that don’t support the Sleep or Hibernation mode.
Since the feature usually collects information from an ongoing Windows session to load the startup faster, it may also keep Blue Screen error intact from the last session. Often times the BSOD errors are less destructive and resolve only after rebooting the computer. In that case, keeping Fast Startup enabled will be detrimental for BUGCODE_USB3_DRIVER Blue Screen Error. Therefore, let’s proceed to disable it using the below steps –
- Move the cursor to the right corner of Taskbar and right click the Battery icon.
- Select Power Options from the available context.
- After a new window unfolds, choose What the power buttons do link from the left pane.
- From the subsequent window, Click on Change settings that are currently unavailable to unveil the hidden options.
- Scroll down and uncheck box says Turn on fast startup (recommended).
- Lastly click the Save Changes button from the bottom.
15] Reset Windows 10 to fix BUGCODE_USB3_DRIVER Blue Screen Error
Resetting Windows 10 is pretty similar to a Clean installation of Operating System. If a BUGCODE_USB3_DRIVER Blue Screen Error is caused by a third party program and very much unlikely to resolve, you have to go for resetting Windows 10. The feature offers you to remove all files from drive C: or keep the files if you like so.
With a decision to remove all files from system, you need to keep a backup of the components before carrying out the task. Another very important tool here is a bootable flash drive or USB with the latest version Windows 10. The process is as follows –
- Open the Start menu and click Power sign from there.
- Select Restart option while holding the Shift button from keyboard.
- When the Windows Will boot up at Automatic Repair, select Troubleshoot option.
- From the next screen, choose Reset this PC > Remove everything.
- When you will be asked to insert the bootable installation media, do this.
- Choose options Only the drive where Windows is installed > Just remove my files in the process.
- Lastly, click Reset to begin the process.
- Complete the process by following on-screen instructions appearing next.
Follow the instructions here – How to Reformat Windows 10.
When the process ends, skip installing any drivers or programs and straightway check if the error has resolved. When the process comes out successfully, set up the windows as you require to make it work worthy.
Methods:
1] Disable Automatic Restart
2] Update the BIOS Firmware
3] Boot the device in Safe Mode
4] Re-adjust the Power Settings of Computer
5] Update the Driver Software
6] Run the default Blue Screen troubleshooter
7] Update the Operating System
8] Run SFC scan to recover system components
9] Keep the System free from Malware
10] Check the Hard Disk for bad areas and fix them
11] Remove unnecessary programs mostly the duplicate ones
12] Use USB 2.0 while installing Windows 10
13] Run the DISM tool and fix corrupted Windows image files
14] Disable the Fast Startup method
15] Reset Windows 10
That’s all!!
When it comes to ease of use Windows Operating System is the first choice of many users. However, its reputation is declining due to its share of issues like BSOD and others that spoil users’ experiences.
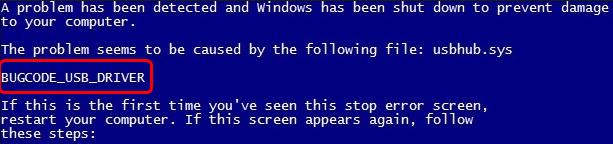
Even in day-to-day operation, the operating system is plagued with bugs, and users face several issues. Windows has the highest security concerns. To address these issues, Microsoft releases frequent updates. The usbhub.sys BSOD error is one such issue that occurs due to faulty hardware or corrupted device drivers.
Luckily, in this post, we will learn how to update the driver and fix the Blue Screen of Death Windows 10.
What is USBHUB.Sys?
Developed by Microsoft for the Windows Operating System, usbhub.sys is a system driver file for the Default Hub Driver. The Universal Serial Bus (USB) hub is a device used to expand a USB port into various gateways allowing multiple devices to connect.
When this device driver is outdated, corrupt, or missing, you face several issues, and Windows 11 Blue Screen of Death with usbhub.sys is one of them.
To fix it, you will need to update the device driver, follow these steps to update the driver.
How to Automatically Identify and Update Outdated Drivers?
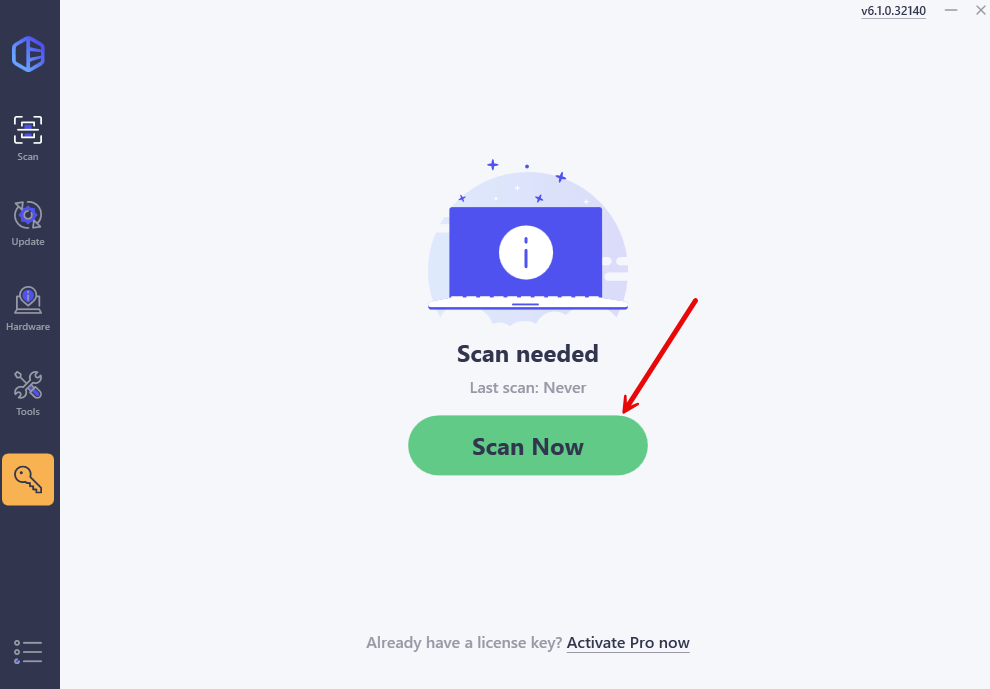
Keeping drivers updated is the best way to avoid facing BSOD caused due to outdated USB Hub driver. To update the driver easily without needing technical information, try Advanced Driver Updater. Using this excellent and powerful driver updating tool without manual intervention, outdated drivers can be easily narrowed down.
To get the driver updater, click the button below:
Best Ways to Fix Windows 10 Blue Screen on Startup
If you’re having trouble with the UsbHub.sys BSOD problem, we’ve compiled a list of the best troubleshooting steps. Let’s see how to resolve the ‘UsbHub.sys BSOD problem’ on Windows 11 and 10.
1. Check Your Hard Drive Health
Because the BSOD error message ‘UsbHub.sys’ is caused by malfunctioning hardware or a damaged device driver. The health of the hard drive should be checked. Hard drives degrade with time, and when this happens, files on the HDD become corrupted, resulting in BSOD problems; if you find an issue with the disk, backup up data and replace the hard disc.
To check the hard disk health, you can either use the CHKDSK command or use the Disk Speed tool.
2. Update Device Driver
Another cause of the ‘UsbHub.sys BSOD problem’ might be an outdated device driver. So, before making any more modifications, ensure the USB Device driver is up to date. To update the USB Device driver manually on a Windows 10 PC, follow these steps:
1. Press Windows + X > select Device Manager and open it.
2. Under Device Manager, go to Universal Serial Bus controllers category or USB Root Hub category. Double click on it and check for the unrecognized devices.
3. Right-click on the Generic USB hub > select Update Driver option.
4. Select the option Search automatically for drivers.
5. Wait for Windows to look for updates; if available, it will be updated in the background.
6. Restart PC to apply changes and then use the PC; you should not encounter Blue Screen on Windows.
However, if you find these steps overwhelming, you can use Advanced Driver Updater to automatically detect outdated drivers and help update them without manually providing any information.
Must Check : How To Update Drivers On PC – Windows 11,10, 8,& 7
How to Update the Driver Automatically Using Advanced Driver Updater?
To use Advanced Driver Updater, follow these steps:
1. Download and install Advanced Driver Updater
2. Launch the driver updating tool to identify and update outdated drivers.

3. Click Start Scan Now & scan the PC for outdated drivers.

4. Let the driver updating tool scan the computer and list outdated drivers.
5. Review scan results and update outdated drivers.
FREE users need to click Update driver to update individual drivers. However, registered users can update all outdated drivers by clicking Update All.

6. Once all the drivers are updated, restart the PC to apply changes.
Note : The FREE version lets you update one driver at a time, while the registered version enables you to update all outdated drivers in a couple of clicks. Most importantly, Advanced Driver Updater comes with a 60-day money-back guarantee.
See This- How to Update Outdated Drivers in Windows 11, 10, 8, 7
3. Check for Hardware for Issues
The previous methods fail to work for you; check the USB for a hardware issue. Unplug all USB devices and see if it helps fix usbhub.sys BSOD error. If you do not encounter the Blue Screen Error notice after detaching all USB devices, the USB might be an issue. Take the system to the local repair shop to look for the hardware issue.
Final Words
So, these are the three best ways to fix the Blue Screen of Death. Updating drivers helps resolve the issue, and to save time in updating the drivers, you can use Advanced Driver Updater. Using it, you can keep all outdated drivers updated and avoid facing Blue Screen of Death on the Windows operating system.
Hopefully, the fixes above work for you and overcome the Blue Screen errors. For any product-related issues, you can contact support@systweak.com; if you like the post or have any suggestions, leave your comments in the section below.