
@AndreyOEM написал (-а):
(1) … Имеется телевизор SONY KD55XF7596 (Android) и ноутбук DELL на ОС Windows 10. Оба потенциально поддерживают Mirocast. И БЕЗ проблем коннектятся друг к другу с первого раза.
Экран ноутбука дублируется на ТВ, но с жесткими тормозами…(2)… есть встроенная Intel, как я понял, и ещё AMD. При подключённом беспроводном дисплее (то есть ТВ) в настройках экрана всего 30гц при 1920×1080. Пробовал все возможные разрешения экрана, ничего не меняется…
(3)… Еще слышал про соединения wi-fi direct 2.4гц u 5 гц, но так и не понял, где это в windows можно увидеть и изменить…
(1) а не пробовали для подключения к беспроводному дисплею просто воспользоваться комбинацией клавиш Win+P на ноуте и в открывшемся меню «Проецировать» выбрать пункт «Подключение к беспроводному дисплею», а не др. пункты из открывшегося меню (типа «Повторяющийся», «Расширить», «Только второй экран»).
Если нет пункта «Подключение к беспроводному дисплею», то возможно «железо» или драйвер не поддерживает эту функцию — требуется поддержка на стороне Wi-Fi-адаптера и графического адаптера видеокарты (как на уровне «железа», так и драйвера), что, кстати, характерно для новых версий Windows 10;
(2) замечено, что:
— стоит попробовать отключить дискретную видеокарту (в Вашем случае — AMD) в диспетчере устройств и оставить работать интегрированную (в Вашем случае — Intel);
— будет нелишним открыть Control Panel/Center интегрированной видеокарты (в Вашем случае — Intel) и в настройках переключить формат цветности RGB в YCbCr;
(3) и все равно подключение к беспроводному дисплею может работать с некоторой задержкой и перебоями, так как штатная функция Wi-Fi Direct у Wi-Fi-модулей моделей BRAVIA обычно поддерживает один единственный частотный диапазон 2.4GHz ;
(4) а в остальном см. детали, к примеру, отсюда:
https://help-wifi.com/raznye-sovety-dlya-windows/besprovodnoj-displej-miracast-widi-v-windows-10/
Успехов , и рассказывайте…
—————————————
«Правильная постановка задачи важнее даже, чем её решение…» (Альберт Эйнштейн).
Applies ToWindows 11 Windows 10 Windows 10 Mobile
Если у вас возникли проблемы с подключением к беспроводному дисплею, попробуйте выполнить следующие действия, чтобы устранить неполадки.
-
Убедитесь, что устройство Windows 11 поддерживает Miracast. Чтобы проверка на компьютере, нажмите клавишу с логотипом Windows + K. Если устройство не поддерживает Miracast, может появиться сообщение о необходимости подключения внешнего дисплея с помощью кабеля.
-
Убедитесь, что Wi-Fi включен. Для этого на компьютере щелкните значок Сеть в правой части панели задач, а затем проверка быстрый параметр Wi-Fi.
-
Убедитесь, что дисплей поддерживает Miracast и убедитесь, что он включен. Если ваш беспроводной дисплей не поддерживает Miracast, вам потребуется адаптер Miracast (иногда называемый аппаратным ключом), который подключается к порту HDMI.
-
Убедитесь, что на целевом компьютере установлено приложение Беспроводной дисплей. Если устройство, к которому вы подключаетесь, является другим компьютером с Windows, необходимо установить приложение беспроводного отображения (необязательное средство в Windows).
-
Если целевой компьютер недоступен для обнаружения, попробуйте ввести беспроводной дисплей в поле поиска на панели задач и выбрать его в списке результатов. Теперь проверка для этого устройства на устройстве, с которого вы хотите проецировать. Дополнительные сведения см. в разделе Использование зеркального отображения и проецирования экрана.
-
На целевом компьютере перейдите в раздел Параметры > системный > Проецирование на этот компьютер и убедитесь, что он настроен для обнаружения.
-
-
Убедитесь, что драйверы устройств обновлены и установлена последняя версия встроенного ПО для беспроводного дисплея или адаптера. Ознакомьтесь с информацией о поддержке на веб-сайте производителя для получения дальнейших инструкций или зайдите в Microsoft Store для поиска приложения производителя, которое поможет вам.
-
Перезагрузите компьютер и беспроводной дисплей.
-
Удалите беспроводной дисплей и снова подключите его. Чтобы удалить устройство, откройте раздел Параметры и выберите Bluetooth & устройства > устройства. В разделе Беспроводные дисплеи & док-станции выберите беспроводной дисплей или адаптер, который требуется удалить, а затем выберите Удалить устройство. После этого попробуйте повторно подключить устройство.
Нужна дополнительная помощь?
Нужны дополнительные параметры?
Изучите преимущества подписки, просмотрите учебные курсы, узнайте, как защитить свое устройство и т. д.
We did a number of videos last year about using Miracast to wirelessly project from your Surface to a TV, a projector or even to another device. It’s a great feature of Surface – in fact its built into most Windows 10, and many Android devices. Thanks to some special capabilities in Windows 10, it’s even possible to share mouse, keyboard, touch and pen input from the second display back to your Surface. It’s very cool tech, and it’s pretty reliable and easy to use. But like all technology things can go wrong. – So we decided to create a comprehensive guide of pretty much everything that can go right and wrong, as well as how to optimize Miracast.
You can watch and listen here, or continue reading at your own pace.
What is Miracast?
Miracast is a networking technology which enables display of multimedia content between Miracast devices. It can be done even when there is no available Wi-Fi. It was created by the Wi-Fi alliance – the same group that governs the standard of Wi-Fi that we all so much rely on! Since it is a network technology, there are a number of layers to the process, and those layers tend to reflect the points at which things can fail. So let’s get into them:
Device doesn’t show in the Connect List
The first step is discovery. When we try to project with Miracast, it scans the Wi-Fi spectrum for available Miracast receivers. This step does not require you to be connected to any wireless network at all. In fact one of the great things about Miracast is that it can be made available to anyone without granting any access to your network.
But it does require your Wi-Fi cards to be enabled, or switched on, on both devices. So make sure that Wi-Fi is turned on.
In Windows, to find an available Miracast receiver to project to we use the connect menu. To get there; press Windows and K on the Keyboard together.
It’s important to Wait a few seconds here for that scan to happen. Your paired Bluetooth devices will show up here instantly, but the Miracast devices will take a few more seconds to show up.
Projecting to a Projector, Display or TV
If your device doesn’t show up, make sure that it’s turned on and check that the input on your projector or TV to make sure that it is ready to receive. If it’s not, I’ll leave you to figure that out with your TV, display or projector… They’re all different.
Projecting to a PC
As of the Windows 10 2004 update you must install the “Wireless Display” optional feature on the receiving PC for this to work. If you do not have that feature installed, you will see this message in Projecting to this PC settings.
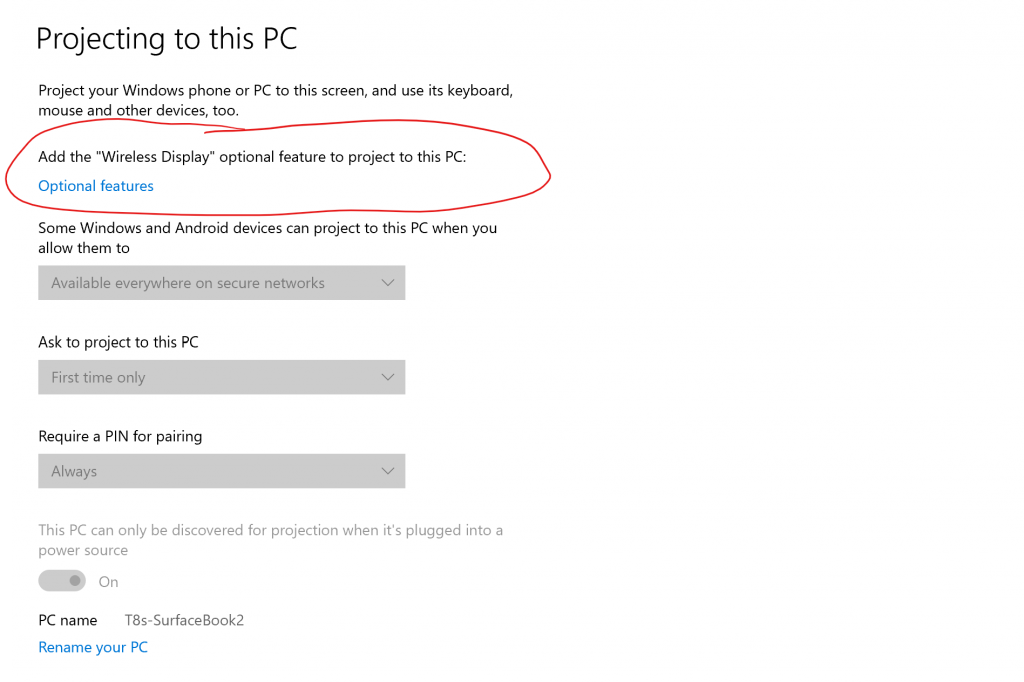
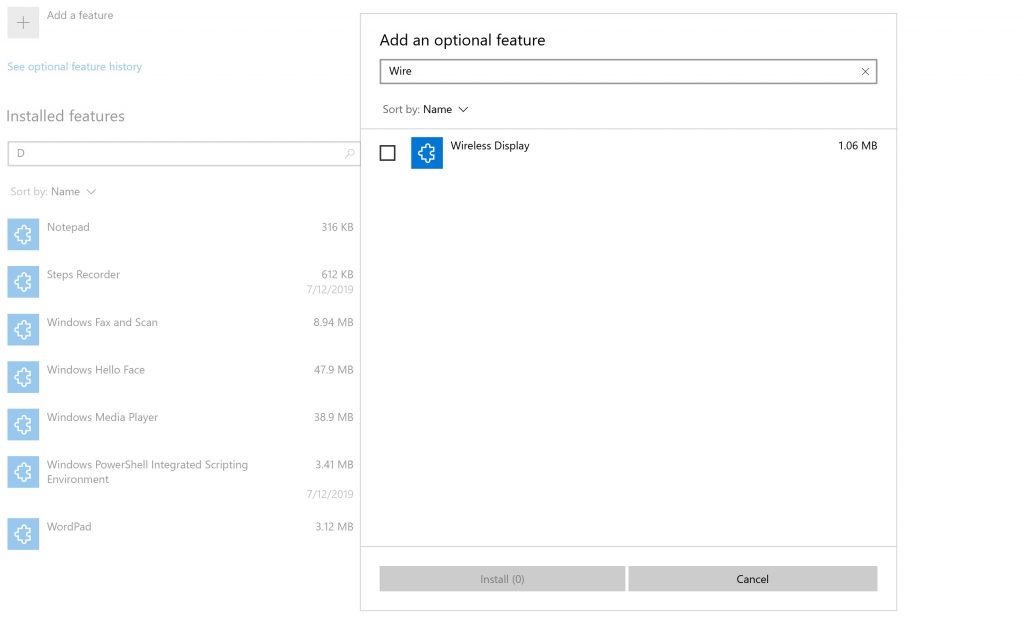
Click on the “Optional features” link and add the “Wireless Display” feature to your device.
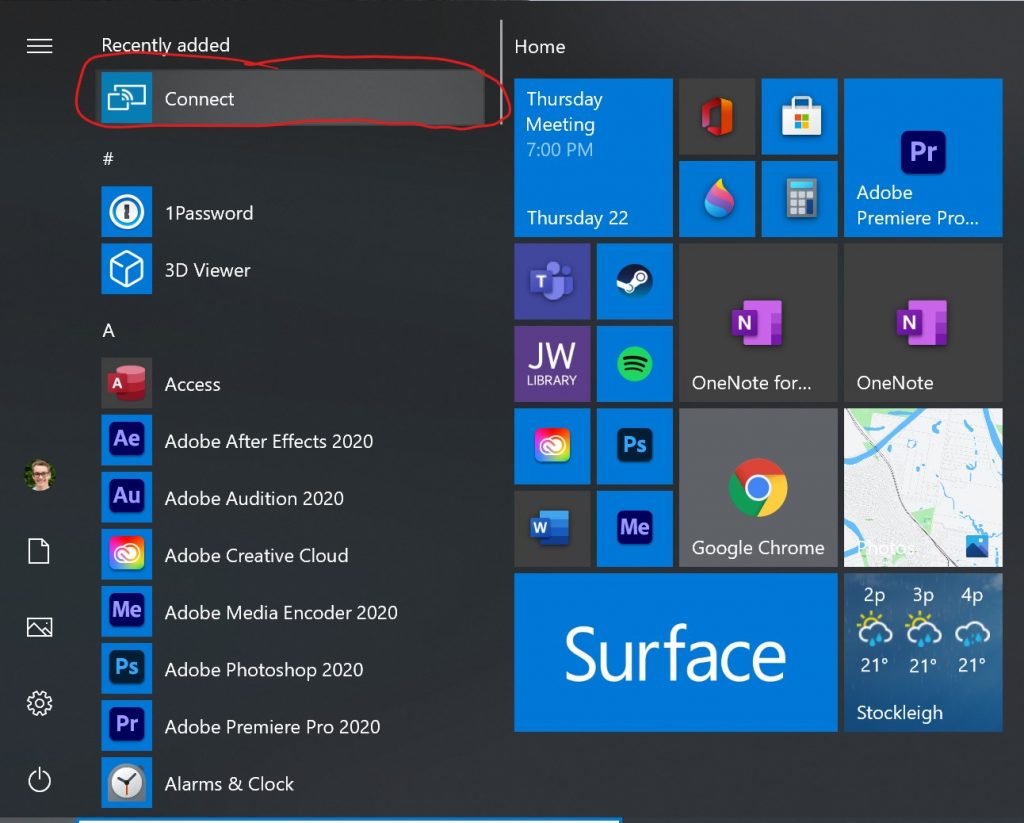
Once you have installed that feature, open the “Connect” app and your device will be ready to receive.
If your device still doesn’t show up in the connect list, don’t panic, there a few more things to try. Take a look at the settings for “projecting to this PC” in the Windows 10 settings app on the device that you want to project to.
In the first box, there are 3 options:
- Always Off
- Available everywhere on secure networks
- Available everywhere
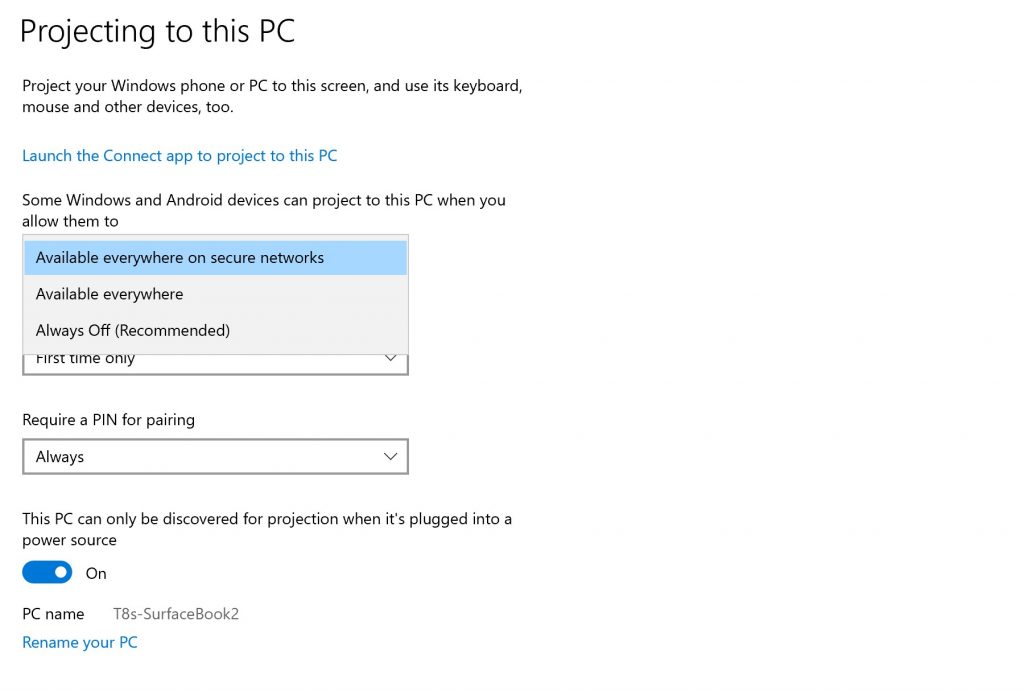
If you set this option to “Available everywhere on secure networks”, it will only show up as a Miracast receiver when both of your devices are connected to a secured Wi-Fi network. The network must be encrypted, for example with WPA2 security.
If you are connected to an unsecured open Wi-Fi network then it will turn off and you won’t be able to project to it at all. Also, if you are not connected to a Wi-Fi network at all, it will not work with this setting. But generally, this is the recommended setting that you should use.
Wi-Fi Network Profile
If your 2 devices are both connected to a secured network, but the receiver is still not showing up, check the Wi-Fi network properties on the device you’re trying to project to. If the Wi-Fi network profile is set to public, then Miracast won’t work. The public network profile setting blocks the Miracast connection.
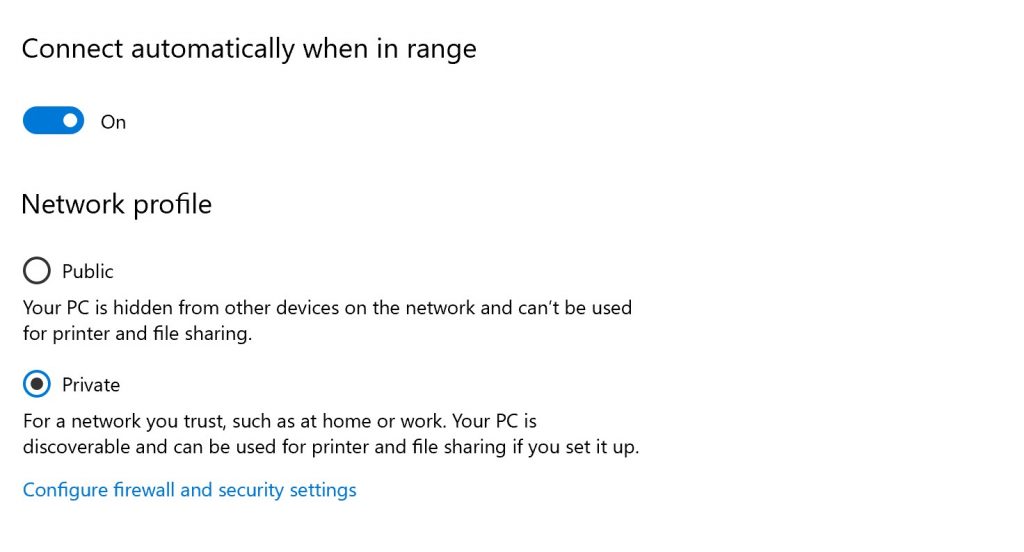
Setting this to private means that a slightly more relaxed firewall setting will be applied, and it should start to show up!
Set the option to “Available everywhere” if your devices are going to be connected to an unsecured Wi-Fi network when you want to project – or if you are not going to be connected to a Wi-Fi network at all.
This setting is there to prevent random people from projecting to your PC while you’re using somewhere in public. Like at a hotel, airport lounge or shopping center for instance. So it’s usually best to select “Available everywhere on secure networks” unless you’re trying to project in one of those places.
Power Option
The next thing to check is the power option. “This PC can only be discovered for projection when it’s plugged into a power source.”
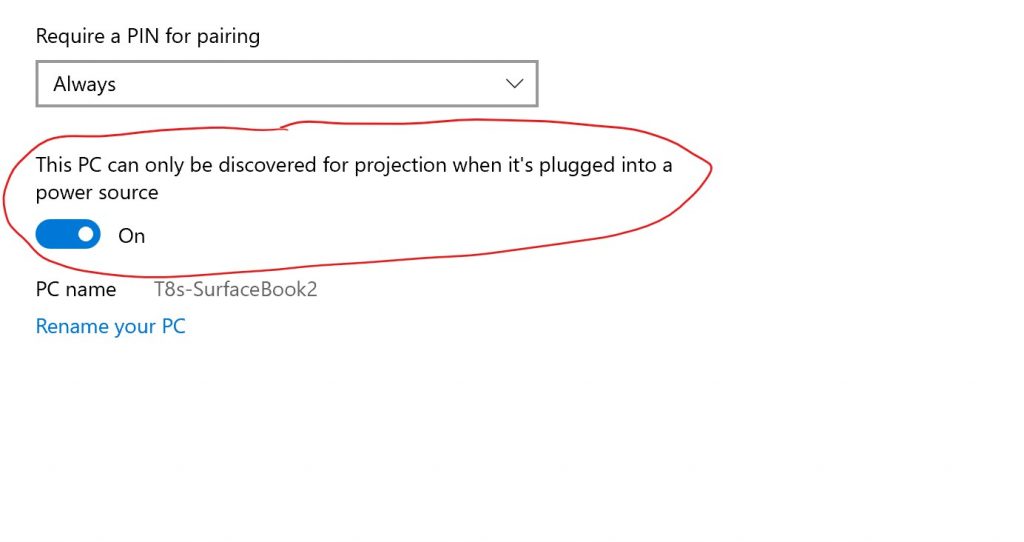
If this one is set to on, it simply won’t work unless it’s plugged into power. If you turn it off, then it will work on battery as well, but that of course has a battery life impact. So don’t turn this one off unless you have to, and remember to turn it back to on when you’re done to save on power!
2.4Ghz or 5Ghz
Another thing that can stop you from projecting to your Surface is your network adapter settings. Most Wi-Fi adapters – like the ones in your Surface will transmit on 2.4Ghz or 5Ghz Wi-Fi networks. However, if you have limited your Wi-Fi adapter to only work on 5Ghz, Miracast will not work. Miracast can work across 5Ghz connections – we’ll talk more about this – but it needs 2.4Ghz to initiate a connection. If you have disabled 2.4Ghz on either device it will not work.
So if you’ve checked out these things, your receiving device should be showing up in the connect list now. Let’s take a look at where things can go wrong next.
Failure to Connect
My first suggestion is to try once more. There are a lot of moving parts with this setup, and I have found that on some devices it does fails to connect the first time. Try again, and it often sorts itself out.
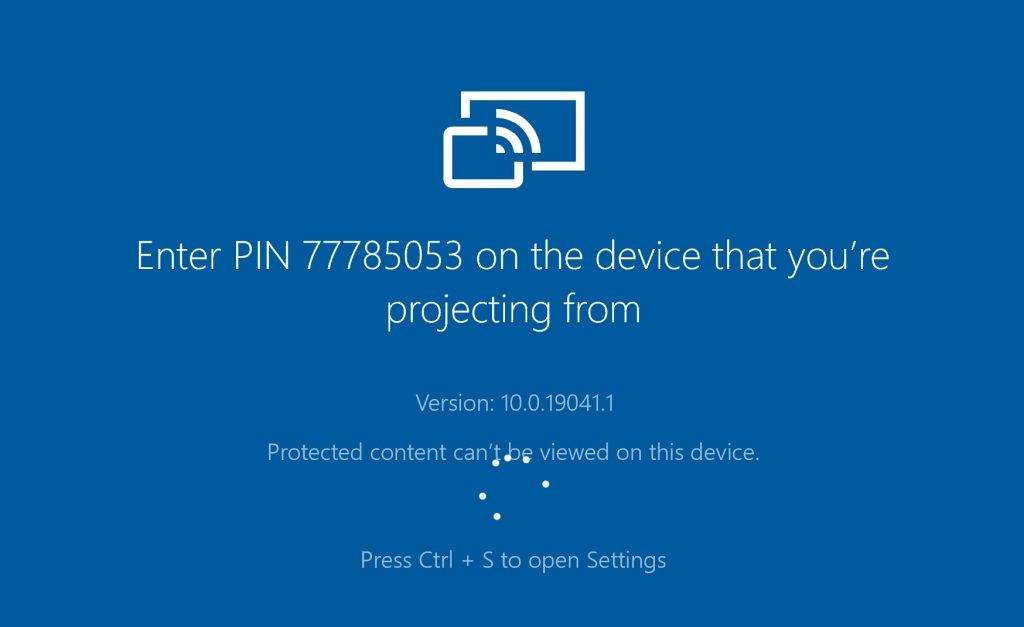
One other thing that could halt the connection is the PIN security. If you have this enabled, when you attempt to project the connect app will open on the receiving PC and show a pin number that you’ll need to type into the project menu on the projecting PC.
Anti-Virus, VPN, Security Software
Something else that can cause an issue at this point though is Anti-Virus, VPN, and security software. Anything that could prevent networking could cause an issue here.
I haven’t used 3rd party Anti-virus for at least 10 years as the built in Windows Defender is good and does the job. But if you have some Anti-virus or VPN software on your Surface and you’re not able to connect. Try without it. Disable it, or remove it. Whatever you need to do.
Display Refresh Rate and Resolution
If your trying to connect to an older monitor or projector you could encounter issues with resolution and refresh rates. For example, if you’re trying to project at 60Hz in 4K, but your monitor doesn’t support that refresh rate and resolution combination, it could fail. If your having issues at this point, you might want to try a lower refresh rate or resolution.
Optimize Miracast performance
So Miracast is pretty handy tech, but like all things wireless… it can be a little laggy when compared to using a cabled solution.
So, many have asked, “can I plug the Surface in?” – For example with a USB C or display port cable. Making it a screen that way instead of using Miracast.
Unfortunately the answer is, no. Windows currently doesn’t support that type of connection. Maybe they will in future! And if you want to see that feature introduced, make sure that you jump into the feedback app on your device and suggest the idea!
But, what I will show you is how to optimize Miracast for best performance.
Behind the scenes of Miracast
To optimize Miracast requires us to dive a little deeper into the technology. The standard was created with the intent to allow you to project wirelessly, just like using a VGA or HDMI cable.
When you go to the office of any big organization, they don’t usually give you access to their corporate Wi-Fi. If they do give you Wi-Fi access, it’s usually to a guest network, and it’s unlikely to allow you to connect to computers, printers, or any infrastructure – and for good reason! Security!
That said, they’ll usually let you bring your laptop in and let you plug into their projector for your PowerPoint presentation.
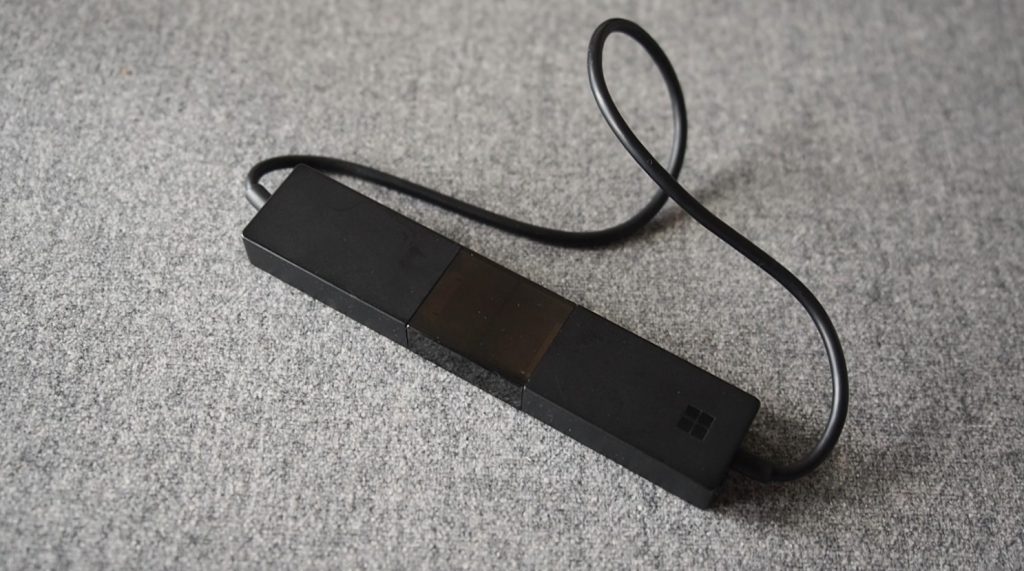
Miracast was designed with this in mind. To setup a point to point network connection between the two devices, just for screen sharing. Thanks to this design, you can allow people to project to your Miracast enabled displays without giving them access to anything on your network. This is called Peer to Peer networking, and it is the basis for the connection between your Surface and most Miracast enabled displays and adapters, like the Microsoft Wireless Display Adapter that I use.
Use 5Ghz Wi-fi
This Peer to Peer connection will use 2.4Ghz wireless to establish the connection and carry the display data. From a speed perspective, it would be better to use 5Ghz Wi-Fi instead of 2.4Ghz. 5Ghz Wi-Fi networks are generally faster and less prone to saturation because they can carry more data. And since we’re usually pretty close to the device that we’re projecting to we don’t have to worry too much about range – which can be reduced on 5Ghz. If you’re getting a bit of display lag or interference with Miracast projecting, 5Ghz is usually the way to fix it.
Miracast will always look for and negotiate a connection using 2.4Ghz. But, if you are connected to a 5Ghz Wi-Fi network while you’re projecting – even if it is not the same one – then Miracast will carry the display data across the 5Ghz band. So you should get better performance and reliability from your display sharing if you’re connected to a 5Ghz network.
If your Wi-Fi area is extremely busy, and you’re still finding performance issues; do a bit of an investigation around the Wi-Fi channels in your environment. It’s a bit above my paygrade, so here is a PDF that you can read from the Miracast Experts – Actiontec. I talked to one of the Actiontec technical team at a Microsoft Inspire conference a couple of years ago and I was blown away by their technical expertise. They know their stuff, and they helped me to quickly get to the bottom of a widespread issue that caused the Surface Pen to disconnect a Miracast session, over a quick conversation. They are the people to look to for professional Miracast gear.
Over Infrastructure Mode
Another factor to consider here is that in addition to Peer to Peer connections, the Miracast standard includes an “over infrastructure” mode that allows it to broadcast the screen sharing traffic across an existing network connection. With Windows 10 devices, this is automatic – and you can see this yourself by watching the task manager.
If you connect to a Miracast device that is not on your network, you will see on the performance tab – a virtual network adapter appear. But if you connect two devices that are on the same network, you won’t see that new adapter appear. That’s because the display data is being carried by your existing network.
And to extend this, infrastructure mode means that you can actually Miracast across a cabled ethernet network too! So in a large organization, this could be very handy. Wi-Fi is still needed to initially setup the connection. But if both devices are on the same wired LAN, your display traffic will be sent over the wired network.
This is potentially something that you can use to make the connection between your two Windows 10 devices work more reliably. It is also a mode that devices like the Surface Hub can take advantage of. Advanced Miracast receivers like the Actiontec Screenbeam 1100 use this too. BTW, if you want to Wirelessly enable displays in your organization, that thing is the top of the pile. It does Miracast, Google Cast and Apple Airplay all over the one manageable device!
Pen and Touch lag
Now I was excited when I learned about the possibility of doing Miracast over Ethernet. As we find people often want to improve pen and touch screen responsiveness when projecting to their Surface.
Miracast enables keyboard, mouse, touch and pen input to travel from the receiver back to the projecting PC. So for example, if you had a non-touch screen laptop, with no pen. Projecting to a device like the Surface Hub allows you to draw on programs, right back on your laptop. Same with projecting to any Surface in fact.
The trouble is that there is a noticeable lag associated with drawing from one device to the other. You can get away with that in a PowerPoint presentation, but you wouldn’t want to take notes this way, let alone draw. Unfortunately using Miracast over Ethernet will not improve this. At least in my experience. Over my Gigabit wired network, the performance was actually worse than using Wi-Fi. Unfortunately, we don’t currently have an Apple-Sidecar-like experience that allows you to draw with your Surface Pen onto your desktop computer. Like I said, if you’re looking for that capability, jump into the Feedback app and put in your 2 cents. Your feedback definitely shapes the decisions that are made around product development, so make your voice heard.
But, bear in mind that this tech, Miracast is not Microsoft tech, and it is not designed to be Apple Sidecar. This tech predates that idea by many years – 7 years in fact. And it’s intent is very different.
Use Sync
So, connecting from a PC to your Surface as a second display with Miracast is a great feature. Especially for email, browsing, documents – it’s even ok for video conferencing and watching videos. Miracast is even great for presentations. But it’s not a great solution for notetaking and drawing.
Instead, it might be better just to run those thing separately. For notetaking, rather than trying to project, you’d be better off using OneNote on the Surface together with OneDrive for easy synchronization. Same thing for watching videos and drawing. If you can, work locally and sync instead.
How I use Miracast
I use my Surface Pro as a second screen when I’m running online training sessions with Teams. That way I can share a screen and still have my video and notes in front of me on the Surface Studio.
Conclusion
If you’d like to look a little deeper at the Miracast Protocol, here is a video ‘Miracast Explained’ by CodeMonkeyRicky from 2013. It’s a great explainer video with an old fashioned dry erase Whiteboard!
I’d also like to acknowledge Microsoft MVP Barb Bowman from Digitalmediaphile.com for her information on Miracast, as well as everything else Surface Support related that she does! And lastly Actiontec for the Miracast information on their website too.
Wow… If you made it this far… Please share our content with your colleagues and check out the video that we published along side this aswell!
Problem
When the computer is connected to the Wi-Fi, the user projects the computer’s screen to another device via Miracast, then play videos, music, or view images on the other device and find that the virtual computer’s system lags or artifacts are sometimes displayed on the screen.
Cause
The following reasons can cause these issues: multiple devices are currently connected to the router, poor Wi-Fi signal, incompatible video resolution, and low network bandwidth.
Solution
- If you have a 5G Wi-Fi hotspot, connect your computer to this hotspot.
- Do not move too far away from the other device when projecting the computer’s screen, and perform the projection when the Wi-Fi connection is stable.
- Restart the computer and the other device, disable Wi-Fi, project the computer’s screen to the other device, then enable Wi-Fi again.
Perform the following steps:
- Click the Wi-Fi icon to display the Wi-Fi list. Click the Wi-Fi network you are connected to, then click Disconnect.
- Click the Action Center icon in the bottom-right corner on the taskbar and go to Project > PC screen only.
- Select the other device you want to project your computer’s screen to.
- After the computer’s screen is projected to the other device, enable Wi-Fi again.
Суть такова. Есть ноутбук с Windows 10, есть телевизор с подключенным к нему донглом, который умеет в Miracast. Подключаюсь к донглу по воздуху с ноутбука, выставляю в настройках дублирование мониторов, все работает более менее сносно. Видео транслируется не с проигрывателя медиа, а из браузера с одного из сайтов, позволяющих просматривать фильмы и сериалы онлайн. Бывает, что начинаются артефакты видео (бегающие квадратики), но это редко и терпимо, лучше чем ничего на данный момент. Но как только я закрываю крышку, или же переключаю в настройках режим показа только на второй монитор (донгл, подключенный к телевизору), начинаются тормоза. Не бегающие квадратики, а именно потеря частоты кадров.
Подскажите, как быть и что делать? Подозреваю, что проблема в том, что переключается на вторую видеокарту. Ноутбук на AMD, карты вот такие: AMD Radeon HD 8650G, AMD Radeon HD 8670M.
Уточнение: Miracast работает по воздуху напрямую, то есть дело точно не в роутере или каком-то промежуточном звене, его просто нет.