
I want to restart some specific service for a specific time every week. Can I use the NET command?
— Shanmuga
Hi Shanmuga.
Yes. With the help of the Windows Task Scheduler, you can use the NET command to restart a specific service at a specific time.
To do so:
1. Find the name of your service
Each Windows Service has two names — a short service name and a friendly display name. We need the service name for the NET command.
If you don’t already know the service name, or want to validate it:
-
Launch the Windows Services application. You can find it by searching for “services” in the Control Panel, or by running services.msc at a command prompt.
- Scroll to locate your service in the list:
")
-
Double-click the entry to open the service’s properties. The service name is displayed at the top.
")
Here we see that the name of the Print Spooler service is actually “Spooler”:
")
2. Create a batch file to restart your service
With the service name in hand, we can now use the NET command to restart the service.
Create a new batch file and enter the following two commands:
NET STOP «Your Service Name«
NET START «Your Service Name«
Please replace Your Service Name with the service name identified in step 1. The quotes are required if the service name contains a space.
For example, if your service name is “Spooler”, the batch file should look like this:
NET STOP «Spooler»
NET START «Spooler»
Save the batch file to a well-known location. We’ll use it in the next step.
Test the batch file
At this point, we recommend performing a quick test to ensure that the batch file works as expected. Run it from an administrative command prompt and confirm that it restarts your service.
3. Create a scheduled task to run the batch file at the time you wish to restart the service
Now that you are able to restart the service with the batch file, let’s schedule it to run whenever you like.
For example, here is how we would restart the Print Spooler service every Sunday at 1 AM:
-
Open the Windows Task Scheduler. You start it from the Control Panel or by running taskschd.msc from a command prompt.
-
Click Create Basic Task on the right:
")
The Create Basic Task Wizard window will come up.
-
Give the task a descriptive name:
Click Next to continue.
-
Select Weekly and click Next:
-
Set the day and time to restart the service:
Click Next to continue.
-
Ensure that the action is Start a program and move to the next step:
-
Enter the full path to the batch file you created to restart the service:
Click Next to continue.
-
Review the summary and make sure that everything looks good.
Check the Open the Properties dialog… box at the bottom because we’ll need to adjust one of the tasks properties:
Click Finish.
-
And finally, in the Properties window, check the Run with highest privileges box. The batch file must run with administrative rights so that it can restart the service.
Click OK to save your settings.
")
")
")
")
")
")
")
")
Going forward, the new task will come alive at the scheduled time to promptly restart the service. You should be good to go.
Improvement: Use ServicePilot instead of NET for better reliability
While NET.EXE will work for most situations, there are a few scenarios where it may fall short.
Does your service:
- take longer than 30 seconds to shut down?
- occasionally hang and refuse to stop?
If so, the NET STOP command may fail. And when that happens, the subsequent call to NET START will fail too (because the service will not be idle). The end result is that your service will be left in an unusable/unresponsive state!
Our free ServicePilot utility was built to work around NET’s shortcomings. It will wait for longer than 30 seconds if necessary and will do its best to forcibly terminate an unresponsive service.
To use ServicePilot instead of NET:
-
Download ServicePilot from our website. Save the executable in a well-known location (e.g. C:\Apps\ServicePilot\ServicePilot.exe).
-
Edit the batch file you created to restart the service.
-
Delete the two NET lines.
-
Add the following line (adjusting the full path to ServicePilot and your service name as necessary):
C:\Apps\ServicePilot\ServicePilot.exe -restart -wait 300 «Your Service Name«
Note: The -wait 300 parameter instructs ServicePilot to wait up to 300 seconds (5 minutes) for the service to stop and restart. Feel free to increase (or decrease) the timeout based your specific use case.
-
Save the batch file.
As you did with the NET version, please perform a quick test to ensure that the updated batch file works as expected. Launch it from an administrative command prompt and confirm that it restarts your service.
Best of luck with your service!
UPDATE: Use our free Service Scheduler utility instead of the Task Scheduler
We got tired of manually creating batch files and scheduled tasks to control our services so we created a free application to do it all. 🙂
With Service Scheduler, you can easily start, stop or restart any Windows Service — daily, weekly or monthly at a time of your choosing:
")
Service Scheduler is completely free and super easy to use. You can schedule your service in seconds:
")
Download Service Scheduler and check it out today!
You may also like…
If you are a Windows user, you most likely have encountered your PC automatically restarting on you in the middle of working. Yes, updates for our computers are essential in keeping it running efficiently. When a restart happens without us knowing, though, it can be quite frustrating. Here’s how to set up a restart schedule for your Windows 10 computer.
With the current version of Windows, your PC automatically downloads updates and installs them when your PC detects that you are not using your computer for a period of time. This happens when your Windows Update has been set to “automatic” – it will work the same way as it has in the previous Windows by waiting until your PC is idle.
However, idle does not mean you allow your PC to be restarted. There may be instances when you just happen to leave your PC for a moment while working on a paper that is due hours from now. Next thing you know, your PC is automatically restarting! We do not want this to happen so Microsoft has given us the option to schedule a specific start time. With this, you now have a measure of control and it is time for you to be proactive with it! No more “Remind me later” pop-ups when you can customize your restarting schedules.
How to set up a restart schedule
- Click on the Start menu and open the Settings option.
- Select Update & Security > Windows Update. You will see two options wherein the first one is a schedule chosen by your computer. The other option is for you to select a specific restart time.
The first option shows a specific time your PC has chosen for you (e.g. 2:30 in the morning). If you want a specific time and date, click on Select a Restart Time and choose a Time and Day. For Time, tap on the box and hover over each part of the time (minutes, hours, and AM/PM) until you can choose your desired schedule. For the Day, you are given dates of the next few days for you to select which one you prefer most.
If you want updates to start immediately, you can choose the Restart Now option at the bottom of the page. Know that Windows schedules its own reboot first and you will have to override it through the Settings page to adjust it to your own schedule.
Go through those easy and simple steps and you no longer have to worry about your computer restarting whenever there is a need for you to leave it for a short period of time. It is also important for users to be notified when the system needs to reboot. You can control this option by following these steps:
- Click on Advanced Options at the bottom part of the Windows Update page.
- Go to the top of the screen and tap on Choose how updates are installed.
- Click the drop down and select the option to Notify to schedule restart.
This way, you will no longer find the need to keep checking the Settings menu if updates have already been installed. You will now receive prompts whenever updates require a restart of your PC. If you happen to be a Windows Insider, you can set your active hours for 18 hours with an option to choose when the OS should finish its updates. You can also set additional notifications before your system restarts to give you more time to save your work.
Once done, you can return to the previous screen by hitting the back button on the upper left. Now you can be notified ahead of time before your computer starts to install updates and restart its system.
How important are updates and scheduling restarts?
Wondering why Microsoft added this feature? With the new system, Microsoft has evolved to the notion of “Windows as a service.” This means that Windows is an on-going product with constant updates and patches. There will be new features every time which will depend on the needs of the users via the Windows Insider program.
It is a new way for Microsoft to develop and release software with a goal to continuously grow. Its aim is to adjust to what the world needs. Since updates have already become mandatory, Microsoft cares about how this could affect the users. Scheduling a restart can make it more convenient for them and could avoid interruptions during hours when they rely on the PC the most.
Microsoft has made it easier for users to work especially for individuals with different or shifting schedules. So if you are a person who works most at night, you can schedule your active hours during the day while you are away from your computer. Now you no longer have to worry about your PC installing updates in the middle of your working schedule!
Now that you know how to set up a restart schedule for your Windows 10 computer, check out our guide on how to reset your Windows 10 computer.
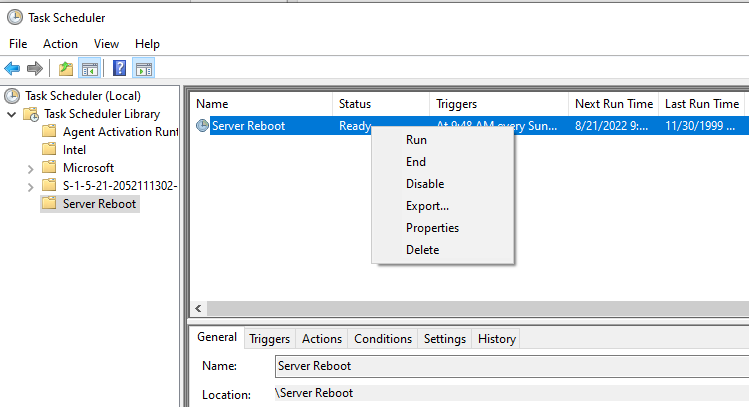
Task Scheduler
The Task Scheduler is a Windows component that can automatically run tasks at a specific time or in response to a specific event. For example, tasks can be run when the computer starts or when a user logs in. You can start tasks when a specific event occurs and using task scheduler you can run commands and execute scripts on a specific day and time.
Getting Started
Search task scheduler in Windows search.
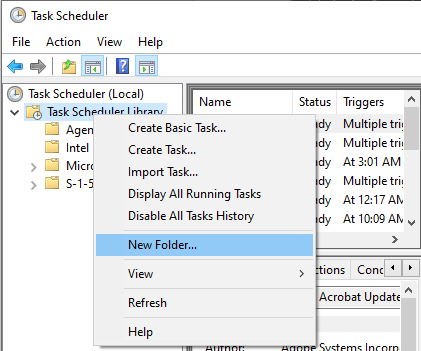
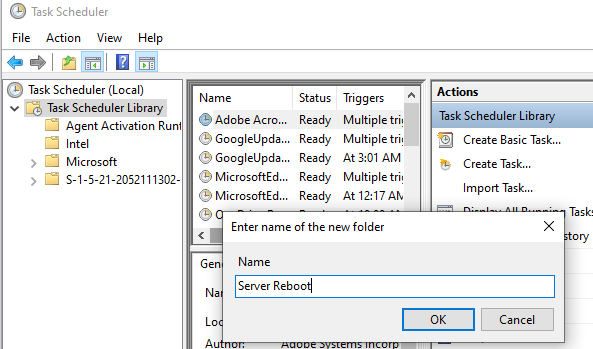
Right-click on Task Scheduler and click New Folder and give a name to the folder like Server Reboot and click OK.
Making a folder makes your tasks separate, so you can manage easily.
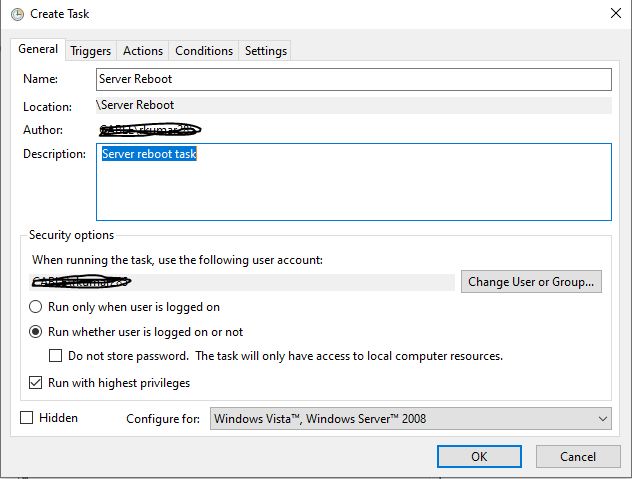
Now right-click on new created folder and select Create Task.
Give a task name and description and select Run whether user is logged on or not and select Run with highest privileges in General tab.
Now click on Triggers tab, which is for restart scheduling date and time. In my trigger I am choosing to run this task every week on Sunday only, you can choose based on your requirement.
Click New.. button to create a new trigger and select required details and click OK.
Now let’s go to Actions tab, click new button to create an action. Enter Program/script path and arguments and start in values and click OK.
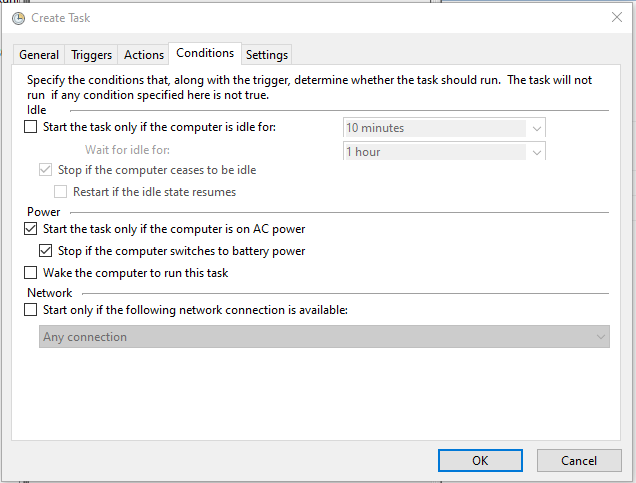
Now select Conditions tab and keep power settings as it if nothing needed.
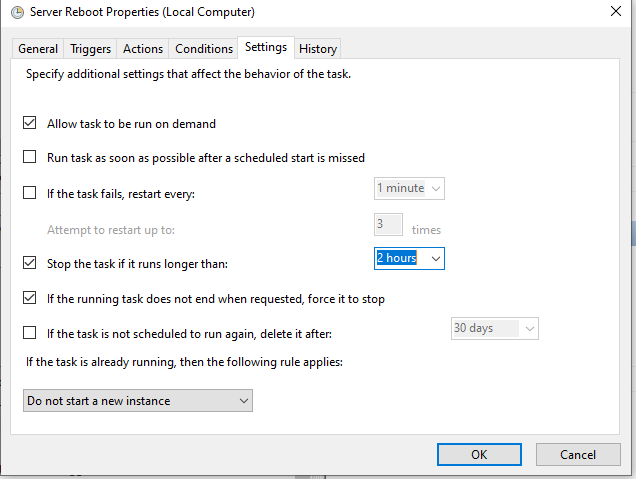
Now click on Settings tab. I am stopping my task if runs longer than 2 hours and click OK.
Now you can see your task is ready to run on given schedule if you want to run anytime just hit the Run button.
Conclusion
In this article, we have learned how to create a new task and set up a server restart using Windows 10 Task Scheduler.
You can use the Task Scheduler to restart on schedule in both Windows 11 and Windows 10. Here’s how.
If you generally use your system all day, every day, and cannot restart it without disrupting the workflow, having the ability to schedule a restart is very useful. For example, maybe the system is functioning as a media server, connected to a medical device, 3D printer, or an industrial machine. Whatever your specific use case is, if you need it, you can restart your computer on schedule using the built-in Task Scheduler app.
One of the biggest advantages of restarting Windows regularly is that fix frees up RAM, may improve performance, solves a lot of system & software glitches, and more.
So, without further ado, let me show you how to schedule restart Windows using Task Scheduler in simple steps. Let’s get started.
Note: If you are looking to restart your system automatically to install Windows updates, make sure the Active Hours feature is enabled instead. No need to use the Task Scheduler.
- Open the Start menu.
- Search for “Task Scheduler” and click “Open“.
- Click the “Create task” option on the right panel.
- Type “Schedule Restart” in the “Name” field.
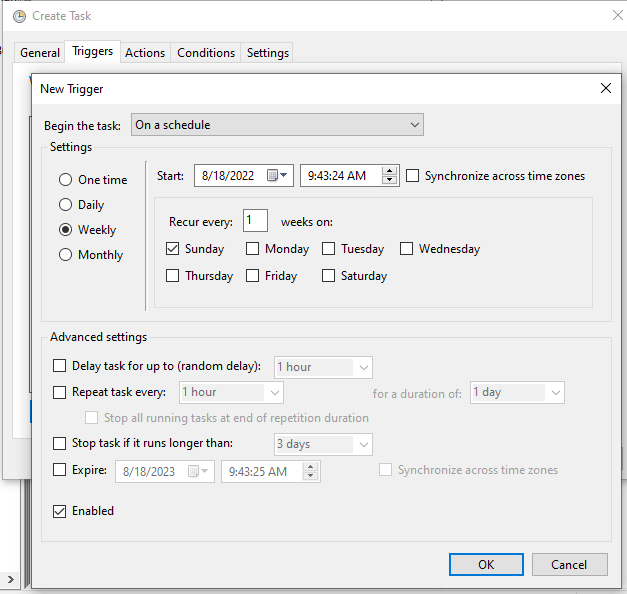
- Go to the “Triggers” tab and click “New“.
- Select “On a schedule” from the first drop-down menu.
- Select the “Daily” under “Settings”.
- Set the date and time.
- Type “1” in the “Recur every” field to run the task every day.
- Click “OK“.
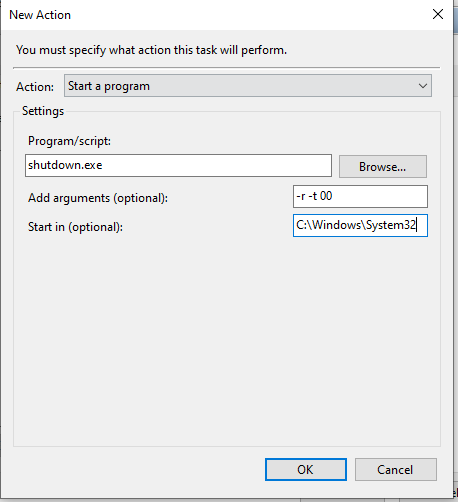
- Go to the “Actions” tab and click “New“.
- Select “Start a program” from the first dropdown menu.
- Type “%SystemRoot%\system32\shutdown.exe” in the “Program/Script” field.
- Type “-r -f -t 10” in the arguments field.
- Click “OK“.
- (Optional) Go to the “Conditions” tab and select the “Start the task only if the computer is idle” checkbox. That way, the system will only restart if it is idle. i.e., not doing anything. Click “OK“.
- That’s it. From now on, Windows restarts on schedule.
Detailed Steps (With Screenshots)
First, open the Task Scheduler. To do that, open the Start menu by pressing the Windows key, search for “Task Scheduler” and click the “Open” option. Once it opens, click the “Create Task” option on the right sidebar.

The above action opens the task creation wizard. Here, type “Schedule Restart” in the “Name” field.

Go to the “Triggers” tab and click the “New” button at the bottom.

Select “On Schedule” from the “Begin the task” dropdown menu. Next, select the “Daily” option under “Settings”. After that, set the start date & time and the number of days you want the task to recur in the “Recur every” field. For example, to run the task every day, you can enter 1, to run the tasks on alternate days, you can enter 2, etc.
Click the “OK” button.
Note: You can also select other schedule options such as Weekly or Monthly depending on your use case.

Go to the “Actions” tab and click the “New” button at the bottom.

In the “New Action” window, configure the options as shown below:
- Action > Start a program.
- Program/script:
%SystemRoot%\system32\shutdown.exe - Add arguments:
-r -f -t 10
Click the “OK” button.

Go to the Conditions tab and select the “Start the task only if the computer is idle for:” checkbox, set the dropdown next to it to “10 minutes“, and click “OK“.

That’s it. You’ve created a scheduled task to restart Windows. You can find it in the middle of the Task Scheduler window.

From now on, Windows will reboot automatically on schedule as per the task configuration. Right before restarting, it will show a little message giving any active users a chance to save the work.

Good to know: How to display a popup message using a task scheduler.
Wrapping Up — Scheduling System Restart in Windows 11 & 10
As you can see, thanks to the Task Scheduler app, you can easily configure a custom scheduled task to restart Windows on schedule. If you ever want to disable the automatic scheduled restart, simply disable the scheduled task. To do that, open the Task Scheduler, find & right-click on the task, and select the “Disable” option.
Good to know: How to start programs on delay at startup using the task scheduler.
If you have any questions or need help, comment below. I’ll be happy to assist.
Если нужно настроить регулярную (по определенному расписанию) перезагрузку или выключение Windows компьютера (сервера), проще всего создать задание в планировщике задач.
Содержание:
- Задание планировщика для автоматической перезагрузки (выключения) Windows
- Перезагрузка (выключение) Windows компьютеров с помощью групповых политик
Чтобы разово перезагрузить компьютер в определенное время, можно создать задание отложенной перезагрузки с помощью PowerShell скрипта:
 [datetime]$RestartTime = '17:00'
[datetime]$CurrentTime = Get-Date
[int]$WaitSeconds = ( $RestartTime - $CurrentTime ).TotalSeconds
shutdown -r -t $WaitSeconds
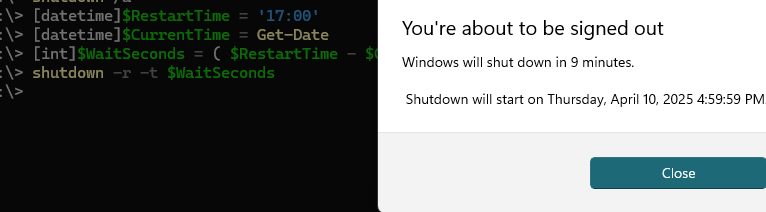
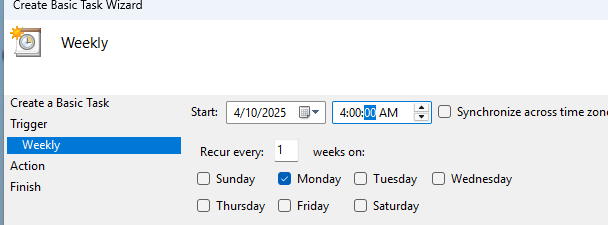
Но чаще всего используются запланированные задания перезагрузки. Например, вам нужно создать задание, которое будет автоматически перезагружать сервер каждый понедельник в 04:00 утра.
Задание планировщика для автоматической перезагрузки (выключения) Windows
Откройте консоль Task Scheduler (
taskschd.msc
) и запустите мастер создания задания: Action -> Create Basic Task.
Задайте имя задания: RebootMonday
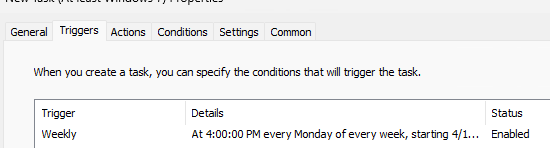
Настройие расписание запуска задания. В нашем примере это еженедельное задание (Weekly), которое запускается каждый понедельник.
Выберите Start a program. Будем запускать встроенную команду shutdown.exe для перезагрузки с параметрами:
Program:
%SYSTEMROOT%\System32\shutdown.exe
Add arguments (optional):
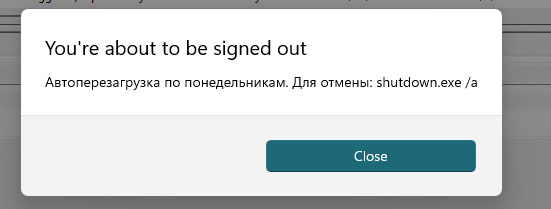
/r /f /t 120 /d p:0:0 /c "Автоперезагрузка по понедельникам. Для отмены: shutdown.exe /a"
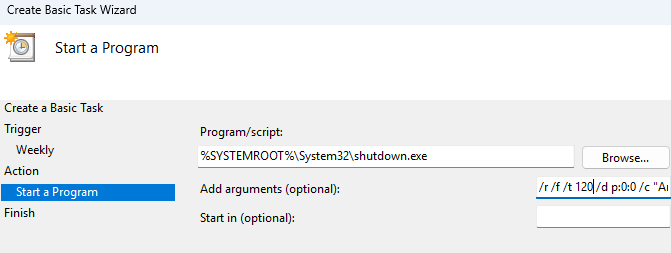
-
/r
— перезагрузка -
/f
– принудительно завершить все приложения -
/t 120
– таймаут перед перезагрузкой -
/d p:0:0
— добавить в Event Viewer плановую причину перезагрузки: Other (planned) -
/с
– вывести информационное сообщение пользователям компьютера перед перезарузкой
Чтобы задание запускалось автоматически, независимо от наличия активной сессий пользователя на компьютере:
- Откройте свойства задания в консоли Task Scheduler
- Выберите опцию Run whether user is logged or not
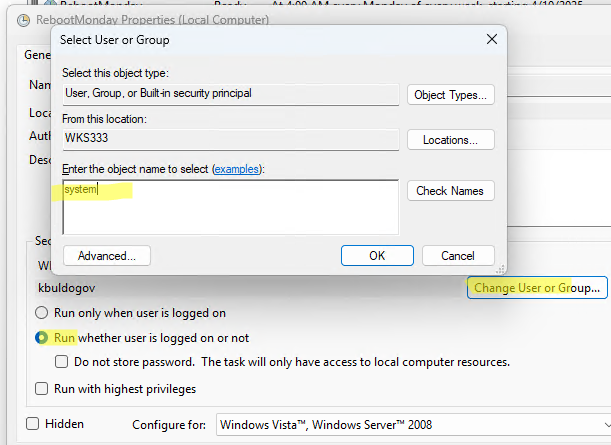
- Нажмите кнопку Change User or Group и укажите System

- Теперь задание будет запускаться от имени NT AUTHORITY\SYSTEM.
- Проверьте, что задание включено.
Теперь данный компьютер будет автоматически перезагружаться в запланированное время, выводя уведомление перед рестартом.
С помощью PowerShell можно быстро создать такое задание планировщика с командой перезагрузки:
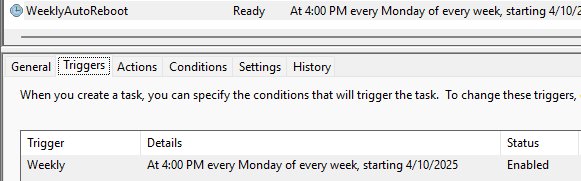
$taskName = "WeeklyAutoReboot"
$taskDescription = "Automatically reboots the server every Monday at 04:00 AM"
$action = New-ScheduledTaskAction -Execute "shutdown.exe" -Argument "/r /f /t 120 /d p:0:0 /c `"Автоперезагрузка по понедельникам. Для отмены: shutdown.exe /a`""
$trigger = New-ScheduledTaskTrigger -Weekly -DaysOfWeek Monday -At 4:00am
$principal = New-ScheduledTaskPrincipal -UserId "SYSTEM" -RunLevel Highest
Register-ScheduledTask -TaskName $taskName -Action $action -Trigger $trigger -Principal $principal
Перезагрузка (выключение) Windows компьютеров с помощью групповых политик
Если нужно настроить выключение (перезагрузку) по расписанию нескольких компьютеров в домене AD, такое задание планировщика можно создать с помощью групповых политик.
- Откройте консоль управления доменными GPO (
gpmc.msc
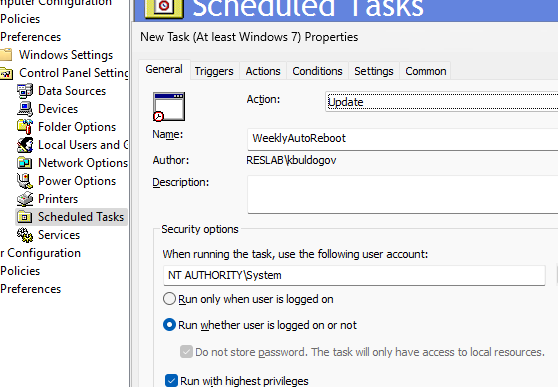
), создайте новую GPO и назначьте ее на OU с компьютерами, которые нужно перезагружать/выключать по расписанию. - Отредактируйте новую GPO и перейдите в раздел Computer Configuration -> Preferences -> Control Panel Settings -> Scheduled Tasks;
- Создайте новое задание: New -> Scheduled task (At least Windows 7);
- Задайте имя задания и запуск от имени SYSTEM (как описано выше)

- На вкладке Triggers добавьте расписание для задания

- На вкладке Actions добавьте запуск команды shutdown.exe с параметрами

- Сохраните задание
- Обновите настройки GPO на клиенте, и проверьте что в планировщике задания появилось задание запланированной перезагрузки Windows.


Если нужно привязать задание автоматической перезагрузки/выключения компьютера к завершению другого задания (например, перезагрузиться после успешного окончания бэкапа), см. пример реализации в статье Как запустить задание планировщика Windows после завершения другого задания?