
Встроенный брандмауэр Windows в целях безопасности по умолчанию блокирует входящий ICMP трафик как в десктопных Windows 10/11, так и в Windows Server. Это означает, что вы не сможете удаленно проверить доступность компьютера с помощью стандартной команды
ping
, т.к. она будет отвечать о превышении интервала ожидания запроса (
Request timed out
) для ICMP Echo-Reply. Если вы хотите сделать возможной проверку доступности хостов Windows по протоколу ICMP из системы мониторинга или вручную из командной строки, можно разрешить ответы на ICMP эхо-запросы.
Чтобы разрешить отправку ответов на запросы по протоколу ICMP, нужно включить предустановленные правила в брандмауэре Windows.
- Откройте оснастку управления Windows Defender Firewall with Advanced Security, выполнив команду
wf.msc - Перейдите в раздел Inbound Rules
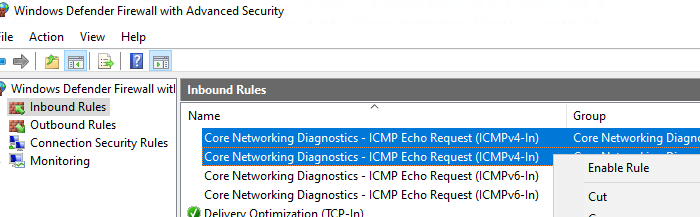
- Найдите правило Core Network Diagnostics – ICMP Echo Request (ICMPv4-In) и включите его.
- В моем случае есть два правила с этим именем. Одно для частного и общедоступного сетевого профиля Windows, и второе для доменного. Я включил их оба. Можно также включить правило, разрешающее ICMP ответы для IPv6 протокола (если используется).

Есть также другое правило File and Printer Sharing (Echo Request – ICMPv4-In), которое также разрешает компьютеру отвечать на эхо-запросы
ping
.
Попробуйте пропиговать ваш компьютер и убедитесь, что теперь он отвечает на ICMP запросы.
Можно включить правила Windows Firewall, разрешающие ответы на эхо-запросы ICMP с помощью такой команды PowerShell:
Set-NetFirewallRule -Name CoreNet-Diag-ICMP4-EchoRequest-In -enabled True
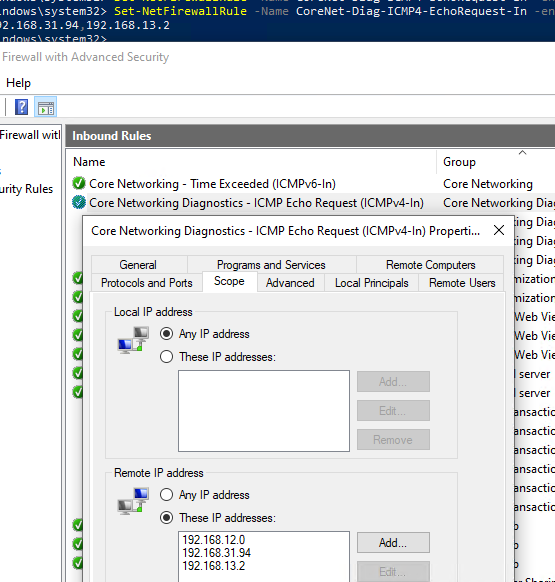
Если нужно ограничить список IP подсетей или хостов, которым разрешено отправлять ответы на ICMP запросы, выполните команду:
Set-NetFirewallRule -Name CoreNet-Diag-ICMP4-EchoRequest-In -enabled True -RemoteAddress 192.168.12.0,192.168.31.94
Откройте свойства правила в Windows Firewall и проверьте, что теперь правило разрешающие ICMP ответы будет работать только для указанных IP/подсетей.
Если в файрволе отсутствует (удалено) правило для входящих ICMP запросов, можно создать его из командной строки:
netsh advfirewall firewall add rule name="Allow_ICMPv4_Echo" protocol=icmpv4:8,any dir=in action=allow
Другой пример PowerShell команды, которое создаст правило файервола, разрешающего ping для всех хостов в локальной сети:
New-NetFirewallRule -DisplayName "Allow_ICMPv4_Echo" -Direction Inbound -Protocol ICMPv4 -IcmpType 8 -RemoteAddress localsubnet -Action Allow
Если нужно заблокировать ответы на ICMP эхо-запрос независимо от того, какие правила включены, создайте запрещающее правило, которое будет иметь более высокий приоритет:
New-NetFirewallRule -DisplayName "Block_ICMPv4_Echo" -Direction Inbound -Protocol ICMPv4 -IcmpType 8 -RemoteAddress localsubnet -Action Block
Чтобы разрешить ответы на ICMP ping на всех компьютерах в сети, можно включить правило Windows Firewall с помощью доменной групповой политики .
- Откройте редактор доменных GPO (
gpmc.msc
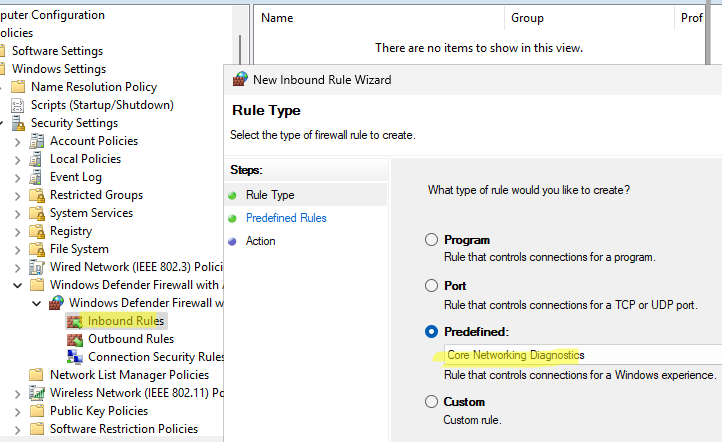
), создайте или отредактируйте имеющуюся GPO и назначьте ее на целевую OU или корень домена. - Перейдите в раздел Computer Configuration -> Windows Settings -> Security Settings -> Windows Firewall with Advanced Security -> Inbound rules
- Создайте новое правило, выберите Predefined rule типа Core Networking Diagnostics

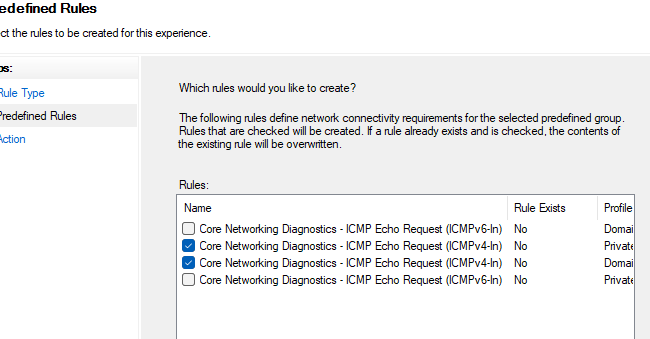
- Укажите какие правила ICMP Echo request нужно включить.

- На следующем шаге вы берите Allow the connection.
ICMP, также известный как PING, обычно используется системными администраторами для проверки работоспособности компьютеров (и других сетевых устройств).
Брандмауэр в Windows 10 по умолчанию блокирует ответы ICMP. Чтобы разрешить ICMP в Windows, нам нужно создать два правила брандмауэра. Один для IPv4 и один для IPV6.
Мы можем добиться этого с помощью графического интерфейса или командной строки.
Использование PowerShell для разрешения проверки связи
Самый простой способ — запустить следующие две команды в окне PowerShell:
netsh advfirewall firewall add rule name="Allow ICMPv4" protocol=icmpv4:8,any dir=in action=allow
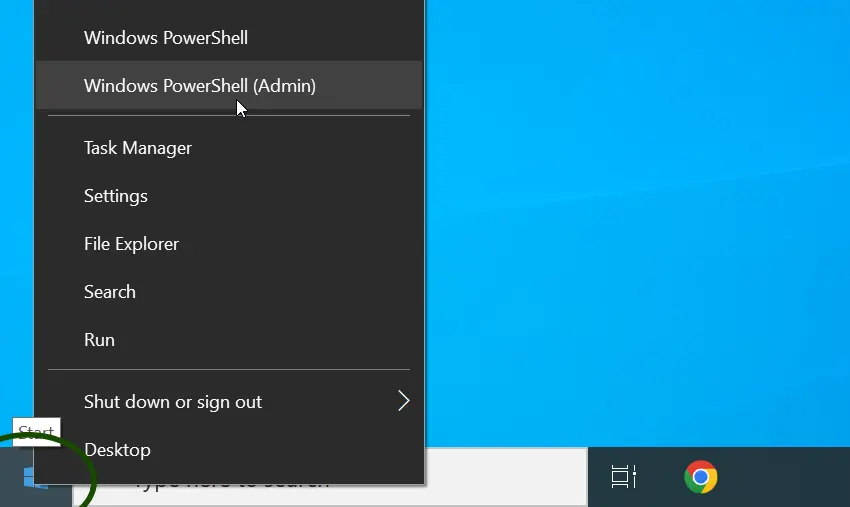
netsh advfirewall firewall add rule name="Allow ICMPv6" protocol=icmpv6:8,any dir=in action=allowЧтобы открыть окно PowerShell, щелкните правой кнопкой мыши кнопку «Пуск» и выберите в меню Windows PowerShell (Admin).
Когда откроется командное окно, запустите две команды, которые мы указали выше.

Ваш ПК/сервер с Windows теперь будет отвечать на запросы ping. Если вы хотите снова заблокировать ping, удалите эти два правила брандмауэра, используя следующие две команды:
netsh advfirewall firewall delete rule name="Allow ICMPv4"
netsh advfirewall firewall delete rule name="Allow ICMPv6"
Использование брандмауэра Защитника Windows
Если вам не нравится командная строка, используйте графический интерфейс, чтобы разрешить эхо-запросы через брандмауэр Windows.
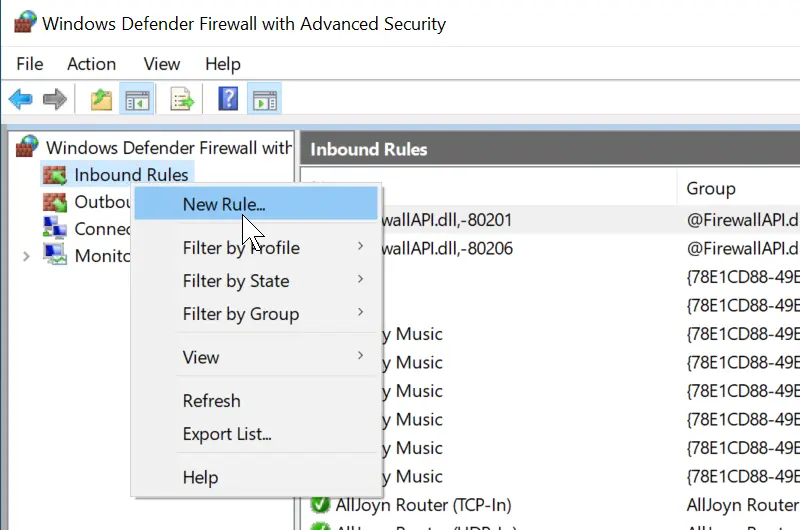
Нажмите кнопку «Пуск» и введите брандмауэр. В результатах поиска выберите Брандмауэр Защитника окон в режиме повышенной безопасности. В приложении брандмауэра щелкните правой кнопкой мыши «Правила для входящих подключений» и выберите «Новое правило» в контекстном меню.
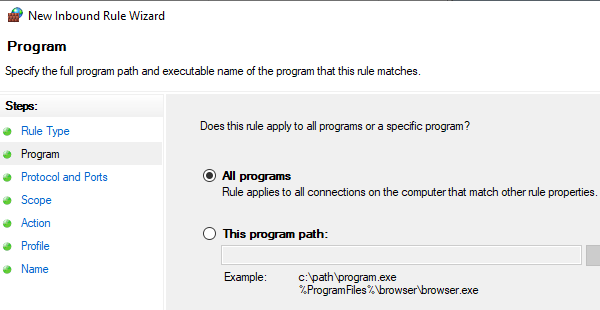
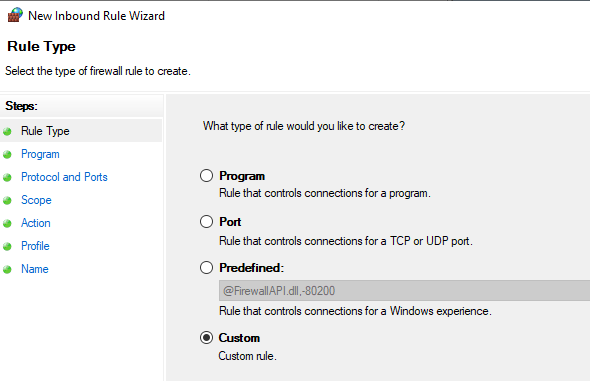
На первом экране выберите Пользовательский тип правила, нажмите Далее, а затем выберите Все программы. Нажмите «Далее» еще раз.

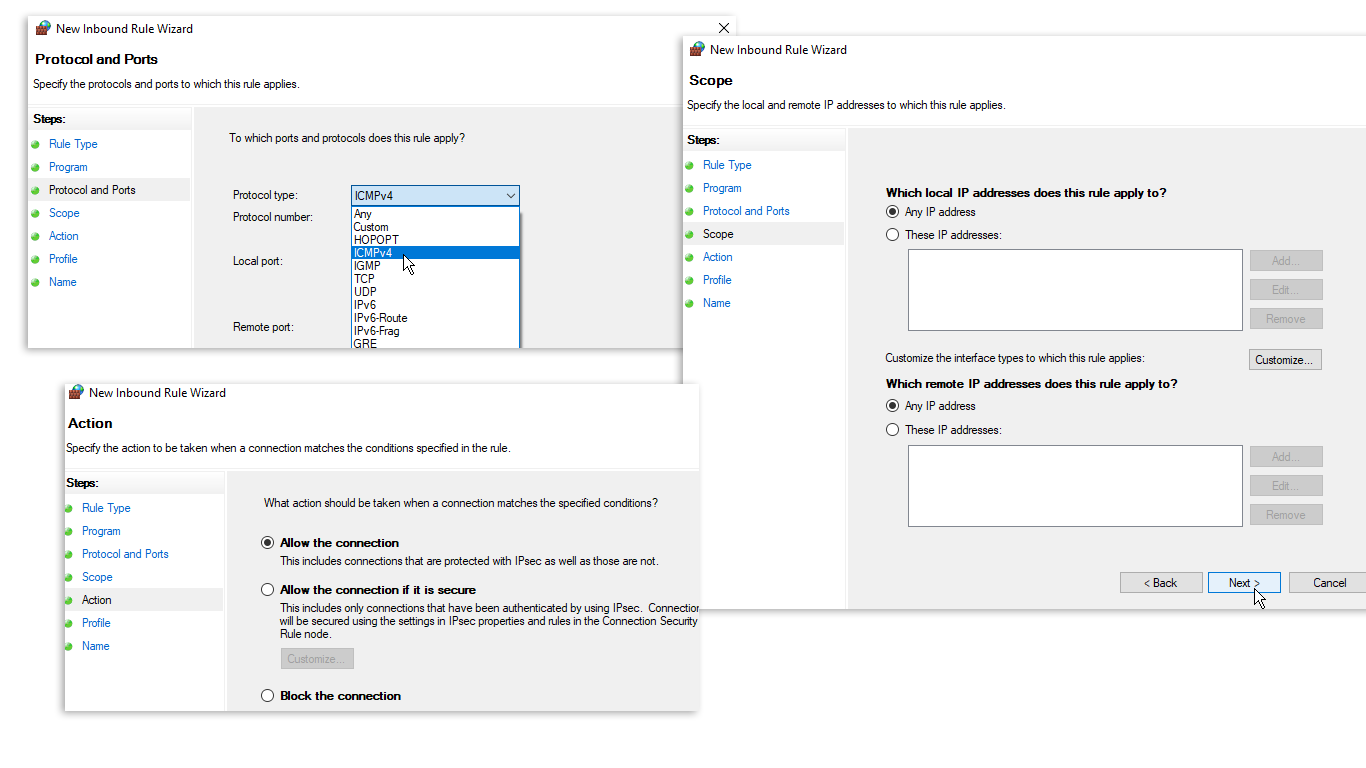
В раскрывающемся меню «Тип протокола» выберите ICMPv4 и нажмите «Далее».

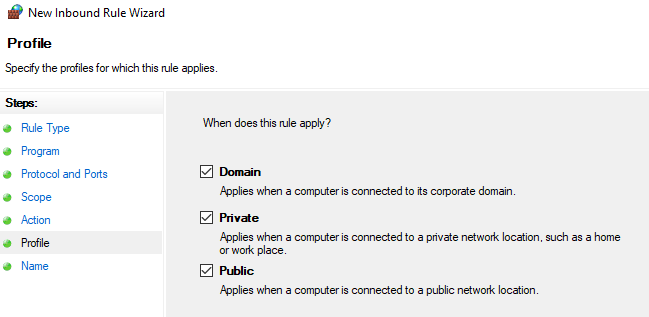
На экране «Область» выберите «Любые IP-адреса», нажмите «Далее» и выберите «Разрешить подключение». На экране «Профиль» оставьте все три профиля брандмауэра отмеченными.
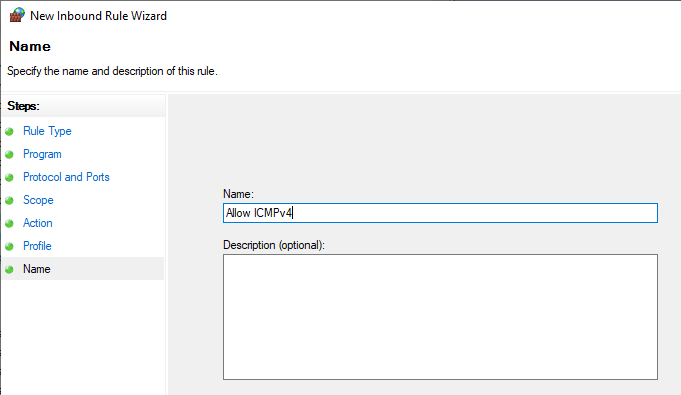
Наконец, дайте имя правилу брандмауэра и нажмите «Готово», чтобы завершить работу мастера.

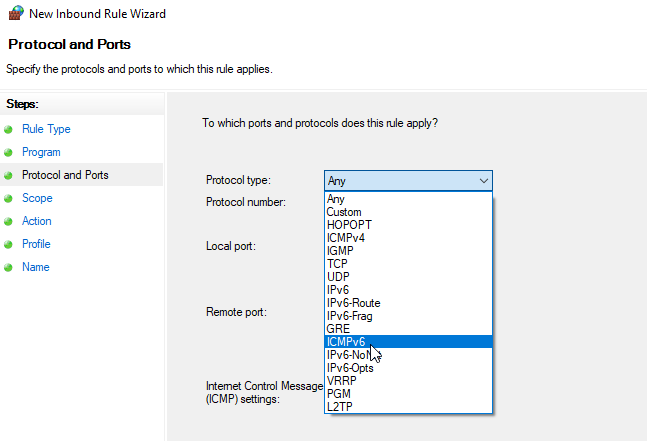
Это правило разрешает трафик ICMPv4 через брандмауэр. Чтобы разрешить трафик ICMPv6, повторите ту же процедуру, но на экране «Протокол и порты» выберите ICMPv6.

И это все. Вы можете использовать описанные выше методы, чтобы разрешить проверку связи в любой операционной системе Windows, включая Windows 10, 11 и Server.
Просмотров: 15 785
Hello! This time I’m going to talk to you about security in Windows 10. It is well known that the system offers multiple layers of security to keep the privacy of our information safe. Certainly, this entails control over network connections. These are really useful for exchanging information and sending data. However, sometimes these connections can fail and so it is imperative to get the error. One of the resources used for this task is PING. It is a basic Internet program that allows a user to verify that a particular IP address exists and can accept requests. This app verifies whether the IP address of a host is currently operational, and how long it takes to respond. Ping works by sending an Internet Control Message Protocol (ICMP) Echo Request to a specified interface on the network and waiting for a reply.
Additionally, it can be used for troubleshooting to test connectivity and determine response time. However, most administrator users consider the ICMP protocol to be potentially unsafe and prefer to block these calls. For this reason, the Windows 10 firewall by default has a security policy of blocking such requests. This is easy to check, trying to ping our computer from a remote machine, we’ll see the following message:

However, it is not advisable to completely block these calls. Therefore, here I show you how to enable and disable ping in Windows 10.
Enable ping in windows 10. Command line mode.
The first thing we need to do is to open a Command Prompt as administrators. Once there, we have to create a rule for IPv4 addressing and another for IPv6. All right, to create the first rule you just have to type the following command in the console:
netsh advFirewall Firewall add rule name="OSRadar Rule PING IPv4" protocol=icmpv4:8,any dir=in action=allow
If everything was done correctly, the CMD should look like this:

Next, we will create the rule for IPv6 addressing:
netsh advFirewall Firewall add rule name="OSRadar Rule PING IPv6" protocol=icmpv6:8,any dir=in action=allow

We have correctly applied the rules for the ping command. We can check that it works, pinging from a remote computer:

To disable the exception for IPv4 addresses, just type the following commanding in the CMD:
netsh advFirewall Firewall add rule name="OSRadar Rule PING IPv4" protocol=icmpv4:8,any dir=in action=block
In the case of IPv6 addressing, the command to write will be the following:
netsh advFirewall Firewall add rule name="OSRadar Rule IPv6" protocol=icmpv6:8,any dir=in action=block
Please note that you can choose the name you want for the rules. If you want to see every rule in the system in detail, just write the following in the terminal:
netsh advFirewall Firewall show rule name=all

Enable ping in windows 10. Graphic mode.
It is also possible to create specific rules to enable and disable ping by entering the Windows 10 Firewall Advanced Security Configuration. With this intention, just type Firewall on the search bar:

Immediately the Firewall options will be displayed. As we did before, we have to create a rule for IPv4 and another for IPv6.

So first, select the Inbound Rules option in the left column and right-click the mouse to create a New Rule:

A rule creation wizard will start. Please select Custom in the rule type and press Next to continue.

On the next screen select All programs and press Next to continue.

In the protocol type, select ICMPv4 and then click on customize.

In the pop-up screen activate the Specific ICMP types box and navigate until you activate the Echo Request option. Press accept to apply the changes.

Next, we can define which specific IP addresses this rule will apply, on the contrary, we will allow the requests of all the addresses. Once the selection is made, press next to continue.

Now select Allow the connection and press Next to continue

In the following screen, we have to select when the new rule will be applied. Please check the 3 available options and press next to continue.

Finally, we only have to assign a name to the rule and press Finish to close the wizard.

Finally, we can see the rule created correctly. To create the exception for IPv6 addressing, we have to repeat the same process but in the protocol and ports window, we have to select ICMPv6.

To disable any of the created rules, just right-click on it and choose Disable Rule.

Conclusion
Finally, we have seen how to enable and disable ping in Windows 10. This will allow us to manage and administer our connections using this command. Finally, we have seen how to enable and disable ping in Windows 10. This will allow us to manage and administer our connections using this command. Consequently, we will be able to monitor the levels of security and data protection on our computers. This is all for now, before saying goodbye I invite you to review our tutorial on bash in Windows 10
— Advertisement —
Everything Linux, A.I, IT News, DataOps, Open Source and more delivered right to you.
Subscribe
«The best Linux newsletter on the web»
Enabling ICMP (Internet Control Message Protocol) on Windows 10 allows other devices to ping your computer, which can be useful for troubleshooting network issues. You can enable ICMP by modifying the Windows Firewall settings. Here’s a quick guide on how to enable it.
Enabling ICMP on Windows 10
In this section, we’re going to walk through the steps to enable ICMP on your Windows 10 machine. This will involve accessing the Windows Firewall and creating a new inbound rule to allow ICMP requests.
Step 1: Open the Control Panel
To begin, you’ll need to access the Control Panel.
You can do this by pressing the Windows key and typing «Control Panel» into the search bar. Click on the Control Panel app that appears in the search results.
Step 2: Go to System and Security
Once you’re in the Control Panel, navigate to System and Security.
This section contains various settings related to your system’s security, including the firewall settings we need to change.
Step 3: Open Windows Defender Firewall
Within System and Security, click on Windows Defender Firewall.
This will take you to a new screen where you can manage your firewall settings and rules.
Step 4: Access Advanced Settings
In the left-hand sidebar, click on the link that says «Advanced settings.»
These advanced settings give you more control over the specific rules and behaviors of the Windows Firewall.
Step 5: Create a New Inbound Rule
Now, click on «Inbound Rules» in the left-hand menu, and then click on «New Rule…» in the right-hand sidebar.
Creating a new inbound rule will let you specify that ICMP requests should be allowed through the firewall.
Step 6: Choose Custom Rule
When prompted to choose a rule type, select «Custom» and click «Next.»
Custom rules offer the most flexibility, allowing us to specify exactly what kind of traffic we want to allow.
Step 7: Select All Programs
On the Program screen, select «All programs» and click «Next.»
This ensures that the rule applies to any and all applications that might send or receive ICMP requests.
Step 8: Specify Protocol and Ports
When you reach the Protocol and Ports screen, select ICMPv4 from the dropdown menu and click «Next.»
ICMPv4 is the standard protocol used for ping requests in most networks.
Step 9: Allow the Connection
On the next screen, choose «Allow the connection» and click «Next.»
This setting will ensure that ICMP requests are allowed through the firewall.
Step 10: Apply Rule to All Profiles
When asked which profiles the rule should apply to, select «Domain,» «Private,» and «Public,» then click «Next.»
Applying the rule to all profiles ensures that ICMP requests are allowed regardless of the network type you’re connected to.
Step 11: Name Your Rule
Finally, give your rule a name (like «Allow ICMP») and click «Finish» to create the rule.
Naming your rule helps you easily identify it in the list of firewall rules if you need to make changes later.
After completing these steps, your Windows 10 machine will allow ICMP requests, making it possible for other devices to ping your computer.
Tips for Enabling ICMP on Windows 10
- Make sure to disable the rule when not needed to maintain security.
- Regularly check your firewall rules to ensure they’re up to date.
- Understand that enabling ICMP can make your system slightly more vulnerable.
- Use other network troubleshooting tools in conjunction with ICMP.
- Keep your system and firewall software updated for the best protection.
Frequently Asked Questions
Why should I enable ICMP on Windows 10?
Enabling ICMP allows other devices to ping your computer, which can help diagnose network connectivity issues.
Is enabling ICMP safe?
Enabling ICMP can slightly increase your system’s exposure to network threats, but it is generally safe if managed properly.
Can I enable ICMP for specific IP addresses?
Yes, you can create custom firewall rules to allow ICMP requests from specific IP addresses.
What should I do if I don’t see the Control Panel?
You can also access Windows Firewall settings via the Settings app under «Update & Security.»
How do I disable the ICMP rule?
You can disable the rule by going back into the Windows Defender Firewall advanced settings and turning off or deleting the specific rule.
Summary
- Open the Control Panel.
- Go to System and Security.
- Open Windows Defender Firewall.
- Access Advanced Settings.
- Create a New Inbound Rule.
- Choose Custom Rule.
- Select All Programs.
- Specify Protocol and Ports.
- Allow the Connection.
- Apply Rule to All Profiles.
- Name Your Rule.
Conclusion
Enabling ICMP on Windows 10 can be a lifesaver when you’re troubleshooting network problems. By following the steps outlined above, you can quickly and easily configure your firewall to allow ICMP requests. This will make it possible for you to use ping tests to diagnose and resolve connectivity issues, ensuring that your network runs smoothly.
Always remember to monitor and review your firewall rules regularly, and disable the ICMP rule when it’s no longer needed to maintain the best security practices.
For further reading, consider diving into more advanced network troubleshooting techniques or explore the various other features that Windows Defender Firewall offers. Taking the time to understand these tools and settings can greatly enhance your ability to manage and secure your network.
Matt Jacobs has been working as an IT consultant for small businesses since receiving his Master’s degree in 2003. While he still does some consulting work, his primary focus now is on creating technology support content for SupportYourTech.com.
His work can be found on many websites and focuses on topics such as Microsoft Office, Apple devices, Android devices, Photoshop, and more.
ICMP, also known as PING, is commonly used by system administrators to check whether the computers (and other network devices) are alive or not.
Firewall in Windows 10 blocks ICMP responses out of the box. To allow ICMP in Windows, we need to create two firewall rules. One for IPv4 and one for IPV6.
We can achieve this using either GUI or Command prompt.
Using PowerShell to Allow Pings
The easiest way is to run the following two commands in a PowerShell window:
netsh advfirewall firewall add rule name="Allow ICMPv4" protocol=icmpv4:8,any dir=in action=allow
netsh advfirewall firewall add rule name="Allow ICMPv6" protocol=icmpv6:8,any dir=in action=allow
To open a PowerShell window, right-click on the Start button and select Windows PowerShell (Admin) from the menu.

Once the command window opens, run the two commands we provided above.

Your Windows PC/Server will now respond to ping requests. If you want to block pings again, remove those two firewall rules using the following two commands:
netsh advfirewall firewall delete rule name="Allow ICMPv4"
netsh advfirewall firewall delete rule name="Allow ICMPv6"
Using Windows Defender Firewall
If you’re not comfortable with the command line, use the GUI to allow pings through the Windows firewall.
Click the Start button and type firewall. From the search result, select Window Defender Firewall with Advanced Security. In the Firewall App, right-click Inbound Rules and choose New Rule from the contextual menu.

On the first screen, select Custom rule type, click Next, and then choose All Programs. Click Next again.

From the Protocol Type drop-down menu, select ICMPv4 and click Next.
On the Scope screen, choose Any IP Address, click Next and choose Allow the connection. In the Profile screen, leave all three firewall profiles checked.

Finally, give a name to the Firewall rule and click Finish to complete the wizard.
This rule will allow ICMPv4 traffic through the firewall. To allow ICMPv6 traffic, repeat the same procedure, but in the Protocol and Ports screen, select ICMPv6.
And that is it. You can use the above methods to allow pings in any windows operating system, including Windows 10, 11, and Server.