
On Windows 10, if you have a device with more than one network adapter (such as Ethernet and Wi-Fi), each interface receives a priority value automatically based on its network metric, which defines the primary connection that your device will use to send and receive networking traffic.
Although, for the most part, Windows 10 does a pretty good job selecting an optimal connection to access the network, sometimes you may need to configure the order of the network adapters manually. For example, if you want to use a Wi-Fi over an Ethernet interface when both adapters are connected to the network.
You could disable those adapters you don’t use, but it may not be the best solution as you may need them as backups. Instead, a more straightforward solution is to adjust the interface metric to specify in which order your device should use each network adapter, which you can do using Control Panel and PowerShell.
In this Windows 10 guide, we’ll walk you through the steps to change the network adapter priorities to stay connected using your prefered adapter when using multiple interfaces.
- How to change network adapter priorities using Control Panel
- How to change network adapter priorities using PowerShell
How to change network adapter priorities using Control Panel
If you want to change the order in which Windows 10 uses network adapters, do the following:
- Open Settings.
- Click on Network & Internet.
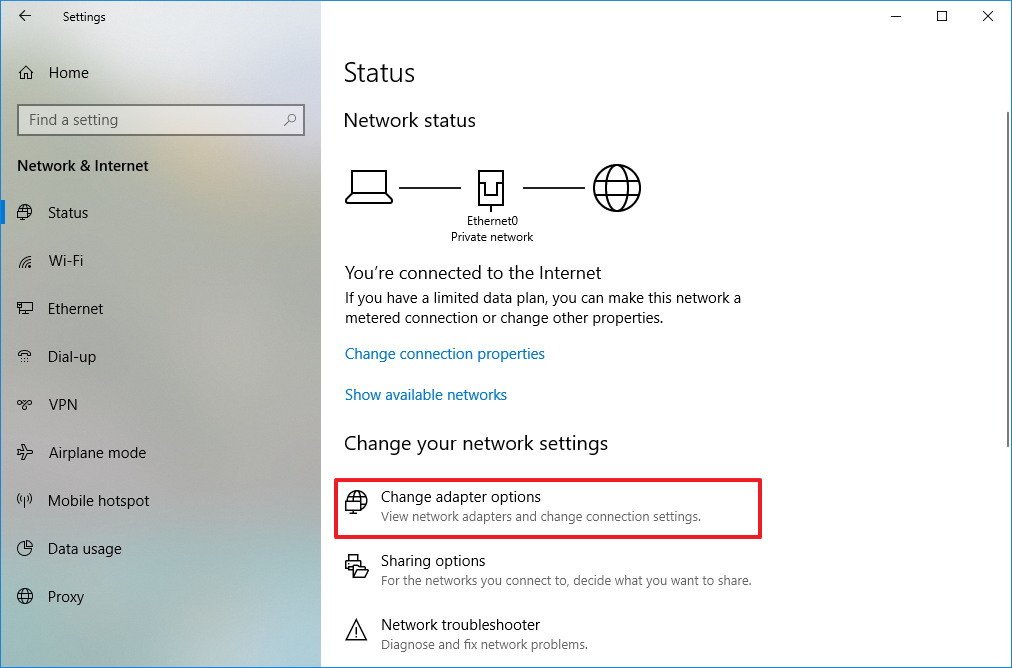
- Click on Status.
- Click the Change Adapter options item.
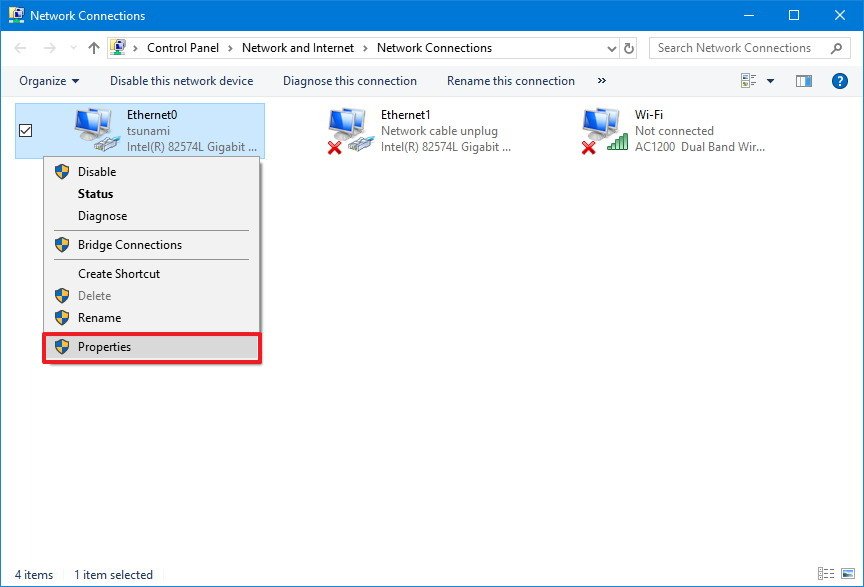
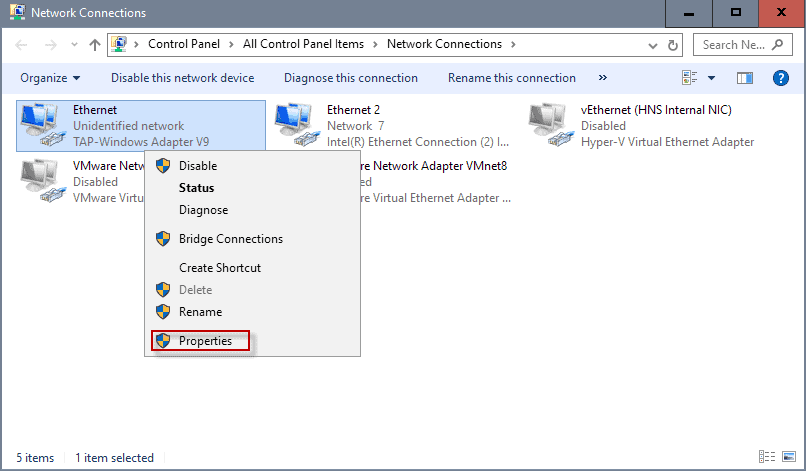
- Right-click the network adapter you want to prioritize, and select Properties.
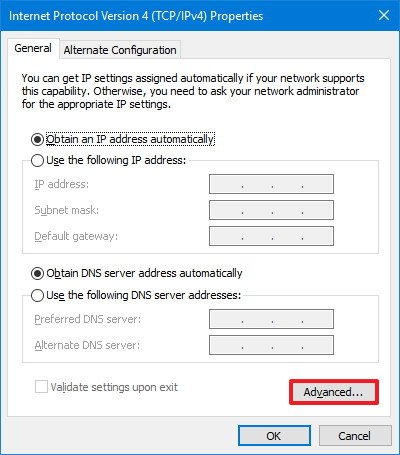
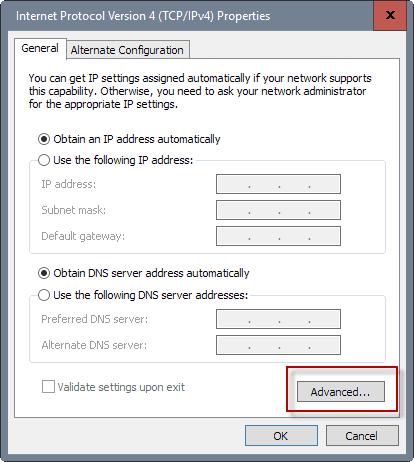
- Select the Internet Protocol Version 4 (TCP/IPv4) item.
- Click the Properties button.
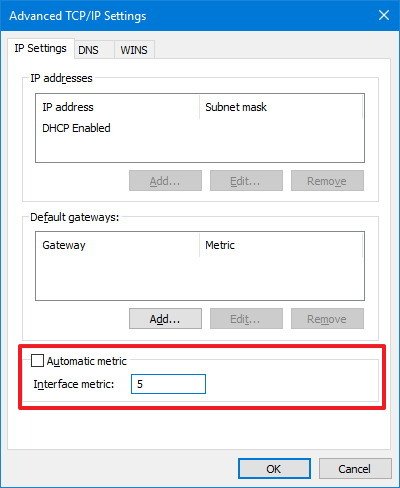
- In the «General» tab, click the Advanced button.
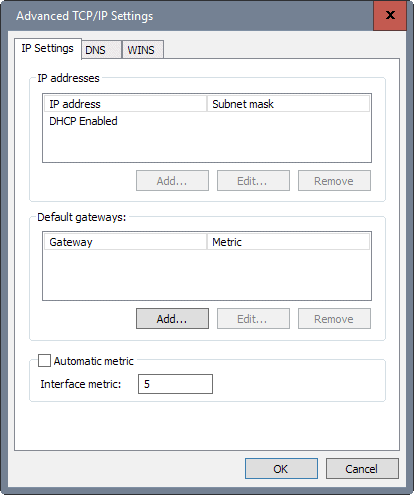
- Clear the Automatic metric option.
- In the «Interface metric» field assign a priority value for the adapter.Quick Tip: The lower the metric number means higher priority, and a higher number indicates lower priority.
- Click the OK button.
- Click the OK button again.
- Click the Close button.
Once you’ve completed the steps, Windows 10 will prioritize the network traffic depending on your configuration.
The only caveat using the Control Panel experience is that depending on your network setup, you may need to adjust the metric for the Internet Protocol Version 6 (TCP/IPv6) as well, if that’s the protocol you’re using. (Usually, you will be using the TCP/IPv4 protocol.)
All the latest news, reviews, and guides for Windows and Xbox diehards.
At any time, you can revert the changes using the same instructions, but on step No. 9, make sure to check the Automatic metric option.
How to change network adapter priorities using PowerShell
Alternatively, you can change network adapters priorities on a device with multiple interfaces using PowerShell with these steps:
- Open Start.
- Search for Windows PowerShell, right-click the top result a select Run as administrator.
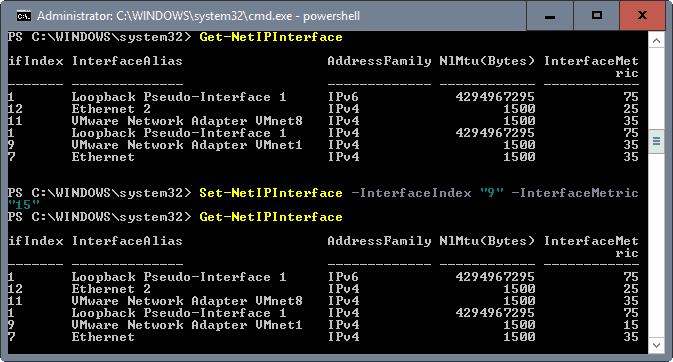
- Type the following command to identify the current interface metric and interface index number and press Enter:
Get-NetIPInterface
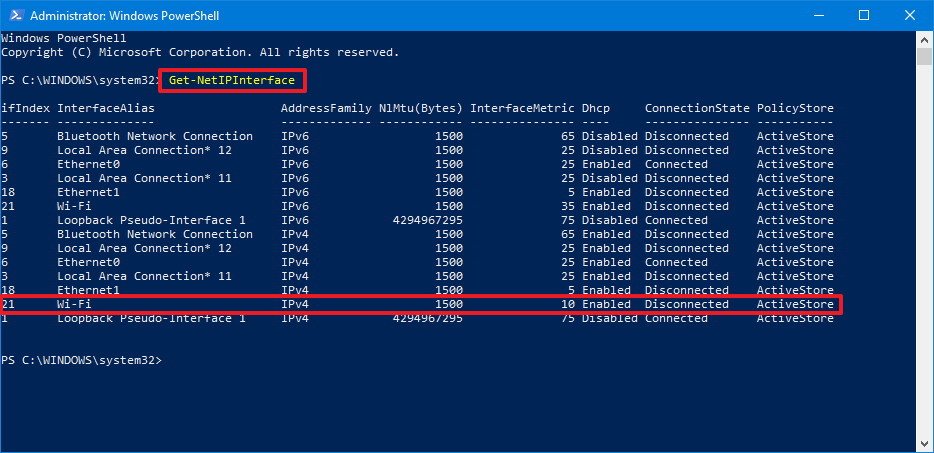
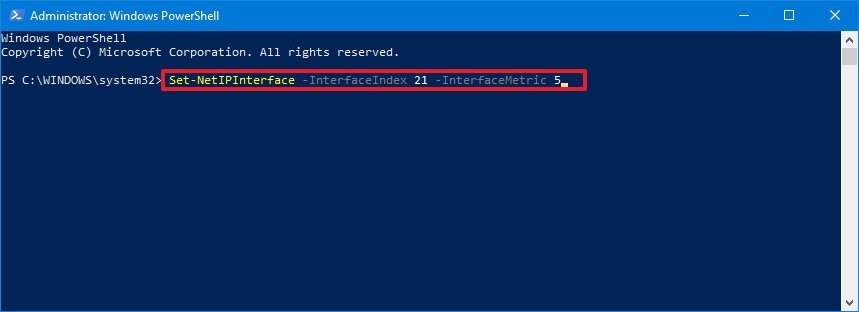
- Type the following command to change the priority order of the network adapter and press Enter:
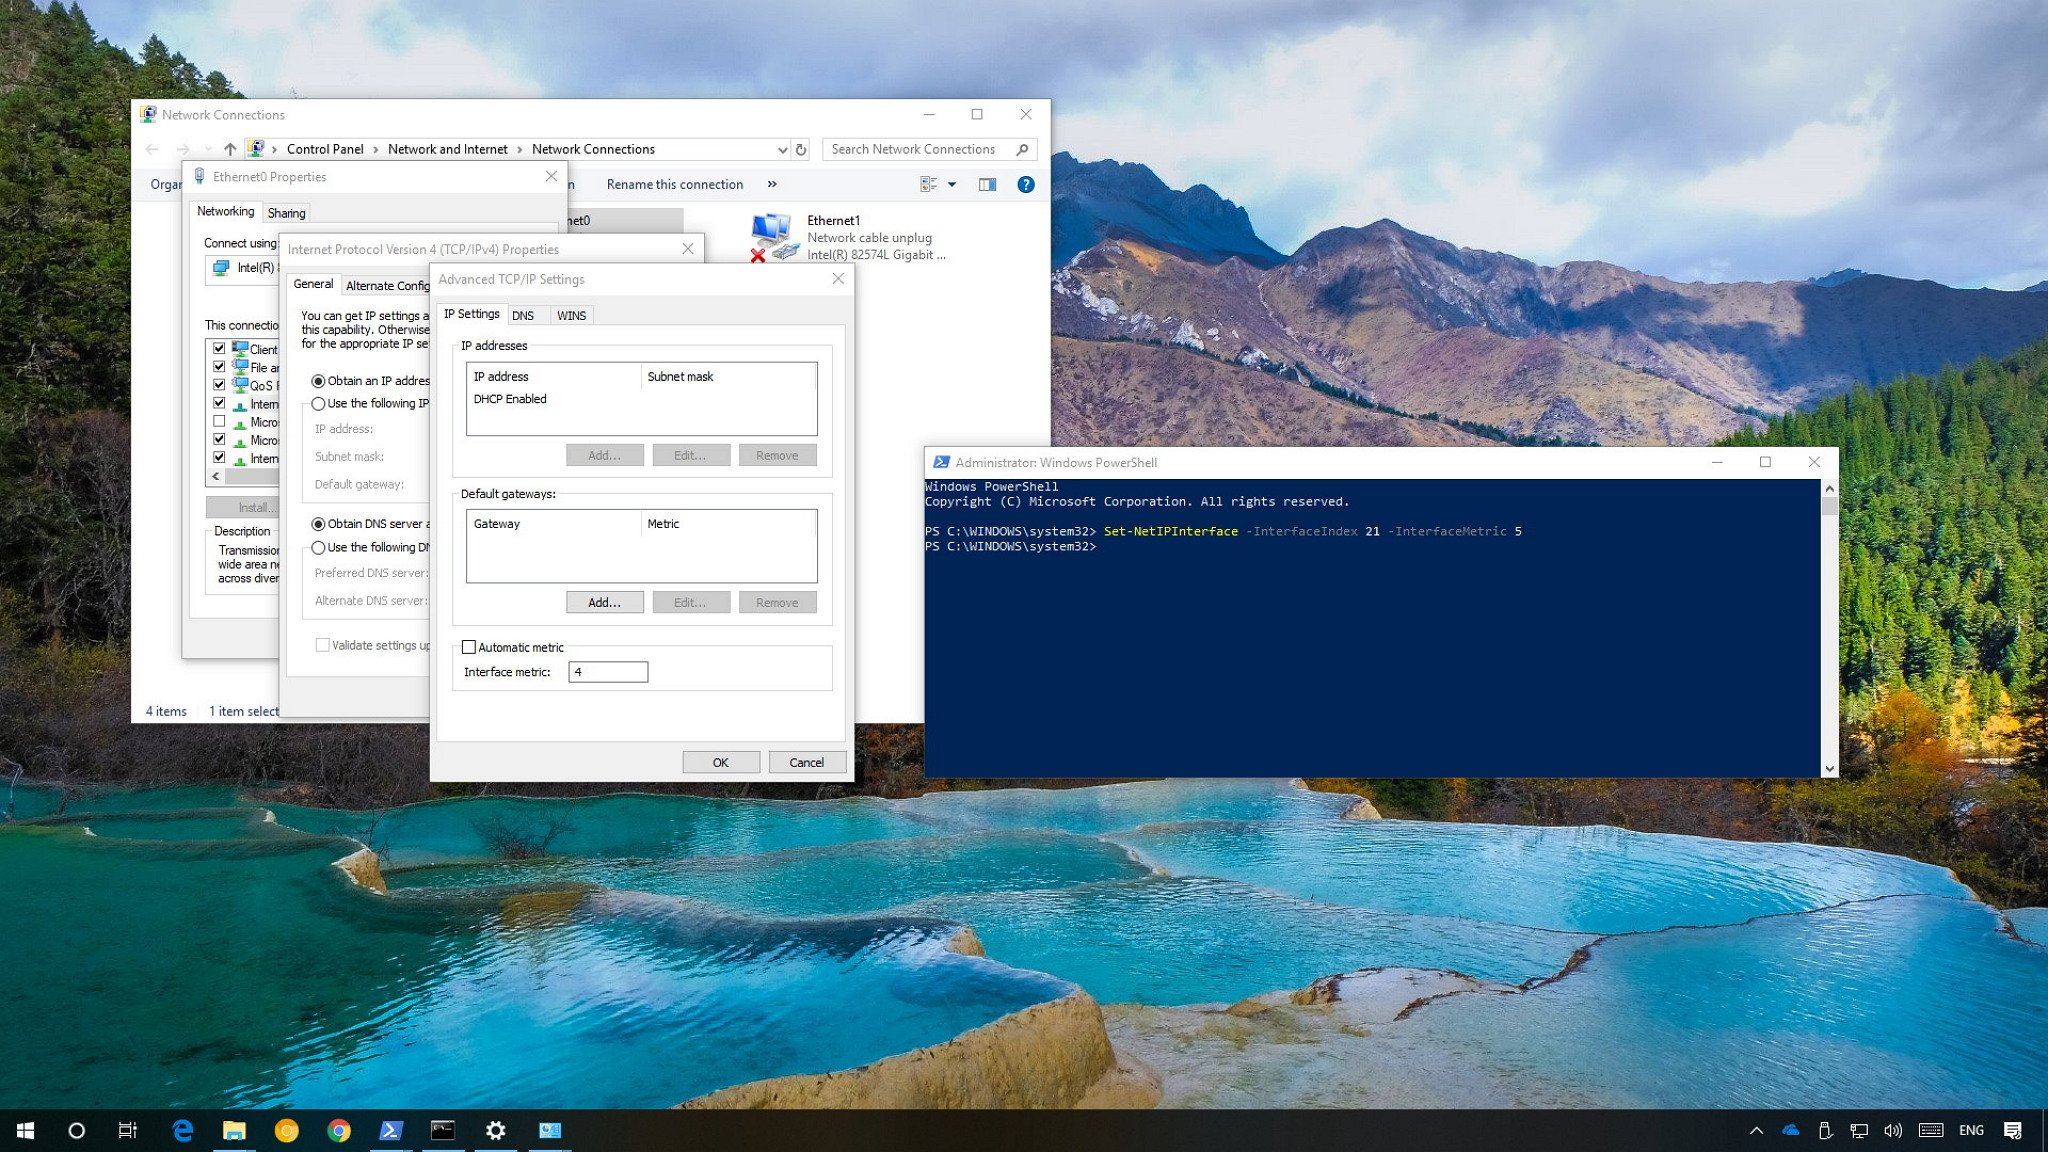
Set-NetIPInterface -InterfaceIndex 21 -InterfaceMetric 10In the command, make sure to change the -InterfaceIndex value to reflect the network adapter you want to prioritize and change the -InterfaceMetric value to assign a priority. Also, remember that a lower metric number means higher priority, and a higher metric number means lower priority.
- Type the following command to see the new metric applied to the network adapter and press Enter:
Get-NetIPInterface
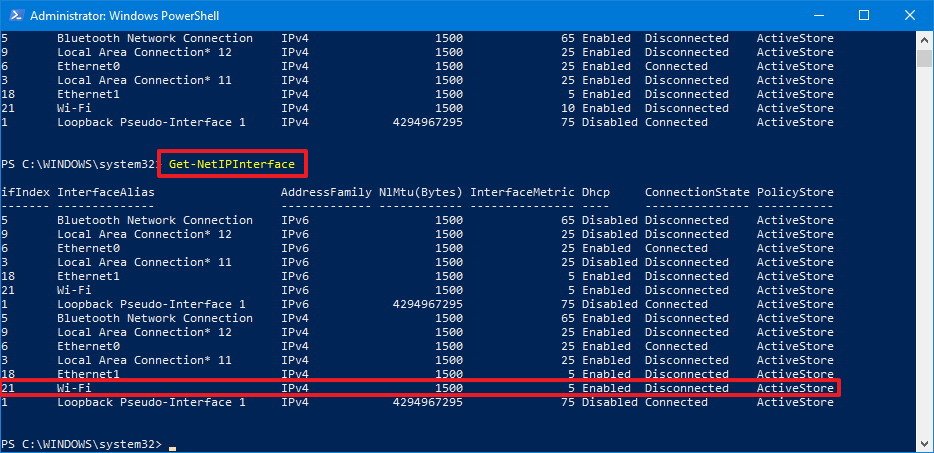
After completing the steps, Windows 10 will prioritize the network traffic depending on your configuration when multiple network adapters are connected to the network.
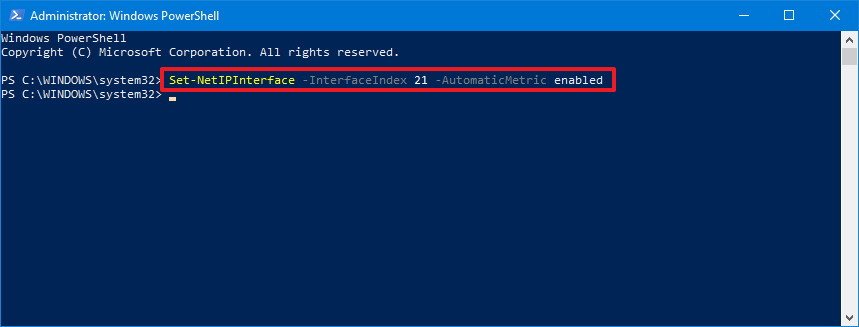
At any time, you can go back to the previous behavior allowing Windows 10 to decide the network adapter priority using these steps:
- Open Start.
- Search for Windows PowerShell, right-click the top result a select Run as administrator.
- Type the following command to identify the current interface metric and interface index number and press Enter:
Set-NetIPInterface -InterfaceIndex 21 -AutomaticMetric enabledIn the command, make sure to change the -InterfaceIndex value with the correct number of the network adapter you want to apply an automatic metric.
More Windows 10 resources
For more helpful articles, coverage, and answers to common questions about Windows 10, visit the following resources:
- Windows 10 on Windows Central – All you need to know
- Windows 10 help, tips, and tricks
- Windows 10 forums on Windows Central
Mauro Huculak has been a Windows How-To Expert contributor for WindowsCentral.com for nearly a decade and has over 15 years of experience writing comprehensive guides. He also has an IT background and has achieved different professional certifications from Microsoft, Cisco, VMware, and CompTIA. He has been recognized as a Microsoft MVP for many years.
На компьютере Windows с несколькими сетевыми адаптерами (Ethernet, Wi-Fi, VPN) для корректной маршрутизации трафика иногда нужно вручную настраивать приоритеты сетевых подключений. Например, при наличии одновременного подключений к сети через Wi-Fi и Ethernet, вы можете изменить приоритеты сетевых адаптеров так, чтобы по-умолчанию трафик всегда отправлялся через проводное подключение.
Windows автоматически назначает приоритеты сетевым адаптерам в зависимости от скорости подключения. Чем выше скорость подключения, тем более высокий приоритет такого сетевого адаптера (меньше значение метрики). Обычно Windows использует следующий порядок приоритетов для различных типов сетевых интерфейсов:
- Ethernet
- Wi‑Fi
- Мобильные подключения
Если компьютер подключен к 100 Мб Ethernet порту и высокоскоростному Wi-Fi роутеру, может оказаться, что беспроводное подключение будет иметь более высокий приоритет.
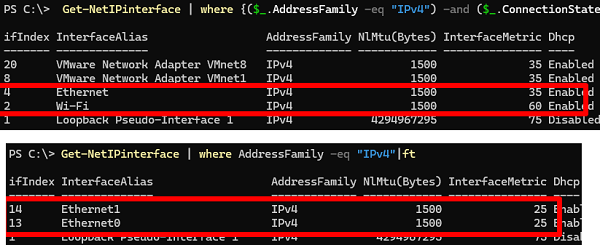
Вывести информацию о доступных IPv4 сетевых адаптерах в Windows:
Get-NetIPinterface | where AddressFamily -eq "IPv4"
Приоритет сетевого интерфейс определяется значением InterfaceMetric. Чем меньше значение InterfaceMetric, тем выше приоритет сетевого подключения.
Ниже представлены результаты команды с двух разных компьютеров. На первом скриншоте видно, что у Ethernet подключения выше приоритет чем у беспроводного Wi-Fi адаптера. На втором скриншоте два Ethernet интерфейса с одинаковыми приоритетами.
Значение InterfaceMetric это метрика, которая задает приоритет IP маршрута через этот сетевой адаптер в таблице маршрутизации Windows:
route print

В этой таблице маршрутизации видно, что по умолчанию сетевой трафик будет отправлен через интерфейс с меньшей метрикой.
С помощью PowerShell можно проверить, какой сетевой адаптер будет использоваться для доступа в Интернет согласно текущей таблицы маршрутизации:
Get-NetRoute -DestinationPrefix 0.0.0.0/0

В данном случае есть два маршрута с одинаковыми метриками. Это означает, что вы не может гарантировать какой адаптер будет использоваться для доступа в Интернет.
Можно изменить метрики сетевых интересов и назначать приоритеты вручную с помощью PowerShell командлета Set-NetIPInterface. Чтобы уменьшить приоритет одного из интерфейсов, нужно указать его название (
InterfaceAlias
) или индекс интерфейса (
ifIndex
) и новое значение метрики:
Set-NetIPInterface -ifIndex 14 -InterfaceMetric 26
или
Set-NetIPInterface -InterfaceAlias Ethernet1 -InterfaceMetric 26
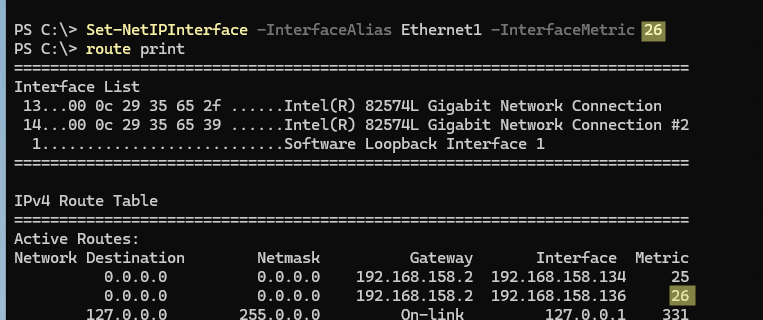
Проверьте, что значение в таблице маршрутизации изменилась метрика для этого адаптера.
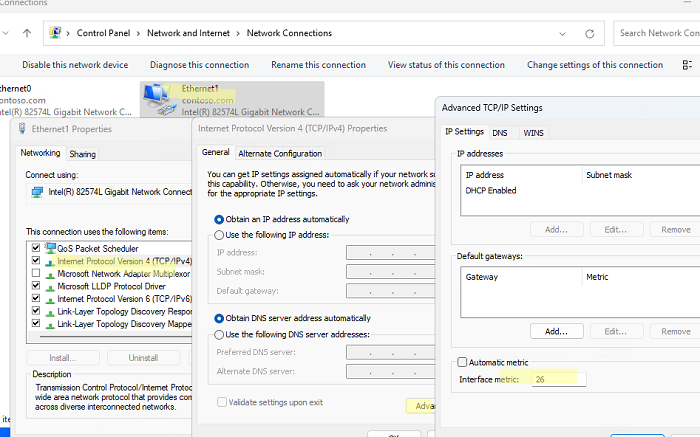
Также вы можете изменить приоритет (метрику) сетевого интерфейса в свойствах сетевого адаптера в панели управления Network Connections (
ncpa.cpl
).
Откройте свойства IPv4 протокола адаптера -> кнопка Advanced -> измените значение в поле Interface metric и примените изменения.
По умолчанию здесь включена опция Automatic metric, которая указывает, что приоритет сетевого адаптера устанавливается автоматически в соответствии со скоростью подключения среды.
В версиях до Windows 10 и Windows Server 2016 можно было изменить приоритет сетевых адаптеров в настройках привязки адаптеров (Adapters and Bindings). В более новых версиях эту опцию убрали.
Если на Вашем ПК встроено больше одного сетевого адаптера (Ethernet или Wi-Fi), то можно задать приоритет подключения для каждого адаптера.
В операционной системе Windows 10, если на вашем компьютере установлено более одного сетевого интерфейса, можно назначить приоритет на основное устройство, которое будет отправлять и получать сетевой трафик.
По умолчанию ОС Windows подключается к сетям в следующем порядке: 1. Подключение по локальной сети (Ethernet). 2. Беспроводная сеть (Wi-Fi). 3. Мобильная широкополосная связь.
Например, на Вашем домашнем ПК установлена сетевая карта Ethernet и Wi-Fi, Вы хотите, чтобы весь трафик в первую очередь шел через Wi-Fi, для этого нужно настроить приоритет.
Изменяем приоритет подключения сетевого интерфейса в настройках TCP/IP
1. Заходим в центр управления сетями и общим доступом, для этого щелкаем в трей по иконке сетевого подключения:
2. В открывшемся окне выбираем пункт «изменение параметров адаптера«:
3. В окне «Сетевые подключения» увидим все доступные сетевые адаптеры:
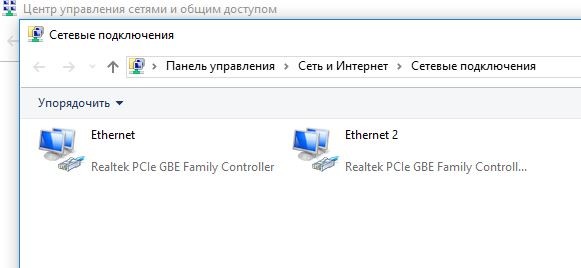
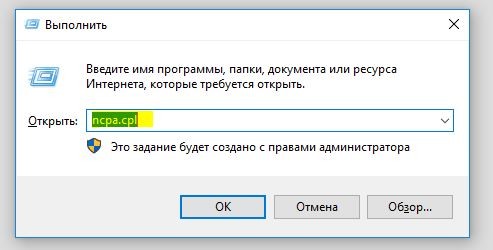
Так же для быстрого перехода в окно «Сетевые подключения» можно использовать горячие клавиши «Win+R«, в окне «Выполнить» набираем «ncpa.cpl«, жмем «ОК«:
4. Выбираем сетевое подключение, которое будет использоваться в приоритете и щелкаем по нему правой клавишей мыши, во всплывающем меню щелкаем по пункту «Свойства«:
5. Далее, двойной щелчок по «IP версии 4 (TCP/IPv4)» перекинет нас в свойства протокола:
6. Щелкаем по кнопке «Дополнительно«:
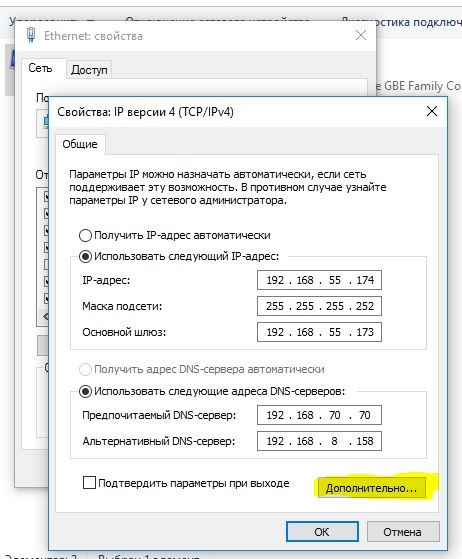
7. Убираем галочку на пункте «Автоматическое назначение метрики» и в «Метрике интерфейса» ставим значение «1«, нажимаем «ОК«:
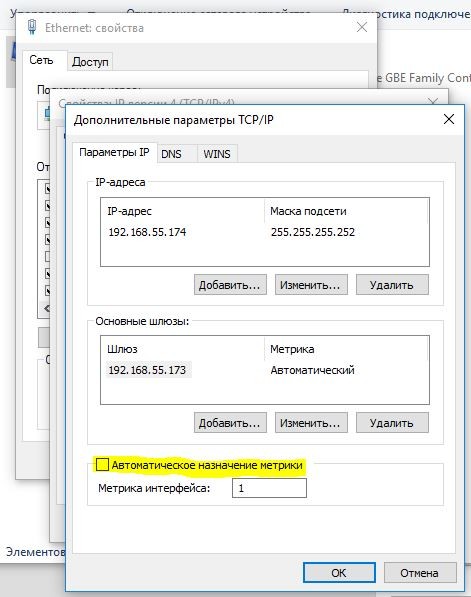
8. Теперь возвращаемся к 4 пункту, выбираем второе сетевое подключение и в дополнительных параметрах TCP/IP в метрике интерфейса ставим значение «2» и так далее в зависимости от количества сетевых адаптеров.
A network adapter is a piece of hardware that connects a device to a network. A laptop or PC may have numerous network adapters, such as network cards, an ethernet port, or a Wi-Fi module, and all of these cards may be active simultaneously. While Windows will automatically select the best card for your requirements, you may want to prefer one network adapter over another. If you have many network adapters connected to the same network, or if you have a slower or unreliable network adapter that you only wish to use as a spare, you may need to assign network adapter priorities manually. In this post, let’s look at how to change network adapter priority in Windows 11/10.
How Does Windows Assign Network Interface Metric Priority?
By default, Windows chooses the best network adapter for a network connection. When numerous network interfaces are at the same speed, Windows’ Automatic Metric feature can force the network to switch the default gateways depending on Transmission Control Protocol (TCP) retransmissions. Various criteria, including the speed of the link, the number of hops to a certain destination, and the delay time, influence a network interface’s priority.
The interface with the highest metric value is prioritized, whereas the interface with the greatest metric value is least prioritized. This means network traffic will be routed through the interface with the lowest metric value unless that interface is unavailable. In this case, it will be routed through the interface with the next-lowest metric value.

There are many ways you can go around changing network adapter priorities in Windows. For instance, you may assign your Wi-Fi adapter always to be active when there’s an available and connected Wi-Fi network over an ethernet connection. You can accomplish the task using the Control Panel and Windows Powershell.
- Control Panel
- Powershell
The methods apply to all types of adaptors, including Ethernet and WiFi. You will need an administrator account to execute these commands.
How to Change Network Adapter Priorities Using Control Panel
To change the network adapter priorities using Control Panel, follow these steps:

- Start with pulling up the Settings panel; right-click on the Windows icon in the Taskbar, and select Settings from the drop-down menu.
- Now, navigate to Network and Internet > Advanced Network Settings, scroll down and select More Network Adapter Options.
- You will now be brought to the Network Connection page; here, select the Network adapter whose priority you want to change, right-click, and select Properties.

- Here, scroll down, find the option for Internet Protocol Version 4 (TCP/IPv4) or Internet Protocol Version 6 (TCP/IPv6), based on your preference, and select Properties.
- Select Advanced under the General tab in the next window that pops up.
- Now disable the Automatic Metric check box under the IP Settings tab, manually assign an Interface Metric, and tap OK.

- It is important to note that the Interface Metric is inversely related to the preference; for example, if you have four network adapters, assigning the Interface Metric to 4 gives it the most preference, while assigning it to 0 gives it the lowest.
How to Change Network Adapter Priorities Using Powershell
You can also adjust the priority metrics using the command line, but attempt if you know what you’re doing. To change the network adapter priorities using Powershell, follow these steps:

- Start with launching an Elevated Powershell or Windows Terminal window. You can do this by searching for the same in the Start Search Box, right-clicking, and selecting Run as Administrator.
- First, you must determine the Interface Index of the Network Adapter for which you wish to define the priority. Execute the following command to view information about all network adapters:
Get-NetIPInterface
- Take a screenshot of the same, or note the network interface index of the network adapters you want to prioritize.
- Then, use the following command to establish the priority. Replace IFIndex with Interface Index and IFMetric with priority.
Set-NetIPInterface -InterfaceIndex [IFIndex] -InterfaceMetric [IFMetric]
- Repeat this process for all the Network Adapters you want to set the priority for, and restart your computer.
Conclusion
One scenario is when you wish to prioritize an ethernet connection for quicker speeds and better stability over a Wi-Fi network; assign the ethernet adapter a lower metric than the Wi-Fi adapter (since Metric is inversely related to priority), and you should be good to go. I hope the post was easy to follow and you now know how to change network adapter priority in Windows.
If a computer running uses multiple network adapters, say an Ethernet connection and a Wi-Fi connection, it uses priorities to decide which adapter to use.
Note: The following guide is for Windows 10, but it should work on previous versions of Windows equally well for the most part.
Windows 10 does a good enough job usually when it comes to picking the right network adapter if multiple options are available. Sometimes though Windows may get it wrong, or you may want to prioritize a different adapter than the one selected by Windows.
Considering that you may have quite a few adapters installed — think Ethernet, wireless, VPN, and virtual machines — you may need to adjust the priority manual.
Change Network Adapter Priorities in Windows 10
You have two options to change adapter priorities in Windows 10. You may either use PowerShell for that, or navigate your way through a series of network interface menus to do the same.
I prefer PowerShell, as it is easier and gives you a better overview of everything. So, lets start there.
The PowerShell Way
First thing you need to do is open a new elevated PowerShell prompt:
- Tap on the Windows-key on the keyboard, type powershell, hold down Shift and Ctrl, and click on the Windows PowerShell link that is displayed.
This opens an elevated PowerShell prompt. Note that you may also launch PowerShell from an elevated command prompt window by typing powershell. The screenshot above shows how the interface looks like when done that way.
The first command that you want to run is Get-NetIPInterface. This displays all network adapters, their interface index number, and the interface metric.
The index is a unique number of each adapter, the metric the priority of that adapter. Also, it lists all adapter known by Windows at that point in time.
To change the priority of an adapter, look at the InterfaceMetric column. Windows lists the priority of the adapter, and priorities of all other adapters.
Run the command Set-NetIPInterface -InterfaceIndex «Index of the adapter you want to change the priority for» -InterfaceMetric «new priority of the adapter».
Example: Set-NetIPInterface -InterfaceIndex «11» -InterfaceMetric «90»
This changes the priority of adapter 11 to the value 90.
Adapters with a lower InterfaceMetric number are prioritized over adapters that have a higher number.
Use the command Get-NetIPInterface to list the adapter information table again to verify the change.
The interface method
If you prefer to use a graphical user interface, you can do that as well. Note that it requires quite a bit of clicking, and is not as straightforward as the PowerShell method.
The main reason for that is that you don’t get an overview of all network adapter priorities in the graphical user interface.
While you can in theory check the value for each adapter individually, this would mean even more clicking and is not recommended. I suggest you run the PowerShell command Get-NetIPInterface to get a reading on those directly.
Step 1: Tap on the Windows-key, type ncpa.cpl and hit the Enter-key to get started. This opens the Network Connections listing.
Step 2: Right-click on the adapter that you want to modify the priority for, and select Properties from the context menu. This opens the properties window of the adapter.
Step 3: Locate Internet Protocol Version 4 (TCP/IPv4), select it, and click on the Properties button. Note: If your connection is IPv6, select Internet Protocol Version 6 (TCP/IPv6) instead.
Step 4: Locate the Advanced button on the next window that opens and click on it.
Step 5: There you find Interface metric near the bottom. Remove the checkmark from the Automatic metric box, and enter a new custom Interface metric number. Make sure you select a value of 2 or higher, as 1 is reserved for the loopback adapter.
Step 6: Click ok, and repeat the process for any other network adapter you want to change the priority for.
I suggest you verify the priorities using the PowerShell command used above.
Now You: How many adapters are installed on your PC?
Summary
Article Name
Change Network Adapter Priorities in Windows 10
Description
Find out how to change the priority of network adapters in Windows 10 to modify which adapters Windows uses when there are multiple options available.
Author
Martin Brinkmann
Publisher
Ghacks Technology News
Logo
Advertisement