
The November 2019 Update for Windows 10 (version 1909) is now available for download with several new changes to improve the work that Microsoft has included with the May 2019 Update (version 1903). This is the eighth major refresh since the original release, and it’s the second semi-annual update for 2019.
Check out our in-depth Windows 10 November 2019 update reivew
Although this new version is a minor update, and it’ll be offered as a cumulative update for devices already using version 1903, there are still chances of running into problems during and after the installation. Even more on devices still running an older version (such as the October 2018 Update), which still requires full reinstallation and can result in unexpected hiccups.
Also, many of the issues upgrading aren’t problems with the new version. Typically, the reason for an update failure is because of outdated drivers, incompatible programs, custom configurations, and hardware related issues.
Black Friday buyer’s guide: Best deals on the best Windows laptops
In this Windows 10 guide, we’ll dive into the problems you may encounter installing the November 2019 Update, and the steps to fix them to get up an running in no time.
Get help to fix issues upgrading to Windows 10 November 2019 Update
Super important — When moving to a new version of Windows 10, it’s possible to run into two types of problems. You could see errors that are common during and after an upgrade (such as issues with Windows Update, storage, activation, etc.), which are not necessarily problems with the November 2019 Update directly.
All the latest news, reviews, and guides for Windows and Xbox diehards.
Then, there are those issues that may appear because of bugs with the feature update. Usually, these problems can include errors during the installation that can result from an outdated driver, compatibility with a particular app, third-party security solution, and many others.
In this guide, we’ll look into the different ways that you can resolve both types of issues, whether you’re installing the feature update on a device already running the May 2019 Update or an older version using Windows Update, Media Creation Tool, or Update Assistant.
- How to fix unexpected errors installing the November 2019 Update using Windows Update
- How to fix error 0x80073712 installing the November 2019 Update using Windows Update
- How to fix error 0x800F0922 downloading the November 2019 Update using Windows Update
- How to fix errors installing the November 2019 Update using Media Creation Tool
- How to fix issues installing the November 2019 Update using USB bootable media
- How to fix error 0x8007042B or 0x800700B7 installing the November 2019 Update using Windows Setup
- How to fix Update Assistant stuck downloading Windows 10 November 2019 Update
- How to fix storage error 0x80070070 installing the November 2019 Update
- How to fix error 0xC1900107 starting upgrade of the November 2019 Update
- How to fix install completion problems with the November 2019 Update
- How to fix error 0x80070002 0x20009 installing the November 2019 Update
- How to fix driver error 0xC1900101 installing the November 2019 Update
- How to fix hardware error 0xC1900200, 0xC1900202, or 0x80300024 installing the November 2019 Update
- How to fix driver compatibility error 0x800F0923 installing the November 2019 Update
- How to fix app compatibility error 0xC1900208 installing the November 2019 Update
- How to fix black screen problems with the November 2019 Update
- How to fix networking problems with the November 2019 Update
- How to fix activation problems with the November 2019 Update
- How to fix accidental restart error 0x80200056 installing the November 2019 Update
- How to prepare to upgrade to Windows 10 November 2019 Update
How to fix unexpected errors installing the November 2019 Update using Windows Update
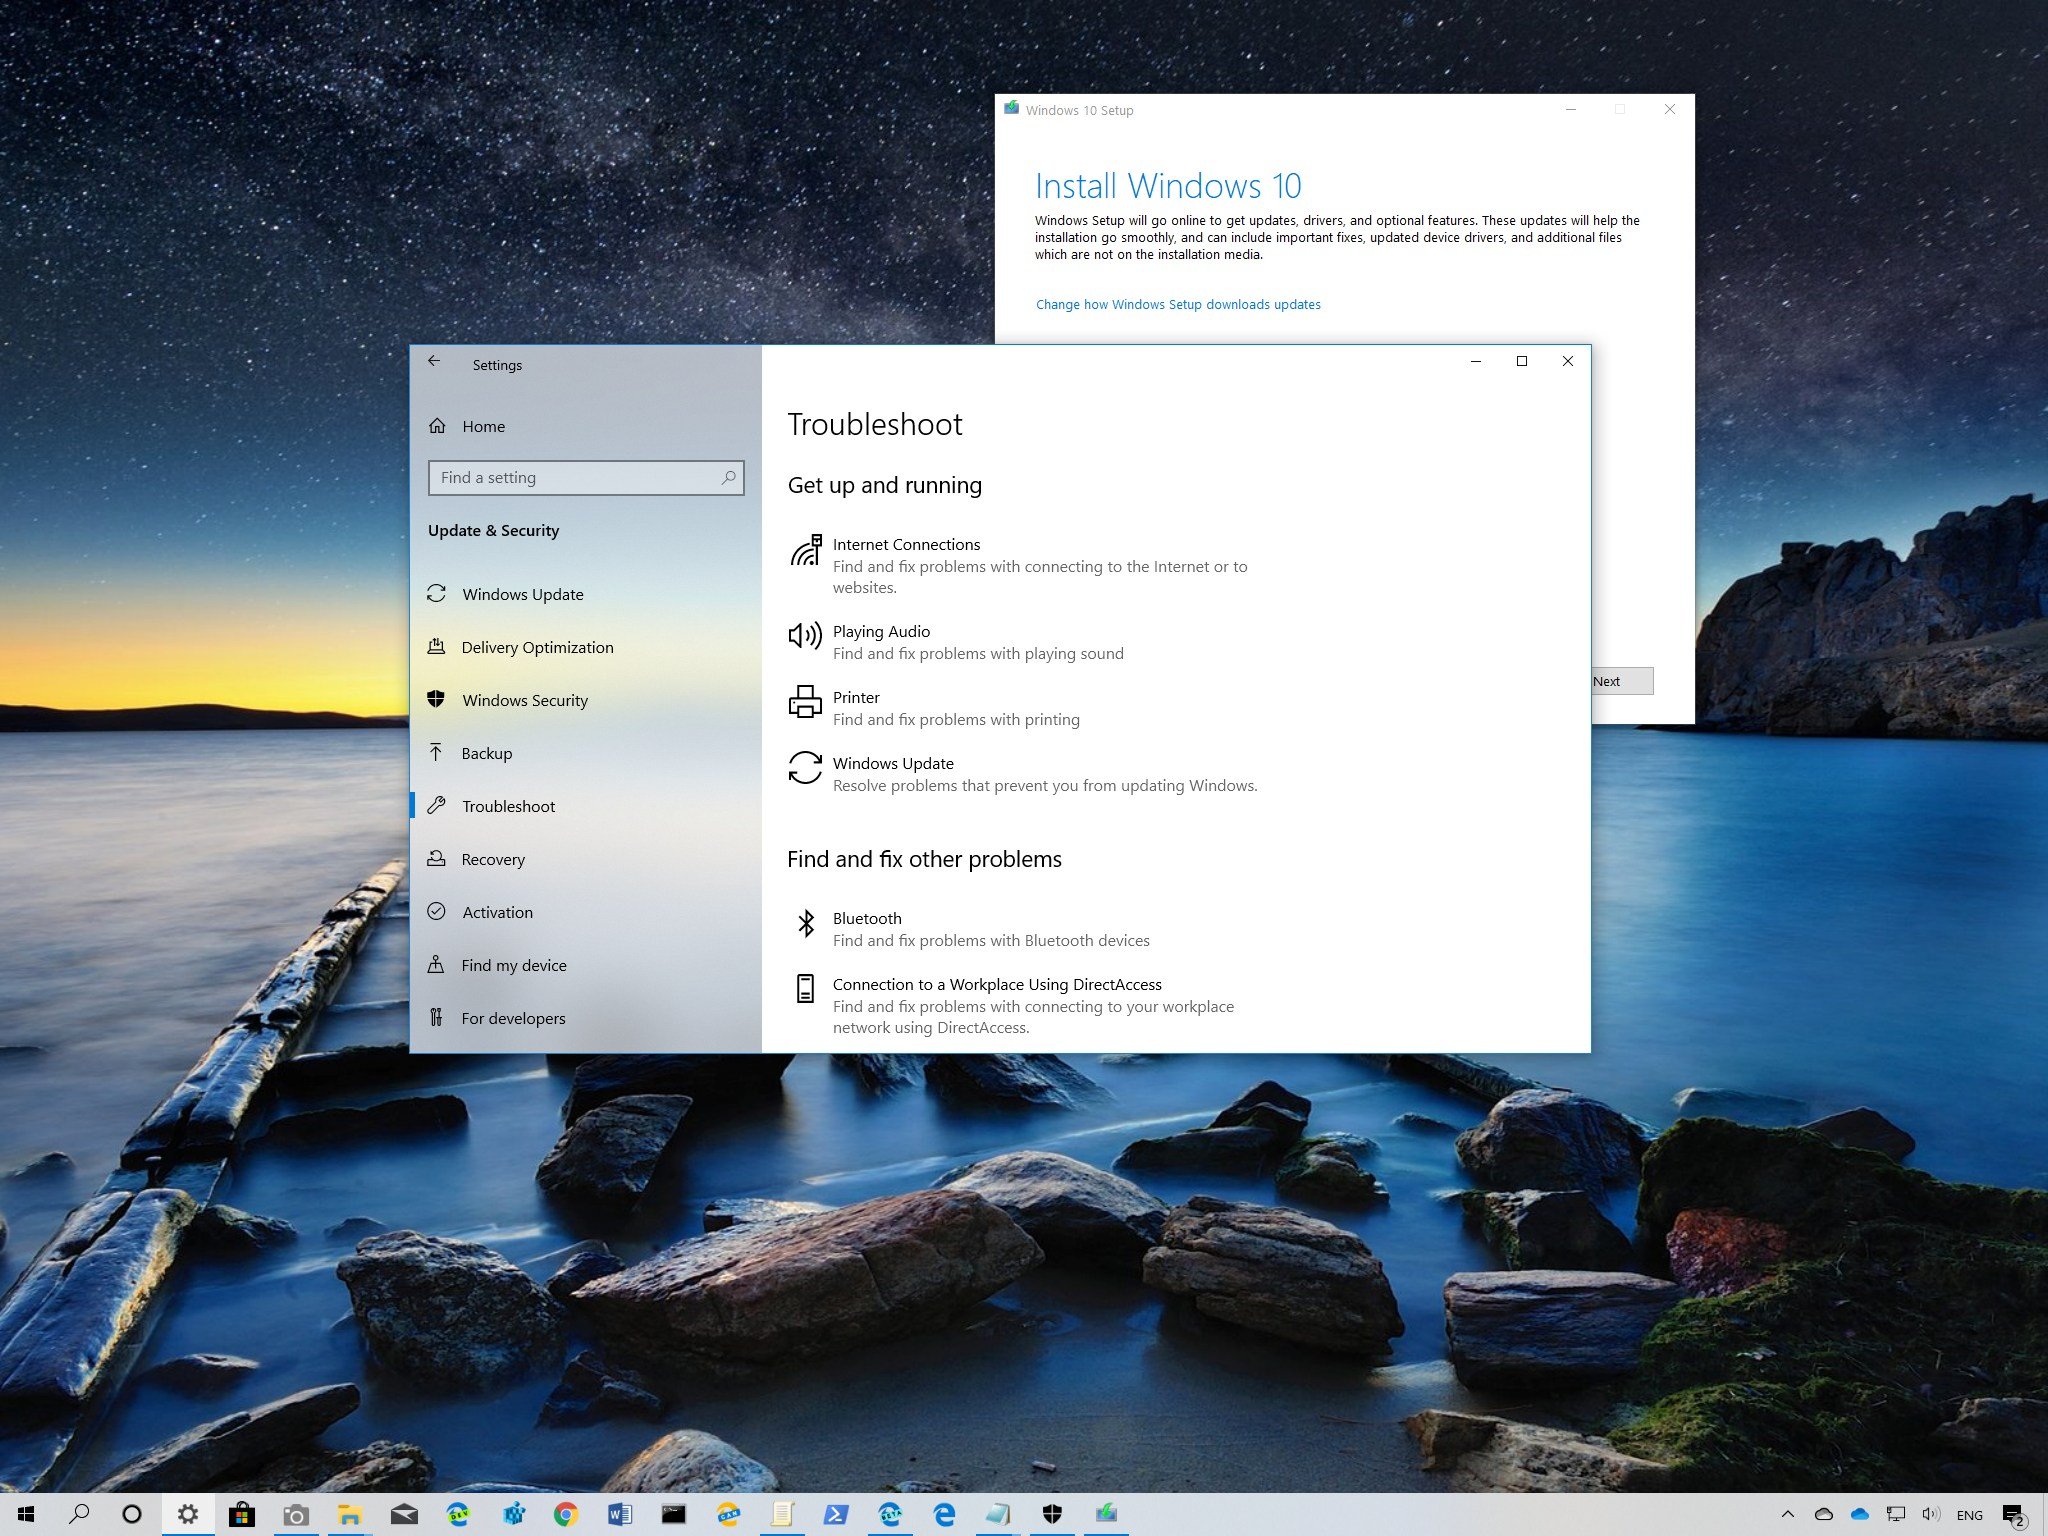
Although the easiest way to apply a new feature update is using Windows Update, this mechanism can also generate errors that prevent the device from installing the new version.
Usually, it’s challenging to identify the root of the cause, but you can use the Windows Update troubleshooter to resolve the most common problems quickly.
To fix Windows Update to download the new feature update, use these steps:
- Open Settings.
- Click on Update & Security.
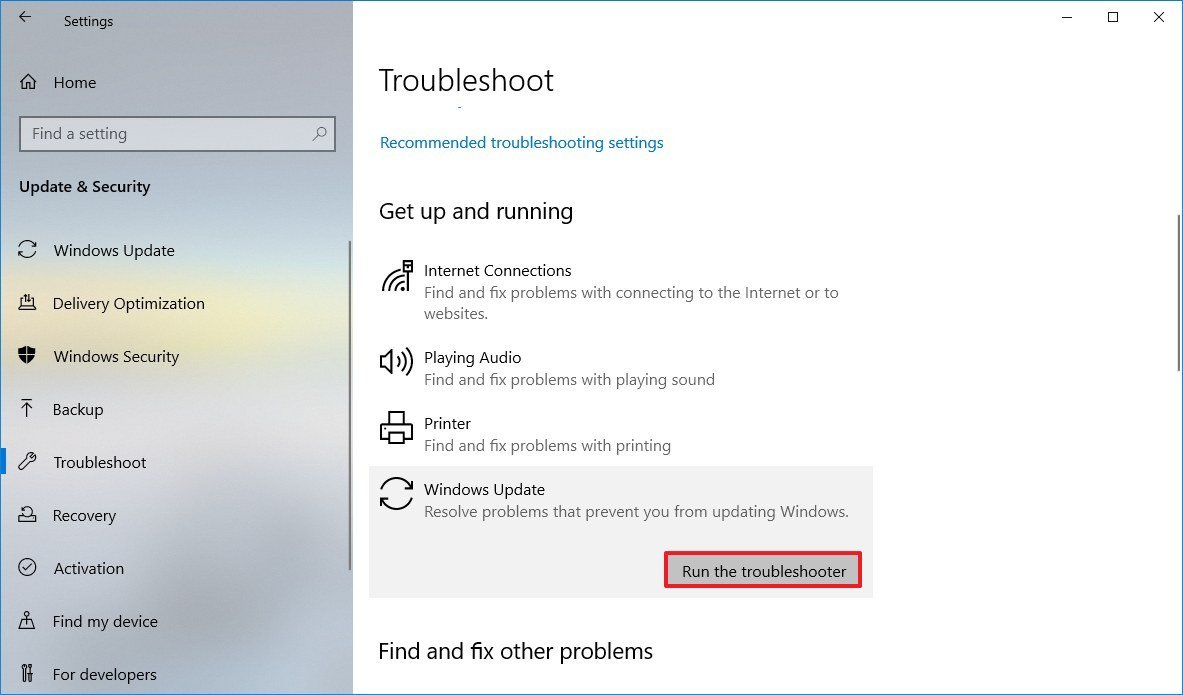
- Click on Troubleshoot.
- Under the «Get up and running» section, select the Windows Update option.
- Click the Run the troubleshooter button.
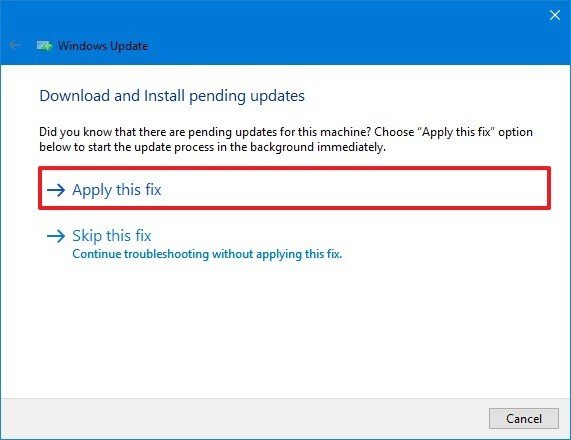
- Click the Apply this fix option (if applicable).Quick note: If you don’t see the «Apply this fix» option, it doesn’t mean that the troubleshooter didn’t work. The tool will actually run an automated script to fix common problems, and if there’s something else, you’ll see the option to apply the fix.
- Continue with the on-screen directions.
- Restart your computer.
Once you complete the steps, use the Windows Update settings one more time to download and install the new feature update.
If you happen to see the error 0xc1900223, then there’s a problem downloading the update, but in this case, there’s nothing that you need to do. Windows Update will try to upgrade at a later time.
How to fix error 0x80073712 installing the November 2019 Update using Windows Update
When you see the 0x80073712 error message as you try to apply the November 2019 Update, then it means that the required files are either missing or damaged.
To fix this issue, use the Storage settings to delete the Windows Update temporary files using these steps:
- Open Settings.
- Click on System.
- Click on Storage.
- Under the «Local Disk» section, click the Temporary files option. (If you’re running version 1809, then click the Free up space now option.)
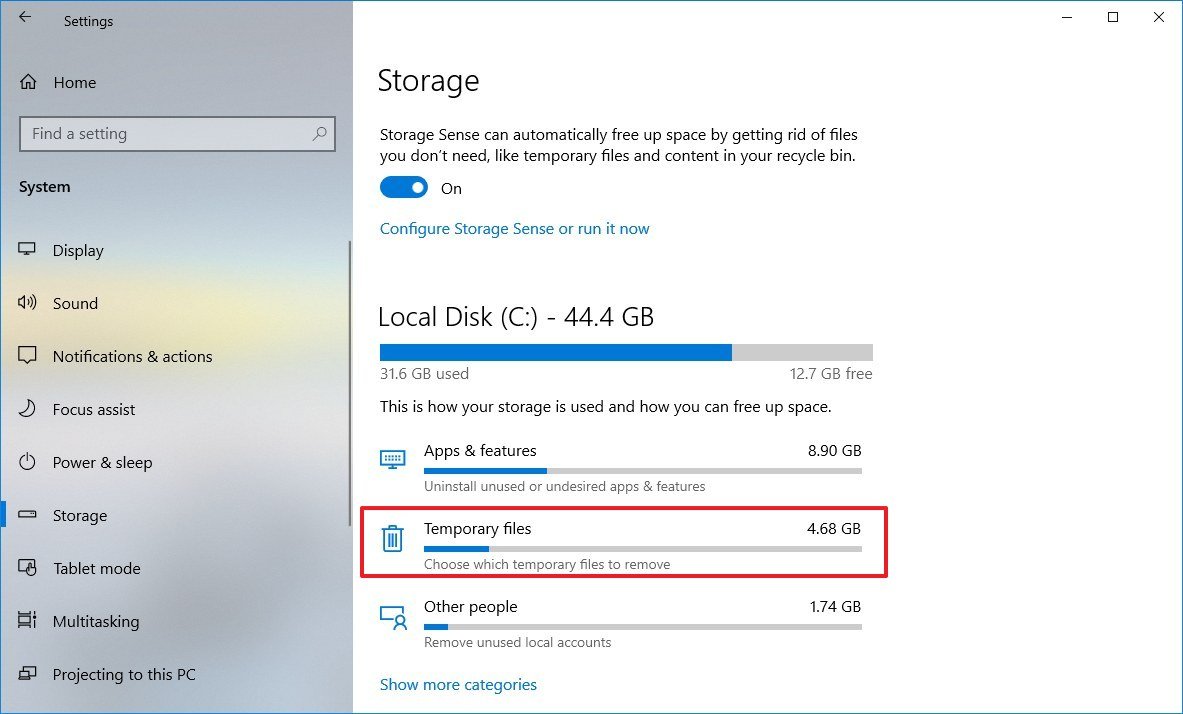
- Clear the current selections.
- Check the Temporary Windows Installation files or Windows Setup temporary files item.
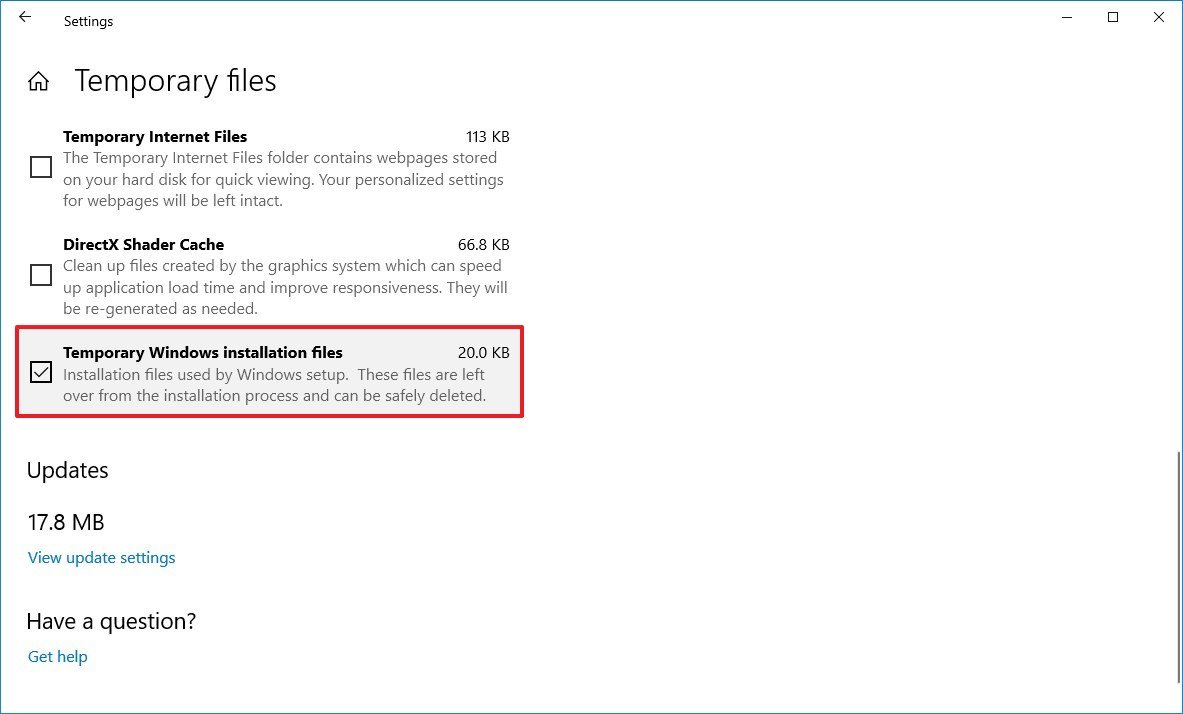
- Click the Remove files button.
Once you complete the steps, use the Windows Update settings one more time to apply version 1909.
If you keep getting the same error, or other errors like 0x80245006 or 0x80190001, then use the Media Creation Tool and proceed with a clean installation of the latest version of Windows 10.
How to fix error 0x800F0922 downloading the November 2019 Update using Windows Update
When using Windows Update, you may also receive error 0x800F0922, which means that the computer can’t reach the download servers, or the System Reserved partition doesn’t have enough space.
Closing VPN connection
If you see the error 0x800F0922 as you try to download version 1909, then there’s a chance that you’re using a VPN connection.
To start the upgrade process, disconnect from the VPN server using these steps:
- Click the network icon in the taskbar.
- Select the VPN connection.
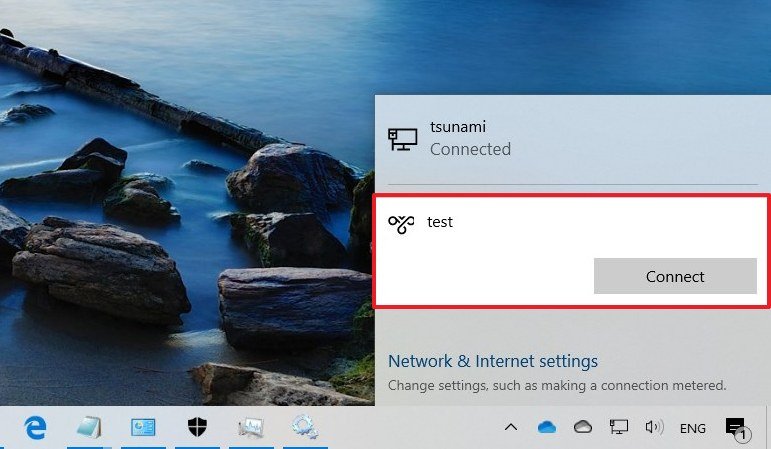
- Click the Disconnect button.
The above steps will disconnect you from a remote session when using the default VPN client on Windows 10. If you’re using another client, then check your software support website for more specific details.
Resizing System Reserved partition
Sometimes third-party security solutions (such as antivirus) store data in the System Reserved partition preventing the installation of a new version of Windows 10.
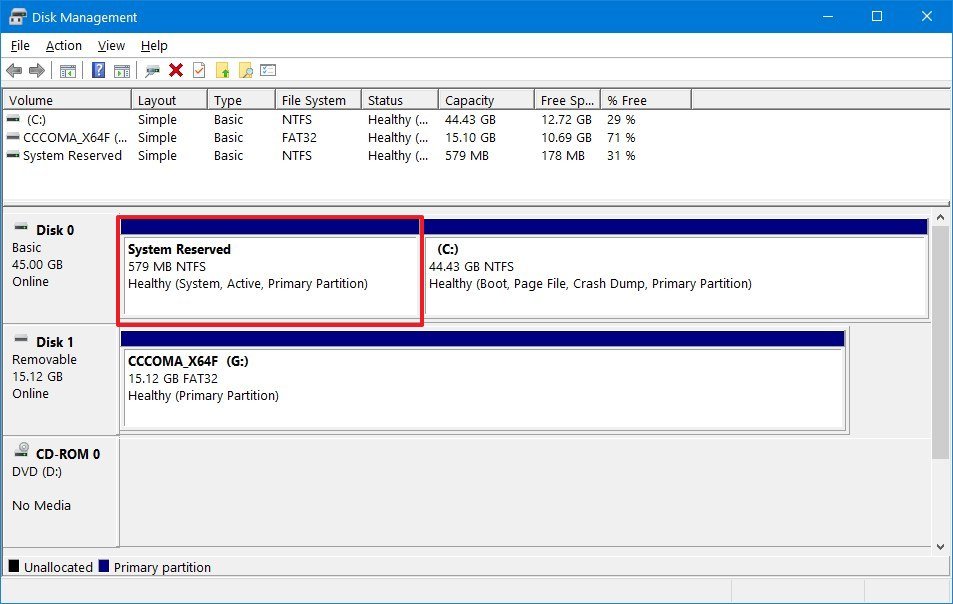
If this is your case, you may need to use a third-party tool to resize the partition to make equal or larger than 500MB. Alternatively, you choose to perform a clean installation with version 1909, which it’ll not only fix the problem, but you’ll start with a new fresh installation of Windows 10 that can improve performance and resolve other issues.
Although the Media Creation Tool is a handy utility to perform a fresh as well as a clean installation of the latest release of Windows 10, sometimes, it may run into issues that will prevent the update from initializing.
Fixing Media Creation Tool stuck downloading updates
As part of the Windows 10 upgrade process, the Media Creation Tool downloads the installation files as well as any available cumulative update to ensure the most up-to-date version is applied to your device.
The only caveat is that sometimes, the tool might end up stuck trying to download additional updates, which will prevent the installation from proceeding.
If the tool stays on the «Getting updates» stage for a very long time, you can use these steps to continue with upgrade:
- Close the Media Creation Tool.
- Relaunch the tool.
- As soon as the installation files finish downloading, unplug the network cable from your computer or disconnect from the wireless network.
Once you complete the steps, the Media Creation Tool will time out the update step, and continue with the setup process.
Fixing Media Creation Tool won’t start setup
In the case that the Media Creation Tool is stuck downloading the new installation files, you may need to start the upgrade process manually using these steps:
- Open File Explorer.
- Browse to the following path:
C:\$Windows.~BT\Sources - Double-click the Setupprep.exe file to launch the setup wizard.
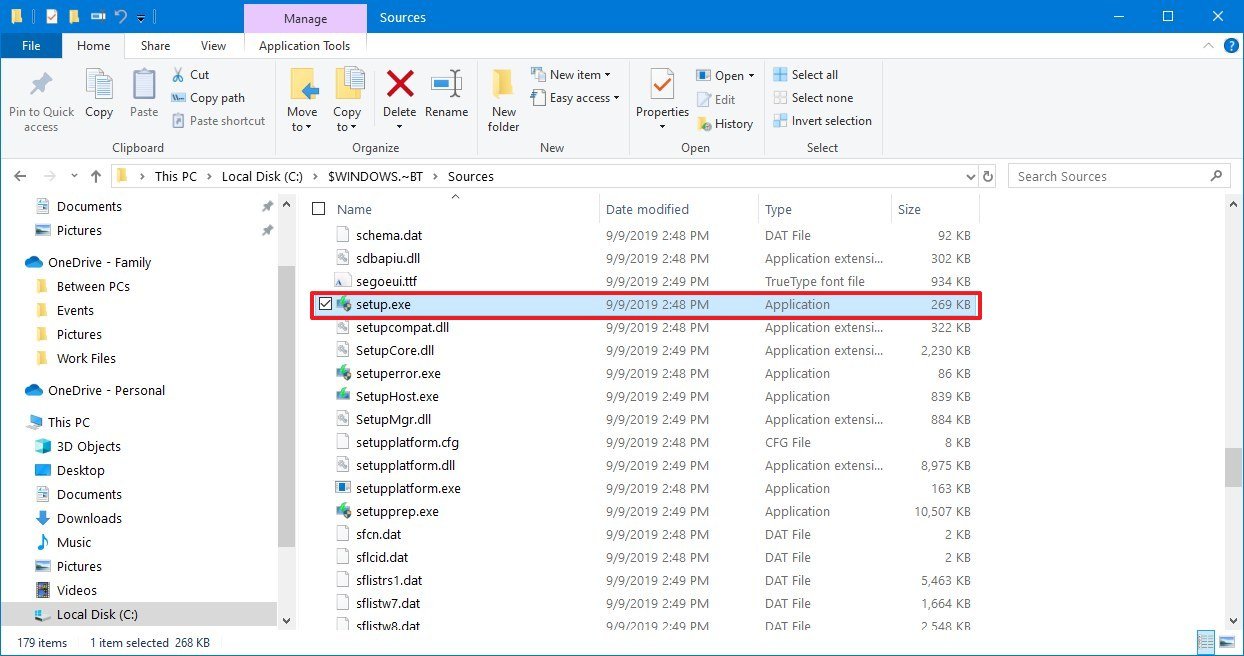
After you complete the steps, the device should be able to continue with the upgrade process to the November 2019 Update.
In the case that you’re still dealing with the same problem, then you should upgrade using the Update Assistant.
If the device is failing to install the Windows 10 November 2019 Update using a USB bootable media, then it’s likely that some of the files are missing or damaged on the flash drive. You can get around this problem, using the Media Creation Tool to create the bootable media one more time.
To create a Windows 10 USB bootable media, use these steps:
- Open this Microsoft support website.
- Under the «Create Windows 10 installation media» section, click the Download tool now button.
- Save the installer on your device.
- Double-click the MediaCreationTool1909.exe to start the setup.
- Click the Accept button.
- Select the Create installation media (USB flash drive, DVD, or ISO file) for another PC option.

- Click the Next button.
- Select your language, architecture, and edition settings, if different from the default selection.

- Click the Next button.
- Select the USB flash drive option.
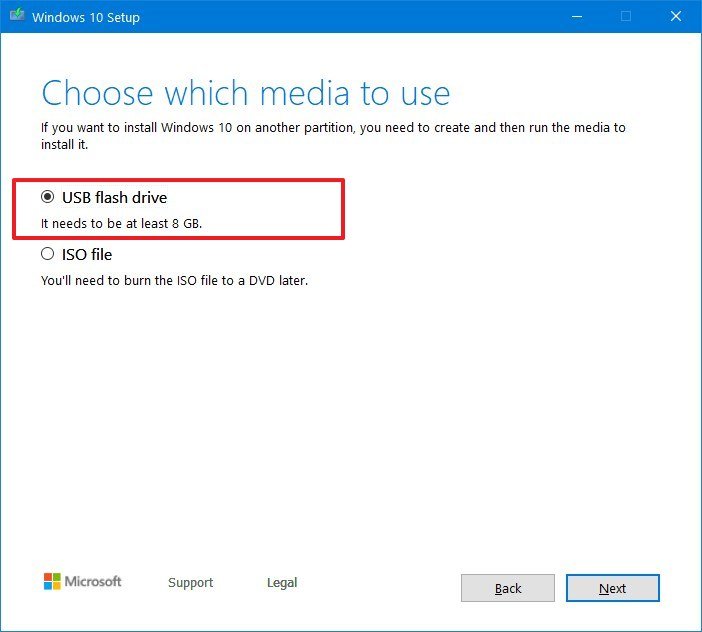
- Click the Next button.
- Select a removable drive from the list.

- Click the Next button.
- Click the Finish button.
Once you complete the steps, the tool will create a new media with fresh files that you can use to update your computer.
If the bootable media fails again, try the steps again, but from another computer.
How to fix error 0x8007042B or 0x800700B7 installing the November 2019 Update using Windows Setup
While installing Windows 10 version 1909 using the Update Assistant or Media Creation Tool to perform an in-place upgrade, you may come across error 0x8007042B 0x4000D or error 0x800700B7 0x2000A that will block the installation of the new feature update.
Typically, these errors messages appear when there’s another process running in the background. For example, when your device is running a third-party antivirus or a particular program.
If you’re performing an in-place upgrade, find and terminate the process or program, and proceed with the update one more time.
Alternatively, you can perform a clean boot of Windows 10 to start the upgrade, or you can temporarily remove the program in question.
To uninstall an app on Windows 10, use these steps:
- Open Settings.
- Click on Apps.
- Click on Apps & features.
- Select the app and click the Uninstall button.
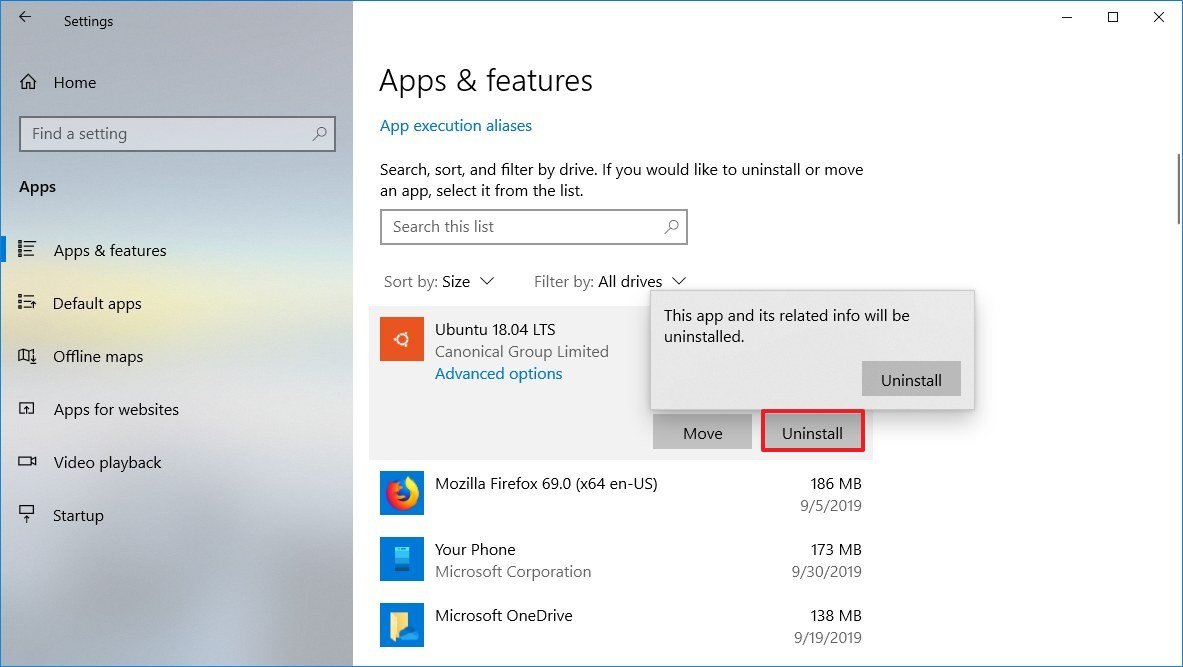
- Continue with the on-screen directions.
After you complete the steps, you should be able to proceed with the upgrade. If you’re removing a security software, make sure to reinstall it after the installation.
How to fix Update Assistant stuck downloading Windows 10 November 2019 Update
Microsoft also offers the Update Assistant as another tool to install feature updates when Windows Update doesn’t work, but at times, the tool can experience cause issues as well.

Usually, problems with the Update Assistant are related to networking issues, which you can fix doing the following:
- Disconnect the network cable, or turn off your network connection. Wait 60 seconds, reconnect to the network, and restart the Update Assistant.
- Restart your computer, and then reopen the Update Assistant.
In the case that you still see the problem, then use the Media Creation Tool to upgrade your device to the November 2019 Update.
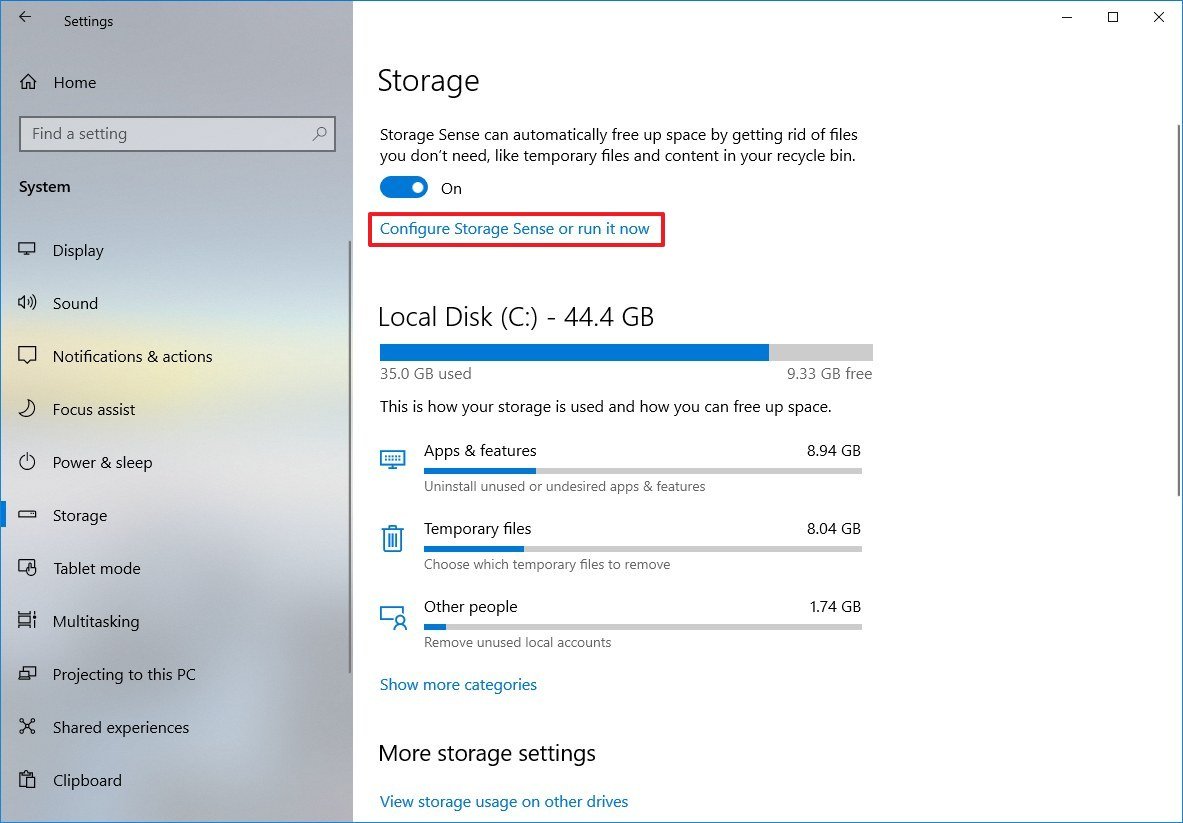
How to fix storage error 0x80070070 installing the November 2019 Update
As part of the minimum hardware requirements, Windows 10 requires 20GB of available space for reinstallation, or 32GB of space to perform a clean installation. If your computer doesn’t meet the requirements, you’re like to see error 0x80070070 – 0x50011, 0x80070070 – 0x50012, or 0x80070070 – 0x60000.
To get around this problem, you’ll need to make more room on the drive by deleting junk and other files with these steps:
- Open Settings.
- Click on System.
- Click on Storage.
- Under the «Local Disk» section, click the Temporary files option. (If you don’t see the option, click the Show more categories option.)
- Check the items to remove.Quick tip: You don’t need to select the «Windows Setup temporary files» or «Windows ESD installation files» options as these are the files required to update your computer.
- Click the Remove files button.
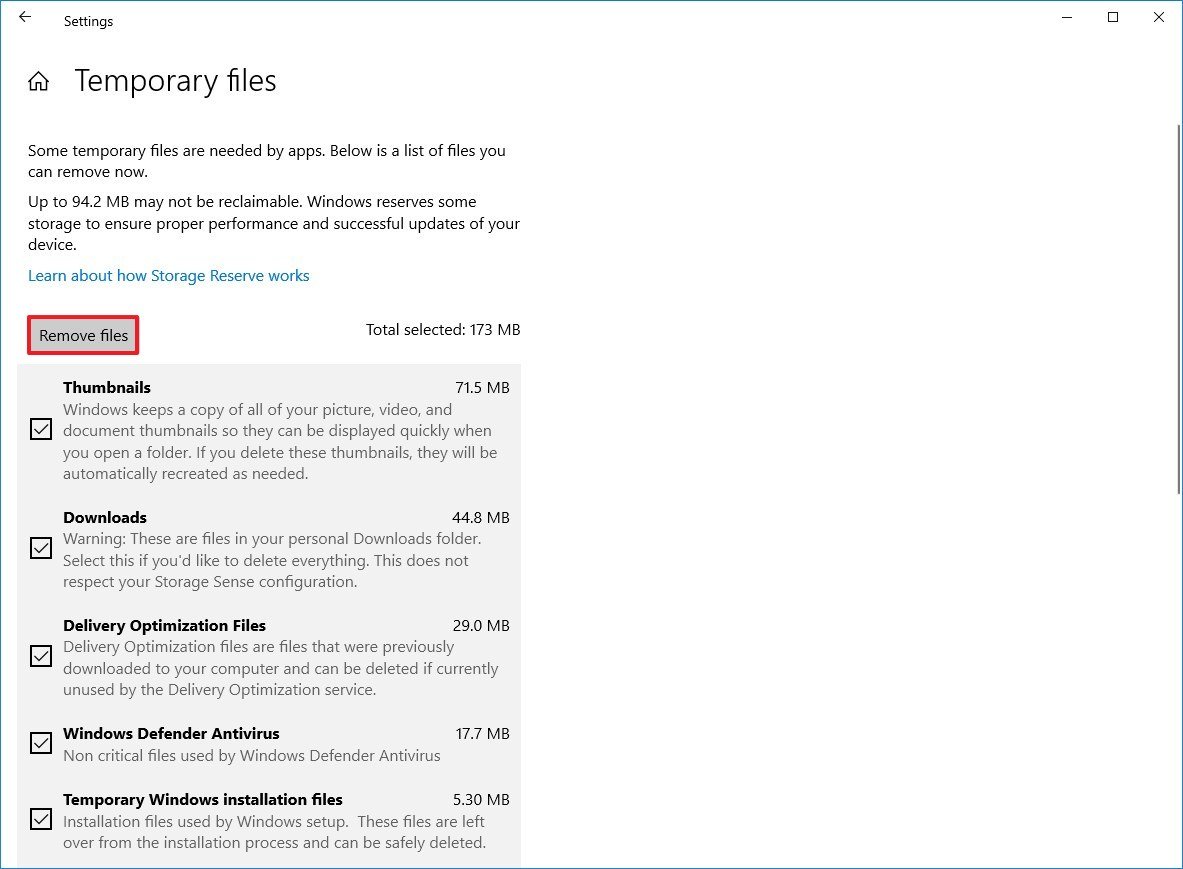
After you complete the steps, you should be able to proceed with the installation of version 1909. However, if you continue without enough space, you may need to connect an external storage (such as a USB flash drive or external hard drive) with at least 16GB of space that the system can use as temporary storage.
How to fix error 0xC1900107 starting upgrade of the November 2019 Update
Although it’s rare, you can also stumble upon the 0xC1900107 error message, which indicates that you recently upgraded to a newer version, but the previous installation files are still pending for deletion.
You should be able to get around this problem by restarting your computer, but if you continue to hit the same error, use the Storage Sense to remove the previous version manually.
To delete a previous installation of Windows 10, use these steps:
- Open Settings.
- Click on System.
- Click on Storage.
- Click the Configure Storage Sense or run in now option. (If you’re running an older version, you may find the option as Change how we free up space automatically.)
- Under the «Free up space now» section, check the Delete previous versions of Windows option.
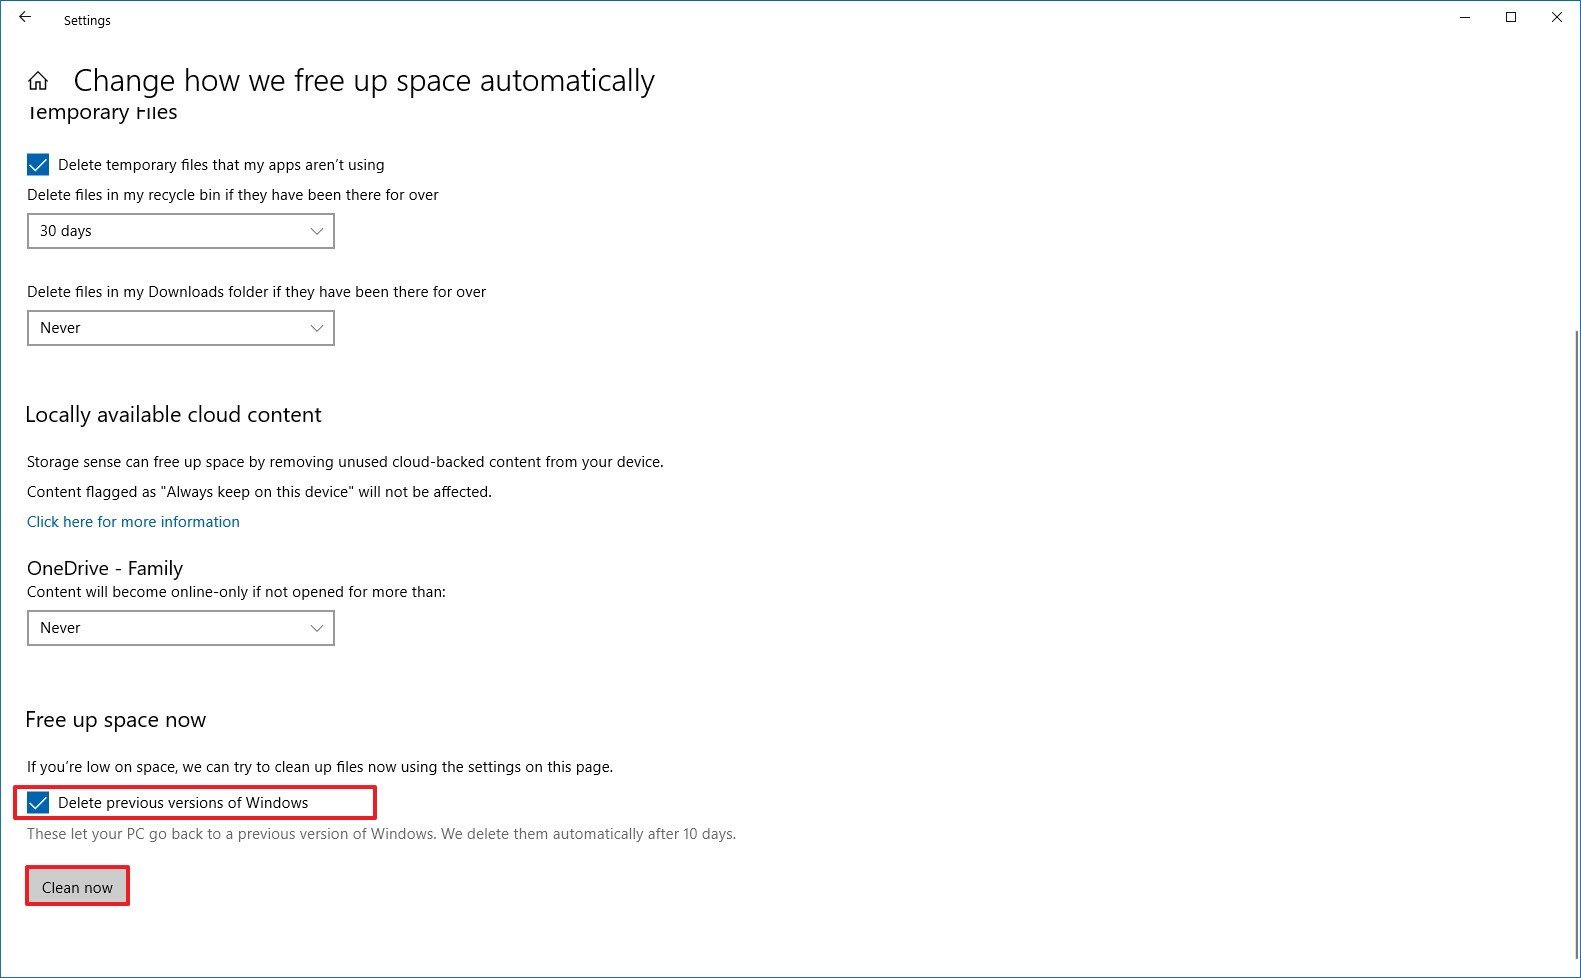
- Click the Clean now button.
After you complete the steps, the Windows.old folder containing the previous installation will be deleted, resolving the 0xC1900107 error message.
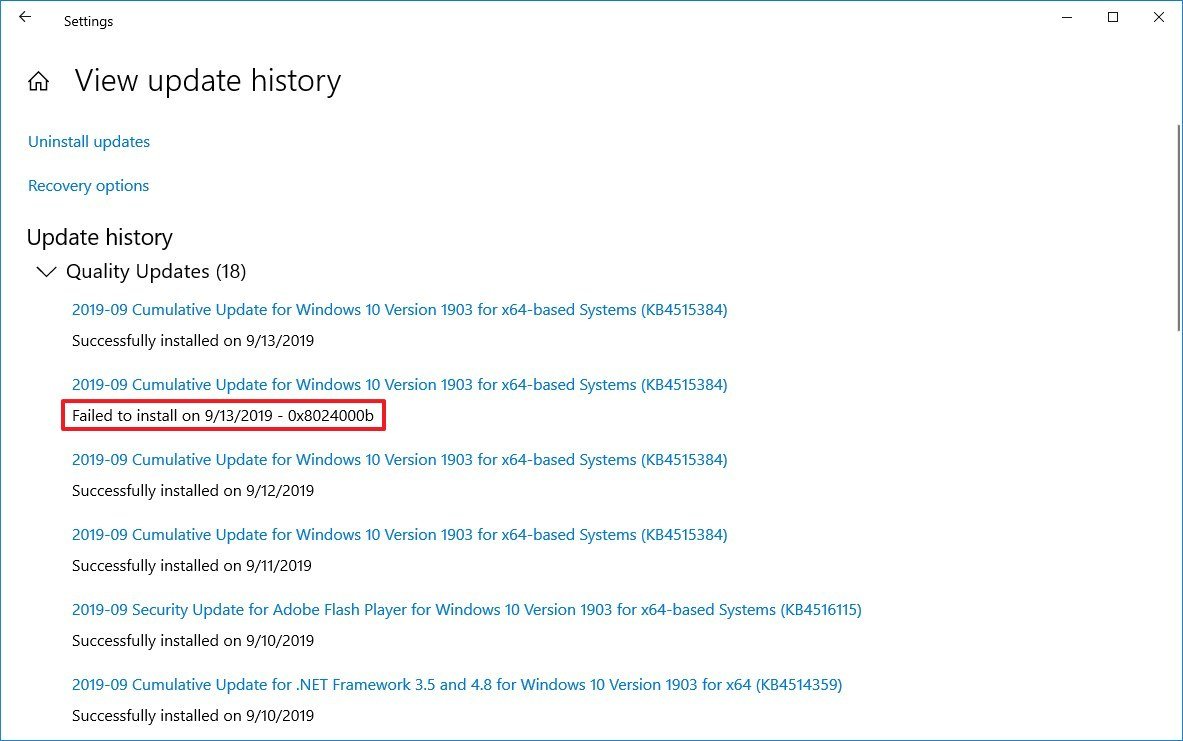
How to fix install completion problems with the November 2019 Update
During the installation of a feature update or quality update, you may run into either of these errors:
- Error: We couldn’t complete the updates. Undoing changes. Don’t turn off your computer.
- Error: Failure configuring Windows Updates. Reverting changes.
The above messages are general errors that will prevent the installation from completing successfully.
If this is your case, you first need to find out the exact error code that you can use to search online to find a solution.
To determine the error code message that is blocking version 1909, use these steps:
- Open Settings.
- Click on Update & Security.
- Click on Windows Update.
- Click the View your update history option.
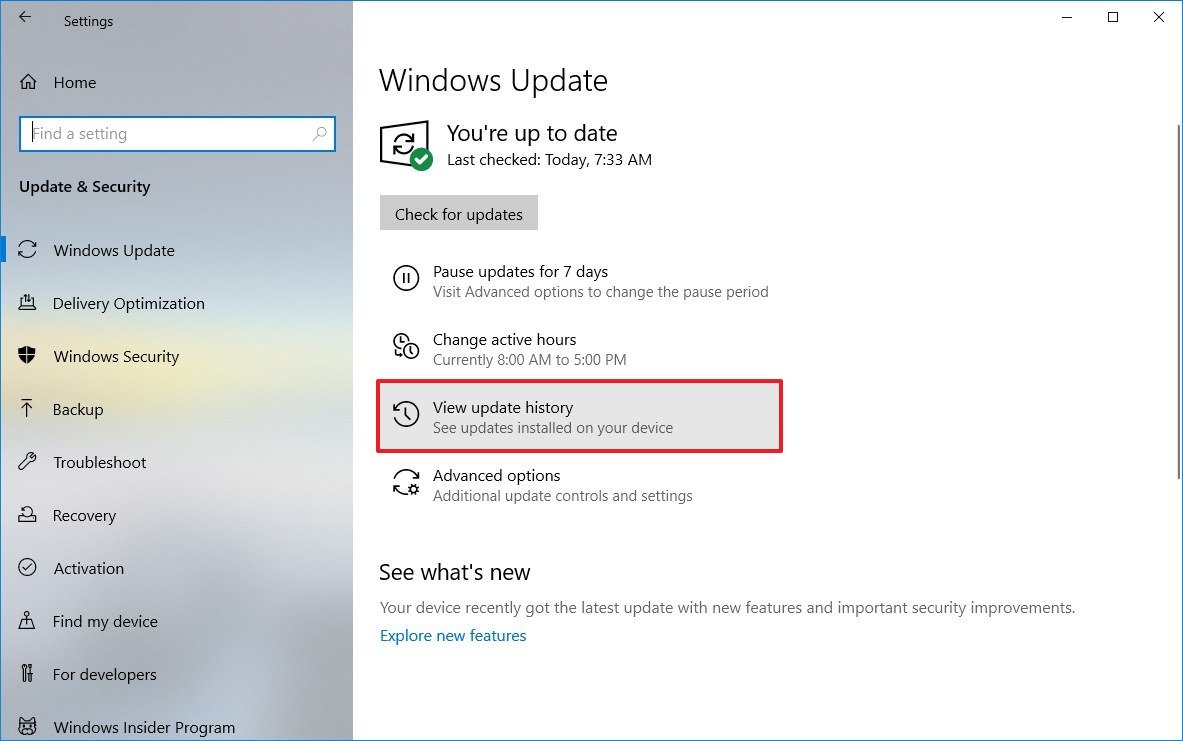
- Check the error code next to the failed update.
After you complete the steps, you’ll need to research the message online. Usually, you may be able to find a solution at the official Microsoft forums or using the Windows Central forums.
In addition, you can check the Windows 10 update history support page, which not only includes details about the quality update but if there’s a known problem, it’ll also be listed on the page along with a workaround to mitigate the issue (if applicable).
How to fix error 0x80070002 0x20009 installing the November 2019 Update
When trying to upgrade to version 1909, there’s also a chance to run into error 0x80070002 0x20009, which indicates that Windows 10 can’t find the specified files.
If this error message occurs, remove any drive connected to the device, such as USB flash drives (other than the one with installation files) and external drives to continue.
After the upgrade, you can reconnect the drives again.
How to fix driver error 0xC1900101 installing the November 2019 Update
During the installation process to version 1909, you may also come across one of the several errors starting with 0xC1900101, or even error 0x80090011, which may indicate a driver problem.
This is the list of the 0xC1900101 error code variants:
- 0xC1900101 — 0x2000c
- 0xC1900101 — 0x20017
- 0xC1900101 — 0x30017
- 0xC1900101 — 0x30018
- 0xC1900101 — 0x3000D
- 0xC1900101 — 0x4000D
- 0xC1900101 — 0x40017
If you see any of these errors, you can use the follows tips to resolve them:
Optimize storage space
Although Windows 10 now uses Reserved Storage to minimize storage problems, it’s only available for new installations and devices running version 1909. However, if you stumble upon one of the 0xC1900101 errors, you may need to use the Storage settings, uninstall non-essential apps and games, and migrate personal files to another location to free up space.
You can use this guide with the best tips to reclaim storage space on your device.
Disconnect devices
If you want to reduce the chances of errors during the installation of the Windows 10 November 2019 Update, it’s recommended to disconnect all the peripherals, including external drives, printers, Bluetooth devices, USB devices, cameras, and other devices.
After the upgrade, you can reconnect them again.
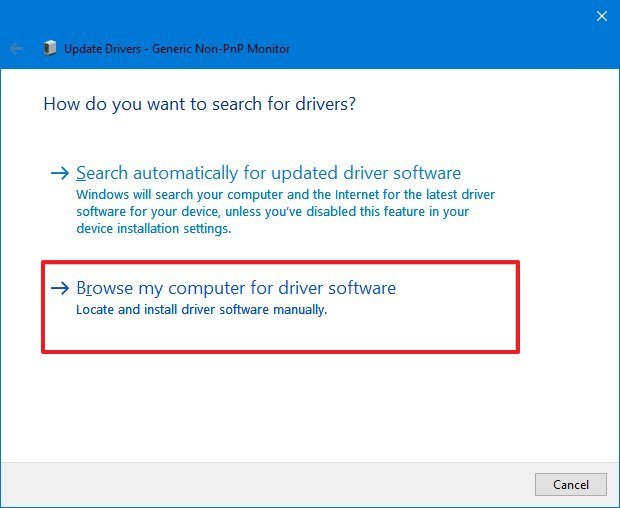
Update device drivers
Also, if you see an error message that starts with 0xC1900101 or even 0x80090011, then make sure that you’re not missing driver updates.
To check for device driver updates, use these steps:
Important: If you’re downloading the update from your device manufacturer support website, make sure to follow their instructions, and skip the steps below.
- Open Start.
- Search for Device Manager, and click the top result to open the app.
- Expand the branch with the device causing issues. (Usually, it’ll be marked with a yellow exclamation sign.)
- Right-click the device, and select the Update driver option.
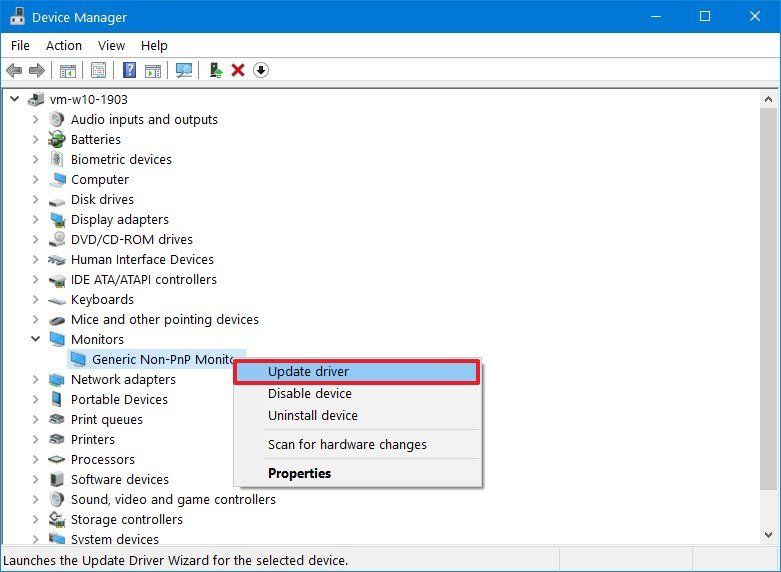
- Click the Browse my computer for driver software option. (Or click the Search automatically for updated driver software option to check for updates automatically.)
- Click the Browse button.
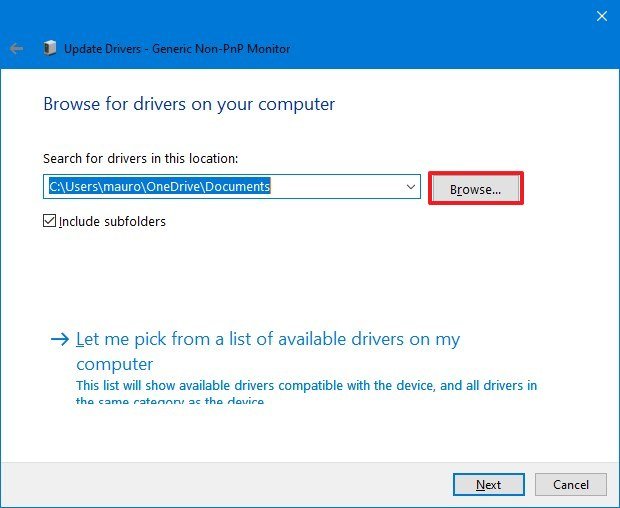
- Select the location with the driver files (unpacked).
- Click the Next button.
- Continue with the on-screen directions.
Once you complete the steps, upgrading to the November 2019 Update should no longer result in an 0xC1900101 or 0x80090011 error message.
Repair current installation
If you’re getting an 0xC1900101 error message, it could mean a problem with the current installation and the upgrade won’t be able to continue. When this happens, you can use the Deployment Servicing and Management (DISM) and the System File Checker (SFC) utilities (in that order) to help to repair issues with the installation.
In the case that you need additional assistance, use this guide with all the steps that you need to follow to use these tools correctly.
Repair hard drive
In addition, you can use the CHKDSK command tool to check and repair logical and some physical errors on the hard drive, which could be the reason your device isn’t upgrading to version 1909.
To use the CHKDSK command tool on Windows 10, save your work, close any running application, and use these steps:
- Open Start.
- Search for Command Prompt, right-click the top result, and select the Run as administrator option.
- Type the following command and press Enter:
chkdsk/f c: - Type Y and press Enter to schedule a scan.
- Restart your device.
After you complete the steps, during startup, the tool will launch automatically, and it’ll scan and repair any errors with the drive.
Clean installation
When nothing seems to resolve the issue, then you should consider using the Media Creation Tool to perform a fresh installation of Windows 10 version 1909.
How to fix hardware error 0xC1900200, 0xC1900202, or 0x80300024 installing the November 2019 Update
If you come across error 0xC1900200 – 0x20008, 0xC1900202 – 0x20008, or 0x80300024, then your hardware configuration doesn’t meet the minimum requirements.
Depending on the way that you’re upgrading your system, the requirements will be slightly different. These are the minimum hardware that you need to install Windows 10.
- CPU: 1GHz or faster CPU or System on a Chip (SoC).
- RAM: 1GB for 32-bit or 2GB for 64-bit.
- Hard drive: 16 GB for 32-bit or 20 GB for 64-bit existing installs, or 32GB clean install or new devices.
- Graphics: DirectX 9 or later with WDDM 1.0 driver.
- Display: 800×600.
Usually, you may see these errors on older or low-end devices, and if you receive error 0xC1900200 – 0x20008, or 0xC1900202 – 0x20008, then it might mean that the device doesn’t have enough memory. If this is a problem, you can resolve it by adding more memory.
How to fix driver compatibility error 0x800F0923 installing the November 2019 Update
When you try to apply a new feature update, the installation process may output error 0x800F0923, indicating a compatibility issue with a device driver or application already installed on the device.
Typically, this particular error happens because of a problem with the graphics driver. However, it can also be an issue with an old program, third-party antivirus, outdated drivers for a specific component.
To help you understand what’s causing error 0x800F0923, use the Update Assistant or Media Creation Tool, as these tools can report the specific problem more clearly.
If it’s a driver problem, you should download and install the latest version from the manufacturer support website using their instructions. Also, look for beta versions of the driver, sometimes there’s a bug with the current version, which has been fixed in an upcoming release of the driver.
In the case that you’re running the most up-to-date driver, you can remove it, and continue with the upgrade process. Then, after the installation, you can reinstall the driver again, if Windows 10 didn’t install it back already.
Fixing driver compatibility
To remove a device driver on Windows 10, use these steps:
- Open Start.
- Search for Device Manager, and click the top result to open the app.
- Expand the branch with the device having issues.
- Right-click the component, and select the Uninstall device option.
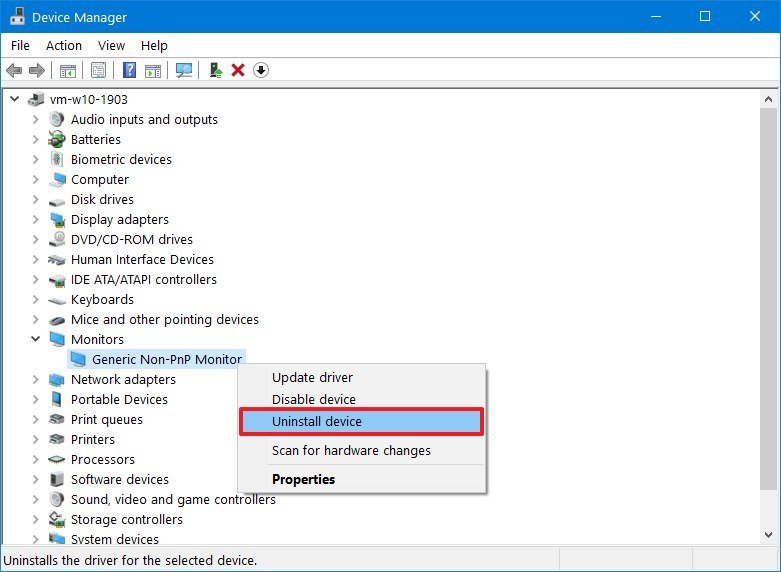
- Click the Uninstall button again.
After you complete the steps, you should be able to complete the upgrade of the November 2019 Update.
Other related errors include error 0x80070490 — 0x20007, which means that a driver is incompatible. And error 0x80070003 — 0x20007 indicates that the upgrade failed during the driver installation stage.
If you receive either error, after the setup rolls back to the previous version, you can use the instructions outlined above to remove the driver causing the problem and try the upgrade process one more time.
Fixing app compatibility
In the case the issue is an incompatible app, then either update the app to a newer version or remove it before proceeding with the upgrade process.
To uninstall an app, use these steps:
- Open Settings.
- Click on Apps.
- Click on Apps & features.
- Select the incompatible app, and click the Uninstall button.
- Click the Uninstall button again.
- Continue with the on-screen directions (if applicable).
Once you complete the steps, continue with the installation process of version 1909. After the upgrade, remember to reinstall the apps again.
How to fix app compatibility error 0xC1900208 installing the November 2019 Update
As you start the process to leap to the November 2019 Update, it’s also possible to receive error 0xC1900208 – 0x4000C, which indicates an application is causing a conflict because it’s not compatible.
You can always get around this issue by removing the app in question with these steps:
- Open Settings.
- Click on Apps.
- Click on Apps & features.
- Select the incompatible application.Quick tip: If you’re not sure which app is causing the problem, often, the issue is a third-party antivirus or older piece software.
- Click the Uninstall button.
- Click the Uninstall button again.
- Continue with the on-screen direction to remove the app.
Once the conflicting apps have been removed, you should be updated to version 1909.
How to fix black screen problems with the November 2019 Update
A black screen is another common problem that may appear during or after updating to Windows 10 version 1909. Often, a black screen indicates an issue with the graphics driver, issues with a piece of hardware, or it could mean that a previous update didn’t apply correctly.
In the case that you’re dealing with the black screen problem as you try to upgrade to version 1909, use this guide to troubleshoot and fix the problem.
If, after using the guide, the problem doesn’t go away, then the feature update isn’t fully compatible with your current hardware or software configuration, and it’s best to roll back the device to the previous version.
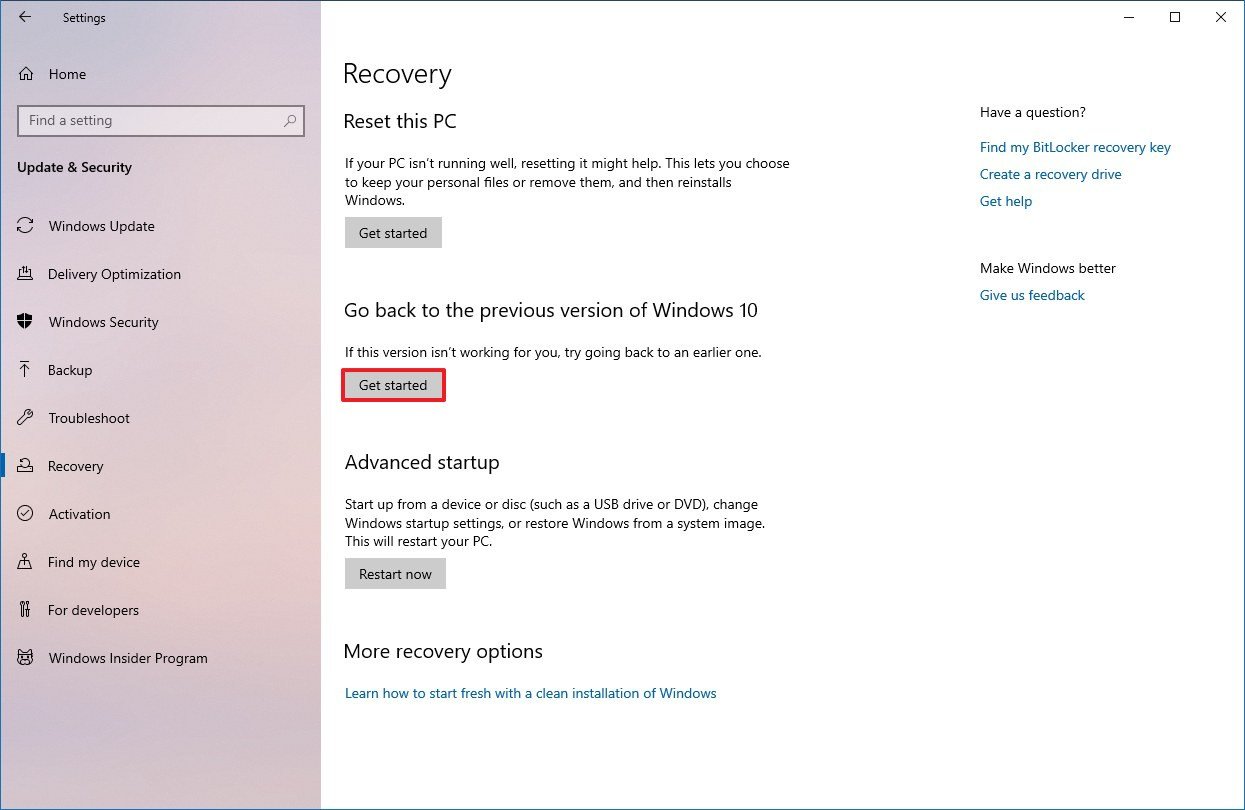
Removing November 2019 Update on PCs running October 2018 Update
If you recently upgraded a device running the October 2018 Update or earlier release, then to remove the November 2019 Update, use these steps:
- Open Settings.
- Click on Update & Security.
- Click on Recovery.
- Under the «Go back to a previous version of Windows 10» section, click the Get started button.
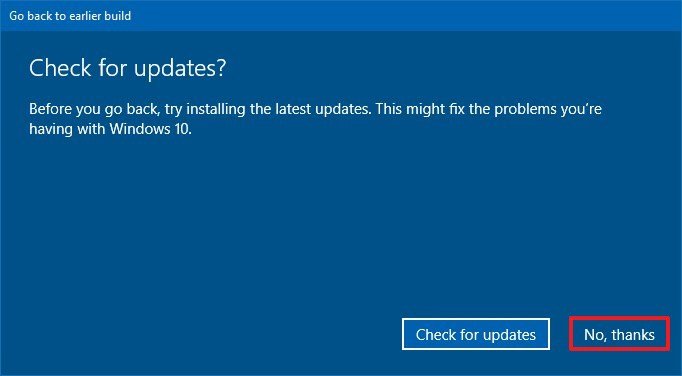
- Check any of the reasons available.
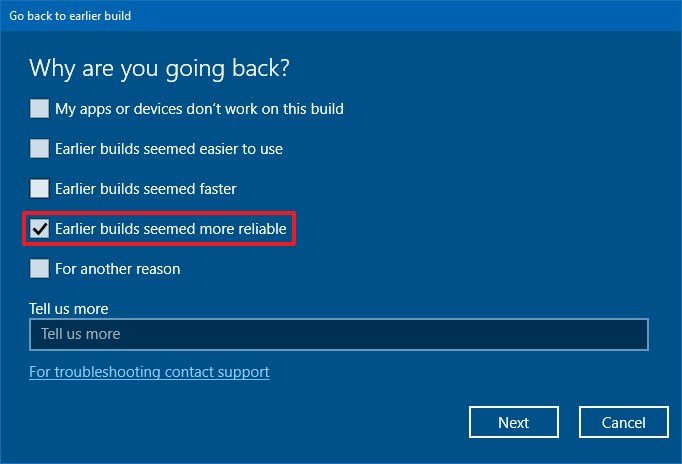
- Click the Next button.
- Click the No, thanks button.
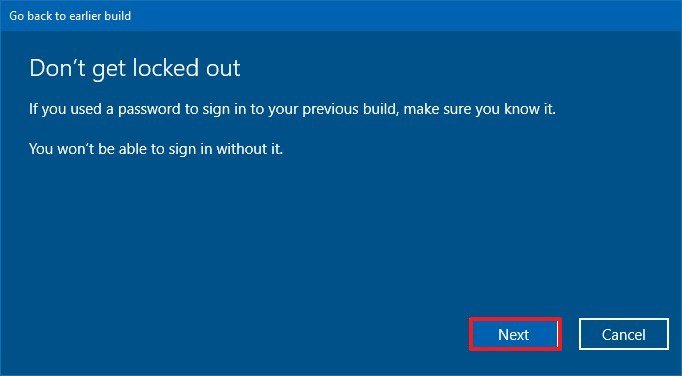
- Click the Next button.

- Click the Next button again.
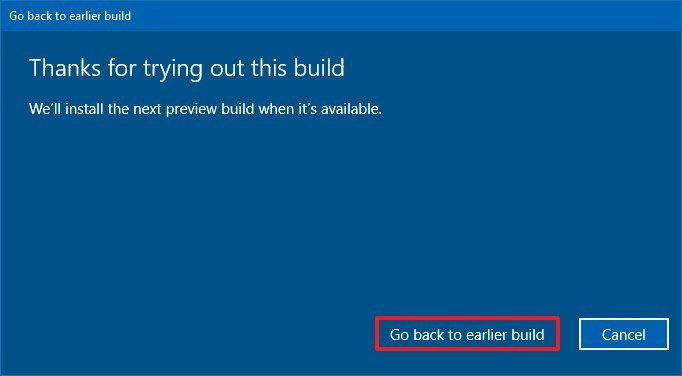
- Click the Go back to earlier build button.
After you complete the steps, it’s best not to upgrade until a new update becomes available that fixes the particular problem.
Removing November 2019 Update on PCs running May 2019 Update
If you recently upgraded a device running the May 2019 Update, then to remove the November 2019 Update, use these steps:
- Open Settings.
- Click on Update & Security.
- Click on Windows Update.
- Click the View update history option.
- Click the Uninstall updates option at the top of the page.
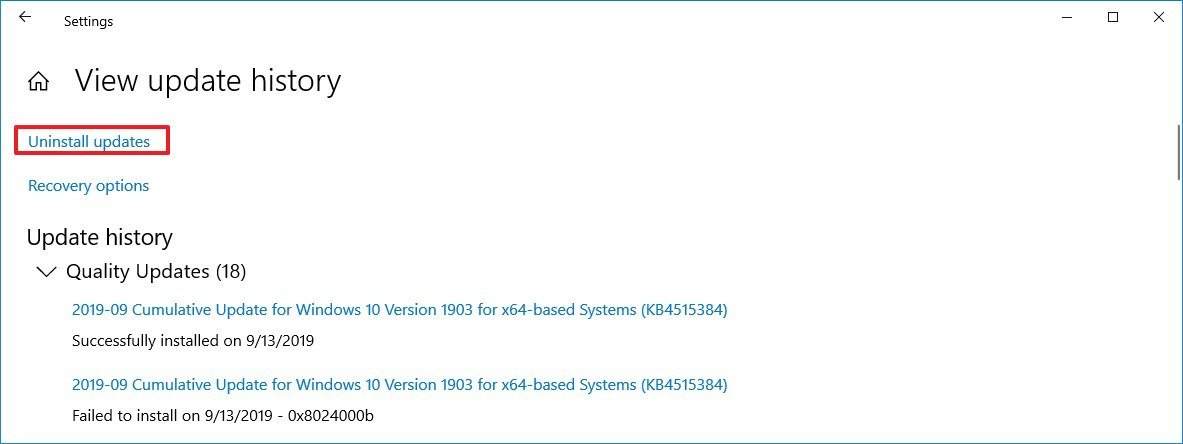
- Select the update KB4517245 from the list.
- Click the Uninstall button.
- Click the Yes button.
- Click the Restart now button.
Depending on when you’re trying to upgrade, if you’re running a version nearing the end of service, Windows Update may try to download the update again, but you can use these steps to block the feature update until you know it’s safe to upgrade.
If it’s a known issue with the new feature update, Microsoft will list the problem along with its status and workaround (if applicable) in the Windows 10 health dashboard page.
How to fix networking problems with the November 2019 Update
Sometimes, after the installation, you may end up with networking problems, including problems connecting to a wireless or wired network, inconsistent connectivity, or then network adapter may appear broken entirely.
If your device is having networking issues, consider that there could be a lot of reasons that can affect the connection, such as adapter, driver, settings, signal, cable, router, internet service provider (ISP), and of course, even a bug with the new feature update.
While troubleshooting and fixing problems with Wi-Fi or wired connection can be time-consuming, if the issues appear immediately after applying version 1909, then it’s likely that the driver or setting is problem, which you might be able to resolve using the «Network troubleshooter.»
Network troubleshooter
To fix network adapter problems after installing version 1909, use these steps:
- Open Settings.
- Click on Network & Security.
- Click on Status.
- Under the «Change your network settings» section, click the Network Troubleshoot button.
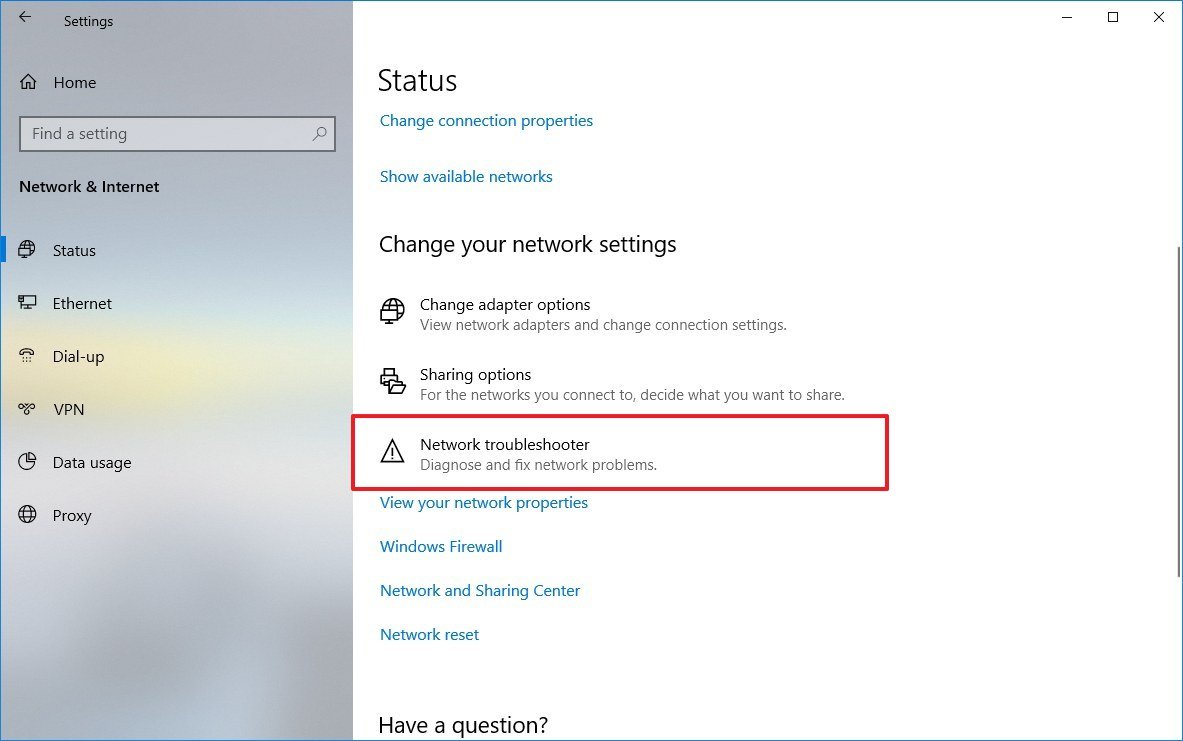
- Continue with the on-screen directions (if applicable).
Once you complete the steps, the device should reconnect to the network and internet without any more problems.
Network reset
If the device still can’t connect to the network, resetting all the networking devices to their default settings may fix the problem.
To reset a wireless as well as wired network adapters on Windows 10, use these steps:
- Open Settings.
- Click on Network & Security.
- Click on Status.
- Under the «Change your network settings» section, click the Network reset button.
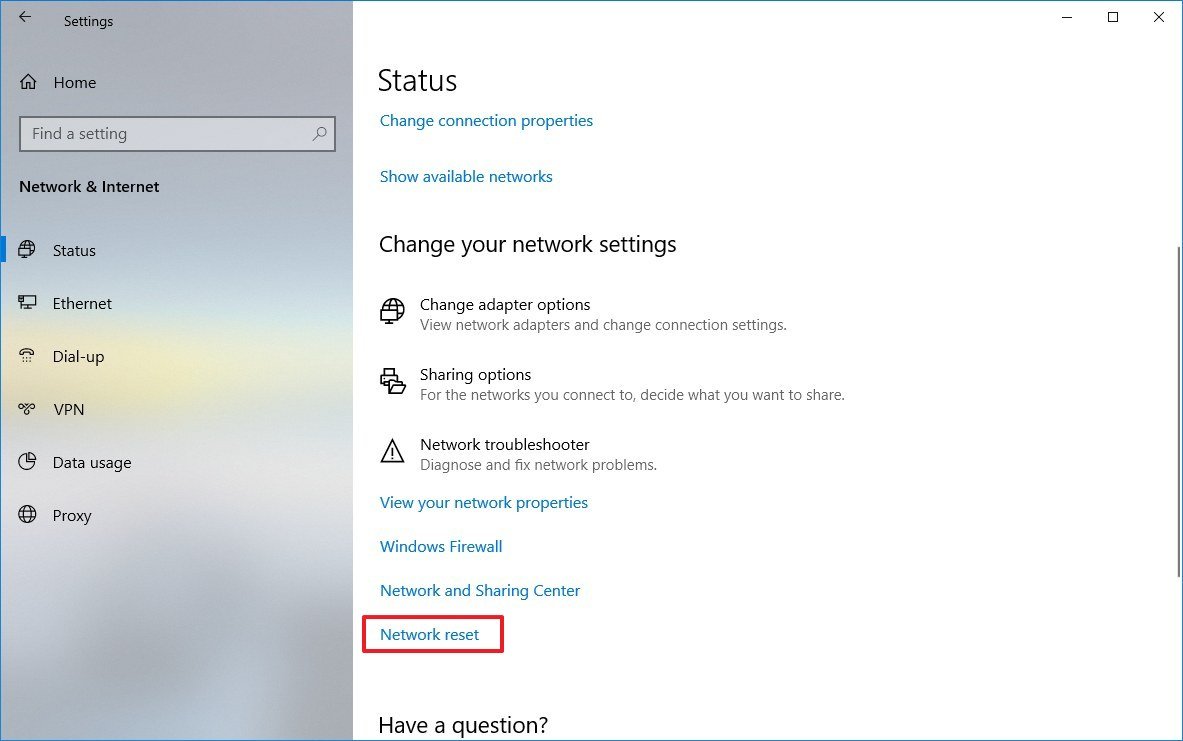
- Click the Reset now button.
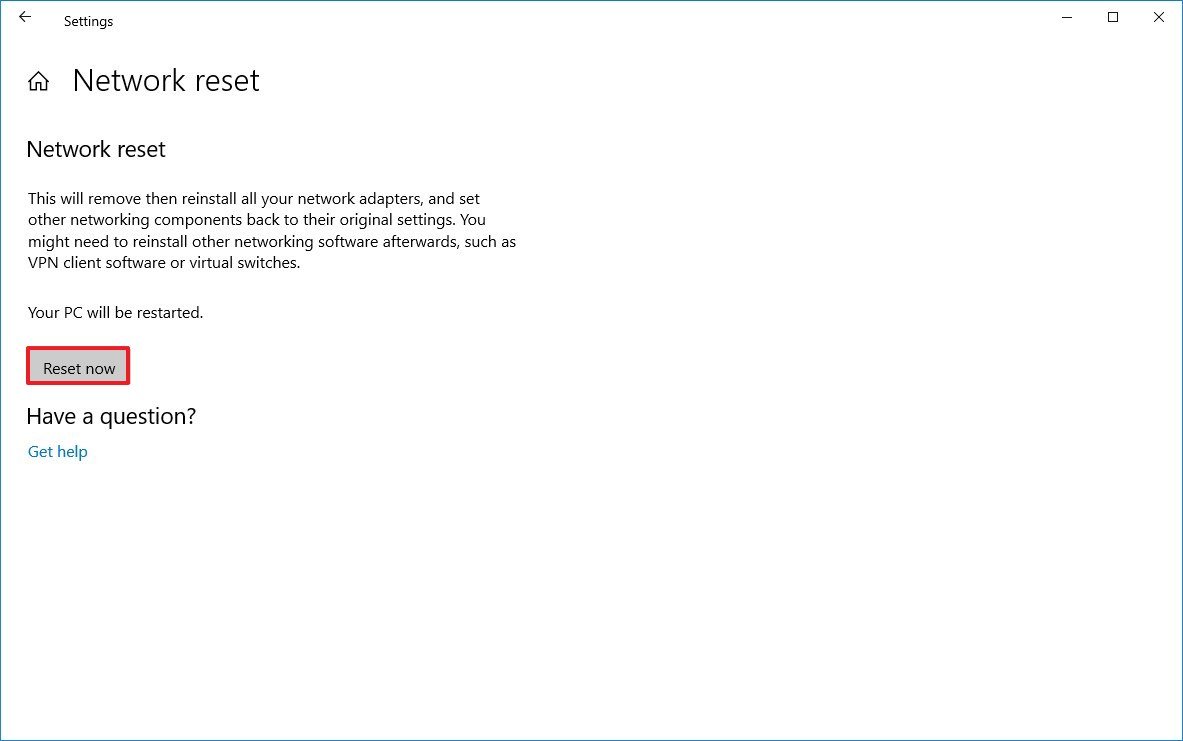
- Click the Yes button to confirm.
After you complete the steps, the tool will remove and reinstall all the adapters connected to your device, and it’ll reset the settings to their defaults.
In the case that the instructions don’t fix the problem, it could be a bug with the November 2019 Update. You can refer to this guide with more tips to overcome most networking problems on Windows 10.
How to fix activation problems with the November 2019 Update
Although once Windows 10 is activated, you’re no longer need to type the product license key after a new installation or after upgrading components, sometimes, the automatic re-activation process may not work as expected, and you’ll end up with a «Windows not activated» message along with the 0x803F7001 error in the Activation settings page.
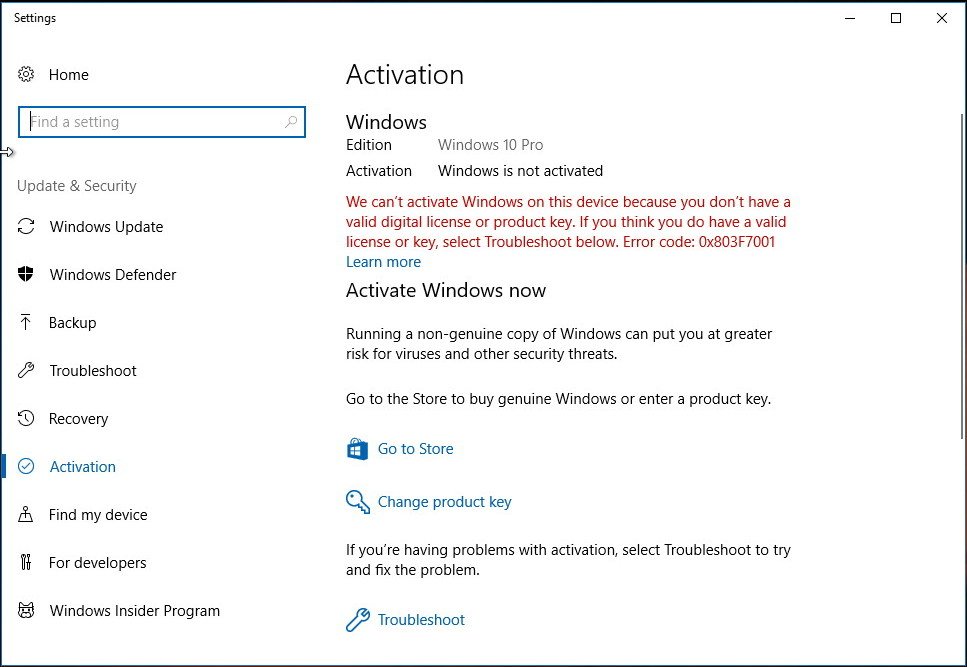
When this happens, you don’t need to do anything else, because Windows 10 will reactivate successfully at a later time. However, you can also use the Activation Troubleshooter to reactivate Windows 10 version 1909 immediately.
How to fix accidental restart error 0x80200056 installing the November 2019 Update
If you accidentally rebooted your computer during the update process, you may get the 0x80200056 error message. But don’t panic, this isn’t a critical problem. You only need to restart the upgrade process. However, this time around, make sure to keep the device running for the entire update process.
How to prepare to upgrade to Windows 10 November 2019 Update
Although Microsoft now makes feature updates optional, and it uses machine learning (ML), artificial intelligence (AI), telemetry, and feedback from users and manufacturers to control the rollout, building a version of Windows 10 for thousands of different configurations is a complex task, which can still result in unexpected issues during and after an upgrade.
However, if you prepare accordingly, you can reduce the chances of error and other issues significantly.
The tips below will help you to minimize the chances of problems during and after the installation of the Windows 10 November 2019 Update.
Create temporary backup
You should never make changes to your current installation before making a full backup. Although the installation process has a safety mechanism to rollback to the previous version, if the upgrade can’t continue for any reason, it’s not guaranteed that it’ll work every time.
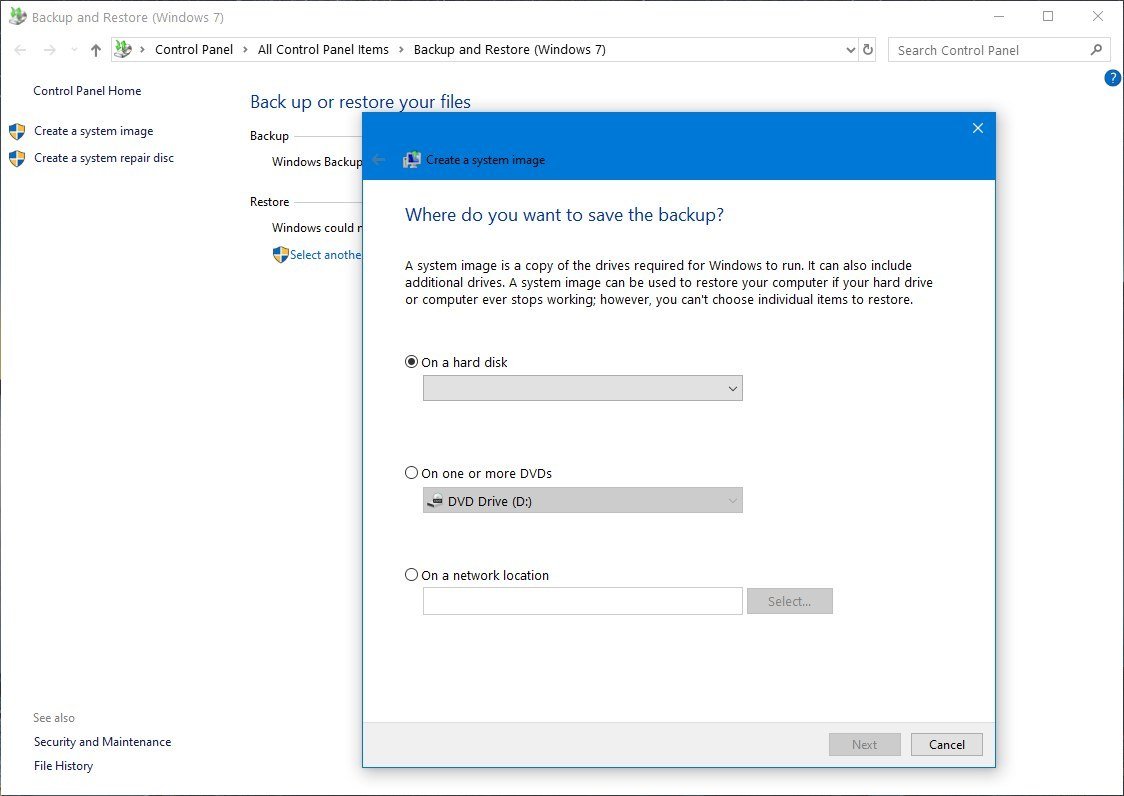
Before applying the update, you should at least create a temporary backup using the imaging tool available on Windows 10, which you can use to go back to a previous installation quickly. Also, it’s recommended to create a backup of your files to an external drive or cloud using OneDrive.
Configure System Restore point
While you’re less likely to encounter problems if you’re using the May 2019 Update, because version 1909 doesn’t require reinstallation in this scenario, there are still chances of unexpected errors.
If you’re running the May 2019 Update, before proceeding with the installation, it’s a good idea to enable and configure System Restore to create a restore point, which you can then use to undo the changes and go back to the previous good-known state.
System Restore may not be enabled by default, in which you’ll need to follow these steps:
- Open Start.
- Search for Create a restore point, and click the top result to open the System Properties app.
- Under the «Protection Settings» section, select the main «System» drive, and click the Configure button.

- Select the Turn on system protection option.
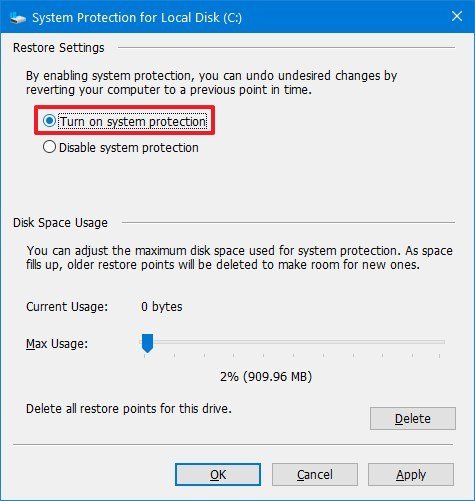
- Click the Apply button.
- Click the Create button.

- Specify a name for the restore point. For instance, Restore point before installing version 1909.
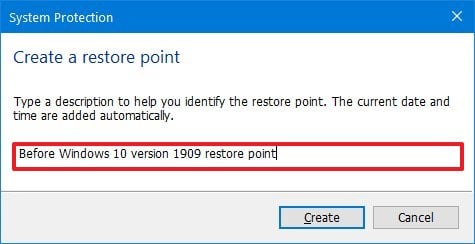
- Click the Create button.
- Click the Close button.
- Click the OK button.
Once you complete the steps, you can proceed to install the new version, then, if the update is causing problems, you can use the restore point to undo the changes.
Uninstall non-essential apps
Sometimes, an update can fail to install because of compatibility with a poorly designed or older application. To minimize the chances of a problem when installing a new feature update, make sure to uninstall those apps that may cause problems. For example, third-party antivirus and legacy desktop apps.
To uninstall apps on Windows 10, use these steps:
- Open Settings.
- Click on Apps.
- Click on Apps & features.
- Select the app you want to remove, and click the Uninstall button.
- Click the Uninstall button again.
- Continue with the on-screen direction (if applicable).
After you complete the steps, repeat the instructions to remove additional apps before proceeding with the upgrade.
Dealing with security solutions
In addition to removing outdated and poorly designed apps, it’s also a good idea to uninstall third-party antivirus and other security software temporarily. (After the update, you can install them again.)
If Windows Defender Antivirus is your default security solution, you won’t be able to uninstall it, but you can disable it before proceeding with the upgrade.
Warning: Removing or disabling a security solution temporarily has low to none security risks. However, it’s assumed that you understand that it’s never recommended to leave your device without protection. Proceed with caution. You’ve been warned.
To disable the real-protection feature of Windows Defender Antivirus, use these steps:
- Open Windows Security.
- Click on Virus & threat protection.
- Under the «Virus & threat protection settings» section, click the Manage settings option.
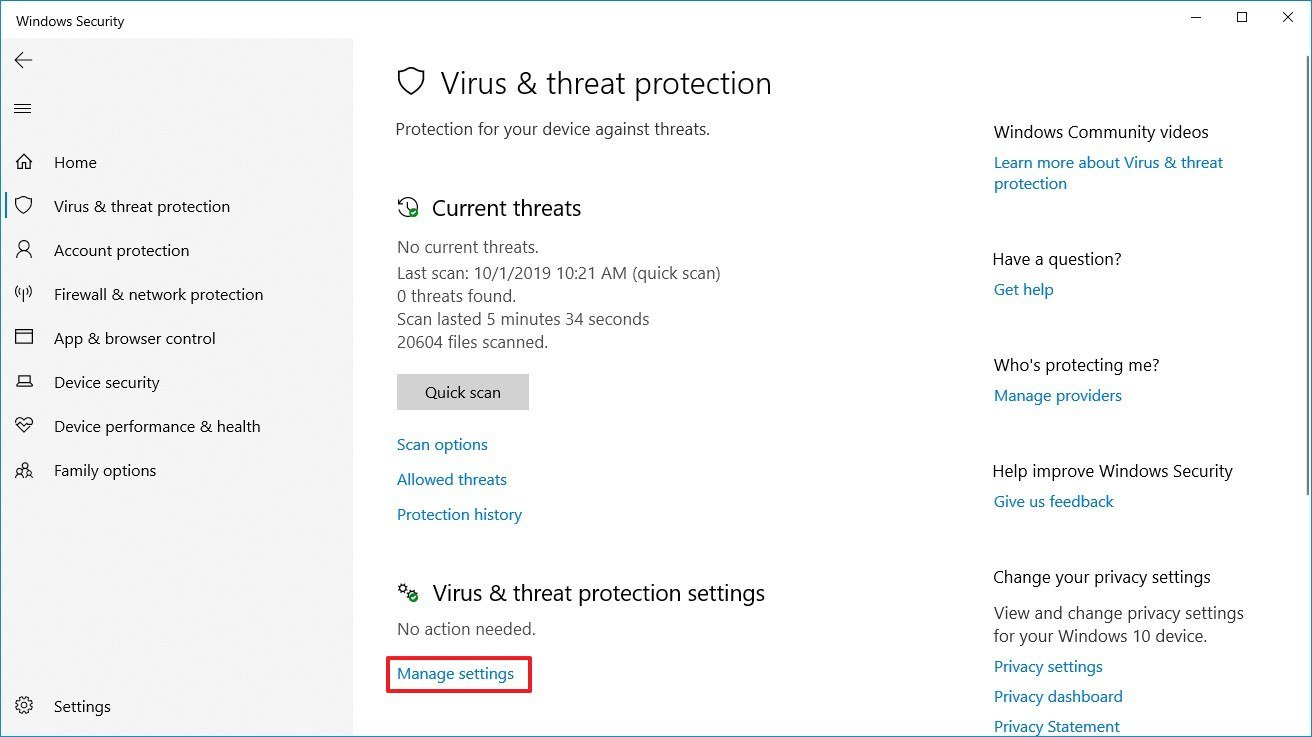
- Turn off the Real-time protection toggle switch.
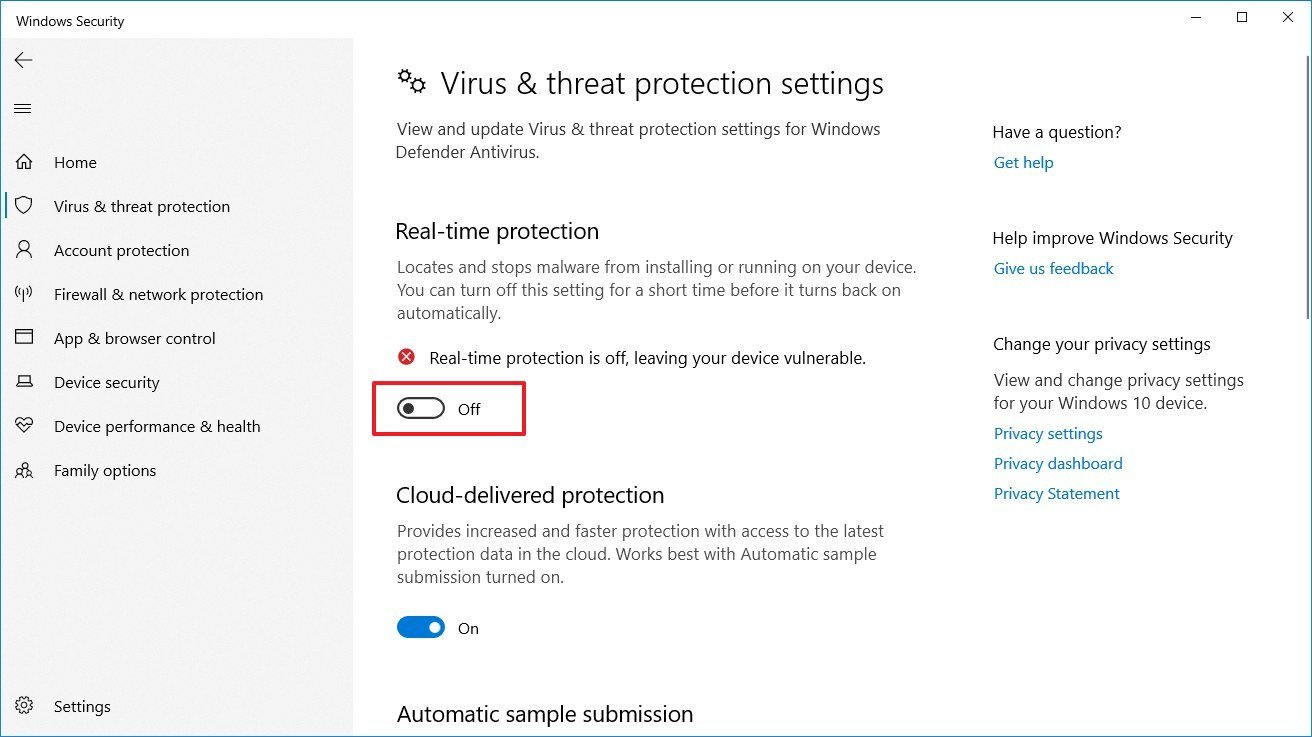
Once you complete the steps, the antivirus will not get on the way of the update, and it’ll re-enable automatically after the installation.
Disconnect non-essential peripherals
Non-essential peripherals, such as USB flash drive, SD cards, external hard drives), printers, scanners, dongles, and Bluetooth devices, sometimes are the reason an installation will fail.
Before proceeding with the November 2019 Update, disconnect all peripherals from your computer. You only need a monitor, keyboard, mouse, and internet connection. (After the update, you can reconnect them again.)
Disable firewall
Although it’s rare, the built-in or third-party firewall can also cause problems while trying to download a new version of Windows 10 through Windows Update.
If you’re using a firewall, disable it using the instructions provided by your software vendor before trying to begin the installation process.
In the case the problem is caused by the Windows Firewall, you can use these steps to disable it temporarily:
- Open Windows Security.
- Click on Firewall & network protection.
- Click the network with the «active» label.
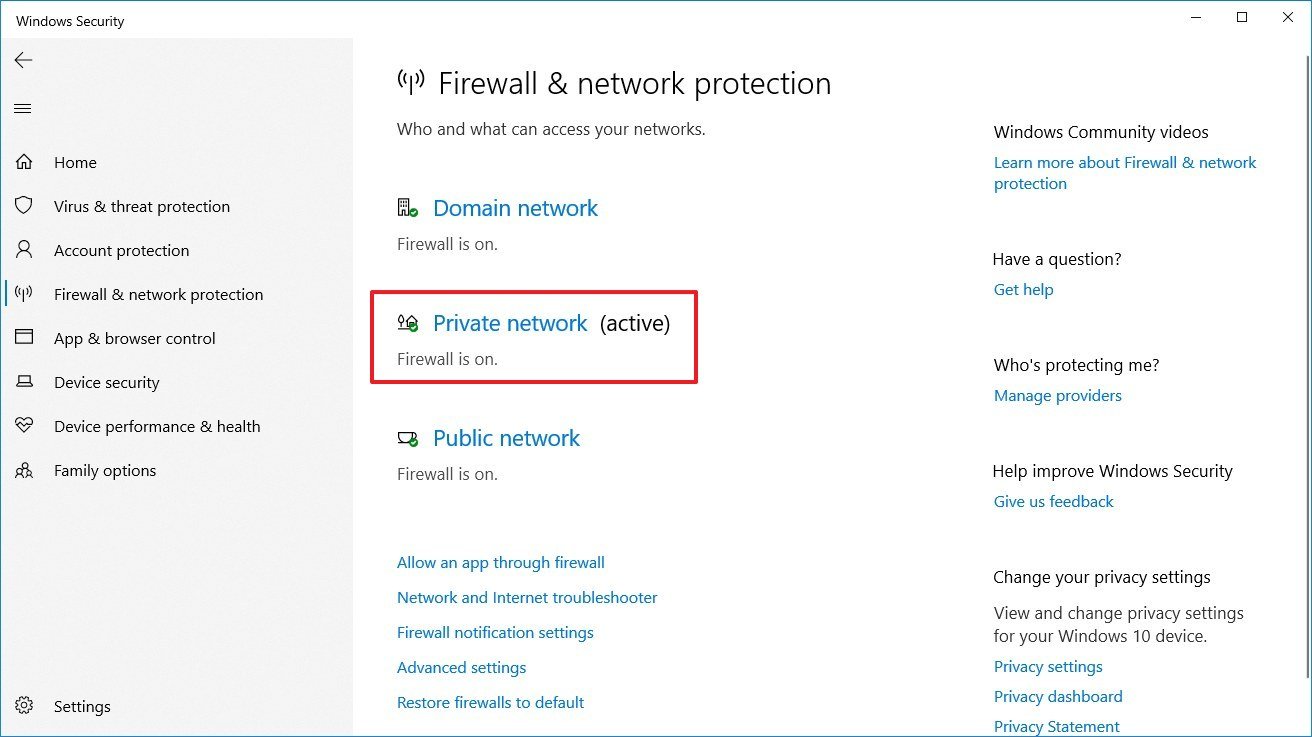
- Turn off the Windows Firewall toggle switch.
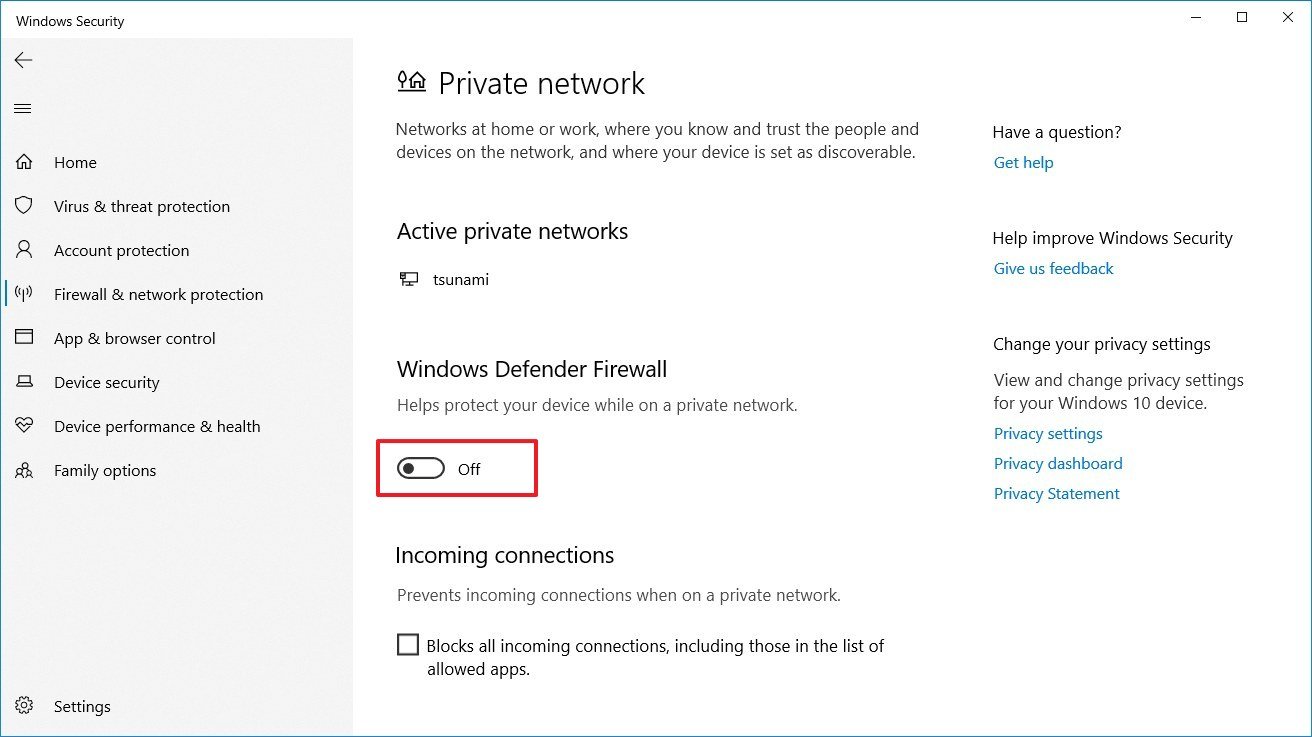
Once you complete the steps, Windows 10 version 1909 should download without issues.
Disable metered connection
The November 2019 Update won’t download on your device when the network connection is configured as metered.
If you’re using a capped internet connection, make sure that you have enough data before proceeding, and then remove the settings to prevent extra charges.
To disable a metered connection on Windows 10, use these steps:
- Open Settings.
- Click on Network & Security.
- Click on Wi-Fi or Ethernet.
- Select the active network connection.
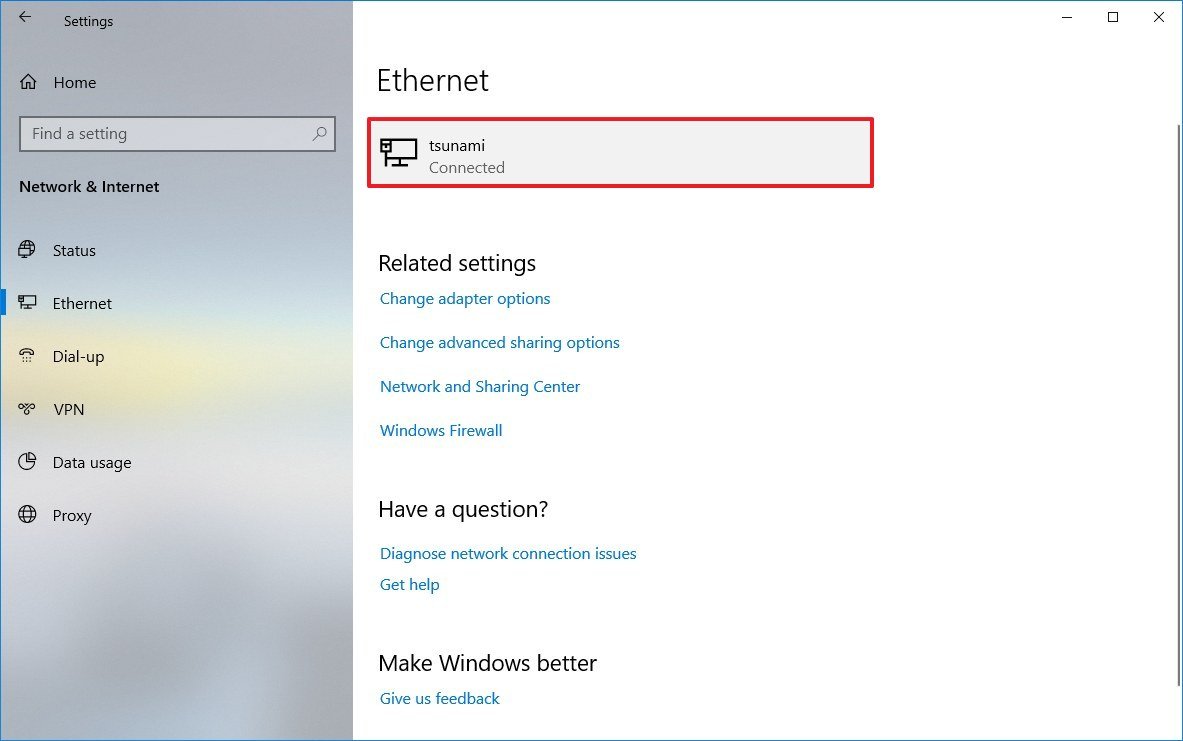
- Under the «Metered connection» section, turn off the Set as metered connection toggle switch.
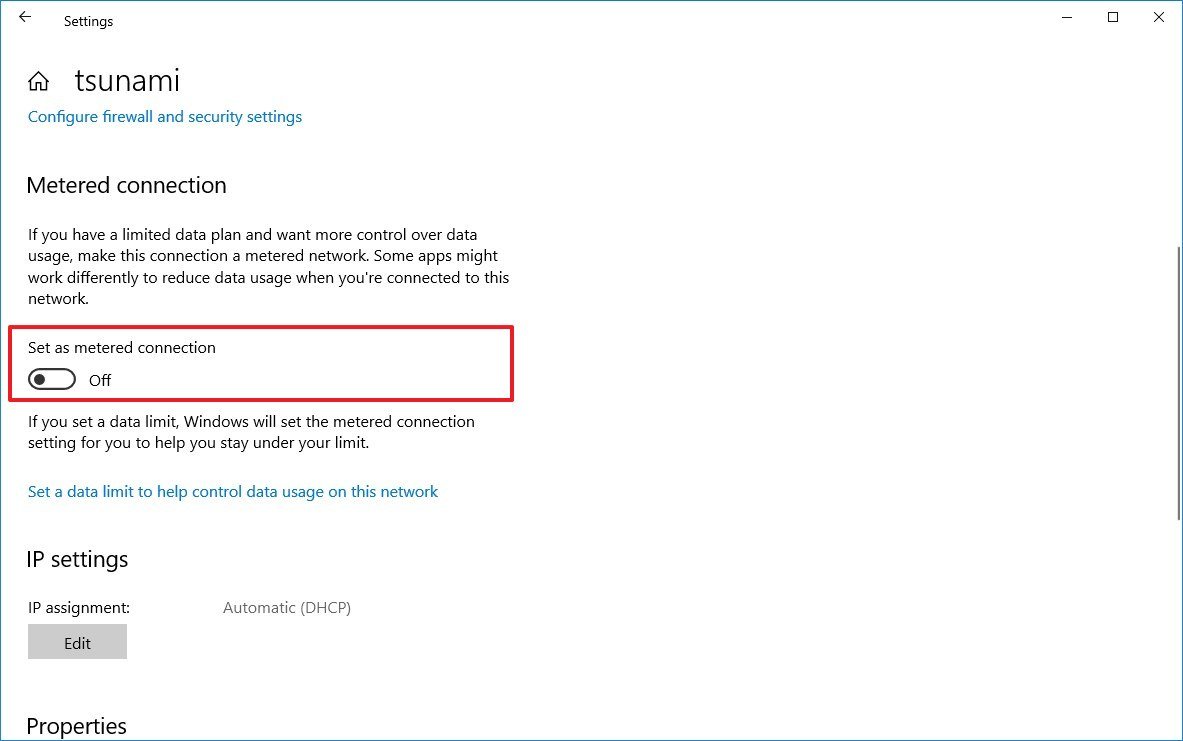
After you complete the steps, you should be able to use Windows Update to download version 1909 on your device.
Perform clean installation
When nothing seems to work, and you don’t want to wait any longer, you may have a better chance of performing a clean installation.
A clean installation will erase everything on the hard drive and install a fresh copy of Windows 10 with the latest update, which also helps to fix other issues, such as problems shutting down and performance.
To perform a proper clean installation, you need to create a bootable flash drive using the Media Creation Tool, and then use it to start your device and continue with the installation.
For additional assistance, use this guide that includes everything you need to know to perform a clean installation of Windows 10.
Wrapping things app
Although Microsoft continues with the idea of making available two feature updates every year, this time around it’s a little different. Instead of shipping big features and changes, the latest version is only a minor update to service the May 2019 Update. As a result, the update experience will be different depending on the version the device is running, which also means that if you’re already running version 1903, reinstallation won’t be required. Therefore, the risks of issues during and after the upgrade should be minimal.
However, if you’re still running the October 2018 Update, April 2018 Update, or an even older version, then the upgrade process will require full reinstallation. Therefore, increasing the chances of running into problems or stumble upon hardware and software compatibility issues.
The instructions in this guide will mostly help users coming from an older version of Windows 10 using Windows Update, Media Creation Tool, or Update Assistant. Or, if you decide to upgrade from Windows 10 version 1903 to version 1909 using the Media Creation Tool or Update Assistant, which is not recommended as using Windows Update will be a safer and quicker method.
As always, it’s never recommended to upgrade as soon as the feature update is ready, as it may still contain unknown issues and bugs that may negatively affect the experience. Instead, it’s best to wait until you receive the notification to start the installation process of the new version manually.
Did you experience any problems updating to the latest version of Windows 10? Tell us in the comments, and the steps you followed to fix the issue.
Mauro Huculak has been a Windows How-To Expert contributor for WindowsCentral.com for nearly a decade and has over 15 years of experience writing comprehensive guides. He also has an IT background and has achieved different professional certifications from Microsoft, Cisco, VMware, and CompTIA. He has been recognized as a Microsoft MVP for many years.
Still using the Windows 10 version 1909? Now, want to upgrade it but Windows 10 stuck on 1909 update?
It’s a very common issue with the Windows 10 users running this version as they keep getting notifications that the OS they are running is about to reach the end of its life. But when they tried to upgrade the computer, they failed badly.
Even after trying multiple times, users are still unable to upgrade their computers due to Windows 10 version stuck on 1909 update. If you have the same issue with your OS and are looking for a solution, then you must check out this article.
However, before moving to the fixes, I would like you to learn a bit about the reasons behind this issue. So, here you go.
Why My Windows 10 is Stuck on 1909 Update?
Talking about the causes, there could be several reasons for Windows 10 not upgrading to the latest version. Some of the most common reasons are:
- Corrupted Windows System Files
- Damaged/corrupted Windows Update components
- Not having enough disk space
- Running outdated Conexant audio driver
How to Fix Windows 10 Stuck on 1909 Version Issue?
Solution 1: Make Sure You Have Enough Disk Space
Lack of hard drive space is the biggest reason for Windows 10 stuck on 1909 update. So, make sure you have enough space on the drive where you want to download the update files (by default C drive).
It is suggested to have at least 20 GB of free space on the hard drive to install the latest Windows updates and to avoid any such Windows update errors or issues.
What if your computer doesn’t have enough space to install the latest Windows 10 update?
Well, there are various workarounds to overcome this problem.
1: Use External Flash Drive
You can download the newly released Windows 10 updates and features on the external flash drive. Next, simply connect the USB flash drive to your computer > download the updates > run the setup.exe file from the external drive location.
2: Download ISO File
The second alternative solution is using the ISO file. First, download the ISO file & extract it on an external hard drive > search for the setup.exe > click on it > launch the latest Windows feature upgrade.
Solution 2: Run Windows Update Troubleshooter
Whenever you run into Windows update-related issues, the first thing you should do is run the Windows update troubleshooter. This tool itself is enough for dealing with a wide variety of update errors and issues users commonly experience on Windows 10 PC.
To run this Windows 10 in-built tool, follow these steps:
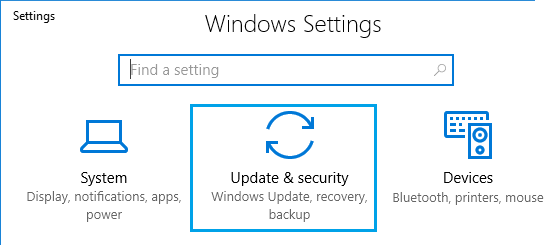
- Press Windows + I keys > click on the Update & Security option.
- Click on the Troubleshoot tab.
- Go to the Windows Update section and click on the Run the troubleshooter button.
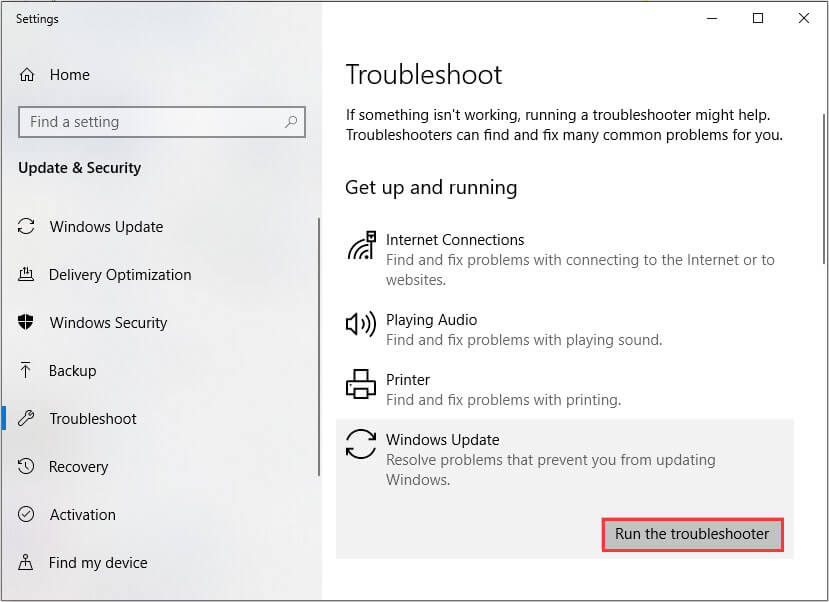
- Now, this utility will scan your computer to check if there is an issue that is causing the Windows 10 stuck on 1909 version.
- Once the process is finished, check if the tool is showing any issue. If you found the issue, then follow the on-screen instructions to fix the problem.
Running the Windows Update Troubleshooter possibly will fix the issue, but if it failed, then go with the next solutions.
Solution 3: Run SFC Scan
Windows update issues often occur due to corrupted system files. Hence, make sure you have no damaged or corrupt Windows system files present on your computer.
To check this, you can run the System File Checker (SFC) tool. It is also a Windows inbuilt tool that scans the computer to check and fix the damaged files.
- Type cmd in the Windows Search box.
- Right-click on the Command Prompt > select Run as administrator option.
- In the Command Prompt window, enter the following command and hit the Enter key to execute it:
sfc /scannow
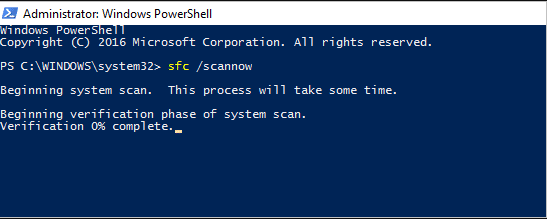
- Let the scanning process be finished.
- By the end of the process, all the corrupted files will get fixed on your Windows computer.
Solution 4: Run DISM Tool
Sometimes, running the SFC tool is not enough to fix missing and corrupted files on Windows 10 computers. In such a situation, you need an advanced tool. So, here you need to use the Deployment Image Servicing and Management (DISM) tool to replace the corrupted files with their healthy copy.
- Open Command Prompt with the admin rights.
- In the Command Prompt window, type these commands and press the Enter key:
DISM /Online /Cleanup-Image /CheckHealth
DISM /Online /Cleanup-Image /ScanHealth
DISM /Online /Cleanup-Image /RestoreHealth
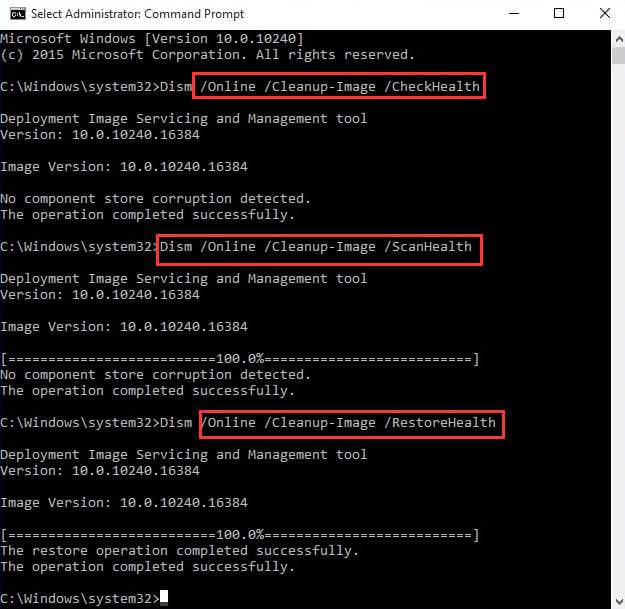
- Now, this tool will scan your PC and repair the damaged system files.
Now, try to update your Windows 10 PC and check if the issue has been resolved or not.
Solution 5: Uninstall Conexant Audio Driver
Another known reason for causing the Windows 10 update stuck on 1909 is Conexant audio driver. Well, this driver doesn’t create a Windows update issue on all the systems.
The Conexant HD or ISST audio driver doesn’t roll out the updated driver for all the systems. So, if your device can’t update the Conexant audio driver to the latest version, then you have no option but to uninstall it.
- First, press Windows + R keys to open the Run dialog box.
- Type devmgmt.msc and click on the OK button.
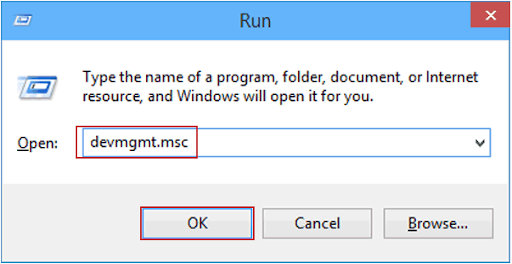
- In the Device Manager window, go to the Sound, video and game controllers.
- Right-click on the Conexant audio driver and select Uninstall.
- Now, go to this link and follow the given instructions to reinstall Windows and upgrade to the latest version.
Solution 6: Reset Windows Update Components
Windows Update components are the most crucial service that Microsoft requires to keep your PC updated and avoid any such update issues. But if these components are corrupted on your system due to any possible reason, then you must reset the update components.
- Click on the Windows Cortana Search box and type “command prompt“.
- Right-click on the Command Prompt and select Run as administrator.
- Type the following commands on the Command Prompt window, and press the Enter key after each command:
net stop wuauserv
net stop cryptSvc
net stop bits
net stop msiserver
Ren C:\Windows\SoftwareDistribution SoftwareDistribution.old
Ren C:\Windows\System32\catroot2 Catroot2.old
net start wuauserv
net start cryptSvc
net start bits
net start msiserver
- After executing these commands, exit the Command Prompt window.
Solution 7: Install latest .NET Framework
If you are running the old version of the .NET framework, then also you can be stuck on Windows 10 1909. So, here it is strongly recommended to install the latest version of the .NET framework.
But before doing this make sure to uninstall the old version of the .NET framework on your computer.
For this, you need to do the following:
- Type control panel in the Windows Search box.
- Click on the Control Panel.
- Now, click on the Uninstall a program link.
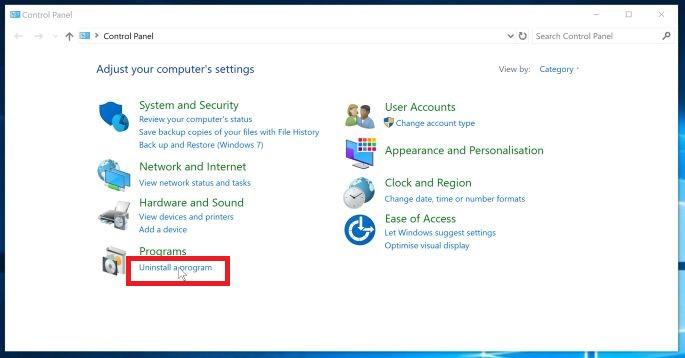
- Search for the .NET framework in the list of installed programs > right-click on it > click on the Uninstall option.
- Follow the on-screen instructions to uninstall the framework.
- Now, go to this website and download the latest version of the .NET framework.
- Next, install it on your computer.
Now, try to upgrade your Windows 10 computer and see if the Windows 10 stuck on release 1909 issue has been resolved or not. If you are still experiencing the same issue, then move towards the next solution.
Solution 8: Use Registry Editor
You can fix Windows 10 stuck on version 1909 issue by using the Registry Editor and making some changes in the registry value. To do this, follow the below-given steps:
- Go to the Windows Search box > type regedit.
- Right-click on the regedit and select Run as administrator.
- Navigate to the following location:
HKEY_LOCAL_MACHINE\SOFTWARE\Policies\Microsoft\Windows\WindowsUpdate
- Right-click on the Windows Update > select New.
- Select the Dword (32-bit) Value.
- Enter TargetReleaseVersion and set its value to 1.
- Again right-click on the Windows Update > select New and then String Value.
- Now, name the String Value as TargetReleaseVersionInfo.
- Net, set the value of this string according to the targeted Windows version. For example, if you want to upgrade your computer to the 20H2 version, then enter 20H2 as the value of TargetReleaseVersionInfo.
Recommended Solution to Fix Windows Errors and Issues
If you are experiencing any kind of error or issue with your Windows PC and you don’t want to fix it manually, then I recommend you to use the PC Repair Tool.
Using this tool you can fix almost all kinds of PC errors, such as DLL, driver, BSOD, game, update, registry errors, etc. Also, this tool repairs the corrupted system file, prevent sudden data loss, keeps your PC safe from malware or any other threats.
Adding to this, you can also improve the PC’s performance with the help of this tool. So, install this tool on your PC and get rid of all PC issues.
Get PC Repair Tool to Fix PC Errors and Issues
Conclusion
Keeping your PC updated is important for its security, performance, and many other aspects. But sometimes, we fail miserably to update Windows due to several reasons.
So, if your Windows 10 update stuck on 1909 version and you are unable to upgrade it to the latest version, then you can follow the fixes I have mentioned above in this article.
After applying these solutions, you would be able to upgrade your Windows 10 computer. Now, if everything worked out in your favor and you liked this article, then give us a like on Facebook or Twitter.
Hardeep has always been a Windows lover ever since she got her hands on her first Windows XP PC. She has always been enthusiastic about technological stuff, especially Artificial Intelligence (AI) computing. Before joining PC Error Fix, she worked as a freelancer and worked on numerous technical projects.
Наконец, Microsoft начала развертывание Windows 10 ноября 2019 Обновление для искателей. Это означает, что обновление функции Windows 10 версии 1909 доступно для тех, кто выбираетскачать устанавливать», Которая отображается в Центре обновления Windows. В отличие от предыдущих обновлений, 1909 не будет совершенно новой версией Windows, которая фокусируется на повышении производительности, корпоративных функциях и повышении качества ». Устройства, работающие с обновлением в 2019 году, получают форму обновления пакета активации (KB4517245), и загрузка и установка занимает несколько минут. Для более старых версий Windows 10 1809 или 1803 это типичное обновление, которое больше по размеру и занимает больше времени.
По сравнению с предыдущими на этот раз обновление функции Windows 10 1909 менее болезненно. Но немногие пользователи сообщают об обновлении Windows 10, версия 1909 Не удалось установить — 0x60244022. Для некоторых других: обновление функций Windows 10, версия 1909 x64, загрузка начинается с установки, останавливается на 58%, которая возобновляет загрузку снова и никогда не завершает установку. Здесь в этом посте мы обсуждаем ошибки и проблемы, мешающие устройствам устанавливать Windows 10 версии 1909.
Содержание сообщения: —
- 1 Windows 10 версия 1909 Не удалось установить
- 1.1 Запустите средство устранения неполадок Центра обновления Windows
- 1.2 Сброс окна обновления компонентов
- 1.3 Запустите утилиту DISM и SFC
- 1.4 Обновление драйвера устройства
- 1.5 Изменить DNS-адрес
Windows 10 версии 1909 Не удалось установить
Существует несколько причин, по которым ошибка установки обновления Windows 10 1909 может быть связана с драйверами и оборудованием, поврежденным кэшем обновлений Windows или повреждением системных файлов и т. Д. Здесь в этом посте мы применяем различные решения для решения различных проблем установки Windows 10 Update. Прежде чем начать:
- Проверьте и убедитесь, что у вас есть стабильное подключение к Интернету для загрузки файлов обновлений Windows с сервера Microsoft.
- Временно отключите защитное программное обеспечение (антивирус) также отключите от VPN (если настроено)
- Отключите внешние устройства, такие как внешний жесткий диск, SD-карты, принтер, сканер и т. Д.
- Попробуйте установить обновления Windows в состояние «Чистая загрузка», которое поможет в случае конфликта службы запуска, вызывающего проблему.
- И самое главное проверьте и убедитесь, что дата время и Область Настройки языка верны.
Запустите средство устранения неполадок Центра обновления Windows
В Windows 10 встроено средство устранения неполадок обновлений, которое сканирует ваш компьютер и исправляет все обнаруженные ошибки. Запустите средство устранения неполадок обновления Windows, выполнив следующие шаги, и пусть Windows автоматически решит проблему за вас.
- Нажмите сочетание клавиш Windows + I, чтобы открыть приложение «Настройки»,
- Нажмите на обновление Безопасность, затем Устранение неполадок,
- Здесь на правой стороне найдите обновление Windows и нажмите кнопку запуска устранения неполадок,

- Это начнет диагностировать проблемы, связанные с обновлением Windows,
- Кроме того, средство устранения неполадок проверяет, не повреждена ли служба Центра обновления Windows или не запущена. Или служба Windows Update повреждена или не работает.
- После завершения процесса устранения неполадок перезагрузите компьютер
- Теперь снова откройте обновление Windows и проверьте наличие обновлений. Проверьте, нет ли больше проблем с установкой обновлений Windows. Все еще нужна помощь? применить следующее решение.
Сброс окна обновления компонентов
Папка Центра обновления Windows (C: \ Windows \ SoftwareDistribution) — это место, где Windows хранит новые обновления после их загрузки. Если по какой-либо причине какой-либо файл поврежден в папке распространения программного обеспечения, вы можете столкнуться с загрузкой обновлений, и установка застрянет в любой точке, или обновление Windows не удастся установить с другим кодом ошибки. Очистка папки, в которой хранятся все файлы обновлений, заставит Центр обновления Windows загружаться заново и устранит почти все проблемы обновления окна.
- Откройте консоль служб Windows, используя services.msc,
- Прокрутите вниз и найдите службу обновления Windows,
- Щелкните правой кнопкой мыши службу обновления Windows и выберите «Остановить»
- Сделайте то же самое для сервиса BIT.

- Теперь откройте проводник Windows, используя сочетание клавиш Windows + E,
- Здесь перейдите к C: \ Windows \ распространение программного обеспечения \ downoad папки.
- Удалите все файлы и папки внутри папки загрузки (не удаляйте эту папку)
- Для этого нажмите сочетание клавиш Ctrl + A, чтобы выбрать все, затем нажмите клавишу удаления.

Обновить безопасность -> обновление окон и проверка обновлений.
Запустите утилиту DISM и SFC
Снова иногда поврежденные системные файлы приводят к зависанию обновлений Windows 10. Запустите средство проверки системных файлов, которое сканирует и исправляет поврежденные системные файлы в Windows 10.
- Откройте командную строку как администратор,
- Здесь внутри типа окна командной строки SFC / SCANNOW и нажмите клавишу ввода.
- при этом начнется сканирование на предмет отсутствия поврежденных системных файлов, если какая-либо утилита SFC автоматически восстановит их правильными из специальной папки, расположенной на % WINDIR% \ System32 \ Dllcache.

Дождитесь 100% завершения процесса сканирования, затем после перезагрузки Windows и проверьте наличие обновлений. Если в результатах сканирования SFC Utility обнаружены поврежденные файлы, но их невозможно исправить, Запустить DISM Tool Что позволяет SFC Utility выполнять свою работу.
Обновить драйвер устройства
Также убедитесь, что все установлено Драйверы устройств обновлены и совместим с текущей версией Windows. Особенно драйвер дисплея, сетевой адаптер и аудио-звуковой драйвер. Вы можете проверить и обновить их из диспетчера устройств. Запустите сторонний системный оптимизатор, например Ccleaner, чтобы удалить ненужные файлы, кеш, системные ошибки, файлы дампа памяти и т. Д. И исправить поврежденные отсутствующие ошибки реестра.
Изменить DNS-адрес
Примените это решение, если обновление Windows не удается установить с другими ошибками или ошибкой «мы не смогли подключиться к службе обновления».
- Нажмите Windows + R, введите ncpal.cpl и нажмите ОК,
- Откроется окно сетевых подключений,
- Щелкните правой кнопкой мыши на активном сетевом адаптере и выберите свойства,
- Затем дважды щелкните по интернет-протоколу версии 4 (TCP / IPv4), чтобы получить его свойства,
- Здесь измените адрес DSN первичный 8.8.8.8. и альтернативный DNS-сервер 8.8.4.4.
- Отметьте галочкой галочку на подтверждении настроек при выходе и нажмите ОК

Также вы можете использовать официальный инструмент для создания медиа-файлов Windows 10, чтобы обновить обновление ноября 2019 года без каких-либо ошибок. Если вы ищете новую установку здесь, как загрузить Windows 10 1909 ISO прямо с сервера Microsoft.
- Решено: не удается настроить разрешение экрана в Windows 10
- Как продлить 10-дневный лимит, чтобы вернуться к предыдущей версии Windows
- Как исправить ошибку, если Windows 10 зависла на экране приветствия после входа в систему
- Исправить состояние ошибки 0xc000012f Bad Image Error в Windows 10 1909
- Продолжайте получать код ошибки BCD 0xc000000f при загрузке Windows 10,
Осеннее обновление операционной системы Windows 10 November 2019 Update, версия 1909, доступно для установки. Оно принесло с собой несколько изменений по сравнению с тем, что было в версии 1903. Это восьмое крупное обновление системы Windows 10 с момента её появления летом 2015 года и второе за 2019 год.
Хотя обновление не очень большое и предлагается в виде накопительного обновления для устройств на Windows 10 1903, в процессе установки и после всё же могут возникнуть проблемы. Особенно на компьютерах под управлением более старых версий Windows 10, где требуется полная переустановка системы. В результате могут появляться ошибки и неполадки.
Чаще всего проблемы возникают не с самой Windows 10. Виноваты могут быть устаревшие драйверы, несовместимые программы, необычные аппаратные конфигурации.
В этом руководстве мы постараемся рассмотреть наиболее распространённые ошибки и варианты их исправления.
Важно: при переходе на новую версию Windows 10 могут быть два вида проблем. Можно увидеть распространённые ошибки в процессе установки или после. Это могут быть проблемы с центром обновления Windows, хранилищем, активацией и т.д. Это могут быть не связанные конкретно с версией November 2019 Update ошибки.
Другие баги относятся конкретно к версии 1909. Обычно это проблемы при установке, причиной которых могут быть устаревшие драйверы, несовместимость с определёнными приложениям, сторонним антивирусом и т.д.
В этом руководстве мы рассмотрим разные способы решения проблем обоих типов, как при установке обновления на версию 1903, так и на более раннее. При этом для обновления могут применяться центр обновления Windows, Media Creation Tool и Update Assistant.
Как решить проблемы, возникающие при использовании центра обновления Windows
Самым простым способом установки версии 1909 является использование центра обновления Windows. При его применении могут возникать ошибки и установить обновление становится невозможно.
Причины ошибок найти обычно затруднительно. Можно задействовать инструмент решения проблем, чтобы быстро исправить самые частые ошибки. Для этого сделайте следующее:
- Откройте приложение «Параметры».
- Перейдите в раздел «Обновление и безопасность».
- Перейдите в раздел устранения неполадок.
- В секции «Запустить диагностику и устранить неполадку» выберите нижнюю команду «Центр обновления Windows».
- Нажмите на кнопку «Запустить средство устранения неполадок».
- Нажмите на кнопку «Применить это решение», если оно есть.
Замечание: если вы не видите данную кнопку, это не означает, что средство устранения неполадок не работает. Мог быть автоматически запущен скрипт для устранения распространённых ошибок. Если есть другие проблемы, вы можете увидеть опцию «Применить исправление».
- Продолжайте следовать указаниям на экране.
- Перезагрузите компьютер.
После завершения этих шагов попробуйте снова скачать и установить обновление.
Если вы видите ошибку с номером 0xc1900223, это означает проблемы со скачиванием обновлений. Центр обновления позднее попробует повторить процесс скачивания.
Как исправить ошибку 0x80073712 при использовании центра обновления
Когда вы видите ошибку 0x80073712 при попытке установить ноябрьское обновление, это означает, что необходимые файлы отсутствуют или повреждены. Для исправления удалите временные файлы обновления.
- Откройте приложение «Параметры».
- Перейдите в раздел «Система».
- Нажмите на подраздел «Память устройства».
- Выберите опцию «Временные файлы». Если у вас версия 1809, нажмите «Освободить место сейчас».
- Снимите выделения по умолчанию.
- Выберите раздел «Временные файлы интернета».
- Нажмите на кнопку «Удалить файлы».
После этого попробуйте установить обновление до версии 1909.
Если вы продолжаете получать прежнюю ошибку или ошибки под номерами 0x80245006 и 0x80190001, используйте Media Creation Tool и выполните чистую установку последней версии Windows 10.
Как исправить ошибку 0x800F0922 при скачивании последней версии Windows 10 через центр обновления Windows
В центре обновления Windows бывает ошибка 0x800F0922. Она означает, что компьютер не может подключиться к серверам обновления или что в разделе System Reserved не хватает свободного места.
Отключение VPN
Если при попытке обновить до версии 1909 вы видите ошибку 0x800F0922, есть вероятность, что вы используете VPN. Для начала процесса обновления отключите его:
- Нажмите на иконку «Сеть» в системном трее.
- Выберите подключение VPN.
- Нажмите на кнопку «Отключить».
Это отключит клиент по умолчанию, который вы используете в Windows 10. Если вы используете сторонние приложения, там отключение может осуществляться по-другому.
Изменение размера раздела System Reserved
Иногда сторонние приложения, такие как антивирусы, сохраняют свои данные в разделе System Reserved. Это может мешать обновлению Windows 10.
В таком случае может потребоваться стороннее программное обеспечение для изменения размера раздела. Он должен быть не менее 500 Мб. Другой вариант — выбрать чистую установку Windows 10 1909, что решит не только эту проблему, но и может повысить производительность работы системы.
Как исправить ошибки при установке Windows 10 November 2019 Update при помощи Media Creation Tool
Media Creation Tool представляет собой удобное средство для выполнения чистой установки Windows 10. Иногда ошибки могут возникать и здесь.
Устранение зависания при скачивании обновления
Прежде чем установить последнюю версию Windows 10, Media Creation Tool скачивает установочные файлы и доступные накопительные обновления. Иногда процесс скачивания зависает и обновление не устанавливается.
Если на экране слишком долго отображается надпись «Получение обновлений», можно сделать следующее:
- Закройте Media Creation Tool.
- Перезапустите приложение.
- Когда установочные файлы скачались, отключите от компьютера сетевой кабель или отключите беспроводную сеть.
- Когда эти шаги завершены, Media Creation Tool продолжит процесс обновления.
Если Media Creation Tool не начинает установку
Если приложение зависло в процессе скачивания установочных файлов, может потребоваться активизировать процесс обновления вручную:
- Откройте проводник.
- Перейдите по следующему пути: C:\$Windows.~BT\Sources
- Дважды нажмите на файл Setupprep.exe для запуска процесса установки.
После выполнения этих действий устройство должно продолжить процесс обновления. Если проблемы сохранились, можно попытаться обновиться при помощи Update Assistant.
Исправление проблем с установкой November 2019 Update с флешки
Если не удаётся выполнить установку обновления через USB-флешку, могут отсутствовать или быть повреждены установочные файлы. Для решения этой проблемы можно задействовать Media Creation Tool для повторного создания загрузочной флешки. Для этого сделайте следующее:
- Перейдите на сайт поддержки Microsoft.
- В разделе «Использование средства для создания установочного носителя» нажмите на кнопку «Скачать инструмент сейчас».
- Сохраните установочный файл на компьютере.
- Дважды кликните на файл MediaCreationTool1909.exe для начала установки.
- Нажмите на кнопку «Принять».
- Выберите «Создать установочный носитель (USB-устройство флэш-памяти, DVD-диск или ISO-файл) для другого компьютера».
- Нажмите на кнопку «Далее».
- Выберите язык, архитектуру и редакцию, если они отличаются от предлагаемых по умолчанию.
- Нажмите на кнопку «Далее».
- Выберите опцию «USB-устройство флэш-памяти».
- Нажмите на кнопку «Далее».
- Выберите съёмный носитель из списка.
- Нажмите на кнопку «Далее».
- Нажмите на кнопку «Завершить».
После выполнения этих действий инструмент создаст установочный носитель с обновлёнными файлами. Если попытка обновить Windows 10 не удалась, попробуйте выполнить эти действия снова на другом компьютере.
Как исправить ошибки установки Windows 0x8007042B и 0x800700B7
В процессе установки обновлений Windows 10 1909 при помощи Update Assistant и Media Creation Tool могут возникнуть ошибки 0x8007042B 0x4000D и 0x800700B7 0x2000A. Они блокируют установку обновления.
Обычно эти ошибки появляются тогда, когда в фоне запущен другой процесс. Например, антивирус стороннего производителя или какая-то программа.
При попытке обновить Windows нужно найти и закрыть эти процессы или программы. Или же можно выполнить чистую установку Windows 10. Также есть вариант временно удалить данные приложения. Для удаления приложений сделайте следующее:
- Откройте приложение «Параметры».
- Перейдите в раздел «Приложения».
- Откроется подраздел «Приложения и возможности».
- Выберите приложение и нажмите на кнопку «Удалить».
- Следуйте указаниям на экране.
После выполнения этих действий обновления Windows 10 должны устанавливаться. Если вы удалили антивирус, после обновления системы установите его обратно.
Как устранить зависание скачивания файлов при использовании Update Assistant
Другим инструментом Microsoft для обновления системы является Update Assistant. Он может пригодиться, если центр обновления Windows не срабатывает. Впрочем, в нём самом также могут возникнуть неполадки.
Проблемы обычно связаны с сетью. В таком случае сделайте следующее:
• Отключите сетевой кабель или выключите беспроводное подключение. Подождите минуту и подключите их обратно. После этого перезапустите Update Assistant.
• Перезагрузите компьютер и повторно запустите Update Assistant.
Если проблемы остались, используйте для обновления Media Creation Tool.
Как исправить ошибку хранилища 0x80070070
Windows 10 требует 20 Гб дискового пространства для переустановки и 32 Гб для чистой установки. Если у вас меньше, могут появиться ошибки 0x80070070 – 0x50011, 0x80070070 – 0x50012 и 0x80070070 – 0x60000.
Чтобы исправить их, нужно освободить место на диске. Удалите ненужные файлы:
- Откройте приложение «Параметры».
- Перейдите в раздел «Система».
- Нажмите на подраздел «Память устройства».
- Выберите опцию «Временные файлы». Если у вас версия 1809, нажмите «Освободить место сейчас».
- Посмотрите, что здесь можно удалить. Не нужно удалять временные файлы установки Windows.
- Нажмите на кнопку «Удалить файлы».
После завершения этих действий вы должны продолжить установку обновления до версии 1909. Если продолжить при нехватке дискового пространства, потребуется подключить внешний жёсткий диск или флешку объёмом как минимум 16 Гб для временного хранения установочных файлов.
Как исправить ошибку 0xC1900107
Изредка можно встретить ошибку 0xC1900107. Она означает, что вы недавно обновились до новой версии, но требуется удалить файлы предыдущей установки.
В таком случае можно перезагрузить компьютер, но если ошибка сохраняется, нужно использовать опцию «Контроль памяти» для удаления предыдущих версий вручную:
- Откройте приложение «Параметры».
- Перейдите в раздел «Система».
- Нажмите на подраздел «Память устройства».
- Нажмите на команду «Настроить контроль памяти или запустить его». На старых версиях это может называться «Изменить настройки автоматической очистки памяти».
- В разделе «Освободить пространство сейчас» проверьте опцию «Удалить предыдущие версии Windows».
- Нажмите на кнопку «Очистить сейчас».
После завершения этих действий папка Windows.old со старыми файлами будет удалена и ошибка 0xC1900107 исчезнет.
Как исправить проблемы с завершением установки обновления November 2019 Update
Во время установки обновлений могут возникнуть следующие ошибки:
Ошибка: Невозможно завершить обновление. Отмена изменений. Не выключайте компьютер.
Ошибка: Сбой настройки обновления Windows. Возврат изменений. Не выключайте компьютер.
Из-за этих ошибок невозможно завершить процесс установки обновления.
В первую очередь нужно узнать, какая именно ошибка произошла, чтобы найти в интернете решение. Для определения кода ошибки сделайте следующее:
- Откройте приложение «Параметры».
- Перейдите в раздел «Обновление и безопасность».
- Откроется центр обновления Windows.
- Нажмите «Просмотр журнала обновлений».
- Посмотрите на код ошибки рядом с обновлением, которое не удалось установить.
По этому коду выполните поиск в интернете. Можно воспользоваться страницей истории обновлений Windows 10. Тут содержится информация относительно обновлений и возникающих при их установке проблемах.
Как исправить ошибку 0x80070002 0x20009
Данная ошибка означает, что Windows 10 не может найти определённые файлы. Если она происходит, отключите любые внешние носители, такие как флешки и жёсткие диски, кроме тех, которые содержат установочные файлы. После обновления можно подключить их обратно.
Как исправить ошибку драйверов 0xC1900101
Ошибки под номерами 0xC1900101 и 0x80090011 могут указывать на проблему с драйверами. Есть следующие возможные варианты ошибок:
0xC1900101 — 0x2000c
0xC1900101 — 0x20017
0xC1900101 — 0x30017
0xC1900101 — 0x30018
0xC1900101 — 0x3000D
0xC1900101 — 0x4000D
0xC1900101 — 0x40017
Для их решения потребуется выполнить следующие действия:
Оптимизация дискового пространства
Windows 10 для решения проблем с дисковым пространством теперь использует Reserved Storage, но только на самых современных версиях. Есть появится ошибка 0xC1900101, может потребоваться использовать настройки памяти, удалить ненужные приложения и игры, перенести файлы в другое место для освобождения пространства.
Отключение устройств
Чтобы уменьшить вероятность появления ошибок при обновлении, рекомендуется отсоединить все неважные устройства. Это внешние жёсткие диски и флешки, устройства Bluetooth, USB, камеры и прочие.
После завершения обновления можно подключить их обратно.
Обновление драйверов устройств
Если вы видите ошибки 0xC1900101 и 0x80090011, нужно обратить внимание на драйверы.
Для их проверки сделайте следующее:
Важно: если вы скачиваете драйверы с сайта производителя устройства, следуйте указаниям там и пропустите описанные ниже шаги.
- Откройте меню «Пуск».
- Введите в поиск «диспетчер устройств».
- Выберите нужное устройство. Проблемные помечены жёлтым значком с восклицательным знаком.
- Нажмите на устройство правой кнопкой мыши, выберите «Обновить драйвер».
- Выберите автоматический поиск драйвера или укажите путь к нему вручную.
- В последнем случае нажмите на кнопку «Обзор».
- Драйвер должен храниться в распакованном виде.
- Нажмите нам кнопку «Далее».
- Следуйте указаниям на экране.
После этого ошибки 0xC1900101 и 0x80090011 должны исчезнуть.
Исправление текущей установки
Если вы получаете сообщение об ошибке 0xC1900101, это может означать проблемы в работе установленной версии Windows 10 и невозможность выполнить обновление. В таком случае можно использовать утилиты Deployment Servicing and Management (DISM) и System File Checker (SFC) (в таком порядке) для исправления текущей установки.
Исправление жёсткого диска
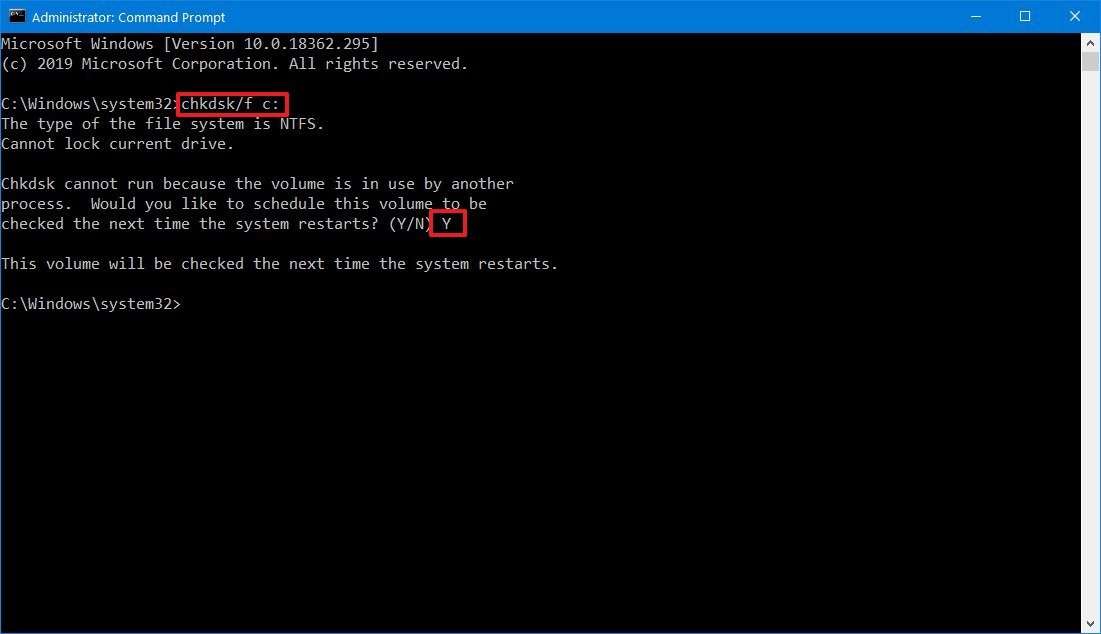
Также можно использовать инструмент командной строки CHKDSK для проверки и восстановления разделов жёсткого диска и исправления некоторых физических ошибок. Из-за них Windows 10 может испытывать проблемы с обновлением до версии 1909.
Закройте все приложения и сделайте следующее:
- Откройте меню «Пуск».
- Введите в поиск cmd и запустите от имени администратора.
- Введите команду chkdsk/f c:
- Введите Y и нажмите на ввод для задания сканирования жёсткого диска.
- Перезагрузите компьютер.
При загрузке системы начнётся сканирование и исправление ошибок.
Чистая установка
Когда ничего не помогает исправить ошибки, можно задействовать Media Creation Tool для чистой установки Windows 10 1909.
Как исправить ошибки 0xC1900200, 0xC1900202, 0x80300024 при установке обновления
Эти ошибки означают, что ваш компьютер не отвечает минимальным системным требованиям. В зависимости от метода обновления эти требования могут слегка отличаться. Минимальные требования при установке Windows 10 следующие:
• Процессор: 1 ГГц или быстрее
• Оперативная память: 1 Гб для 32-разрядных систем, 2 Гб для 64-разрядных систем
• Жёсткий диск: 16 Гб для 32-разрядных систем, 20 Гб для 64-разрядных систем, 32 Гб для чистой установки
• Графика: DirectX 9 или новее с драйвером WDDM 1.0
• Экран: 800 х 600 пикселей
Обычно ошибки 0xC1900200 – 0x20008 и 0xC1900202 – 0x20008 можно встретить на старых и дешёвых устройствах и чаще всего там не хватает памяти.
Как исправить ошибку несовместимости драйверов 0x800F0923
Ошибка 0x800F0923 показывает несовместимость установленных в системе драйверов или приложений. Чаще всего это драйвер видеокарты. Также это может быть старая программа, антивирус, драйвер другого устройства.
Update Assistant и Media Creation Tool могут описать проблему более подробно.
Если виноват драйвер, нужно скачать более современную версию с сайта производителя. Можно попробовать установить последнюю бета-версию драйвера.
Если же у вас установлены последние версии драйверов, можно удалить их и продолжить процесс обновления. После этого можно вернуть драйверы.
Исправление несовместимости драйверов
Чтобы удалить драйвер устройства:
- Откройте меню «Пуск».
- Введите в поиск «диспетчер устройств».
- Найдите в списке проблемное устройство.
- Нажмите на него правой кнопкой мыши и выберите «Удалить устройство».
- Снова нажмите «Удалить».
После этого попробуйте поставить обновление.
К числу других похожих ошибок относится 0x80070490 — 0x20007. Ошибка 0x80070003 — 0x20007 означает, что сбой обновления произошёл на этапе установки драйвера.
Если вы получаете одну из этих ошибок, после отката до предыдущей версии можно использовать описанные выше инструкции для удаления вызывающего проблемы драйвера.
Исправление проблем с совместимостью приложений
Если в системе установлены несовместимые приложения, обновите его до новой версии или удалите до начала обновления Windows 10.
Для удаления приложения:
- Откройте приложение «Параметры».
- Перейдите в раздел «Приложения».
- Откроется раздел «Приложения и возможности».
- Выберите нужное приложение и нажмите на кнопку «Удалить».
- Снова нажмите «Удалить».
- Выполняйте указания на экране.
После этого попробуйте поставить Windows 10 1909. Затем можно вернуть приложение.
Как исправить ошибку несовместимости приложения 0xC1900208
Если вы получили ошибку 0xC1900208 – 0x4000C, снова виновато несовместимое приложение. Удалите его, как описано выше. Если вы не знаете, какое именно приложение виновато, в первую очередь обращайте внимание на сторонние антивирусы и старые версии приложений.
Как исправить проблемы с чёрным экраном
При обновлении до Windows 10 1909 может быть проблема с чёрным экраном. Это указывает на драйвер видеокарты, аппаратные ошибки или некорректную установку прошлого обновления.
Попробуйте воспользоваться инструментом устранения неполадок. Если проблема сохранилась, обновление 1909 может быть несовместимым с вашей аппаратной или программной конфигурациями. В таком случае не рекомендуется устанавливать его.
Удаление November 2019 Update на компьютере с Windows 10 October 2018 Update
Если вы недавно обновили устройства под управлением версии Windows 10 October 2018 Update или более ранней, для удаления November 2019 Update сделайте следующее:
- Откройте приложение «Параметры».
- Перейдите в раздел «Обновление и безопасность».
- Перейдите в подраздел «Восстановление».
- В разделе «Вернуться к предыдущей версии Windows 10» нажмите на кнопку «Начать».
- Укажите причины.
- Нажмите на кнопку «Далее».
- Нажмите на кнопку «Нет, спасибо».
- Нажмите на кнопку «Далее».
- Нажмите на кнопку «Далее».
- Нажмите на кнопку «Вернуться к предыдущей версии».
После этого лучше не обновлять компьютер до данной версии, пока не будут решены проблемы на вашем устройстве.
Удаление November 2019 Update на компьютерах на Windows 10 May 2019 Update
Если вы поставили версию 1909 на компьютер под управлением Windows 10 May 2019 Update, для её удаления выполните следующие шаги:
- Откройте приложение «Параметры».
- Перейдите в раздел «Обновление и безопасность».
- Откроется подраздел «Центр обновления Windows».
- Нажмите на «Просмотр журнала обновлений».
- Нажмите на «Удалить обновления».
- Выберите KB4517245 наверху списка.
- Нажмите на кнопку «Удалить».
- Нажмите на кнопку «Да».
- Нажмите на кнопку «Перезагрузить сейчас».
Если вы работаете на близкой к прекращению поддержки версии Windows 10, центр обновления Windows может попытаться установить обновление снова. Можно заблокировать эти попытки, если вы не хотите обновляться.
Известные проблемы обновлений можно посмотреть на панели состояния Windows 10 на этой странице.
Как решить проблемы с сетью в November 2019 Update
Иногда после завершения установки могут возникнуть проблемы с подключением к интернету, будь-то беспроводная или проводная связь. Соединение может быть нестабильным или полностью отсутствовать. Причин этого может быть множество. Например, проблема в работе адаптера, драйвера, настроек, сигнала, кабеля, маршрутизатора, провайдера или программная ошибка в операционной системе.
Поиск и исправление проблем Wi-Fi или проводного подключения может занимать много времени. Если ошибки появились сразу после установки версии 1909, скорее всего виноваты драйверы или настройки. Такие проблемы можно решить при помощи средства устранения сетевых неполадок.
Средства устранения сетевых неполадок
- Откройте приложение «Параметры».
- Перейдите в раздел «Сеть и интернет».
- Откроется подраздел «Состояние».
- В разделе «Изменение сетевых параметров» нажмите на кнопку «Средство устранения сетевых неполадок».
- Выполняйте инструкции на экране.
Сброс сети
Если устройство всё равно не может получить доступ в сеть, может потребоваться сбросить все настройки до вариантов по умолчанию.
- Откройте приложение «Параметры».
- Перейдите в раздел «Сеть и интернет».
- Откроется подраздел «Состояние».
- В разделе «Изменение сетевых параметров» нажмите на ссылку «Сброс сети».
- Нажмите на кнопку «Сбросить сейчас».
- Нажмите на кнопку «Да».
После этого будут удалены и переустановлены все сетевые адаптеры, которые подключены к устройству. У них будут выставлены настройки по умолчанию.
Если это не помогло, в November 2019 Update может быть программная ошибка.
Как решить проблемы с активацией November 2019 Update
Когда Windows 10 активирована, не нужно вводить лицензионный ключ после установки или обновления компонентов. Впрочем, иногда процесс повторной активации может не сработать как положено. В результате появляется сообщение «Windows не активирована» и ошибка 0x803F7001 на странице активации.
Когда такое происходит, нужно просто подождать. Также можно использовать инструмент решения проблем с активацией, чтобы исправить ошибку немедленно.
Как исправить ошибку 0x80200056 при случайной перезагрузке
Если вы нечаянно перезагрузили компьютер во время обновления, может появиться ошибка 0x80200056. Это не страшно, требуется лишь перезапустить процесс обновления.
Как подготовиться к обновлению до Windows 10 November 2019 Update
Хотя эти обновления необязательные и Microsoft применяет машинное обучение, искусственный интеллект, телеметрию и отзывы пользователей и производителей для контроля распространения обновлений, разработка системы для сотен тысяч сочетаний компонентов является сложной задачей. В результате могут возникнуть неожиданные проблемы в процессе обновления и после.
Если подготовиться заранее, можно уменьшить вероятность столкнуться с ошибками. Что для этого нужно сделать:
Создайте резервную копию
Никогда не следует вносить изменения в текущую установку системы, не сделав резервную копию. Хотя в процессе установки есть механизм безопасности для отката к предыдущей версии, он не всегда срабатывает.
Прежде чем ставить обновление, нужно создать временную резервную копию при помощи инструмента в составе Windows 10. Это позволит быстро откатиться на предыдущую версию. Также желательно сохранять важные файлы на внешних жёстких дисках или в облачных хранилищах.
Настройка точки восстановления
Хотя при использовании May 2019 Update вероятность столкнуться с ошибками при обновлении невелика, поскольку версия 1909 не требует полной переустановки, проблемы всё же случаются.
При работе на May 2019 Update, прежде чем продолжать обновление, желательно создать точку восстановления системы. Это позволит в случае проблем восстановить состояние системы до работоспособного.
Создание точек восстановления по умолчанию может быть выключено.
- Откройте меню «Пуск».
- В поиске наберите «восстановление». Нажмите «Настройка восстановления системы».
- На вкладки «Защита системы» выберите системный раздел, обычно это диск C. Нажмите на кнопку «Настроить».
- Выберите «Включить защиту системы».
- Нажмите OK.
- Нажмите «Создать».
- Задайте имя точки восстановления.
- Нажмите на кнопку «Создать».
- Нажмите на кнопку «Закрыть».
- Нажмите на кнопку OK.
После этого, если в процессе обновления возникнут ошибки, можно воспользоваться этой точкой восстановления для отката к предыдущему состоянию.
Удаление необязательных приложений
Иногда обновления не устанавливаются из-за несовместимости с приложениями, обычно устаревшими. Чтобы уменьшить вероятность такого развития событий, удалите ненужные приложения. Например, сторонний антивирус и или устаревшие программы рабочего стола.
- Откройте приложение «Параметры».
- Перейдите в раздел «Приложения».
- Откроется подраздел «Приложения и возможности».
- Выберите нужные приложения и нажмите на кнопку «Удалить».
- Снова нажмите кнопку «Удалить».
- Продолжайте выполнять указания на экране.
После этого попробуйте обновить Windows 10.
Работа с приложениями безопасности
Кроме удаления устаревших приложений хорошей идеей будет удалить сторонние антивирусы и прочие приложения защиты. После обновления их можно поставить обратно.
Если вы пользуетесь только антивирусом Защитник Windows, его удалить нельзя, но можно отключить.
Предупреждение: временное отключение или удаление антивирусов не несёт с собой риска. Однако, на протяжении долгого времени работать в интернете без защиты не рекомендуется.
Для отключения защиты в реальном времени у антивируса Защитник Windows сделайте следующее:
- Перейдите в приложение Параметры > Обновления и безопасность > Безопасность Windows.
- Нажмите «Защита от вирусов и угроз».
- Отключите защиту в реальном времени.
После установки обновления защита включается обратно автоматически.
Отключение необязательных периферийных устройств
Необязательные периферийные устройства, такие как флешки, внешние жёсткие диски, карты памяти SD, принтеры, сканеры, Bluetooth-устройства, могут стать причиной ошибок при попытке обновится. Перед обновлением желательно отключить их. Нужно оставить только монитор, клавиатуру, мышь и подключение к интернету. После установки обновления всё можно подключить обратно.
Отключение брандмауэра
Хотя редко, бывает так, что встроенные или сторонние брандмауэры тоже вызывают проблемы с обновлением Windows 10 через центр обновления Windows. Отключите его.
Если вы используете встроенный в Windows брандмауэр, сделайте следующее:
- Перейдите в приложение Параметры > Обновления и безопасность > Безопасность Windows.
- Нажмите «Брандмауэр и защита сети».
- Нажмите на сеть с надписью «Активный».
- Отключите брандмауэр защитника Windows.
Отключение лимитного соединения
Невозможно скачать обновление Windows 10, если ваше соединение обозначено как лимитное. Такие соединения устанавливаются, если у вас не безлимитный тариф интернета. Для отключения лимитного соединения Windows 10 сделайте следующее:
- Откройте приложение «Параметры».
- Перейдите в раздел «Сеть и интернет».
- Выберите раздел Ethernet или Wi-Fi, в зависимости от вашего способа доступа в сеть.
- Выберите активную сеть.
- В разделе «Лимитное подключение» отключите «Задать как лимитное подключение».
После этого можно будет скачивать обновление Windows 10.
Чистая установка
Когда ничего не помогает и вы больше не хотите пробовать, можно выполнить чистую установку Windows 10. Это стирает все файлы на данном разделе жёсткого диска и устанавливает свежую копия Windows 10 со всеми последними обновлениями. Это может решить множество проблем и повысить производительность.
Для чистой установки Windows 10 нужно создать загрузочный носитель при помощи Media Creation Tool и запустить с него систему.
Заключение
Microsoft продолжает выпускать крупные обновление Windows 10 раз в полгода, но на этот раз ситуация немного изменилась. Вместо большого обновления с множеством изменений версия 1909 мало что меняет по сравнению с May 2019 Update. В результате процесс обновления стал проще и быстрее, хотя многое зависит от производительности вашего компьютера. Полная переустановка при обновлении с версии 1903 не потребуется. Это означает, что риск столкнуться с ошибками уменьшается.
Если вы работаете с более старыми версиями вроде October 2018 Update или April 2018 Update, будет выполняться полная переустановка системы. Здесь вероятность встретиться с ошибками увеличивается из-за возможных аппаратных и программных несовместимостей.
Данное руководство помогает пользователям старых версий Windows 10 при работе с центром обновления Windows, Media Creation Tool, Update Assistant. При обновлении с версии 1903 до 1909 рекомендуется пользоваться центром обновления Windows, что будет быстрее и безопаснее.
Не рекомендуется обновляться сразу после появления последней версии, поскольку в ней могут быть неизвестные проблемы и баги. Нужно подождать отзывов других пользователей и получения уведомления о доступности обновления в центре обновления Windows.