
In today’s world of technology, the internet plays a crucial role in our daily lives. From communication to entertainment, we rely on the web for various purposes.
However, with the increasing use of the internet, the need for a secure and stable connection has become imperative. And that’s where WPS Connect comes in!
WPS Connect is a popular WiFi hacking app that allows you to connect to a network secured with WPS protocol. It’s not just a tool for hacking into other people’s networks, though.
It’s also a useful app for testing the security of your own network and making sure that your Wi-Fi connection is secure.
See Also: How to Download WiFi Master Key for PC (Windows & Mac)
In this blog, we will discuss WPS Connect in detail, its features, and how to download it for PC using an emulator.
Features of WPS Connect
✓ Easy to Use: WPS Connect is user-friendly and has a simple interface that makes it easy for users to connect to a network. The app scans for nearby WiFi networks and displays their names, encryption type, and the signal strength.
✓ WiFi Security Testing: WPS Connect allows you to test the security of your own WiFi network. By connecting to your network and attempting to crack the password, you can determine if your network is secure or not.
✓ Brute Force Attack: WPS Connect uses a brute force attack method to crack the password of a network. This means that it will try every possible combination of characters until the correct password is found.
✓ Supports Multiple Languages: WPS Connect supports multiple languages, making it accessible to users around the world.
✓ Free to Use: WPS Connect is a free app that can be downloaded from the Google Play Store.
How to Download WPS Connect for PC
While WPS Connect is primarily designed for mobile devices, you can also download it for PC using an emulator. An emulator is a software that allows you to run Android apps on your PC.
Here’s how to download WPS Connect for PC using the Amiduos emulator:

- Download and Install Amiduos emulator: The first step is to download and install the Amiduos emulator on your PC follow this guide.
- Set Up the Emulator: Once you have installed the emulator, launch it and set up your virtual device. You will need to sign in with a Google account to access the Google Play Store.
- Download WPS Connect: Open the Google Play Store and search for WPS Connect. Click on the app and then click on the “Install” button.
- Launch the App: Once the app is installed, you can launch it from the home screen of your virtual device.
That’s it! You can now use WPS Connect on your PC just like you would on your mobile device.
Conclusion
WPS Connect for PC is a powerful app that provides users with an easy and secure way to connect to WiFi networks. With its user-friendly interface and features like WiFi security testing and brute force attack, WPS Connect is a must-have app for anyone who wants to ensure their WiFi connection is secure. And by downloading it for PC using an emulator, you can enjoy the benefits of this app on a larger screen.
Looking for other ways to manage your Wi-Fi network? Check out TP-Link Tether for PC.
Did you know that if you have a Windows 10 laptop, tablet, or 2-in-1 device, you can use the WPS button on your router to connect to its Wi-Fi network quickly? And you don’t have to type in your wireless network password? Here’s a complete guide for how to connect to Wi-Fi through WPS on any laptop with Windows 10, as well as on any desktop computer with a wireless network card:
NOTE: If you need a refresher on what WPS (Wi-Fi Protected Setup) is, I recommend reading: What is WPS? Where is the WPS button on a router?. For this procedure to work, you need WPS enabled on the wireless router or access point that broadcasts the Wi-Fi signal in your area. Both the device emitting the wireless signal and the one receiving it must support WPS. Oh, and before we begin, please don’t confuse the Wi-Fi WPS feature with WPS Office. The latter is a suite of applications for creating and editing things like documents, presentations, and spreadsheets, and it has nothing to do with WPS (Wi-Fi Protected Setup).
Step 1: Select the Wi-Fi network to connect via WPS in Windows 10
First of all, to connect via WPS on your Windows 10 laptop or computer, open the list of available wireless networks. One easy way is to click or tap the internet icon from the system tray.
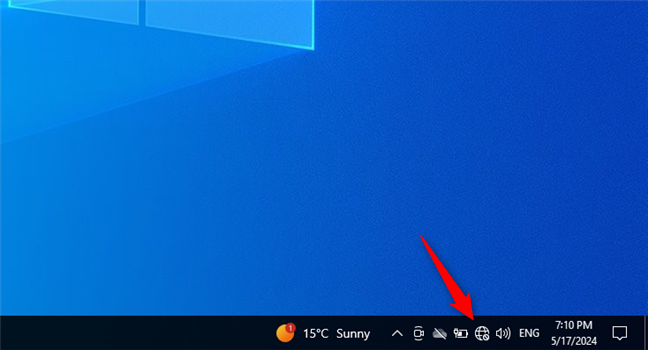
The Network icon from the notification area in Windows 10
The list that pops up shows all the Wi-Fi networks available near you. Find the wireless network you want to connect with through WPS and click or tap on its name.
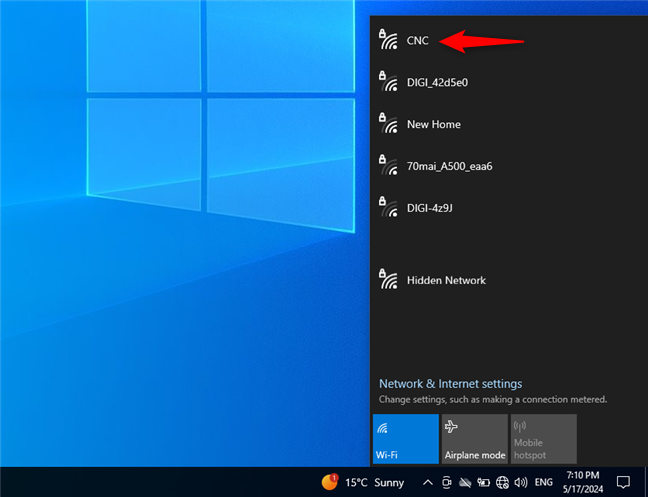
Click or tap the Wi-Fi network to connect to
Then, select whether you intend to Connect automatically to the selected network each time you are in its coverage area, and click or tap the Connect button.
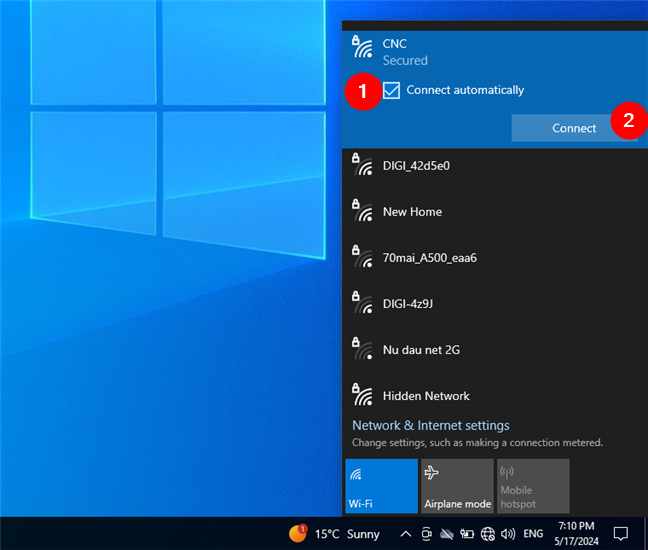
Choose whether to Connect automatically, then press Connect
Windows 10 asks you to enter the password for the Wi-Fi to which you want to connect. Don’t do it just yet! If WPS is enabled on the router that broadcasts the Wi-Fi network, right under the password field, Windows 10 tells you that:
You can also connect by pushing the button on the router.
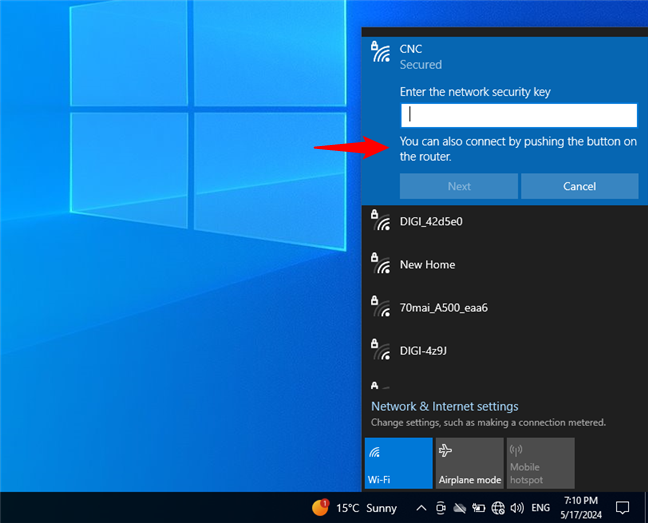
You can also connect by pushing the button on the router
TIP: You can also use WPS on laptops and PCs with Windows 11, not just in Windows 10.
Step 2: Push the WPS button on your router
In order to connect your Windows 10 PC or laptop via WPS, instead of typing the Wi-Fi password, walk to your wireless router or access point. Push the WPS button on it for a couple of seconds. This button is usually found on the back of the router or one of its sides.
For example, on an ASUS RT-AX1800S, the WPS button is located on its back, next to the power jack.
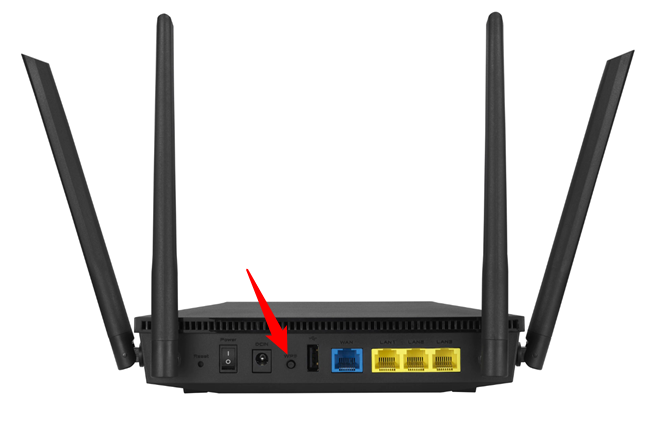
The location of the WPS button on an ASUS router
On Linksys wireless routers, the WPS button is usually labeled appropriately. For instance, on a Linksys EA7430 router, you’ll find a blue WPS button on its rear side.
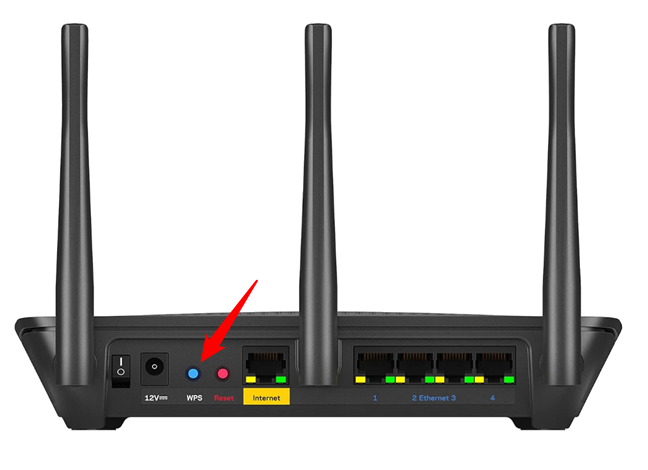
The WPS button on a Linksys router
TP-Link also has the habit of placing the WPS button on the back of its Wi-Fi routers. Here’s, for example, where you’ll find WPS on a TP-Link Archer AX21.
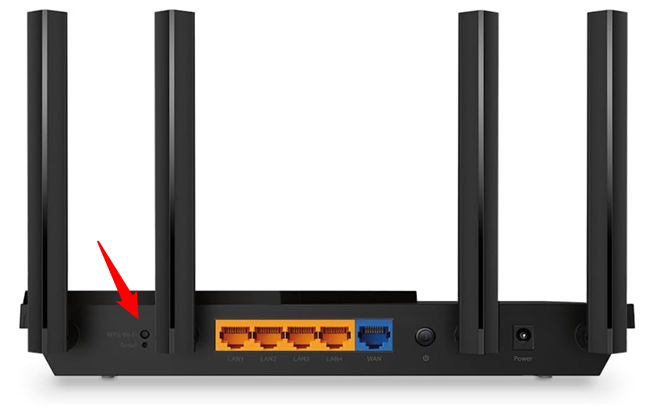
Where’s the WPS button on a TP-Link router
On NETGEAR routers, the WPS button might not be labeled, but it will have an icon resembling Wi-Fi. And while some NETGEAR routers have it on their back, others, like the NETGEAR Nighthawk RAX54S, have the WPS button next to the LEDs on its top area.
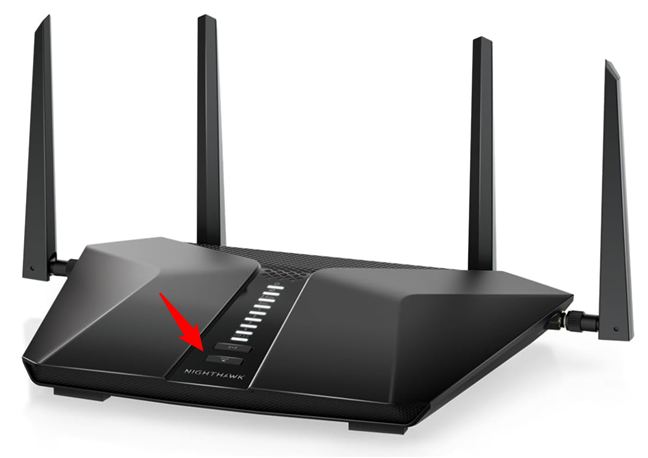
Where’s the WPS button on a NETGEAR Wi-Fi router
Tenda follows the traditional design path and usually positions the WPS button on the back of its routers, like on this Tenda AC6.
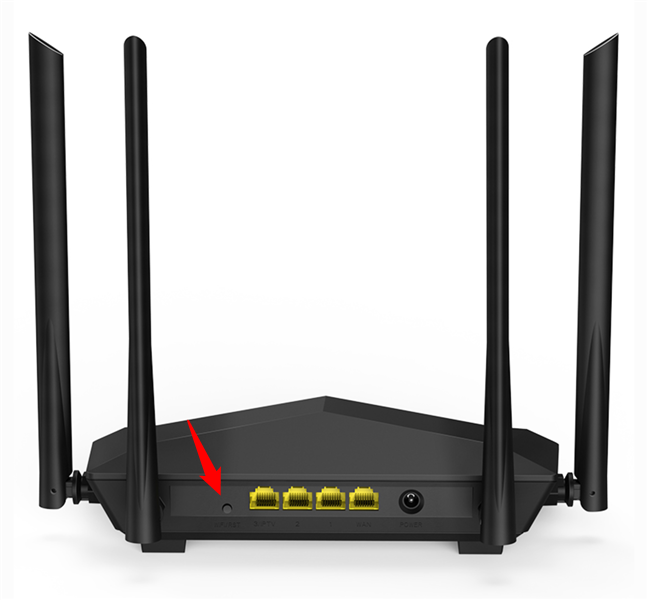
The WPS button on a Tenda router
Finally, D-Link also has the habit of placing the WPS button on the rear side of its routers, like on the D-Link DIR-1950 model in the next picture.
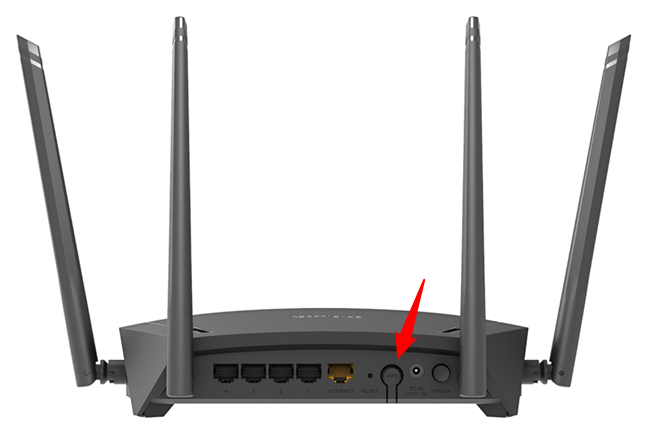
Where to find the WPS button a D-Link router
Step 3. Go back to your Windows 10 PC/laptop and wait for WPS to establish the Wi-Fi connection
You can now return to your Windows 10 device. After a couple of seconds, the operating system will automatically receive the wireless settings from the router (or access point) and connect to the Wi-Fi network by itself, without you entering the password.
NOTE: If you don’t know the password for your network, here are a couple of ways to learn your Wi-Fi password in Windows 10.
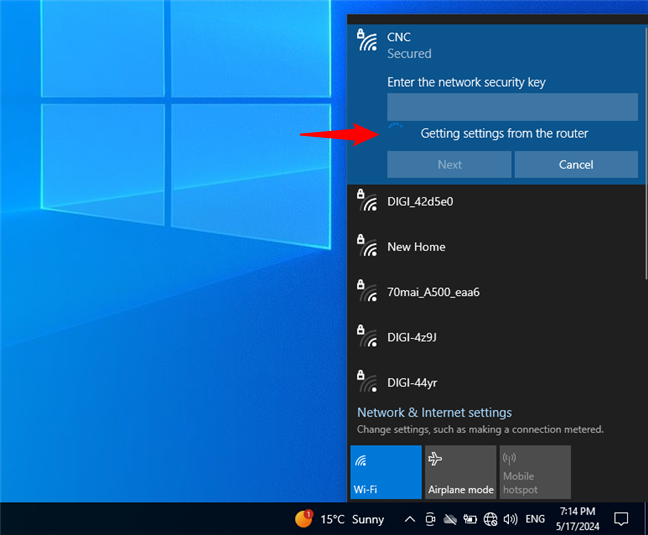
Windows 10 uses WPS for Getting settings from the router
You are now connected to the wireless network using WPS in Windows 10. The next time you connect to this network from the same Windows 10 computer or device, you won’t have to push the WPS button again.
That’s because the router has already transferred all the required settings to Windows 10, including the security password. Windows 10 stores these details and uses them automatically each time it has to make future connections to the same network.
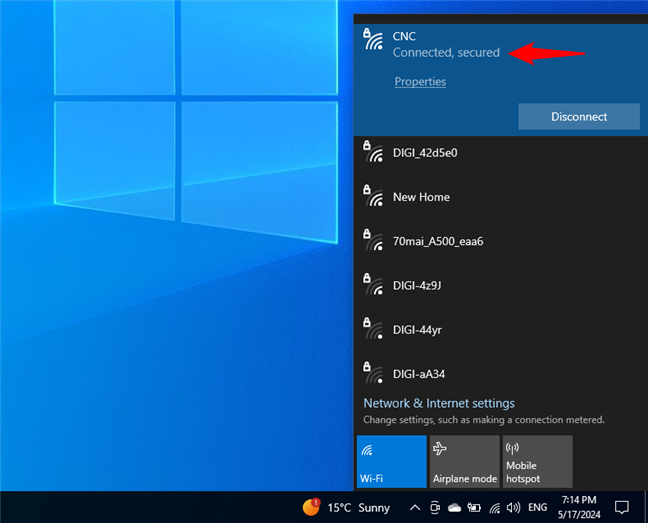
The Wi-Fi network connection is established and working
TIP: If you want to share files or folders with other users and devices connected to the same network, you might have to change the network profile location in Windows 10.
Can I connect through WPS in Windows 10 using a client PIN code?
The WPS standard also allows devices to connect using a PIN code. One eight-digit PIN code is generated by the wireless router (or access point) and another by the client that wants to connect to the Wi-Fi network using WPS. Unfortunately, Windows 10 doesn’t generate a client PIN code that you can use for WPS connections. You can get the client PIN only if your wireless network card has a specialized application that generates it for you. Sadly, on the computers and laptops I own, there aren’t such apps, so I can’t demonstrate how this method works.
Did you connect your Windows 10 PC or laptop to Wi-Fi via WPS?
As you’ve seen in this guide, you can also connect to Wi-Fi by pushing the WPS button on your router. Moreover, using WPS in Windows 10 to connect to wireless networks is often easier and faster than entering passwords. Anyone can do it, and you only need to read this guide the first time you do it. If you have any questions or problems, don’t hesitate to leave a comment in the section below.
Developed By: FroX
License: Free
Rating: 4,1/5 — 161.920 votes
Last Updated: April 21, 2025
App Details
| Version | 1.3.9 |
| Size | 4.9 MB |
| Release Date | December 02, 22 |
| Category | Tools Apps |
|
App Permissions: |
|
|
What’s New: |
|
|
Description from Developer: App developed with educational… [read more] |
About this app
On this page you can download WPS Connect and install on Windows PC. WPS Connect is free Tools app, developed by FroX. Latest version of WPS Connect is 1.3.9, was released on 2022-12-02 (updated on 2025-04-21). Estimated number of the downloads is more than 10,000,000. Overall rating of WPS Connect is 4,1. Generally most of the top apps on Android Store have rating of 4+. This app had been rated by 161,920 users, 22,643 users had rated it 5*, 107,970 users had rated it 1*.
How to install WPS Connect on Windows?
Instruction on how to install WPS Connect on Windows 10 Windows 11 PC & Laptop
In this post, I am going to show you how to install WPS Connect on Windows PC by using Android App Player such as BlueStacks, LDPlayer, Nox, KOPlayer, …
Before you start, you will need to download the APK/XAPK installer file, you can find download button on top of this page. Save it to easy-to-find location.
[Note] You can also download older versions of this app on bottom of this page.
Below you will find a detailed step-by-step guide, but I want to give you a fast overview of how it works. All you need is an emulator that will emulate an Android device on your Windows PC and then you can install applications and use it — you see you’re playing it on Android, but this runs not on a smartphone or tablet, it runs on a PC.
If this doesn’t work on your PC, or you cannot install, comment here and we will help you!
- Install using BlueStacks
- Install using NoxPlayer
Step By Step Guide To Install WPS Connect using BlueStacks
- Download and Install BlueStacks at: https://www.bluestacks.com. The installation procedure is quite simple. After successful installation, open the Bluestacks emulator. It may take some time to load the Bluestacks app initially. Once it is opened, you should be able to see the Home screen of Bluestacks.
- Open the APK/XAPK file: Double-click the APK/XAPK file to launch BlueStacks and install the application. If your APK/XAPK file doesn’t automatically open BlueStacks, right-click on it and select Open with… Browse to the BlueStacks. You can also drag-and-drop the APK/XAPK file onto the BlueStacks home screen
- Once installed, click «WPS Connect» icon on the home screen to start using, it’ll work like a charm


[Note 1] For better performance and compatibility, choose BlueStacks 5 Nougat 64-bit read more
[Note 2] about Bluetooth: At the moment, support for Bluetooth is not available on BlueStacks. Hence, apps that require control of Bluetooth may not work on BlueStacks.
How to install WPS Connect on Windows PC using NoxPlayer
- Download & Install NoxPlayer at: https://www.bignox.com. The installation is easy to carry out.
- Drag the APK/XAPK file to the NoxPlayer interface and drop it to install
- The installation process will take place quickly. After successful installation, you can find «WPS Connect» on the home screen of NoxPlayer, just click to open it.
Discussion
(*) is required
Connect to WiFi networks using WPS protocol.
Advertisement
How to Install WPS Connect for PC

WPS Connect is primarily a mobile app designed for smartphones. However, you can run WPS Connect on your computer using an Android emulator. An Android emulator allows you to run Android apps on your PC. Here’s how to install WPS Connect on your PC using Android emuator:
Download Android Emulator:
Visit any Android emulator website. Download the latest version of Android emulator compatible with your operating system (Windows or macOS). Install Android emulator by following the on-screen instructions.
Set up Android Emulator:
Launch Android emulator and complete the initial setup, including signing in with your Google account.
Install WPS Connect:
Inside Android emulator, open the Google Play Store (it’s like the Android Play Store) and search for «WPS Connect.»Click on the WPS Connect app, and then click the «Install» button to download and install WPS Connect.
You can also download the APK from this page and install WPS Connect without Google Play Store.

Use WPS Connect on PC:
You can now use WPS Connect on your PC within the Anroid emulator. Keep in mind that it will look and feel like the mobile app, so you’ll navigate using a mouse and keyboard.
Scan WiFi networks, Test WPS networks and Connect WPS networks
Information
Rating: 3.4 (68%) — 571 votes
Downloads: 100,000+
WiFi WPS Connect for PC on Windows 10/8.1/8/7 & Mac Laptop
WiFi WPS Connect is a Education app developed by WiFi Password Show. The latest version of WiFi WPS Connect is 1.6. It was released on 2025-04-29. You can download WiFi WPS Connect 1.6 directly on AppforPC.net. Over 571 users rating a average 571 of 5 about WiFi WPS Connect. More than 100,000+ is playing WiFi WPS Connect right now. Coming to join them and download WiFi WPS Connect directly!
Description of WiFi WPS Connect
WiFi WPS Connect is a free app designed to simplify your connection to 2.4GHz and 5GHz Wi-Fi networks using the WPS button. Most new routers feature WPS (Wi-Fi Protected Setup), allowing you to connect without needing a password. Scan Wi-Fi networks and test WPS vulnerability within a range of 24-25 meters for optimal connectivity. If it has any vulnerability, you can disable wps button on your router.
How to Use WiFi WPS Connect:
1.Open the app and select your desired Wi-Fi network.
2.Press the WPS button on your router.
3.The app will automatically connect you to the network.
WiFi WPS Connect is a secure method to connect to Wi-Fi networks. The WPS protocol utilizes a secure PIN to authenticate devices, ensuring your data remains safe.
Key Features:
1.Scan for available Wi-Fi networks
2.Test WPS vulnerability
3.Connect to WPS networks using a PIN
4.Display Wi-Fi passwords (root/superuser permission required)
5. Access default router PINs
Why Choose WiFi WPS Connect?
If you need a straightforward and secure way to connect to Wi-Fi networks, WiFi WPS Connect is the perfect solution.
Important Considerations:
WPS is less secure than using a password.
Some routers have security flaws that make WPS vulnerable to attacks.
For enhanced security, consider using a password instead of WPS.
Overall, WiFi WPS Connect offers a convenient method to connect to Wi-Fi networks. However, be aware of the associated security risks with WPS before using it.
Disclaimer:
WiFi WPS Connect is not a Wi-Fi hacking tool.
Do not misuse this app on routers or networks you do not own.
website:
https://www.wifipasswordshow.app
contact us: contact@wifipasswordshow.app
Changelog / What’s New
bugs fixed
Read more
Download WiFi WPS Connect for PC on Windows 10/8.1/8/7 & Mac Laptop
To be clear about download process of WiFi WPS Connect for PC, it is not available directly from the web. As of now, the app developer have made it available for only Android Platform. To enjoy using it on your PC device, installation of Android Emulator is mandatory.
For doing all these things on your Computers & Laptops, you need to download WiFi WPS Connect for PC/Laptop with Operating systems Windows 10/8.1/8/7 or Mac.
There are two ways of downloading this app on Laptop/PC. Use anyone, NOX App Player or Bluestacks for this purpose. As both of them support APK installation, you just need to install them on your Desktops and Install wps.wifi.wpa.wps-v1.6-AppforPC.net.apk file with it so that you can enjoy WiFi WPS Connect services on PC using NOX or Bluestacks. I will explain both methods here; you can choose anything you want.
As I was telling earlier, in this post, I will demonstrate two procedures, let’s see the first method of downloading WiFi WPS Connect for PC using Bluestacks emulator.
Install WiFi WPS Connect for PC Windows using BlueStacks
- Firstly, You should install Bluestacks Software on your Computer or Laptop. Click here to download bluestacks for PC. (Note: Come back to this post once you installed bluestacks correctly)
- After Bluestacks, now, you must download .APK file of WiFi WPS Connect. Click here.
- Open the Bluestacks App already installed on your PC/Laptop. In the left-hand corner toolbox, you will find an option of Add APK. Load the APK file using the option on the Bluestacks. Click on that.
- It will ask about the location where you have kept the downloaded APK. In my case, I have kept it on Desktop, so I am selecting that.
- It will now automatically install the application on Bluestacks. You will find the WiFi WPS Connect on applications tab on the main screen of the Bluestacks window.
- Now, you are all set to use WiFi WPS Connect on PC. Here is the WiFi WPS Connect successfully running on my PC after installing and clicked on the app.
Now, we should discuss the installation of WiFi WPS Connect on PC using NOX App player. You can use this method if Bluestacks method is not working properly on your Laptop or Computer.
Install WiFi WPS Connect on PC Windows using NOX App Player
- First of all, you must download Nox App player – https://www.bignox.com, click on the software to start installation on your Computer/Laptop.
- Now, download APK file from here.
- After installation, open the NOX player. In the right-hand side corner toolbox, you will find an option of Add APK. Click on that option.
- Select Don’t show again and click on I know.
- You have to choose the APK from the downloaded location. As I have saved it on the desktop, I choose from there. (If your downloaded file is in Downloads area, select the .APK from there itself)
- Nox will automatically install the Application. Open it from the home screen of Nox app player.
- You will then be asked about if you want to change your location from ‘Worldwide’ to any particular location. Initially, choose Later option.
- Now, you are ready to use the App with some pre-existing website links embedded in the App.
- Note: Use ESCAPE to come back to the home screen or else you can use the symbols to operate WiFi WPS Connect app on PC NOX app player.
We feel that you will not get any hitches while downloading the App through the suggested ways. If you do encounter some problem, do share it with us.
Older versions
More apps from this developer