
WebDAV is a protocol mainly used by Windows to share folders over the Internet. The folder shared on the server can be mounted on clients as a network drive. So it is possible to use remoter resources without additional programs or similar. In contrast to FTP, files can be opened, edited and processed directly from the WebDAV directory. It is similar to a folder shared with SAMBA in the local network.
This article shows you step-by-step how to share a folder using WebDAV and then connect it from a Windows client.
Prepare Server
A fully installed and configured IIS is a prerequisite for the use of WebDAV. The installation of IIS 10 on Windows Server 2016 is shown in this article.
If IIS is installed and ready for use, you can start the installation of WebDAV.
Install WebDAV
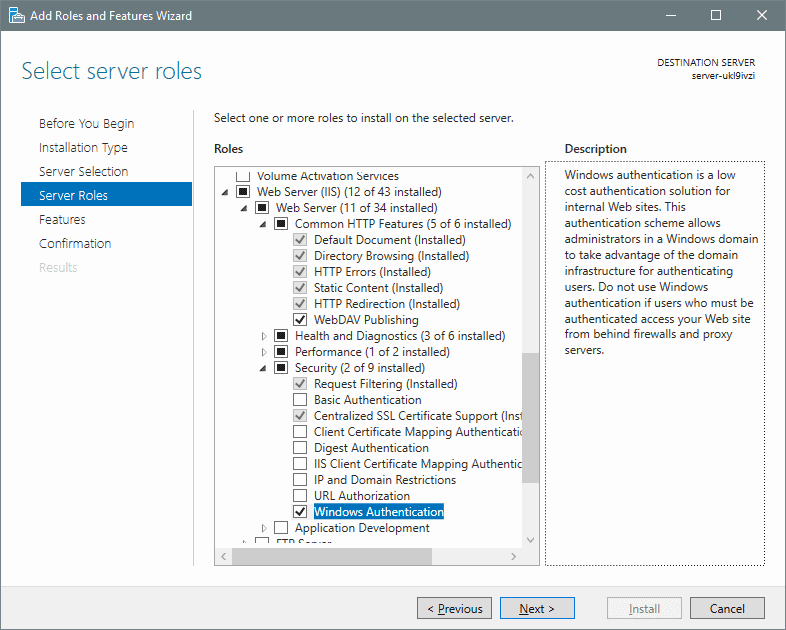
Similar to IIS, WebDAV is installed using Server Manager. Open the Server Manager (as explained in the IIS article) to select “Add Roles and Features”. Afterwards, the wizard can be clicked until “Server Roles” appears. There, under Web Server (IIS), select “Web Server” and then click on WebDAV Publishing.

Windows Authentication is also required. This can be found under Web Server IIS -> Web Server -> Security -> Windows Authentication.
Then click Next. The point features are skipped.
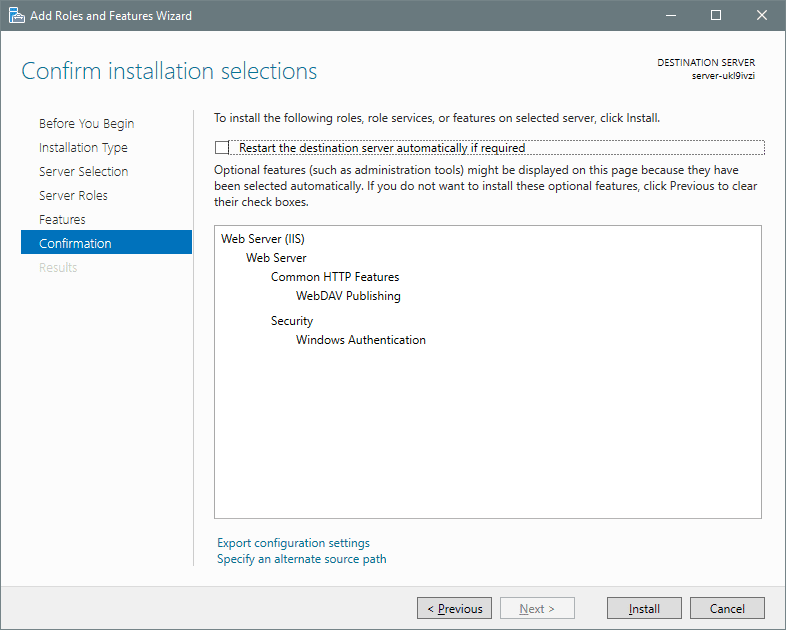
Then the summary is shown again. Click on Install.
When the installation is complete, WebDAV is installed. However, to use WebDAV, some settings are still required.
Set up WebDAV
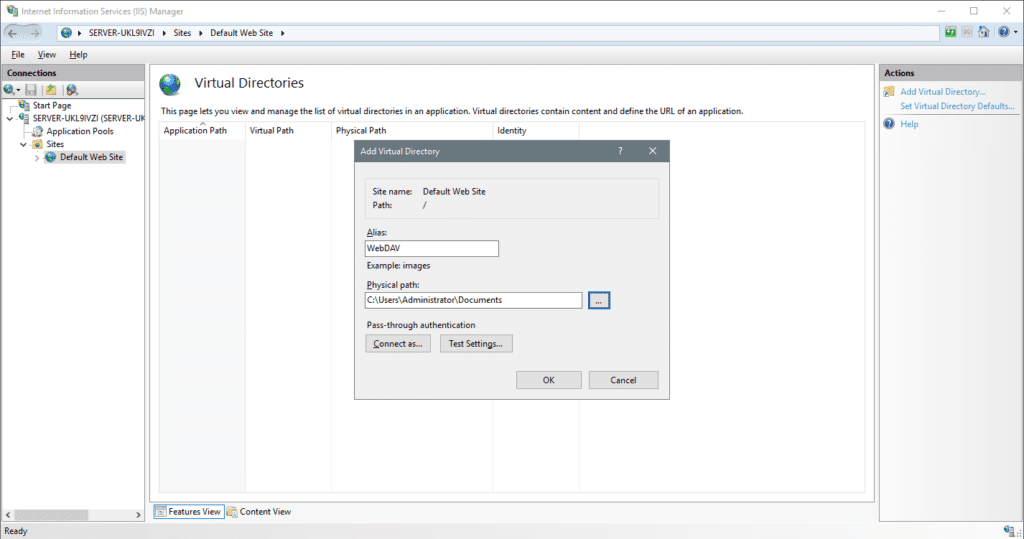
Next, open the IIS Manager to create a Virtual Directory. To do this, navigate to Default Web Site (or your site) in the left menu, and then click View Virtual Directory on the left side of the menu. By clicking on Add Virtual Directory (also in the left menu) you can now add a new directory. This will later be the directory to be shared via WebDav. The alias that is given here is later part of the URL. In this example, the corresponding address would be
Copyhttp://IPorDomain/WebDAV
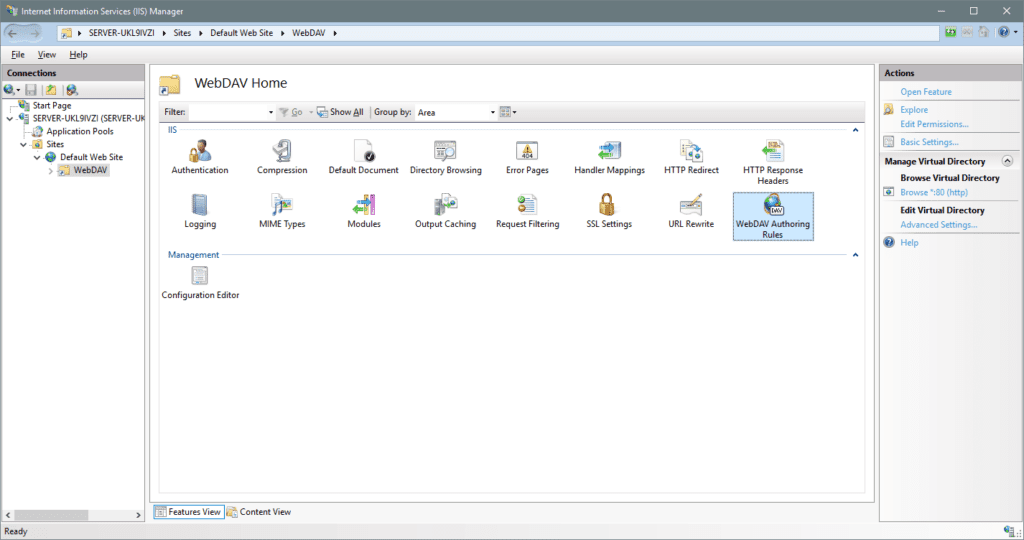
Then click on the directory you just created and select WebDAV Authoring Rules.
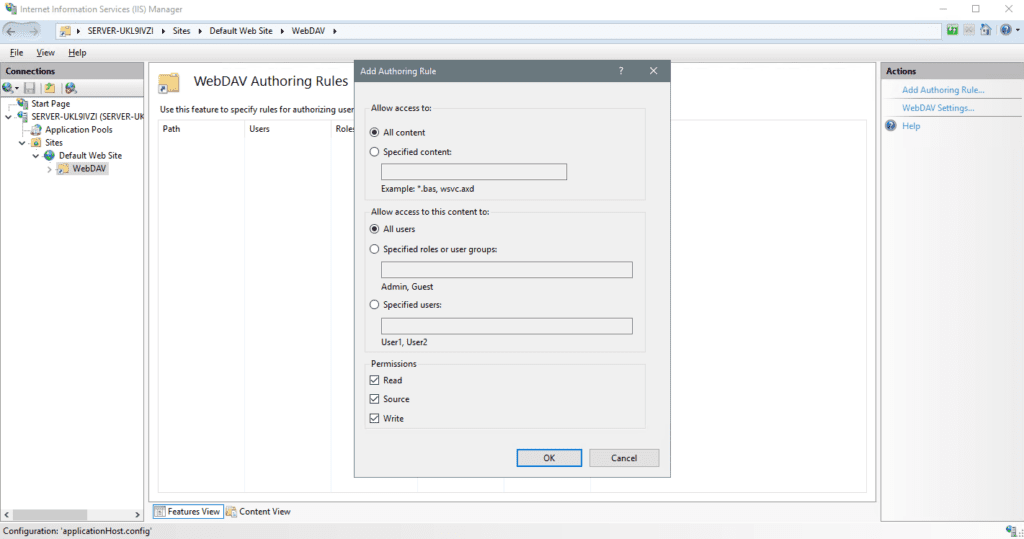
In the right-hand menu you can select Add Authoring Rule. Here you have to define the type of content that can be viewed by whom. For example, UserGroup “employees” can only see “.docx” files, or group “guest” can only see “.jpg and .png” files. The permissions are also important here. You specify whether the user can only view or use the file.
If the selection is made, you can confirm with OK.
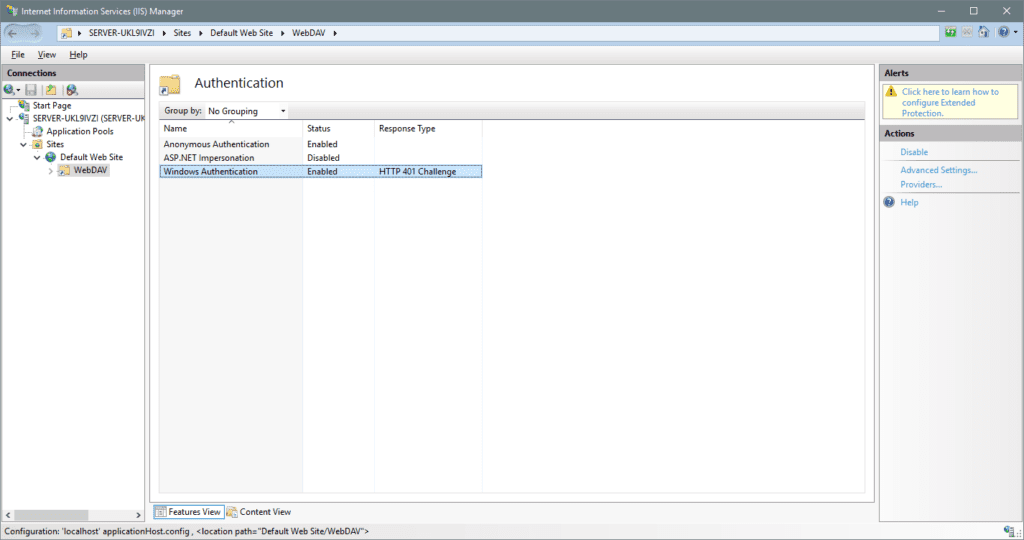
The authentication method must then be selected and activated. To do this, click on the directory on the left of the menu and then select Authentication.
Right-click “Windows Authentication”.
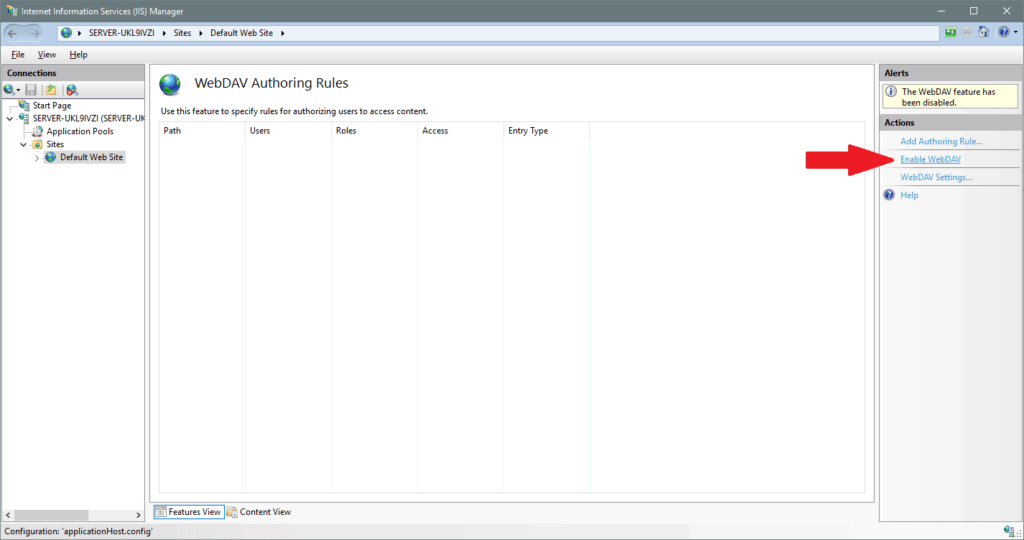
You can then click on the Default Web Site (or the site of your choice) on the left side of the menu to select WebDAV Authoring Rules. On the right, WebDAV must be activated by clicking Enable WebDAV.
You must then click again on Default Web Site (or any other website) on the left side. The IIS service can then be restarted by clicking Restart.
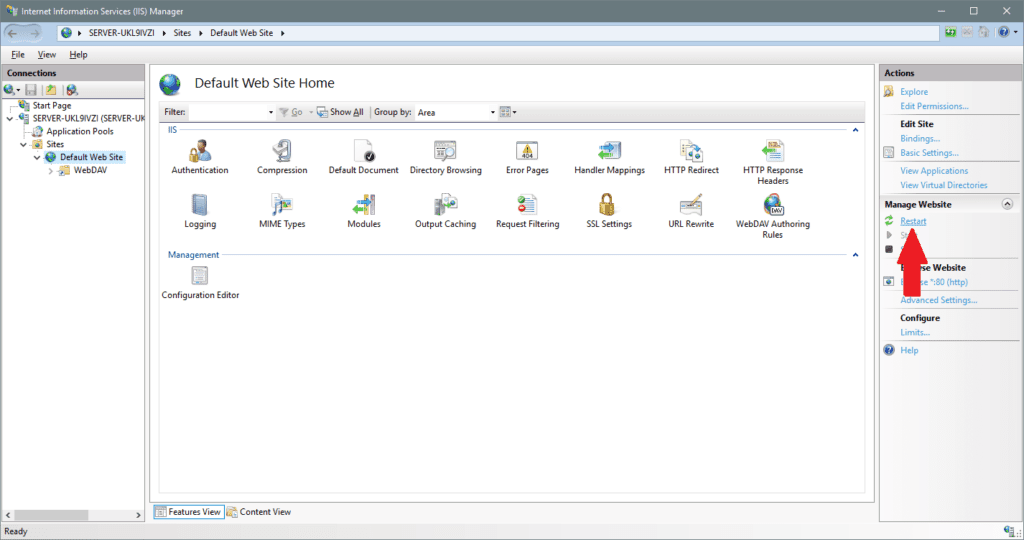
WebDAV is now ready. Depending on the configuration, the port 80 / TCP may have to be released in the firewall.
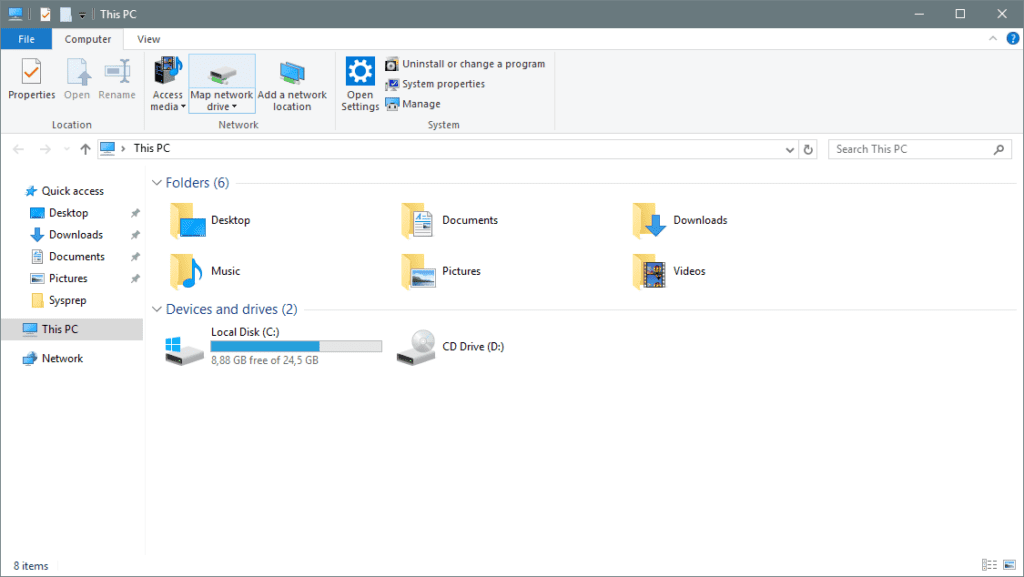
Integrate WebDAV on client
To create the created folder now on the client, the Explorer must be opened. Click on Map network drive at the top.
Then the path to the corresponding folder must be entered. The following syntax applies:
Copyhttp://<IPorDomain>/<Filename>
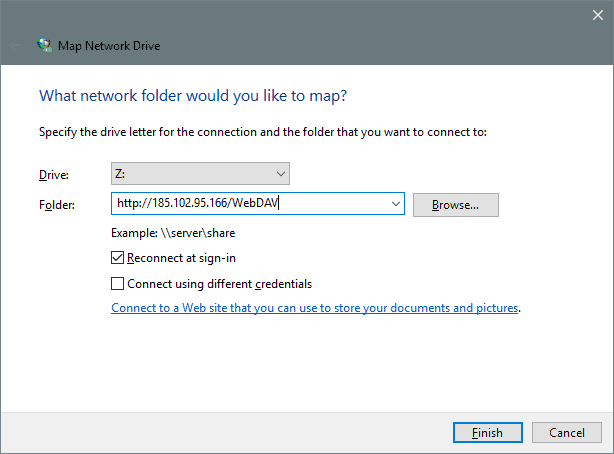
It is important that WebDAV is case-sensitive. The folder name must be entered exactly as it is stored in IIS.
If the client already has access data for the server but the WebDAV folder is used for other data, a checkmark must be made for “Connect using different credentials”. If no access data is stored at all, the next step is prompted to enter it.
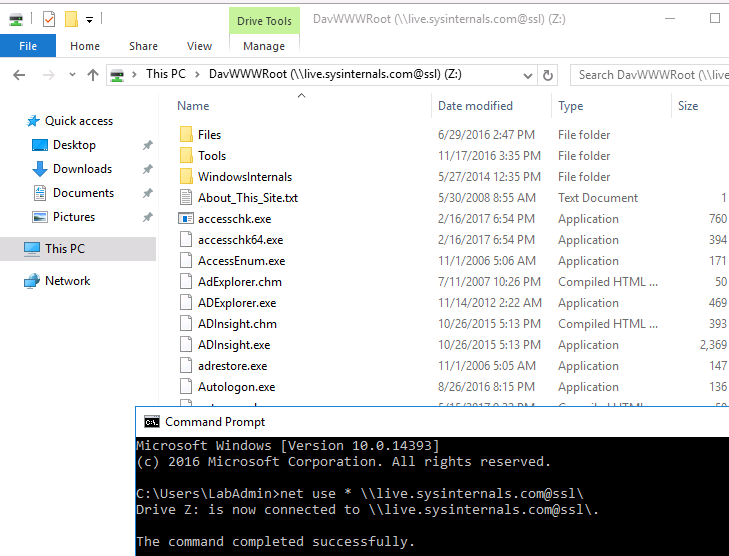
The folder can now be reached under the selected drive letter (in the example “Z:”).
Summary
The setup of WebDAV directories is done quickly and offers the possibility to make folders accessible from outside. However, as always when it is possible to reach services from the Internet, there is a certain security risk. Therefore it is recommended to encrypt all services with an SSL certificate and use only encrypted protocols.
WebDAV (Web Distributed Authoring and Versioning) является расширением протокола HTTP / 1.1. и позволяет обращаться к файлам на удаленном сервере и выполнять с ними общие операции, такие как чтение, запись, копирование, удаление файлов и т.д. Как правило, этот протокол используется пользователями для совместной работы с удаленными файлами. Проще говоря, webdav — это, по сути, общая сетевая папка, расположенная на веб-сервере. Для доступа к общим ресурсам WebDAV на клиентской стороне должен быть установлен клиент WebDAV.
В серверных операционных системах Microsoft отдельного клиента WebDAV нет. Например, в Windows Server 2008 R2,2012/2012 R2 клиент WebDAV входит в состав компоненты Desktop-Experience. Поэтому для доступа к WebDAV ресурсам на этих ОС необходимо установить это расширение.
Install-WindowsFeature Desktop-Experience
Совет. В Windows Server 2008 R2, отсутствует командлет Install-WindowsFeature, вместо него нужно использовать другой командлет — Add-WindowsFeature.
В Windows Server 2016 ситуация немного другая. В этой операционной системе появился отдельный компонент WebDAV-Redirector. Для эго установки, нужно выполнить такую команду (потребуется перезагрузка сервера)
Install-WindowsFeature WebDAV-Redirector –Restart
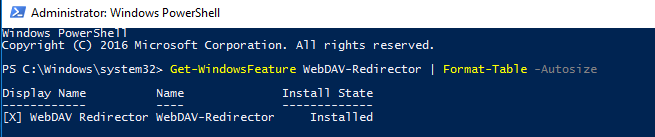
После перезагрузки проверим, что компонент WebDAV-Redirector установлен:
Get-WindowsFeature WebDAV-Redirector | Format-Table –Autosize
В системе при этом появятся две новые службы:
- WebClient (get-service WebClient) – позволяет программ Windows создавать, изменять и получать доступ к файлам в Интернете.
- MRxDAV (get-service MRxDAV) – драйвер файловой системы (WebDav Client Redirector Driver)
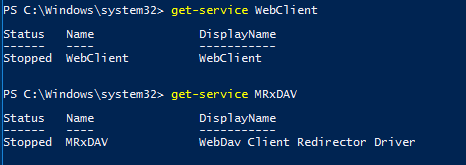
По умолчанию служба WebClient и драйвер MRxDAV отключены и настроены на запуск в ручном режиме, при срабатывании определенного триггера. По-видимому, идея разработчиков была в том, что сервис должен автоматически запускаться при попытке доступа через драйвер MRXDAV.SYS, но, увы, это не работает. Поэтому лучше изменить тип запуска этих служб на автоматический.
Set-Service WebClient -StartupType Automatic
Set-Service MRxDAV -StartupType Automatic
Осталось запустить данные службы:
Start-Service WebClient
Start-Service MRxDAV
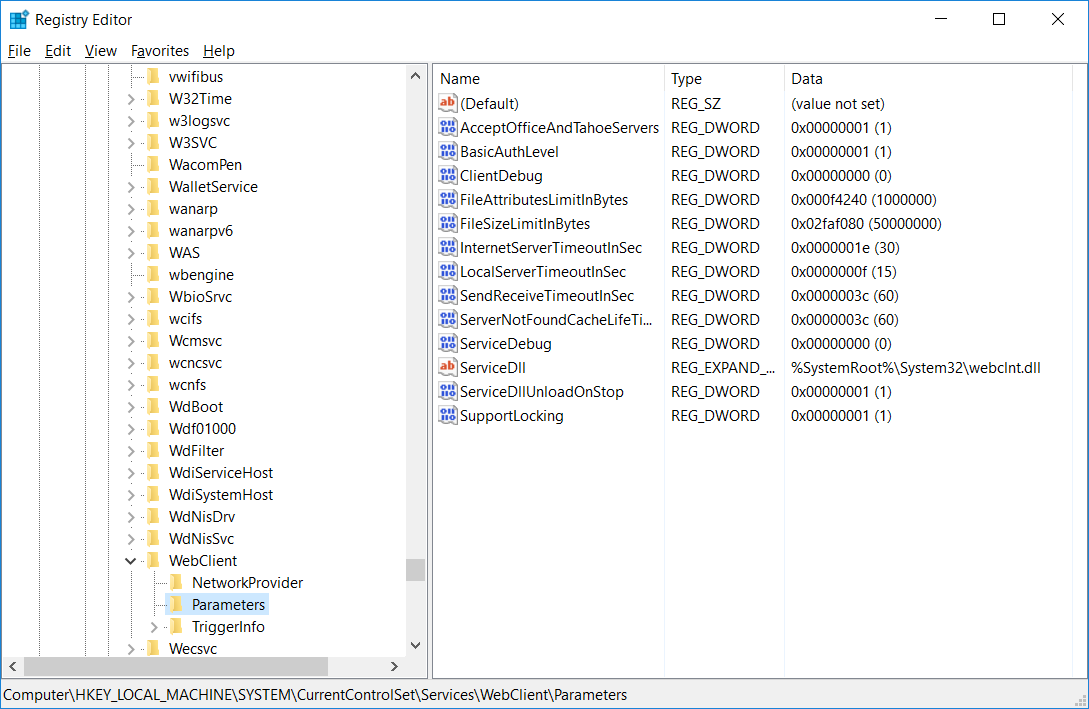
Служба WebClient настраивается только через реестр. Все ее параметры хранятся в ветке HKLM\SYSTEM\CurrentControlSet\Services\WebClient\Parameters.

С практической точки зрения, могут быть интересны следующие параметры службы WebClient
AcceptOfficeAndTahoeServers — отвечает за возможность подключения к веб-серверам SharePoint и Office Web Server (по умолчанию значение — 1)
BasicAuthLevel – тип аутентификации, используемый клиентом WebClient. Доступны следующие значения:
- 0 — Базовая (Basic) аутентификация отключена
- 1 — Базовая (аутентификация включена только SSL каталогов — это значение используется по умолчанию в Windows Server 2016)
- 2 и выше— используется базовая аутентификация для любого типа общих каталогов, как с поддержкой SSL, так и без (это небезопасный вариант, т.к. имя и пароль пользователя при таком типе аутентификации пересылаются по сети в открытом виде)
FileSizeLimitInBytes — максимальный размер передаваемых файлов (задается в байтах, по умолчанию размер файлов ограничен 50 Мб)
Для проверки работы клиента WebDav можно попробовать подключить к общедоступному ресурсу с включенной поддержкой Webdav, например live.sysinternals.com. В этом веб-каталоге хранятся популярные утилиты от Sysinternals (Марка Русиновича).
Сетевую папку WebDAV в Windows Server 2016 можно подключить следующими способами :
- Без SSL:
net use * \\live.sysinternals.com\ - С SSL:
net use * \\live.sysinternals.com@ssl\ - Можно указать данные для авторизации на удаленном сервере:
net use * \\live.sysinternals.com@ssl\ /user:vmblog * - Можно указать конкретный порт TCP:
\\live.sysinternals.com@80\folderили\\live.sysinternals.com@ssl\share - Чтобы отмонтировать подключенный по WebDav диск, выполните команду:
net use * /del /y
Если при монтировании диска Webdav через Проводник или командную строку вы получаете ошибку:
System error 67 has occured.
The network name cannot be found.
Проверьте, что служба WebClient запущена, измените значение ключа реестра BasicAuthLevel, на 1 и перезагрузите сервер.
Клиент WebDAV по умолчанию в серверных операционных системах Windows не установлен. Установим.
WebDAV (Web Distributed Authoring and Versioning) является расширением протокола HTTP/1.1. Позволяет обращаться к файлам на удаленном сервере и выполнять с ними операции чтения, записи, копирования, удаления и т.д.
Для установки WebDAV клиента на сервере Windows требуется установить дополнительную компоненту. В Windows Server 2008 R2,2012/2012 R2 клиент WebDAV входит в состав компоненты Desktop-Experience. В Windows Server 2016 появился отдельный компонент WebDAV-Redirector.
Установить можно командой (потребуется перезагрузка):
Install-WindowsFeature WebDAV-Redirector –RestartИли через GUI, открываем Server Manager: Add Roles and Features.

В мастере в разделе Features выделяем галкой компонент WebDAV Redirector. Next.

Устанавливаем галку «Restart the destination server automatically if required».
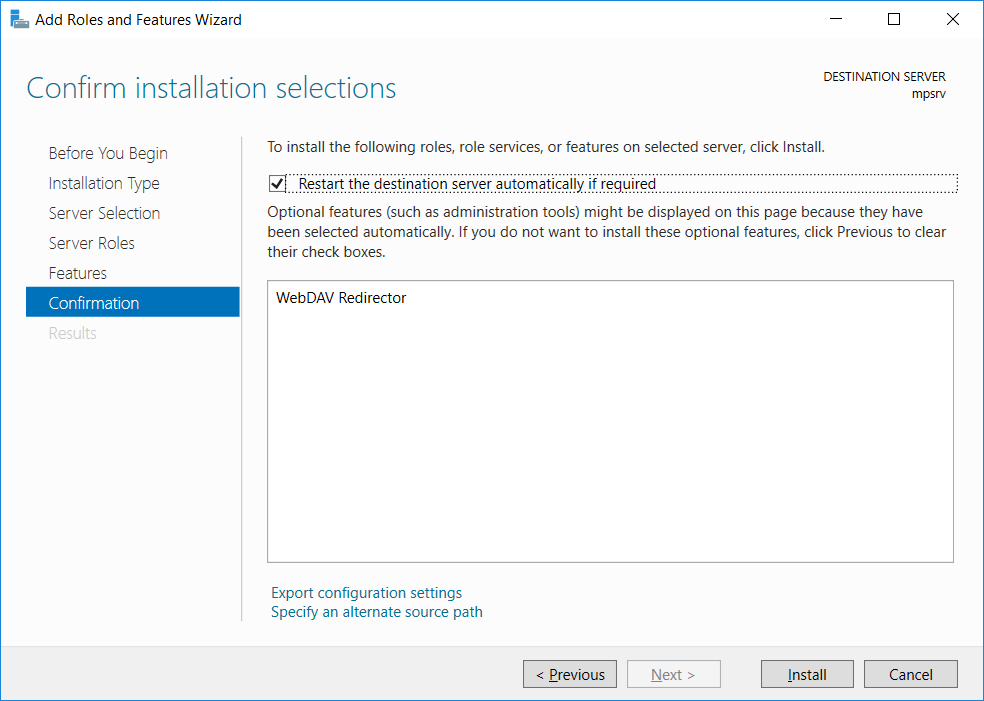
Install. Начинается установка компонента.
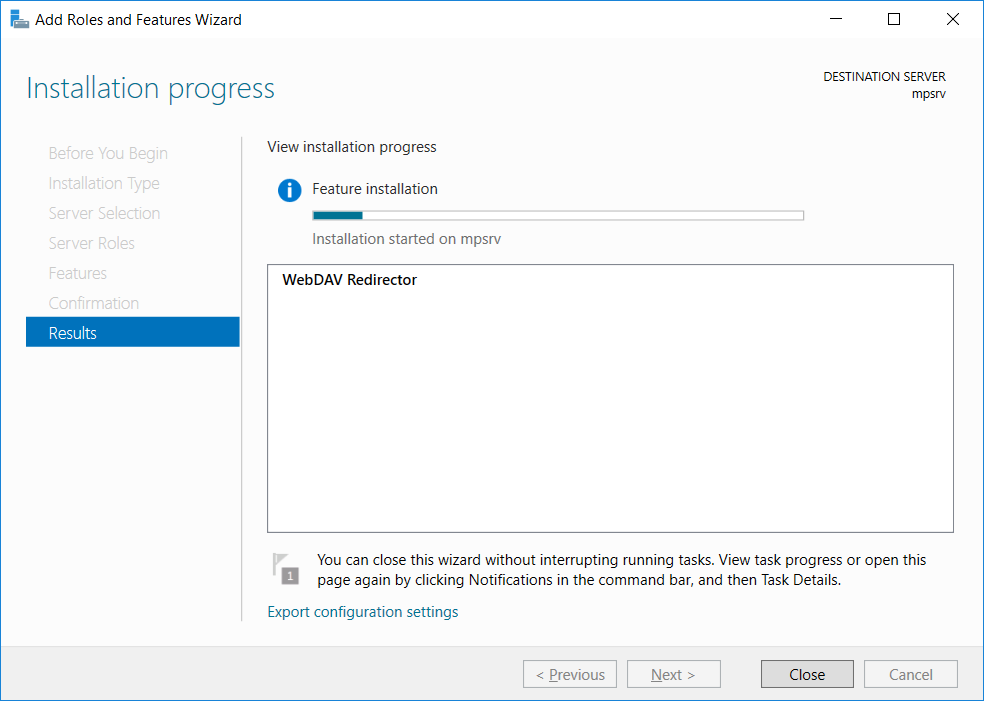
Сервер после установки компонента автоматически перезагрузится.

Клиент WebDAV установлен. После перезагрузки в системе появятся две новые службы:
- WebClient — позволяет создавать, изменять и получать доступ к файлам в Интернете
- MRxDAV — драйвер файловой системы (WebDav Client Redirector Driver)
По умолчанию служба WebClient и драйвер MRxDAV отключены и настроены на запуск в ручном режиме, при срабатывании определенного триггера. Меняем тип запуска этих служб на автоматический и запускаем.
get-service WebClient
get-service MRxDAV
Set-Service WebClient -StartupType Automatic
Set-Service MRxDAV -StartupType Automatic
Start-Service WebClient
Start-Service MRxDAV
get-service WebClient
get-service MRxDAV
Параметры WebClient хранятся в ветке реестра:
HKLM\SYSTEM\CurrentControlSet\Services\WebClient\Parameters
AcceptOfficeAndTahoeServers — возможность подключения к веб-серверам SharePoint и Office Web Server (по умолчанию значение — 1)
BasicAuthLevel – тип аутентификации:
- 0 — аутентификация отключена
- 1 — аутентификация включена только для SSL каталогов (по умолчанию в Windows Server 2016)
- 2 и выше— используется базовая аутентификация для любого типа общих каталогов, как с SSL, так и без (небезопасный вариант)
FileSizeLimitInBytes — максимальный размер передаваемых файлов в байтах (по умолчанию 50 Мб). Но у меня и 4 ГБ грузится без изменения этих настроек.
В этой заметке мы поговорим о замечательной надстройке над службой Internet Information Services (IIS) под названием WebDAV. WebDAV это протокол для доступа к общим файлам и папкам через интернет, чем то похожий на FTP. Передача файлов по протоколу WebDAV может быть осуществлена через различные межсетевые экраны и брандмауэры, передаваемую информацию можно шифровать, да и работа с файлами и папками реализована намного удобнее, полностью напоминая работу службы общего доступа к фалам и папкам в Windows.
Вместе с выходом Windows Server 2008 Microsoft презентовала обновленную версию модуля WebDAV для IIS 7. Данный модуль существенно расширил возможности, удобство и безопасность использования WebDAV для доступа к файлам в Интернет, кроме того теперь он стал поддерживать многопользовательскую работу и блокировку файлов.
В этой статье мы поговорим о том, как установить WebDAV на ОС Windows 7 и Windows Server 2008 R2, как его настроить и каким образом можно получить доступ к файлам и папкам, к которым открыт общий сетевой доступ по WebDAV .
Еще раз напомню, что WebDAV это расширение службы IIS, поэтому, если у вас еще не установлен IIS, сделайте это (как вы, наверное, помните и в Windows 7 и в Windows Server 2008 R2, IIS идет по умолчанию, но в целях безопасности этот компонент нужно включать отдельно). Установка WebDAV в Windows 7 и в Windows 2008 R2 немного отличается.
Установка WebDAV на IIS 7.5 в Windows Server 2008 R2
- Откройте меню Start-> Administrative Tools-> Server Manager.
- В окне управления сервером выберите Roles и отметьте Web Server (IIS).
- В окне Web Server (IIS), найдите секцию Role Services и добавьте новую роль Add Role Services.
- В списке служб разверните элемент Common HTTP Features, выберите опцию WebDAV Publishing и нажмите Next.

- Затем нажмите Install.
- После установки расширения WebDAV, закройте окно установки кнопкой Close.

Установка WebDAV на IIS 7.5 в Windows 7
- Перейдите в панель управления.
- В панели управления откройте элемент Programs and Features, и перейдите в режим установки функций Windows (Turn Windows Features on or off).
- Разверните узел Internet Information Services, затем World Wide Web Services, и Common HTTP Features.

- Отметьте WebDAV Publishing и нажмите OK.

Настраиваем публикацию WebDAV в менеджере IIS
На этом этапе мы включим WebDAV для сайта IIS и дадим права на редактирование содержимого локальному администратору.
- В менеджере IIS Manager, разверните дерево сайтов и выберите Default Web Site.
- Как показано на рисунке, щелкните по элементу WebDAV Authoring Rules.

- На странице WebDAV Authoring Rules щелкните в правой колонке(Actions) по сслыке Enable WebDAV
- После включения WebDAV, создадим правила доступа к содержимому, нажав кнопку Add Authoring Rule.
- В окне Add Authoring Rule укажем:
- All content – значит, что правило будет применяться для контента всех типов.
- Выберите «Specified users»и введте имя пользователя «administrator»
- Права доступа: Read, Source и Write.
- После настройки, жмите OK.
- В панели управления IIS выберите опцию Authentication.
- В окне аутентификации активируйте аутентификацию Windows (Windows Authentication), если IIS будет работать только в качестве сервера WebDAV, анонимную аутентификацию можно отключить.
- Вернитесь на уровень сайта Default Web Site и выберите Authorization Rules (либо .Net Authorization Rules)
- Создайте Allow правило (либо убедитесь, что оно уже существует), в котором администратору было бы разрешено получать доступ к серверу (в моем случае, такое правило уже было, и всем пользователям — All Users, в том числе администратору был разрешен доступ к IIS).


Попробуем теперь подключиться к сайту WebDAV c учетной записью администратора, для чего в командной строке наберите:
net use * http://localhost/
В результате в системе появиться новый сетевой диск, подключенный с сервера с помощью WebDAV.
Совет. Если при попытке подключить каталог по WebDav появляется ошибка «System error 67 has occurred. The network name cannot be found.«, в Windows 8 /Windows Server 2012 попробуйте установить компонент Desktop Experience и убедится, что служба Web Client запущена.
Если же нужно расшарить определенную папку на диске, необходимо создать виртуальный каталог IIS. Для этого щелкните правой кнопкой мыши по сайту и выберите ‘Add New Virtual Directory’:

Укажите алиас (имя виртуального каталога IIS) и путь к папке, к которой необходимо открыть доступ и нажмите OK.
Теперь, чтобы подключить данный каталог, нужно воспользоваться командой:
net use * _https://winitpro.ru/projects
Сетевой диск, подключенный по WebDAV выглядит так:

Как вы видите WebDAV — это отличное средство для удаленного доступа к файлам и папкам в Windows поверх протокола HTTP, которое можно использовать, даже через межсетевой экран. Кроме того, так как WebDAV базируется на службе IIS, это означает, что в такой архитектуре мы можем использовать различные технологии обеспечения безопасности и средства управления IIS, в том числе HTTPS для шифрования передаваемых данных (при использовании обычного HTTP вся информация передается в открытом виде, кроме пароля, который при использовании Windows Authentication шифруется).
Опишем еще несколько аспектов использования WebDAV
- Если вы используете Basic authentication вместе с HTTP, это означит, что ваш пароль будет пересылаться в открытом виде, поэтому лучше использовать протокол HTTPS или все-таки включить аутентификацию Windows.
- Не забудьте, что IIS работает из под учетной записи, у которой нет доступа к большинству каталогов и файлам, поэтому придется назначить NTFS права этой учетной записи вручную.
- Для того, чтобы подключить диск по WebDAV с клиента Windows XP, необходимо убедится, что запущена служба WebClient

- Чтобы подключить каталог WebDAV по HTTPS, воспользуйтесь командой:
net use x: "_https:// winitpro.ru/projects " /User:UserName Password

Are you looking to set up a WebDAV server on your Windows Server system but unsure how to do it? Let us help you! In this guide, we will show you step-by-step how to set up a WebDAV server on your Windows Server.
How to Install the WebDAV Publishing Feature on Windows Server
To use WebDAV on Windows Server, you must first install and set up the WebDAV Publishing feature. Open the “Server Manager” in Windows Server and locate the “Add Roles and Features” button. Select it to continue.
After selecting the “Add Roles and Features” button, click “Next” to select your server. Once you’ve selected your server, locate the “Server Roles” section and click on it. Then, look for “Web Server (IIS)” and check the box next to it.
Note: you may also need to enable “WebDAV Redirector” under “Features”.
When you check the box next to “Web Server (IIS),” Windows Server will prompt you to add various features in the form of a pop-up window. Find the “Add Features” button and click it to add the new features.
Next, you need to add “WebDAV Publishing” to your Windows Server. In the “Select Role Services” window, locate “WebDAV Publishing” under “Web Server” and check the box to enable this feature.
After checking the box next to “WebDAV Publishing,” click the “Next” button to continue. The “Add Roles and Features Wizard” will ask for confirmation. Click the “Install” button, and be sure to also check the box next to “Restart the destination server automatically if required.”
Once you click the “Install” button, Windows Server will begin setting up Web Server (IIS) as well as WebDAV Publishing on your Windows Server. When the process is complete, click on the “Close” button to exit the wizard.
How to Create a WebDAV Website on Windows Server
To use WebDAV, you need to create a WebDAV website on Windows Server. First, open the Internet Information Services Manager in Windows Server, which was installed in the previous section of this guide.
To launch IIS Manager, search for “IIS” in the Start Menu. Once IIS is open, right-click on the “Sites” folder, and select the “Add Website” button. After clicking this button, enter a site name in the “Site name” area.
Next, find the browse button next to “Physical path” and select where your website’s physical files will be located on Windows Server.
After adding a folder to the Physical path area in the “Add Website” page, you’ll need to set the correct permissions to allow WebDAV access through the website. To do this, launch PowerShell and enter the following commands. Make sure to replace “username” with the username you wish to add to IIS_IUSRS.
Note: You will need to run “Add-LocalGroupMember” for each user you wish to add to IIS_IUSRS.
New-LocalGroup -Name "IIS_IUSRS"

Add-LocalGroupMember -Group "IIS_IUSRS" -Member "username"
Once you’ve entered the commands, open Windows Explorer and navigate to the folder you specified in the “Physical path” area. Right-click on the folder and select the “Properties” option. Then, click on the “Security” tab and click the “Edit” button.
When you’ve clicked on the “Edit” button, select the “Add” button, and add “IIS_IUSRS.” Click the “OK” button when done. With “IIS_IUSRS” added to the WebDAV folder, anyone in the “IIS_IUSRS” group will have full access to the physical path.
With the physical path set, go to the “IP address” section and set the IP address for the WebDAV server. You can also add a hostname (domain name) if you wish.
Once everything is configured on the “Add Website” page, click the “OK” button to continue.
Configuring WebDAV Authoring Rules
WebDAV authoring rules need to be configured in IIS for your newly created website so that users can access your WebDAV server. To start, launch IIS Manager, and select your website under “Sites.” After selecting it, find “WebDAV Authorization” and click on it.
Inside the “WebDAV Authorization” area, click “Add Authoring Rule”. Then, under “Allow access to,” choose “All content.” Next, find the “Allow access to this content to” area, and select “Specified roles or user groups.” In the text box, enter “IIS_IUSRS” as the specified group. This means that only users who have been added to the “IIS_IUSRS” group may use WebDAV.
After adding the group, find “Permissions”. Check “Read,” “Source,” and “Write” to configure permissions for those who access your WebDAV server.
Connecting to Your WebDAV Server
To connect to your WebDAV server on Windows, you’ll need to log in using specified users. Open up Windows Explorer on a Windows PC, and enter the address:
\\server-ip\webdav
Press enter to initiate login. Then, enter your WebDAV user credentials to log in. Once you’ve logged in, you’ll be able to read, write, and access files on WebDAV running on your Windows Server.
