
By this time, computers could create similar improvised networks for file sharing without WiFi Direct. Those still interested in using WiFi Direct as a wireless file transfer service can do so by completing a few relatively straightforward steps. Moving forward with your WiFi Direct service can begin as soon as you are ready.
WiFi Direct for PC is a wireless technology that enables direct communication and data transfer between two or more personal computers without the need for a traditional network infrastructure. It creates a peer-to-peer connection, allowing devices to establish a direct link with one another, similar to how Bluetooth works. This technology is especially useful when users want to quickly share files, collaborate on projects, or play multiplayer games, all without the necessity of an internet connection or a router.
To utilize WiFi Direct on a PC, users typically need a compatible operating system, such as Windows 8 or later. The technology uses the Wi-Fi hardware already present in most PCs, enabling them to act as both clients and hosts. Setting up a WiFi Direct connection involves discovering nearby devices, establishing a secure connection using WPA2 encryption, and then exchanging data over the established link. Users can directly browse files on other connected PCs, send files, stream media, and even share an internet connection, if one PC is connected to the internet via Ethernet or another network.
WiFi Direct provides a convenient and versatile way for PCs to communicate and share resources without requiring a traditional Wi-Fi network or physical cables. It’s especially valuable for scenarios where internet connectivity might be limited or unavailable, making it an appealing option for collaborative work, data sharing, and entertainment among PCs.
Why Use WiFi Direct
WiFi Direct is ideal for sending something to another wireless device without requiring the internet. For example, if you’re trying to print something through a wireless printer or send a photo to somebody in the same room, you don’t need to send the data through an internet connection. Like Bluetooth, WiFi Direct allows you to send files like this.
Exploring WiFi Direct for PC Windows 7/8.1/10/11
If your device attempting to connect to your computer has the WiFi Direct feature, creating a network is relatively simple. First, you will need to turn on the device you wish to connect to your computer using WiFi Direct. Keep in mind that this device must also be WiFi Direct enabled. Find the specific task window on your device that allows you to turn on WiFi Direct and do so. At this point, you should be provided with a specific network name and passcode.
When you return to your computer, access your network menu and locate the new network created by the Direct WiFi device. At this point, you can connect to the network using the passcode provided. Your computer will now be linked wirelessly to the device in question.
Assessing Other Options
As mentioned, WiFi Direct is just one option for individuals looking to connect to a tablet from PC WiFi or other similar tasks. You can now create a network similar to those using the Direct WiFi protocol on your computer by selecting the “Network Options” menu on your Windows 7/8.1/10/11 operating system and clicking the “Set up an Ad-hoc (computer-to-computer) network.” This feature will accomplish the same level of connectivity as WiFi Direct. Like the Direct WiFi service, these ad hoc networks can be connected to any device featuring wireless connectivity.
WiFi Direct: Windows 7/8.1/10/11 Wireless File Transfer That’s Faster Than Bluetooth
Wireless data sharing has made rapid strides over the past few years. Thanks to WiFi, Bluetooth, and NFC, data can be moved from one device to another with little effort. Windows 7/8.1/10/11 10 boasts WiFi Direct, a wireless connectivity system that helps hook devices up effortlessly. Want to move data from PC to laptop? Easily done. Need to set up wireless printing? Connect your phone to your computer?
All this is quite simple, thanks to WiFi Direct. Here’s how to use WiFi Direct on Windows 7/8.1/10/11 and transfer files wirelessly.
Introducing WiFi Direct for PC: Wireless File Transfer
You can think of WiFi Direct as a sort of Bluetooth over WiFi. That is, it has the same “discover and sends” functionality of Bluetooth, but the data is sent using wireless networking. As you might have guessed, this offers incredible speed for your file transfer.
Bluetooth has been around since 1994, and although helpful in transmitting audio and connecting devices, it isn’t ideal for transferring larger files. WiFi Direct covers this problem and looks set to supplant Bluetooth in the next few years.
At this stage, WiFi Direct isn’t yet as universal as Bluetooth However, when used successfully, it is a handy feature for transferring data between Windows 7/8.1/10/11 and other suitable hardware.
Check If Your Windows 7/8.1/10/11 PC Is WiFi Direct Compatible
Using WiFi Direct to send a file is faster and simpler than Bluetooth.
First, you’ll need to check that your device is WiFi Direct-compatible. You can do this by pressing WIN+R, entering CMD to open the Command Prompt (which you should probably be using more than you are), then entering ipconfig /all.
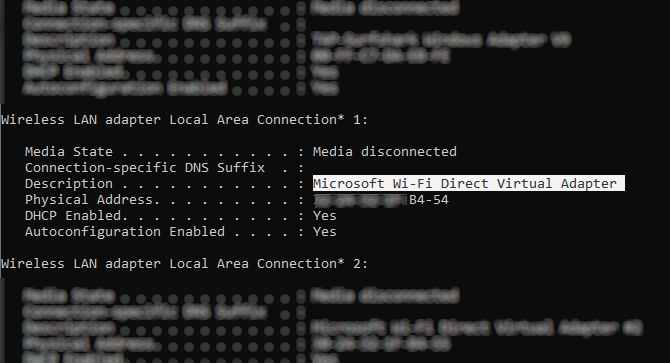
If WiFi Direct is available, you should see an entry labeled “Microsoft WiFi Direct Virtual Adapter.”
Next, you’ll need to start transferring data over WiFi Direct. However, this isn’t as obvious as you would expect…
How to Transfer Files From Android to Windows 7/8.1/10/11 With WiFi Direct
As you’ll need a third-party app to use WiFi Direct, choosing the right option is essential.
Feem is a software that has provided WiFi Direct support to Windows 7/8.1/10/11 PC and laptop users since the days of Windows 7/8.1/10/11.
Feem is free to use, although it has various premium options. WiFi Direct in Feem is free, as is live chat. However, you can pay for iOS support, unlimited file transfers, and removing ads.
Using Feem to transfer data from Android to a PC or laptop is straightforward.
- Set Android as a mobile hotspot in Settings > Network & Internet > Hotspot & tethering. Then connect your Windows 7/8.1/10/11 computer to this network.
- Launch Feem on Android and on Windows 7/8.1/10/11 too. You’ll notice that both devices are given unusual names by the app (e.g., Junior Raccoon) and a password. Note the password, as you’ll need it to establish the initial connection.
- Send a file from Android to Windows 7/8.1/10/11 using WiFi Direct, choose the destination device, and tap Send File. Browse for the File or files, then tap Send.
Moments later, the data will be sent to your PC. It’s as simple as that—and it works in reverse, too!
No WiFi Direct? Transfer Files From Android to Windows 7/8.1/10/11 PC With FTP
If your computer doesn’t support WiFi Direct, don’t give up.
Several tools are available in Android that will let you remotely share data with Windows 7/8.1/10/11 without WiFi Direct.
ES File Explorer is a popular third-party file manager for Android. This comes with several file management features for local and network use. Among these is FTP, which provides a direct network connection between two devices.
Use ES File Explorer’s Network > FTP feature to display your Android device’s IP address.
Paste this into a file transfer program such as FileZilla to browse the contents. You can then effortlessly transfer files between the two devices.
So, try ES File Explorer if you want to transfer data from a mobile device to your laptop through WiFi and don’t have WiFi Direct.
Don’t Have WiFi Direct? Transfer Files With Bluetooth!
If your devices don’t support WiFi Direct and you don’t want to use FTP, the intelligent solution (in the absence of a USB cable) is Bluetooth.
This is particularly useful if you’re trying to use WiFi Direct on Windows 7/8.1/10/11 and find that the feature isn’t there or it doesn’t work.
First, ensure your computer is paired to a suitable Bluetooth device (phone, tablet, computer, etc.) before sending a file. The methodology for this is essentially the same across devices and requires that both are set to “discoverable.”
Both devices will then search for one another and, if successful, connect following the input of a confirmation code.

How to Transfer Files From Android to PC: 7 Methods Want to learn how to transfer Android files to a PC or vice-versa? Here are several easy methods for moving data between devices. Read More
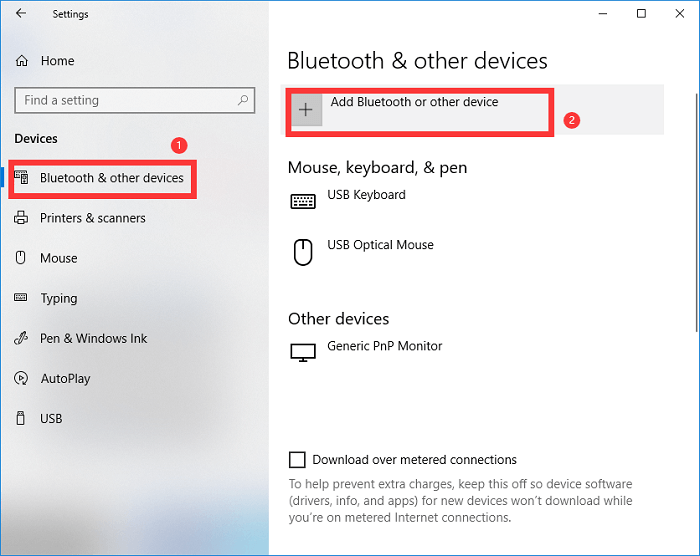
If you’re not sure where the controls for Bluetooth can be found on your Windows 7/8.1/10/11 computer, open Settings > Devices.
With the second device in discoverable mode (check your device’s documentation), select Add Bluetooth or another device. Windows 7/8.1/10/11 will then poll for the discoverable device. Follow the on-screen instructions to add it.
With a successful pairing, switch to the Windows 7/8.1/10/11 desktop and find the Bluetooth icon in the system tray/notification area. Left-click and select Send a file; you’ll be prompted to select the target device, then browse for the File.
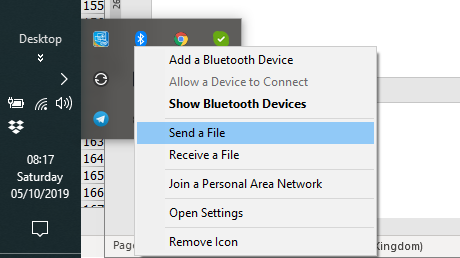
On sending the File, the device receiving your data file will ask you to confirm that you wish to save the data. Agree to this, then wait for the transfer to complete.
Note that due to the shorter range of Bluetooth, the best results will be enjoyed by keeping both devices close together.
Data Transfer Speeds: Which Is Best?
While trying these two methods, you will probably notice that WiFi Direct is considerably quicker than Bluetooth. Indeed, recent tests have demonstrated that Bluetooth speed is like a tortoise in comparison.
While WiFi Direct isn’t quicker than any cable data transfer (such as USB 2.0 or USB 3.0), it can transfer a 1.5 GB file within 10 minutes; in contrast, Bluetooth takes almost 125 minutes to shift the same data.
Start Using WiFi Direct in Windows 7/8.1/10/11 Today
Which option you choose will depend on the data you want to shift. A USB 3.0 cable with compatible hardware is the fastest option. WiFi Direct is close behind, with Bluetooth coming third. WiFi direct makes an excellent middle-ground option, but as it is not as widely available (or known) as Bluetooth, you might opt for a cable.
Perhaps the most crucial aspect of using WiFi Direct in Windows 7/8.1/10/11 is its ease of use today. After all, early implementations of the technology were somewhat tricky to use.
How to Reset a USB Wireless Adapter
USB wireless network adapters offer instant Internet access to PCs with no built-in wireless capabilities. They are also smaller and more convenient than bulky wireless network cards. If you are experiencing Internet connection problems, your adapter may have an issue. Reset your USB wireless adapter through Windows 7/8.1/10/11 to repair any problems that occur with the device.
Илья Кондрашов
Работает в IT сфере, занимается программированием и тестированием банковских систем.
Задать вопрос
Wi-Fi насчитывает уже шесть поколений. Каждое отличается от предыдущего не только скоростью, стабильностью и уровнем сигнала, но и прикладными технологиями, о которых мало кто знает. Одной из таких дополнительных технологий является Wi-Fi директ. В этой статье расскажем о том, что это такое и как включить функцию Wi-Fi Direct в Windows 10 и 7.
Содержание
- Определение и применение
- Плюсы и минусы
- Включение в Windows 10
- Параметры системы
- Передача файлов
- Горячие клавиши
- Активирование через сеть
- Включаем в Windows 7
- Возможные проблемы и решения
Определение и применение
Это универсальный стандарт, который поддерживают многие производители техники, Wi-Fi Direct можно встретить на ноутбуках, телефонах, телевизорах.

Её смысл заключается в том, что устройства могут поднимать сеть и обмениваться между собой информацией, даже если к ним не подключен интернет. То есть роутер не потребуется. Связь устанавливается напрямую, где одно из устройств выступает в качестве точки доступа, а второе подключается к нему. Передача информации осуществляется на максимальной скорости без каких-либо ограничений. Это позволяет не только принимать и отправлять файлы, но и транслировать экран, заниматься созданием DLNA и прочим.
Плюсы и минусы
Как и у всех решений, у этой технологии есть достоинства и недостатки.
К явным плюсам можно отнести:
- Возможность сопряжения самых разных типов устройств. К примеру, к ноутбуку или ПК можно подключить телевизор через Wi-Fi для стриминга фильмов или любого аудио- и видеоконтента. Это очень удобно, так как непосредственно в ТВ не нужно будет ничего скачивать.
- Можно транслировать рабочий стол со смартфона на ПК. Для этого потребуется установить приложение, работающее с miracast, а на подключаемом устройстве установить ответную часть ПО.
- Устройства, подключенные по Direct, имеют максимально допустимую скорость передачи, так как между ними нет коммутатора, настройки и особенности которого могут сильно резать скорость передачи и загрузки контента.
- Стандарт поддерживает все современные операционные системы, в число которых входят MacOS, Windows 7 и старше, а также мобильные ОС Andoid и iOS.
- В идеальных условиях можно добиться стабильного сигнала в радиусе до 100 м.
Недостатков у технологии хватает, они не особо критичны, но сказать о них стоит.
- Быстрая разрядка аккумулятора у техники, в которой он есть. Так как идёт непрерывное подключение, работают беспроводные модули, мы получаем постоянный разряд.
- Если у одного из устройств плохой беспроводной модуль, качество сигнала будет падать, а значит снизится и радиус действия. То есть соединение нестабильно.
- Проблемы в связывании в одну сеть более двух устройств.
- Невысокая степень защиты передаваемого сигнала. Но это больше технический аспект, с которым в повседневной жизни вряд ли будут проблемы.
Включение в Windows 10
Перед началом работы с Директом нужно подготовить ПК или ноутбук. В случае если не получается подключиться, нужно провести некоторые манипуляции. Первое, что нужно сделать, – на время отключить антивирус, либо настроить его и внутренний файрволл так, чтобы они пропускали все входящие и исходящие подключения.
Если рядом с устройством работает беспроводной передатчик Bluetooth или ресивер от клавиатур или мышек, их лучше выключить, либо быть готовым к тому, что они могут мешать подключению из-за смешения сигналов.
Не лишним будет убедиться, что беспроводной адаптер или встроенная плата имеют актуальные драйверы, а сам Wi-Fi работает в принципе. Так как если будут проблемы с беспроводным подключением в целом, может показаться, что не работает именно протокол Direct.
Параметры системы
Для того, чтобы запустить Вайфай Директ для системы Виндовс 10, потребуется провести несколько подготовительных шагов.
- Необходимо включить Wi-Fi модуль на ноутбуке и убедиться, что устройство не подключено ни к одному роутеру.
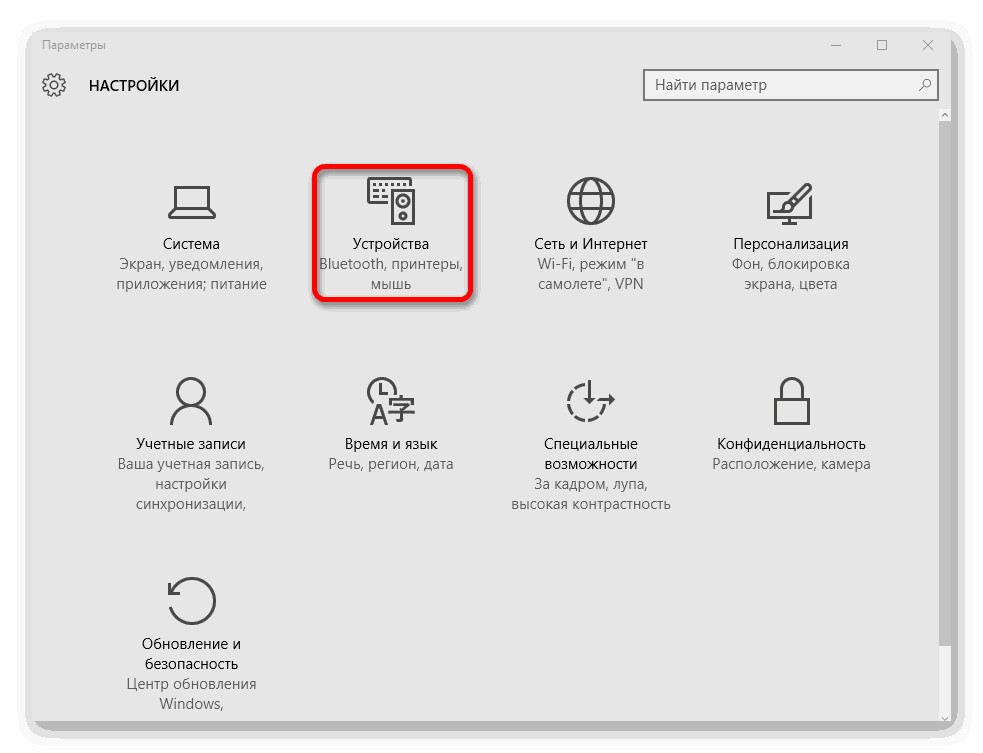
- Далее потребуется перейти в настройки системы. Сделать это проще всего через меню «Пуск», раздел «Параметры», в котором будет находиться пункт «Устройства».

- В открывшемся окне нужно кликнуть на иконку добавления устройств. В этот момент запустится поиск девайсов по близости.

- В окне добавления устройств выбираем пункт «Всё остальное» или «Беспроводной дисплей», в зависимости от устройства;
- И если второе устройство включено и у него активирован Wi-Fi, оно отобразится в списке и станет доступно к выбору.

- После инициализации сопряжения на втором девайсе нужно подтвердить подключение. После этого можно использовать передачу как файлов, так и медиа-потока.


Передача файлов
Чтобы включить Wi-Fi Direct на ноутбуке Windows 10 для передачи файлов, придётся использовать сторонний софт. Наиболее удобным будет приложение «Wi-Fi Transfer», которое можно найти в магазине приложений Windows.

Его же потребуется установить на телефон.
После запуска утилиты на обеих девайсах потребуется дать им имена, а затем на ПК выставить переключатель в положение «Send».

На телефоне надо переключиться на вкладку «Receive», где вам будет показан код для сопряжения.
После успешного сопряжения принимающее устройство, в нашем случае телефон, будет отображен в окне программы на компьютере. Кликом на наименование смартфона откроется область для загрузки файлов.

После добавления данных нужно нажать на кнопку «Send files» и они уйдут на телефон.
Горячие клавиши
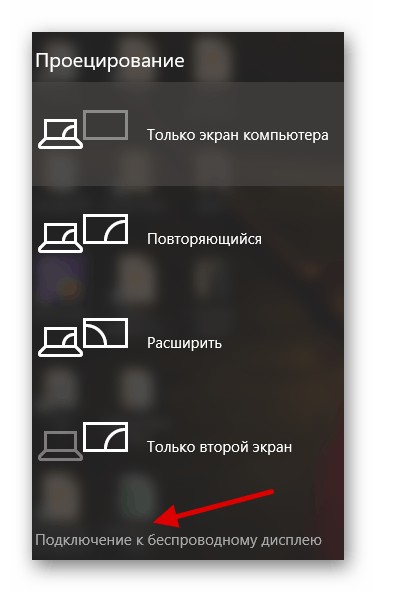
Для быстрой активации Direct для проецирования экрана ПК на смартфон или ТВ есть быстрое сочетание клавиш, которое вызывает встроенный менеджер транслирования изображения.
Для запуска потребуется:
- Включить miracast на принимающем устройстве.
- На клавиатуре нажать сочетание Win + P.

- Далее «Подключение к беспроводному дисплею» и выбираем устройство.

Активирование через сеть
Настройку Wi-Fi Direct на ПК можно выполнить с помощью проводника. Устройства должны быть подключены к одной сети.
Далее потребуется:
- Открыть «Проводник» и перейти в раздел «Сеть»;

- Следующим шагом нужно включить сетевое обнаружение и общий доступ к файлам.
- Сеть должна быть частной, если это не так, нужно ее создать.
- В сетевой инфраструктуре появятся устройства, с которыми можно работать.


WiFi Direct в телефоне настраивается легче.
Для этого нужно:
- Перейти в настройки системы и выбрать там пункт «Wi-Fi»
- В следующем окне перейти в «Дополнительно» и там выбрать пункт «Wi-Fi Direct».


Если в зоне видимости смартфона будут устройства, на которых сейчас запущено сопряжение или поиск по нужному нам протоколу, они появятся в перечне и их можно будет выбирать.
Если между собой сопрягаются смартфоны, то после выбора одного из них в перечне устройств, на втором потребуется подтверждением подключения.
Стоит заметить, что здесь не используется ввод ПИН-кода, поэтому нужно быть аккуратнее, ведь подключившись не к тому устройству, можно подвергнуть опасности файлы, находящиеся во внутренней памяти смартфона.
Если требуется настройка в беспроводном телевизоре, пользователю потребуется зайти в параметры системы. В них выбрать раздел «Сеть» и перейти в отдельный пункт «Wi-Fi Direct»

В остальном варианты включения директа на устройствах выполняется по тем же принципам, что описаны выше.
Включаем в Windows 7
Для настройки Direct на семёрке потребуется использовать сторонний софт, так как сама система не располагает необходимым ПО.
К примеру, если нужно вести удалённую передачу изображения с ПК на телевизор или экран, потребуется установить специальное приложение, которое называется Intel Wireless Display».
После её установки и запуска система автоматом перейдёт в режим поиска окружающих устройств и, если они будут найдены, их список будет выведен в окне программы. С кнопкой «Connect».

После попытки подключения нужно будет ввести ПИН-код принимающего устройства, и сопряжение будет завершено.
Для передачи файлов через Wi-Fi Direct в Windows 7 тоже потребуется использовать сторонние решения. К примеру, можно организовать доступ к файлам на телефоне через FTP, либо при помощи ShareIt. Её версия есть как для ПК, так и для Андроида.
Важно! Перед тем, как настроить и запустить Wi Fi Direct на ноутбуке Windows 7, нужно убедиться, что устройство работает на процессоре поколения Core i3, Core i5 или Core i7, а также встроенный сетевой адаптер от производителя Broadcom, либо Intel.
Возможные проблемы и решения
- При проблемах, в первую очередь, проверьте настройки сети.
- Нередко проблемы с беспроводными сетями создают антивирусы. Если такая ситуация произошла, защитное ПО можно остановить, настроить, или заменить на другое.
- Если используется подключение в диапазоне 2.4 ГГц, есть вероятность, что подключение прерывается другими сетями Wi-Fi, такое бывает в местах с большим количеством роутеров, либо радиопомех. Данная проблема может решиться путем поиска наименее «захламленного» канала, т.е. того, на котором сейчас находится меньше всего устройств.
Когда надо подключить к компьютеру принтер, телевизор, смартфон или планшет, многие используют для этого специальные кабели. Это не совсем удобно, поскольку приходится думать, как расположить их, чтобы они не мешали. Также не всегда находится нужный провод.
Компания Microsoft решила эту проблему, создав технологию Miracast. Стандарт был разработан на основе Wi-Fi Direct. Сегодня востребованы обе технологии. Однако, в этой статье будет описано, как включить Wi-Fi Direct на Windows 10 (все-таки правильнее будет сказать Miracast, «десятка» поддерживает этот стандарт).
Содержание
- Определение
- Особенности
- Преимущества и недостатки
- Способы включения
- Способ 1
- Способ 2
- Способ 3
- Возможные проблемы и способы их решения
- Задать вопрос автору статьи
Определение

Wi-Fi Direct – это стандарт беспроводной связи для соединения приборов без использования кабелей. Для подключения требуется только точка доступа. Чаще всего используют адаптер встроенный или внешний.
Технология поддерживается большинством компьютеров, гаджетов и других аппаратов.
Особенности
Характеристики:
- скорость передачи данных составляет 200-250 Мбит/с;
- радиус действия – 50-100 м;
- нужен адаптер беспроводной связи с диапазоном 2,4 или 5 ГГц, поддерживающий Wi-Fi Direct или Miracast.
Стандарт рекомендуется использовать только для домашних сетей, которые защищены паролем. Дело в том, что если использовать технологию, например, в офисе, то третьи лица получат возможность присоединить к приборам сторонние гаджеты. Это ставит под угрозу безопасность данных, хранящихся в файлах устройства. Поэтому технологию не рекомендуется использовать на работе.
Преимущества и недостатки
Плюсы:
- позволяет установить безопасное беспроводное соединение и избавиться от проводов;
- простота настройки;
- не требуется наличие порта HDMI;
- для соединения не нужен роутер, поскольку можно использовать встроенный адаптер устройств в качестве точки доступа Wi-Fi;
- можно использовать для обмена данными между аппаратами в поездках.
Недостатки стандарта:
- иногда соединение прерывается, но стабильность во многом зависит от качества беспроводной связи;
- задержка передачи данных.
Несмотря на недостатки, технология популярна, поэтому пользователи часто задаются вопросом, как включить Wi-Fi Direct на Windows 10. Процедура выполняется просто, но требует соблюдения инструкции.
Способы включения
Видео-инструкции доступны тут:
WiFi Direct на Windows 10 включают разными способами, каждый из которых имеет определенные особенности.
Способ 1
Активировать опцию на компьютере можно простым сочетанием клавиш. Процедура включения занимает всего несколько минут. Алгоритм действий:
- включите функцию или активируйте беспроводной модуль на том аппарате, с которым выполняется соединение;
- на клавиатуре компьютера одновременно нажмите клавиши + P;

- в открывшемся окне нажмите на надпись: «Подключение к беспроводному дисплею»;
- после обнаружения устройств выберите нужный прибор;
- если все прошло успешно, на экране подключаемого прибора появится соответствующая надпись.
Таким способом можно подключить к Windows 10 с помощью Wi-Fi Direct сотовый телефон, принтер и другие устройства.
Способ 2
Инструкция использования Вай-Фай Директ на Windows 10 через параметры системы:
- войдите в меню Пуск;
- выберите вкладку с параметрами системы;
- нажмите на папку «Устройства»;
- нажмите на надпись: «Добавление…;
- после обнаружения прибора нажмите на него, и будет выполнено подключение.
Такой способ устанавливает соединение с помощью Wi-Fi Direct между Windows 10 и телевизорами, принтерами, телефонами и другими приборами.
Способ 3
Иногда нужно выполнить соединение компьютера и телевизора. Для этого ПК подключить к той же сети, что и ТВ. Соединение аппаратов выполните через меню телевизора, пользуясь инструкцией или подсказками системы.
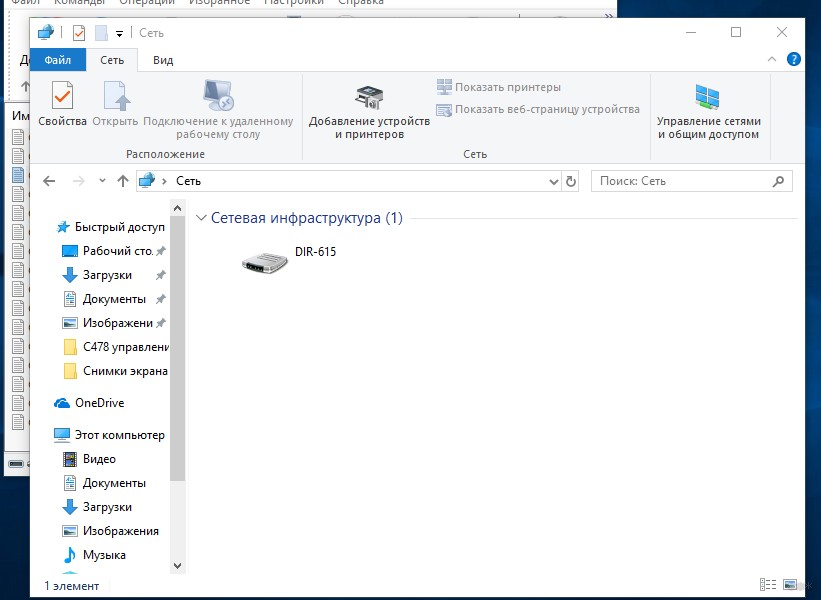
Нужно также выполнить настройку компьютера. Для этого откройте доступ к просмотру файлов на других устройствах с помощью DLNA-сервера:
- зайдите в «Проводник» и слева внизу найдите раздел «Сеть»;
- сверху увидите сообщение «Общий доступ к файлам отключен…», нажмите на него ПКМ и выберите «Включить сетевое обнаружение…»;
- если частная сеть не создавалась, нужно ее создать;
- в окошке «Сетевая инфраструктура» будут представлены все устройства, подключенные к одной сети.
Теперь можно воспроизводить файлы с ПК на экран телевизора.
Возможные проблемы и способы их решения
Обычно функция включается легко. Однако, иногда могут возникнуть проблемы и тогда опция не активизируется. Чаще всего это происходит в следующих случаях:
- На мониторе появляется сообщение, что прибор не поддерживает технологию. Это означает, что драйверы устройства устарели. Решение проблемы – обновление «дров». Лучше всего брать их с официального портала Microsoft.
- На мониторе появляется сообщение, что прибор не поддерживает технологию также в том случае, если адаптер не поддерживает Wi-Fi Direct. Проблема решается подключением через общий маршрутизатор или покупкой правильного адаптера.
- Соединение приборов происходит долго. Обычно причина в устаревших драйверах. Обновление системы решит проблему.
Если переустановка драйверов не помогла, рекомендуется обратиться в сервисный центр. Возможно, произошла аппаратная поломка.
Miracast (Wi-Fi Direct) – технология, позволяющая выполнить соединение различных устройств, которые ее поддерживают. В отличие от Bluetooth, она дает возможность обмениваться не только файлами, хранящимися в памяти приборов, но и передавать данные из интернета – видео, изображения, аудиозаписи.
Learn how to pair Bluetooth devices with your PC in simple steps. Enable Bluetooth in settings, set your device to pairing mode, and connect seamlessly. Troubleshoot common issues for a smooth wireless experience.
Learn how to quickly enable or disable Bluetooth on your Windows device. Discover step-by-step methods using the taskbar icon, Settings app, or keyboard shortcuts for seamless control. Perfect for connecting devices or conserving battery life effortlessly.
Create bootable Windows installation media effortlessly with the official Microsoft Windows USB/DVD Tool. This free ISO burner utility lets you convert ISO files to bootable USB drives or DVDs, ensuring reliable setup for OS installations or repairs. Trusted, user-friendly, and designed for seamless Windows deployment.
Struggling with audio problems on your Windows 10 PC? Learn step-by-step solutions to fix sound driver issues, including updating drivers, reinstalling software, using Windows troubleshooter, and restoring default settings. Resolve no-sound errors, distorted audio, or unrecognized devices quickly for seamless playback and optimal system performance.
The Logitech Unifying Receiver simplifies your workspace by enabling wireless connectivity for up to six compatible devices—like keyboards, mice, and more—through a single USB port. Enjoy clutter-free convenience, reliable performance, and effortless device management across Logitech peripherals.
Epson Print and Scan delivers unmatched precision and rapid performance, empowering professionals to achieve peak efficiency. Engineered for reliability, its advanced technology ensures crisp prints, swift scanning, and seamless workflow integration—transforming complex tasks into effortless processes for uninterrupted productivity.
Learn how to set up your Epson L3250 all-in-one printer with ease. This guide covers unboxing, installing ink cartridges, connecting to power, and configuring via USB or Wi-Fi. Follow step-by-step instructions to install drivers, download software, and troubleshoot common issues for seamless printing, scanning, and copying.
Discover the ultimate photo viewer for Windows 10/11 designed to simplify image management. Enjoy lightning-fast loading, intuitive organization tools, and seamless browsing with support for all major formats. Effortlessly sort albums, tag favorites, and enhance visuals with built-in editing features—perfect for photographers and casual users alike. Streamline your workflow today!
Learn how to set up your Epson L3250 printer quickly and efficiently with this step-by-step guide. From unboxing to connecting power, installing software, and configuring settings, we’ll walk you through each stage for a smooth, hassle-free installation. Perfect for beginners and experts alike!
Learn step-by-step methods to update drivers on Windows 10 for optimal hardware performance. Discover manual updates via Device Manager, automatic updates through Windows, and manufacturer tools. Ensure system stability, fix bugs, and enhance compatibility with the latest driver versions.
See all queries
Developed By: NetComps Ltd
License: Free
Rating: 3,6/5 — 2.108 votes
Last Updated: April 22, 2025
App Details
| Version | 9.0.30 |
| Size | 15.4 MB |
| Release Date | March 07, 24 |
| Category | Communication Apps |
|
App Permissions: |
|
|
Description from Developer: |
About this app
On this page you can download WiFi Direct + and install on Windows PC. WiFi Direct + is free Communication app, developed by NetComps Ltd. Latest version of WiFi Direct + is 9.0.30, was released on 2024-03-07 (updated on 2025-04-22). Estimated number of the downloads is more than 1,000,000. Overall rating of WiFi Direct + is 3,6. Generally most of the top apps on Android Store have rating of 4+. This app had been rated by 2,108 users, 1,137 users had rated it 5*, 523 users had rated it 1*.
How to install WiFi Direct + on Windows?
Instruction on how to install WiFi Direct + on Windows 10 Windows 11 PC & Laptop
In this post, I am going to show you how to install WiFi Direct + on Windows PC by using Android App Player such as BlueStacks, LDPlayer, Nox, KOPlayer, …
Before you start, you will need to download the APK/XAPK installer file, you can find download button on top of this page. Save it to easy-to-find location.
[Note] You can also download older versions of this app on bottom of this page.
Below you will find a detailed step-by-step guide, but I want to give you a fast overview of how it works. All you need is an emulator that will emulate an Android device on your Windows PC and then you can install applications and use it — you see you’re playing it on Android, but this runs not on a smartphone or tablet, it runs on a PC.
If this doesn’t work on your PC, or you cannot install, comment here and we will help you!
- Install using BlueStacks
- Install using NoxPlayer
Step By Step Guide To Install WiFi Direct + using BlueStacks
- Download and Install BlueStacks at: https://www.bluestacks.com. The installation procedure is quite simple. After successful installation, open the Bluestacks emulator. It may take some time to load the Bluestacks app initially. Once it is opened, you should be able to see the Home screen of Bluestacks.
- Open the APK/XAPK file: Double-click the APK/XAPK file to launch BlueStacks and install the application. If your APK/XAPK file doesn’t automatically open BlueStacks, right-click on it and select Open with… Browse to the BlueStacks. You can also drag-and-drop the APK/XAPK file onto the BlueStacks home screen
- Once installed, click «WiFi Direct +» icon on the home screen to start using, it’ll work like a charm


[Note 1] For better performance and compatibility, choose BlueStacks 5 Nougat 64-bit read more
[Note 2] about Bluetooth: At the moment, support for Bluetooth is not available on BlueStacks. Hence, apps that require control of Bluetooth may not work on BlueStacks.
How to install WiFi Direct + on Windows PC using NoxPlayer
- Download & Install NoxPlayer at: https://www.bignox.com. The installation is easy to carry out.
- Drag the APK/XAPK file to the NoxPlayer interface and drop it to install
- The installation process will take place quickly. After successful installation, you can find «WiFi Direct +» on the home screen of NoxPlayer, just click to open it.
Discussion
(*) is required