
Выберите вариант загрузки:
- скачать с сервера SoftPortal (zip-файл)
- скачать с официального сайта (zip-файл)
Небольшая бесплатная утилита, которая отслеживает службу беспроводной сети операционной системы Windows и отображает любое событие, включая сканирование беспроводных сетей, подключение или отключение от точки доступа, неудачную попытку подключения и пр. (полное описание…)

Рекомендуем популярное
BlueSoleil 10.0.498.0
BlueSoleil — одно из наиболее популярных приложений, которое при помощи Bluetooth поможет соединить…
InSSIDer 5.5.0.0
InSSIDer — полезное приложение, благодаря которому можно легко выбрать лучшую из доступных Wi-Fi…
MyPublicWiFi 30.1
MyPublicWiFi — программа, с помощью которой можно расшарить Wi-Fi с Вашего ПК, создав временную…
SHAREit 5.1.0.7
SHAREit — отличная программа для быстрого и удобного обмена файлами в одной Wi-Fi сети между…
Wi-Fi Scanner 22.11
Полезная утилита для поиска доступных Wi-Fi точек доступа, а также отображения различной…
How to Test WiFi Speed?
There are several ways how you can test your WiFi speed, some more convenient than others. In fact, one handy WiFi internet speed test tool comes with all versions of the Windows operating system, and its name is Ping.
Microsoft describes it as the primary tool for troubleshooting IP-level connectivity in Windows. This command-line tool can measure how long it takes a local or remote network device, such as a web server, to respond to a request, and it can also detect when packets of data get lost. Theoretically, you could even use Ping to determine your download and upload speed, but doing so would be inconvenient for a number of reasons.
A common alternative to Ping are various online speed tests provided by different ISPs. While easy to use and convenient, such speed tests lack transparency and their results could be manipulated to either make the competition look bad or to make customers believe that their internet speeds are greater than they really are.
Because of this, we recommend independent WiFi speed test apps, like the ones listed below.
| All Utilities |
| Password Tools |
| System Tools |
| Browser Tools |
| Programmer Tools |
| Network Tools |
| Outlook/Office |
| 64-bit Download |
| Panel |
| Forensics |
| Pre-Release Tools |
| Articles |
DescriptionWifiDiagnosticsView is a Wifi diagnostics tool for Windows 11/10/8/7/Vista that monitors the wireless network service of Windows operating system and displays any 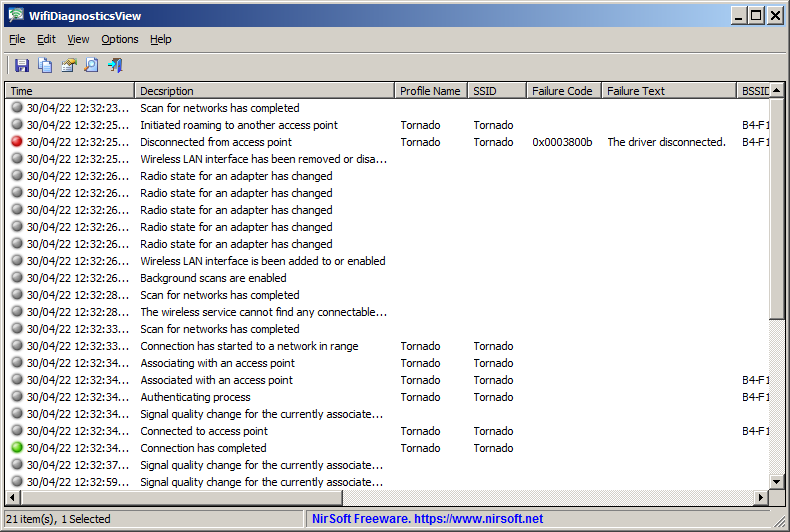
System Requirements
Version History
Start Using WifiDiagnosticsViewWifiDiagnosticsView doesn’t require any installation process or additional DLL files. In order to start using it, simply run the executable file — WifiDiagnosticsView.exe Put Icon On TrayIf you want to run WifiDiagnosticsView in the background without displaying any window, simply turn on the ‘Put Icon On Tray’ option (Under the Options menu). Translating WifiDiagnosticsView to other languagesIn order to translate WifiDiagnosticsView to other language, follow the instructions below:
LicenseThis utility is released as freeware. DisclaimerThe software is provided «AS IS» without any warranty, either expressed or implied, FeedbackIf you have any problem, suggestion, comment, or you found a bug in my utility, Download WifiDiagnosticsView WifiDiagnosticsView is also available in other languages. In order to change the language of
|
Уровень сигнала Wi-Fi влияет на качество вашего интернет подключения. В Windows вы можете определить текущее значение уровня сигнала Wi-Fi подключения несколькими способами. Я попробовал разобраться, как с помощью PowerShell определить текущий уровень сигнала Wi-Fi; вывести уведомление, если качество сигнала упало; и вывести список всех доступных беспроводных сетей с их техническими параметрами.
Обычный пользователь Windows 10 может оценить уровень сигнала Wi-Fi для текущего подключения по иконке беспроводной сети в таскбаре. Щелкните по иконке и перед вами появится список доступных Wi-Fi сетей.
У каждой Wi-Fi сети есть иконка с полосками. Чем больше полосок, тем лучше уровень сигнала точки доступа. Три полоски говорят о том, что уровень качества сигнала находится в диапазоне от 75 до 100%. Если у подключения две полоски, значит качество приема сигнала Wi-Fi между 50 и 75%, и т.д.
Вы можете получить более точное значение качества сигнала из командой строки. Все параметры текущего беспроводного подключения можно вывести с помощью команды:
netsh wlan show interfaces
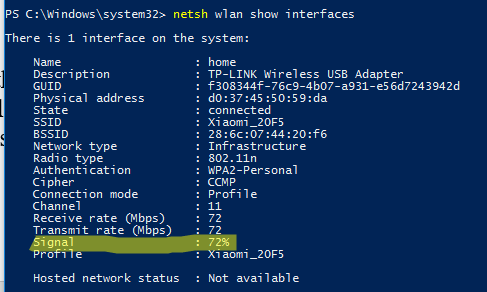
На скриншоте выделен уровень сигнала подключения к Wi-Fi точке доступа (Signal: 72%).
С помощью PowerShell можно получить только значение уровня сигнала в процентах:
(netsh wlan show interfaces) -Match '^\s+Signal' -Replace '^\s+Signal\s+:\s+',''

С помощью простого PowerShell скрипта можно вывести всплывающее уведомление пользователю, если уровень Wi-Fi сигнала стал менее 30%.
$cur_strength=(netsh wlan show interfaces) -Match '^\s+Signal' -Replace '^\s+Signal\s+:\s+','' | Out-String
If ($cur_strength.replace('%','') –le 30)
{
Add-Type -AssemblyName System.Windows.Forms
$global:balmsg = New-Object System.Windows.Forms.NotifyIcon
$path = (Get-Process -id $pid).Path
$balmsg.Icon = [System.Drawing.Icon]::ExtractAssociatedIcon($path)
$balmsg.BalloonTipIcon = [System.Windows.Forms.ToolTipIcon]::Warning
$balmsg.BalloonTipText = “Уровень Wi-Fi сигнала менее $cur_strength Вернитесь к точке доступа!”
$balmsg.BalloonTipTitle = "Внимание $Env:USERNAME"
$balmsg.Visible = $true
$balmsg.ShowBalloonTip(10000)
}
Такой PowerShell цикл можно запустить в бесконечном цикле и проверять состояние сигнала раз в 10 секунд, или сделать из него службу Windows, чтобы она уведомляла вас об плохом Wi-Fi подключении.
Также с помощью netsh вы можете вывести список всех доступных беспроводных сетей в зоне действия вашего беспроводного адаптера (а не только список сохраненных wi-fi сетей). Для этого используется команда:
netsh wlan show network mode=bssid
Следующий PowerShell скрипт сканирует все доступные Wi-Fi сети (в том числе точки доступа на Windows), выводит их имена, уровень сигнала, каналы (полезно для поиска свободных каналов), и стандарты (802.11n, 802.11ac, 802.11g и т.д.), на которых они работают.
$logs=@()
$date=Get-Date
$cmd=netsh wlan show networks mode=bssid
$n=$cmd.Count
 For($i=0;$i -lt $n;$i++)
{
If($cmd[$i] -Match '^SSID[^:]+:.(.*)$')
{
$ssid=$Matches[1]
$i++
$bool=$cmd[$i] -Match 'Type[^:]+:.(.+)$'
$Type=$Matches[1]
$i++
$bool=$cmd[$i] -Match 'Authentication[^:]+:.(.+)$'
$authent=$Matches[1]
$i++
$bool=$cmd[$i] -Match 'Cipher[^:]+:.(.+)$'
$chiffrement=$Matches[1]
$i++
While($cmd[$i] -Match 'BSSID[^:]+:.(.+)$')
{
$bssid=$Matches[1]
$i++
$bool=$cmd[$i] -Match 'Signal[^:]+:.(.+)$'
$signal=$Matches[1]
$i++
 $bool=$cmd[$i] -Match 'Type[^:]+:.(.+)$'
$radio=$Matches[1]
$i++
$bool=$cmd[$i] -Match 'Channel[^:]+:.(.+)$'
$Channel=$Matches[1]
$i=$i+2
$logs+=[PSCustomObject]@{date=$date;ssid=$ssid;Authentication=$authent;Cipher=$chiffrement;bssid=$bssid;signal=$signal;radio=$radio;Channel=$Channel}
}
}
}
$cmd=$null
$logs|Out-GridView -Title 'Scan Wifi Script'
Перед вами должна появится вот такая таблица Out-GridView с информацией о параметрах всех доступных беспроводных сетях.
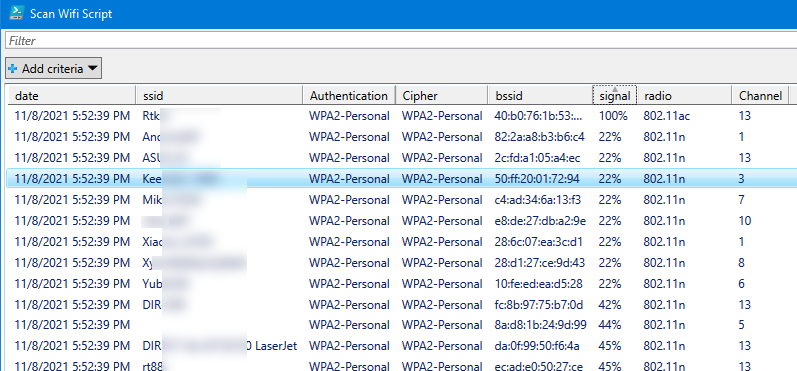
На это скриншоте видно, что в моем окружении популярен 13 канал, поэтому мне не стоит запускать свою точку доступа на этом канале.
(Image credit: Mauro Huculak)
On Windows 11, you can check the Wi-Fi signal strength in multiple ways, and in this guide, I will show you how to complete this task.
When you connect your laptop or desktop computer to the network and the internet using a wireless adapter, the quality of the signal will impact the connection’s performance. The main reason is that this technology uses radio waves to send and receive data, which are susceptible to interference and limited in range.
As a result, the ability to know the signal strength for a Wi-Fi connection can help you troubleshoot connectivity problems and quickly discard an issue with the Internet Service Provider (ISP).
If you must check the signal strength, Windows 11 offers at least five ways to complete this task: using the Taskbar’s Quick Settings, the Settings app, the legacy Control Panel, and commands with PowerShell and Command Prompt.
In this how-to guide, I will explain the different ways to monitor the wireless signal quality on Windows 11.
How to check wireless strength from Taskbar
To determine the signal quality of your Wi-Fi connection from the Taskbar, use these steps:
- Click the network icon in the Taskbar.
- Click the «Manage Wi-Fi connections» button.
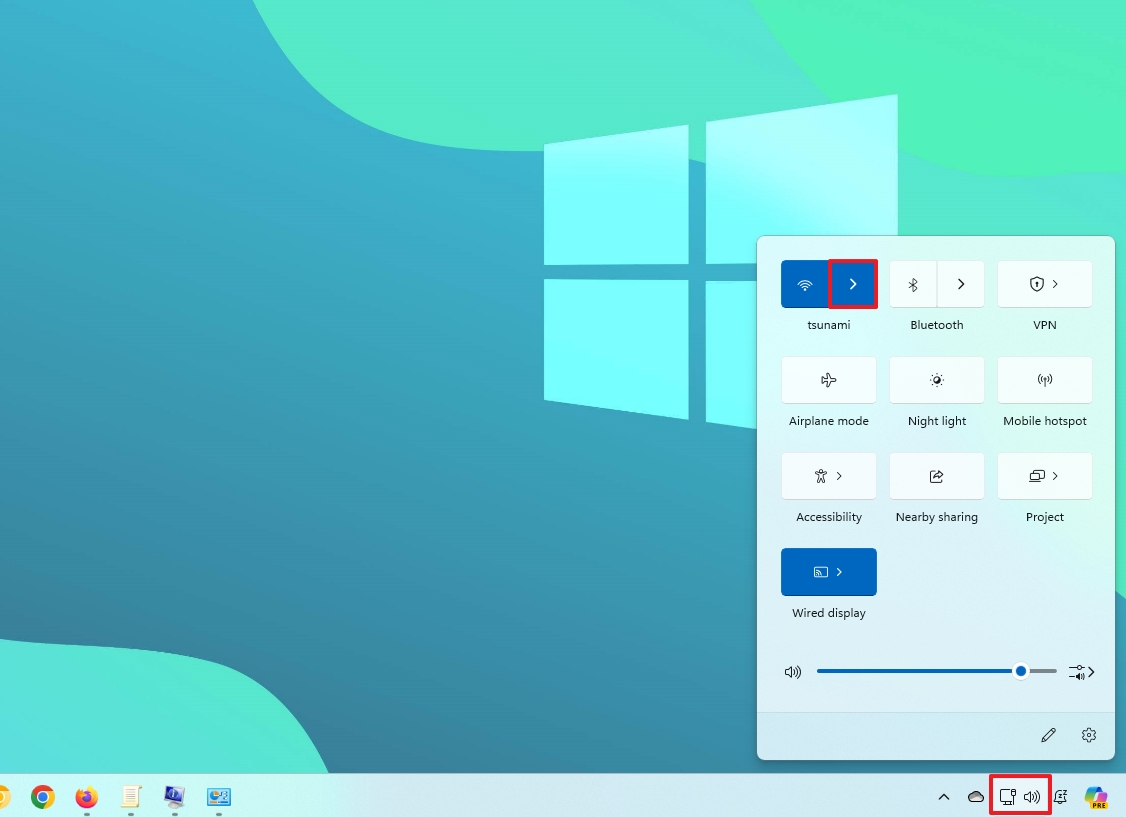
- Confirm the number of bars in the wireless icon for the active connection to determine the strength.
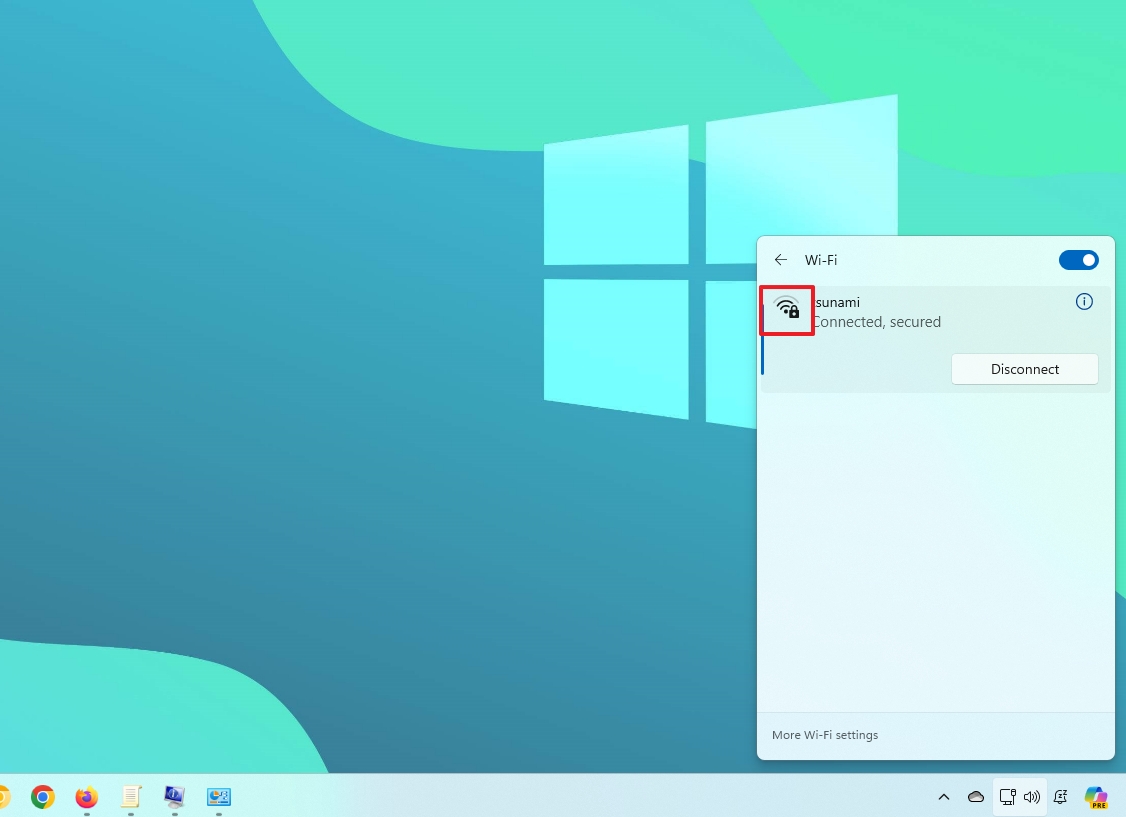
In the icon, one solid bar indicates a weak signal, two bars mean the signal is acceptable, and three and four bars represent the best signal you can get.
All the latest news, reviews, and guides for Windows and Xbox diehards.
How to check wireless strength from Settings
To check the Wi-Fi signal strength from the Settings app, use these steps:
- Open Settings.
- Click on Network & internet.
- Click the Wi-Fi page on the right side.
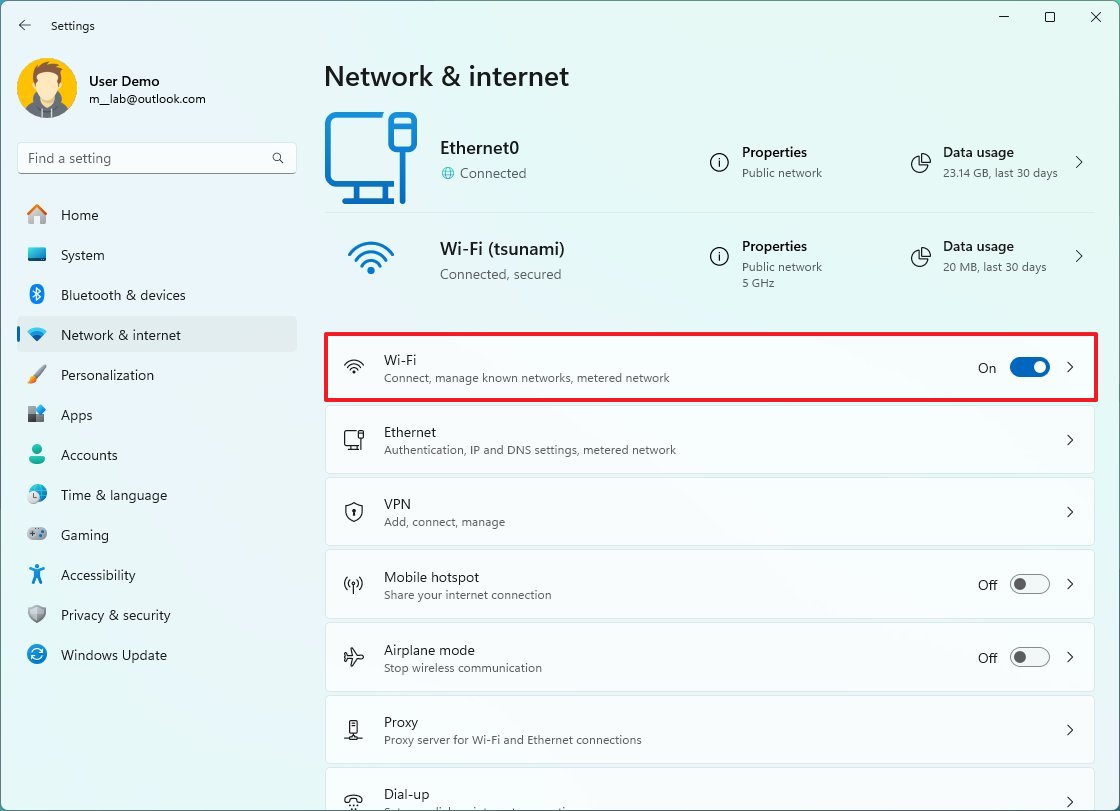
- Check the number of bars in the wireless icon for the active connection to determine how strong the signal is.

After you complete the steps, the wireless icon will give you an indication of the signal quality on Windows 11.
How to check wireless strength from Control Panel
To determine the signal quality of a wireless connection, use these steps:
- Open Control Panel.
- Click on Network and Internet.
- Click on Network and Sharing Center.
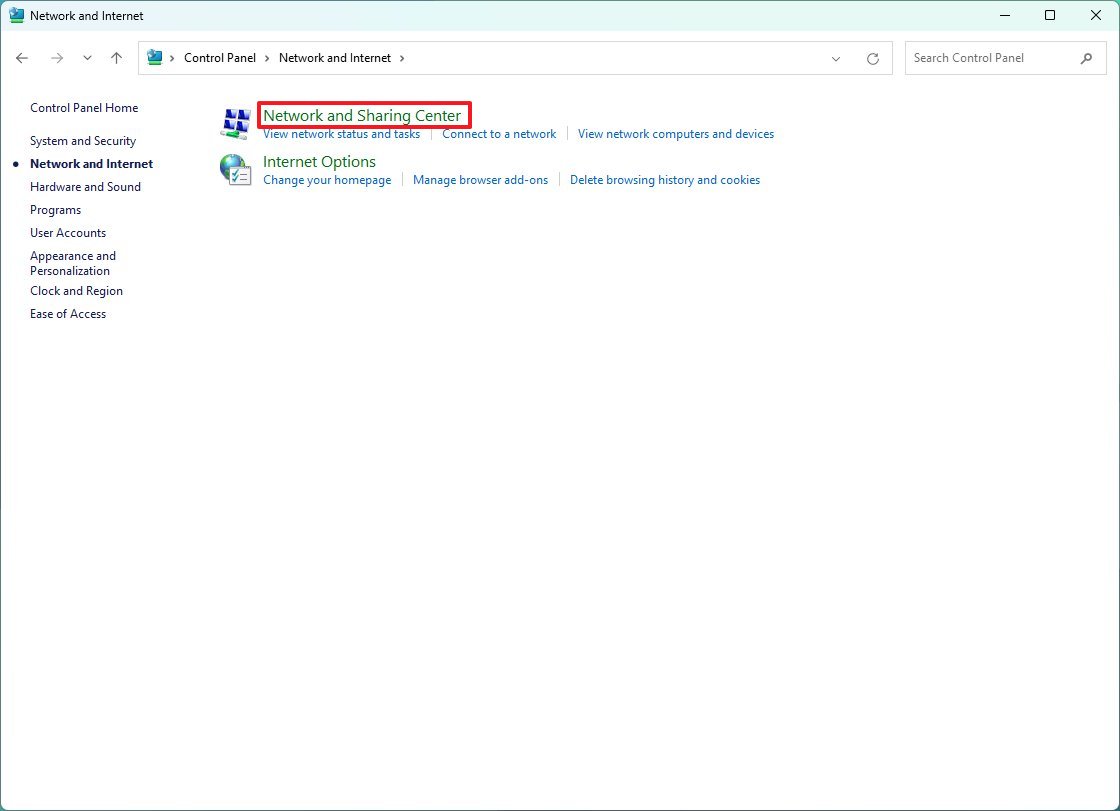
- The icon for «connections» will indicate the signal quality under the «View your active networks» section.
- (Optional) Click the connection name to check the signal strength and other information.
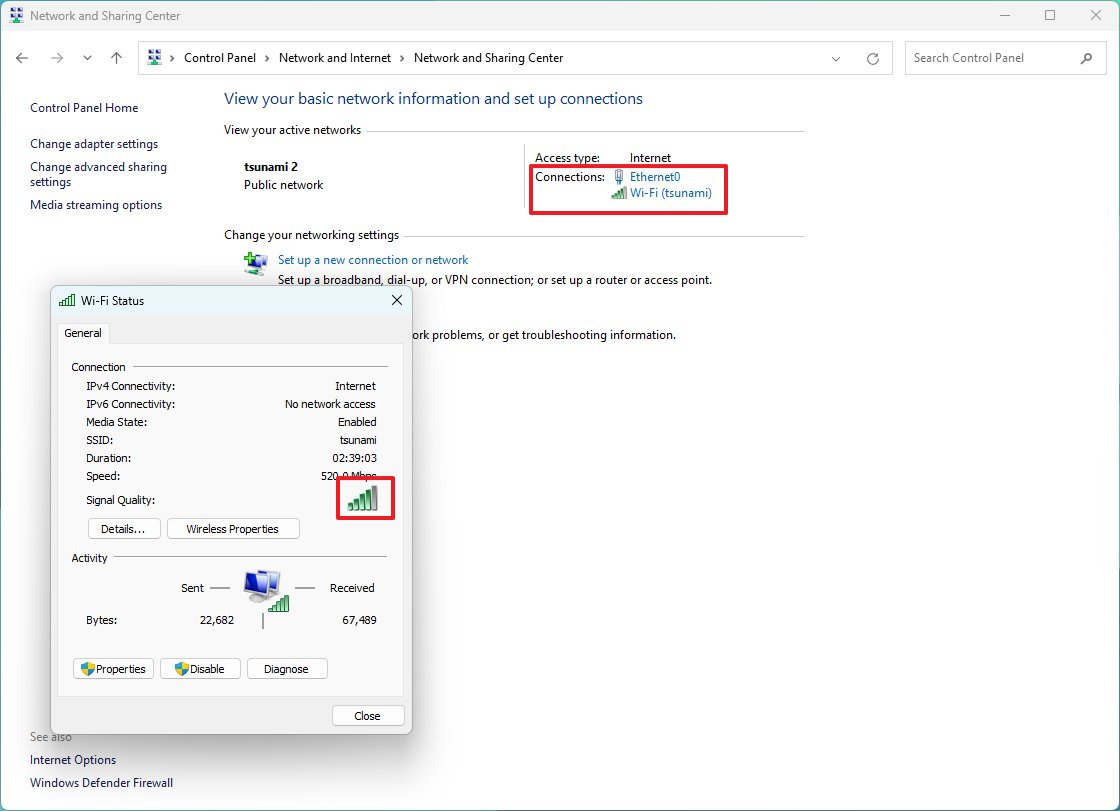
Once you complete the steps, the legacy Control Panel will reveal the connection signal quality of your computer.
How to check wireless strength from PowerShell
To find out the Wi-Fi signal strength through PowerShell, use these steps:
- Open Start.
- Search for PowerShell and click the top result to open the app.
- Type the following command to check the signal strength and press Enter: (netsh wlan show interfaces) -Match ‘^\s+Signal’ -Replace ‘^\s+Signal\s+:\s+’,’‘
- Confirm the signal quality output. (The percentage goes from 0 to 100, where 100 percent indicates excellent signal quality.)
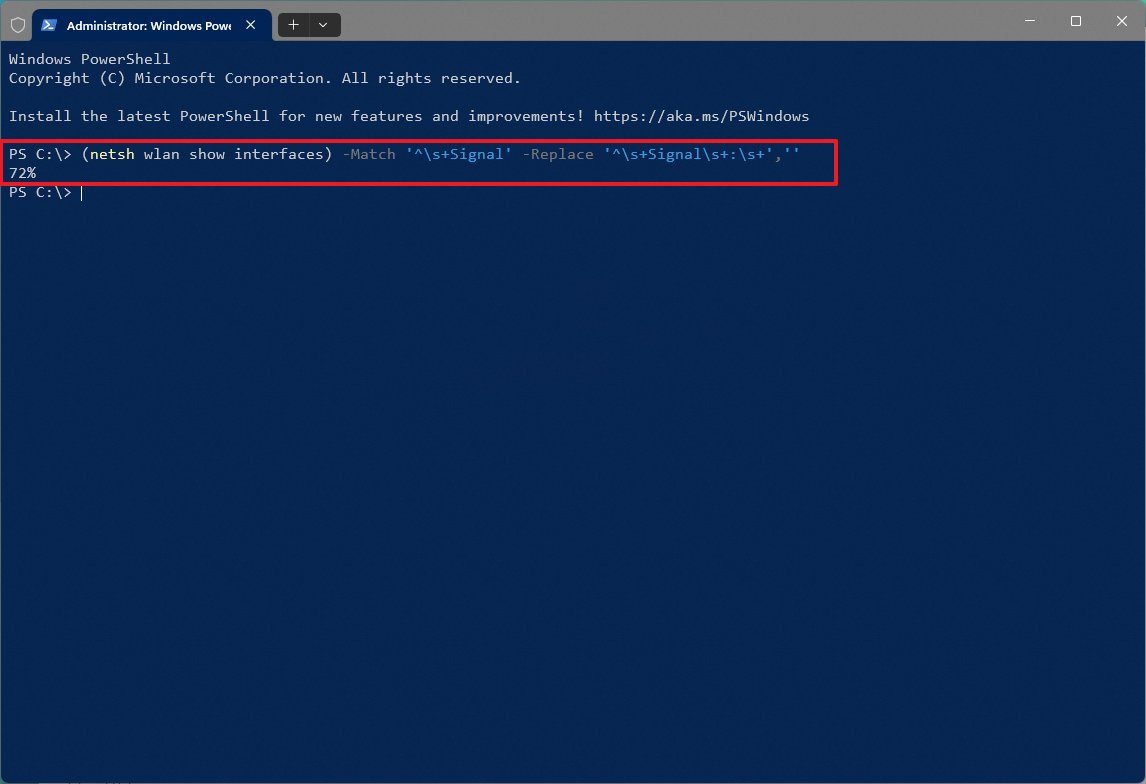
After you complete the steps, the connection is reliable if you see a signal quality between 80 and 100 percent. If the signal is above 70 percent, it’s still good for light web browsing. Anything below 60 percent of the signal is weak.
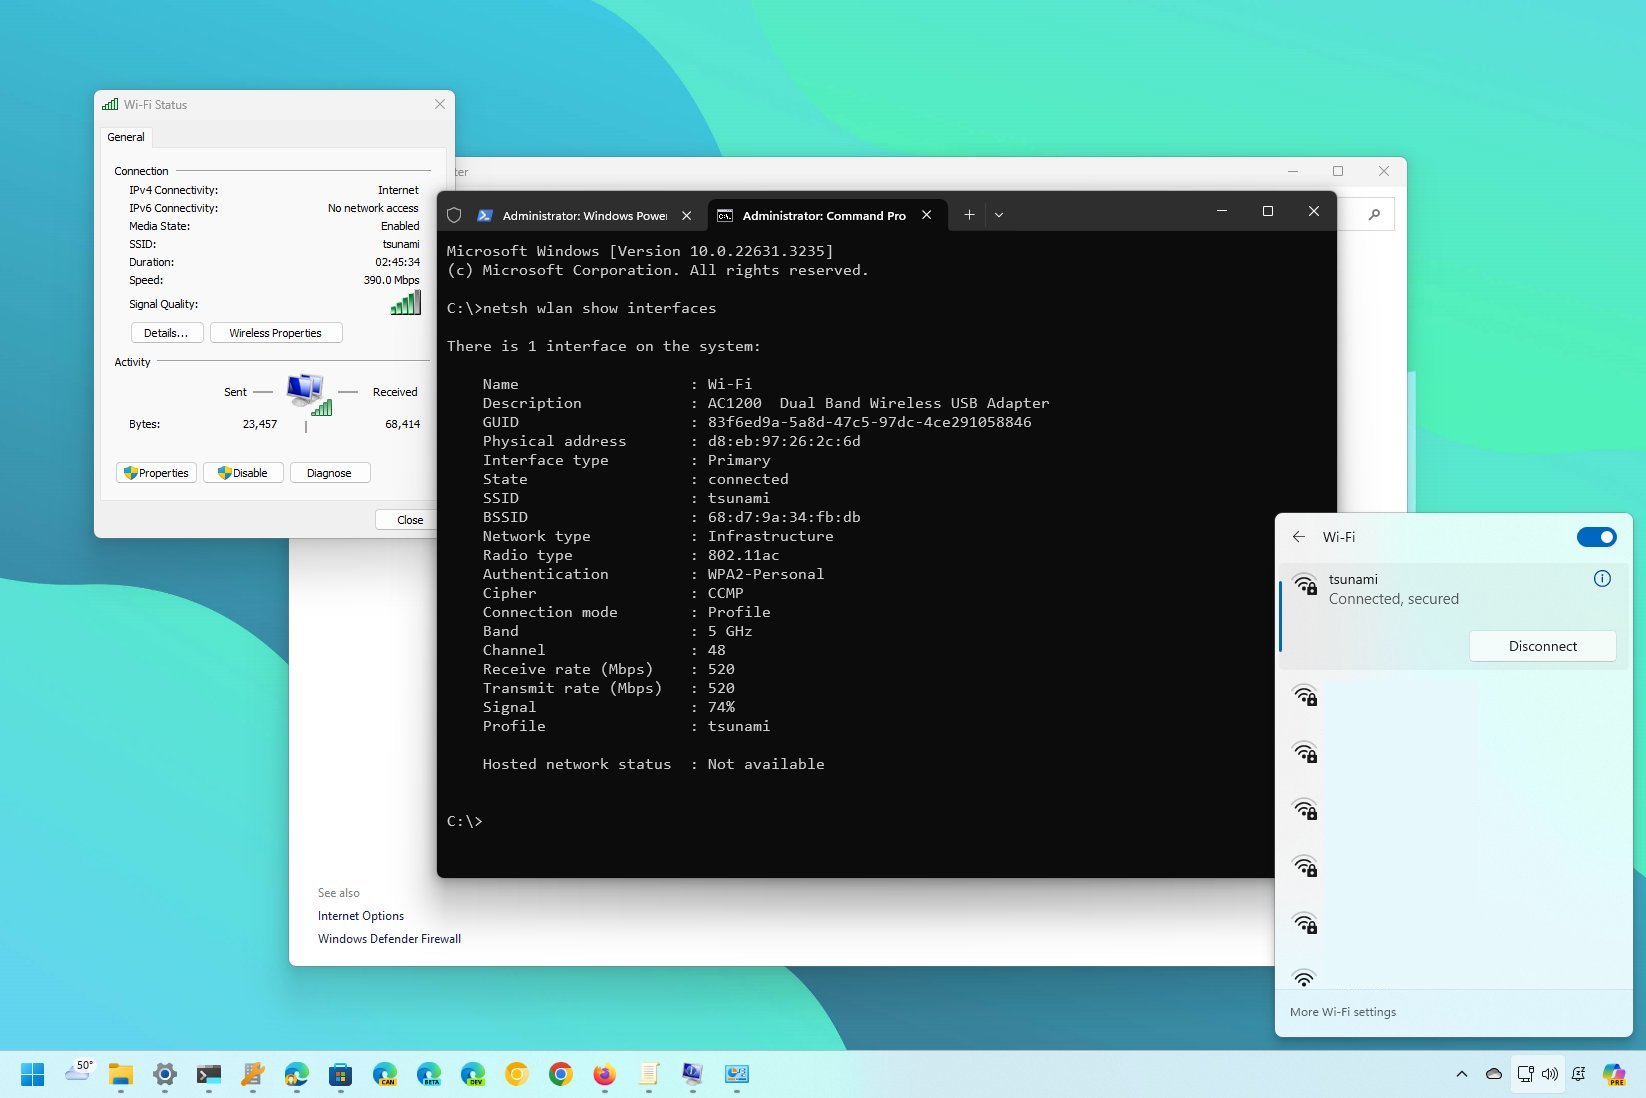
How to check wireless strength from Command Prompt
To confirm the Wi-Fi signal strength from the Command Prompt, use these steps:
- Open Start.
- Search for Command Prompt and click the top result to open the app.
- Type the following command to view the Wi-Fi signal strength and press Enter: netsh wlan show interfaces
- Confirm the signal quality in the «Signal» details. (If the output number equals or exceeds 80, the signal’s strength is good.)
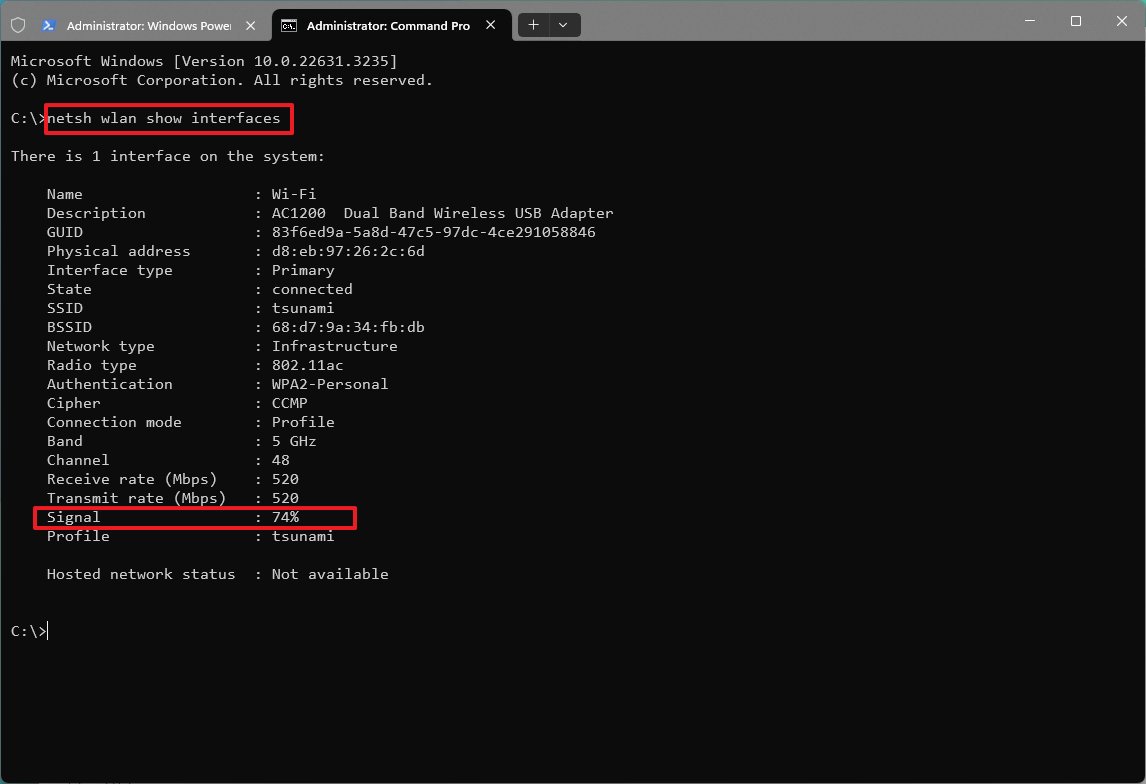
Once you complete the steps, Command Prompt will reveal the quality of the signal quality.
Consider these tips to improve signal strength
If your device has a weak wireless signal, move the computer closer to the access point or place the access point in the line of sight, such as in the middle of the room, where you can see it.
As you make physical changes to the computer or access point’s location, run the Command Prompt or PowerShell commands to get more accurate results.
You can also use the dynamic wireless icon. Each bar (including the dot) represents a quarter of the signal quality. The dot is 25 percent, the second bar is 50 percent, the third is 75 percent, and the fourth is 100 percent.
You should also consider the physical environment. For example, fluorescent lights and microwaves can cause wireless signal interference, walls, and other solid objects can weaken the quality of the signal, and the position of the antennas can also play a role.
In addition, if you’re in a location with many wireless signals using the channel, this can also cause problems with the connection speeds. Usually, modern access points can detect and adapt to the environment, but sometimes, you may just have to change the configuration, such as changing the wireless channel to one that is less crowded.
More resources
For more helpful articles, coverage, and answers to common questions about Windows 10 and Windows 11, visit the following resources:
- Windows 11 on Windows Central — All you need to know
- Windows 10 on Windows Central — All you need to know
Mauro Huculak has been a Windows How-To Expert contributor for WindowsCentral.com for nearly a decade and has over 15 years of experience writing comprehensive guides. He also has an IT background and has achieved different professional certifications from Microsoft, Cisco, VMware, and CompTIA. He has been recognized as a Microsoft MVP for many years.