
The built-in widgets platform in Windows 11 may lead to the issue of widgets high CPU usage. The issue will slow down your system’s running speed. In this post, MiniTool Partition Wizard provides some solutions to the issue for you. Please follow them when you meet the issue.
Windows 11 has a built-in widgets program. It is an attractive feature that can be used to display the date, weather, traffic, and so on. And it can be easily opened by clicking the Widgets icon in the taskbar.
Although it is useful, some issues are caused by it, and widgets high CPU usage in Windows 11 is one of them. It is mainly caused by the following factors:
- Background apps: Sometimes, we minimize the apps and keep them running in the background, which will consume a high CPU power and lead to high usage.
- Corrupt files: If any files needed by the Widgets are corrupt, it will keep searching for them in the background, resulting in high CPU usage.
Once you encounter high CPU usage by widgets in Windows 11, your computer will slow down and even get crash at times. By the way, you can check CPU usage in Task Manager.
To improve the performance of your computer, you have to solve the issue. Do you know what to do? Follow the tutorial to work out.
First of all, you should end the programs that you don’t need at the moment. It will increase the running speed your system more or less.
Solution 1: Run SFC and DISM Scans
If the Widgets-related files are corrupted, you will encounter a high CPU usage issue. In this case, to fix widgets high CPU usage in Windows 11, you are supposed to run SFC (System File Checker) and DISM (Deployment Image Servicing and Management) scans.
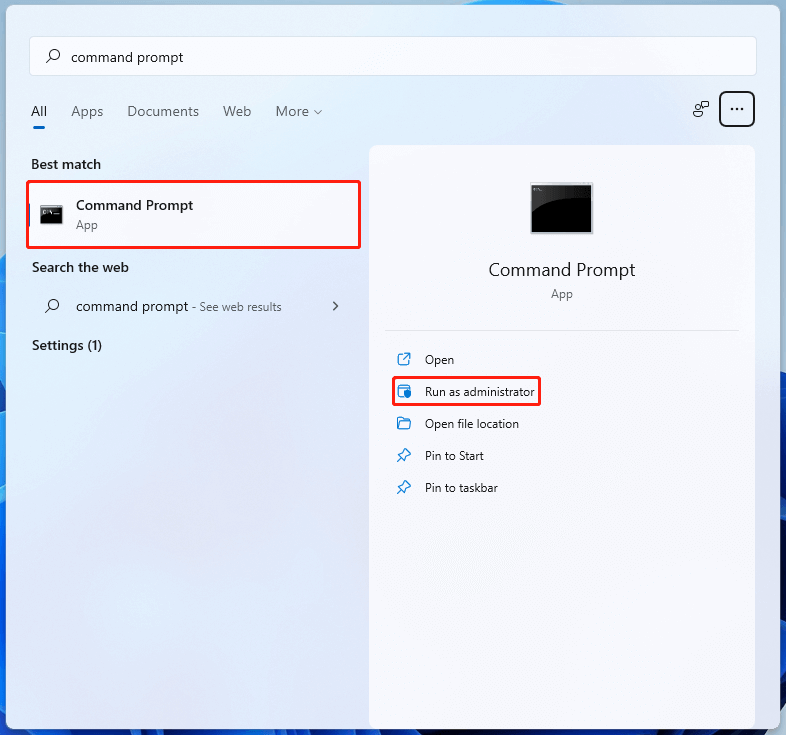
Step 1: Search for Command Prompt in the search bar. Find it in Best match and then select Run as administrator from the right panel.
Step 2: Type sfc /scannow in the panel and press Enter to execute the scan.
Step 3: Once the scan finishes, restart your computer and run Command Prompt as administrator again.
Step 4: Type DISM /online /cleanup-image /scanhealth in the panel and press Enter to begin the scan.
After the whole operation, the corrupted files have been repaired and the widgets high CPU usage in Windows 11 issue may disappear as well.
Solution 2: Update Windows 11
Usually, some errors can be repaired by Windows updates. Therefore, you can try updating your Windows to the latest version to see if the widgets high CPU usage in Windows 11 issue can be fixed.
Step 1: Press Windows and I together to open Settings.
Step 2: Go to Windows Update from the left pane.
Step 3: Click Check for updates to see the latest updates.
Tip: If there are any available updates, your Windows will download and install them automatically.
You need to restart your computer to finish the installation process. After you update your Windows to the latest version, the widgets high CPU usage in Windows 11 is probably fixed.
If the solutions mentioned above don’t work and the high CPU usage by widgets in Windows 11 still exists, you can consider disabling widgets to remove the issue.
Step 1: Press Windows + I to open Settings.
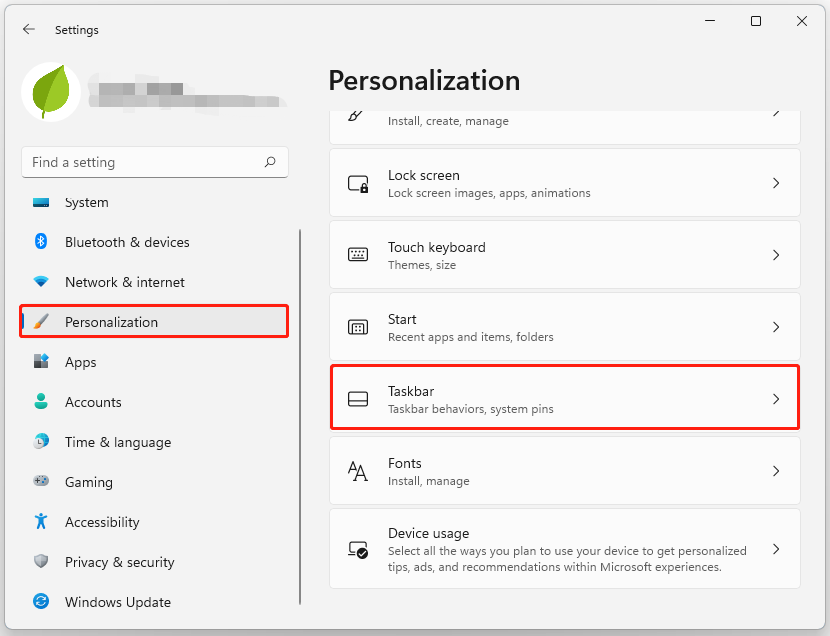
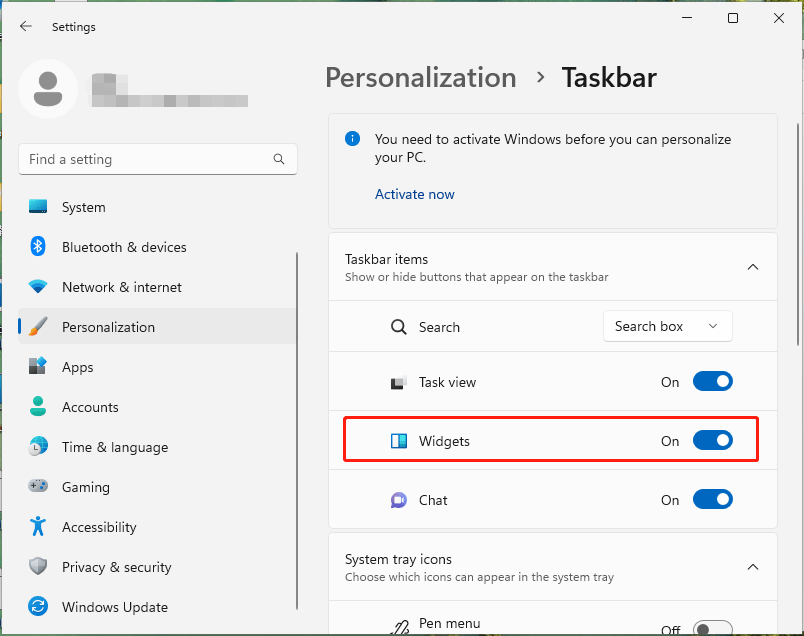
Step 2: Go to Personalization in the Settings menu. And then click Taskbar in the right pane.
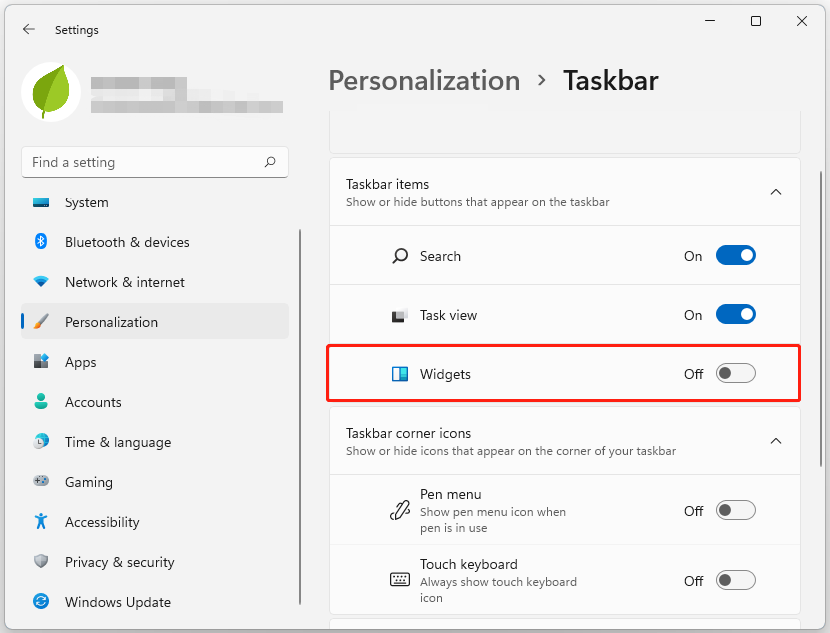
Step 3: Turn off the Widgets toggle.
Since Widgets has been disabled, it will not run itself when you start your computer. As a result, the widgets high CPU usage in Windows 11 issue disappears, too.
Don’t worry when you meet the issue of widgets high CPU usage in Windows 11. These solutions in the post can help you to fix the issue. Try them to resolve the issue efficiently. If you have any other problems with the widgets high CPU usage, you can leave them in the comments part below.
Windows Widgets is a built-in platform that can tell you the weather, date, news, etc. But why are they taking up so much CPU all of a sudden? Perhaps there’s something wrong with the program. Don’t worry! This post from MiniTool System Booster will discuss how to fix Windows Widgets high CPU usage with effective ways.
Windows 11 Widgets are a useful feature that can be used to display weather forecasts, sports scores, time, and so on. Sometimes, however, some users complain that the Widgets are using too much CPU and the system performance drops down. About this Windows Widgets high CPU usage issue, the main reasons are listed in the below section.
- Multiple applications running in the background will consume a high CPU power and lead to high usage.
- A corrupted Windows Widgets support file can also give rise to high CPU usage.
When there is Widgets high CPU consumption in Windows 11, it can result in your system crashes and slowness at times. So how to fix the high CPU usage issue and improve the performance of your machine?
Fix 1. Run MiniTool System Booster
As mentioned before, if you have too many background processes running on Windows 11, it can cause the Widgets high CPU consumption problem. In this way, it’s a good option to minimize those background processes using MiniTool System Booster.
This facilitated PC tune-up utility is tailored to maximize the speed and performance of your computer. It can not only be used for removing junk files but also for defragmenting a hard drive and uninstalling unwanted programs.
Download and install MiniTool System Booster Trial Edition for 15-day free. Then you are able to launch it and take the following instructions to fix Windows Widgets high CPU usage.
MiniTool System Booster TrialClick to Download100%Clean & Safe
Step 1. Open the freeware and enter the Performance page.
Step 2. Click on Performance Home and select Toolbox from the drop-down menu.
Step 3. Under System Management, hit Process Scanner and click on Scan now. Then, you can see a list of running processes and the memory and CPU they use individually. Scroll through the resource-intensive processes and hit the Terminate Process option beside them.

Fix 2. Update Windows 11 or Roll Back to Previous Update
Everyone knows that Windows always rolls out new updates at regular intervals, with improvements and bug fixes. If luck is on your side, Windows high CPU consumption can be solved by updating Windows. To do so, you can press Win plus I at the same time to open Settings > select Windows Update from the left panel > click on Check for updates. Then Windows will automatically download and install your available updates if there are.
Ironically, a recently installed Windows update could be the root cause of high CPU usage on Windows Widgets. There are bound to be some minor bugs in Windows updates. This way, you can try rolling back to the previous update. Below are the steps you need.
Step 1. Type Control Panel in Windows search and open it.
Step 2. Choose Programs > click the View installed updates link under Programs and Features.
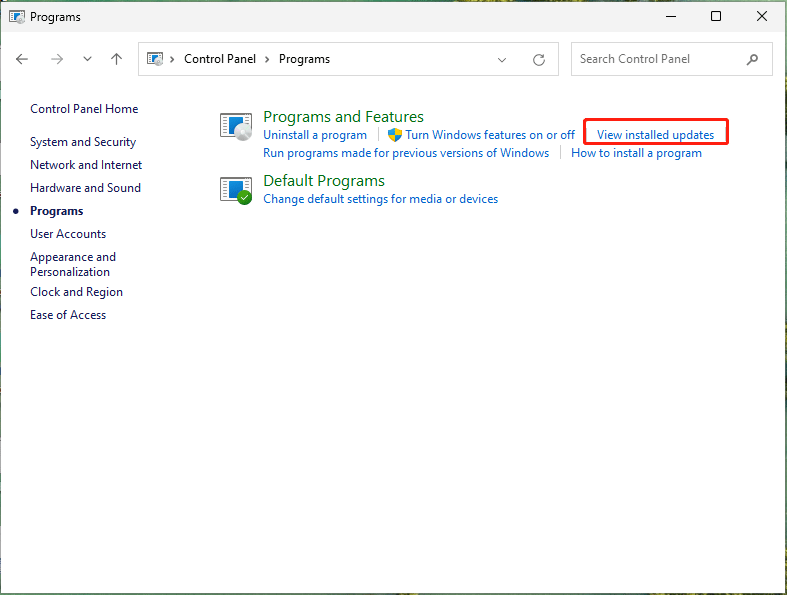
Step 3. Find the update that started causing the Windows Widgets high CPU usage problem after it was installed. Then click on the Uninstall button beside the update.
After uninstallation, restart your PC and check whether the issue is gone or not.
Fix 3. Disable Windows Widgets
If the high CPU usage issue still exists after using the above methods, consider disabling Widgets. To do so:
Step 1. Head to Settings > click Personalization from the left panel > slide down to locate Taskbar.
Step 2. Then toggle off the Widgets feature.
Fix 4. Perform SFC Scan
When it comes to scanning and restoring corrupted system files, the first thing that comes to mind is the built-in Windows utility, System File Checker (SFC). To perform a SFC scan:
Step 1. Type cmd in the search bar and run Command Prompt as an administrator.
Step 2. Input sfc /scannow into the command window and hit Enter to run it. The scanning process will last for a while.
When finishing, reboot the system and see if the problem is fixed.
Related post: Quickly Fix – SFC Scannow Not Working (Focus on 2 Cases)
Fix 5. Run DISM Command
After restoring corrupted files, you should also run DISM command to detect the system and identify any inconsistencies that may be caused by different hardware failures or application problems. Follow the steps below.
Step 1. Still open Command Prompt in administrator mode.
Step 2. Copy & paste the following command and don’t forget to press Enter to run it.
DISM /Online /Cleanup-Image /RestoreHealth
DISM /online /cleanup-image /scanhealth
DISM /Online /Cleanup-Image /CheckHealth
Upon completion, reboot the system and check for the problem.
Fix 6. Reinstall Widgets
The last resort is to reinstall Widgets. Here’s how to do it.
Step 1. According to the steps of Fix 4, enter the Command Prompt window.
Step 2. Copy & paste the command below and hit Enter.
winget uninstall “Windows web experience Pack”
Step 3. When you see the question Do you agree to all the source agreements terms, press Y and Enter to confirm.
Step 4. Once the uninstallation is completed, go to Microsoft Store and search Windows Web Experience Pack to install the Widgets back.
Final Thoughts
In this post, we demonstrate how to fix Windows Widgets high CPU usage in 6 solutions. Just follow them down the list until you find the one that works for you. As you perceive, MiniTool System Booster has the capability of keeping your computer running at peak performance.
If you experience some problems while using our product, please feel free to contact us via [email protected] and our support team will reply to you as soon as possible.
Windows Widgets is a useful feature in Windows 11, offering quick access to news, weather, and personalized content. However, some users have reported that Windows Widgets can cause high CPU usage, leading to performance issues. If your computer is slowing down due to this, don’t worry! There are several ways to fix it. In this guide, we’ll go through multiple solutions to reduce CPU consumption caused by Windows Widgets.
Does Windows 11 use more CPU than Windows 10?
1. Restart Your PC
Before diving into advanced fixes, it’s always a good idea to restart your computer. Restarting can resolve temporary glitches that may be causing high CPU usage by Windows Widgets. Simply click on the Start menu, select the power icon, and choose Restart.
2. Disable and Re-enable Windows Widgets
Sometimes, disabling and re-enabling Windows Widgets can help reset any background processes consuming high CPU resources.
- Right-click on the taskbar and select “Taskbar settings.”
- Scroll down to the “Widgets” toggle and turn it off.
- Restart your PC and then turn Widgets back on using the same method.
3. End the Windows Widgets Process in Task Manager
If Windows Widgets is using too much CPU, you can manually end the process in Task Manager.
- Press Ctrl + Shift + Esc to open Task Manager.
- Look for Windows Widgets (Widgets.exe) under the “Processes” tab.
- Right-click on it and select “End task.”
- Relaunch Widgets from the taskbar to check if the issue is resolved.
4. Disable Windows Widgets from Group Policy Editor
For users who do not use Windows Widgets often, disabling it via Group Policy can be a long-term solution.
- Press Win + R, type gpedit.msc, and hit Enter.
- Navigate to Computer Configuration > Administrative Templates > Windows Components > Widgets.
- Double-click on Allow widgets and select Disabled.
- Click Apply and OK, then restart your computer.
5. Disable Widgets via Registry Editor
If you don’t have access to Group Policy Editor (on Windows 11 Home edition), you can disable Widgets via the Registry.
- Press Win + R, type regedit, and hit Enter.
- Navigate to HKEY_LOCAL_MACHINE\SOFTWARE\Policies\Microsoft\Dsh.
- If the “Dsh” key does not exist, create it.
- Inside “Dsh,” create a new DWORD (32-bit) Value named AllowNewsAndInterests.
- Set its value to 0 and restart your PC.
6. Update Windows to the Latest Version
Microsoft regularly releases updates to fix bugs and optimize performance. High CPU usage could be caused by a known issue that has been fixed in a newer update.
- Open Settings with Win + I.
- Go to Windows Update and click Check for updates.
- Install any available updates and restart your PC.
7. Update Graphics Drivers
Outdated or corrupted graphics drivers can sometimes cause performance issues, including high CPU usage.
- Press Win + X and select Device Manager.
- Expand Display adapters and right-click on your GPU.
- Select Update driver > Search automatically for drivers.
- Restart your PC after the update.
8. Disable Widgets from Startup
Windows Widgets might be running in the background even when not in use. Disabling it from startup can help reduce CPU usage.
- Press Ctrl + Shift + Esc to open Task Manager.
- Go to the Startup tab.
- Look for Widgets, right-click on it, and select Disable.
9. Clear Windows Widgets Cache
A corrupted cache can lead to high CPU usage. Clearing the cache may help resolve the issue.
- Open File Explorer and navigate to *C:\Users\YourUsername\AppData\Local\Packages\MicrosoftWindows.Client.WebExperience_
- Delete all files inside this folder.
- Restart your computer and check if the issue persists.
10. Reinstall Windows Widgets
If nothing works, reinstalling Windows Widgets might fix the issue.
- Open PowerShell as an administrator.
- Run the following command:
Get-AppxPackage MicrosoftWindows.Client.WebExperience | Remove-AppxPackage - Restart your PC.
- To reinstall it, run:
Get-AppxPackage -allusers MicrosoftWindows.Client.WebExperience | Foreach {Add-AppxPackage -DisableDevelopmentMode -Register "$($_.InstallLocation)\AppXManifest.xml"}
Conclusion
High CPU usage due to Windows Widgets can slow down your PC, but following these fixes should help reduce the load. Whether it’s restarting your PC, updating drivers, or disabling Widgets entirely, these solutions will improve performance. Try them out and see which one works best for you!
Windows 11 comes with a widget platform. This feature does increase the appeal of Windows 11, but sometimes it might use too much of your CPU. This can cause problems for your computer and cause it to slow down or even crash at times. If you are worried that widgets are causing problems for your computer, you can quickly fix it. This tutorial will show you how to fix widgets high CPU usage on Windows 11.
Fix Widgets High CPU Usage
There are different things that you can try and fix this problem. This tutorial will show you three methods to help you resolve this issue.
Fix Widgets High CPU Usage by Updating Windows
Sometimes, the latest update can help resolve any problems you may face. To do this, follow the steps below:
Step-1: Open the settings app using shortcut keys Win + I.
Step-2: Select Windows Update from the left pane.

Step-3: Click on Check for Updates to see if there are any pending updates.
Step-4: If there are any updates available, install them.

Step-5: Now, after the updates are available, click on Restart now.

SFC Scan
- Open the WinX menu using shortcut keys Win + X.
- Select Windows Terminal (Admin).
- You will be asked, do you want to allow this app to make changes to your device? Select Yes.
- Type the following and press Enter:
sfc /scannow

The scan will take a little time to complete, if there are issues found, they will be resolved, and you will see the following message:


Disable Widgets
If nothing else works, you can disable the widgets.
Step-1: Open the settings app using shortcut keys Win + I.
Step-2: Select Personalization from the left pane.

Step-3: Scroll down in the right pane and select Taskbar.

Step-4: Turn the toggle switch Off next to Widgets.

I hope this helps. Let us know if you have any more questions in the comments below.
Windows 11 comes with widgets that provide information at a glance and can be used to display weather forecasts, new sports scores, clocks and more. It’s helpful for users and can be easily opened by clicking on the icon of the widget in taskbar, but some users complained Windows 11 widgets use too much CPU. High CPU usage not only consumes a lot of system resources but also slows down the computer and makes Windows 11 unstable. In this article, we try to identify the reason and how to fix Windows 11 widgets high CPU usage problem.
Contents
- 1 How to Fix Widgets High CPU Usage Problem
- 1.1 Update windows 11
- 1.2 Run system file checker
- 1.3 Disable Widgets on Windows 11
The common reason behind Widgets High CPU Usage problem is too many programs or applications running at once or the Windows Widgets support file is corrupted. Again outdated Windows versions, corrupted Windows 11 files and virus malware infection also lead to Windows 11 High CPU usage problems.
Sometimes restarting Windows 11 helps you get rid of temporary files and solve the high CPU usage problem. In addition, you need to update Windows 11 with the latest version or run DISM and System File Checker or SFC Scan to repair system files and fix the problem. Disabling Windows Widgets is another effective way to fix the High CPU usage problem on Windows 11.
Update windows 11
Microsoft update Windows 11 at regular intervals with the latest bug fixes and performance improvement. Widgets high CPU consumption can result from a temporary bug, and which is resolved with recent Windows updates. Let’s check and install the latest Windows updates that not only fix problems with Windows 11 but also optimize system performance.
- Open the settings app using Windows key + I
- Select Windows update then hit the check for Updates button
- If there are any pending updates allow them to download and install from the Microsoft server,
- Once done, reboot your computer to apply the changes.
Alternatively, If you notice the problem widgets high CPU usage started after Windows 11 update, a faulty update could be the reason behind it. Try to uninstall recent updates and check if this helps.
Run system file checker
For some reason windows files are corrupted or any files needed by the Widgets are corrupt, and it keeps searching for them in the background, resulting in high CPU usage. Run the built-in system file checker utility that helps scan and restore corrupted system files.
- Press Windows key + S, type cmd and select run as administrator,
- First, run the DISM restore health command DISM /Online /Cleanup-Image /RestoreHealth
- Next, run the system file checker command sfc /scannow
The above command scan all protected system files, and replace corrupted files with a cached copy that is located in a compressed folder at %WinDir%\System32\dllcache.
- The scan will take a little time to complete, if there are issues found, they will be resolved.
- Once 100% scanning completes, reboot your PC and check if the high CPU usage problem is resolved.
Disable Widgets on Windows 11
If nothing else works, you can try is to disable Widgets from the Taskbar which probably fix the high CPU usage problem on Windows 11.
- Press Windows key + X and select settings
- Select Personalization from the left pane then click on Taskbar (on the right pane)
- And finally, Turn the toggle switch Off next to Widgets.
In addition, a few users report, Reinstall the Windows Web Experience Pack help them widgets High CPU usage problems on Windows 11.
- First Open the command prompt as administrator
- Run the command winget uninstall “Windows web experience Pack” and Type Y then press Enter to confirm your selection
- Now to reinstall Widgets open Microsoft Store, search and install Windows Web Experience Pack
Sometimes virus or malware infection also lead to Windows 11 High CPU usage problem. If the above solutions fail to fix the problem, we recommend performing a full system scan with the latest updated antivirus program.
FAQ:
What are Windows 11 Widgets?
- Windows 11 Widgets are small applications that can be displayed on the desktop, providing quick access to information and functionality.
Why are Windows 11 Widgets causing high CPU usage?
- There have been reports of some Windows 11 Widgets causing high CPU usage. This could be due to several reasons, such as inefficient code, compatibility issues, or conflicts with other software.
How do I check which Widget is causing high CPU usage on Windows 11?
- To check which Widget is causing high CPU usage on Windows 11, right-click on the taskbar and select “Task Manager”. Click on the “CPU” tab to sort processes by CPU usage. Look for any Widget processes that are using a high percentage of CPU resources.
How do I fix the high CPU usage caused by Windows 11 Widgets?
- There are several steps you can take to fix high CPU usage caused by Windows 11 Widgets. These include disabling or removing Widgets that are causing high CPU usage, updating Windows and drivers to the latest version, and resetting the Windows 11 installation to its default settings.
How do I disable or remove Widgets on Windows 11?
- To disable or remove Widgets on Windows 11, right-click on the desktop and select “Widgets”. Click on the three-dot menu icon at the top right of the Widgets panel and select “Manage widgets”. Here, you can disable or remove any Widgets that are causing high CPU usage.
Also read:
- Solved: Windows 10 High CPU usage after update!
- Windows 11 is very Slow after update? Let’s Improve Performance
- 9 Ways to Fix 100% Disk Usage Problem in Windows 11
- Netflix Not Working with VPN? Try these 8 solutions to fix it
- 7 Ways to Fix Blurry Screen Issue on Windows 11