
IT Questions Bank › Category: IT Essentials › Which version of the OS can be upgraded to 64 bit Windows 10 Pro?
Which version of the OS can be upgraded to 64 bit Windows 10 Pro?
- 64-bit version of Windows XP Pro
- 32-bit version of Windows 10 Pro
- 32-bit version of Windows 8 Pro
- 64-bit version of Windows 7 Home
Explanation: A 32-bit OS cannot be upgraded to a 64-bit OS. Windows XP and Windows Vista cannot be upgraded to Windows 10.
Exam with this question: IT Essentials v7.01 Chapter 10 Quiz Answers
Please login or Register to submit your answer
Если вы обновляетесь с 32-битной Windows 7 или 8 (8.1) до Windows 10, то в процессе устанавливается 32-бит версия системы. Также, некоторые устройства имеют предустановленную 32-разрядную систему, однако процессор поддерживает 64-бит Windows 10 и имеется возможность поменять ОС на неё (и иногда это может быть полезно, особенно если вы увеличили объем оперативной памяти на вашем компьютере или ноутбуке).
В этой инструкции о том, как поменять 32-битную Windows 10 на 64-битную. Если вы не знаете, как узнать разрядность вашей текущей системы, подробно об этом в статье Как узнать разрядность Windows 10 (как узнать сколько бит 32 или 64).
Установка Windows 10 x64 вместо 32-битной системы
При обновлении ОС до Windows 10 (или покупке устройства с Windows 10 32-бит) вы получили лицензию, которая подходит и к 64-разрядной системе (в обоих случаях она зарегистрирована на сайте Майкрософт за вашим оборудованием и ключ вам знать не нужно).
К сожалению, без переустановки системы изменить 32-бит на 64-бит не получится: единственный путь поменять разрядность Windows 10 — выполнить чистую установку x64 версии системы в той же редакции на компьютер, ноутбук или планшет (при этом вы можете не удалять уже имеющиеся данные на устройстве, но драйверы и программы придется переустановить).
Примечание: если на диске есть несколько разделов (т.е. есть условный диск D), будет хорошим решением перенести свои пользовательские данные (в том числе с рабочего стола и системных папок документов) на него.
Порядок действий будет следующим:
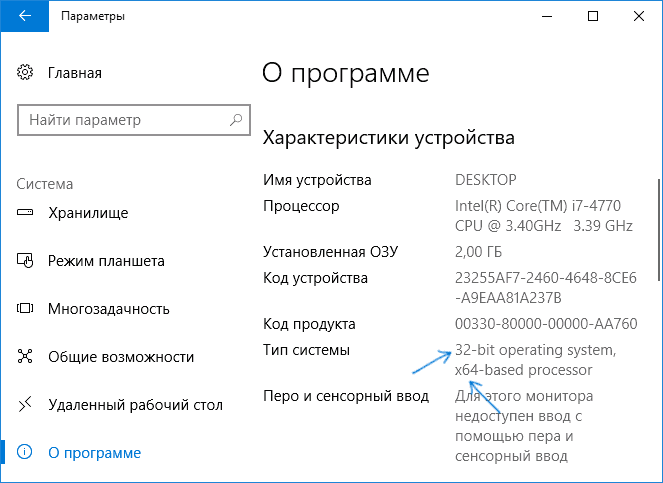
- Зайдите в Параметры — Система — О программе (О системе) и обратите внимание на параметр «Тип системы». Если там указано, что у вас 32-bit operating system, x64-based processor, это означает, что ваш процессор поддерживает системы 64-бит (Если процессор x86 — то не поддерживает и дальнейшие шаги не следует выполнять). Также обратите внимание на выпуск (редакцию) вашей системы в разделе «Характеристики Windows».

- Важный шаг: если у вас ноутбук или планшет, убедитесь, что на официальном сайте производителя есть драйверы для 64-бит Windows для вашего устройства (если разрядность не указано, как правило поддерживается оба варианты системы). Желательно сразу скачать их.
- Скачайте оригинальный ISO образ Windows 10 x64 с сайта Майкрософт (на настоящий момент в одном образе содержатся сразу все редакции системы) и создайте загрузочную флешку (диск) или сделайте загрузочную флешку Windows 10 x64 официальным способом (с помощью Media Creation Tool).
- Запустите установку системы с флешки (см. Как установить Windows 10 с флешки). При этом, если вы получите запрос о том, какую редакцию системы установить — выберите ту, которая отображалась в сведениях о системе (на шаге 1). Ключ продукта при установке вводить не нужно.
- Если на «диске C» были важные данные, то для того, чтобы они не удалились, не форматируйте диск C при установке, просто выберите этот раздел в режиме «полная установка» и нажмите «Далее» (файлы предыдущей Windows 10 32-бит будут помещены в папку Windows.old, которую в дальнейшем можно будет удалить).
- Завершите процесс установки, после неё установите оригинальные драйверы системы.
На этом процесс перехода с 32-бит Windows 10 на 64-бит будет завершен. Т.е. основная задача — правильно пройти этапы с установкой системы с USB-накопителя и последующей установкой драйверов, чтобы получить ОС в нужной разрядности.
(Image credit: Future)
Windows 10 can run on both 32-bit and 64-bit processor architectures. If you have a computer with a 32-bit setup, you can upgrade to the 64-bit version without acquiring a new license. The only caveat is that there is no in-place upgrade path to make the switch. The only option is to perform a clean installation of Windows 10.
Although each version delivers the same features, when you upgrade to the 64-bit (x64) version, the device will be able to take advantage of large amounts of memory (up to 2TB) instead of the 4GB limitation with 32-bit (x86).
Accessing more memory allows you to run more apps simultaneously without affecting the experience, and you can work with a mix of 64-bit and 32-bit programs. Also, perhaps, more importantly, it will help you improve productivity on memory-intensive tasks. For instance, rendering videos, running virtual machines, and opening many tabs on your web browser.
This guide will walk you through the steps to upgrade a computer from a 32-bit to a 64-bit version using an existing genuine license.
How to check 64-bit hardware support on Windows 10
If you want to upgrade a system from Windows 10 32-bit to the 64-bit version, you first need to determine whether the processor has 64-bit support, 2GB of memory, or more, and whether the remaining parts have support for 64-bit drivers.
Determine 64-bit compatibility from Settings
To check whether the processor can run the 64-bit of Windows 10, use these steps:
All the latest news, reviews, and guides for Windows and Xbox diehards.
- Open Settings.
- Click on System.
- Click on About.
- Check the Installed RAM details.
- Confirm that the information reads 2GB or higher.
- Under the «Device specifications» section, check the System type details.
- Confirm the information reads «32-bit operating system, x64-based processor.»
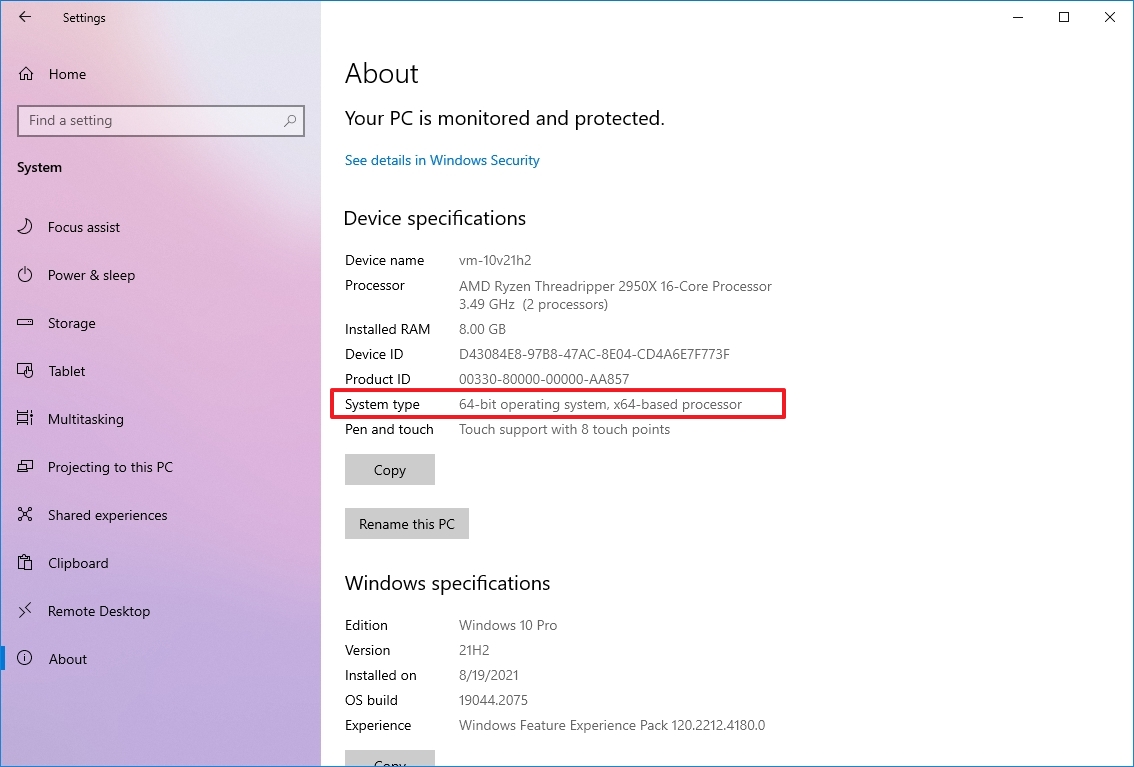
Once you complete the steps, you can determine whether the device runs the 32-bit version of Windows 10 on a 64-bit processor. However, if it reads «32-bit operating system, x86-based processor,» the computer does not support the 64-bit version of Windows.
If the device can’t run the 64-bit version, consider purchasing a new device that meets the system requirements.
Determine CPU compatibility from Coreinfo
Although most computers using relatively modern hardware can work with any version of Windows 10, you still want to confirm that the four essential features are present on the processor:
- Physical Address Extension (PAE).
- No-eXecute (NX).
- Streaming SIMD Extensions 2 (SSE2).
- CMPXCHG16b (CX16).
To confirm the processor has the required features, you can use the Microsoft Coreinfo command-line tool with these steps:
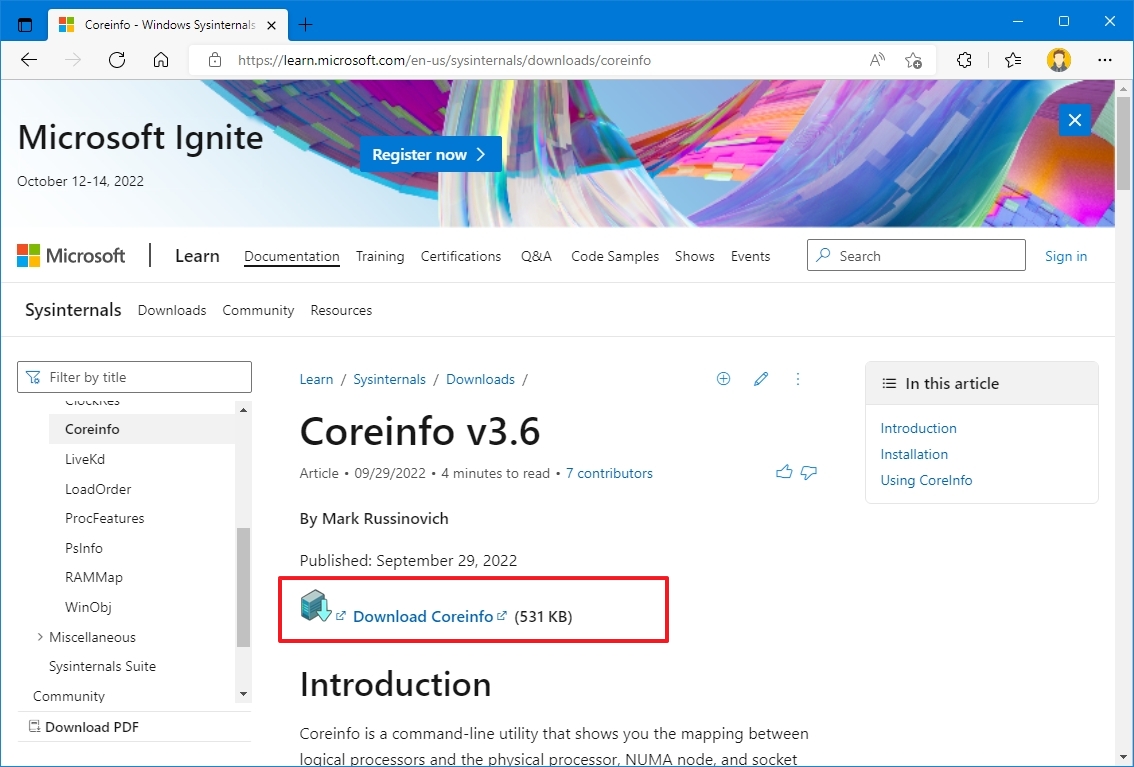
- Open the Microsoft Sysinternals website.
- Click the Download Coreinfo link.
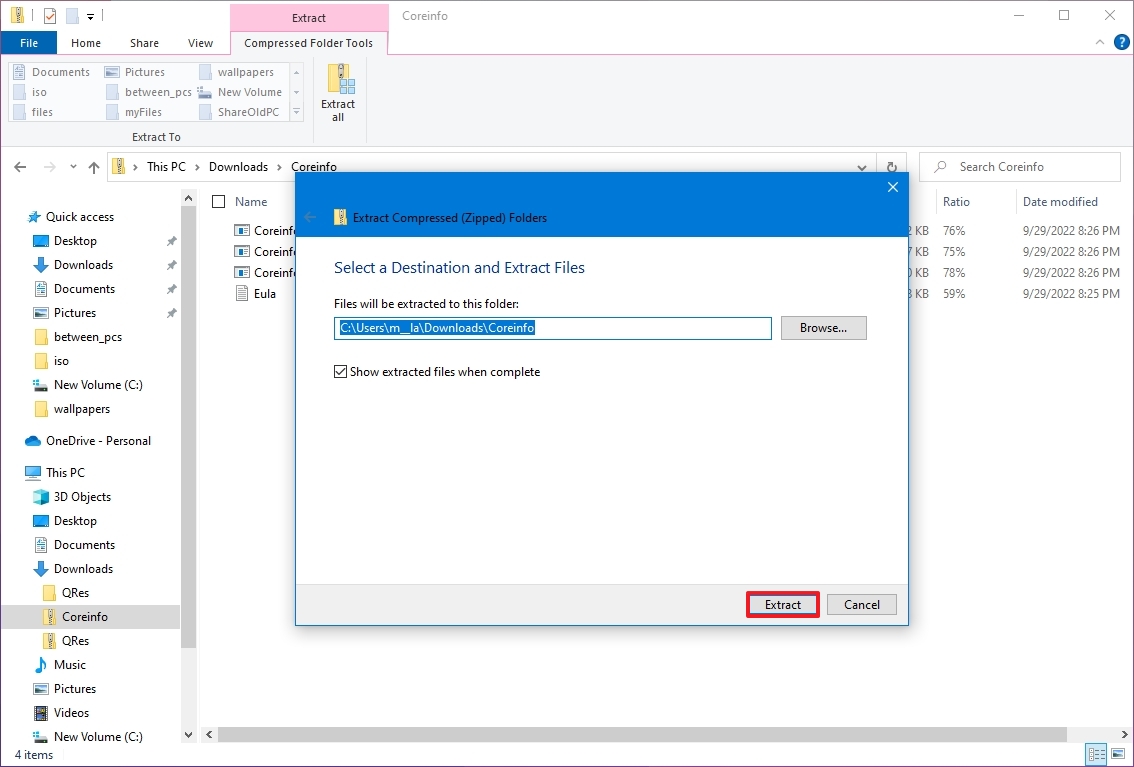
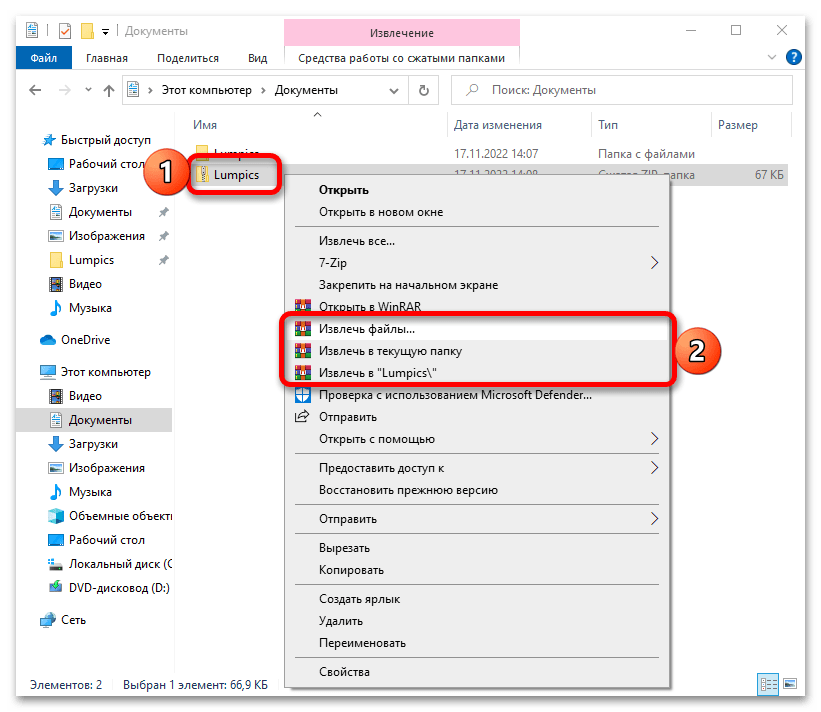
- Right-click the Coreinfo.zip folder and select the Extract all option.
- Click the Extract button.
- Type the following command in the address bar and press Enter to open Command Prompt in this folder location.
cmd
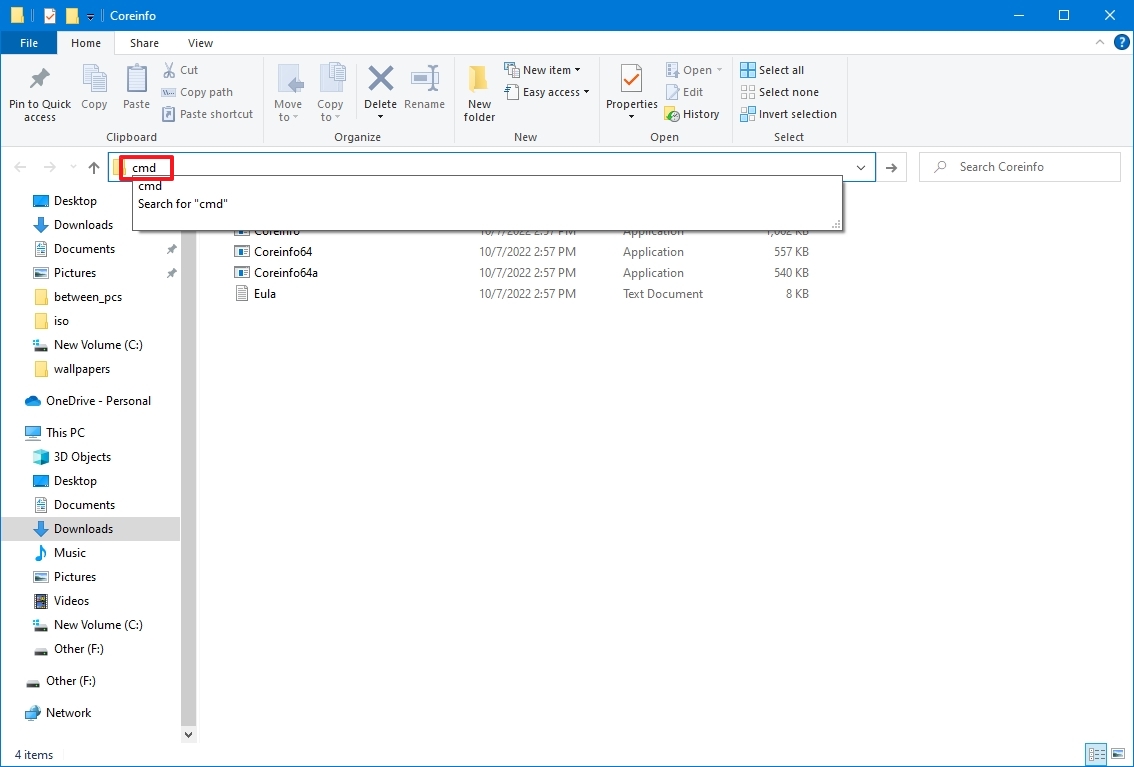
- Type the following command and press Enter: coreinfo
- Search (Ctrl + F keyboard shortcut or Ctrl + Shift + F on Terminal) for these features:
- PAE.
- NX.
- SSE2.
- CX16.
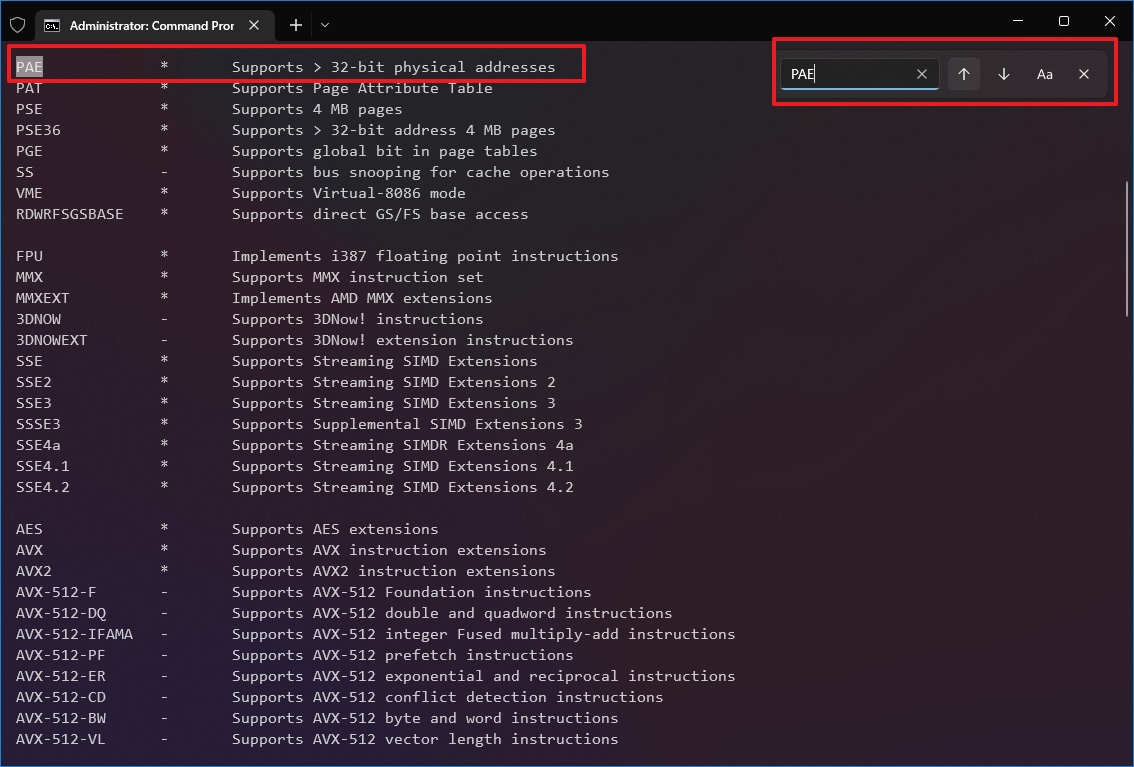
After you complete the steps, if the tool confirms that the features are available, you can upgrade to the 64-bit version of Windows 10.
While the upgrade process should be able to confirm the processor compatibility, the «Coreinfo» tool allows you to check these features ahead of time.
Determine driver compatibility
Also, it’s recommended to check whether other components (such as graphics and sound cards) are compatible with the 64-bit version of Windows 10.
If the computer has the 32-bit version of Windows 10 and the hardware is relatively new, there is a good chance that you will find 64-bit versions of the drivers. You can check the device manufacturer support website to confirm that the components have drivers for the x64 architecture.
How to upgrade from 32-bit to 64-bit on Windows 10
A Windows 10 product key allows you to install the 32-bit or 64-bit version. The only caveat is that you can’t perform an in-place upgrade. Instead, you must delete the previous setup and perform a clean installation to change architectures.
Create installation media
As part of the architecture upgrade process, you have to use the Microsoft Media Creation Tool to create a USB bootable media by connecting a USB flash drive of at least 8GB of space to the computer, and then use these steps:
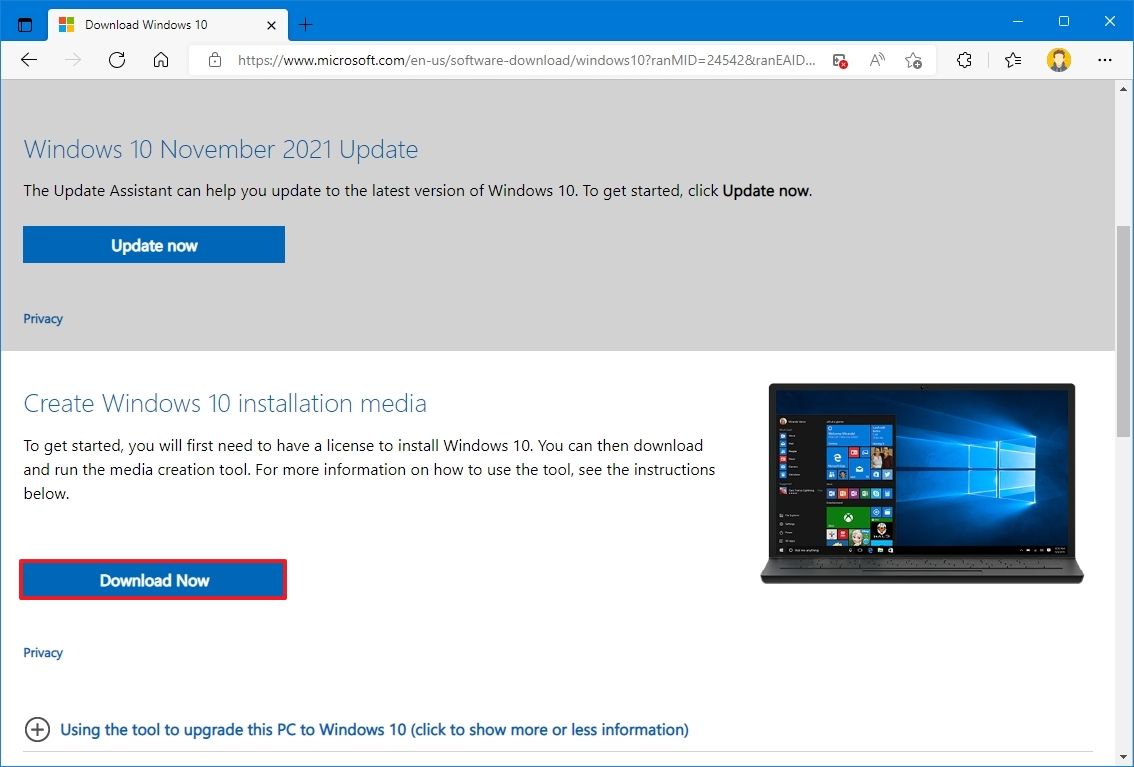
- Open Microsoft download page.
- Under the «Create Windows 10 installation media» section, click the Download Now button.
- Double-click the MediaCreationToolxxxx.exe file to launch the tool.
- Click the Accept button to agree to the terms.
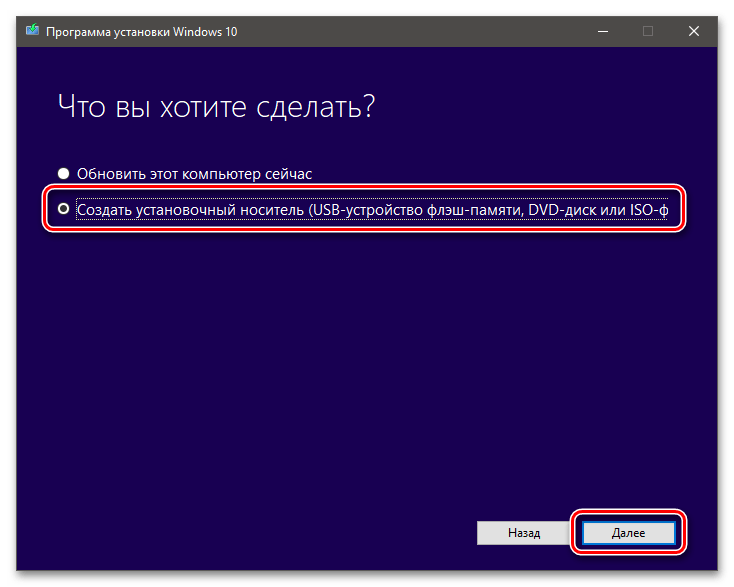
- Select the «Create installation media (USB flash drive, DVD, or ISO file) for another PC» option.
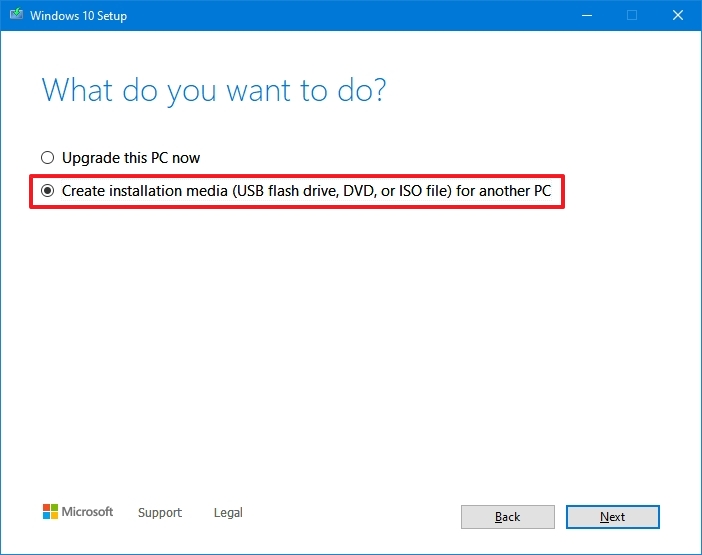
- Click the Next button.
- Clear the «Use the recommended options for this PC» option.
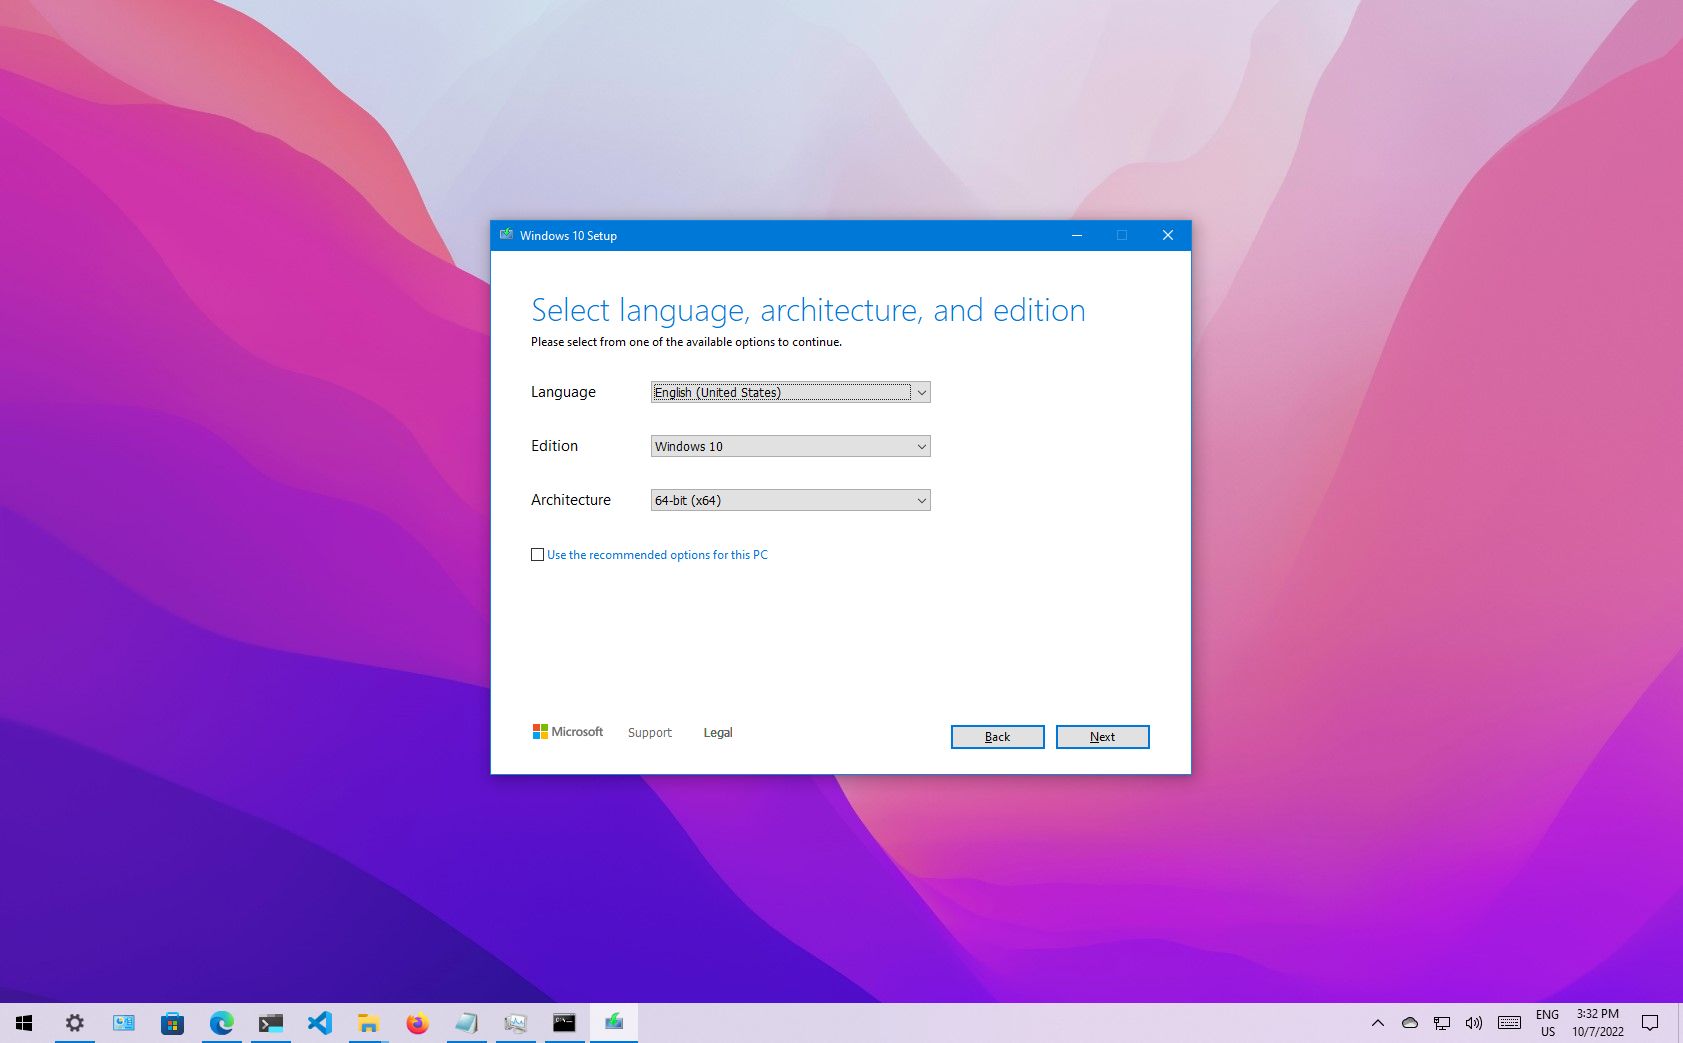
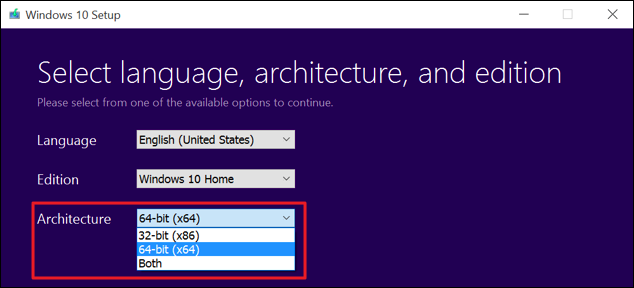
- Select the correct language and edition of Windows 10 for the new installation.
- Select the 64-bit (x64) option for «Architecture.»
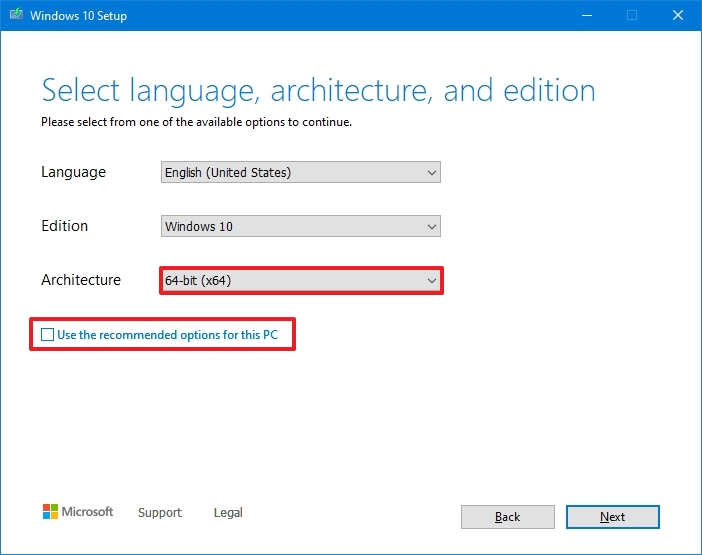
- Click the Next button.
- Select the «USB flash drive» option.
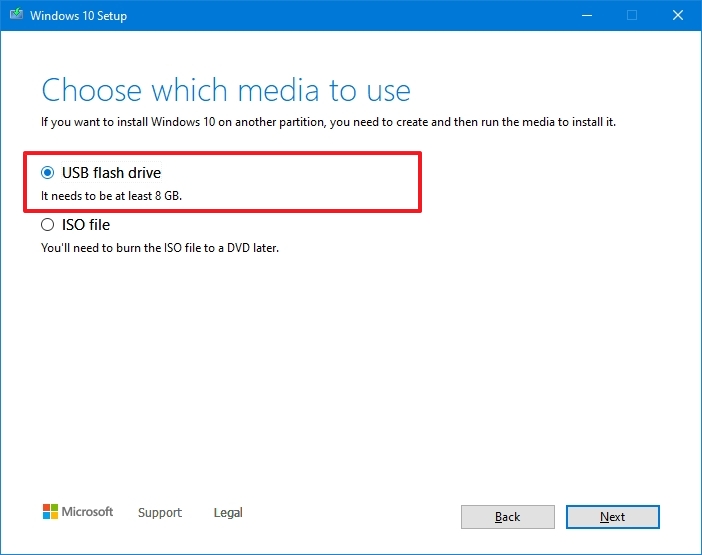
- Click the Next button.
- Select the USB flash drive to create the bootable media.
- Quick tip: If you don’t see the flash drive, reconnect the device, click the «Refresh drive list» option, and select the drive from the list.
- Click the Next button.
- Click the Finish button.
Once you complete the steps, the tool will proceed to download the installation files, and it’ll create the bootable media compatible with Windows 10 64-bit.
If you don’t have a USB flash drive, you can find many reliable and inexpensive drives (for example, the SanDisk Cruzer Glide CZ60 32GB) on Amazon.

SanDisk Cruzer Glide CZ60
If you need a flash drive to create a Windows 10 bootable media, the Cruzer Glide CZ60 by SanDisk is a good option. The flash drive offers 32GB of storage and reliable data transfer speed to perform a Windows installation and store files on the go.
Windows 10 32-bit to 64-bit install
When you are ready to upgrade to Windows 10 64-bit from 32-bit, before proceeding, you may need to change some settings to allow the computer to start from a USB flash drive. This requires accessing the Basic Input/Output System (BIOS) or Unified Extensible Firmware Interface (UEFI) on the motherboard to change the boot order.
Usually, the process requires hitting one of the function keys (F1, F2, F3, F10, or F12), Esc, or Delete key as soon as you start the computer. However, the instructions can be different depending on the manufacturer and even per device model. As a result, you may need to check the manufacturer’s support website for more specific details.
After accessing the firmware, open the «Boot» menu page, configure the boot order to start from the USB flash drive, and save the changes.
Warning: This is a friendly reminder that you will be making changes to the current setup, which may cause problems and even data loss if you don’t do this correctly. Before proceeding, it’s recommended to make a temporary full backup of your PC. It’s also a good idea to create a copy of your files to an external drive or OneDrive, as you’ll have to restore them after the upgrade.
To switch from the 32-bit to the 64-bit version of Windows 10, use these steps:
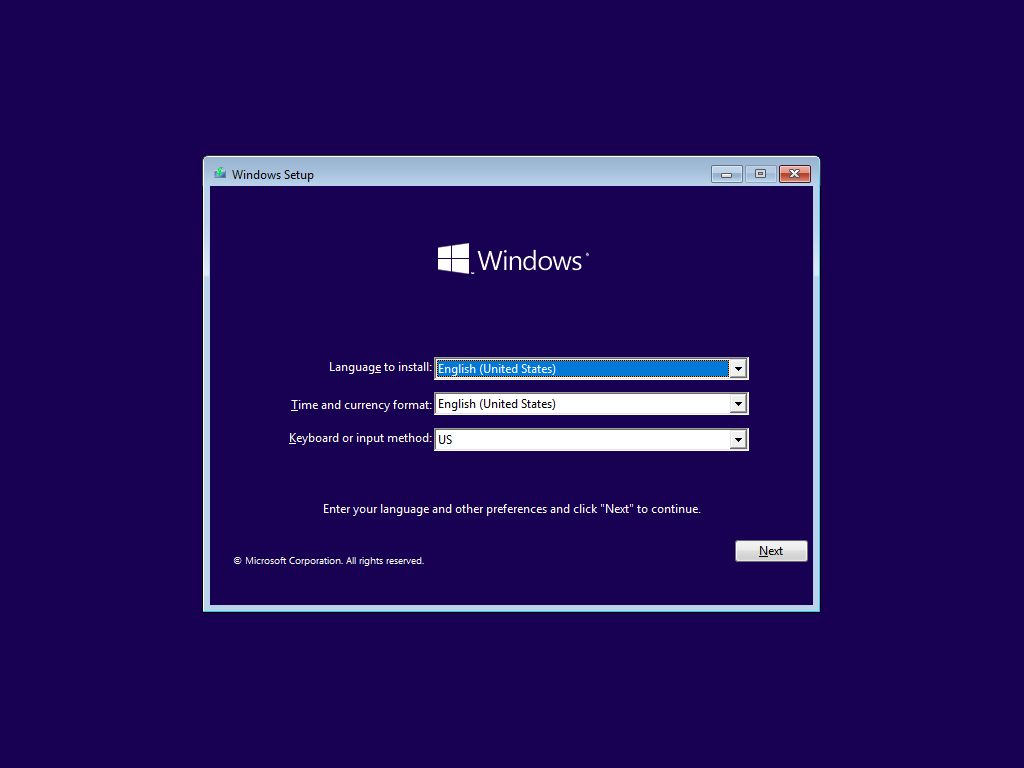
- Start PC with USB flash drive.
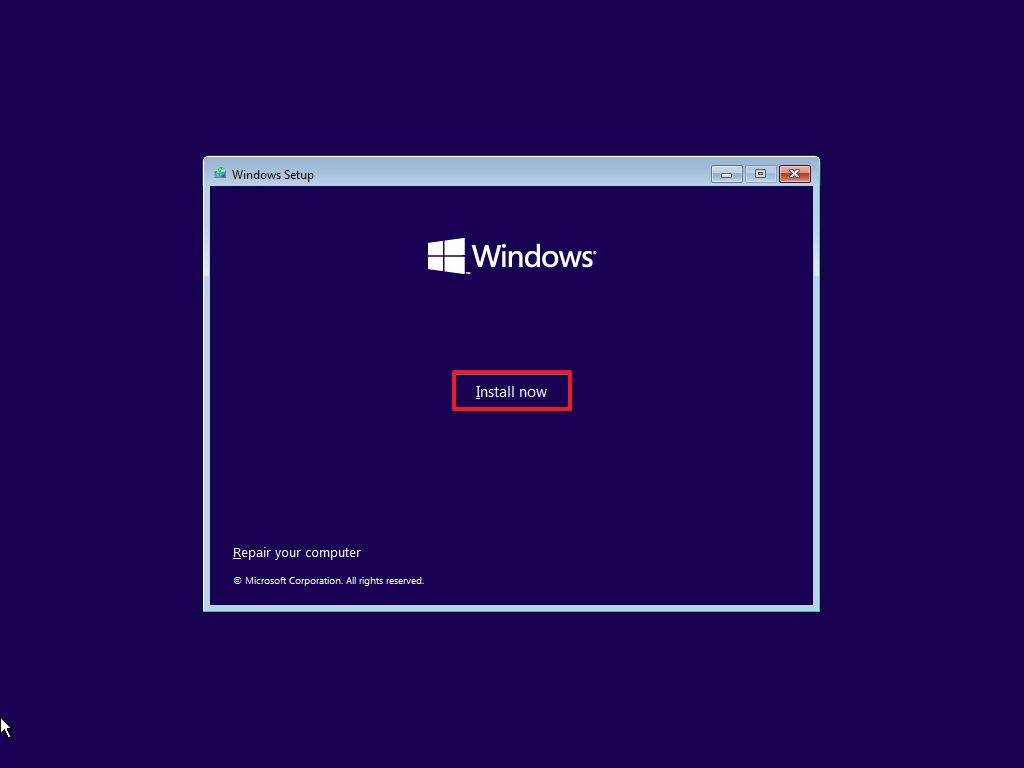
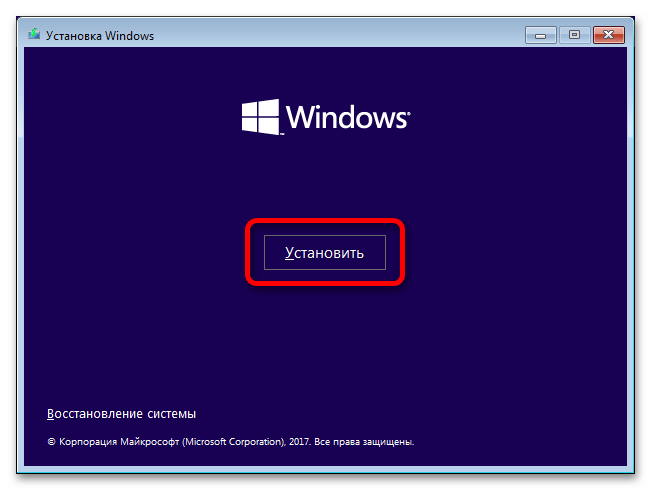
- On «Windows Setup,» click the Next button.
- Click the Install Now button.
- Click the «I don’t have a product key» link to continue (assuming that the computer was already properly activated).

- Select the edition of Windows 10 (if applicable). This selection must match the edition of the license activated.
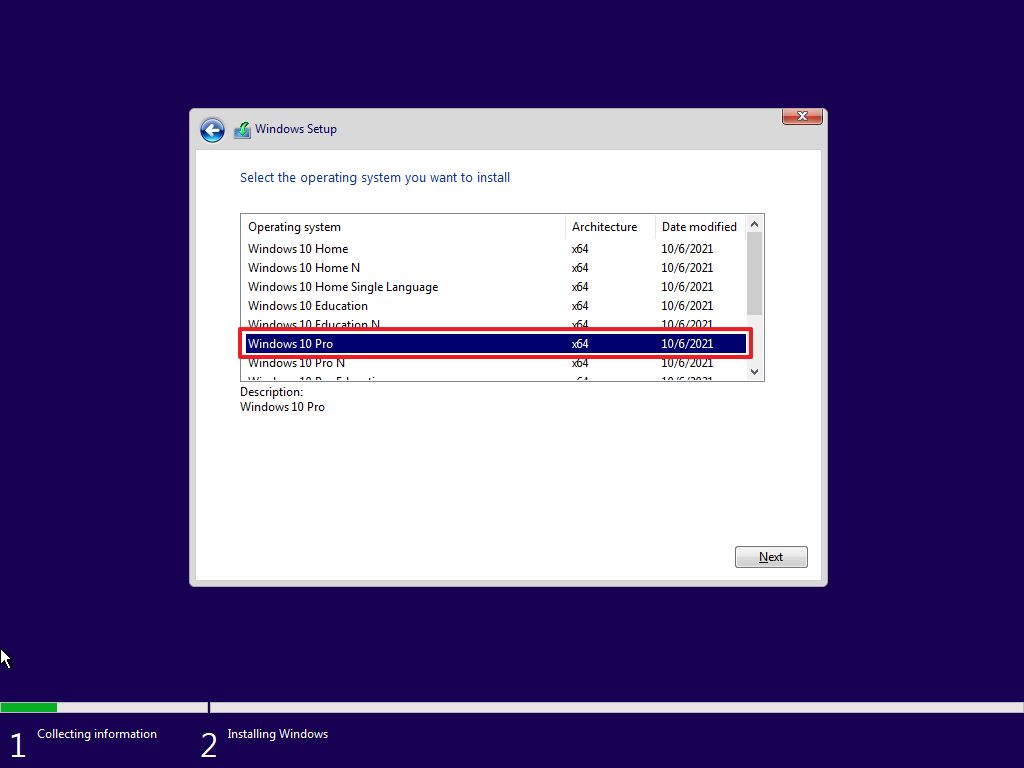
- Click the Next button.
- Check the «I accept the license terms» option to continue.
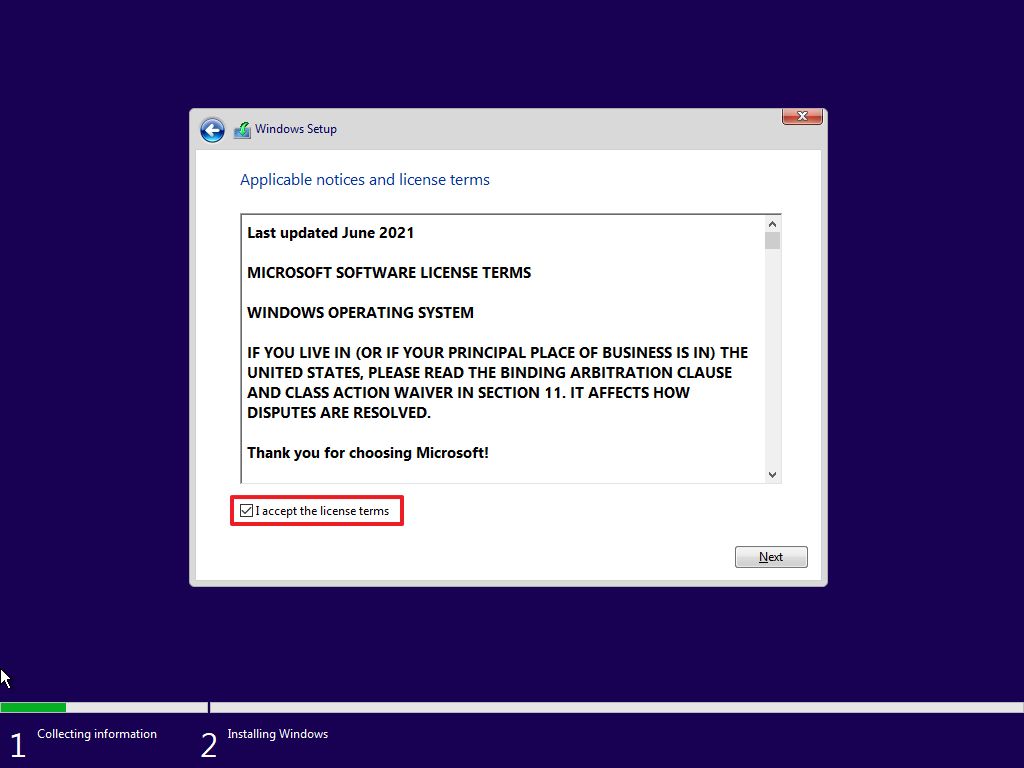
- Click the Next button.
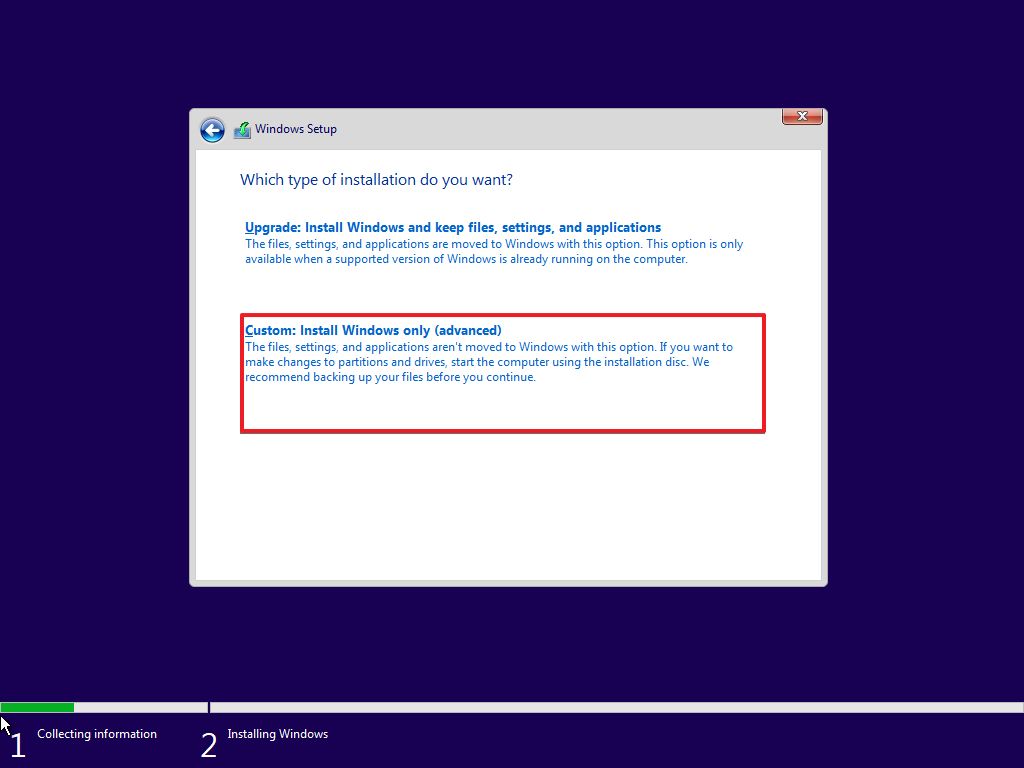
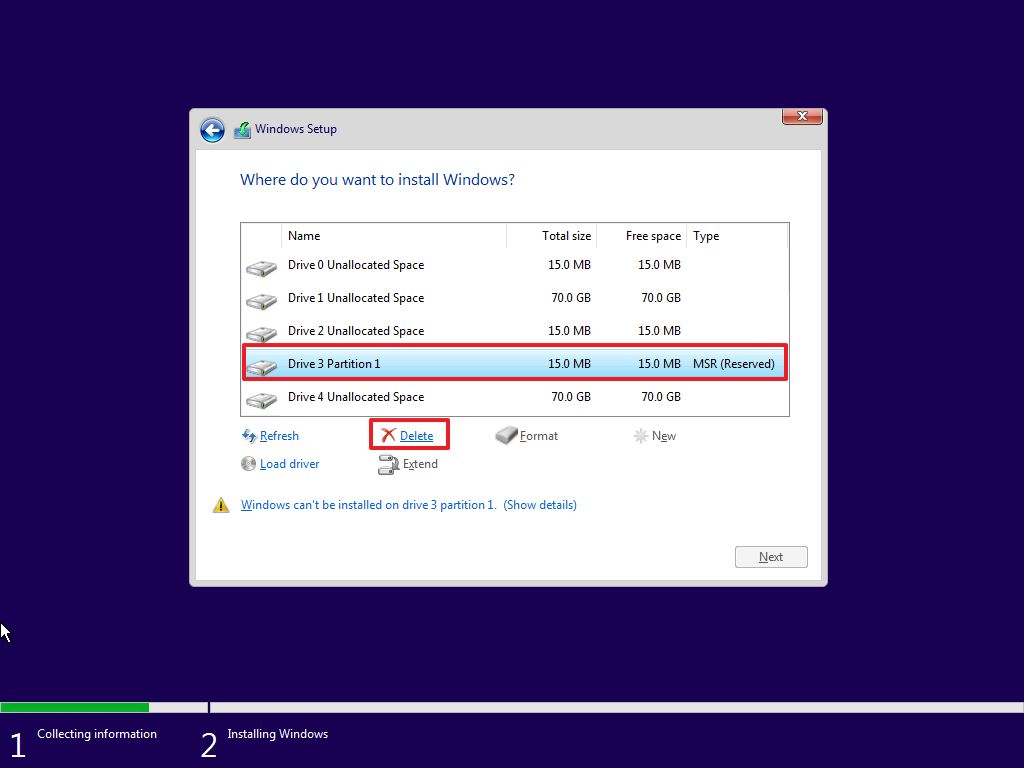
- Click the «Custom: Install Windows only (advanced)» option.
- Select the partition with the current installation of Windows 10 (usually «Drive 0»), and click the Delete button to remove the partition from the hard drive.
- Quick tip: If you see multiple partitions on the primary hard drive (Drive 0), select and delete each one. Windows 10 will recreate the required partitions during the installation process automatically. It’s not necessary to remove the partitions on secondary drives.
- Select the empty drive labeled «Drive 0 Unallocated Space.»
- Click the Next button.
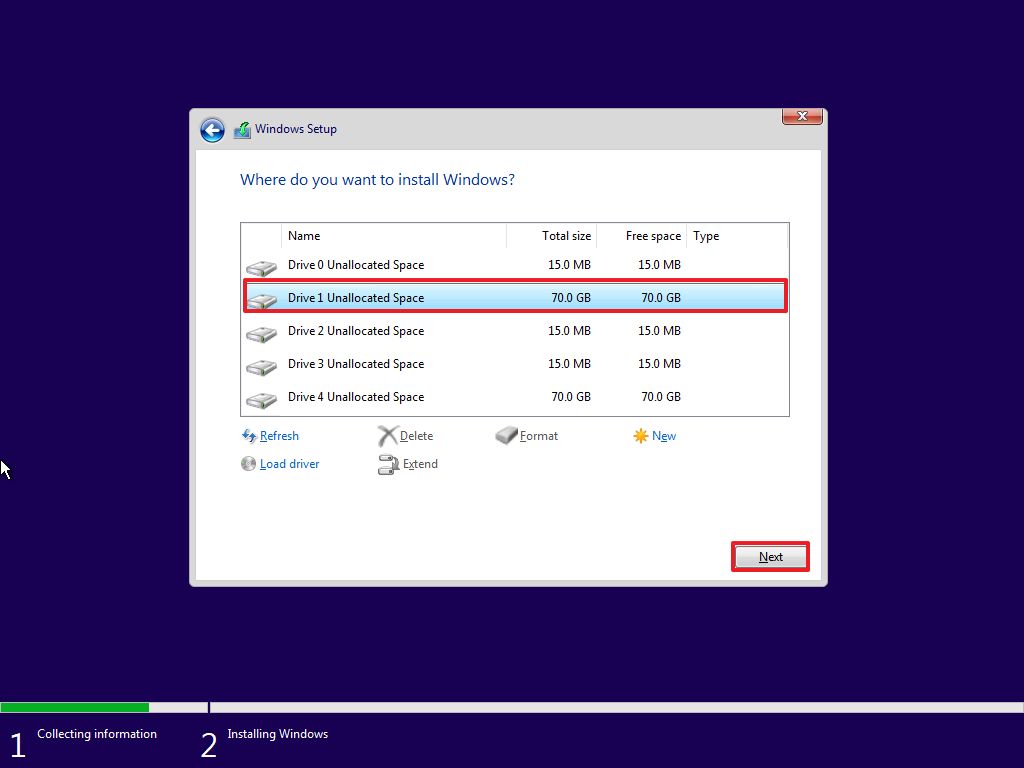
After you complete the steps, the setup will install the 64-bit version of Windows 10.
Once the installation completes, you will have to continue with the on-screen directions to finish the out-of-box experience (OOBE), which allows you to create a new account, configure the preferences, and choose the privacy settings.
It’s also a good idea to check for updates on Settings > Update & Security > Windows Update to ensure that the latest patches and drivers are installed.
Finally, remember to restore your files from a previous backup and reinstall your applications, including those designed for the 32-bit or 64-bit version of Windows 10.
More resources
For more helpful articles, coverage, and answers to common questions about Windows 10 and Windows 11, visit the following resources:
- Windows 11 on Windows Central — All you need to know
- Windows 10 on Windows Central — All you need to know
Mauro Huculak has been a Windows How-To Expert contributor for WindowsCentral.com for nearly a decade and has over 15 years of experience writing comprehensive guides. He also has an IT background and has achieved different professional certifications from Microsoft, Cisco, VMware, and CompTIA. He has been recognized as a Microsoft MVP for many years.
Quick Links
-
Make Sure Your Processor is 64-bit Capable
-
Make Sure Your PC’s Hardware Has 64-bit Drivers Available
-
Upgrade by Performing a Clean Install
Microsoft gives you the 32-bit version of Windows 10 if you upgrade from the 32-bit version of Windows 7 or 8.1. But you can switch to the 64-bit version, assuming your hardware supports it.
If you had a 32-bit versions of Windows 7 or 8.1 installed on your PC and upgraded to Windows 10, Microsoft automatically gave you the 32-bit version of Windows 10. But, if your hardware supports using a 64-bit operating system, you can upgrade to the 64-bit version of Windows for free.
Make Sure Your Processor is 64-bit Capable
First thing’s first. Before even thinking of upgrading to 64-bit Windows, you’ll need to confirm that the CPU in your computer is 64-bit capable. To do so, head to Settings > System > About. On the right-hand side of the window, look for the «System type» entry.
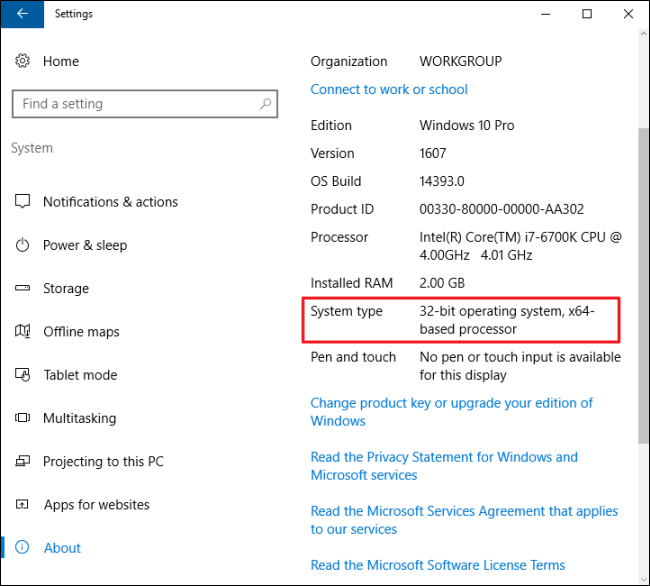
You’ll see one of three things here:
- 64-bit operating system, x64-based processor. Your CPU does support 64-bit and you already have the 64-bit version of Windows installed.
- 32-bit operating system, x86-based processor. Your CPU does not support 64-bit and you have the 32-bit version of Windows installed.
- 32-bit operating system, x64-based processor. Your CPU supports 64-bit, but you have the 32-bit version of Windows installed.
If you see the first entry on your system, you don’t really need this article. If you see the second entry, you won’t be able to install the 64-bit version of Windows on your system at all. But if you see the last entry on your system—«32-bit operating system, x64-based processor»—then you’re in luck. This means you’re using a 32-bit version of Windows 10 but your CPU can run a 64-bit version, so if you see it, it’s time to move on to the next section.
Make Sure Your PC’s Hardware Has 64-bit Drivers Available
Even if your processor is 64-bit compatible, you might want to consider whether your computer’s hardware will work properly with a 64-bit version of Windows. 64-bit versions of Windows require 64-bit hardware drivers, and the 32-bit versions you’re using on your current Windows 10 system won’t work.
Modern hardware should certainly offer 64-bit drivers, but very old hardware may no longer be supported and the manufacturer may have never offered 64-bit drivers. To check for this, you can visit the manufacturer’s driver download web pages for your hardware and see if 64-bit drivers are available. You shouldn’t necessarily need to download these from the manufacturer’s website, though. They are likely included with Windows 10 or automatically will be downloaded from Windows Update. But old hardware—for example, a particularly ancient printer—simply may not offer 64-bit drivers.
Upgrade by Performing a Clean Install
You’ll need to perform a clean install to get to the 64-bit version of Windows 10 from the 32-bit one. Unfortunately, there’s no direct upgrade path.
Warning: Back up your important files before continuing and also make sure you have what you need to reinstall your programs. This process will wipe your whole hard disk, including Windows, installed programs, and personal files.
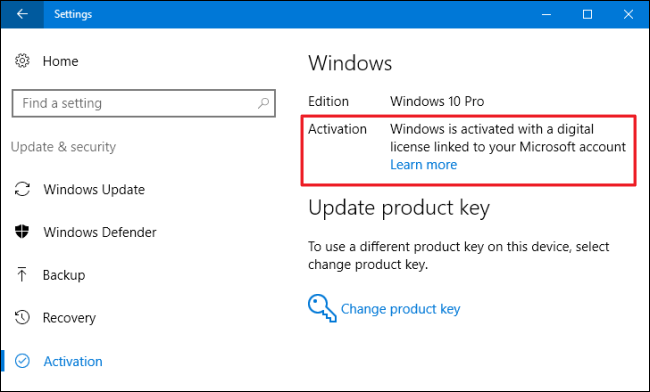
First, if you haven’t upgraded to Windows 10 yet, you’ll need to use the upgrade tool to upgrade. You’ll get the 32-bit version of Windows 10 if you were previously using a 32-bit version of Windows 7 or 8.1. But the upgrade process will give your PC a Windows 10 license. After upgrading, be sure to check that your current 32-bit version of Windows 10 is activated under Settings > Update & security > Activation.
Once you’re using an activated version of the 32-bit Windows 10, download the Windows 10 media creation tool from Microsoft. If you’re using the 32-bit version of Windows 10 at the moment, you’ll have to download and run the 32-bit tool.
When you run the tool, select «Create installation media for another PC» and use the tool to create a USB drive or burn a disc with Windows 10. As you click through the wizard, you’ll be asked whether you want to create 32-bit or 64-bit installation media. Select the «64-bit (x64)» architecture.
Next, restart your computer (you did back everything up, right?) and boot from the installation media. Install the 64-bit Windows 10, selecting «Custom install» and overwriting your current version of Windows. When you’re asked to insert a product key, skip the process and continue. You’ll have to skip two of these prompts in total. After you reach the desktop, Windows 10 will automatically check in with Microsoft and activate itself. You’ll now be running the 64-bit edition of Windows on your PC.
If you want to go back to the 32-bit version of Windows, you’ll need to download the media creation tool—the 64-bit version, if you’re running the 64-bit version of Windows 10—and use it to create 32-bit installation media. Boot from that installation media and do another clean install—this time installing the 32-bit version over the 64-bit version.
Image Credit: lungstruck on Flickr
Все способы:
- Шаг 1: Проверка совместимости
- Разрядность процессора
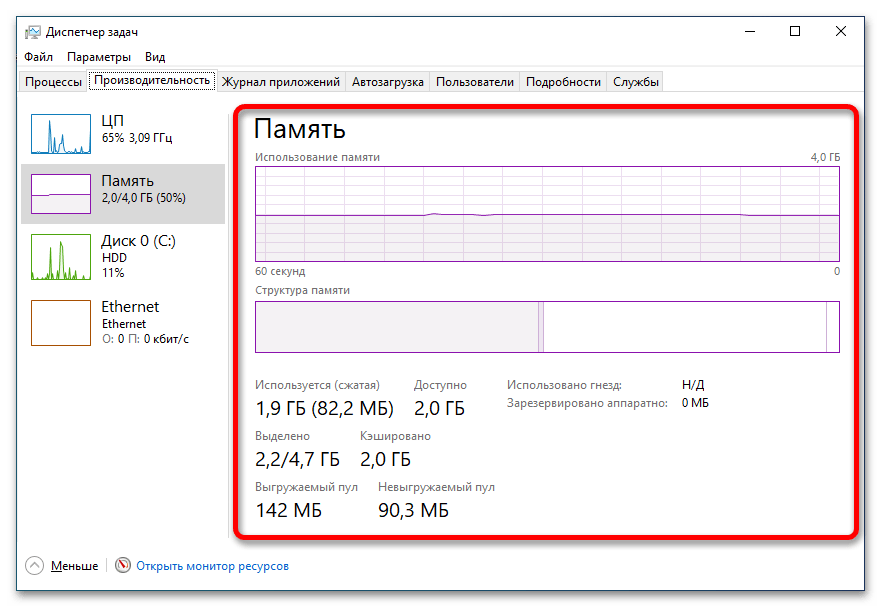
- Объем оперативной памяти
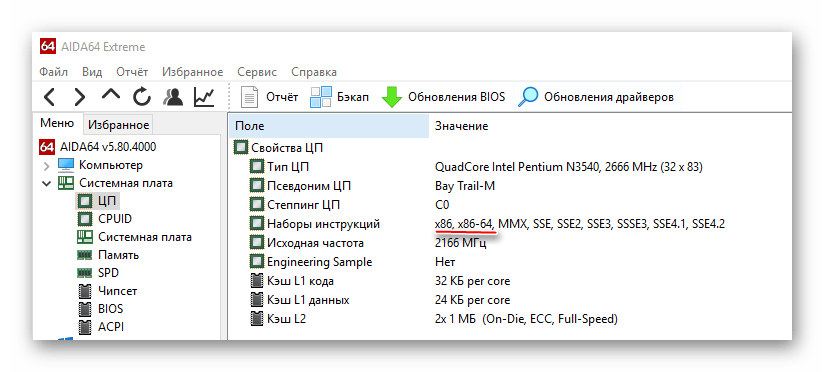
- Инструкции центрального процессора
- Драйверы оборудования
- Шаг 2: Полная переустановка операционной системы
- Вопросы и ответы: 0
Важно! Сменить 32-разрядную версию Windows 10 на 64-разрядную можно только путем полной переустановки. Но важно предварительно убедиться в том, что характеристики компьютера соответствуют минимальным требованиям операционной системы. По этой причине уделите должное внимание первому шагу этой статьи.
| Минимальные системные требования | ||
|---|---|---|
| Архитектура | Windows x86 (32-разрядная) | Windows x64 (64-разрядная) |
| Процессор | 1 ГГц и более тактовой частоты с поддержкой PAE, NX и SSE2 (x86-64 процессоры должны также поддерживать CMPXCHG16B, PrefetchW и LAHF/SAHF инструкции) или система на кристалле | |
| Оперативная память | 2 ГБ | 4 ГБ |
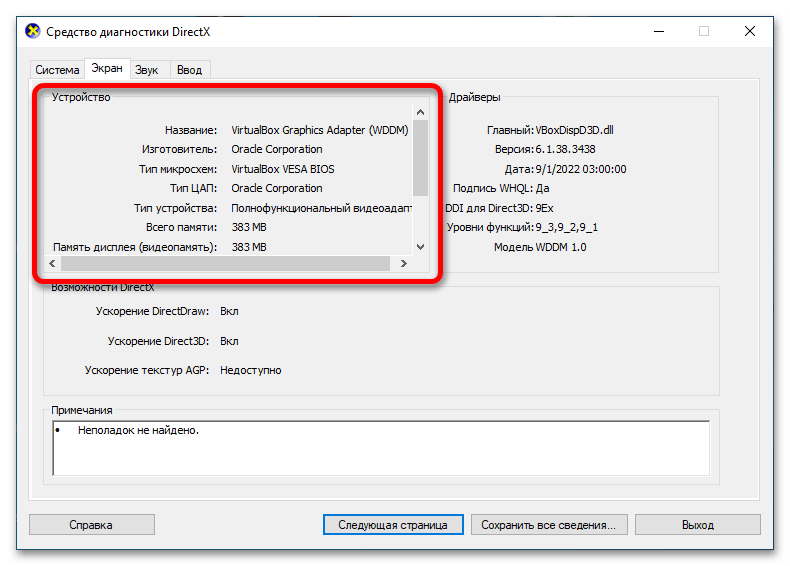
| Видеокарта | Видеоадаптер с поддержкой DirectX 9 и WDDM версии 1.0 | |
| Свободное на жёстком диске | 16 ГБ | 20 ГБ |
| Разрешение дисплея | 800 x 600 | |
| Устройство ввода | Клавиатура и мышь |
Шаг 1: Проверка совместимости
Прежде чем перейти с 32-разрядной версии операционной системы на 64-разрядную, необходимо удостовериться, что компьютер ее поддерживает. Стоит также обратить внимание, что представленные ниже способы актуальны только для старых компьютеров, выпущенных до 2014 года, так как современные модели поставляются с комплектующими, которые соответствуют всем требованиям Windows 10.
Разрядность процессора
Первостепенно нужно убедиться, что установленный в компьютере процессор поддерживает архитектуру x64. Сделать это можно непосредственно в операционной системе, открыв окно свойств:
-
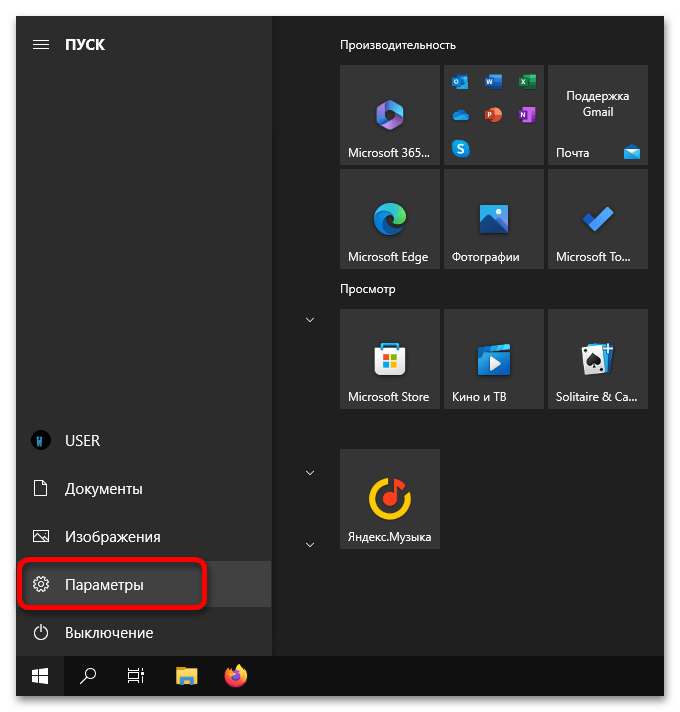
Перейдите в параметры Windows 10 любым удобным для вас способом. Проще всего это сделать через меню «Пуск», кликнув по соответствующему пункту в нижнем левом углу экрана.

Читайте также: Как открыть «Параметры» компьютера в Windows 10
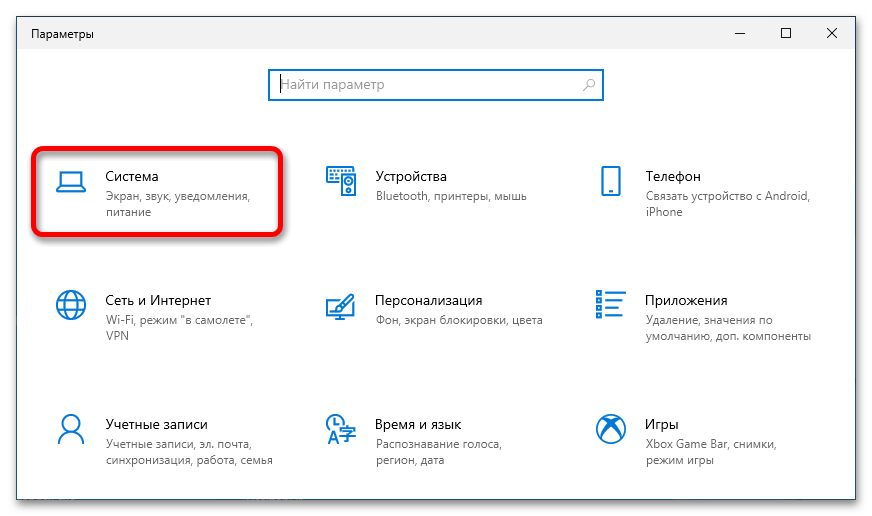
- Проследуйте в раздел «Система», щелкнув левой кнопкой мыши по соответствующему пункту меню.
- Воспользовавшись навигацией в левой части, перейдите на вкладку «О программе». Интересующая информация будет располагаться в основной части окна в блоке «Характеристики устройства» напротив строки «Тип системы».
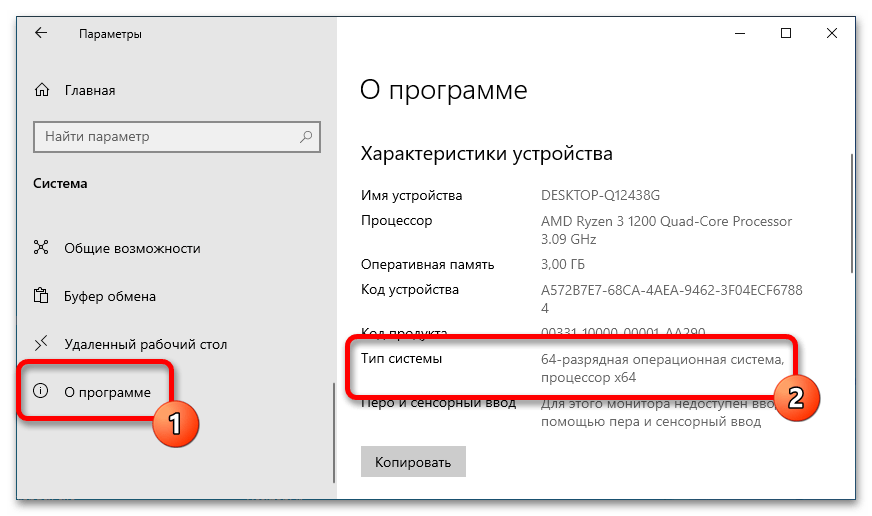
Если на вашем компьютере указано, что процессор является 32-битным (x86), тогда выполнить переход на 64-разрядную операционную систему не получится.
Обратите внимание! Если предложенным способом проверить разрядность установленного в компьютере процессоре не получилось, можете обратиться за помощью к отдельной статье на нашем сайте, где предлагаются к рассмотрению еще три дополнительных метода. Несмотря на то что все действия там производятся в рамках Windows 7, они актуальны и для десятой версии операционной системы.
Подробнее: Как проверить разрядность процессора на компьютере
Объем оперативной памяти
Немаловажным является наличие требуемого для корректной работы Windows 10 объема оперативно запоминающего устройства (ОЗУ). Разница заключается в том, что для 32-разрядной операционной системы достаточно всего 2 ГБ, а 64-разрядная требует 4 ГБ. Поэтому перед переходом нужно проверить эти значения на своем компьютере. У нас на сайте есть отдельная статья, в которой рассказывается обо всех доступных вариантах решения поставленной задачи.
Подробнее: Просмотр информации об оперативной памяти в Windows 10
Если объема ОЗУ недостаточно, можно установить дополнительные модули оперативной памяти. Но эта процедура требует не только знаний об устройстве компьютера, но и понимания технических особенностей рассматриваемого компонента. Рекомендуем обратиться к отдельной статье на нашем сайте, в которой рассмотрены все нюансы выбора, покупки и установки дополнительного ОЗУ.
Подробнее: Как увеличить количество оперативной памяти на компьютере с Windows 10
Инструкции центрального процессора
Если ваш центральный процессор был выпущен в момент появления первых 64-битных моделей, тогда важно убедиться, что он обладает всеми необходимыми для запуска Windows 10 x64 инструкциями. Следует обратить внимание на следующие параметры:
- Встроенный режим работы управления памятью «Physical Address Extension» («PAE»).
- Атрибут страницы памяти для защиты системы от ошибок программ «No-eXecute» («NX»).
- Потоковое «SIMD-расширение» набора инструкций процессора («SSE2»).
- Поддержка «CMPXCHG16b» («CX16»).
Встроенными средствами операционной системы проверить наличие перечисленных инструкций нельзя, для этого потребуется воспользоваться сторонним программным обеспечением. В качестве примера будет рассмотрена официальная утилита от Microsoft под названием Coreinfo.
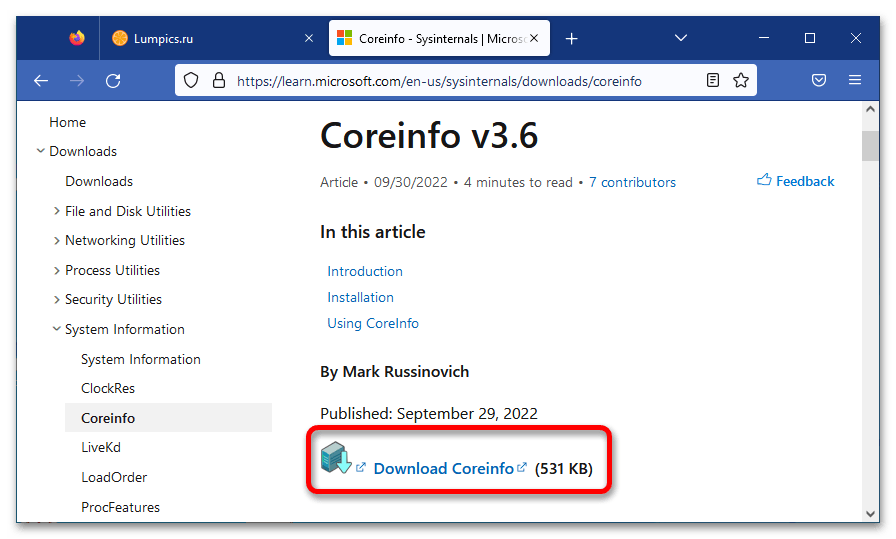
Скачать Coreinfo с официального сайта
- Перейдите на официальный сайт, воспользовавшись соответствующей ссылкой-кнопкой выше, после чего найдите и кликните по надписи «Download Coreinfo».
-
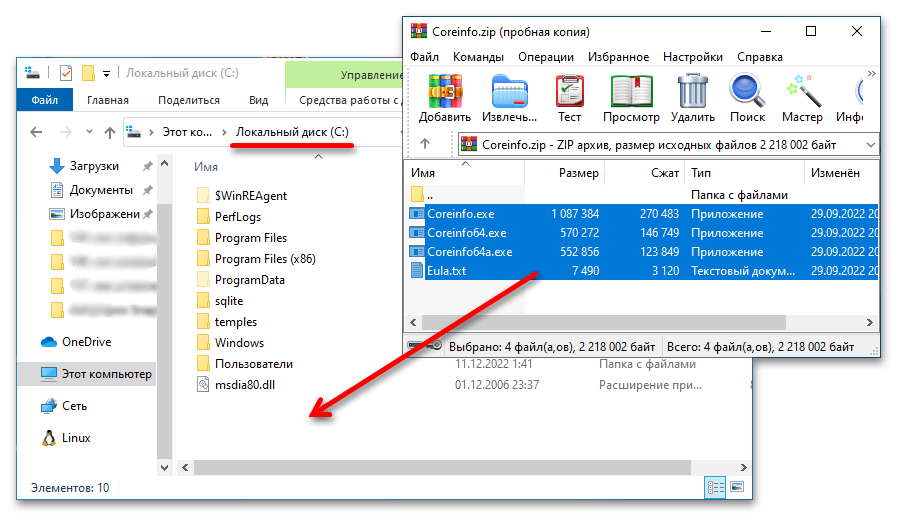
Распакуйте скачанный архив в любое место на диске. Для удобства использования утилиты сделать это рекомендуется в корневой каталог диска C.

Примечание! В качестве примера на скриншоте выше приведена программа WinRAR. Если на вашем компьютере она не установлена, можно воспользоваться любой другой подобной. На нашем сайте есть отдельная статья, посвященная этой теме.
Подробнее: Как распаковать ZIP-архив в Windows 10
-
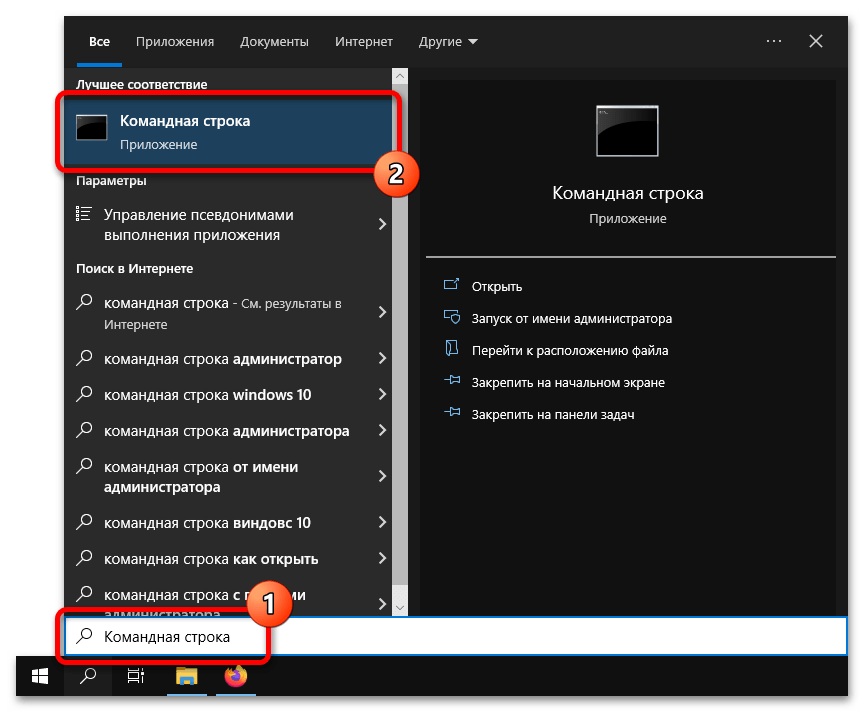
Запустите «Командную строку» любым доступным способом. Проще всего для этих целей воспользоваться системным поиском. Кликните по иконке лупы на панели задач и впишите в поле запрос
Командная строка, после чего кликните по соответствующему пункту в результатах выдачи.
Читайте также: Все способы запуска «Командной строки» в Windows 10
-
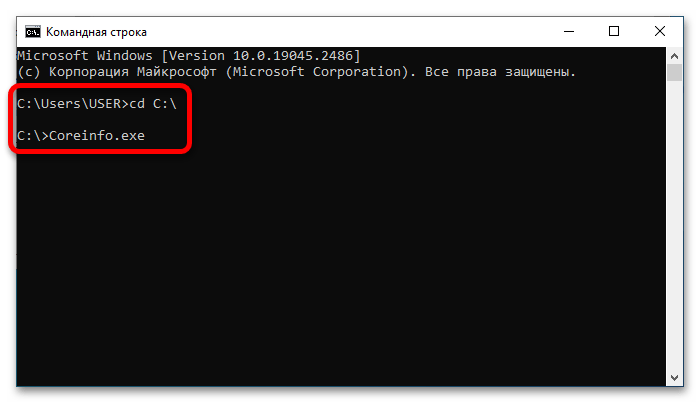
Перейдите в корневой каталог диска C. Для этого в открывшейся консоли пропишите следующую команду, после чего нажмите Enter:
cd C:\Обратите внимание! Если исполняемый файл утилиты вы распаковали в другую директорию, тогда вам нужно будет указать путь к ней.
-
Запустите утилиту Coreinfo, вписав название исполняемого файла в консоли и нажав клавишу Enter:
Coreinfo.exe(для 32-разрядной операционной системы)или
Coreinfo64.exe(для 64-разрядной операционной системы) -
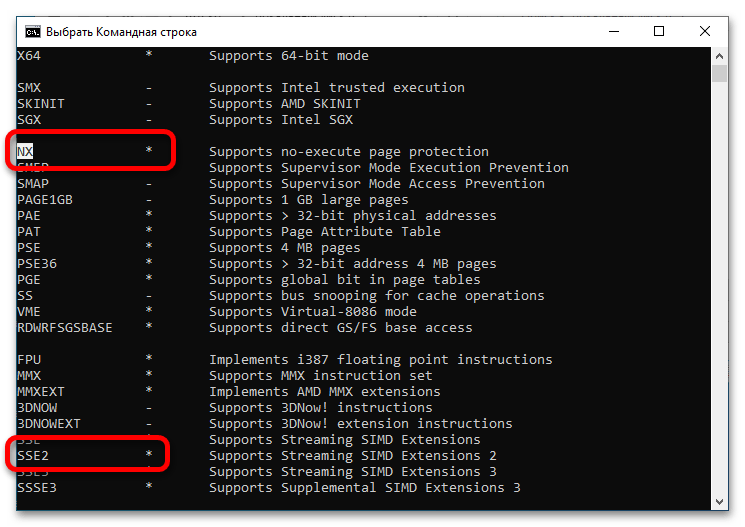
В результатах выдачи найдите названия всех необходимых инструкций и проверьте их статус. Если напротив стоит символ звездочки («*»), это означает, что функция поддерживается, если знак минуса («-») — не поддерживается. Список искомых наименований следующий:
- «PAE»;
- «NX»;
- «SSE2»;
- «CX16».

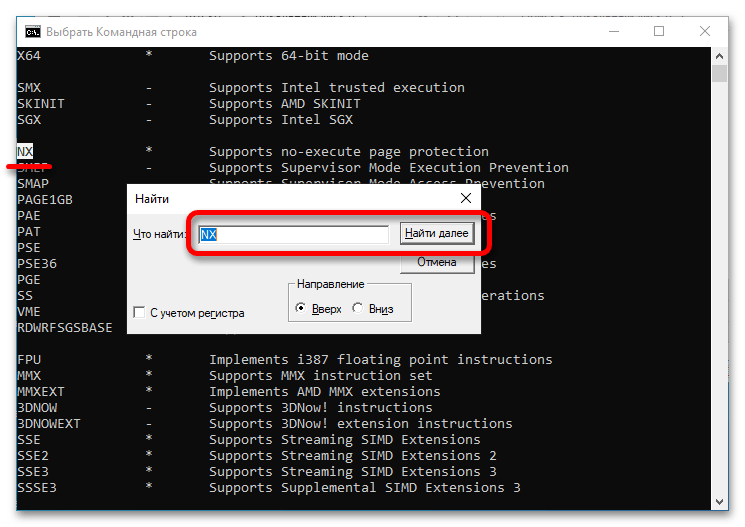
Примечание! Для быстрого поиска можно воспользоваться встроенной функцией «Командной строки». Для этого нажмите сочетание клавиш Ctrl + F, после чего в поле запроса введите искомое значение и нажимайте «Найти далее», пока заданный параметр не выделится в консоли.
После завершения проверки окно «Командной строки» можно закрыть, а все распакованные файлы утилиты удалить, если они в будущем больше не потребуются.
Драйверы оборудования
Даже если комплектующие компьютера обладают всеми необходимыми характеристиками для установки 64-разрядной операционной системы, это не означает, что после не возникнут проблемы с драйверами. Есть вероятность, что компания-производитель прекратила поддержку своего оборудования и не предоставляет 64-разрядные версии драйверов для загрузки на компьютер. В этом случае часть комплектующих будет работать некорректно.
Важно заранее проверить наличие всего необходимого программного обеспечения. Для этого потребуется узнать наименование каждого компонента, установленного в системном блоке. На нашем сайте есть статья, в которой подробно рассказывается, как узнать нужную информацию и проверить наличие драйверов на официальном сайте и не только. Воспользуйтесь изложенной там информацией, чтобы избежать неприятностей впоследствии.
Подробнее: Узнаем, какие драйвера нужно установить на компьютер
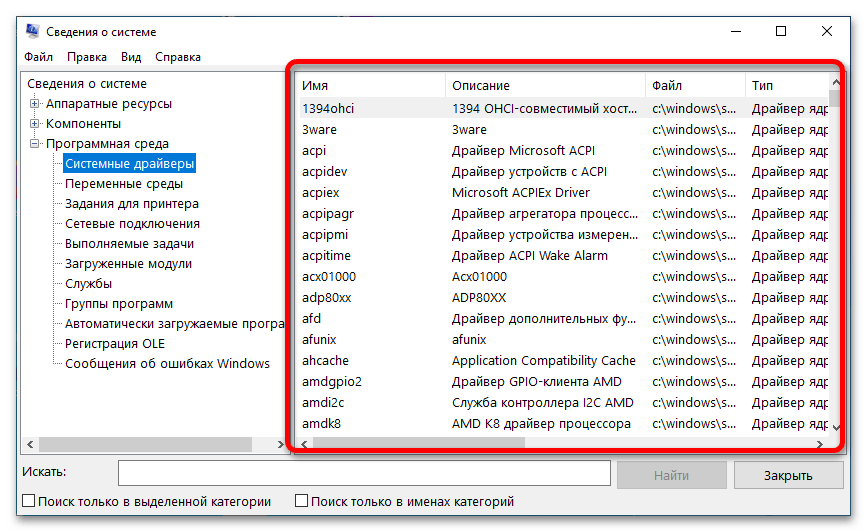
Важно! Также может пригодиться информация об уже установленных драйверах в Windows 10. На этот случай ознакомьтесь с другой статьей на нашем сайте, перейдя по ссылке ниже.
Подробнее: Просмотр сведений о драйверах в Windows 10
Шаг 2: Полная переустановка операционной системы
Если характеристики компьютера полностью удовлетворяют системные требования 64-разрядной Windows 10, можно приступать к ее переустановке. Эта процедура ничем не отличается от стандартной инсталляции, но есть несколько нюансов, о которых далее пойдет речь.
Если данные на диске вам не важны, тогда рекомендуется воспользоваться штатным методом переустановки операционной системы, подразумевающим полное форматирование диска на этапе разметки. Но прежде потребуется правильно создать загрузочный носитель и выполнить запуск компьютера с него. Обо всем этом подробно рассказывается в соответствующей статье на нашем сайте.
Подробнее: Руководство по установке Windows 10 с USB-носителя или диска
Если на диске находятся важные данные, следует провести подготовительные мероприятия перед переустановкой Windows 10. Также важно на этапе разметки дискового пространства правильно разбить носитель на разделы, иначе огромная часть информации может затереться. Чтобы правильно выполнить все действия, обратитесь за помощью к тематической статье на нашем сайте.
Подробнее: Методы переустановки Windows 10 без потери данных
Для обладателей лицензионной Windows 10 немаловажным является ее сохранение после переустановки операционной системы. Ознакомьтесь с информацией в другой статье на нашем сайте, чтобы узнать все нюансы этой процедуры. Особое внимание уделите третьему способу — «Чистая установка».
Подробнее: Как переустановить Windows 10 без потери лицензии
Наша группа в TelegramПолезные советы и помощь