
The Hosts file in Windows 11/10, is used to map hostnames to IP addresses. This Hosts file is located deep down in the Windows folder. It is a plain text file, and the size of the original default Hosts file is around 824 bytes.

The HOSTS file is used by Microsoft TCP/IP for Windows. This file contains the mappings of IP addresses to host names. Each entry should be kept on an individual line. The IP address should be placed in the first column, followed by the corresponding host name. Moreover, the IP address and the host name should be separated by at least one space.
In this post, we will see its location and also how to manage, lock, or edit the Hosts file in Windows 11/10. We will discuss the following:
- Host file location
- Lock Hosts file to prevent hijacking
- Block website using the Hosts file
- How to edit the Hosts file
- Using free Hosts File Editor software.
Let us take a look at them.
Host file location in Windows
The Hosts file in Windows is located at the following location:
C:\Windows\System32\drivers\etc
Lock Hosts file to prevent hijacking
Imagine clicking on www.thewindowsclub.com and seeing a completely different website load in your browser. Malware can redirect Web addresses on your computer by altering your Hosts file. This is referred to as the Host File Hijack.
To prevent Host file hijacks, you may navigate to it, right-click on it, select Properties and make it a Read-only file. This will lock down your Hosts file and prevent anyone or any malware from writing to it.
Block website using the Hosts file
To block a website using the Hosts File, simply add the following entry:
127.0.0.1 blocksite.com
Although I do not do it, many users like to manually add entries to it in order to block the opening of one or more particular websites. Others, like to download and use List from well-known sources like mvps.org, to add entries that block malware sites from opening.
How to edit Hosts file in Windows 11/10
To edit the Hosts file in Windows 11/10:
- Open Explorer
- Navigate to \System32\drivers\etc\ location
- Locate Hosts file
- Right-click on it and select Notepad
- Make the changes and Save.
Now let us go into a detailed explanation.
To edit the Hosts file, navigate to the following folder location:
C:\Windows\System32\drivers\etc\
Here you will see the Hosts file. Right-click on it and select Notepad. Make the changes and Save.
But sometimes, even when you are logged on with administrative credentials, you may receive the following error message:
Access to C:\Windows\System32\drivers\etc\ hosts was denied
Or
Cannot create the C:\Windows\System32\drivers\etc\hosts file. Make sure that the path and file name are correct.
In this case, type Notepad in Start search and right-click on the Notepad result. Select Run as administrator.
Open the Hosts file, make the necessary changes, and then click Save.
Using free Hosts File Editor software
If you are looking for an easier way, you can use a free Hosts file Editor software.
1] Using HostsMan
While you can always manually manage or edit Hosts file manually, I would like to suggest that you use a third-party freeware tool like HostsMan to do it.
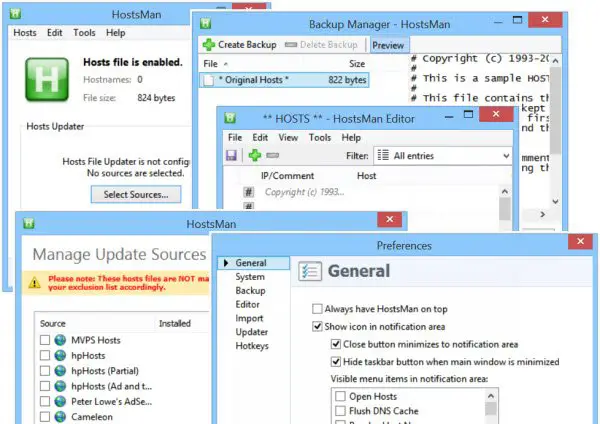
HostsMan is a feature-rich tool that lets you add, remove, edit entries in the Hosts file. It also lets you easily add third-party Hosts lists that help in blocking malware sites and lets you easily enable or disable the Hosts file. It includes a built-in hosts file updater & a hosts editor. It lets you scan the hosts file for errors, duplicates, and possible hijacks – and also lets you create an Exclusion list. One more useful feature it offers is the Hosts file backup manager. Backup your Hosts file to a safe place and use it to restore it, should the need arise.
Hostman also lets you Flush DNS cache, open Hosts with a text editor, count the number of hosts, find duplicates, replace IP, scan hosts for malicious entries, rearrange hosts, manage DNS Client Service, and more. In short, it’s the only Hosts Manager that you will ever need. You can download it from its home page.
TIP: SwitchHosts is a Hosts file switcher for Windows that allows you to change your Hosts file with a click. It is useful if you need to have two Hosts files on your PC.
2] Using SysMate Hosts File Manager

SysMate Hosts File Manager and is another tool that lets you do so. With Host File Walker you can add as many records to the system hosts file. It even lets you backup and restore the Hosts File.
3] Using Host File Editor tool
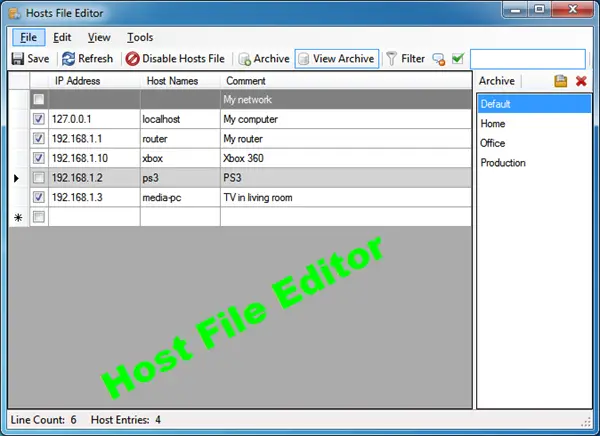
Host File Editor is another good tool that you can use. It has the following features:
- Enable and disable hosts file from the system tray
- Cut, copy, paste, duplicate, enable, disable and move entries
- Filter and sort host entries
- Backup and restore various hosts file configurations when switching between environments
- Ping endpoints to check availability.
You can download it from here. It offers a portable version too.
4] HostsDock

HostsDock is another useful software to edit the hosts file on Windows 11/10 computers. This is an open-source hosts file editor software that also lets you create new local hosts files and save them. You can also connect to a remote hosts file which is an important option. Some other interesting features are also available which are as follows:
- Syntax Highlighter that can automatically highlight IP addresses, comments, domains, etc., present in the hosts file. It detects all these items by itself and then highlights them
- Basic editing options like undo/redo, search and replace, cut, paste, etc.
- Create folding block
- Test IP addresses in the hosts file with the ping command
- A navigation pane to quickly switch to local and remote hosts files, check system hosts info, etc.
You can download this tool from eshengsky.github.io. Launch the tool after installation and it will show the system hosts file. After that, you can use the available options to add or create a new hosts file, use editing options, export the hosts file, and more.
5] Hosts File Editor PowerToy

The Hosts File Editor PowerToy also lets you edit the Hosts file.
How do I grant permission to edit the Hosts file in Windows 11/10?
If you want to grant permission to edit the hosts file in Windows 11/10 using Notepad, then you need to run Notepad as an administrator. You should also sign in to your Windows 11/10 system with an administrator account to edit hosts file so that you won’t get any errors while saving the hosts file.
Read: What is LMHOSTS file in Windows?
Do not have permission to edit the Hosts file?
If you are unable to edit the hosts file on Windows 11/10 or you do not have permission to edit the hosts file, then you can use the following solutions:
- Use Notepad with administrative privileges and then open a hosts file to edit it
- Copy the hosts file from the original location to the desktop or some other location, edit that file, and then copy the edited file and paste it into the original location to overwrite the hosts file
- Use some third-party hosts file editing tools, etc.
TIP: See this post if Hosts File is not working in Windows. How to manually reset the Hosts file back to default in Windows may also interest you.
If your browser has been hijacked, you might find this post on Browser Hijacking and Free Browser Hijacker Removal Tools helpful.
В этой статье мы расскажем, что такое файл hosts и где он лежит.
hosts — это текстовый документ, в котором прописаны соответствия доменов IP-адресам. Когда вы вводите домен в адресной строке браузера, в первую очередь запрос IP-адреса отправляется к файлу hosts. Если в нем не прописана информация об искомом сайте, запрос перенаправляется к системе DNS.
Как выглядит файл hosts в Windows:
Как выглядит файл hosts в Linux:
Как появился файл hosts
В 1970-х годах появилась прародительница современного интернета: сеть под названием ARPAnet. Она состояла из нескольких сотен порталов с информацией. За маршрутизацию в этой сети отвечал файл hosts.txt: в нем хранились соответствия между именем ресурса и его IP-адресом.
В то время за hosts.txt отвечал Сетевой информационный центр Стэнфордского исследовательского института (сокращенно NIC SRI). Если в сети появился новый сайт, администраторы отправляли информацию об изменениях в NIC SRI. После этого они синхронизировали свой файл hosts с данными из NIC. Это происходило 1-2 раза в неделю.
Однако по мере распространения интернета эта схема работы стала невозможна: объем информации рос, и синхронизировать данные стало значительно сложнее.
В 1984 году появились документы, в которых была описана система DNS. Именно она пришла на замену hosts.txt.
Файл hosts по-прежнему существует, но его назначение изменилось. Он есть на каждом компьютере и отвечает за отображение сайтов на конкретном устройстве. На глобальную паутину hosts не влияет.
Как можно использовать файл hosts
Файл hosts можно использовать для проверки работы сайта: это полезно, если вы недавно зарегистрировали новый домен или изменили DNS-серверы для существующего. Обновление DNS происходит в течение 24 часов, однако hosts позволяет увидеть сайт раньше. Для этого в нем нужно прописать доменное имя и IP-адрес хоста.
Что такое хост? Это сервер или услуга, на которой размещен ваш сайт. Уточнить ее IP-адрес можно у поставщика услуг.
Где находится файл hosts
Расположение файла hosts зависит от семейства и версии ОС, которая установлена на вашем компьютере.
- Путь к файлу hosts на Windows 10: c:\windows\system32\drivers\etc\hosts
- Путь к файлу hosts на Windows 11: c:\windows\system32\drivers\etc\hosts
- Путь к файлу hosts на Windows 7: c:\windows\system32\drivers\etc\hosts
- Путь к файлу hosts на Linux: /etc/hosts
- Путь к файлу hosts на macOS: /private/etc/hosts
Не удается изменить файл hosts: как это исправить
Иногда попытка изменить hosts завершается ошибкой. С этим можно столкнуться, если вы редактируете файл в системе Windows.
Чтобы решить эту проблему, откройте Блокнот от имени администратора. Для этого:
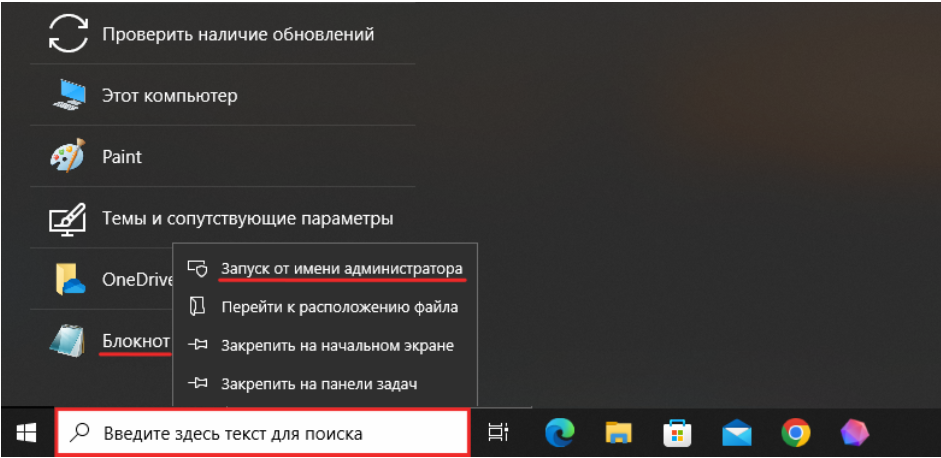
- Кликните по строке поиска. Нажмите на Блокнот правой кнопкой мыши и выберите Запуск от имени администратора:

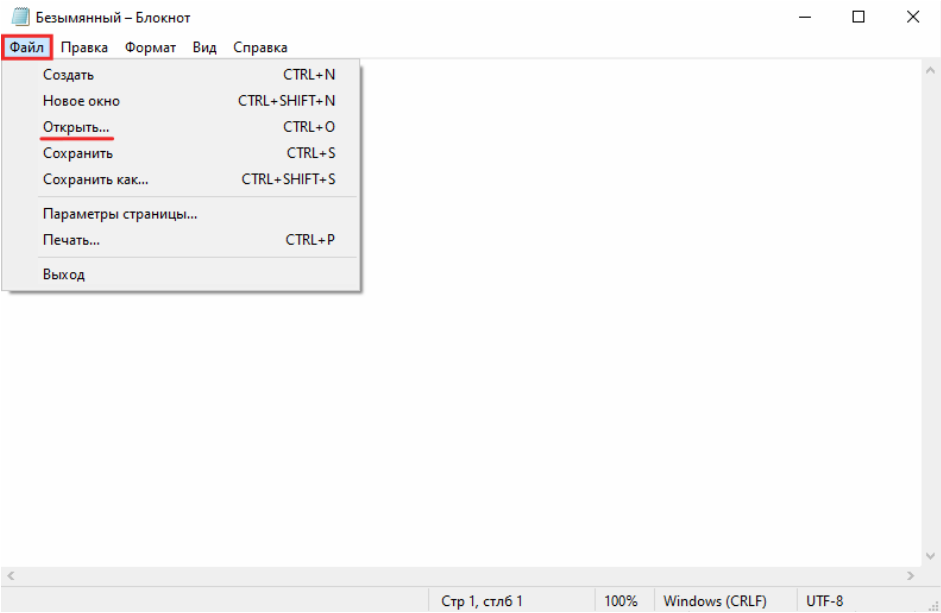
- Нажмите на меню Файл и выберите Открыть.
- Выберите файл hosts на вашем компьютере и нажмите Открыть.
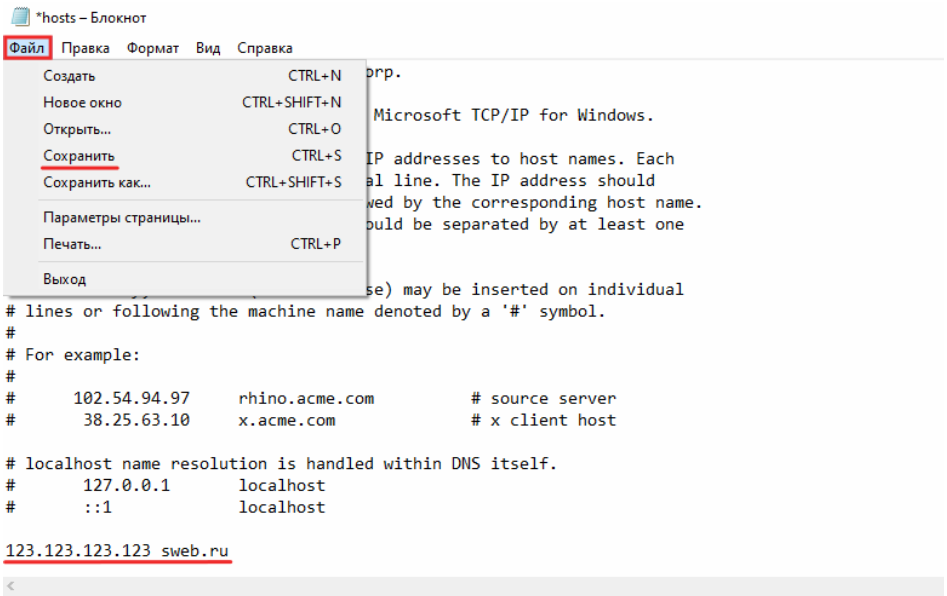
- Добавьте данные о вашем сайте. В примере:
123.123.123.123 — IP-адрес вашего хостинга,
sweb.ru — доменное имя вашего сайта. - Затем нажмите Файл и выберите Сохранить
Что такое localhost
localhost — это домен, который позволяет обратиться к вашему компьютеру напрямую. Это имя привязано к IP-адресу 127.0.0.1.
Как правило, localhost используется для настройки сетевых инструментов: например, если вы настроили сервер на компьютере и хотите к нему обратиться по имени или IP.
Помимо этого, localhost можно использовать, чтобы закрыть доступ к какому-либо сайту. Предположим, вы хотите заблокировать vk.com на конкретном компьютере. Тогда в файл hosts необходимо добавить строку:
127.0.0.1 vk.com
Как восстановить оригинальный файл hosts
Если вы случайно удалили файл hosts, его можно восстановить вручную. Для этого перейдите в папку, в которой он должен храниться. Затем создайте текстовый файл без расширения, назовите его hosts. После этого файл необходимо наполнить. Содержимое по умолчанию зависит от ОС, которая установлена на вашем компьютере.
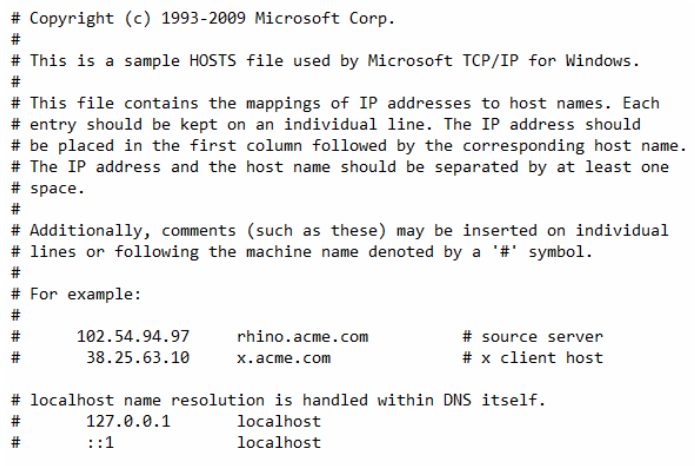
Стандартный hosts для Windows:
# Copyright (c) 1993-2006 Microsoft Corp.


#
# This is a sample HOSTS file used by Microsoft TCP/IP for Windows.
#
# This file contains the mappings of IP addresses to host names. Each
# entry should be kept on an individual line. The IP address should
# be placed in the first column followed by the corresponding host name.
# The IP address and the host name should be separated by at least one
# space.
#
# Additionally, comments (such as these) may be inserted on individual
# lines or following the machine name denoted by a '#' symbol.
#
# For example:
#
# 102.54.94.97 rhino.acme.com # source server
# 38.25.63.10 x.acme.com
# x client host
# localhost name resolution is handle within DNS itself.
# 127.0.0.1 localhost
# ::1 localhost
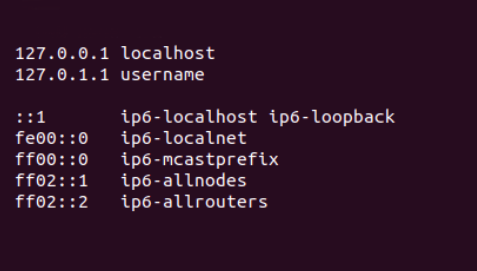
Стандартный hosts для Linux:
127.0.0.1 localhost
127.0.1.1 username
# The following lines are desirable for IPv6 capable hosts
::1 ip6-localhost ip6-loopback
fe00::0 ip6-localnet
ff00::0 ip6-mcastprefix
ff02::1 ip6-allnodes
ff02::2 ip6-allrouters
Вместо username укажите имя вашей учетной записи на компьютере.
Стандартный hosts для MacOS:
##
# Host Database
#
# localhost is used to configure the loopback interface
# when the system is booting. Do not change this entry.
##
127.0.0.1 localhost
255.255.255.255 broadcasthost
::1 localhost
После этого сохраните файл.
Несмотря на то, что файл hosts уже не влияет на работу сайтов в глобальной сети, он помогает решить некоторые важные задачи на вашем компьютере.
Helping millions of people navigate the world of technology.
Key Takeaways
- The hosts file is located in the drive path C:\Windows\System32\drivers\etc
- You should ensure you can view hidden folders on Windows to access this file.
- You can use the built-in Notepad editor to edit the hosts file.
Where Is the Hosts File Located in Windows
The host files are stored locally on your computer within the C drive. To locate the path, follow the steps below.
Step 1: Press the Windows + S key on your keyboard. Type This PC and click Open.

Step 2: Double-click on Local Disk C.

Step 3: Navigate to the Windows folder.

Step 4: Scroll down and open the System32 folder.

Step 5: Search for the drivers folder and open it.

Step 6: Double-click on the etc folder.

Step 7: Now, you can see your hosts files.

Alternatively, you can also open This PC and paste the following in the address bar:
C:\Windows\System32\drivers\etc\hosts
Note that you may have to make hidden folders visible to see the hosts file.
Editing the hosts file in Windows is a straightforward process. To get started, you’ll need a text editor, and Windows conveniently includes Notepad as the default option. To modify the hosts file, follow these steps:
Step 1: Click the Windows icon and select the search box. Enter Notepad, right-click the app, and click Run as administrator. Select Yes when prompted.

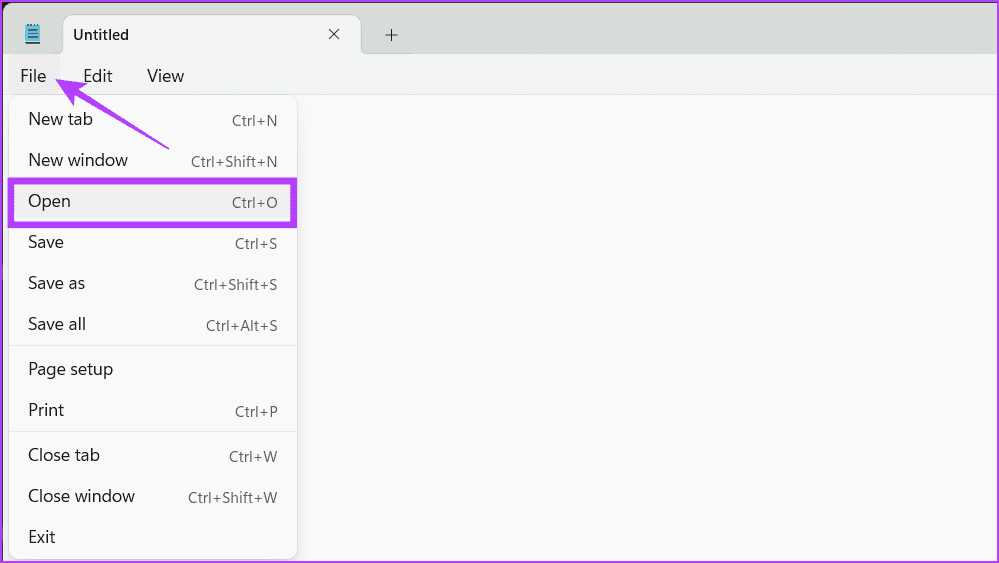
Step 2: Click File and choose Open from the drop-down menu.
Tip: You can also press Ctrl + O to launch the Open menu directly.
Step 3: Paste the following in the address bar.
C:\Windows\System32\drivers\etc
Note: Switch the file type to All files instead of .txt, the default file type.

Step 4: Select the hosts file and click Open.
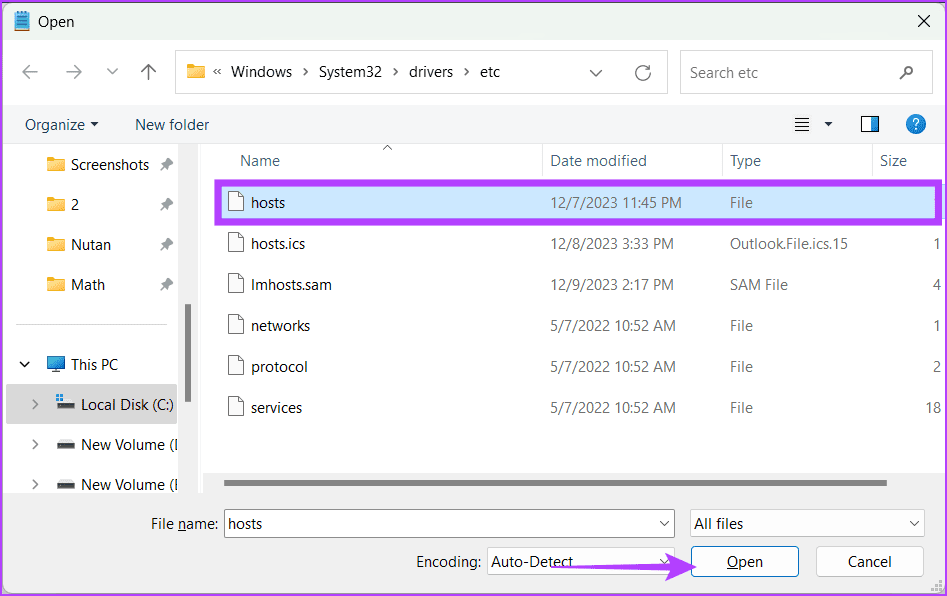
Step 5: Now, you can edit the host file. Once edited, click File and choose Save.

Also Read: How to fix Notepad not opening
Was this helpful?
Thanks for your feedback!
Last updated on 10 July, 2024
The article above may contain affiliate links which help support Guiding Tech. The content remains unbiased and authentic and will never affect our editorial integrity.
При соединении с каким-либо сайтом, прежде чем запросить его IP у DNS-сервера, Windows проверяет файл hosts: если для каких-то сайтов в этом файле заданы IP-адреса, используются именно они. Это может использоваться для блокировки доступа к некоторым сайтам (и некоторые вирусы блокируют доступ к сайтам антивирусов) и других задач.
В этой инструкции пошагово о том, где находится файл hosts в Windows 11, как его отредактировать и как выглядит файл hosts по умолчанию.
Где находится файл hosts в Windows 11
Расположение файла hosts одинаково во всех версиях Windows: он находится в папке C:\Windows\system32\drivers\etc

Иногда в указанной папке можно обнаружить более одного файла с именем hosts, в этом случае нужный — тот, который не имеет никакого расширения.
Дополнительные нюансы, касающиеся файла hosts:
- Иногда его может и не быть в указанной папке. Если вы столкнулись с таким, это странно, но никак не влияет на работу вашего Интернет-подключения (по умолчанию файл hosts не содержит значимых записей).
- Теоретически возможно изменение расположения файла hosts. Оно прописывается в разделе реестра
HKEY_LOCAL_MACHINE\SYSTEM\CurrentControlSet\Services\Tcpip\Parameters\
в параметре DataBasePath. На изображении ниже — значение этого параметра по умолчанию.


Как изменить файл hosts
Если вам требуется отредактировать файл hosts, сделать это можно в любом текстовом редакторе, но его обязательно следует запускать от имени администратора. Пример изменения файла hosts с помощью блокнота в Windows 11:
- С помощью поиска на панели задач найдите «Блокнот», нажмите по найденному результату правой кнопкой мыши и выберите пункт «Запуск от имени администратора».

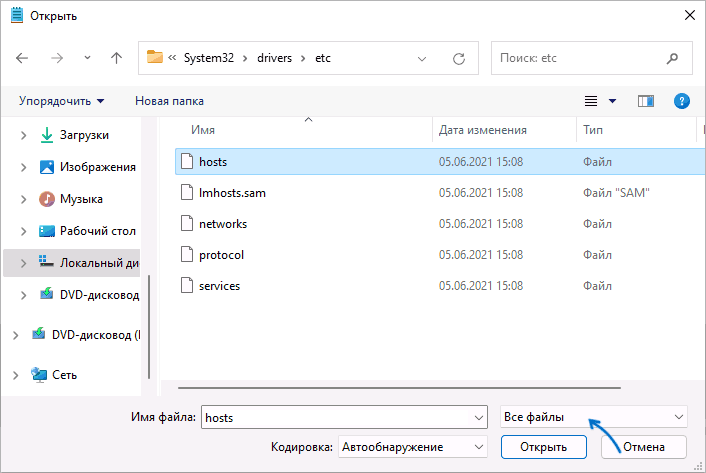
- После запуска в меню блокнота выберите «Файл» — «Открыть», а затем в поле внизу слева выберите «Все файлы».

- Перейдите к папке C:\Windows\system32\drivers\etc и откройте файл hosts без расширения.
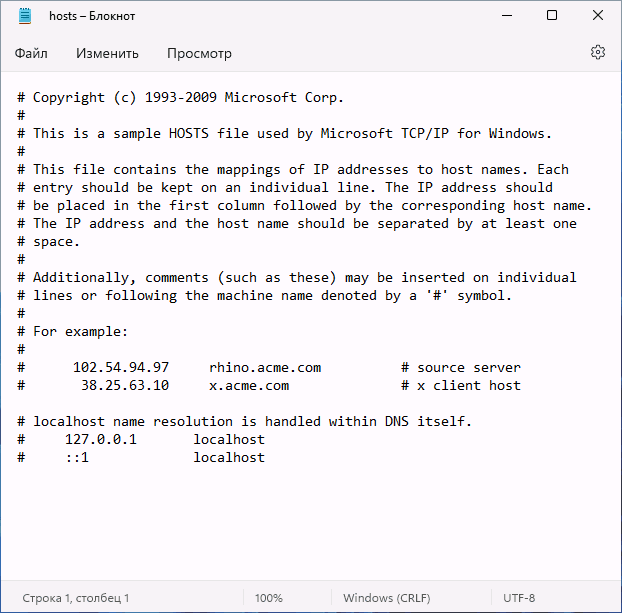
- По умолчанию файл hosts может иметь вид либо как на скриншоте ниже, либо быть пустым — оба варианта равнозначны, поскольку все строки, начинающиеся с символа решётки являются комментариями и не участвуют в работе этого файла.

- Для добавления записей, добавьте их на новой строке: сначала IP-адрес, а затем через пробел — сайт, при открытии которого будет открываться указанный IP-адрес. Например, если вы хотите заблокировать сайт Одноклассники, вы можете добавить новую строку 0.0.0.0 ok.ru (для блокировки обычно используются IP-адреса 127.0.0.1 или 0.0.0.0, но второй вариант предпочтительнее, так как при некоторых условиях на первом адресе может открываться HTTP-ресурс, запущенный на текущем компьютере).

- После завершения редактирования, в меню выберите Файл — Сохранить. Каких-либо окон для выбора места сохранения появиться не должно, а если появились, это говорит о том, что вы запустили блокнот не от имени администратора и сохранить файл hosts «правильно» не получится.


Восстановление файла hosts по умолчанию
Если в вашем файле hosts появились блокировки каких-то нужных сайтов (антивирусов, компьютерных или других), то для его восстановления вам достаточно выполнить описанные выше 1–3, а затем либо удалить всё содержимое файла, либо, если вам требуется первозданный файл hosts — скопировать и вставить следующее содержимое:
# Copyright (c) 1993-2009 Microsoft Corp.
#
# This is a sample HOSTS file used by Microsoft TCP/IP for Windows.
#
# This file contains the mappings of IP addresses to host names. Each
# entry should be kept on an individual line. The IP address should
# be placed in the first column followed by the corresponding host name.
# The IP address and the host name should be separated by at least one
# space.
#
# Additionally, comments (such as these) may be inserted on individual
# lines or following the machine name denoted by a '#' symbol.
#
# For example:
#
#      102.54.94.97     rhino.acme.com          # source server
#       38.25.63.10     x.acme.com              # x client host

# localhost name resolution is handled within DNS itself.
#	127.0.0.1       localhost
#	::1             localhost
После удаления строк или вставки содержимого файла hosts, сохраните его (Файл — Сохранить). Как и в предыдущем случае, если при сохранении появилось окно выбора места сохранения, это говорит о том, что текстовый редактор был запущен не от имени администратора.
Также вы можете использовать сторонние средства удаления вредоносных программ, которые, помимо прочего, умеют восстанавливать файл hosts.
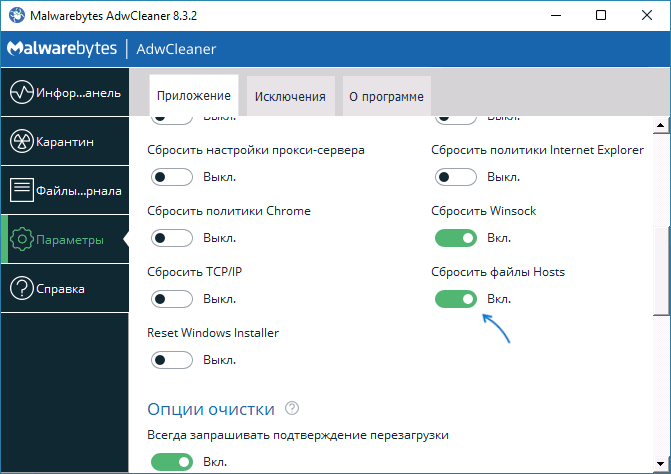
Например, если перед сканированием AdwCleaner зайти в «Параметры» и включить опцию «Сбросить файлы Hosts», то в ходе сканирования и последующей очистки компьютера будет сброшен и этот файл.
Если изменения, сделанные в файле hosts не работают
Как правило, все внесённые в файл hosts изменения начинают работать сразу после его сохранения, какая-либо перезагрузка не требуется. Однако, в некоторых случаях это может быть не так. Здесь могут помочь следующие действия:
- Если вы убирали блокировку сайтов в файле hosts, а они все равно заблокированы, возможно, блокировка присутствует где-то ещё, например, в брандмауэре Windows.
- Если вы блокировали сайт, а он продолжает открываться, причиной может быть тот факт, что многие современные браузеры начали использовать DNS over HTTPS и блокировка не заработает, пока вы не включите DNS over HTTPS в Windows 11.
- Неверный синтаксис в строках hosts также может приводить к неработоспособности записей. В начале строки не требуются пробелы или символы решётки. Между IP-адресом и доменом используйте один символ пробела, допускается использование табуляции. Кодировка файла — ANSI или UTF-8 (блокнот по умолчанию сохранит в правильной кодировке).
- Использование прокси и некоторых VPN-сервисов также может повлиять на работу файла hosts.
When you visit a website, for example Save Location, the domain (in this case, savelocation.net) is just an alias for an IP address. If we think about the IP address as the host, and the domain as the name, it’s quite clear to see where the name «hostname» comes from: it’s the name for a host.
Perhaps the most-commonly used example of a hostname is localhost which is actually just a hostname for 127.0.0.1. But how does your computer know which IP address a hostname points to?
In the case of savelocation.net and localhost, they both use system called DNS (domain name system) which — to really water things down — tells the computer where they point to.
It would also be possible to use the hosts file to declare these. A hosts file defines any and all hostnames that aren’t in the domain name system, in fact, one can even override the DNS by changing the hosts file (as it has priority). If you want to learn how to open up the hosts file, read on…
Windows Hosts File Location
The hosts file location on Windows 10, Windows 8, and Windows 7 is the same. You can find it at the following path:
C:\Windows\System32\Drivers\etc\hosts
On Windows 8 and 10, you’ll need to run the application you wish to open the hosts file with as administrator in order to access it. We’ll use Notepad as an example. First, open Notepad as an administrator by right clicking it and selecting Run as Administrator:
Then, go to File > Open (or hit CTRL + O):
Finally, paste the hosts file location from above into the File name: field and hit Open:
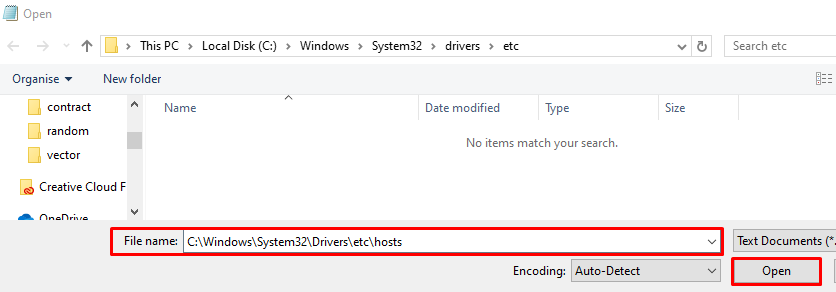
And that’s you, inside the hosts file and ready to edit it! If you want to learn how to use the hosts file, read on…
How to Edit the Hosts File on Windows
Each hostname you want to define should be on one line (and there should be a new line for each hostname). The syntax is fairly straight forward, first write the name of the host (e.g. IP address) you want the hostname to point to. Then, after a space (or tab), add the hostname. For example, the below line would make home.computer point to 127.0.0.1:
home.computer 127.0.0.1
Say you also wanted to add the host 192.168.1.143 to have the hostname lan.network, you could just add another line, so the file would look like so:
home.computer 127.0.0.1
lan.network 192.168.1.143