
В этой статье я расскажу, как быстро развернуть webdav-хранилище под Linux или Windows. Это может понадобиться для подобных сценариев:
– Открыть доступ к папке с фотографиями на домашнем ПК, чтобы просмотреть их с телефона или выгрузить туда новые фотографии.
– Открыть доступ к фонотеке и иметь возможность проигрывать музыку на Android-устройстве или с другого компьютера, к которому подключены колонки.
При желании можно организовать и более сложные варианты, где будет использоваться аутентификация, а у пользователей будут права доступа к определённым директориям.
Содержание– Настраиваем webdav-сервер
– Подключаемся с Android
– Подключаемся с Windows
– Подключаемся с Linux
– Автозапуск сервера при загрузке системы
Настраиваем webdav-сервер1. Заходим на страницу https://github.com/hacdias/webdav/releases и качаем последнюю версию под свою систему (там множество сборок под все возможные платформы).
2. Распаковываем архив в удобную папку и создаём файл конфигурации config.yml:
-
address: 192.168.1.139
-
port: 8082
-
auth: true
-
tls: false
-
users:
-
— username: admin
-
password: «{bcrypt}$2y$12$E4n7DvySA7UfzyBTNikkFeSFuQ8sEDxI37hjCTZQyjouLm.Ox6G.2″
-
modify: true
-
scope: «E:/MUSIC/»
-
— username: share
-
password: 12345
-
modify: true
-
scope: «E:/MUSIC/Share/»
2.1. В поле address указываем IP адрес компьютера в вашей локальной сети
2.2. В поле port укажите удобный свободный порт (убедитесь, что порт открыт и фаерволл не блокирует к нему доступ).
2.3. В users указываются пользователи, их пароли для входа и путь к директории, которая будет доступна им (используйте прямой слэш / для путей). В данном случае у пользователя admin будет полноценный доступ ко всей папке с музыкой, а пользователь share имеет доступ только к папке для обмена файлами.
2.4. Пароль можно задавать в открытом виде, как это сделано для пользователя share, но для администратора так делать не рекомендуется. Чтобы задать пароль, идём на https://bcrypt-generator.com/, в поле String to encrypt указываем желаемый пароль и нажимаем кнопку Hash

В данном случае для пароля
My5uper5ecretPa$$w0rd
получили хэш
$2y$12$E4n7DvySA7UfzyBTNikkFeSFuQ8sEDxI37hjCTZQyjouLm.Ox6G.2
Записываем в конфиг это значение с префиксом {bcrypt} и в двойных кавычках:
«{bcrypt}$2y$12$E4n7DvySA7UfzyBTNikkFeSFuQ8sEDxI37hjCTZQyjouLm.Ox6G.2»
3. Запускаем программу из консоли/терминала, передав файл конфига:
-
webdav —c config.yml
Если всё пройдёт успешно, покажется сообщение «Listening on 192.168.1.139:8082»
Подключаемся с AndroidЯ буду использовать MiXplorer, но подойдёт любой файловый менеджер с поддержкой webdav.
1. В боковом меню добавляем новое хранилище
2. Выбираем из списка WebDav
3. Вводим адрес, заполняем логин и пароль. Жмём Save.
4. Подключаемся и видим список наших файлов с полноценным доступом по сети.

Подключаемся с WindowsДля подключения можно воспользоваться WinSCP:
В диалоге создания сессии добавьте новый сайт, укажите протокол WebDAV и заполните значения

Также можно добавить хранилище в плеере AIMP:
Переходим на вкладку Мои облака, жмём ПКМ и Добавить хранилище
Заполняем данные

Если всё успешно, можно будет проигрывать музыку, которая находится на удалённом компьютере:

Также возможен вариант подключения через RaiDrive:
Выбираем Add, во вкладке NAS выбираем WebDAV, убираем галочку https (4), заполняем IP, порт, данные пользователя и нажимаем OK

Если сделали всё правильно, откроется проводник с указанной папкой, а в списке дисков появится новый диск Z:/

Подключаемся с LinuxНа примере Ubuntu. Заходим в Files -> Other Locations и внизу в поле Connect to Server вводим строку:
dav://192.168.1.139:8082

Жмём Connect и вводим данные пользователя:

После чего webdav-хранилище будет доступно в файловом менеджере.
Автозапуск сервера при загрузке системыДля быстрого поднятия сервера, чтобы послушать музыку пару часов или посмотреть фотографии несложно запустить сервер из командной строки вручную. Но что, если хочется, чтобы сервер стартовал сам при загрузке системы и был доступен всегда, пока включен компьютер? Да и лишнее окно с консолью иметь не хочется. В таком случае, нужно создать сервис.
В Linux можно добавить задачу в cron:
-
(crontab -l ; echo «@reboot cd /path/to/webdav/binary && webdav -c config.yml») | crontab —
Либо добавить юнит для сервиса systemd.
В Windows так просто сервис не создать, но на помощь приходит NSSM. Скачиваем архив с программой и помещаем nssm.exe в папку %WINDIR% (обычно C:\Windows). В папке с webdav.exe открываем командную строку и вводим:
-
nssm install
В появившемся окне выбираем программу webdav.exe, автоматически заполнится поле Path и Startup directory.

В Arguments вписываем
-c config.yml
А в Service name желаемое имя сервиса. После этого жмём Install service.
При желании можно заполнить описание на вкладке Details и выбрать желаемый способ запуска сервиса на вкладке Log on (по умолчанию сервис будет стартовать при входе в систему Windows).
Теперь в диспетчере задач будет виден новый сервис
Также можно проверить статус из командной строки:
-
nssm status webdav
Остановить службу:
-
nssm stop webdav
Запустить её вновь:
-
nssm start webdav
Или вовсе удалить:
-
nssm remove webdav
В этой заметке мы поговорим о замечательной надстройке над службой Internet Information Services (IIS) под названием WebDAV. WebDAV это протокол для доступа к общим файлам и папкам через интернет, чем то похожий на FTP. Передача файлов по протоколу WebDAV может быть осуществлена через различные межсетевые экраны и брандмауэры, передаваемую информацию можно шифровать, да и работа с файлами и папками реализована намного удобнее, полностью напоминая работу службы общего доступа к фалам и папкам в Windows.
Вместе с выходом Windows Server 2008 Microsoft презентовала обновленную версию модуля WebDAV для IIS 7. Данный модуль существенно расширил возможности, удобство и безопасность использования WebDAV для доступа к файлам в Интернет, кроме того теперь он стал поддерживать многопользовательскую работу и блокировку файлов.
В этой статье мы поговорим о том, как установить WebDAV на ОС Windows 7 и Windows Server 2008 R2, как его настроить и каким образом можно получить доступ к файлам и папкам, к которым открыт общий сетевой доступ по WebDAV .
Еще раз напомню, что WebDAV это расширение службы IIS, поэтому, если у вас еще не установлен IIS, сделайте это (как вы, наверное, помните и в Windows 7 и в Windows Server 2008 R2, IIS идет по умолчанию, но в целях безопасности этот компонент нужно включать отдельно). Установка WebDAV в Windows 7 и в Windows 2008 R2 немного отличается.
Установка WebDAV на IIS 7.5 в Windows Server 2008 R2
- Откройте меню Start-> Administrative Tools-> Server Manager.
- В окне управления сервером выберите Roles и отметьте Web Server (IIS).
- В окне Web Server (IIS), найдите секцию Role Services и добавьте новую роль Add Role Services.
- В списке служб разверните элемент Common HTTP Features, выберите опцию WebDAV Publishing и нажмите Next.

- Затем нажмите Install.
- После установки расширения WebDAV, закройте окно установки кнопкой Close.

Установка WebDAV на IIS 7.5 в Windows 7
- Перейдите в панель управления.
- В панели управления откройте элемент Programs and Features, и перейдите в режим установки функций Windows (Turn Windows Features on or off).
- Разверните узел Internet Information Services, затем World Wide Web Services, и Common HTTP Features.

- Отметьте WebDAV Publishing и нажмите OK.

Настраиваем публикацию WebDAV в менеджере IIS
На этом этапе мы включим WebDAV для сайта IIS и дадим права на редактирование содержимого локальному администратору.
- В менеджере IIS Manager, разверните дерево сайтов и выберите Default Web Site.
- Как показано на рисунке, щелкните по элементу WebDAV Authoring Rules.

- На странице WebDAV Authoring Rules щелкните в правой колонке(Actions) по сслыке Enable WebDAV
- После включения WebDAV, создадим правила доступа к содержимому, нажав кнопку Add Authoring Rule.
- В окне Add Authoring Rule укажем:
- All content – значит, что правило будет применяться для контента всех типов.
- Выберите «Specified users»и введте имя пользователя «administrator»
- Права доступа: Read, Source и Write.
- После настройки, жмите OK.
- В панели управления IIS выберите опцию Authentication.
- В окне аутентификации активируйте аутентификацию Windows (Windows Authentication), если IIS будет работать только в качестве сервера WebDAV, анонимную аутентификацию можно отключить.
- Вернитесь на уровень сайта Default Web Site и выберите Authorization Rules (либо .Net Authorization Rules)
- Создайте Allow правило (либо убедитесь, что оно уже существует), в котором администратору было бы разрешено получать доступ к серверу (в моем случае, такое правило уже было, и всем пользователям — All Users, в том числе администратору был разрешен доступ к IIS).


Попробуем теперь подключиться к сайту WebDAV c учетной записью администратора, для чего в командной строке наберите:
net use * http://localhost/
В результате в системе появиться новый сетевой диск, подключенный с сервера с помощью WebDAV.
Совет. Если при попытке подключить каталог по WebDav появляется ошибка «System error 67 has occurred. The network name cannot be found.«, в Windows 8 /Windows Server 2012 попробуйте установить компонент Desktop Experience и убедится, что служба Web Client запущена.
Если же нужно расшарить определенную папку на диске, необходимо создать виртуальный каталог IIS. Для этого щелкните правой кнопкой мыши по сайту и выберите ‘Add New Virtual Directory’:

Укажите алиас (имя виртуального каталога IIS) и путь к папке, к которой необходимо открыть доступ и нажмите OK.
Теперь, чтобы подключить данный каталог, нужно воспользоваться командой:
net use * _https://winitpro.ru/projects
Сетевой диск, подключенный по WebDAV выглядит так:

Как вы видите WebDAV — это отличное средство для удаленного доступа к файлам и папкам в Windows поверх протокола HTTP, которое можно использовать, даже через межсетевой экран. Кроме того, так как WebDAV базируется на службе IIS, это означает, что в такой архитектуре мы можем использовать различные технологии обеспечения безопасности и средства управления IIS, в том числе HTTPS для шифрования передаваемых данных (при использовании обычного HTTP вся информация передается в открытом виде, кроме пароля, который при использовании Windows Authentication шифруется).
Опишем еще несколько аспектов использования WebDAV
- Если вы используете Basic authentication вместе с HTTP, это означит, что ваш пароль будет пересылаться в открытом виде, поэтому лучше использовать протокол HTTPS или все-таки включить аутентификацию Windows.
- Не забудьте, что IIS работает из под учетной записи, у которой нет доступа к большинству каталогов и файлам, поэтому придется назначить NTFS права этой учетной записи вручную.
- Для того, чтобы подключить диск по WebDAV с клиента Windows XP, необходимо убедится, что запущена служба WebClient

- Чтобы подключить каталог WebDAV по HTTPS, воспользуйтесь командой:
net use x: "_https:// winitpro.ru/projects " /User:UserName Password

— 7 min read

Table of Content
WebDAV is an extension protocol to HTTP that allows users to create, move and edit remote documents on the server.
WebDAV is widely used for file sharing, file collaboration between teams and groups. It is widely used in many enterprise apps as groupware, and ERP solutions.
10 Free Open-source Data backup & File Synchronization Programs
10 Best open source free data backup and file synchronization software programs and tools

MEDevel.com: Open-source Guide to Healthcare and Medical SoftwareHamza Mousa

CalDAV and CardDAV are WebDAV extensions to manage and edit calendar and contact cards remotely on server. We published several articles many solutions for both.
There are many enterprise commercial WebDAV servers, however, they have a dozen of open source alternatives. So, here is a quick list of these alternatives.
Open source solutions saves a ton of resources for enterprise and individuals, however, they require knowledge, effort, and time to learn and setup.
Here, we offer you a list of the best open source WebDAV servers out there.
Open source WebDAV servers
1- Sabre
Sabre is a free open-source server for WebDav, CalDAV, and CardDAV. The same developers also offer Baikal a Calendar and Contact server.
Sabre is used as the core for Bikal which is an open source CardDAV and CalDAV server.
sabre/dav
sabre/dav
2- Xandikos
Xandikos is a free lightweight yet complete CardDAV/CalDAV server that backs onto a Git repository.
Xandikos (Ξανδικός or Ξανθικός) takes its name from the name of the March month in the ancient Macedonian calendar, used in Macedon in the first millennium BC.
GitHub — jelmer/xandikos: A CalDAV/CardDAV server
A CalDAV/CardDAV server. Contribute to jelmer/xandikos development by creating an account on GitHub.

GitHubjelmer

3- phởdav
phởdav (phodav) is a minimal WebDAV server implementation using GNOME libsoup library.
phởdav was initially developed as a file sharing mechanism for Spice, but it is generic enough to be reused in other projects, in particular in the GNOME desktop. Further integration work would be a welcome contribution!
phodav — GNOME Wiki!
GNOME Wiki!
4- dave
dave is a simple WebDAV server.
Features
- Single binary that runs under Windows, Linux and macOS.
- Authentication via HTTP-Basic.
- TLS support — if needed.
- A simple user management which allows user-directory-jails as well as full admin access to all subdirectories.
- Live config reload to allow editing of users without downtime.
- A cli tool to generate BCrypt password hashes.
GitHub — micromata/dave: A totally simple and very easy to configure stand alone webdav server
A totally simple and very easy to configure stand alone webdav server — GitHub — micromata/dave: A totally simple and very easy to configure stand alone webdav server
GitHubmicromata
5- WebDav (Go)
WebDAV is a customized fast WebDAV server written in the Go programming language. It focuses on speed and performance.
GitHub — hacdias/webdav: Simple Go WebDAV server.
Simple Go WebDAV server. Contribute to hacdias/webdav development by creating an account on GitHub.
GitHubhacdias
6- WebDav Server is Docker
If you require a quick WebDAV setup, then you may need to use this WebDAV Docker image to create your server. It does take a few minutes then you are ready to go.
Docker
7- Webdav server (Docker)
A WebDAV server based on Debian:10.6 and Alpine Linux with nginx server. It comes with detailed instructions on how to setup, configure and manage your WebDAV Docker image install.
Docker
8- WebDAV Server (Go)
Yet another simple WebDAV server written in the Go programming language for speed and efficiency.
GitHub — ViRb3/webdav-server: A simple WebDAV server in Go
A simple WebDAV server in Go. Contribute to ViRb3/webdav-server development by creating an account on GitHub.
GitHubViRb3
9- SFTPGo
SFTPGo is a fully featured and highly configurable SFTP server with optional HTTP/S, FTP/S and WebDAV support S3, Google Cloud Storage, Azure Blob Storage, SFTP, and more.
The project has several contributors who keep it updated and maintained.
SFTPGo: Open Source SFTP Server with WebDAV Support
SFTPGo is a feature-rich open source SFTP server that offers HTTP/S, FTP, FTPS, and WebDAV support. It also supports several storage backends as local filesystem, encrypted local filesystem, S3 (compatible) Object Storage, Google Cloud Storage, Azure Blob Storage, SFTP. The project is written in t…
MEDevel.comHamza Mousa

10- Dufs
Dufs is a file server that supports static serving, uploading, searching, accessing control WebDAV server. Dufs is written in the Rust programming language. It is available for Windows, Linux, and macOS.
Features
- Serve static files
- Download folder as zip file
- Upload files and folders (Drag & Drop)
- Search files
- Partial responses (Parallel/Resume download)
- Path level access control
- Support https
- Support webdav
- Easy to use with curl
GitHub — sigoden/dufs: A file server that supports static serving, uploading, searching, accessing control, webdav…
A file server that supports static serving, uploading, searching, accessing control, webdav… — GitHub — sigoden/dufs: A file server that supports static serving, uploading, searching, accessing c…
GitHubsigoden
11- Davis
Davis is a simple, fully translatable admin interface and frontend for sabre/dav based on Symfony 5 and Bootstrap 4, initially inspired by Baïkal.
Provides user edition, calendar creation and sharing, address book creation and sharing. The interface is simple and straightforward, responsive, and provides a light and a dark mode.
GitHub — tchapi/davis: 🗓 A simple, fully translatable admin interface for sabre/dav based on Symfony 5 and Bootstrap 4, largely inspired by Baïkal.
🗓 A simple, fully translatable admin interface for sabre/dav based on Symfony 5 and Bootstrap 4, largely inspired by Baïkal. — GitHub — tchapi/davis: 🗓 A simple, fully translatable admin interface…
GitHubtchapi
12- Milton
Milton Java WebDAV / CalDAV / CardDAV Server Library that runs on Windows, Mac, Linux, Android and iOS.
GitHub — miltonio/milton2: Milton Java WebDAV / CalDAV / CardDAV Server Library that runs on Windows, Mac, Linux, Android and iOS.
Milton Java WebDAV / CalDAV / CardDAV Server Library that runs on Windows, Mac, Linux, Android and iOS. — GitHub — miltonio/milton2: Milton Java WebDAV / CalDAV / CardDAV Server Library that runs o…
GitHubmiltonio
13- Apache WebDAV (mod_dav)
Apache is an open source web server, that runs most of the internet for years. It has a large set of modules that can be used to extend its functionalities.
Mod_DAV (Apache mod_dav) allows server masters to add WebDAV support to Apache in no time.
mod_dav — Apache HTTP Server Version 2.4
Apache HTTP Server Version 2.4

14- Nginx WebDAV
Like Apache, Nginx has its own WebDAV module that eases file management automation and management.
All is required is to make sure your Nginx has ngx_http_dav_module setup and ready.
Module ngx_http_dav_module
15- WSGI WebDAV
WSGI WebDAV is a generic and extendable WebDAV server written in Python and based on WSGI.
It supports SSL by default, and works on Windows, Linux, and macOS.
GitHub — mar10/wsgidav: A generic and extendable WebDAV server based on WSGI
A generic and extendable WebDAV server based on WSGI — GitHub — mar10/wsgidav: A generic and extendable WebDAV server based on WSGI
GitHubmar10
Wrapping up
Open source WebDAV servers can be the right answer to commercially enterprise-oriented solution. As they come without cost, and they do not not require much time or resources to run.
If you require a WebDAV server, we can recommend the right one based on your business and setup.
Best 11 Open-source CalDAV Self-hosted Servers
What is CalDAV? CalDAV is the web standard calendaring extension for the WebDAV. It allows CalDAV clients to access, manage, sync and schedule calendar events and calendars on servers. CalDAV synchronizes calendar data across different devices. In this list, we preview some of self-hosted CalDAV…
MEDevel.com: Open-source Guide to Healthcare and Medical SoftwareHamza Mousa

Are you looking to set up a WebDAV server on your Windows Server system but unsure how to do it? Let us help you! In this guide, we will show you step-by-step how to set up a WebDAV server on your Windows Server.
How to Install the WebDAV Publishing Feature on Windows Server
To use WebDAV on Windows Server, you must first install and set up the WebDAV Publishing feature. Open the “Server Manager” in Windows Server and locate the “Add Roles and Features” button. Select it to continue.
After selecting the “Add Roles and Features” button, click “Next” to select your server. Once you’ve selected your server, locate the “Server Roles” section and click on it. Then, look for “Web Server (IIS)” and check the box next to it.
Note: you may also need to enable “WebDAV Redirector” under “Features”.
When you check the box next to “Web Server (IIS),” Windows Server will prompt you to add various features in the form of a pop-up window. Find the “Add Features” button and click it to add the new features.
Next, you need to add “WebDAV Publishing” to your Windows Server. In the “Select Role Services” window, locate “WebDAV Publishing” under “Web Server” and check the box to enable this feature.
After checking the box next to “WebDAV Publishing,” click the “Next” button to continue. The “Add Roles and Features Wizard” will ask for confirmation. Click the “Install” button, and be sure to also check the box next to “Restart the destination server automatically if required.”
Once you click the “Install” button, Windows Server will begin setting up Web Server (IIS) as well as WebDAV Publishing on your Windows Server. When the process is complete, click on the “Close” button to exit the wizard.
How to Create a WebDAV Website on Windows Server
To use WebDAV, you need to create a WebDAV website on Windows Server. First, open the Internet Information Services Manager in Windows Server, which was installed in the previous section of this guide.
To launch IIS Manager, search for “IIS” in the Start Menu. Once IIS is open, right-click on the “Sites” folder, and select the “Add Website” button. After clicking this button, enter a site name in the “Site name” area.
Next, find the browse button next to “Physical path” and select where your website’s physical files will be located on Windows Server.
After adding a folder to the Physical path area in the “Add Website” page, you’ll need to set the correct permissions to allow WebDAV access through the website. To do this, launch PowerShell and enter the following commands. Make sure to replace “username” with the username you wish to add to IIS_IUSRS.
Note: You will need to run “Add-LocalGroupMember” for each user you wish to add to IIS_IUSRS.
New-LocalGroup -Name "IIS_IUSRS"

Add-LocalGroupMember -Group "IIS_IUSRS" -Member "username"
Once you’ve entered the commands, open Windows Explorer and navigate to the folder you specified in the “Physical path” area. Right-click on the folder and select the “Properties” option. Then, click on the “Security” tab and click the “Edit” button.
When you’ve clicked on the “Edit” button, select the “Add” button, and add “IIS_IUSRS.” Click the “OK” button when done. With “IIS_IUSRS” added to the WebDAV folder, anyone in the “IIS_IUSRS” group will have full access to the physical path.
With the physical path set, go to the “IP address” section and set the IP address for the WebDAV server. You can also add a hostname (domain name) if you wish.
Once everything is configured on the “Add Website” page, click the “OK” button to continue.
Configuring WebDAV Authoring Rules
WebDAV authoring rules need to be configured in IIS for your newly created website so that users can access your WebDAV server. To start, launch IIS Manager, and select your website under “Sites.” After selecting it, find “WebDAV Authorization” and click on it.
Inside the “WebDAV Authorization” area, click “Add Authoring Rule”. Then, under “Allow access to,” choose “All content.” Next, find the “Allow access to this content to” area, and select “Specified roles or user groups.” In the text box, enter “IIS_IUSRS” as the specified group. This means that only users who have been added to the “IIS_IUSRS” group may use WebDAV.
After adding the group, find “Permissions”. Check “Read,” “Source,” and “Write” to configure permissions for those who access your WebDAV server.
Connecting to Your WebDAV Server
To connect to your WebDAV server on Windows, you’ll need to log in using specified users. Open up Windows Explorer on a Windows PC, and enter the address:
\\server-ip\webdav
Press enter to initiate login. Then, enter your WebDAV user credentials to log in. Once you’ve logged in, you’ll be able to read, write, and access files on WebDAV running on your Windows Server.

WebDAV is a protocol mainly used by Windows to share folders over the Internet. The folder shared on the server can be mounted on clients as a network drive. So it is possible to use remoter resources without additional programs or similar. In contrast to FTP, files can be opened, edited and processed directly from the WebDAV directory. It is similar to a folder shared with SAMBA in the local network.
This article shows you step-by-step how to share a folder using WebDAV and then connect it from a Windows client.
Prepare Server
A fully installed and configured IIS is a prerequisite for the use of WebDAV. The installation of IIS 10 on Windows Server 2016 is shown in this article.
If IIS is installed and ready for use, you can start the installation of WebDAV.
Install WebDAV
Similar to IIS, WebDAV is installed using Server Manager. Open the Server Manager (as explained in the IIS article) to select “Add Roles and Features”. Afterwards, the wizard can be clicked until “Server Roles” appears. There, under Web Server (IIS), select “Web Server” and then click on WebDAV Publishing.

Windows Authentication is also required. This can be found under Web Server IIS -> Web Server -> Security -> Windows Authentication.
Then click Next. The point features are skipped.
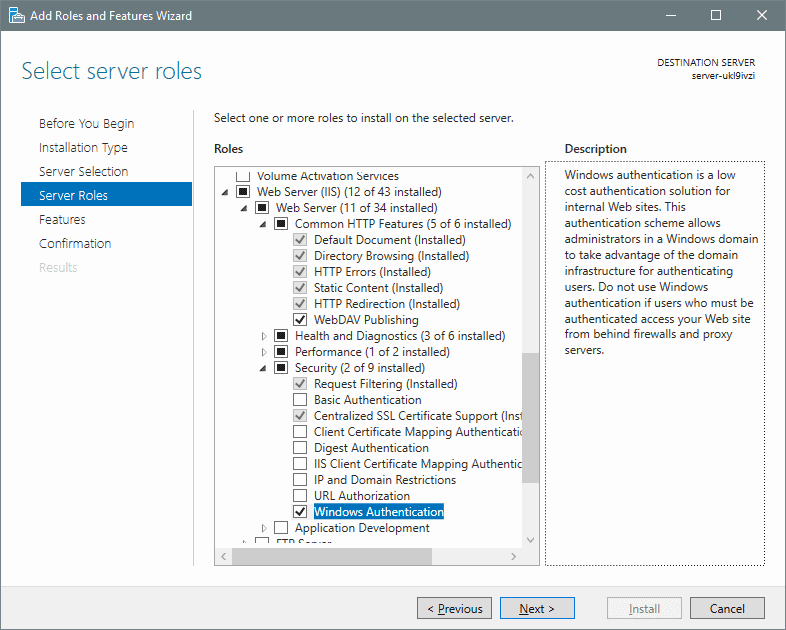
Then the summary is shown again. Click on Install.
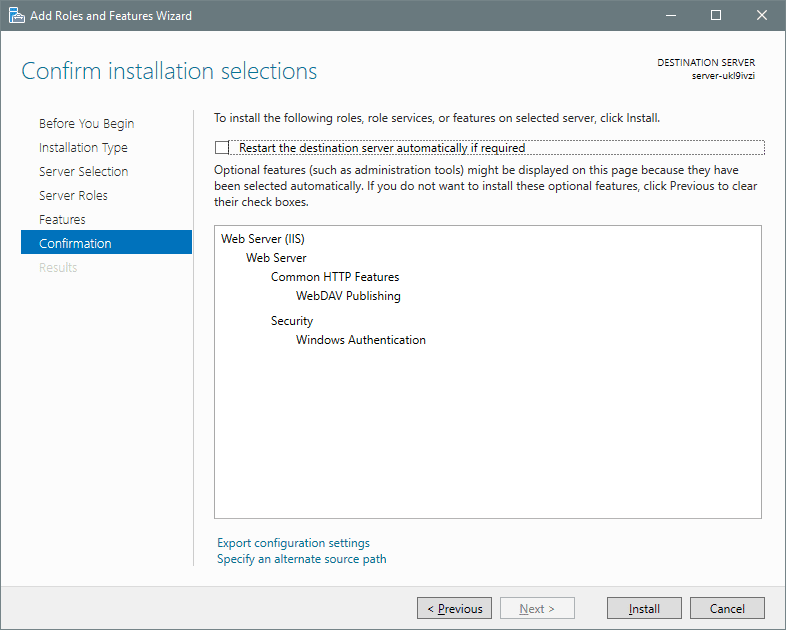
When the installation is complete, WebDAV is installed. However, to use WebDAV, some settings are still required.
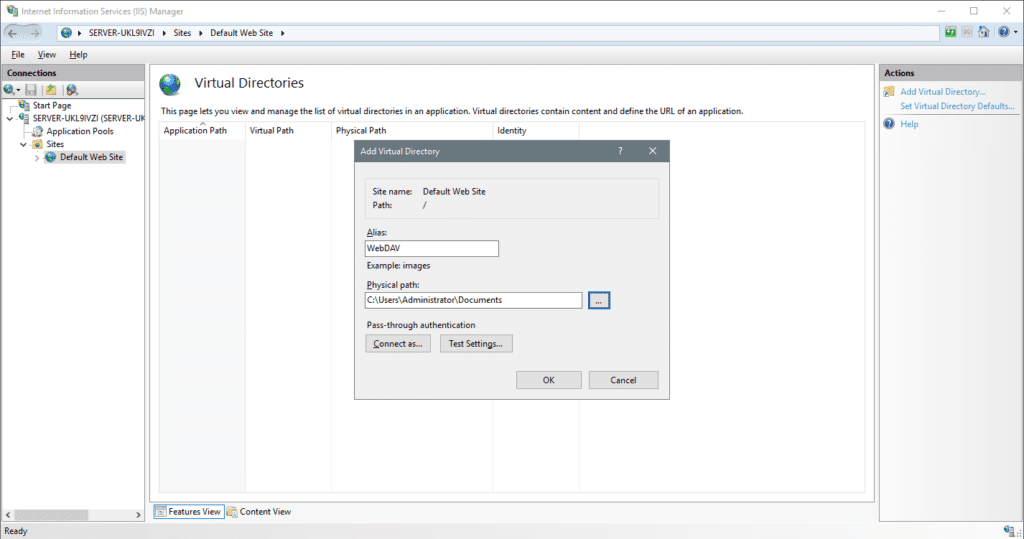
Set up WebDAV
Next, open the IIS Manager to create a Virtual Directory. To do this, navigate to Default Web Site (or your site) in the left menu, and then click View Virtual Directory on the left side of the menu. By clicking on Add Virtual Directory (also in the left menu) you can now add a new directory. This will later be the directory to be shared via WebDav. The alias that is given here is later part of the URL. In this example, the corresponding address would be
Copyhttp://IPorDomain/WebDAV
Then click on the directory you just created and select WebDAV Authoring Rules.
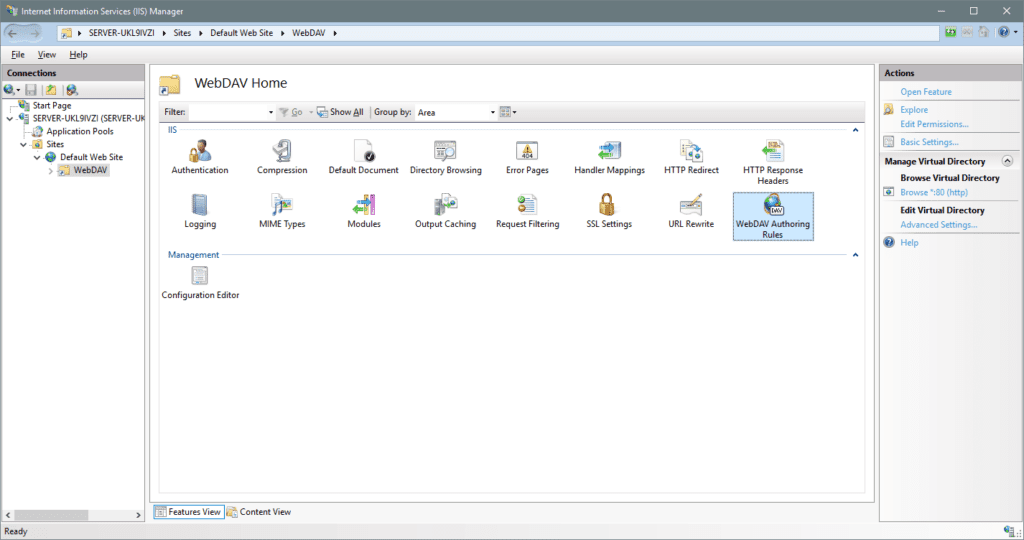
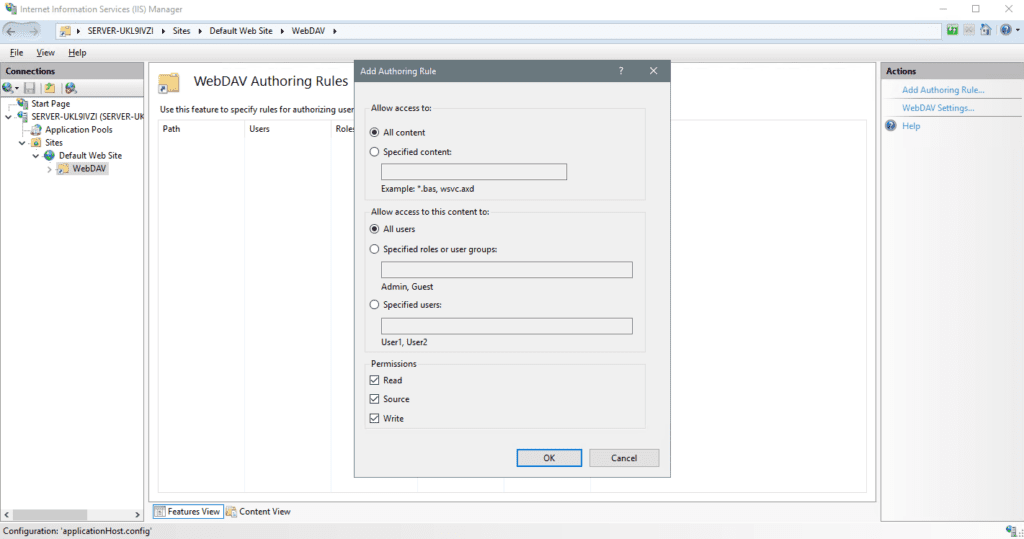
In the right-hand menu you can select Add Authoring Rule. Here you have to define the type of content that can be viewed by whom. For example, UserGroup “employees” can only see “.docx” files, or group “guest” can only see “.jpg and .png” files. The permissions are also important here. You specify whether the user can only view or use the file.
If the selection is made, you can confirm with OK.
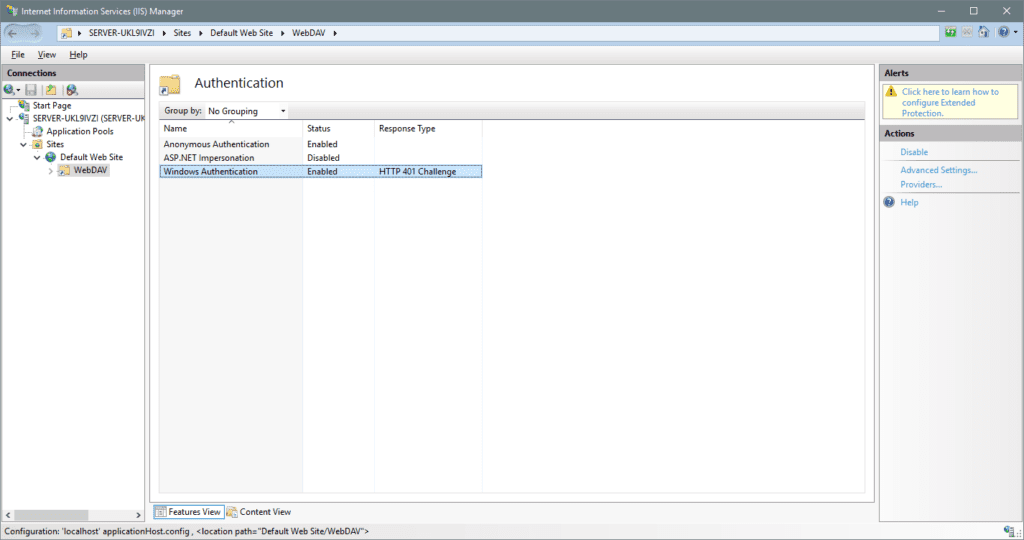
The authentication method must then be selected and activated. To do this, click on the directory on the left of the menu and then select Authentication.
Right-click “Windows Authentication”.
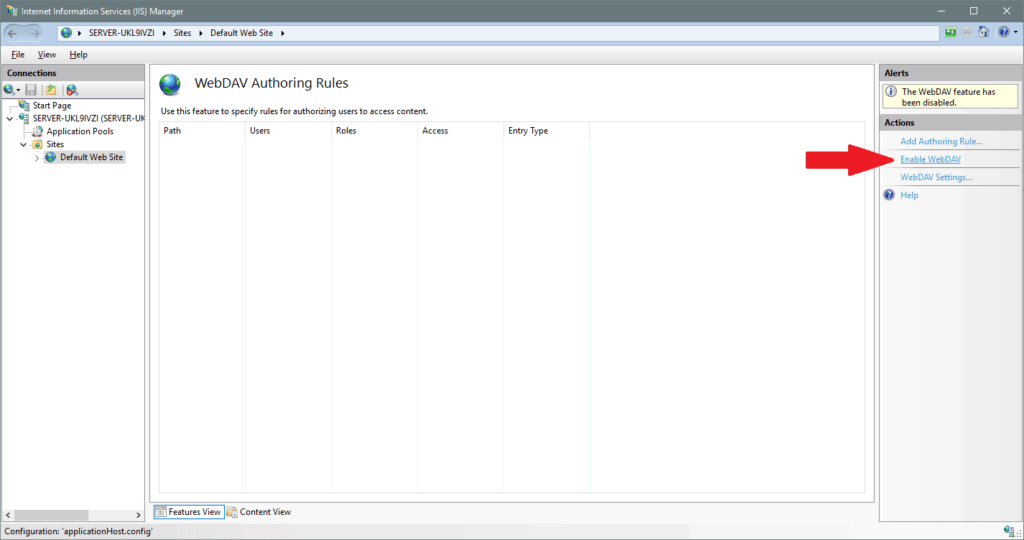
You can then click on the Default Web Site (or the site of your choice) on the left side of the menu to select WebDAV Authoring Rules. On the right, WebDAV must be activated by clicking Enable WebDAV.
You must then click again on Default Web Site (or any other website) on the left side. The IIS service can then be restarted by clicking Restart.
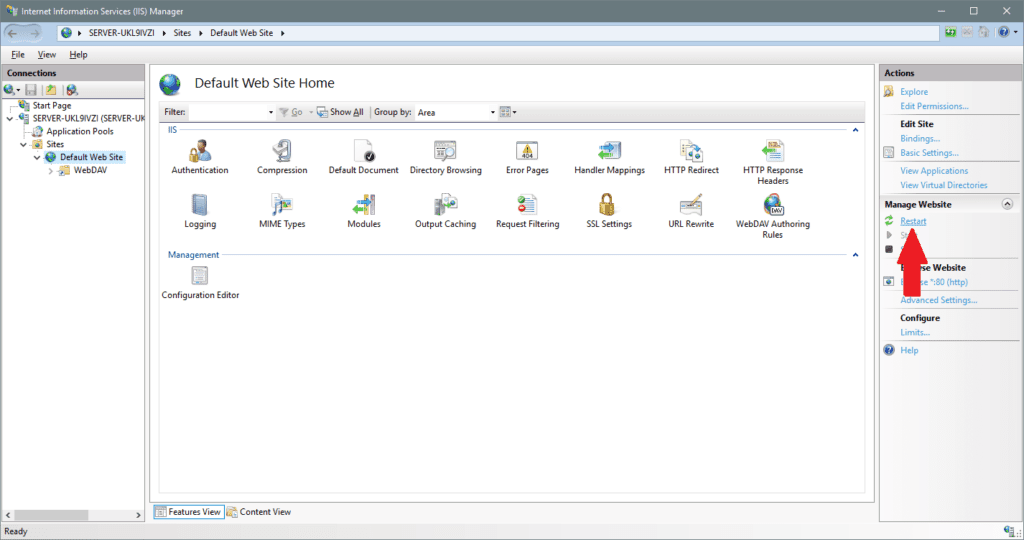
WebDAV is now ready. Depending on the configuration, the port 80 / TCP may have to be released in the firewall.
Integrate WebDAV on client
To create the created folder now on the client, the Explorer must be opened. Click on Map network drive at the top.
Then the path to the corresponding folder must be entered. The following syntax applies:
Copyhttp://<IPorDomain>/<Filename>
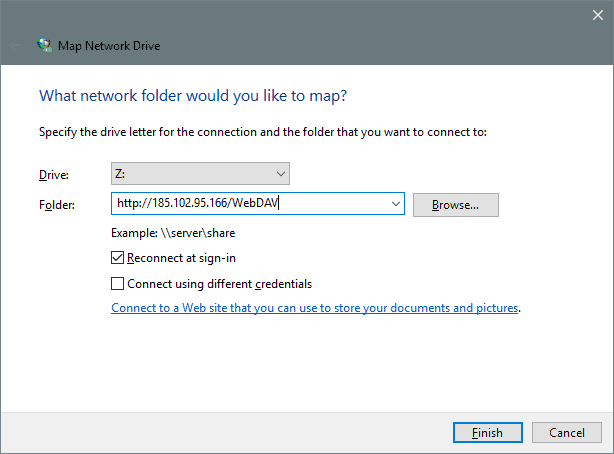
It is important that WebDAV is case-sensitive. The folder name must be entered exactly as it is stored in IIS.
If the client already has access data for the server but the WebDAV folder is used for other data, a checkmark must be made for “Connect using different credentials”. If no access data is stored at all, the next step is prompted to enter it.
The folder can now be reached under the selected drive letter (in the example “Z:”).
Summary
The setup of WebDAV directories is done quickly and offers the possibility to make folders accessible from outside. However, as always when it is possible to reach services from the Internet, there is a certain security risk. Therefore it is recommended to encrypt all services with an SSL certificate and use only encrypted protocols.