
Материал из 1GbWiki.
Перейти к: навигация, поиск
Информация относится к устаревшим услугам, продуктам, технологиям, или просто устарела. Современные аналоги могут быть лучше или работать немного иначе.
Клиент WebDAV, встроенный в Windows работает плохо, рекомендуем пользоваться сторонним ПО, например NetDrive.
Содержание
- 1 Настройка через программу NetDrive (рекомендуется)
- 2 Настройка для Windows XP через графический интерфейс
- 3 Настройка для Windows XP через командную строку
- 4 Настройка Windows 7
- 5 Возможные неполадки
[править] Настройка через программу NetDrive (рекомендуется)
- Скачайте программу NetDrive с сайта http://www.netdrive.net/, установите и запустите её
- Нажмите кнопку «New site» в левом нижнем углу, дальше заполняйте поля в правой части экрана:
- Site name — название сайта, которое будет показываться вам, введите то, которое вам удобно
- Site IP или URL — путь к вашей папке, например http://webdav.1gb.ru/folder/
- Server Type — WebDav
- Drive — выберите букву диска, которая будет назначена на папку WebDAV
- Account — имя пользователя
- Password — пароль
- Save password — сохранить пароль и больше его не спрашивать
- Automatic login when system starts — автоматически подключать диск при старте системы (по желанию)
- Automatic login whe NetDrive starts — автоматически подключаться при запуске программы NetDrive (по желанию)
- Нажмите кнопку Advanced и в поле Encoding выберите UTF-8, если вы работаете через прокси введите тут его параметры.
- Можно нажимать Connect и работать
[править] Настройка для Windows XP через графический интерфейс
1. Зайдите в «мой компьютер» / «сервис» / «Подключить сетевой диск»

2. Нажмите ссылку «Подписать на хранилище в Интернете или подключиться к сетевому серверу» (Для Windows Vista: «Подключение к веб-узлу, на котором можно хранить свои документы и изображения»)

3. Нажмите «Далее»
4. Пункт «Выберите другое сетевое размещение»
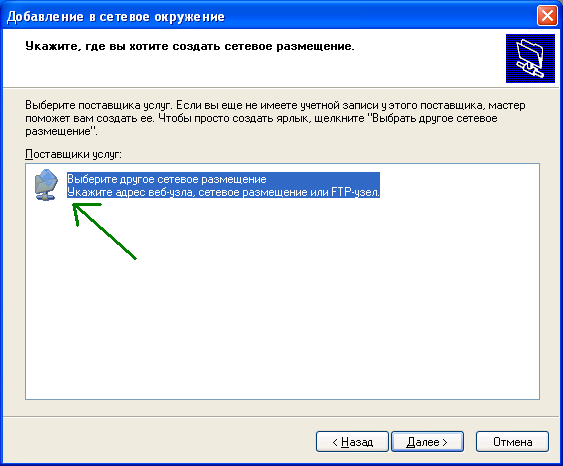
5. Укажите путь к хранилищу.

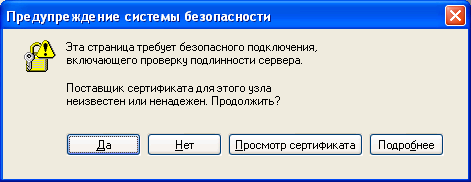
6. Сейчас на этом узле используется само-подписанный сертификат, поэтому появится предупреждение системы безопасности Internet Explorer. Чтобы оно не появлялось каждый раз сертификат надо установить. После нажатия кнопки «Установить сертификат» надо нажать «Да » во всех окошках, которые появятся.

7. Введите имя пользователя и пароль, которые предназначены для входа в WebDAV (Вводились при создании ресурса в личном кабинете).
Теперь новое место добавлено.
В Windows Vista папка добавилась в «Мой компьютер».
В Windows XP в служебную папку «Сетевое окружение»


[править] Настройка для Windows XP через командную строку
образец команды:
net use x: http://webdav.1gb.ru/folder /user:<user_name> <password>
[править] Настройка Windows 7
- Установить сертификат со страницы https://www.1gb.ru/ca как сертификат доверенного корневого центра сертификации
- из командной строки выполнить команду вида net use x: https://webdav.1gb.ru/folder /user:<user_name> <password>
Обратите внимание — для Windows XP использовался протокол http, для Windows 7 — https
[править] Возможные неполадки
- При добавлении папки возникает ошибка определения имени сервера или папки — установите пакет обновления http://www.microsoft.com/downloads/details.aspx?displaylang=ru&FamilyID=17c36612-632e-4c04-9382-987622ed1d64
- MS Office открывает файлы в режиме «только чтение» — установите пакет обновления http://www.microsoft.com/downloads/details.aspx?displaylang=ru&FamilyID=17c36612-632e-4c04-9382-987622ed1d64
- Не принимаются имя пользователя и пароль, хотя они точно правильные — добавьте в адресную строку номер порта: http://webdav.1gb.ru:80/xxx
- Для полноценной поддержки WebDAV в Windows Vista, возможно, потребуется установить пакет обновления http://www.microsoft.com/downloads/details.aspx?displaylang=ru&FamilyID=17c36612-632e-4c04-9382-987622ed1d64
- Tutorial
- File access
- Internet
Last modified date:
2017-03-20
The step-by-step guide below demonstrates how to connect to your NAS via WebDAV on Windows XP and Vista
A.Windows XP:
1.Right click «My Computer» and select «Map Network Drive…».

2.Click «Sign up for online storage or connect to a network server».

3.Select «Choose another network location».

4.Enter the URL of your NAS with the share folder name. Please note that you should put a «#» at the end of the URL. Click «Next» and go to the next step.
Format: http://NAS_IP_or_HOST_NAME/SHARE_FOLDER_NAME/#

5.Enter the user name and its password which has the WebDAV privilege to access this share folder.
6.Type a name for this network place.

7.There you go, the network place has been created and is ready to be used.

8.Now you can access this share folder anytime through WebDAV. A shortcut has also been created in «My Network Places».

B.Windows Vista:
Before getting started
Note that if you are using Windows Vista, you might need to install the «Software Update for Web Folders (KB907306)». This update is for 32-bit Windows OS only.
http://www.microsoft.com/downloads/details.aspx?FamilyId=17c36612-632e-4c04-9382-987622ed1d64&displaylang=en
1.Right click «Computer» and select «Map Network Drive…».

2.Click «Connect to a Web site that you can use to store your documents and pictures».

3.Select «Choose a custom network location».

4.Enter the URL of your NAS with the share folder name.
Format: http://NAS_IP_or_HOST_NAME/SHARE_FOLDER_NAME

5.Enter the user name and its password which has the WebDAV privilege to access this share folder.
6.Type a name for this network location.

7.You have created the Web Folder on the Windows Vista successfully.

8.The network share appears as a web folder in the «Network Location» section in «Computer».

9.You can easily access the share folder through this link via HTTP/WebDAV.

Was this article helpful?
37% of people think it helps.
Thank you for your feedback.
Please tell us how this article can be improved:
If you want to provide additional feedback, please include it below.
Setting up a WebDAV connection
- Open ‘Computer’ from your start menu or desktop
- Open the ‘Map network drive’ wizard
- Enter the full http:// address to your webdav installation
Note that you need to have the Web Client service enabled and running for Web
Client to work. Some OS versions have it disabled, e.g. Windows Server 2003.
Additional some optimisation instructions lead to it being disabled.
You can also map a drive on the command line by typing:
net use * http://example.org/dav/
Using Basic Auth
Basic Authentication is not supported on Windows by default, but you can turn
it on using the registry:
- Create a new registry key called
HKLM\SYSTEM\CurrentControlSet\Services\WebClient\Parameters\UseBasicAuthand - Set the value to ‘1’ (without quotes).
It was also reported that in certain cases
HKEY_LOCAL_MACHINE\SYSTEM\CurrentControlSet\Services\WebClient\Parameters\BasicAuthLevel
needs to be set to 2
- KB928692
- KB841215
Save the following to a .reg file and open it to simplify patching the
registry:
[HKEY_LOCAL_MACHINE\SYSTEM\CurrentControlSet\Services\WebClient\Parameters]
"UseBasicAuth"=dword:00000001
"BasicAuthLevel"=dword:00000002
Make sure you restart the ‘WebClient’ service afterwards. You can do this via
Control Panel -> Performance And Maintanance -> Administrative Tools -> Services.
Issues
Windows clients have a wide range of technical issues, varying between
versions. This page aims to categorize them all and show a list of windows
versions where these issues have been confirmed.
The grid below has the following values:
- ‘X’ — If there’s a known issue for that version.
- ‘?’ — If the issue has not been confirmed for that version
- Empty, if it’s definitely not an issue, or assumed it’s not an issue.
| Issue name | Windows XP | Windows Vista | Windows 7 | Windows 8 | Windows 8.1 | Windows 10 |
|---|---|---|---|---|---|---|
| performance | X | ? | ? | ? | ||
| vistabug | X | |||||
| root-1 | X | X | ||||
| root-2 | X | |||||
| ms-author | X | ? | ? | ? | ? | ? |
| whitespace | X | ? | ||||
| getlastmodified | X | |||||
| charactersets | X | ? | ||||
| locking | X | ? | ||||
| filesize | X | X | X | ? | ||
| displayname | X | ? | ? | ? | ? | ? |
| auth | X | X | X | X | X | X |
| port | X | ? | ? | ? | ? | ? |
| sni | X | X | X | X | ? | ? |
| caching | X | X | X | X |
performance
Windows 7 has a serious performance issue with WebDAV volumes. By default,
accessing WebDAV volumes on Windows 7 is very slow.
The issue can be solved by unchecking «Automatic Detect Settings» in IE8 /
Tools / Internet Options / Connections / LAN Settings.
See this article with further information.
vistabug
On Windows Vista, if you use the Web Folders client, you may need to install
Software Update for Web Folders (KB907306) to avoid the following error:
«The folder you entered does not appear to be valid».
root1
These older implementations require the WebDAV service to sit at the root of a
domainname. There’s no way you can connect to a url deeper in the WebDAV
structure, because it will traverse every part of the path and make PROPFIND
requests. So you have to make absolutely sure you have SabreDAV installed on a
root url. If you are using apache, you can use mod_rewrite to map every single
request to your WebDAV server, for example:
RewriteEngine On
RewriteRule ^/(.*)$ /server.php [L]
root2
Windows XP has even more quirks, and will treat the root of your WebDAV server
as if it was connecting to an SMB server. You’ll notice that when you’re
connecting, you will only see directories the root folder and they have icons
similar to windows shared folders. You can only really perform operations
within subdirectories on your root.
So:
make sure it is installed on the root of your domain, and make sure all
operations happen within sub-directories of your share.
The easiest way to do this is by simply creating a single top-level /dav/
directory.
Windows XP requires the following HTTP header when making OPTIONS requests:
MS-Author-Via: DAV
whitespace
Windows XP does not like whitespace in xml body responses for PROPPATCH
and PROPFIND. Make sure you send back the xml response with no whitespace
at all. It took the author a very long time to figure this out.
getlastmodified
Windows XP requires a special format for the getlastmodified dav property in
the propfind response. An example is:
<d:getlastmodified xmlns:b="urn:uuid:c2f41010-65b3-11d1-a29f-00aa00c14882/" b:dt="dateTime.rfc1123">Sat, 26 Apr 2008 18:00:18 -0400</d:getlastmodified>
This did no longer seem to be an issue with Windows XP SP3. Because this
actually causes an incompatibility with MS Office, this is removed as per
SabreDAV 1.7.4 and 1.8.2.
charactersets
Windows XP sends encoded characters in HTTP requests as ISO-8859-1. Possibly
even CP-1252, but this has yet to be verified.
A converter for this purpose has been included since SabreDAV-1.2.0alpha1.
However, this currently only works for converting the HTTP requests coming
from windows, and not yet responses to windows. Oddly enough, windows did seem
to accept UTF-8 strings. Files could be opened, but not written to. This is
probably only the case for UTF-8 filenames that don’t cleanly map to
ISO-8859-1. A workaround for this will probably not happen in the short-term.
These issues are verified on Windows XP SP3, but no testing has been done on
Windows Vista or Windows 7.
locking
Normally windows unlocks files with the following header in the UNLOCK request:
Lock-Token: <opaquelocktoken:98b0726b-b34f-4778-9c35-da3927b6fe36>
For some reason however, it will specify it incorrectly.
Lock-Token: opaquelocktoken:98b0726b-b34f-4778-9c35-da3927b6fe36
Starting SabreDAV 1.4.3 there’s a workaround for this behaviour.
filesize
Windows has introduced a file size limitation of 50000000 bytes in a security
update.
You may receive one of the following error messages while downloading a file
from a WebDAV volume:
- «Cannot Copy FileName: Cannot read from the source file or disk» (Windows
Vista or XP SP1 with security update 896426 installed) - «Error 0x800700DF: The file size exceeds the limit allowed and cannot be
saved.» (Windows 7) - «An unexpected error is keeping you from copying the folder. If you continue
to receive this error, you can use the error code to search for help with
this problem.» (Windows 7)
The limitation can only be disabled on client side, by changing registry keys.
See this article for detailed instructions. Additional information is
also available in this kb article.
displayname
It was reported in earlier clients (XP at least, and perhaps Vista too) that
sending back a displayname can cause the client to use the displayname instead
of a url to access resources.
This will cause all kinds of bugs, so it’s best to avoid {DAV:}displayname
entirely. It was was reported that this bug was ‘fixed’ in Windows 7 by taking
out support for {DAV:}displayname entirely.
auth
HTTP Digest is support across the board. HTTP Basic auth can be used directly
from within IE, but will not work by default if you’re using Web Client, unless
WebDAV is used over SSL.
Basic auth can be enabled if the following registry change is made:
- Create a new registry key called
HKLM\SYSTEM\CurrentControlSet\Services\WebClient\Parameters\UseBasicAuthand - Set the value to ‘1’ (without quotes).
It was also reported that in certain cases
HKEY_LOCAL_MACHINE\SYSTEM\CurrentControlSet\Services\WebClient\Parameters\BasicAuthLevel
needs to be set to 2
- KB928692
- KB841215
Save the following to a .reg file and open it to simplify patching the
registry:
[HKEY_LOCAL_MACHINE\SYSTEM\CurrentControlSet\Services\WebClient\Parameters]
"UseBasicAuth"=dword:00000001
"BasicAuthLevel"=dword:00000002
In some cases Windows will incorrectly prepend the NT domain to the username
with two backslashes. Example:
MYDOMAIN\\username
The workaround for this is making the user go through all the login prompts
(removing the NT domain), it will succeed after a while. It would also be
possible to automatically detect and strip out these usernames but that could
be problematic in relation to HTTP digest authentication.
port
It appears that Windows does not support ports other than the default (80).
Make sure your server is not running on a non-default http port.
sni
It was reported that the Windows 7 and 8 (and likely older clients as well) do
not support ‘SNI’ (server name identification), which is a technology that
allows virtual hosting of multiple HTTPS domains on one server.
If you’re running into issues with this, make sure you don’t host more than
one HTTPS-based domain off one ip address, or make sure that it’s the default.
In the case of apache, the default https server would be the top-most
virtualhost definition.
Furthermore it was reported that the WinHTTP API (used in the Windows WebDAV client)
doesn’t support TSLv1.1/TSLv1.2 connections. If you have restricted your server
config to only provide TLSv1.1 and above the connection to your server will fail.
See this article with further information.
caching
It was reported that Windows 7 has a 60 second cache, which may be frustrating
if you expect an immediate update.
This can be disabled using a registry key. See http://technet.microsoft.com/en-us/library/ee683963%28v=ws.10%29.aspx for more info.
upload timeouts
An upload of large files taking longer than 30 minutes using Web Client in
Windows 7 can cause the following error:
- «Error: 0x80070079 The semaphore timeout period has expired»
See this kb article for detailed instructions how to raise the timeout.
Technical details
User agents:
Vista:
Microsoft-WebDAV-MiniRedir/6.0.6000

XP:
Microsoft-WebDAV-MiniRedir/5.1.2600
Microsoft Data Access Internet Publishing Provider DAV 1.1
Microsoft Data Access Internet Publishing Provider Cache Manager
Properties
Windows XP requests the following webdav properties when making requests:
- name
- parentname
- href
- ishidden
- iscollection
- isreadonly
- getcontenttype
- contentclass
- getcontentlanguage
- creationdate
- lastaccessed
- getlastmodified
- getcontentlength
- resourcetype
- isstructureddocument
- defaultdocument
- displayname
- isroot
Windows (XP and Vista) introduces the following properties under the
urn:schemas-microsoft-com: xml namespace:
- Win32CreationTime (example: Sat, 26 Apr 2008 20:38:50 GMT)
- Win32LastAccessTime (same format)
- Win32LastModifiedTime (same format)
- Win32FileAttributes (example: 00002020) indicates the classic MS-DOS properties, such as ‘read only, hidden, archive, system’ and a couple of newer ones. Haven’t located detailed docs yet
To easily take advantage of these properties, enable the propertystorage plugin.
Using Web Folders
Before Windows 7, Windows had a feature called ‘Web folders’. This is a
different WebDAV client with less features. This feature is removed in
Windows 7.
To use it:
# Open up Internet Explorer
# Press File, Open and fill in the full url
# Check the «Open as Web Folder» setting
# Press Ok
В этой заметке мы поговорим о замечательной надстройке над службой Internet Information Services (IIS) под названием WebDAV. WebDAV это протокол для доступа к общим файлам и папкам через интернет, чем то похожий на FTP. Передача файлов по протоколу WebDAV может быть осуществлена через различные межсетевые экраны и брандмауэры, передаваемую информацию можно шифровать, да и работа с файлами и папками реализована намного удобнее, полностью напоминая работу службы общего доступа к фалам и папкам в Windows.
Вместе с выходом Windows Server 2008 Microsoft презентовала обновленную версию модуля WebDAV для IIS 7. Данный модуль существенно расширил возможности, удобство и безопасность использования WebDAV для доступа к файлам в Интернет, кроме того теперь он стал поддерживать многопользовательскую работу и блокировку файлов.
В этой статье мы поговорим о том, как установить WebDAV на ОС Windows 7 и Windows Server 2008 R2, как его настроить и каким образом можно получить доступ к файлам и папкам, к которым открыт общий сетевой доступ по WebDAV .
Еще раз напомню, что WebDAV это расширение службы IIS, поэтому, если у вас еще не установлен IIS, сделайте это (как вы, наверное, помните и в Windows 7 и в Windows Server 2008 R2, IIS идет по умолчанию, но в целях безопасности этот компонент нужно включать отдельно). Установка WebDAV в Windows 7 и в Windows 2008 R2 немного отличается.
Установка WebDAV на IIS 7.5 в Windows Server 2008 R2
- Откройте меню Start-> Administrative Tools-> Server Manager.
- В окне управления сервером выберите Roles и отметьте Web Server (IIS).
- В окне Web Server (IIS), найдите секцию Role Services и добавьте новую роль Add Role Services.
- В списке служб разверните элемент Common HTTP Features, выберите опцию WebDAV Publishing и нажмите Next.

- Затем нажмите Install.
- После установки расширения WebDAV, закройте окно установки кнопкой Close.

Установка WebDAV на IIS 7.5 в Windows 7
- Перейдите в панель управления.
- В панели управления откройте элемент Programs and Features, и перейдите в режим установки функций Windows (Turn Windows Features on or off).
- Разверните узел Internet Information Services, затем World Wide Web Services, и Common HTTP Features.

- Отметьте WebDAV Publishing и нажмите OK.

Настраиваем публикацию WebDAV в менеджере IIS
На этом этапе мы включим WebDAV для сайта IIS и дадим права на редактирование содержимого локальному администратору.
- В менеджере IIS Manager, разверните дерево сайтов и выберите Default Web Site.
- Как показано на рисунке, щелкните по элементу WebDAV Authoring Rules.

- На странице WebDAV Authoring Rules щелкните в правой колонке(Actions) по сслыке Enable WebDAV
- После включения WebDAV, создадим правила доступа к содержимому, нажав кнопку Add Authoring Rule.
- В окне Add Authoring Rule укажем:
- All content – значит, что правило будет применяться для контента всех типов.
- Выберите «Specified users»и введте имя пользователя «administrator»
- Права доступа: Read, Source и Write.
- После настройки, жмите OK.
- В панели управления IIS выберите опцию Authentication.
- В окне аутентификации активируйте аутентификацию Windows (Windows Authentication), если IIS будет работать только в качестве сервера WebDAV, анонимную аутентификацию можно отключить.
- Вернитесь на уровень сайта Default Web Site и выберите Authorization Rules (либо .Net Authorization Rules)
- Создайте Allow правило (либо убедитесь, что оно уже существует), в котором администратору было бы разрешено получать доступ к серверу (в моем случае, такое правило уже было, и всем пользователям — All Users, в том числе администратору был разрешен доступ к IIS).


Попробуем теперь подключиться к сайту WebDAV c учетной записью администратора, для чего в командной строке наберите:
net use * http://localhost/
В результате в системе появиться новый сетевой диск, подключенный с сервера с помощью WebDAV.
Совет. Если при попытке подключить каталог по WebDav появляется ошибка «System error 67 has occurred. The network name cannot be found.«, в Windows 8 /Windows Server 2012 попробуйте установить компонент Desktop Experience и убедится, что служба Web Client запущена.
Если же нужно расшарить определенную папку на диске, необходимо создать виртуальный каталог IIS. Для этого щелкните правой кнопкой мыши по сайту и выберите ‘Add New Virtual Directory’:

Укажите алиас (имя виртуального каталога IIS) и путь к папке, к которой необходимо открыть доступ и нажмите OK.
Теперь, чтобы подключить данный каталог, нужно воспользоваться командой:
net use * _https://winitpro.ru/projects
Сетевой диск, подключенный по WebDAV выглядит так:

Как вы видите WebDAV — это отличное средство для удаленного доступа к файлам и папкам в Windows поверх протокола HTTP, которое можно использовать, даже через межсетевой экран. Кроме того, так как WebDAV базируется на службе IIS, это означает, что в такой архитектуре мы можем использовать различные технологии обеспечения безопасности и средства управления IIS, в том числе HTTPS для шифрования передаваемых данных (при использовании обычного HTTP вся информация передается в открытом виде, кроме пароля, который при использовании Windows Authentication шифруется).
Опишем еще несколько аспектов использования WebDAV
- Если вы используете Basic authentication вместе с HTTP, это означит, что ваш пароль будет пересылаться в открытом виде, поэтому лучше использовать протокол HTTPS или все-таки включить аутентификацию Windows.
- Не забудьте, что IIS работает из под учетной записи, у которой нет доступа к большинству каталогов и файлам, поэтому придется назначить NTFS права этой учетной записи вручную.
- Для того, чтобы подключить диск по WebDAV с клиента Windows XP, необходимо убедится, что запущена служба WebClient

- Чтобы подключить каталог WebDAV по HTTPS, воспользуйтесь командой:
net use x: "_https:// winitpro.ru/projects " /User:UserName Password

WebDav Client Redirector.
This service also exists in Windows 10, 11, 7, 8 and Vista.
Startup Type
| Windows XP edition | without SP | SP1 | SP2 | SP3 |
|---|---|---|---|---|
| Home | Manual | Manual | Manual | Manual |
| Professional | Manual | Manual | Manual | Manual |
Default Properties
| Display name: | WebDav Client Redirector |
| Service name: | MRxDAV |
| Type: | filesys |
| Path: | %WinDir%\system32\DRIVERS\mrxdav.sys |
| Error control: | normal |
Default Behavior
The WebDav Client Redirector service is a file system driver. If the WebDav Client Redirector fails to load or initialize, the error is recorded into the Event Log. Windows XP startup should proceed, but a message box is displayed informing you that the MRxDAV service has failed to start.
Dependencies
If the WebDav Client Redirector is stopped, the WebClient fails to start and initialize.
Restore Default Startup Type of WebDav Client Redirector
Automated Restore
1. Select your Windows XP edition and Service Pack, and then click on the Download button below.
2. Save the RestoreWebDavClientRedirectorWindowsXP.bat file to any folder on your hard drive.
3. Run the downloaded batch file.
4. Restart the computer to save changes.
Note. Make sure that the mrxdav.sys file exists in the %WinDir%\system32\DRIVERS folder. If this file is missing you can try to restore it from your Windows XP installation media.
Yea, though I walk through the valley of the shadow of death, I will fear no evil: for thou art with me; thy rod and thy staff they comfort me.