Windows 10 comes with lock screen image that can be customized in control panel. Just like wallpaper, there is a centralized way to control the lock screen image which is using Group Policy. In a managed domain like corporate environment, they typically would want to show company-branded image or a disclaimer on the computer lock screen. In this post, we will show how to change the default lock screen image using GPO that applies for Windows 10 computers.
This example below will demonstrate how to change the default lock screen image in client PC running Windows 10 Enterprise or Education editions. Client PC is joined to the domain asaputra.com with domain controller installed in Windows Server 2012 R2 named asaputra-dc1. Image file used for lock screen is named LockscreenMBG.jpg and saved in a shared folder in the DC with UNC path \\asaputra-dc1\DomainShared\LockscreenMBG.jpg.
1. Ensure the image file is accessible
Make sure that the targeted users has at least read access on the folder sharing properties and able to see the image file.

2. Creating the Group Policy Object
In this example, a new policy object named “Global Branding” is created on the Group Policy Management Console.
The setting that we must apply is named “Force a specific default lock screen image” and it is located at Computer Configuration > Policies > Administrative Templates > Control Panel > Personalization. Double click the setting name to configure it.

3. Specify the lock screen image location
After set it to Enabled, type the network path where the image file resides.

4. Apply the GPO to Computer OU
Since the policy applies to computer, then we must link the GPO to the OU where the computer is resides.
5. Verify the result on client computer
When the policy is refreshed, you can try signing out or lock the computer to see the new lock screen image being applied.
Before

After

Troubleshooting Tips
We can always force the GPO to update right away by using command gpupdate /force on command prompt. When this GPO is applied successfully it will create a registry value named LockScreenImage in HKLM\Software\Policies\Microsoft\Windows\Personalization containing the image file path.

If the path and file name is correct and accessible, then lock screen image will be applied without problem. And that’s how to change the default lock screen image using GPO.
The following two tabs change content below.
- Bio
- Latest Posts
I am IT practitioner in real life with specialization in network and server infrastructure. I have years of experience in design, analysis, operation, and optimization of infrastructure solutions for enterprise-scaled network. You can send me a message on LinkedIn or email to arranda.saputra@outlook.com for further inquiry regarding stuffs that I wrote or opportunity to collaborate in a project.
Привет, друзья. Тема этой публикации — как поменять экран блокировки на Windows 10. Создатель операционной системы — компания Microsoft – не особо щедра в реализации штатных пользовательских возможностей по настройке экрана блокировки, но кое-что немногое изменить в нём мы можем. Кстати, если он вам не нужен, вы можете его вообще отключить, а как это сделать, смотрите в статье сайта «Как отключить экран блокировки в Windows 10». Если же нужен, давайте разбираться с теми немногими настроечными возможностями, которые доступны для него. А это смена картинки, запуск слайд-шоу фотографий, настройка сведений приложений, настройка фона входа пользователя в Windows 10.

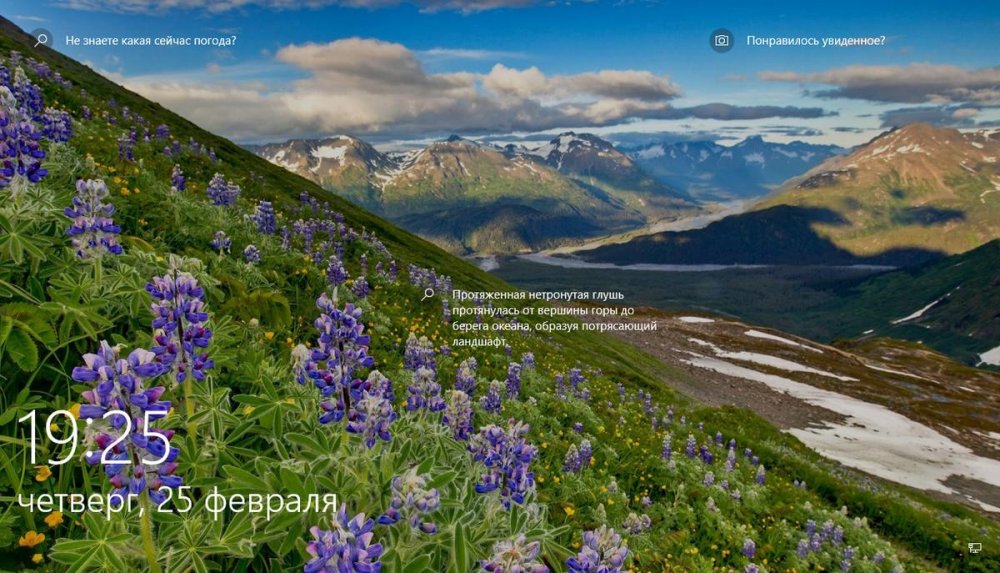
Итак, друзья, экран блокировки Windows 10. Это системная среда вне пользовательских учётных записей, среда, где пользователи операционной системы выполняют вход в свои учётные записи и имеют доступ к некоторым системным функциям. И сделана эта среда на фоне приятных картинок живописных пейзажей, показываемых нам в рамках по умолчанию активной функции «Windows: Интересное».
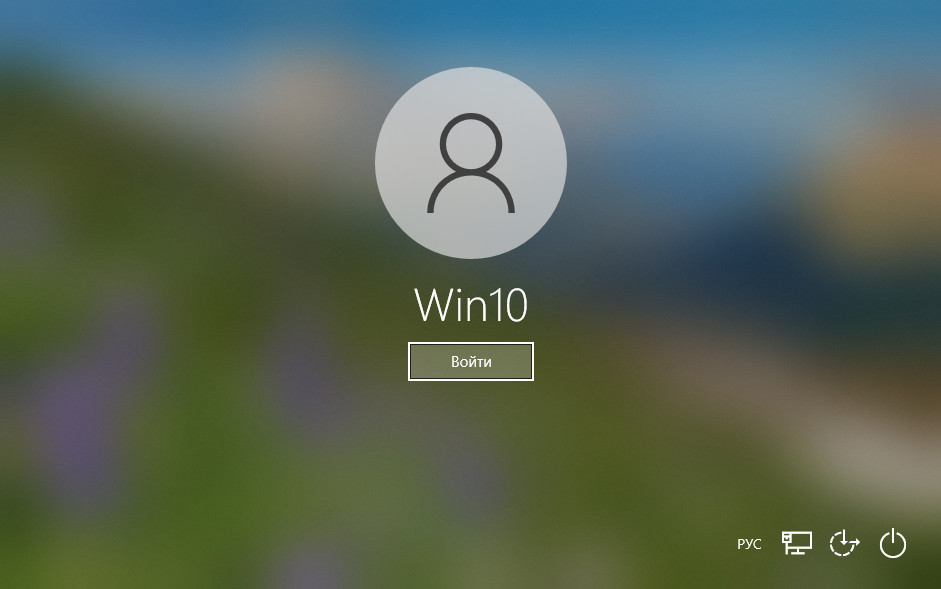
При клике по экрану блокировки фон заблюривается, и мы получаем доступ ко входу в наши учётные записи, а также к функциям смены языковой раскладки, настройки Интернета и выключения компьютера.
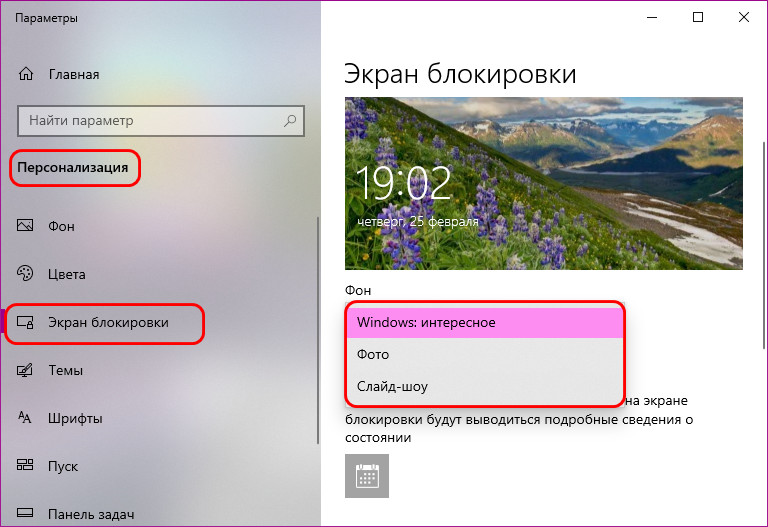
Настраивается экран блокировки в системных настройках персонализации Windows 10. А чтобы настройки персонализации были доступны, ваша операционная система, друзья, должна быть активирована. На рабочем столе вызываем контекстное меню и выбираем «Персонализация».
В самих настройках персонализации идём в радел «Экран блокировки». И вот что нам здесь доступно.
По умолчанию в качестве фона экрана блокировки Windows 10 показываются разные картинки в рамках активной функции «Windows: Интересное», она же Windows Spotlight. Эта функция подтягивает с ресурсов Microsoft эффектные пейзажи и меняет их каждый день. Кроме того, на самих картинках отображаются различные занимательные факты о местностях, изображённых на картинках. А иногда отображаются советы по работе с Windows 10 и продуктами Microsoft.
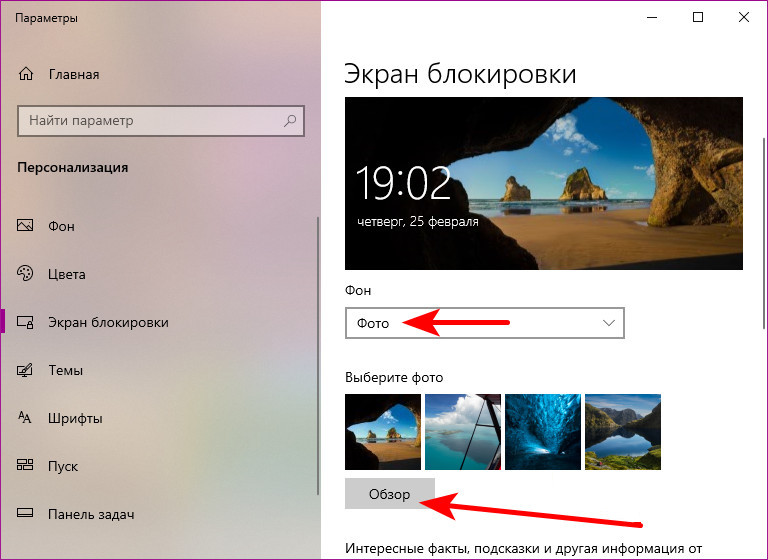
Если вы хотите на экране блокировки видеть свои изображения – свои пейзажи, иные картинки, свои фото, выбираем в качестве фона «Фото» и с помощью кнопки обзора указываем на изображение на диске компьютера.
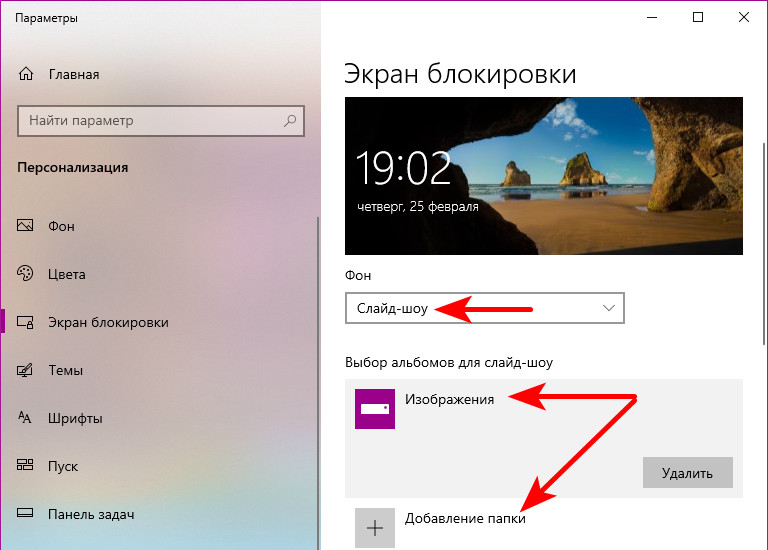
Третий вариант фона при настройке экрана блокировки Windows 10 – слайд-шоу. Этот вариант не меняет главное изображение экрана блокировки, но добавляет на экран воспроизведение слайд-шоу картинок из добавленных папок. Выбираем в качестве фона «Слайд-шоу» и добавляем папку с картинками на компьютере.
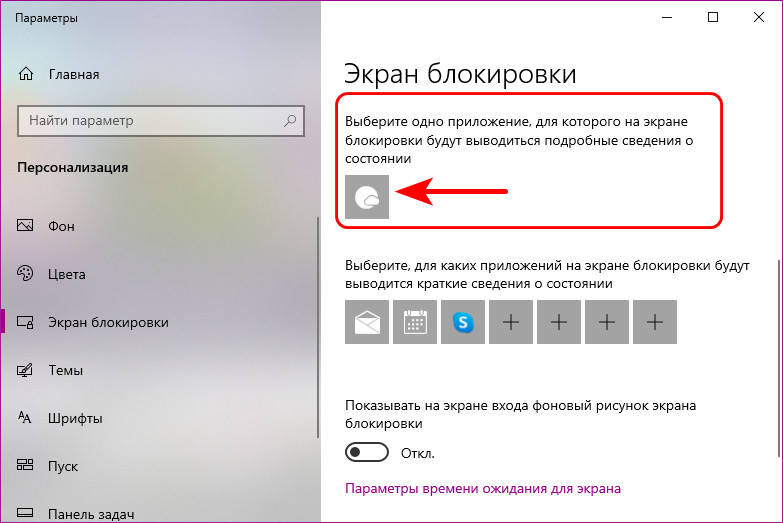
В настройках экрана блокировки Windows 10 можем выбрать современные универсальные приложения, которые будут выводить на экран какие-то сведенья – число новых писем или сообщений, пропущенные звонки по Скайпу, задачи планировщика и т.п. Одно приложение можно настроить для подробных сведений, а семь приложений — для кратких сведений. Конечно, у каждого свои приоритеты, но наверняка для многих актуальным будет отображение погоды на экране блокировки. Для этого нужно указать приложение «Погода» в качестве того одного, для которого будут отображаться подробные сведения.
И последняя настройка экрана блокировки Windows 10 – настройка экрана входа в учётную запись. Для него при желании можно отключить фоновый рисунок, применяемый к экрану блокировки.

И лицезреть просто однотонный фон из акцентного системного цвета.

Друзья, есть ещё одна возможность настроить экран входа в учётную запись Windows 10, не предусмотренная настройками персонализации – возможность убрать эффект блюра (размытия). Т.е. сделать так, как было в системе до версии 1903, которая и привнесла такое дизайнерское решение. Для этого нужно кое-что подправить в системном реестре. Запускаем его, вводим в системный поиск:
regedit
Раскрываем путь:
Компьютер\HKEY_LOCAL_MACHINE\SOFTWARE\Policies\Microsoft\Windows\System
Создаём 32-битный параметр DWORD.
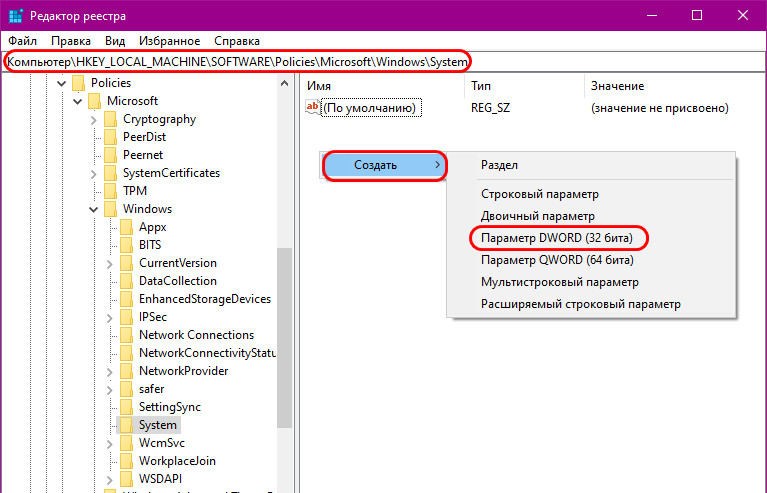
Называем его:
DisableAcrylicBackgroundOnLogon
Устанавливаем его значение 1.
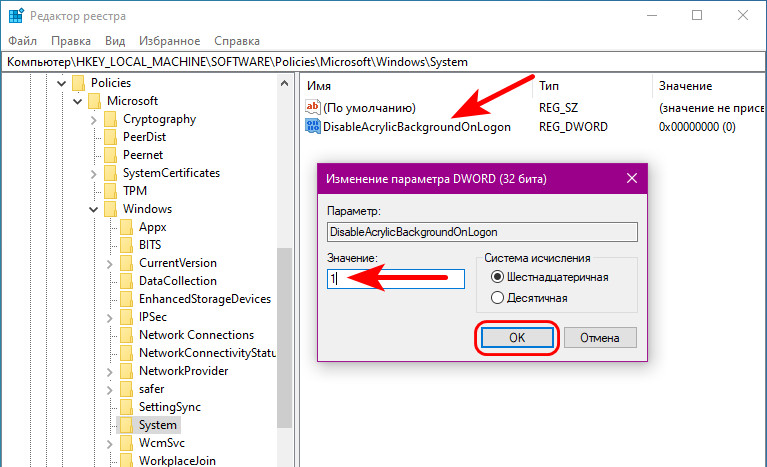
Если нужно будет впоследствии вернуть эффект блюра, просто удаляем этот параметр.
Вот это, друзья, как поменять экран блокировки на Windows 10: системные настроечные возможности в этом плане весьма скромны, но в общем-то более и не нужно. У Microsoft есть ещё много непаханых полей…
Экран блокировки Windows 10 — экран, как правило с каким-либо фото, отображением даты и времени, который появляется при включении компьютера перед входом в систему, вызывается сочетанием клавиш Windows + L и при выборе пункта «Заблокировать» после нажатия по значку учетной записи в меню Пуск, появляется после выхода компьютера или ноутбука из спящего режима.
Этот экран можно настроить — не только изменить обои экрана блокировки, но и добавить дополнительные элементы на него, о чем и пойдет речь в этой инструкции. Также может быть полезным: Как отключить экран блокировки Windows 10, Как отключить размытие фона на экране входа в Windows 10.
- Как поменять обои экрана блокировки Windows 10
- Добавление приложений на экран блокировки
- Видео инструкция
Как поставить или изменить обои на экране блокировки Windows 10
Самая простая задача — изменение обоев на экране блокировки, сделать это можно следующим образом:
- Нажмите правой кнопкой мыши в пустом месте рабочего стола и выберите пункт «Персонализация», либо зайдите в Параметры — Персонализация.
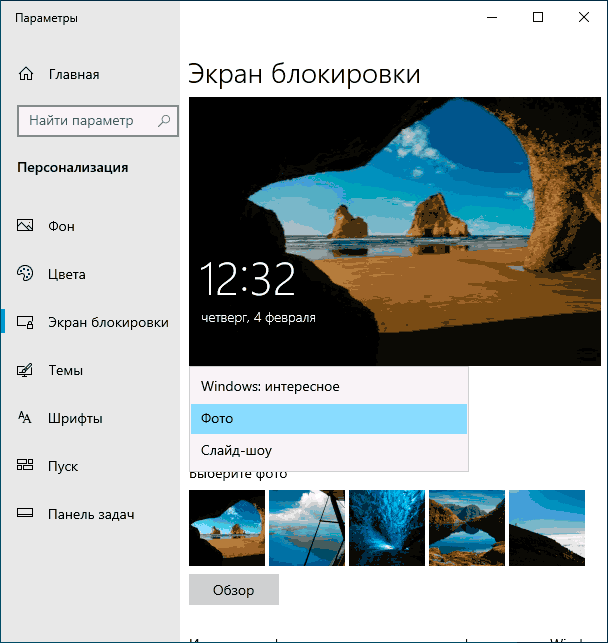
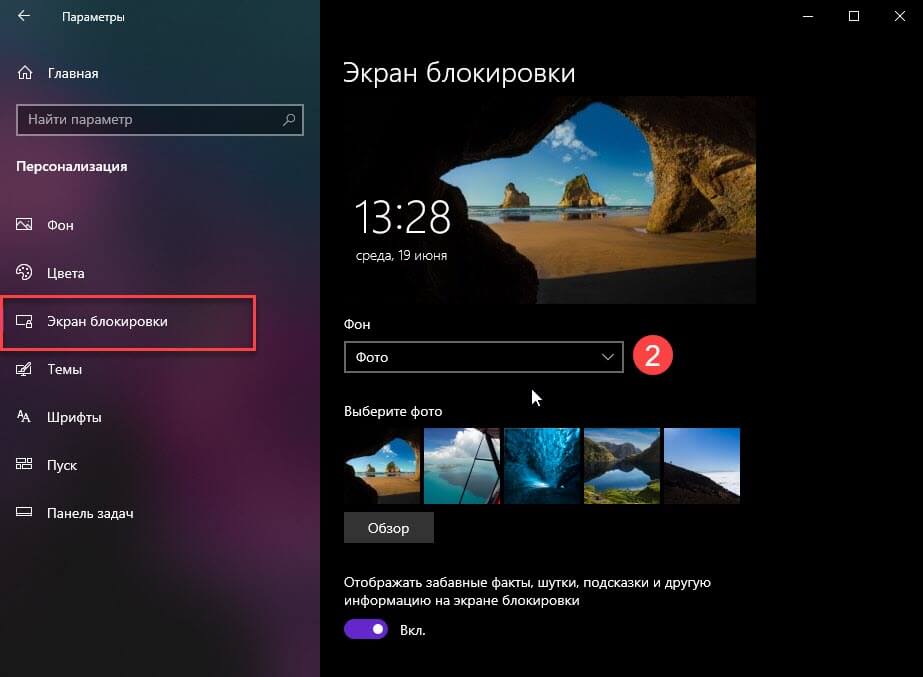
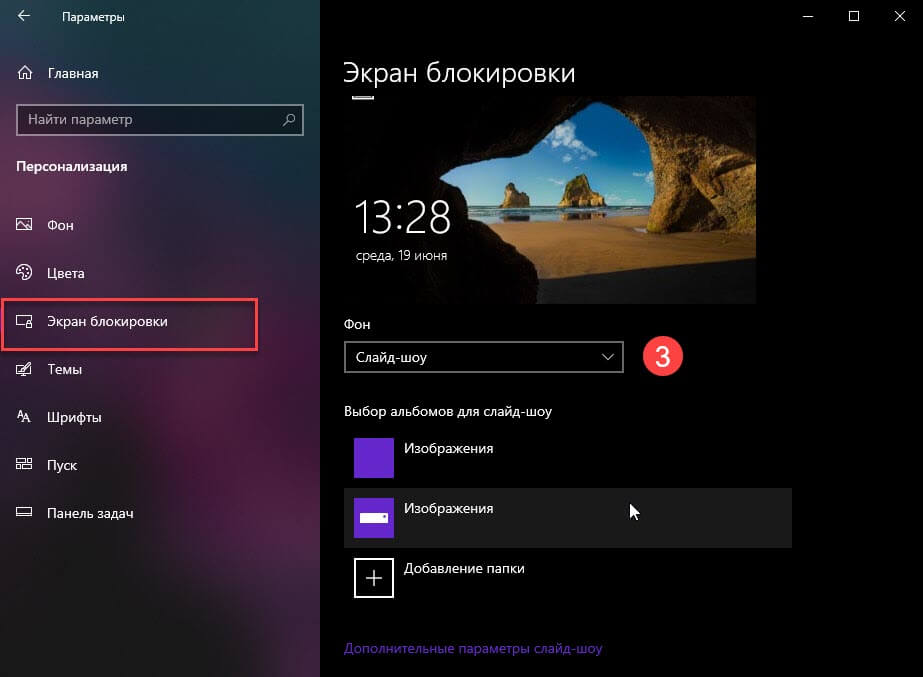
- В списке слева выберите пункт «Экран блокировки». А затем в поле «Фон» укажите, что отображать на экране блокировки, варианты описаны ниже.

- Windows: интересное — фотографии от Майкрософт, автоматически сменяющиеся время от времени). Если вы захотите забрать одно из таких фото себе, вам пригодится: Где хранятся обои экрана блокировки и рабочего стола Windows 10.
- Фото — вы можете выбрать фото из доступных ниже поля выбора фона, либо нажать «Обзор» и выбрать ваше изображение на компьютере
- Слайд шоу — при этом выборе на экране блокировки будут меняться фото из вашей папки «Изображения», а при желании, вы можете сами указать, из каких папок брать фото для обоев.


Эти же обои будут показываться не только на экране блокировке, но и на экране входа (с полем ввода пароля и кнопкой «Войти»). Если вы хотите отключить эту опцию — пролистайте список параметров внизу и отключите пункт «Показывать на экране входа фоновый рисунок экрана блокировки».
Внимание: очень частый вопрос пользователей связан с тем, что при выборе пункта «Windows: интересное» обои на экране блокировки не изменяются. Иногда это нормальное поведение (они не должны меняться каждый день и после каждой перезагрузки). Но иногда проблема более серьёзная и здесь может помочь инструкция Что делать, если не меняются обои на экране блокировки Windows 10.
Добавление приложений на экран блокировки
В Windows 10 присутствует возможность добавлять содержимое различных приложений Windows 10 — встроенных или из магазина Microsoft Store. Для этого:
- Перейдите в Параметры — Персонализация — Экран блокировки.
- В разделе «Выберите одно приложение, для которого на экране блокировки будут выводиться подробные сведения», нажмите по значку приложения и выберите, для какого приложения вам требуется видеть более подробную информацию. Например, вы можете добавить погоду на экран блокировки.

- Ниже укажите до 6 приложений, которые будут показывать информацию в кратком виде (впрочем, по какой-то причине некоторые из приложений хотя и можно выбрать, к каким-либо изменениям на экране блокировки не приводят).
- Также, возможно, вы захотите отключить пункт «Интересные факты, подсказки и другая информация от Windows и Кортаны на экране блокировки» вверху.

В итоге, после коротких экспериментов можно добиться нужного вам внешнего вида экрана блокировки, мой результат — на изображении ниже.

Здесь в качестве обоев установлено фото со сплошным черным цветом, а также добавлены некоторые приложения.
Видео
Если у вас есть собственные решения для настройки оформления экрана блокировки — буду рад комментарию к статье.
Статьи по теме: Быстрые советы для Персонализации Windows 10
Одним из самых больших отличий между итерациями Windows 10 и более ранними версиями, является то, что вы можете персонализировать страницу входа в систему и рабочий стол компьютера. Однако, в отличие от других версий Windows, у некоторых пользователей, по началу может вызвать определенные сложности. Чтобы помочь с настройкой персонализации, мы создали это пошаговое руководство для изменения изображения на экране блокировки и экране входа в систему.
Переход к настройкам персонализации Windows 10.
Сначала откройте приложение «Параметры», кликнув значок шестеренки в «Центре действий и уведомлений» в правом нижнем углу экрана или нажмите сочетание клавиш Win + I на клавиатуре. В приложении «Параметры» перейдите в раздел «Персонализация».
Пользователи Windows 10 также могут кликнуть правой кнопкой мыши на рабочем столе, и выбрать в контекстном меню «Персонализация» и требуемый раздел откроется в приложении «Параметры Windows».
Примечание: Обратите внимание, существует небольшая путаница, технически есть два экрана входа, один для ввода пароля (Экран входа) и один для Экрана блокировки. Чтобы изменить экран входа, найдите на странице переключатель: «Показывать на экране входа фоновый рисунок экрана блокировки» и переключите его в положение «Вкл.». Это гарантирует, что изображение, экрана блокировки, появится на экране входа, что обеспечит более плавный переход.
В этой статье мы рассмотрим, как изменить изображение фона для Экрана блокировки.
Изменение фона Экрана Блокировки в Windows 10
- Откройте Параметры Windows 10.
- Перейдите в раздел Персонализация → Экран Блокировки.
В данном разделе вы можете настроить изображения для экрана блокировки:
- Windows: Интересное
- Фото
- Слайд-шоу
Если вы намерены изменить только изображение экрана входа в систему — На данной странице пользователи могут выбрать Фотографию для экрана блокировки с жесткого диска своего компьютера, либо установить Слайд-шоу различных изображений. Пользователи также могут выбрать вариант Windows: Интересное, который отображает случайно генерируемое изображение из поисковой системы Bing. После выбора, изменение происходит автоматически.
- Справа в разделе Фон, выберите один из следующих вариантов:
Windows: Интересное — будет отображать различные фоны, автоматически загруженные из Интернета.
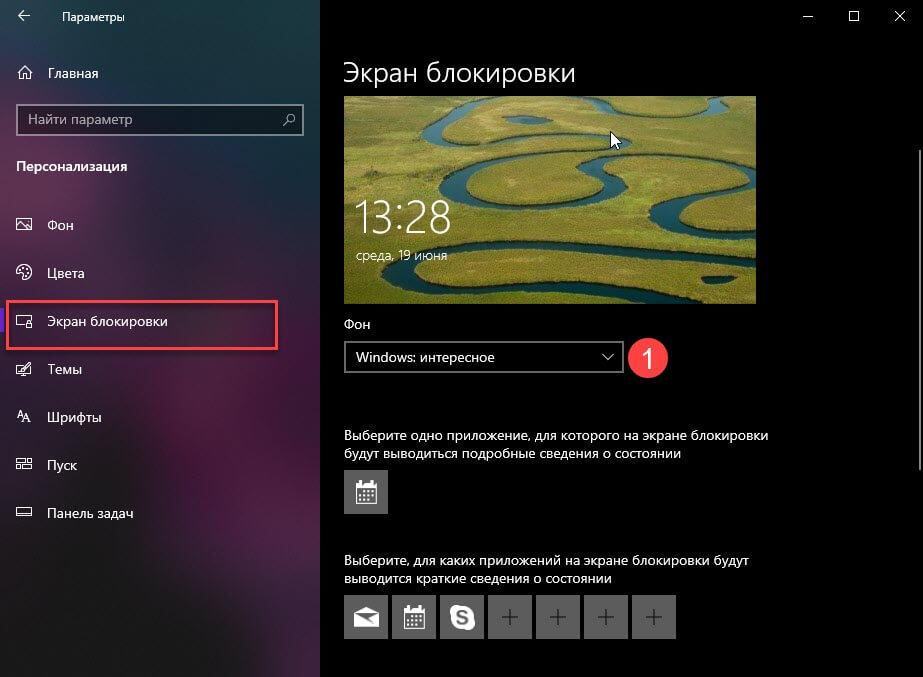
Фото — здесь вы можете установить одно изображение, которое будет использоваться в качестве фона экрана блокировки.
Вы можете выбрать любое пользовательское изображение, с помощью кнопки Обзор. Нажмите на нее и выберите нужное изображение:
Слайд — шоу — используйте эту опцию , для показа слайд — шоу в качестве вашего экрана блокировки. Она будет показывать изображения из папки, которую вы укажете. Нажмите кнопку «Добавить папку», чтобы добавить новую папку с изображениями, которые будут циклически показаны на экране блокировки.
В Windows 10, изображение экрана блокировки показывается в ряде случаев. Например, если вы заблокировали сеанс пользователя с помощью Win + L или нажав на изображение пользователя в меню «Пуск», и выбрали пункт Заблокировать кликнув на значок пользователя в меню «Пуск», на экране вашего ПК появится фоновое изображение блокировки экрана. При входе в Windows 10, вы тоже видите экран блокировки.
Совет: Вы можете также использовать приложение Фотографии, для установки ваших любимых изображений в качестве фона экрана блокировки. Откройте нужное изображение в приложении Фотографии и нажмите кнопку меню три точки.
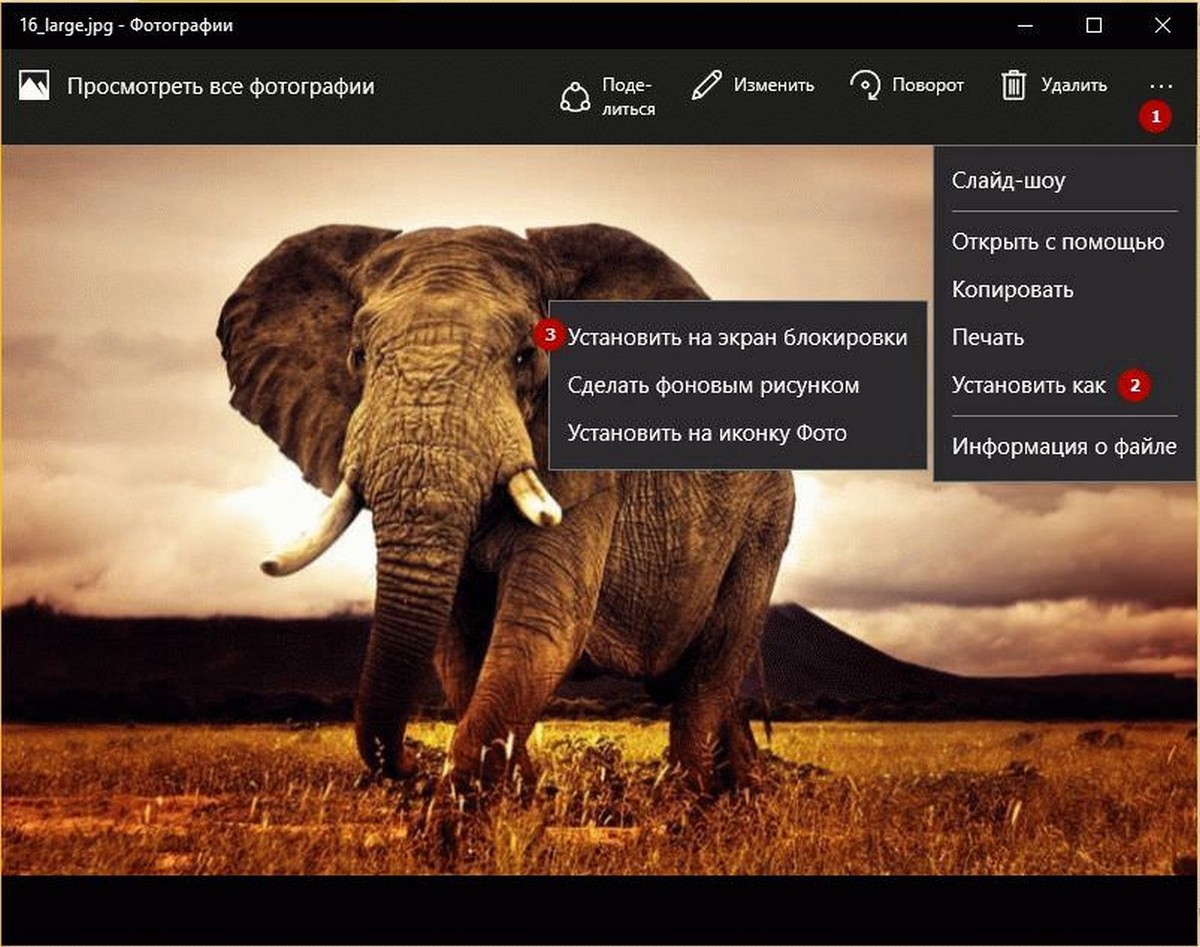
Выберите пункт «Установить как«. Новое меню появляться на экране с помощью команды «Установить на экран блокировки«, это позволит установить текущее изображение в качестве фона экрана блокировки.
Существует комбинация клавиш Ctrl+L для того же действия. Вы можете нажать ее, чтобы установить фон экрана блокировки с приложением фотографий напрямую.
Рекомендуем: Как включить сплошной фон для экрана входа Windows 10.
Как исправить, функция Windows: Интересное не работает в Windows 10.
Отключить эффект размытия фонового рисунка на экране входа Windows 10.
In this blog post, we will explore how to set a custom desktop wallpaper and lock screen background image using group policy on Active directory domain joined computers including laptops with intermittent network connectivity and those who connect to the corporate network occasionally via VPN. For this setup, we will require:
- Desktop and Lock Screen Wallpaper files in JPEG or JPG format.
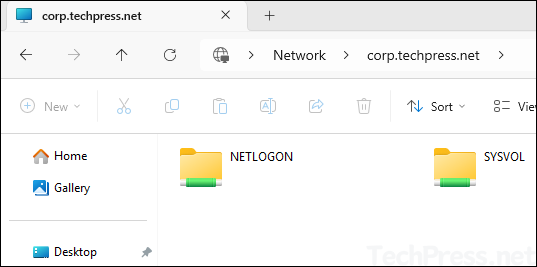
- Wallpaper files copied to SYSVOL folder on one of the domain controllers.
By default, all domain users have read permissions on SYSVOL folder and it’s accessible from all domain joined computers. You can also use NETLOGON folder instead of SYSVOL.
Contents
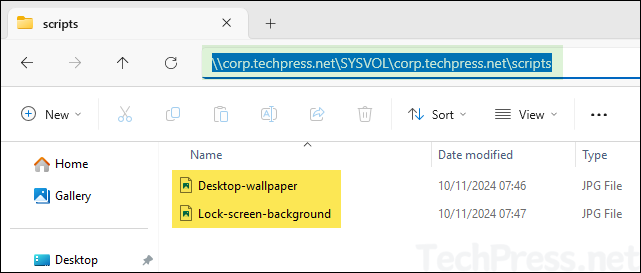
Prepare desktop and lock screen wallpaper files in JPEG or JPG format. For demonstration purpose, I have created two files Desktop-wallpaper.jpg and Lock-screen-background.jpg.
2. Copy Wallpaper files to SYSVOL folder
Next step is to copy wallpaper files to the SYSVOL folder on one of the Active directory domain controllers. To copy the files, follow below steps:
- Login to one of the Domain controllers.
- Go to the location \\<domain name\SYSVOL\domain name\scripts and paste the wallpaper files.
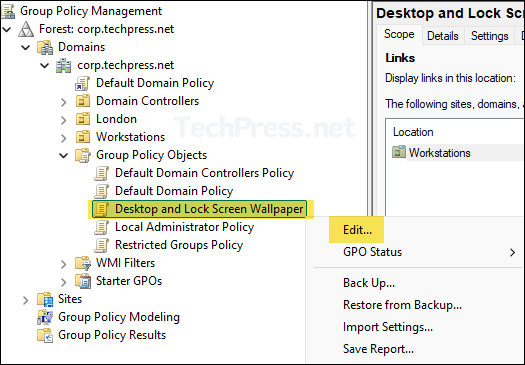
3. Create a Group Policy
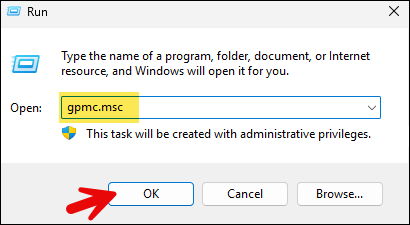
- Open Group policy management console (gpmc.msc).
- Create and Edit a Group Policy. I have already created a group policy called Desktop and Lock Screen Wallpaper. Right-click on it and select Edit. We will be configuring three group policy settings to change desktop wallpaper and lock screen background image on the windows workstations.
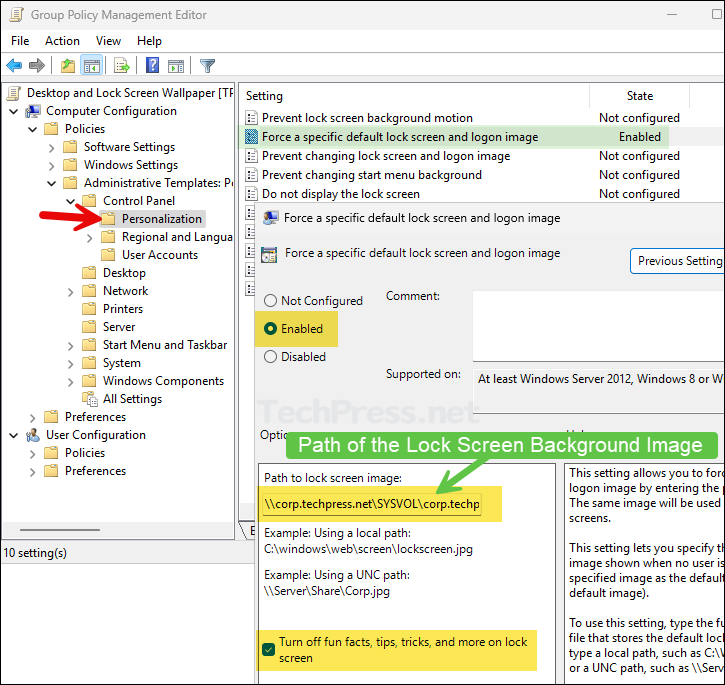
3.1. Force a specific default lock screen and logon image
Navigate to the path Computer Configuration > Policies > Administrative Templates > Control Panel > Personalization and Enable Force a specific default lock screen and logon image policy.
- Path to lock screen image: Provide the path of the lock screen image. In our example, we have set the path to \\corp.techpress.net\SYSVOL\corp.techpress.net\scripts\Lock-screen-background.jpg.
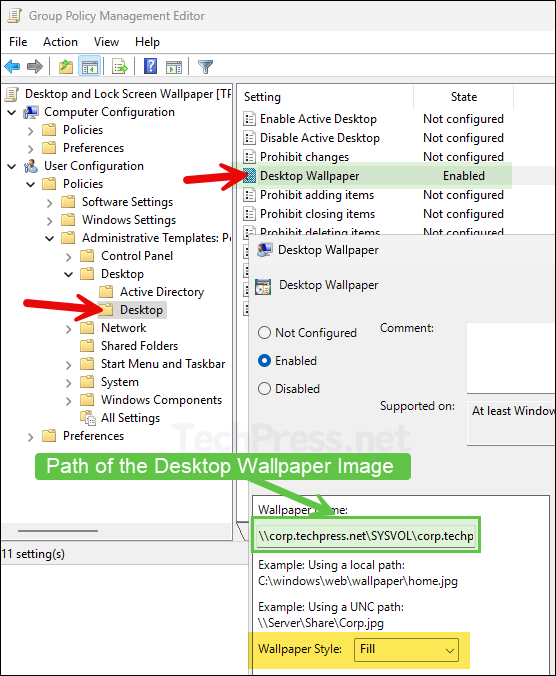
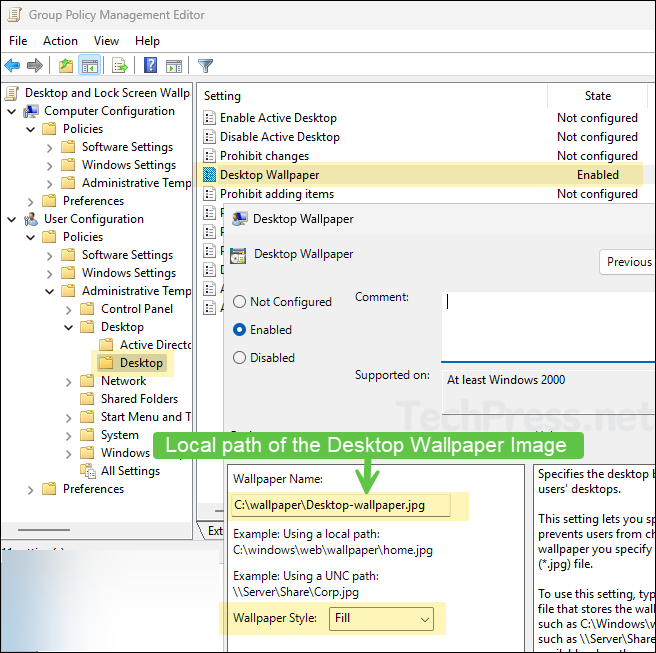
3.2. Desktop Wallpaper Setting
Navigate to the path User Configuration > Policies > Administrative Templates > Desktop > Desktop and Enable Desktop Wallpaper setting.
- Wallpaper Name: Provide the path of the desktop wallpaper image. In our example, we have set the path to \\corp.techpress.net\SYSVOL\corp.techpress.net\scripts\Desktop-wallpaper.jpg.
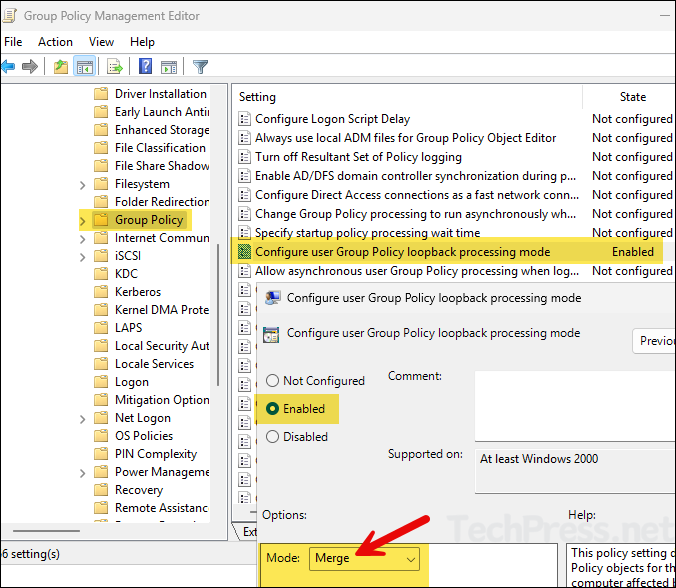
3.3. Loopback Processing Mode
Set the loopback processing mode to Merge by navigating to Computer Configuration > Policies > Administrative Templates > System > Group Policy. Enable the policy setting Configure user Group Policy loopback processing mode and set it to Merge.
4. Add Domain Computers to the Security Filtering
Select the Group Policy and add Domain Computers in the Security Filtering.

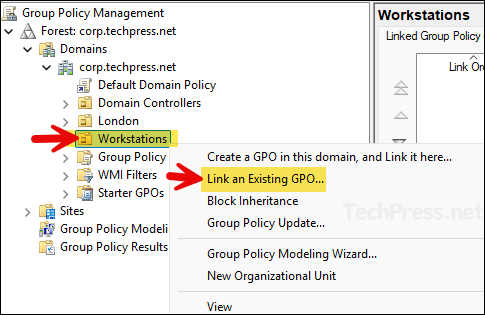
5. Link the GPO to Workstations OU
Once you have configured the GPO settings, link it to an OU containing Windows devices. Right-click on the OU and select Link an Existing GPO.
- Select the GPO Desktop and Lock Screen Wallpaper and click on OK to link.
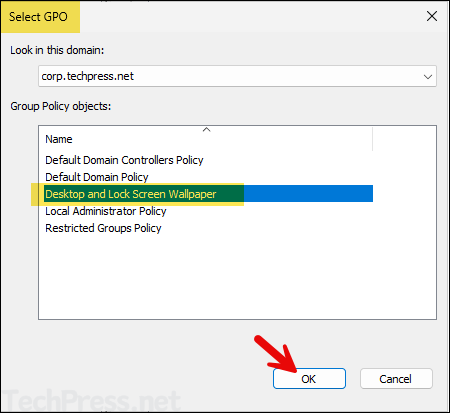
- GPO is now linked to the Workstations OU.
6. Test the Group Policy
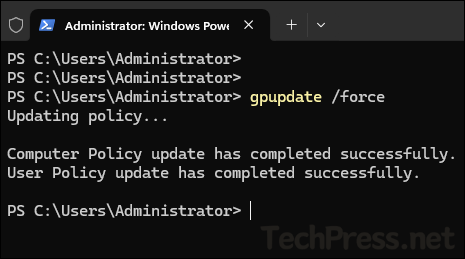
- Login to one of the target Windows client device, open command prompt in admin mode and type
gpupdate /forceand Restart your computer.
- Desktop and Lock screen wallpapers will be set as per the GPO.
By default, group policy refreshes/updates every 90 minutes. To speed up the process, you can open command prompt or PowerShell console in Admin mode and execute
gpupdate /forcecommand.
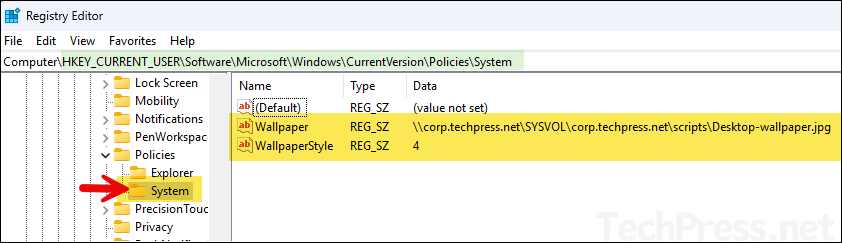
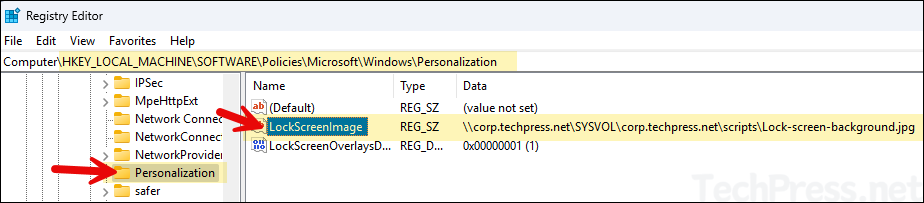
Verify Desktop and Lock Screen WallPaper Configuration from Registry Editor
Once the desktop and lock screen wallpapers GPO has been applied successfully, it will create registry entries at the following location in the Windows registry editor.
Open Registry editor regedit and Navigate to the following paths:
- For Desktop wallpaper: HKEY_CURRENT_USER\Software\Microsoft\Windows\CurrentVersion\Policies\System. There would be a REG_SZ entry called Wallpaper, which will be set to the path of the Desktop wallpaper image configured in the GPO.
For Lock Screen background: HKEY_LOCAL_MACHINE\SOFTWARE\Policies\Microsoft\Windows\Personalization. There would be a REG_SZ entry called LockScreenImage which will be set to the path of the lock screen image configured in the GPO.
Update Desktop and Lock Screen Wallpaper
Once you have configured desktop and lock screen wallpaper on windows devices, you may want to update them with new wallpaper images in the future. To update the wallpapers, follow below steps:
- Prepare new desktop and lock screen wallpaper images and keep the same name as the one copied in the SYSVOL location.
- Replace the new wallpaper files to overwrite the files at SYSVOL location. If required, you can first take a backup of old wallpaper files before replacing.

- If prompted, Select Replace the files in the destination.
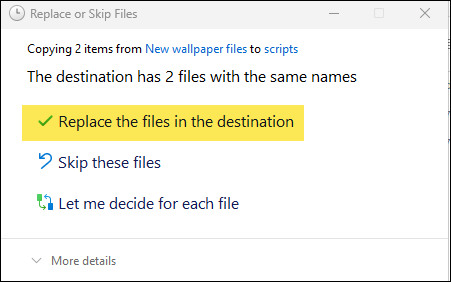
- That’s it! When GPO will refresh next time and users will reboot their devices. New Desktop and Lock Screen Wallpaper Images will be displayed. I have tested the policy for updating both wallpapers and it works fine.
Option 2: Setting Desktop and Lock Screen WallPaper by First Copying Wallpaper files on Client Devices
Previous option to configure desktop and lock screen wallpaper requires windows client devices access to SYSVOL folder. In some cases, if users have intermittent connectivity to the corporate network and does not always have access to SYSVOL folder, desktop and lock screen wallpaper might not set correctly.
Therefore, an alternative approach is to copy the desktop and lock screen image on the client devices first and use the local path of the wallpaper files in the GPO. In this case, even if users does not have access to SYSVOL folder, there will be no issues with desktop and lock screen wallpapers.
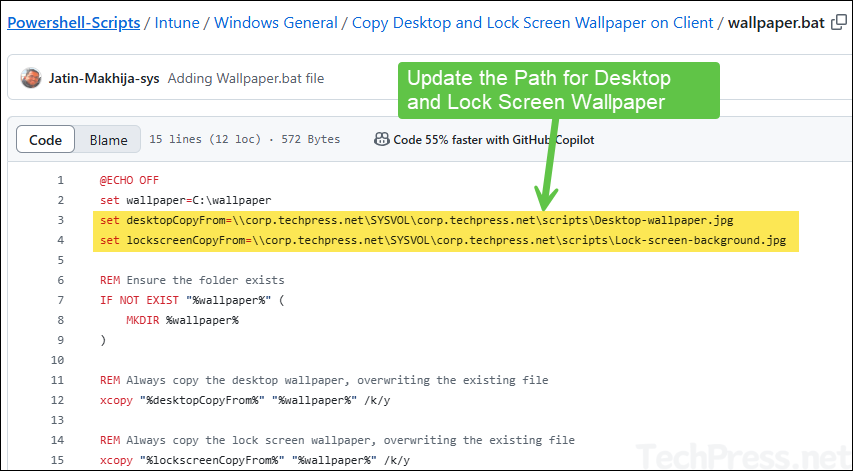
Prepare wallpaper.bat file
- Save Desktop and Lock screen wallpaper files in SYSVOL folder.
- Download wallpaper.bat file from my Github repo.
- Update
desktopCopyFromandlockscreenCopyFromvariables and point it to the desktop and lock screen wallpaper files.
Create a Group Policy
- Create and Edit a Group Policy. I have already created a group policy called Desktop and Lock Screen Wallpaper. Right-click on it and select Edit.
- Navigate to Computer Configuration > Policies > Windows Settings > Scripts.
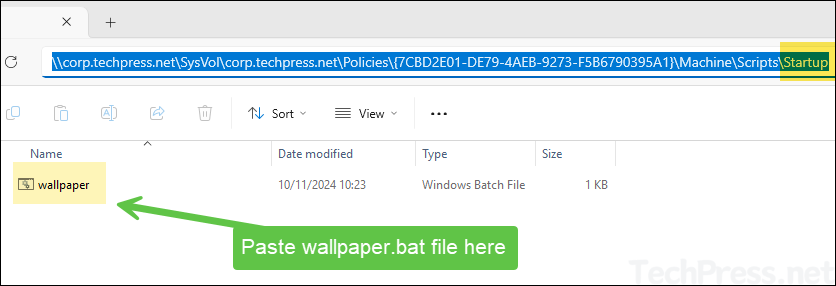
- Double-click on Startup and click on Show Files button at the bottom.
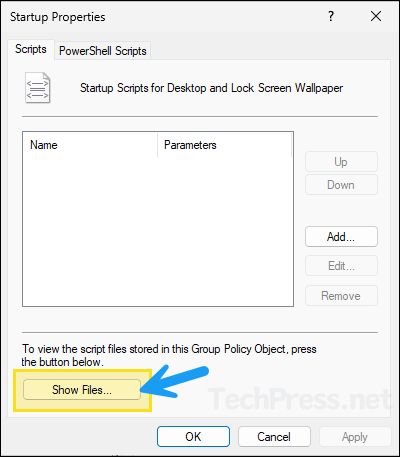
- Copy and Paste wallpaper.bat file in the Startup folder.
- Go back to the Startup Properties settings. Click on Add and then click on Browse button.
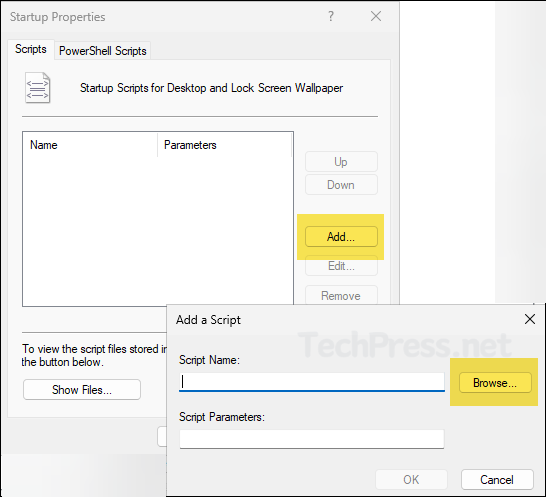
- Select wallpaper.bat file.
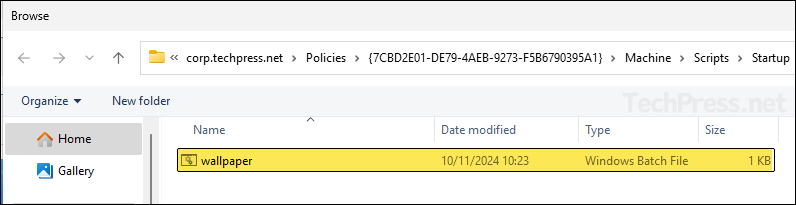
- wallpaper.bat file added.
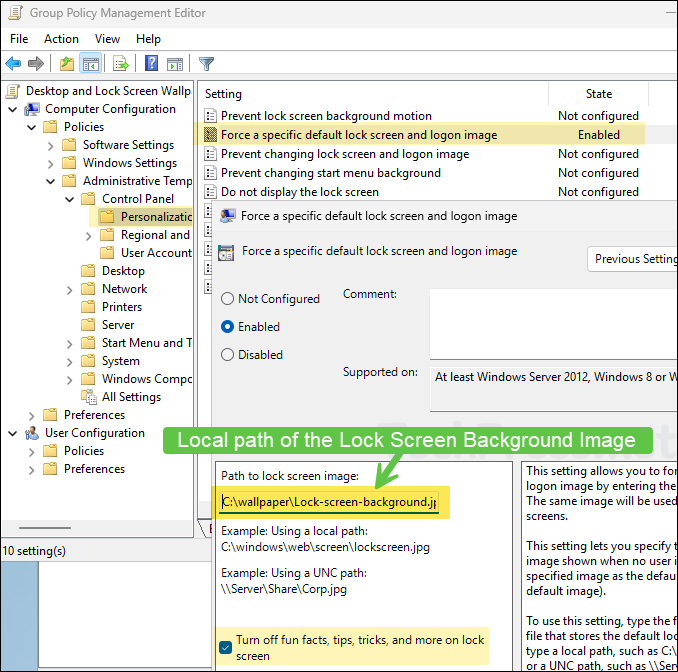
- Enable Force a specific default lock screen and logon image and set path to lock screen image as c:\wallpaper\<lockscreenimage>.jpg.
- Enable Desktop Wallpaper setting and set Wallpaper name to: C:\wallpaper\<desktopwallpaperimage>.jpg. Configure a Wallpaper Style.
- Enable Configure user Group Policy loopback processing mode and set it to Merge.
Add Domain Computers to the Security Filtering
Select the Group Policy and add Domain Computers in the Security Filtering.
Link the GPO to Workstations OU
Link the GPO to an OU containing Windows computers.
Test the Group Policy
You can wait for group policy refresh or to speed up the testing you can use gpupdate /force command and reboot the client computer. Let’s check the steps:
- Login to one of the target Windows computer.
- Open command prompt as an adminstrator and type gpupdate /force command.
- Reboot the computer and verify if desktop and lock screen wallpapers are set.
Deploy Desktop and Lock Screen Wallpaper (In a VPN Scenario)
Its more challenging to set desktop and lock screen wallpaper for remote users who do not connect to the corporate network very often. This may include the users who are working from home using domain joined windows computers and connect via VPN.
First solution we discussed configures wallpapers using SYSVOL location and In the second solution, we copied wallpaper files using a Startup script. In some cases, you may have Issues with the execution of Startup script and therefore wallpaper files are not copied on the client machine.
Either you can provide wallpaper.bat file to the user so that they can double-click on it and manually Execute it to fetch the wallpapers or you can also create a GPO that will copy Wallpaper. bat file from a shared location accessible from the device on to users desktop or any other location on their device (e.g. c:\temp).
Copy Wallpaper.bat file on Users desktop
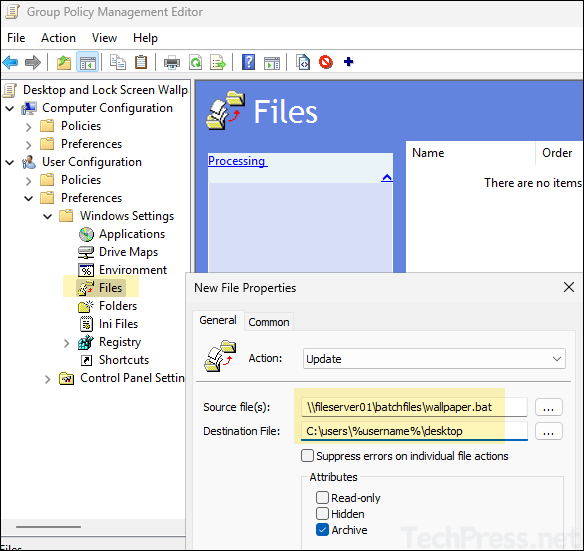
- Create and Edit a Group Policy and navigate to User configuration > Preferences > Windows Settings > Files. Right-click on it > New > File.
- Source file: Provide the location of the wallpaper.bat file which is accessible from client devices. For example: \\corp.techpress.net\SYSVOL\corp.techpress.net\scripts\wallpaper.bat or it could be a shared folder on a file server \\fileserver01\batchfiles\wallpaper.bat.
- Destination file: C:\users\%username%\desktop to copy wallpaper.bat on to users desktop or you can provide c:\temp or any other location which users can easily access.
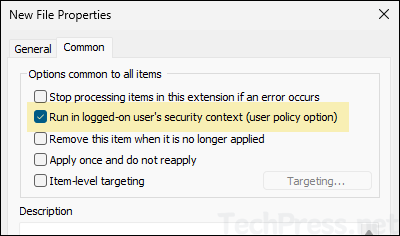
- Under Common tab, select Run in logged-in user’s security context.
Configure Execution of Wallpaper.bat file
To ensure that wallpaper.bat file is executed everytime the device is restarted. You can create an entry in the Run registry location: HKLM\SOFTWARE\Microsoft\Windows\CurrentVersion\Run.
- Go to Computer Configuration > Preferences > Registry > Create a registry Item
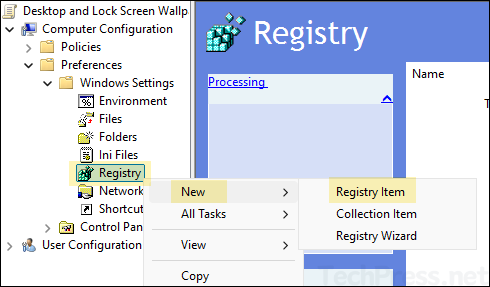
- Action: Update
- Hive: HKEY_LOCAL_MACHINE
- Key Path: /SOFTWARE\Microsoft\Windows\CurrentVersion\Run
- Value Name: Wallpaper
- Value type: REG_SZ
- Value data: C:\users\%username%\desktop\wallpaper.bat
- Make sure to enable Configure user Group Policy loopback processing mode and set it to Merge in the same GPO.
Group Policy Troubleshooting
If there are any issues with the GPO, you can follow below steps to troubleshoot.
- Ensure that the domain controllers are replicating fine. To force AD replication, open the command prompt as an administrator on a domain controller and run repadmin /syncall /APed.
- Run
gupdate /forcecommand on the workstation to force sync any policy changes.
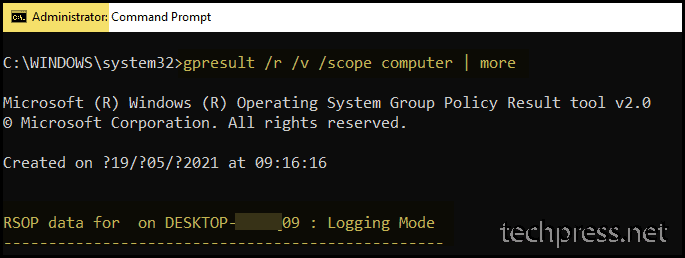
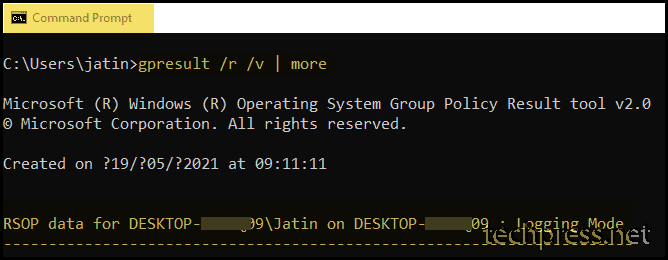
- Run the command gpresult /r /v | more to get a list o policies applied on the computer. This will only show user configuration policy settings.
- To check the computer configuration policy, open the command prompt as an administrator and run the command gpresult /r /v /scope computer | more.
Gpresult User Configuration Policy
Gpresult Computer Configuration Policy