
WebDAV — расширение протокола HTTP предназначенное для редактирования и управления файлами, размещенными на веб-серверах. К его достоинствам относится работа по стандартным протоколам, что дает возможность работать практически из любого места, где есть доступ в интернет. В настоящее время WebDAV часто используется в качестве сетевой файловой системы предоставляя доступ к удаленным файлам стандартными средствами ОС как будто бы они являлись локальными. В данной статье мы рассмотрим настройку WebDAV на базе популярного веб-сервера Apache.
Онлайн-курс по устройству компьютерных сетей
На углубленном курсе «Архитектура современных компьютерных сетей» вы с нуля научитесь работать с Wireshark и «под микроскопом» изучите работу сетевых протоколов. На протяжении курса надо будет выполнить более пятидесяти лабораторных работ в Wireshark.
Прежде всего обозначим некоторые особенности и ограничения. В современных условиях мы не видим смысла использовать WebDAV поверх небезопасного протокола HTTP, разве что в пределах периметра локальной сети. Также не следует использовать Basic-аутентификацию, которая предает пароль по сети в открытом виде, особенно в связке с HTTP, тем более что современные Windows-системы не поддерживают такое сочетание.
Для нормальной работы нам понадобится веб-сервер на базе Apache с настроенным SSL и валидным сертификатом, как настроить такой сервер мы рассказывали в статье: Настраиваем Apache для работы по HTTPS (SSL) с сертификатами Let’s Encrypt. В дальнейшем мы будем опираться на приведенную там конфигурацию.
Прежде всего определимся с местом хранения, так как WebDAV является расширением веб-сервера, то и данные логично разместить в /var/www, создадим там директорию webdav и назначим ее владельцем веб-сервер:
mkdir /var/www/webdav
chown www-data:www-data /var/www/webdav
Затем откроем файл конфигурации виртуального хоста, который будет обслуживать WebDAV, в нашем случае это /etc/apache2/sites-available/example.com-ssl.conf и добавим в самый его конец, перед закрывающим тегом </VirtualHost> следующие строки:
Alias /webdav /var/www/webdav<Directory /var/www/webdav>
        DAV On
        AuthType Digest
        AuthName "dav"
        AuthUserFile /etc/davpasswd
        Require valid-user
</Directory>
Директива Alias позволяет связать запросы к ресурсу https://example.com/webdav с папкой /var/www/webdav несмотря на то, что она находится вне корневой директории сайта. Секция Directory задает настройки, применяемые к данной директории.
- DAV On — включает WebDAV
- AuthType Digest — задает тип аутентификации. Digest-аутентификация не использует пароли в открытом виде, храня и передавая MD5-хеш.
- AuthName «dav» — имя области аутентификации, можно выбрать на собственное усмотрение
- AuthUserFile /etc/davpasswd — файл с паролями пользователей
- Require valid-user — разрешать доступ только прошедшим аутентификацию пользователям.
Теперь заведем пользователей WebDAV ресурса. Для этого используем утилиту htdigest, первого пользователя заводим командой:
htdigest -c /etc/davpasswd dav ivanКлюч -с указывает на необходимость создать файл паролей, если файл существует, то он будет удален и создан заново. После имени файла паролей указывается область аутентификации, в нашем случае — dav, и имя пользователя. После чего ему будет необходимо задать пароль. Второго и следующего пользователя создаем командой:
htdigest /etc/davpasswd dav mariaФайл паролей имеет следующую структуру:
ivan:dav:4cd22d3cb72753862alc7310533eb371
maria:dav:a96fIa2e753cd337d63408324720bb7f
Первой частью строки идет имя, затем область аутентификации и затем MD5-хеш пароля. Для удаления пользователя просто удалите относящуюся к нему строку.
После чего подключим необходимые модули Apache:
a2enmod dav
a2enmod dav_fs
a2enmod auth_digest
Проверим конфигурацию на ошибки и перезапустим сервер:
apachectl -t
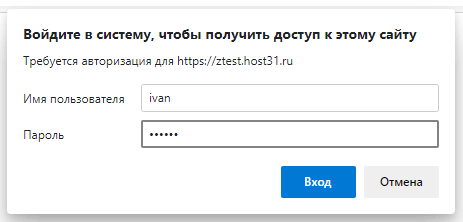
service apache2 restartДля проверки наберите в любом браузере https://example.com/webdav и вы должны увидеть форму аутентификации, после которой вы увидите листинг директории.
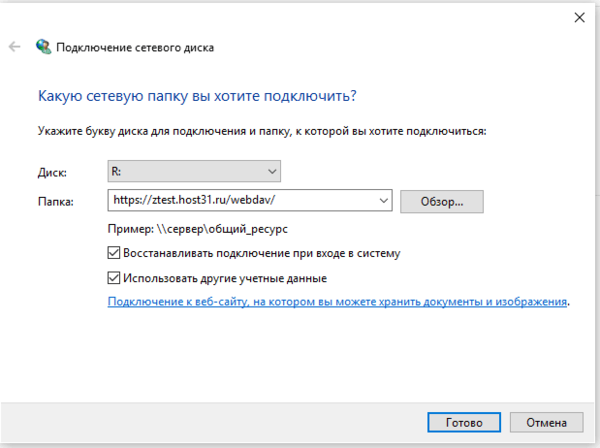
Для подключения WebDAV ресурса в файловую систему Windows просто выполните подключение сетевого диска с адресом сервера, не забудьте установить флаги Восстанавливать подключение при входе в систему и Использовать другие учетные данные.
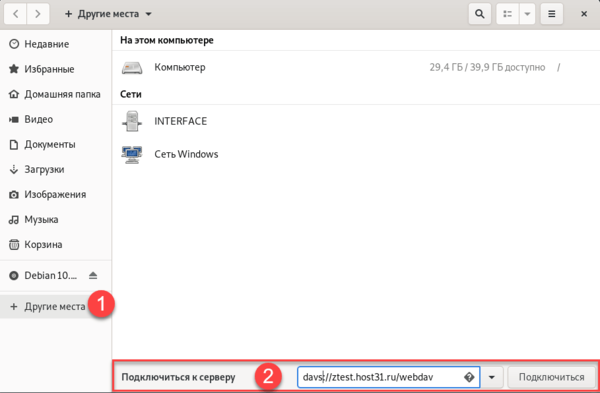
В Linux настраиваем подключение к серверу, при необходимости протокол указываем как davs (либо dav при доступе через http), например? так выглядит подключение в Gnome 3:
Теперь об особенностях эксплуатации. Внутри WebDAV ресурса нет возможности разграничивать права доступа для разных пользователей, так как в реальности владельцем всех файлов является веб-сервер. Но можно создать несколько WebDAV ресурсов со своим набором пользователей каждый (используем разные имена области аутентификации).
Еще более серьезной проблемой является блокировка открытых файлов, что может приводить к потере данных при совместном редактировании. Несмотря на то, что WebDAV поддерживает блокировки открытых файлов, не все клиенты корректно с ними работают, например, Nautilus Gnome3 корректно обрабатывает такие ситуации, выдавая предупреждение:
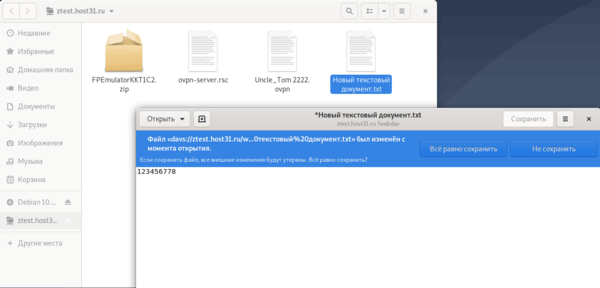
А Проводник Windows позволяет перезаписывать файлы без предупреждения. Поэтому используйте WebDAV для совместной работы с большой осторожностью, убедившись, что ваш клиент или приложение корректно работают с блокировками.
Также учтите, что несмотря на то, что все файлы хранятся удаленно, файловый менеджер воспринимает их как локальные, а следовательно листинг папок, содержащих большое количество файлов может оказаться замедленным, особенно если они содержат мультимедийное содержимое, для которого система будет создавать эскизы, поэтому для WebDAV ресурсов лучше использовать представление в виде списка или таблицы, но не значков и, тем более, эскизов.
Как видим, настройка WebDAV на базе веб-сервера Apache очень проста и не занимает много времени.
Онлайн-курс по устройству компьютерных сетей
На углубленном курсе «Архитектура современных компьютерных сетей» вы с нуля научитесь работать с Wireshark и «под микроскопом» изучите работу сетевых протоколов. На протяжении курса надо будет выполнить более пятидесяти лабораторных работ в Wireshark.
Windows supports mounting WebDAV shares as drives. WebDAV is a HTTP protocol for file access used by for example SharePoint.
|
net use Z: http://server/webdav /PERSISTENT:yes /USER:USER PASS |
It does however not support basic auth by default (basic auth sends password in cleartext, which is bad). It took me some troubleshooting to figure it out so I thought I’d share my results. You’ll probably need basic knowledge of setting up and troubleshooting Apache sites as I’ve left out some details. See this tutorial on setting up basic WebDAV. The following builds on this tutorial, but adds digest auth in addition. Note that to mount WebDAV on Windows Server you need Desktop Experience feature installed.
First enable digest auth module:
Create the first user:
|
htdigest —c /var/www/webdav/passwd.dav webdav USER |
And edit /etc/apache2/sites-available/default:
|
1 2 3 4 5 6 7 8 9 10 11 12 13 14 15 16 17 18 19 20 21 22 23 24 |
NameVirtualHost * <VirtualHost *> ServerAdmin webmaster@localhost DocumentRoot /var/www/webdav/mounts <Directory /var/www/webdav/mounts> Options Indexes MultiViews AllowOverride None Order allow,deny allow from all </Directory> Alias /webdav /var/www/webdav/mounts <Location /webdav> DAV On DavDepthInfinity on #AuthType Basic AuthType Digest AuthName «webdav» AuthUserFile /var/www/webdav/passwd.dav AuthDigestDomain /var/www/webdav Require valid-user </Location> </VirtualHost> |
Optional: Under the mounts-folder I wanted to share some SMB shares. I also wanted to combine all shared (multiple disks) into a single folder. Note the file_mode and dir_mode if you want write access. You also need standard web permissions on the folders (same as for any website).
|
//10.0.0.10/pub1 /mnt/pub1 cifs username=XXX,password=XXX,umask=222 0 0 //10.0.0.10/pub2 /mnt/pub2 cifs username=XXX,password=XXX,umask=222 0 0 //10.0.0.10/pub3 /mnt/pub3 cifs username=XXX,password=XXX,umask=222 0 0 //10.0.0.10/pub_rw /var/www/webdav/mounts/pub_rw cifs username=XXX,password=XXX,file_mode=0676,dir_mode=0676,gid=www—data 0 0 mhddfs#/mnt/pub1,/mnt/pub2,/mnt/pub3 /var/www/webdav/mounts/pub fuse defaults,allow_other 0 0 |
To combine folders (last line) you need mhddfs installed: apt-get install mhddfs
Do you want to install a WevDAV server? This article is for you.
What is WebDAV?
WebDAV is a protocol that lets you read and write files on the web almost as if you were accessing local files. You can create folders and files, as well as rename them, delete them and perform most common operations on them.
It stands for Web-based Distributed Authoring and Versioning. Since WebDAV is an extension to the HTTP protocol, you can still use features like security during file transfers (via HTTPS) or password protection on files and folders on the server.
Why a WebDAV server?
Because that way you can access your files from any computer connected to the web. The information where you need it, when you need it.
But, why not to use FTP, HTTP, or SSH?
FTP. It lacks security. Usernames and passwords are sent in clear text and can be intercepted by someone else.
HTTP. You can get documents, but how do you put them back on the server? Or what if you need to copy a folder and all its contents? Will you click on every link to download them?
SSH. You need a special application installed on the client to connect to your files. What if you cannot install it? If you cannot setup file transfer on client computer, how are you going to edit that Word document?
Starting up
This installation was performed on an Ubuntu computer. If yours is not, you might still use this page as a guide or install first Ubuntu on your computer 🙂
Since WebDAV extends the HTTP protocol, first thing we need is a web server. So, install the apache server:
sudo apt-get install apache2
When installation finishes you will need to enable the DAV module which is already included in the Apache package.
sudo a2enmod dav
sudo a2enmod dav_fs
www-data is the default username created by Apache. Be sure it has write permissions to the DocumentRoot directory (this is usually /var/www)
sudo chmod -R u+w /var/www
Now, set up the digest authentication module (this is not really required, but is strongly recommended):
sudo a2enmod auth_digest
And create a couple users who can remotely modify files on the WebDAV server:
sudo htdigest -c /etc/apache2/webdav-passwd webdav user1
sudo htdigest /etc/apache2/webdav-passwd webdav user2
webdav-passwd is the file where user/password information will be stored and webdav is the realm. You can change this information to whatever you want as long as you use it consistently.
Now it’s time to edit the default apache configuration file:
sudo nano /etc/apache2/sites-available/default
Add the following lines at the end, before the </VirtualHost> line.
Alias /webdav /var/www
<Location /webdav>
  DAV on
  AuthType Digest
  AuthName webdav
  AuthDigestProvider file
  AuthUserFile /etc/apache2/webdav-passwd
  Require valid-user
</Location>
What we are doing here is creating an alias (/webdav) that let us access the root of our http server (/var/www) using the WebDAV protocol (DAV on). Also we are asking that all users who want to access send a valid username and password (Require valid-user) using digest authentication (AuthType Digest). The information they send will be checked against the file we created before (AuthName, AuthDigestProvider and AuthUserFile).
Save your file. Now it’s time to reload our server for changes to take effect:
sudo /etc/init.d/apache2 force-reload
At this point, you have setup your server using the plain HTTP protocol and have setup usernames and passwords to protect from unauthorized writers. If you want to setup HTTPS keep reading.
Setting up HTTPS
First, install openssl (this should not be necessary, but just in case):
sudo apt-get install openssl
Enable the Apache ssl module:
sudo a2enmod ssl
Generate a personal certificate for your server (do not forget the password you use to create the server.key file, you will need it during the whole process):
sudo openssl genrsa -des3 -out server.key 1024
sudo openssl req -new -key server.key -out server.csr
sudo openssl x509 -req -days 365 -in server.csr -signkey server.key -out server.crt
You should have three files: server.key, server.csr and server.crt. Copy server.key and server.crt to the certs and private directories as shown next:
sudo cp server.crt /etc/ssl/certs
sudo cp server.key /etc/ssl/private
Edit your ports.conf configuration file:
sudo nano /etc/apache2/ports.conf
And comment the first line as shown:
#Listen 80
<IfModule mod_ssl.c>
  Listen 443
</IfModule>
This will block regular HTTP calls to your server, but permit HTTPS ones.
Finally, you must configure Apache so it knows where your certificate is:
sudo nano /etc/apache2/sites-available/default
and add the following lines after the DocumentRoot line:
SSLEngine on
SSLOptions +FakeBasicAuth +ExportCertData +StrictRequire
SSLCertificateFile /etc/ssl/certs/server.crt
SSLCertificateKeyFile /etc/ssl/private/server.key
save your changes and reload Apache:
sudo /etc/init.d/apache2 force-reload
Your WebDAV server is now fully configured!, and it’s time to try it.
Accessing the WebDAV server from Windows
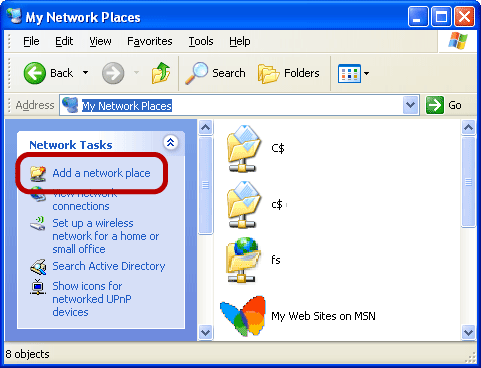
Open My Computer and go to My Network Places. Click on Add a network place.
Click Next.
Select “Choose another network location” and click Next.
Type https://your.ip.address/webdav/ and click Next. If you don’t know what your IP address is you can check it in this site.
Accept the certificate by pressing Yes and type your username and password. Click ok.
Type a friendly name for your connection and click Next.
Click Finish.
Once you are done, you will find a new folder inside your My Network Places folder. Double click it to open it. It will warn you about the security certificate (click Yes) and ask you again for your username and password. After this, you should see an empty window similar to the next one.
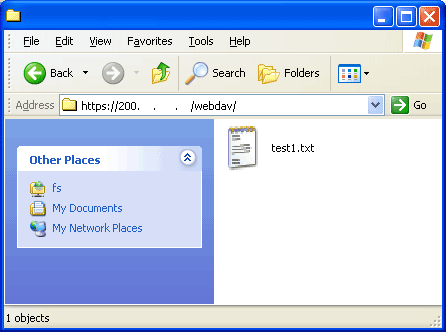
Congratulations! you did it! Try creating a file using Word or whatever. Save it to your desktop and Cut and Paste it to your remote server window and after some seconds you should see it there. Cut it again from your remote server and paste it to your desktop. Isn’t it great!?
Some applications like Microsoft Office will let you save your files directly to your WebDAV server (from the File > Save option). Other applications lack this functionality, so what you should do is create your files locally (on client computer) and then Cut the files and Paste them to the remote server.
Accessing the WebDAV server from Ubuntu
This is pretty simple too.
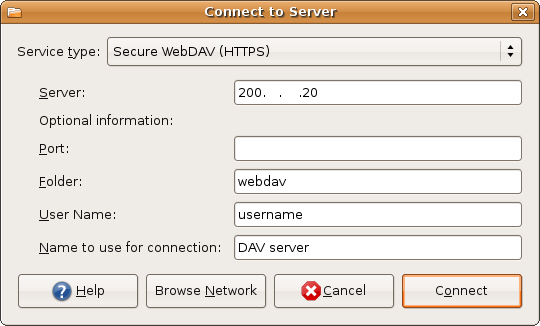
First go to the Places menu and select Connect to Server…
Select the Service Type – in my case SecureWebDAV (HTTPS) – and type the required information:
After pressing the Connect button the window will close. You can access now your server by double clicking its icon on the desktop:
or from the Places area on any File Browser window (Nautilus):
Conclusion
This is not an utopical solution but surely will help you get your important documents from wherever you are. Some problems may arise if you have a slow Internet connection or if you are working on a large document. My recommendation is to always copy your remote files to your local computer, work on them, and then move them back to the server.
Hope you find this tutorial useful.
Web-based Distributed Authoring and Versioning (WebDAV) is an often-overlooked protocol that can provide cross-platform file sharing with minimal client-side configuration. This article explains how to configure WebDAV servers on Windows with IIS, on Mac OS X and Linux with Apache, and how to connect using built-in WebDAV clients on all three OSes.
Windows as the WebDAV Server
WebDAV is built in to IIS 5 and later versions. On Windows XP, WebDAV is enabled by default when IIS is running. To enable IIS on Windows XP Pro, install it from Add/Remove programs, Add/Remove Windows Components. Drill down into the IIS component details in the Add/Remove dialog and choose to add the World Wide Web sub-sub-component as shown below. Follow the prompts to install and start IIS:
Once IIS is installed and running, create a folder to share. In this example, we will use f:webdav. To enable WebDAV for a particular folder, browse to it in Windows Explorer, right-click the folder, choose properties, and go to the Web Sharing tab:
Choose the Share this Folder radio button, and set Read, Write, and Directory browsing access permissions, and no Application permissions. The alias listed here is the name IIS will use, and by default is the same as the folder name:
In the IIS MMC console, you’ll now see your shared folder listed as a new virtual directory in the Default Web Site. At this point, the folder is accessible via WebDAV. For increased security, install an SSL certificate and force 128 bit encryption for the webdav virtual directory. For this example, we will stick with the default Windows Integrated Authentication.
OS X as the WebDAV Server
To enable Apache on OS X, go to System Preferences, Sharing, and turn on Personal Web Sharing:
In httpd.conf, uncomment the mod_dav module lines:
$ <strong>sudo vi /etc/httpd/http.conf</strong>
..
#LoadModule unique_id_module    libexec/httpd/mod_unique_id.so
LoadModule setenvif_module      libexec/httpd/mod_setenvif.so
<strong>LoadModule dav_module       libexec/httpd/libdav.so</strong>

..
AddModule mod_so.c
AddModule mod_setenvif.c
<strong>AddModule mod_dav.c</strong>
Still in httpd.conf, add a path for the DAVLockDB and a directory definition that points to the folder to be shared. This Apache configuration requests unencrypted passwords. To increase security, install an SSL certificate and configure the webdav directory to only accept SSL connections:
..
<strong>DAVLockDB /Library/WebServer/davlocks/DAVLockDB
<Directory "/Library/WebServer/Documents/webdav">
  DAV On
  AuthName "WebDAV Login"
  AuthType Basic
  AuthUserFile /etc/httpd/.htpasswd
  <LimitExcept GET HEAD OPTIONS>
    require valid-user
  </LimitExcept>
  Order allow,deny
  Allow from all
</Directory></strong>
Now create the directories and set permissions:
$ <strong>sudo su</strong>
# <strong>mkdir /Library/WebServer/davlocks</strong>
# <strong>chown www:www /Library/WebServer/davlocks</strong>
# <strong>mkdir /Library/WebServer/Documents/webdav</strong>
# <strong>chown www:www /Library/WebServer/Documents/webdav</strong>
Finally, create the user and password file and restart the httpd daemon:
# <strong>htpasswd -m -c /etc/httpd/.htpasswd testuser</strong>
New password:
Re-type new password:
Adding password for user testuser
# <strong>apachectl restart</strong>
/usr/sbin/apachectl restart: httpd restarted
Linux as the WebDAV Server:
On Linux, use your favorite package manager to install Apache. Most distributions will use Apache httpd 2.0 which has mod_dav built-in, so the only editing of the httpd.conf file needed are the DAVLockDB and Directory definitions. Note that you can also authenticate against Active Directory or LDAP using the mod_auth_kerb or mod_auth_ldap Apache modules. For this example, we’ll stick with using htpasswd:
$ <strong>sudo vi /etc/httpd/conf/http.conf</strong>
..
<strong>DAVLockDB /usr/local/apache/var/DAVLockDB
<Directory "/var/www/html/webdav">
  DAV On
  AuthName "WebDAV Login"
  AuthType Basic
  AuthUserFile /etc/httpd/.htpasswd
  <LimitExcept GET HEAD OPTIONS>
    require valid-user
  </LimitExcept>
  Order allow,deny
  Allow from all
</Directory></strong>
Now create the directories and set permissions:
$ <strong>sudo su</strong>
# <strong>mkdir /usr/local/apache/var</strong>
# <strong>chown apache:apache /usr/local/apache/var</strong>
# <strong>mkdir /var/www/html/webdav</strong>
# <strong>chown www:www /var/www/html/webdav</strong>
Finally, on Linux create the user and password file and restart the httpd daemon:
# <strong>htpasswd -m -c /etc/httpd/.htpasswd testuser</strong>
New password:
Re-type new password:
Adding password for user testuser
# <strong>/sbin/service httpd restart</strong>
Stopping httpd:  [ OK ]
Starting httpd:  [ OK ]
Now let’s try it out by connecting some clients!
Windows as the WebDAV Client
In Internet Explorer, go to File Open, check the Open as Web Folder box, and type in the URL of the shared folder. Note: When connecting over non-SSL connections, append a “/#” to the URL here. Windows XP has two built-in methods for connecting via WebDAV. Appending /# is a workaround that forces the use of the Web Folder Client connection, which will authenticate successfully to the WebDav-enabled folder as configured here.
Click OK to open the URL and you will be prompted to login. Enter the username in the form of Domainusername. If you are logging in to IIS using a non-domain local computer account, enter the username in the form of computernameusername, where computername is the hostname of the IIS server. When connecting to Apache as configured here, enter the username and password that you created using the htpasswd command.
On successful login, the WebDAV share opens in a new Windows Explorer window, and a shortcut is added to My Network Places. You can now drag and drop files between this window and the local computer, and edit Microsoft Office documents directly.
OS X as the WebDAV Client
To connect in Finder, choose Go / Connect to server (command-K). Type in the WebDAV server URL and click Connect:
At the login prompt, fill in domain name, username and password. If you are logging in to IIS using a non-Domain account, enter the IIS server computer name in the Domain box. When connecting to Apache, enter the username and password created with htpasswd:
On successful login, the WebDAV folder is mounted:
Linux as the WebDAV Client
To connect on Linux using Konqueror, type in the URL in the address bar using webdav:// instead of http:// . At the login prompt, enter domainusername or computernameusername in the username box when connecting to IIS. When connecting to Apache, the username as configured here is testuser:
On successful login, the WebDAV folder is connected:
On all platforms, WebDAV provides some basic file-locking to prevent simultaneous file modifications. Permissions are handled by the underlying file systems and cannot be modified remotely. WebDAV has some limitations, but can be an easy solution for firewall-friendly cross-platform file sharing.
13 февраля, 2021 12:20 пп
3 594 views
| Комментариев нет
Ubuntu

WebDAV – это набор расширений протокола HTTP, который позволяет управлять файлами на удаленных серверах.
Существует много способов использовать WebDAV-сервер. Например, вы можете поделиться документами Word или Excel со своими коллегами, загрузив их на свой сервер WebDAV. Таким же образом можно поделиться музыкальной коллекцией с семьей и друзьями –достаточно просто предоставить им URL-адрес. При этом никому не нужно устанавливать дополнительное программное обеспечение, поскольку все уже встроено в операционную систему «из коробки».
В этом руководстве вы научитесь настраивать доступ WebDAV через веб-сервер Apache из систем Windows, Mac и Linux по SSL и с парольной аутентификацией.
Требования
- Сервер Ubuntu 18.04, настроенный по этому мануалу.
- Домен, привязанный к IP-адресу вашего сервера.
- Веб-сервер Apache. Чтобы связать домен с вашим веб-сервером, следуйте инструкциям Настройка виртуальных хостов Apache в Ubuntu 18.04.
- SSL-сертификат для вашего домена. Чтобы получить такой сертификат, обратитесь к руководству Создание сертификата Let’s Encrypt для Apache в Ubuntu 18.04.
WebDAV требует очень мало ресурсов, поэтому для запуска и работы WebDAV-сервера хватит виртуальной машины любого размера.
Войдите на свой сервер как пользователь sudo, чтобы начать работу.
1: Включение WebDAV-модулей Apache
Веб-сервер Apache предоставляет множество дополнительных функций в виде модулей. Их можно включать и отключать, чтобы добавлять и удалять те или иные функции Apache. Функциональность WebDAV обеспечивает модуль, который устанавливается вместе с Apache, но по умолчанию он не включен.
Вам нужно включить модули WebDAV с помощью утилиты a2enmod. Это сделают следующие две команды:
sudo a2enmod dav
sudo a2enmod dav_fs
Теперь перезапустите Apache, чтобы загрузить новые модули в работу:
sudo systemctl restart apache2.service
Итак, вы загрузили и запустили функции WebDAV. На следующем этапе мы настроим Apache для обслуживания файлов по WebDAV.
2: Настройка Apache
Сейчас мы создадим все необходимые конфигурации, чтобы внедрить WebDAV на сервер Apache.
Сначала создайте корневую папку WebDAV, /var/www/webdav, в ней будут храниться файлы, которыми вы хотите поделиться через WebDAV:
sudo mkdir /var/www/webdav
Затем сделайте пользователя Apache, www-data, владельцем папки WebDAV:
sudo chown www-data:www-data /var/www/webdav
После этого нам нужно создать место для хранения файла базы данных, который Apache использует для управления и блокировки файлов, доступных по WebDAV. Этот файл должен быть доступен для чтения и изменения только пользователю Apache (широкий доступ к нему может стать причиной утечки конфиденциальной информации).
Создайте новый каталог для хранения файла базы данных с помощью утилиты mkdir:
sudo mkdir -p /usr/local/apache/var/
Параметр -p позволяет утилите mkdir создать все родительские каталоги в указанном вами пути (если какого-то из них не существует).
Затем с помощью утилиты chown передайте права на новый каталог пользователю и группе Apache:
sudo chown www-data:www-data /usr/local/apache/var
Давайте отредактируем файл VirtualHost, который содержит конфигурацию Apache для вашего домена. Он находится в /etc/apache2/sites-enabled/, а его имя заканчивается на le-ssl.conf, если вы использовали Certbot для получения сертификата SSL.
Откройте файл VirtualHost в текстовом редакторе:
sudo nano /etc/apache2/sites-enabled/your_domain-le-ssl.conf
В первой строке поместите директиву DavLockDB:
DavLockDB /usr/local/apache/var/DavLock
. . .
Затем вставьте директивы Alias и Directory внутри тегов <VirtualHost> после всех остальных директив:
. . .
Alias /webdav /var/www/webdav
<Directory /var/www/webdav>
DAV On
</Directory>
Директива Alias связывает запросы к http://your.server/webdav с папкой /var/www/webdav.
Директива Directory включает в Apache поддержку WebDAV для папки /var/www/webdav. Узнать больше о mod_dav можно в документации Apache.
Окончательный файл VirtualHost включает директивы DavLockDB, Alias и Directory, это выглядит следующим образом:
DavLockDB /usr/local/apache/var/DavLock
<IfModule mod_ssl.c>
<VirtualHost *:443>
ServerAdmin admin@your_domain
ServerName your_domain
ServerAlias your_domain
DocumentRoot /var/www/your_domain/public_html
ErrorLog ${APACHE_LOG_DIR}/error.log
CustomLog ${APACHE_LOG_DIR}/access.log combined
SSLCertificateFile /etc/letsencrypt/live/your_domain/fullchain.pem
SSLCertificateKeyFile /etc/letsencrypt/live/your_domain/privkey.pem
Include /etc/letsencrypt/options-ssl-apache.conf
Alias /webdav /var/www/webdav
<Directory /var/www/webdav>
DAV On
</Directory>
</VirtualHost>
</IfModule>
Если во время редактирования конфигурации Apache были допущены синтаксические ошибки, веб-сервер не запустится. Поэтому перед перезапуском Apache рекомендуется проверить ошибки в настройках. Для этого используйте утилиту apachectl:
sudo apachectl configtest
Утилита apachectl выведет Syntax OK, если ошибок в файле нет. Получив такое сообщение, вы можете спокойно перезапустить Apache, чтобы активировать новые конфигурации:
sudo systemctl restart apache2.service
Теперь сервер Apache поддерживает расширение WebDAV для обслуживания файлов, которые хранятся в /var/www/webdav. Однако пока мы не включили аутентификацию, читать и редактировать ваши файлы сможет любой пользователь, у кого есть доступ к вашему серверу. В следующем разделе мы включим аутентификацию для WebDAV.
3: Настройка аутентификации для WebDAV
Метод, который мы настроим в этом руководстве, называется дайджест-аутентификацией. Это более безопасный метод аутентификации для WebDAV, особенно в сочетании с HTTPS.
Дайджест-аутентификация работает с файлом, в котором хранятся имена и пароли доверенных пользователей – только они могут получить доступ к серверу WebDAV. Как и файл базы данных, такой файл должен храниться в месте, которое доступно веб-серверу Apache и которое не отображается на вашем сайте.
Поскольку для этой цели мы уже создали папку /usr/local/apache/var/, мы также поместим туда и этот файл.
Сначала создайте в этой папке пустой файл users.password:
sudo touch /usr/local/apache/var/users.password
Затем передайте права на файл группе www-data, чтобы Apache мог читать и изменять файл:
sudo chown www-data:www-data /usr/local/apache/var/users.password
Новые пользователи добавляются в WebDAV с помощью утилиты htdigest. Следующая команда добавит в файл нового доверенного пользователя:
sudo htdigest /usr/local/apache/var/users.password webdav 8host
В этой команде есть аргумент webdav – он задает область, ее следует воспринимать как группу, в которую вы и добавляете нового пользователя. Также этот пользователи видят, когда вводят свое имя и пароль, чтобы получить доступ к вашему серверу WebDAV. Вы можете выбрать любое другое имя области, если оно лучше описывает ваш каталог WebDAV.
При запуске команды htdigest будет предложено ввести пароль и подтвердить его:
Adding user 8host in realm webdav
New password:
Re-type new password:
Следующим нашим шагом будет включение обязательной аутентификации для доступа к WebDAV – тогда Apache будет требовать ее у всех пользователей и читать для этого файл users.password.
Откройте файл VirtualHost:
sudo nano /etc/apache2/sites-enabled/your_domain-le-ssl.conf
Вставьте следующие строки в блок Directory:
AuthType Digest
AuthName "webdav"
AuthUserFile /usr/local/apache/var/users.password
Require valid-user
Вот что делают эти строки:
- AuthType Digest включает метод дайджест-аутентификации.
- AuthName “webdav” позволяет доступ только пользователям области webdav.
- AuthUserFile /usr/local/apache/var/users.password проверяет учетные данные с помощью файла /usr/local/apache/var/users.password.
- Require valid-user открывает доступ любому пользователю, который включен в файл users.password и предоставил правильный пароль.
Теперь блок <Directory> выглядит так:
<Directory /var/www/webdav>
DAV On
AuthType Digest
AuthName "webdav"
AuthUserFile /usr/local/apache/var/users.password
Require valid-user
</Directory>
Включите модуль auth_digest, чтобы Apache мог использовать метод дайджест-аутентификации:
sudo a2enmod auth_digest
Наконец, перезапустите Apache, чтобы включить новые настройки:
sudo systemctl restart apache2.service
Итак, мы настроили сервер WebDAV для поддержки HTTPS и дайджест-аутентификации. Он уже готов начать раздачу файлов вашим пользователям. В следующем разделе мы протестируем доступ к серверу WebDAV в системах Windows, Linux и macOS.
4: Доступ к серверу WebDAV
Пора проверить доступ к серверу WebDAV с помощью браузеров в системах macOS, Windows и Linux (KDE и GNOME).
Прежде чем приступить, давайте загрузим в папку WebDAV какой-нибудь файл, который мы могли бы открыть во время проверки.
Откройте новый файл в текстовом редакторе:
sudo nano /var/www/webdav/webdav-testfile.txt
Добавьте в файл какой-нибудь текст, а затем сохраните и закройте его. Передайте права на файл пользователю и группе www-data:
sudo chown www-data:www-data /var/www/webdav/webdav-testfile.txt
Теперь мы можем попробовать получить доступ к серверу WebDAV.
Система Linux KDE
Сначала откройте менеджер файлов KDE Dolphin. Затем отредактируйте адресную строку, указав такой URL-адрес:
webdavs://your_domain/webdav
Когда вы нажмете ввод, вам будет предложено ввести имя пользователя и пароль.
Поставьте галочку в Remember password, если вы хотите, чтобы Dolphin сохранил ваш пароль. Затем нажмите Ок, чтобы продолжить. На экране вы увидите содержимое каталога /var/www/webdav/, которым вы можете управлять так, как если бы оно находилось в вашей локальной системе.
Добавьте сервер WebDAV в закладки, перетащив значок папки из адресной строки в раздел Remote в левой части панели навигации.
Система Linux GNOME
Сначала откройте приложение Files, кликнув на его значок в правой части рабочего стола.
Когда приложение откроется, сделайте следующее:
- Нажмите на кнопку + Other Locations.
- Введите URL-адрес вашего сервера WebDAV в следующей форме:
davs://your_domain/webdav
Затем нажмите Connect. На экране появится форма для аутентификации. В нее введите ваше имя и пароль.
Нажмите Connect, чтобы войти на сервер WebDAV. Поставьте галочку Remember forever, если вы не хотите каждый раз заново вводить пароль при доступе к этому серверу.
Теперь папка WebDAV будет доступна в приложении Files, где вы сможете управлять ее файлами.
Система macOS
Сначала откройте приложение Finder. Затем откройте меню Go и выберите Connect to server
Теперь вы увидите новое диалоговое окно, в котором можно указать URL-адрес сервера WebDAV. Этот URL должен иметь следующий вид:
https://your_domain/webdav
Нажмите кнопку Connect, чтобы продолжить. После этого вам будет предложено ввести имя пользователя и пароль.
Снова нажмите Connect, чтобы завершить процесс добавления сервера WebDAV в вашу систему.
Теперь сервер WebDAV можно найти в Finder в разделе Locations.
Система Windows
Сначала в меню Пуск откройте проводник (File Explorer). Когда приложение откроется, выберите This PC в левой панели навигации.
Затем нажмите Map network drive в верхней панели навигации.
Введите URL-адрес вашего сервера WebDAV в следующем формате:
https://your_domain/webdav
Нажмите Finish, чтобы подключиться к серверу WebDAV. Вам будет предложено ввести имя пользователя и пароль.
Введите учетные данные и нажмите ОК, чтобы войти на сервер. Поставьте галочку в Remember my credentials, если вы не хотите каждый раз вводить пароль при доступе к этому серверу.
Теперь WebDAV появится в разделе This PC в левой панели проводника.
Заключение
В этом руководстве вы настроили безопасный WebDAV-сервер, который позволяет делиться файлами с доверенными пользователями. Независимо от того, какая операционная система установлена у ваших пользователей, они смогут получать доступ и управлять файлами на вашем сервере WebDAV без установки дополнительных инструментов.
Tags: Apache, HTTPS, Linux, Mac OS, WebDAV, Windows