
My Cloud, My Cloud Home и My Passport Wireless: не обнаружено в сети Windows 10 и 11
Важно:
Мобильное приложение My Passport Wireless для iOS и Android сейчас находится в стадии Ограниченых Обновлений. На этом этапе исправление ошибок, обновление новых функций и исправлений совместимости ОС могут прекратиться, но Western Digital продолжит предоставлять обновления безопасности для приложения для решения критических проблем.
Нужна дополнительная помощь br /> Политика поддержки жизненного цикла продуктов Western Digital
В качестве дополнительного варианта продолжения использования накопителя подключите его к компьютеру, как описано в Руководстве пользователя на стр. 19.
Нужна дополнительная помощь?
- Руководство пользователя My Passport SSD
- Руководство пользователя My Passport Pro
Описание
Продукты My Cloud, My Cloud Home или My Passport Wireless не обнаруживаются в сети Windows 10 и 11.
Функция «Обзор сети» отключена в Windows 10 и 11.
Поддержка общего доступа к файлам SMB 1.0/CIFS отключена в Windows 10 и 11.
Служба обозревателя компьютеров использует протокол SMB 1.0 для заполнения сетевого узла проводника Windows (также известного как «сетевое окружение»). Этот устаревший протокол давно устарел, не выполняет маршрутизацию и имеет ограниченную безопасность. Поскольку служба не может работать без SMB 1.0, она удаляется при отключении SMB 1.0.
Важно: Изменение не ограничивается продуктами WD.
Подробнее см. в Статье Microsoft SMBv1 не установлен по умолчанию в Windows 10 и 11
Для включения функции «Обзор сети» в Windows 10 и 11 требуется включить «CIFS SMB v1.0 и общий доступ к файлам», которые по умолчанию отключены из-за угрозы безопасности. Сопоставление сетевого диска рекомендуется вместо включения функции «Обзор сети». Инструкции см. в ID ответа 25274: Windows: подключение сетевого диска WD в Windows 10 и 11
.
Разрешение
| Тема | Инструкции |
|---|---|
| Вариант 1. Доступ к общим ресурсам с помощью значка My Cloud Storage | Нажмите здесь для получения инструкций |
| Вариант № 2. Включение служб обнаружения функций в Windows 10 и 11 | Нажмите здесь для получения инструкций |
| Вариант №3 Включить поддержку общего доступа к файлам SMB 1.0/CIFS в Windows 10 и 11 | Нажмите здесь для получения инструкций |
|
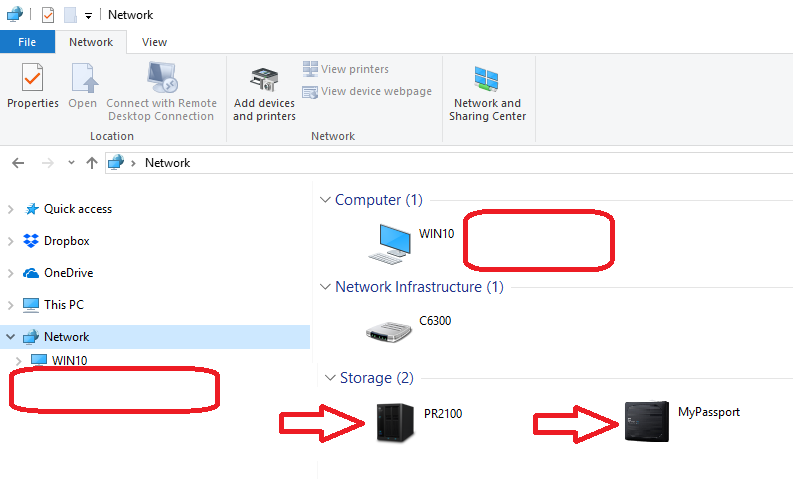
Windows 10 не видит сетевого хранилища WD My Cloud |
|||||
|
|||||
|
|||||
|
|||||
|
|||||
|
|||||
|
|||||
|
|||||
|
|||||
|
В связи с введением в действие Постановления Правительства Российской Федерации от 14.11.2023 № 1905 т.н. «о запрете популяризации VPN» с 1 марта 2024 года — любое обсуждение способов обхода блокировок и VPN на портале запрещено!
You may be wondering why your WD NAS is no longer visible in Windows 10.
Where did it go? How do you get it back?
Find out why your WD NAS cannot no longer be seen in Windows, and what are the solutions!

WD NAS Can’t Be Seen In Windows : What Happened?
You may have been using your WD NAS for some time, but one day, its network share – the “drive” that you directly access – can no longer be seen in Windows 10.
The NAS links in Windows File Explorer will only lead you to the login page for the WD NAS management page, not the actual drive where you can directly read, copy, write or edit your files.

All these NAS issues are happening because Microsoft disabled the Network Browse function from Windows 10 v1709 onwards.
The problems started after Windows 10 Fall Creators Update 1709, which :
- removed support for the SMBv1 (Server Message Block version 1) network protocol
- disabled guest access for the SMB2 network protocol
The Computer Browser service relies on the SMB 1.0 protocol to discover network devices and display them in the Windows Network Neighbourhood.
Disabling SMB 1.0 breaks the Computer Browser service, so it is automatically uninstalled and your NAS drives “disappear” from Network Neighbourhood.
Disabling guest access prevents guest or public access to your NAS drives, even to folders you specifically set to allow for public access. Hence, the Public folder they had access to earlier “disappears”.
Why Did Microsoft Disable Those Network Features?
The SMB1 network protocol was first implemented in Windows back in 1992, so it’s old… very old.
It’s so old that it lacks encryption. Everything transmitted via SMB1 can be captured and read, and even modified, by any attacker who gains access to the network.
Guest logins even on SMB2 do not support standard security features like signing and encryption. This makes them vulnerable to man-in-the-middle attacks.
That’s why Microsoft (finally) disabled them both, starting with the Windows 10 Fall Creators Update 1709.
WD NAS Can’t Be Seen In Windows : Before We Start…
Preliminary Step #1 : Update Your NAS
Before you do anything, you should log into your WD NAS management system and update its firmware, in case it’s not already set to automatically update.
Updating its firmware will ensure that your NAS supports at least SMB 2, if not SMB 3 as well.
| WD NAS | Windows URL | macOS URL |
| My Cloud EX2100 | http://wdmycloudex2100 | http://wdmycloudex2100.local |
| My Cloud DL2100 | http://wdmyclouddl2100 | http://wdmyclouddl2100.local |
| My Cloud EX4100 | http://wdmycloudex4100 | http://wdmycloudex4100.local |
| My Cloud DL4100 | http://wdmyclouddl4100 | http://wdmyclouddl4100.local |
Preliminary Step #2 : Use A Higher SMB Protocol
Then, enable the highest SMB protocol your WD NAS supports (Settings > Network). Set it to SMB 3 if possible.
This will ensure that both your WD NAS and your network support the most secure network protocol possible, for your security.

WD NAS Can’t Be Seen In Windows : The Solutions!
Best Solution : Map Your WD NAS By Device Name
The best way is to manually map your WD NAS by its device name. This lets you use the more secure SMB2 or SMB3 network protocols, with direct access to your files as usual.
- Determine your WD NAS network path, which is based on the device name.If you changed your WD NAS device name to TechARPCloud (for example), the network name will be \\TechARPCloudHere is a list of default network paths for different WD NAS :
| WD NAS | Default Network Path |
| My Cloud Home | \\MYCLOUD-last 6 digits of serial number Example : \\MYCLOUD-123456 |
| My Cloud Home Duo | |
| My Cloud | \\WDMYCLOUD |
| My Cloud Mirror | \\WDMYCLOUDMIRROR |
| My Cloud Mirror Gen 2 | |
| My Cloud EX2 | \\WDMYCLOUDEX2 |
| My Cloud EX2 Ultra | \\MYCLOUDEX2ULTRA |
| My Cloud EX4 | \\WDMYCLOUDEX4 |
| My Cloud EX2100 | \\WDMYCLOUDEX2100 |
| My Cloud EX4100 | \\WDMYCLOUDEX4100 |
| My Cloud DL2100 | \\WDMYCLOUDDL2100 |
| My Cloud DL4100 | \\WDMYCLOUDDL4100 |
| My Cloud PR2100 | \\MYCLOUDPR2100 |
| My Cloud PR4100 | \\MYCLOUDPR2100 |
- Open Windows File Explorer and click on Network on the left pane.
- Key in the network path of the WD NAS, which is based on its device name. Make sure you include \\ before the network path.

- You will be asked to key in a user name and password.
This can be the administrator’s login, or the login of any registered user of your WD NAS.
Remember – Windows 10 no longer allows guest logins or public access. So you will need to create a password-protected account even for guests to use.

- Once you successfully authenticate your user name and password, the network shares of your WD NAS will become visible in File Explorer under Network!You can stop here, but you will need to keep keying in the network path and login to access your NAS every time you boot into Windows.

- For more convenience, you can create a password-protected Private Share.Start by right-clicking on a network share from your WD NAS and select Map network drive…

- Select a drive letter for the network share.
Check Reconnect at sign-in if you don’t want to automatically log into the drive.
Then click Finish to map the drive.

That’s it! If you expand This PC in Windows File Explorer, you should now see that the WD NAS network drive has now been mapped by its device name!

Alternate Solution : Enable Network Discovery Without SMB1
This Windows 10 workaround can be used if your WD NAS supports SMB2 or SMB3 and you prefer not to map the network drives.
- Go to Windows Services.
- Start these two services :
– Function Discovery Provider Host
– Function Discovery Resource Publication - Set the Startup type for both those services to Automatic (Delayed Start).
- Open Windows File Explorer and go to Network.
- When prompted, enable Network Discovery.
Your WD NAS shares should now be visible in Windows File Explorer.
Worst Case Solution : Enable Network Discovery Without SMB1
This should only be attempted if your WD NAS simply cannot support SMB2 or SMB3, and can only use SMB1.
- Go to Control Panel > Programs.
- Click on Turn Windows features on or off.
- Expand the SMB 1.0/CIFS File Sharing Support option.
- Check the SMB 1.0/CIFS Client option.
- Click the OK button.
- Restart Windows 10
After Windows 10 restarts, your WD NAS shares should now be visible in Windows File Explorer.
Recommended Reading
- Dell G5 15 5500 Review : Affordable RTX Gaming!
- The New HP ENVY : Be The Envy Of Creators Wherever You Go!
- 11th Gen Intel Core (Tiger Lake) : What You Need To Know!
- NVIDIA GeForce RTX 30 Series : What You Need To Know!
- How An NVIDIA Founders Edition Graphics Card Is Designed!
- NVIDIA GeForce MX450 : New MX-Class Laptop Graphics!
- Mac Camera Cover Guide : Why Apple Is Wrong!
- How To Setup NVIDIA NULL For G-SYNC Monitors Correctly!
- NVIDIA Image Sharpening Guide for DirectX, Vulkan, OpenGL!
- Epson EcoTank L3150 Review : Print To Your Heart’s Content!
- AMD Ryzen PRO 4000 Desktop APUs : All You Need To Know!
- AMD Athlon PRO 3000 Desktop APUs : All You Need To Know!
- AMD Athlon 3000 G-Series with Radeon Graphics Revealed!
- AMD Ryzen 4000 G-Series with Radeon Graphics Revealed!
- Samsung Odyssey G9 : Malaysia + Singapore Price + Deal!
- Samsung Odyssey G9 : 49-inch 1000R QLED Gaming Monitor!
- Samsung Odyssey G7 : Malaysia Price + Pre-Order Deals!
- Lenovo ThinkStation P620 : Threadripper PRO Workstation!
- AMD Ryzen Threadripper PRO 3000 Series : Full Details!
- Death Stranding : How To Get It FREE With GeForce RTX!
- Warning : Using A Camera Cover Can Damage Your MacBook!
- 2020 Dell XPS Desktop : Malaysia Price + Specifications!
- Dell XPS Desktop (8940) : Premium Desktop PC!
- 31.5-inch Dell S3221QS : Curved 4K UHD Multimedia Monitor!
- 27-inch Dell S2721QS / S2721Q : 4K UHD Multimedia Monitor!
- 27-inch Dell S2721DS / S2721D : What You Need To Know!
- 2020 Dell Latitude : Models, Price + Availability!
- 2020 Dell Precision Mobile : Models, Price + Availability!
- Dell Latitude 9510 : 15″ Ultralight With 30 Hr Battery Life!
- Dell G7 15 7500 Gaming Laptop : What You Need To Know!
- Dell S2721HGF Curved 144Hz Gaming Monitor : First Look!
- Dell S2721DGF Gaming Monitor : QHD + 165 Hz FTW!
- Alienware AW410K : Everything You Need To Know!
Go Back To > Computer Hardware | Home
Support Tech ARP!
If you like this review, please support our work by visiting our sponsors, participating in the Tech ARP Forums, or even donating to our fund. Any help you can render is greatly appreciated!
WD My Cloud is one of the best cloud storage services out there, and since the service has so many users, there have been countless Windows 10 users complaining of not being able to access their WD My Cloud accounts ever since their upgrade to Windows 10. The problem has become so severe that some Windows 10 users have even resorted to rolling back to Windows 7 and Windows 8.
If you are unable to access your WD My Cloud account on a Windows 10 computer, fear not, as this issue can indeed be fixed. In almost all cases, the culprit behind a user not being able to access their WD My Cloud account on a Windows 10 computer is the fact that Windows 10 does not allow users to access certain accounts unless credentials for these accounts are added to the credentials list. The following are the two most effective methods that you can use to successfully fix the issue that is inhibiting you from accessing your WD My Cloud account on Windows 10:
Method 1: Add a Windows Credential for your WD My Cloud account
The simplest and most widely effective fix for this issue is to simply add a Windows Credential for your WD My Cloud account to the credentials list on your Windows 10 computer. To do so, you need to:
Right-click on the Start Menu to open the WinX Menu.
Click on Control Panel in the WinX Menu to open it.
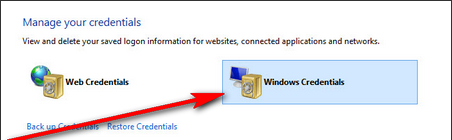
In the Control Panel, locate and click on Credential Manager,
Click on Windows Credentials.
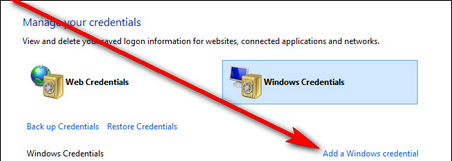
Click on the Add a Windows credential link in the top right corner of the list of Windows Credentials.
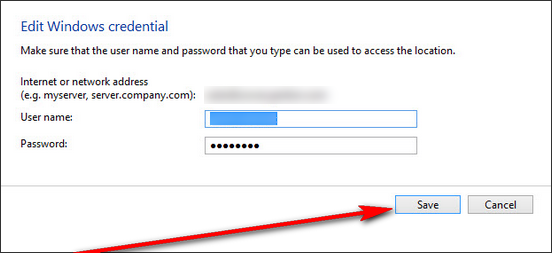
Type the name you assigned to your WD My Cloud device into the internet or network address bar. Enter the username of your WD My Cloud account into the username bar, and input your WD My Cloud account password into the password field. Click on ‘Save’.
Close the Control Panel.
Restart your computer, and when it boots up, you will be able to seamlessly access your WD My Cloud account.
Method 2: Fix the issue using the Registry Editor.
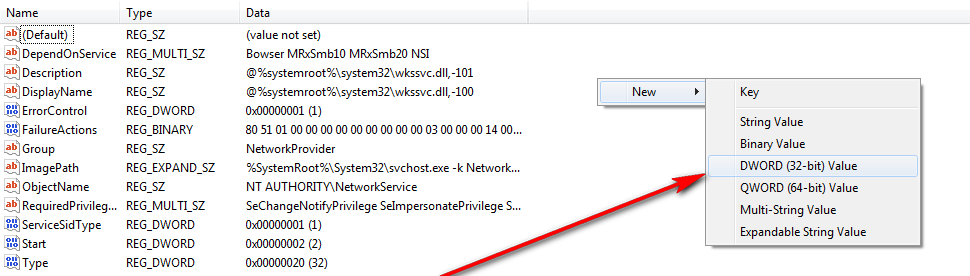
If Method 1 does not work for you, which is highly unlikely, this issue can also be fixed by editing your computer’s registry and adding a certain DWORD (32-bit) value to a specific key. To successfully gain access to your WD My Cloud account on a Windows 10 computer using this method, you need to:
Press the Windows logo key + R to bring up the Run command.
Type regedit into the Run dialog and press the Enter key to open the Registry Editor.
Navigate to HKEY_LOCAL_MACHINE\SYSTEM\CurrentControlSet\Services\LanmanWorkstation in the left pane.
Click on the LanmanWorkstation key to display its contents in the right pane.
Right-click on an empty space in the right pane, hover over New and click on DWORD (32-bit) value.
Name the new DWORD value AllowInsecureGuestAuth.
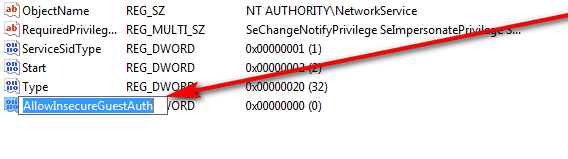
Double-click on the new value and, in the dialog that opens up, change its value to 1 and then click on OK,
Close the Registry Editor and restart your computer, and when your computer boots up, you will be able to successfully access your WD My Cloud account without any issues.
Method 3: Network Reset,
This method has been widely reported by users in the comments to have worked for many on Windows 10.
- Please hold down the Windows key and then press ‘I’”.
- Choose Network & Internet

- Make sure Status is selected in the left pane.
- Scroll down and choose Network Reset, and confirm by Clicking Reset Now.


Kevin Arrows
Kevin Arrows is a highly experienced and knowledgeable technology specialist with over a decade of industry experience. He holds a Microsoft Certified Technology Specialist (MCTS) certification and has a deep passion for staying up-to-date on the latest tech developments. Kevin has written extensively on a wide range of tech-related topics, showcasing his expertise and knowledge in areas such as software development, cybersecurity, and cloud computing. His contributions to the tech field have been widely recognized and respected by his peers, and he is highly regarded for his ability to explain complex technical concepts in a clear and concise manner.
Are you unable to find your WD My Cloud on your Windows 11 network? Relax! This is the sort of issue that has irked a good number of PC folks recently. So, you shouldn’t look down at yourself and curse for running into it. As always, I have gone into the details to jot down the 12 best tips and tricks to resolve the WD My Cloud issues on Windows PC.
So, what causes the WD My Cloud to disappear? Well, its sudden disappearance occurs due to a number of factors such as –
- Network discovery disabled
- Misconfigured IP settings
- Outdated network drivers
- Incorrect SMB settings
- Device firmware issues
- Improper file-sharing setup
- Firewall blocking access
- Wi-Fi and LAN mismatch
- Antivirus interference
- Router configuration issues
Talking about the solutions to resolve this issue, tips like fixing the outdated network drivers, removing the firewall restriction, and taking control of the misconfigured settings often work. Besides, there are other viable solutions that have a reliable track record of fixing it.
1. Ensure Network Discovery is Enabled
If Network Discovery is disabled on your PC, Windows will not be able to detect devices like WD My Cloud on your local network.
For those unaware, Network Discovery allows your PC to recognize and communicate with other devices, making this setting essential for accessing network drives and shared files. If it’s disabled, WD My Cloud may remain invisible.
- Open the Settings app on your PC > Network & internet.
- Now, choose Advanced network settings > Advanced sharing settings.

- Under the Private network section, enable Network discovery and File and printer sharing by toggling them on.
- Then, save the settings and restart your computer to apply the changes. After restarting, check if WD My Cloud is now visible on the network.
2. Check the SMB Protocol Setting
It’s worth pointing out that WD My Cloud is heavily dependent on the SMB (Server Message Block) protocol to allow file sharing and device discovery. In some cases, this protocol may be disabled on your Windows PC, preventing network drives like WD My Cloud from being detected. Enabling SMB can restore proper connectivity.
- To get it done, press Win + R, type optional features, and press Enter to open Windows Features. Scroll down and check the box next to SMB 1.0/CIFS File Sharing Support.
- Click OK and allow Windows to install the feature.
- Then, make sure to restart your computer and check if WD My Cloud appears on the network after enabling SMB.
3. Disable IPv6
Bear in mind that IPv6 is a newer internet protocol that may cause compatibility issues with older network devices like WD My Cloud, which often rely on IPv4. Hence, disabling IPv6 can sometimes resolve network conflicts and improve device discovery.
- Go to Control Panel > Network and Sharing Center > Change adapter settings.
- Right-click your active network, select Properties, and uncheck Internet Protocol Version 6 (TCP/IPv6).
- Now, click OK.
- Next up, you have to restart your PC, and check if WD My Cloud is now detected on the network.

4. Assign a Static IP to WD My Cloud
WD My Cloud may frequently change its IP address due to DHCP settings, making it harder for Windows to consistently detect it. Assigning a static IP address helps ensure the device remains connected to the same network address at all times, improving stability.
- Log in to your router’s admin panel, locate WD My Cloud under connected devices, and assign a static IP address.
- Save the settings and restart your router and WD My Cloud if needed. Once done, check if the device appears on the network.
5. Restart the Router and WD My Cloud
Temporary network glitches or IP conflicts can prevent WD My Cloud from showing on the network. Restarting your router and the My Cloud device can resolve such issues by refreshing the network configuration and connections.
- Power off your router and WD My Cloud, unplug them from the power source, and wait for 2-3 minutes.
- Plug them back in, power them on, and allow them to fully reboot.
- Then, reconnect your devices to the network and check if WD My Cloud is now visible.
6. Turn Off Password-Protected Sharing
Note that password-protected sharing requires other devices to authenticate with a username and password before accessing shared files. If this feature is on, WD My Cloud may be inaccessible if the login credentials don’t match. Disabling it can improve accessibility.
- To do so, open Control Panel > Network and Sharing Center > Advanced sharing settings.
- Then, you have to expand the Private network section and turn off Password-protected sharing. Save the changes and restart your PC to see if the issue is resolved.
7. Set Network Profile to Private
It’s worth pointing out that the private network profile allows better device discovery and sharing compared to a public network. If your network is set to Public, Windows may block WD My Cloud from appearing on the network.
- Open the Settings app on your Windows device > Network & internet, select your Wi-Fi or Ethernet connection, and set the network profile to Private.
- Reconnect to the network and verify if WD My Cloud is now visible.
8. Update Network Adapter Drivers
It always pays to have a close eye on the outdated or corrupted network adapter drivers can cause connectivity issues and prevent WD My Cloud from being detected. Updating the drivers can restore proper functionality.
- Right-click Start and select Device Manager. Expand Network adapters, right-click your adapter, and choose Update driver.

- Select Search automatically for drivers, and after updating, restart your PC to check if WD My Cloud appears.
9. Verify WD My Cloud’s Network Configuration
Incorrect settings on WD My Cloud, such as network mode misconfigurations, can cause connection problems. Verifying the network configuration ensures that the device is correctly connected to the network.
- Log in to the WD My Cloud dashboard by entering its IP address in a browser. Go to Settings > Network and check if DHCP is enabled.
- You can also try switching between DHCP and a static IP to stabilize the connection.
10. Temporarily Disable Firewall and Antivirus
Firewalls or antivirus software may block network connections, preventing WD My Cloud from appearing. Temporarily disabling them can help identify if they are causing the issue.
- On your Windows device, Settings > Privacy & Security > Windows Security > Firewall & Network Protection.

- After that, turn off the firewall for the Private network and check if WD My Cloud becomes visible.
- If it does, add an exception for WD My Cloud in the firewall settings and re-enable the firewall.
11. Enable WD Discovery Tool
WD provides the WD Discovery tool to help locate and map My Cloud devices on the network. This tool can be useful if Windows is unable to detect the device on its own.
- Download and install the WD Discovery tool from the official WD website. Launch the tool, sign in if required, and follow the on-screen instructions.
- The tool should automatically detect WD My Cloud and allow you to map it as a network drive.
12. Reset WD My Cloud
Resetting WD My Cloud can resolve any misconfigurations or network glitches by restoring the device to its default network settings. This process won’t delete your data but may fix connectivity problems.
- To begin with, press and hold the reset button on the back of the WD My Cloud device for about 4-5 seconds.
- Release the button and wait for the device to reboot. After the reset, reconnect WD My Cloud to your router and check if it appears on the network.
Wrapping up…
There you have it! I hope these solutions have worked in fixing the issue and made your WD My Cloud visible on your Windows 11 network. If one method fails to yield the desired result, I’d recommend you try combining multiple fixes, such as enabling network discovery and updating your network drivers. For additional troubleshooting, you can also contact WD support.