
Время на прочтение9 мин
Количество просмотров101K
Windows Communication Foundation – программная платформа от Microsoft для создания, настройки и развертывания распределенных сетевых сервисов. WCF-runtime и его пространство имен System.ServiceModel, представляющее его главный программный интерфейс, это преемник технологий создания распределенных систем, успешно применяемых разработчиками для создания распределенных приложений на платформе Windows в последнее десятилетие. Разберём тестовый пример создания WCF-сервиса.
Открываем Visual Studio 2015 и создаём новый проект типа Class Library. Проект назовём WCFMyServiceLibrary.

Файл Class1.cs переименуем в MyService.cs и добавим ещё один класс, файл для которого назовём IMyService.cs.
Добавим ссылку на сборку System.ServiceModel.
В файле IMyService.cs опишем интерфейс:
using System.ServiceModel;

namespace WCFMyServiceLibrary
{

[ServiceContract]
public interface IMyService
  {
    [OperationContract]
    string Method1(string x);
    [OperationContract]
    string Method2(string x);
  }
}
В файле MyService.cs опишем реализацию интерфейса:
namespace WCFMyServiceLibrary
{
  public class MyService : IMyService
  {
    public string Method1(string x)
    {
      string s = $"1 You entered: {x} = = = 1";
      return s;
    }

    public string Method2(string x)
    {
      string s = $"2 you entered: {x} = = = 2";
      return s;
    }
  }
}
На этом разработка сервиса завершена. Переходим к созданию службы Windows, которая будет контейнером для данного сервиса.
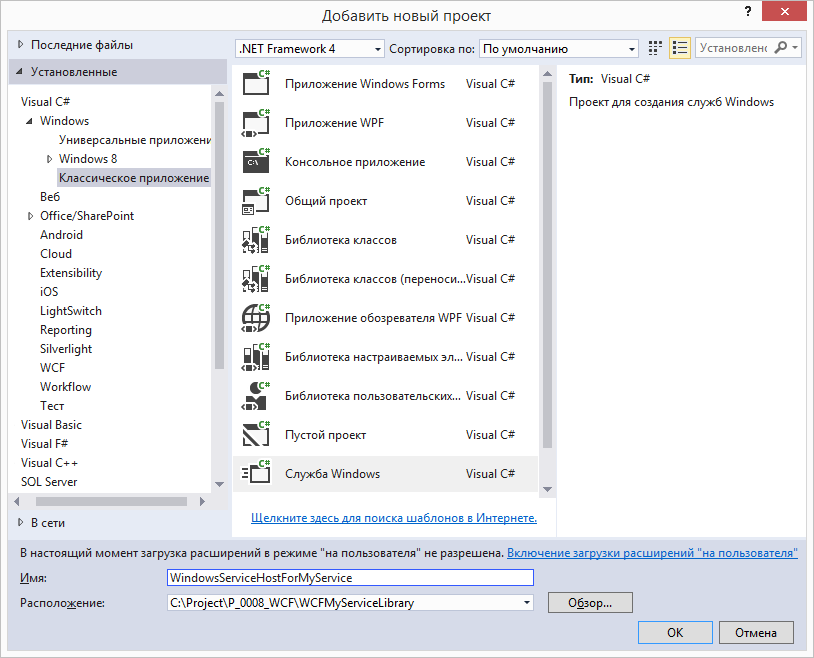
В том же решении (Solution) создадим новый проект типа «Служба Windows». Называем проект WindowsServiceHostForMyService.
Затем файл Service1.cs (только что созданного проекта) переименуем в MyService.cs. В этот проект добавим ссылку на сборку System.ServiceModel, а также не забываем указывать в файле MyService.cs директивы:
using System.ServiceModel;
using System.ServiceModel.Description;
В классе MyService добавляем новый член:
private ServiceHost service_host = null;Также необходимо добавить ссылку на проект WCFMyServiceLibrary, который находится в этом же решении:

Затем в классе MyService изменим метод OnStart таким образом, чтобы в этом методе добавлялись конечные точки нашего сервиса (endpoint):
метод OnStart
    protected override void OnStart(string[] args)
    {
      if (service_host != null) service_host.Close();

      string address_HTTP = "http://localhost:9001/MyService";
      string address_TCP = "net.tcp://localhost:9002/MyService";

      Uri[] address_base = { new Uri(address_HTTP), new Uri(address_TCP) };
      service_host = new ServiceHost(typeof(WCFMyServiceLibrary.MyService), address_base);

      ServiceMetadataBehavior behavior = new ServiceMetadataBehavior();
      service_host.Description.Behaviors.Add(behavior);

      BasicHttpBinding binding_http = new BasicHttpBinding();
      service_host.AddServiceEndpoint(typeof(WCFMyServiceLibrary.IMyService), binding_http, address_HTTP);
      service_host.AddServiceEndpoint(typeof(IMetadataExchange),   MetadataExchangeBindings.CreateMexHttpBinding(), "mex");

      NetTcpBinding binding_tcp = new NetTcpBinding();
      binding_tcp.Security.Mode = SecurityMode.Transport;
      binding_tcp.Security.Transport.ClientCredentialType = TcpClientCredentialType.Windows;
      binding_tcp.Security.Message.ClientCredentialType = MessageCredentialType.Windows;
      binding_tcp.Security.Transport.ProtectionLevel = System.Net.Security.ProtectionLevel.EncryptAndSign;
      service_host.AddServiceEndpoint(typeof(WCFMyServiceLibrary.IMyService), binding_tcp, address_TCP);
      service_host.AddServiceEndpoint(typeof(IMetadataExchange),  MetadataExchangeBindings.CreateMexTcpBinding(), "mex");

      service_host.Open();
    }
Затем реализуем остановку сервиса в методе OnStop:
    protected override void OnStop()
    {
      if (service_host != null)
      {
        service_host.Close();
        service_host = null;
      }
    }
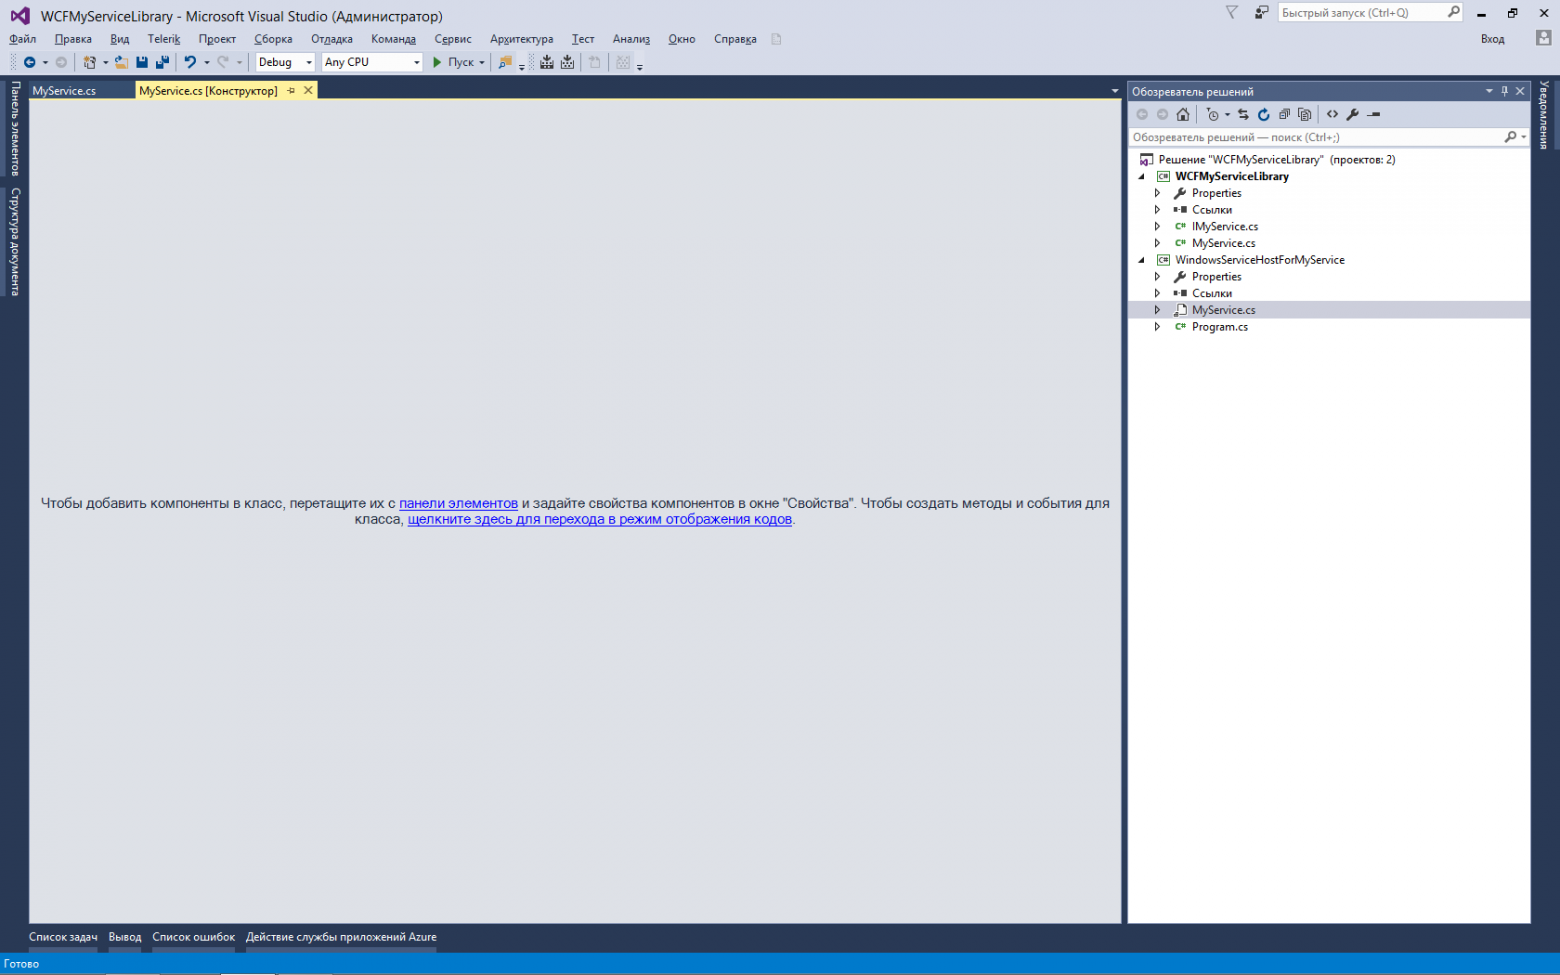
Затем в Обозревателе решения — двойной клик на файле MyService.cs (проекта WindowsServiceHostForMyService) откроет этот файл в режиме конструктора (Design Mode).
На пустом пространстве вызываем контекстное меню (щелчок правой кнопкой мыши) и выбираем «Добавить установщик».

При этом будет создан новый класс ProjectInstaller.cs
Переименуем файл ProjectInstaller.cs в MyServiceInstaller.cs.
При этом выйдет окно с вопросом, следует ли переименовать зависимые объекты – отвечаем «Да».
Добавим в файл ссылку
using System.ServiceProcess;
Затем изменим код конструктора класса MyServiceInstaller:
    public MyServiceInstaller()
    {
      // InitializeComponent();
      serviceProcessInstaller1 = new ServiceProcessInstaller();
      serviceProcessInstaller1.Account = ServiceAccount.LocalSystem;
      serviceInstaller1 = new ServiceInstaller();
      serviceInstaller1.ServiceName = "WindowsServiceHostForMyService";
      serviceInstaller1.DisplayName = "WindowsServiceHostForMyService";
      serviceInstaller1.Description = "WCF Service Hosted by Windows NT Service";
      serviceInstaller1.StartType = ServiceStartMode.Automatic;
      Installers.Add(serviceProcessInstaller1);
      Installers.Add(serviceInstaller1);
    }
Заметим, что вызов метода InitializeComponent() мы заблокировали с помощью комментария.
На этом разработка службы Windows завершена. Собираем всё решение (Build Solution) и переходим к следующему этапу – установка службы Windows.
Для установки нашей службы создадим bat-файл (с произвольным названием, например Install_Windows_Service.bat) следующего содержания:
C:\Windows\Microsoft.NET\Framework\v4.0.30319\InstallUtil.exe WindowsServiceHostForMyService.exe
Нужно скопировать этот bat-файл в ту же папку, где находится скомпилированный файл WindowsServiceHostForMyService.exe (вам нужно заранее продумать, в какой папке будет лежать этот файл, который будет всегда запущен в качестве службы Windows).
Запускаем bat-файл, после чего наша программа WindowsServiceHostForMyService.exe будет установлена в качестве службы Windows.
Запустим эту службу с помощью стандартной программы управления службами.
Следующий этап – разработка клиентского приложения для использования предоставляемых сервисом услуг.
Для этого прежде всего нужно организовать так называемый «переходник» — Service Proxy – набор настроек, описывающих сервис для клиентского приложения.
Воспользуемся для этого стандартной утилитой SvcUtil.exe. Создадим файл Generate_Proxy.bat следующего содержания
SvcUtil http://localhost:9001/MyService /out:MyServiceProxy.cs /config:App.config
Запустим этот файл (стандартная утилита SvcUtil.exe находится в папке C:\Program Files\Microsoft SDKs\Windows\v7.0\Bin).
Этот файл нужно запустить во время работы нашего сервиса, т.е. в данном случае, после успешного запуска службы Windows WindowsServiceHostForMyService.
В случае успешного запуска, программа SvcUtil.exe сгенерирует 2 файла — MyServiceProxy.cs и App.config.
Эти файлы необходимо добавить для клиентского приложения, чтобы это приложение могло вызывать методы нашей службы (чуть ниже вы узнаете, что файл App.config я решил не добавлять — обойдёмся и без него).
Примечание. Аналогичного результата можно было добиться, запустив
SvcUtil net.tcp://localhost:9002/MyService /out:MyServiceProxy.cs /config:App.config
Т.е. можно запускать эту утилиту, указав только одну конечную точку, либо http либо net.tcp.
В том же решении (Solution) создадим обычное приложение Windows Forms. Назовем его WindowsFormsApplication1

Добавим в этот проект ссылку на System.ServiceModel и, конечно же,
using System.ServiceModel в файле формы.
Добавим в этот проект файл MyServiceProxy.cs (именно его мы сгенерировали утилитой SvcUtil.exe). При этом следует добавить в файл MyServiceProxy.cs следующие строки:
namespace ServiceReference1
{
  using System.Runtime.Serialization;
  using System;
  … затем идёт содержимое файла MyServiceProxy.cs …
и конечно, не забываем поставить завершающую скобку для namespace
}
После этого, мы сможем ссылаться на класс MyServiceClient (этот класс создан программой SvcUtil.exe), указав в файле формы директиву.
using ServiceReference1;
Пример готового файла MyServiceProxy.cs (комментарии удалены):
namespace ServiceReference1
{
  using System.Runtime.Serialization;
  using System;

[System.CodeDom.Compiler.GeneratedCodeAttribute("System.ServiceModel", "3.0.0.0")]
[System.ServiceModel.ServiceContractAttribute(ConfigurationName="IMyService")]
public interface IMyService
{

 [System.ServiceModel.OperationContractAttribute(Action="http://tempuri.org/IMyService/Method1", ReplyAction="http://tempuri.org/IMyService/Method1Response")]
    string Method1(string x);

    [System.ServiceModel.OperationContractAttribute(Action="http://tempuri.org/IMyService/Method2", ReplyAction="http://tempuri.org/IMyService/Method2Response")]
    string Method2(string x);
}

[System.CodeDom.Compiler.GeneratedCodeAttribute("System.ServiceModel", "3.0.0.0")]
public interface IMyServiceChannel : IMyService, System.ServiceModel.IClientChannel
{
}

[System.Diagnostics.DebuggerStepThroughAttribute()]
[System.CodeDom.Compiler.GeneratedCodeAttribute("System.ServiceModel", "3.0.0.0")]
public partial class MyServiceClient : System.ServiceModel.ClientBase<IMyService>, IMyService
{
    public MyServiceClient()
    {
    }

    public MyServiceClient(string endpointConfigurationName) :
            base(endpointConfigurationName)
    {
    }

    public MyServiceClient(string endpointConfigurationName, string remoteAddress) :
            base(endpointConfigurationName, remoteAddress)
    {
    }

    public MyServiceClient(string endpointConfigurationName, System.ServiceModel.EndpointAddress remoteAddress) :
            base(endpointConfigurationName, remoteAddress)
    {
    }

    public MyServiceClient(System.ServiceModel.Channels.Binding binding, System.ServiceModel.EndpointAddress remoteAddress) :
            base(binding, remoteAddress)
    {
    }

    public string Method1(string x)
    {
        return base.Channel.Method1(x);
    }

    public string Method2(string x)
    {
        return base.Channel.Method2(x);
    }
}
}
Поступим неординарно – и не будем добавлять файл App.Config в проект клиента!
Затем набросаем на форму 3 кнопки, текстовое поле textBox1 (пользователь вводит сюда строку для отправки на сервер) и поле richTextbox1 (имитация подсистемы сообщений нашего приложения – именно в это поле будут поступать сообщения от программы, в том числе и те, что вернул нам сервис)
Кнопка btn_Start – создаёт клиента
Кнопка btn_Send – отправляет сервису текстовую строку из текстового поля
Кнопка btn_Close – удаляет клиента из памяти и закрывает приложение
Код формы:
using System;
using System.ServiceModel;
using System.Windows.Forms;
using ServiceReference1;

namespace WindowsFormsApplication1
{

  public partial class Form1 : Form
  {

    MyServiceClient client = null;

    public Form1()
    {
      InitializeComponent();
    }

    private void Print(string text)
    {
      richTextBox1.Text += text + "\n\n";
      richTextBox1.SelectionStart = richTextBox1.Text.Length;
      richTextBox1.ScrollToCaret();
    }

    private void Print(Exception ex)
    {
      if (ex == null) return;
      Print(ex.Message);
      Print(ex.Source);
      Print(ex.StackTrace);
    }

    private void Create_New_Client()
    {
      if (client == null)
        try { Try_To_Create_New_Client(); }
        catch (Exception ex)
        {
          Print(ex);
          Print(ex.InnerException);
          client = null;
        }
      else
      {
        Print("Cannot create a new client. The current Client is active.");
      }
    }

    private void Try_To_Create_New_Client()
    {
      try
      {

        NetTcpBinding binding = new NetTcpBinding(SecurityMode.Transport);

        binding.Security.Message.ClientCredentialType = MessageCredentialType.Windows;
        binding.Security.Transport.ClientCredentialType = TcpClientCredentialType.Windows;
        binding.Security.Transport.ProtectionLevel = System.Net.Security.ProtectionLevel.EncryptAndSign;

        string uri = "net.tcp://192.168.1.2:9002/MyService";

        EndpointAddress endpoint = new EndpointAddress(new Uri(uri));

        client = new MyServiceClient(binding, endpoint);

        client.ClientCredentials.Windows.ClientCredential.Domain = "";
        client.ClientCredentials.Windows.ClientCredential.UserName = "Vasya";
        client.ClientCredentials.Windows.ClientCredential.Password = "12345";

        Print("Creating new client ....");
        Print(endpoint.Uri.ToString());
        Print(uri);

        string test = client.Method1("test");

        if (test.Length < 1)
        {
          throw new Exception("Проверка соединения не удалась");
        }
        else
        {
          Print("test is OK  ! " + test);
        }

      }
      catch (Exception ex)
      {
        Print(ex);
        Print(ex.InnerException);
        client = null;
      }
    }

    private void btn_Start_Click(object sender, EventArgs e)
    {
      Create_New_Client();
    }

    private void btn_Send_Click(object sender, EventArgs e)
    {
      Print("sending message . . .");
      string s = textBox1.Text;
      string x = "";
      if (client != null)
      {
        x = client.Method1(s);
        Print(x);
        x = client.Method2(s);
        Print(x);
      }
      else
      {
        Print("Error! Client does not exist!");
      }
    }

    private void btn_Close_Click(object sender, EventArgs e)
    {
      if (client != null)
      {
        Print("Closing a client ...");
        client.Close();
        client = null;
      }
      else
      {
        Print("Error! Client does not exist!");
      }
      this.Close();
    }
  }
}
Компилируем и запускаем с другой машины из той же сети – и тестируем сервис, нажав сначала btn_Start, а затем отправляя сервису сообщения нажатием btn_Send.

Заметим, что в данном примере на клиенте мы совсем не использовали конечную точку
http://localhost:9001/MyService
а работали только с
net.tcp://localhost:9002/MyService
(вы легко сможете это сделать самостоятельно – раз уж вам net.tcp по плечу, то уж http-то с закрытыми глазами сделаете).
Кроме того, мы не использовали файл App.config, создав на клиенте конечную точку не с помощью настроек, а с помощью кода C#. Причины тому – субъективные – автор не любит возиться с XML-настройками, а по возможности всё делает явно в коде. Спасибо за внимание!
Лирическое отступление. Автор статейки познакомился с языком C# в марте сего года, первое приложение на C# написал в мае (до этого много лет формошлёпил на Delphi и даже на MS Access).
Introduction
What exactly is a Windows service? Windows services are the applications that are running in the background. These services can be automatically started when the computer boots, can be paused and restarted, and do not show any user interface. These features make services ideal for use on a server or whenever you need long-running functionality that does not interfere with other users who are working on the same computer.
What is WCF?
Windows Communication Foundation (WCF) is a framework for building service-oriented applications Using WCF, you can send data as asynchronous messages from one service endpoint to another.
Endpoints
A service endpoint can be part of a continuously available service hosted by IIS, or it can be a service hosted in an application. An endpoint can be a client of a service that requests data from a service endpoint.
An endpoint consists of an Address, a Binding, and a Contract (ABC)
- An address that indicates where the endpoint can be found.
- A binding that specifies how a client can communicate with the endpoint.
- A contract that identifies the operations available.
For more information, you can check out the below link:
https://docs.microsoft.com/en-us/dotnet/framework/wcf/feature-details/endpoints-addresses-bindings-and-contracts
How to create a WCF Windows service
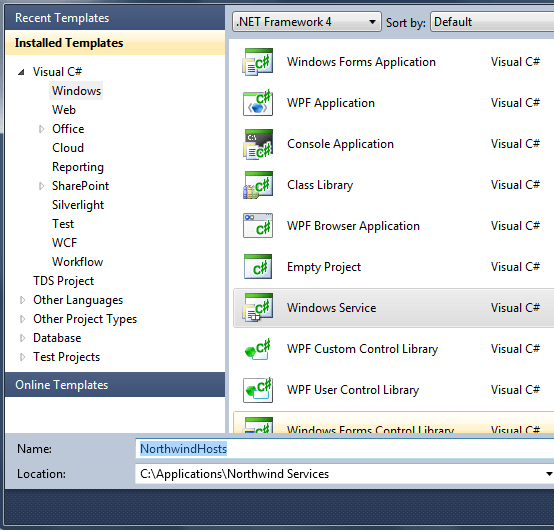
1.Create a new project — Select Windows Service – rename as WindowsService
2.In Windows Service project — right click on Service.cs[design] – select add installer
3. Right-click on service process installer – properties
Select Modifiers as Public and Account as LocalSystem
4. In serviceinstaller1 — properties change service name(TestService) , also change the start typeset as Manual and Save.
5. Now Right Click on the solution (Solution ‘WindowsService’) – Add- New Project – Select WCF — Add WCF Service Library and rename as WcfServiceLibrary
6. Now build Build WCF service library project(WcfServiceLibrary)
7. And add WCF service library reference in windows service(WindowsService)(bin — .dll)
WindowsService – Right click on References – Add Reference – Browse –Select WcfServiceLibrary.dll – Click Ok
8. In Windows service project click on Service1.cs — click on — click here to switch to code view — add namespace of wcf service library (using WcfServiceLibrary)
Also, add a reference of System.ServiceModel
9. Write a start and stop method or replace Service1.cs with the below code
- using System;
- using System.Collections.Generic;
- using System.ComponentModel;
- using System.Data;
- using System.Diagnostics;
- using System.Linq;
- using System.ServiceProcess;
- using System.Text;
- using System.Threading.Tasks;
- using System.ServiceModel;
- namespace WindowsService
- {
- public partial class Service1 : ServiceBase
- {
- internal static ServiceHost hostService = null;
- public Service1()
- {
- InitializeComponent();
- }
- protected override void OnStart(string[] args)
- {
- try
- {
- hostService = new ServiceHost(typeof(WcfServiceLibrary.Service1));
- WcfServiceLibrary.Service1 mgmtService = new WcfServiceLibrary.Service1();
- hostService.Open();
- }
- catch (Exception ex)
- {
- throw new Exception(ex.Message);
- }
- }
- protected override void OnStop()
- {
- hostService.Close();
- }
- }
- }
10. Add below script in App.config of WindowsService
- <?xml version=«1.0» encoding=«utf-8» ?>
- <configuration>
- <startup>
- <supportedRuntime version=«v4.0» sku=«.NETFramework,Version=v4.5.2» />
- </startup>
- <system.web>
- <compilation debug=«true» />
- <membership defaultProvider=«ClientAuthenticationMembershipProvider»>
- <providers>
- <add name=«ClientAuthenticationMembershipProvider» type=«System.Web.ClientServices.Providers.ClientFormsAuthenticationMembershipProvider, System.Web.Extensions, Version=4.0.0.0, Culture=neutral, PublicKeyToken=31bf3856ad364e35» serviceUri=«» />
- </providers>
- </membership>
- <roleManager defaultProvider=«ClientRoleProvider» enabled=«true»>
- <providers>
- <add name=«ClientRoleProvider» type=«System.Web.ClientServices.Providers.ClientRoleProvider, System.Web.Extensions, Version=4.0.0.0, Culture=neutral, PublicKeyToken=31bf3856ad364e35» serviceUri=«» cacheTimeout=«86400» />
- </providers>
- </roleManager>
- </system.web>
- <system.serviceModel>
- <diagnostics>
- <messageLogging logEntireMessage=«true» logKnownPii=«true» logMalformedMessages=«true» logMessagesAtServiceLevel=«true» logMessagesAtTransportLevel=«true» />
- <endToEndTracing propagateActivity=«true» activityTracing=«true» messageFlowTracing=«true» />
- </diagnostics>
- <bindings>
- <basicHttpBinding>
- <binding name=«basicSecureBinding» maxBufferPoolSize=«1000000» maxReceivedMessageSize=«1000000»>
- <readerQuotas maxDepth=«1000000» maxArrayLength=«1000000» maxBytesPerRead=«1000000» />
- <security mode=«TransportWithMessageCredential»>
- <message clientCredentialType=«UserName» />
- </security>
- </binding>
- </basicHttpBinding>
- </bindings>
- <services>
- <service name=«WcfServiceLibrary.Service1»>
- <!—<endpoint address=«» binding=«basicHttpBinding» bindingNamespace=«http://enterurlhere/» contract=«WcfServiceLibrary.IService1»>
- <identity>
- <dns value=«localhost» />
- </identity>
- </endpoint>
- <endpoint address=«mex» binding=«mexHttpBinding» bindingNamespace=«http://enterurlhere/» contract=«IMetadataExchange» />—>
- <host>
- <baseAddresses>
- <add baseAddress=«http://localhost:8733/Design_Time_Addresses/WcfServiceLibrary/Service1/» />
- </baseAddresses>
- </host>
- </service>
- </services>
- <behaviors>
- <serviceBehaviors>
- <behavior>
- <serviceMetadata httpGetEnabled=«true» httpsGetEnabled=«true» />
- <serviceDebug includeExceptionDetailInFaults=«true» />
- </behavior>
- </serviceBehaviors>
- </behaviors>
- <serviceHostingEnvironment multipleSiteBindingsEnabled=«true» />
- </system.serviceModel>
- <runtime>
- <assemblyBinding xmlns=«urn:schemas-microsoft-com:asm.v1»>
- <dependentAssembly>
- <assemblyIdentity name=«Newtonsoft.Json» publicKeyToken=«30ad4fe6b2a6aeed» culture=«neutral» />
- <bindingRedirect oldVersion=«0.0.0.0-9.0.0.0» newVersion=«9.0.0.0» />
- </dependentAssembly>
- <dependentAssembly>
- <assemblyIdentity name=«Microsoft.Owin» publicKeyToken=«31bf3856ad364e35» culture=«neutral» />
- <bindingRedirect oldVersion=«0.0.0.0-4.0.0.0» newVersion=«4.0.0.0» />
- </dependentAssembly>
- </assemblyBinding>
- </runtime>
- </configuration>
11. Build your Windows service project
Now right-click on the solution (Solution ‘WindowsService’) – Add- New Project – Click on Other Project Types tab – Select Setup Project – Rename as WcfWinServiceSetup
12.Right-click on setup project name — View — Custom action
Right-click on custom action — add custom actions — application folder-
Add output — Primary output – In project dropdown select WindowsService — Ok – Ok
13.Now build the setup project
The file will generate in your debug or release folder
Now Install the setup project – you can install the setup project by double click on setup.exe file
Or in the solution right-click on WcfWinServiceSetup and click on Install- click next – select radio button Everyone – Next – Next – after Install Complete click close
14.Start the service — Start menu — services — right click on the service name(TestService) — start service.
How to consume a WCF windows service through a console application
1. Create a new Console Application and rename as CallWcfWinService
2. Add service reference — Copy baseAdddress from app.config file of WcfServiceLibrary in my case it is http://localhost:8733/Design_Time_Addresses/WcfServiceLibrary/Service1/
Right-click on References – Add service references – In address – Add baseaddress(http://localhost:8733/Design_Time_Addresses/WcfServiceLibrary/Service1/)
Click on Go – You can see the below screen – Click OK
3. Write down the below code in your program.cs file:
- using System;
- using System.Collections.Generic;
- using System.Linq;
- using System.Text;
- using System.Threading.Tasks;
- namespace CallWcfWinService
- {
- class Program
- {
- public static void Main(string[] args)
- {
- try
- {
- ServiceReference1.Service1Client objServive = new ServiceReference1.Service1Client();
- ServiceReference1.CompositeType objComposite = new ServiceReference1.CompositeType();
- objComposite.BoolValue = true;
- objComposite.StringValue = «Hello World»;
- ServiceReference1.CompositeType obj = objServive.GetDataUsingDataContract(objComposite);
- string output = obj.StringValue;
- Console.WriteLine(«Output: « + output);
- }
- catch (Exception ex)
- {
- string message = ex.Message;
- throw;
- }
- finally
- {
- Console.ReadKey();
- }
- }
- }
- }
How to debug windows service using a console application
1. In windows service solution click on debug in the main menu — attach process which has service name .exe (WindowsService.exe)
2. Now debug the console application, line by line
You can see the output below.
Summary
In this blog, you learned how to create a WCF Windows Service, how to create a setup project, and finally, how to consume a WCF Windows service in a console application.
Thank you for reading.
Hosting WCF service to Windows service gives you the following benefits.
-
Service will be automatically started whenever the hosting computer starts.
Service can be manually started, stop, or restart. - Service will always be activated and available for clients. No need for runtime activation.
- Windows Administrators already know managing Windows services.
- Provides an extra layer of security through windows identity.
- Gives better performance than service hosted in IIS.
- Gives you the flexibility to choose any bindings.
Host WCF Product Service to windows Service
-
Create a WCF Service library
Create a new WCF Service library with the help of Create a new WCF service library and test using WCFTestClient
-
Add Windows service application for hosting
Add new windows service application by right click on the solution and select a new project
-> windows from installed template -> Windows Service. Name the project as NorthwindHosts.
-
Add Product Service Host
Add a new class to NorthwindHosts project name it as ProductServiceHost. You can mark
it as internal as it will be referred only by the NorthwindHosts assembly. Add a
reference to NorthwindServices or your WCF service and System.ServiceModel.Create an object of ServiceHost and write methods for service start and stop events.
namespace NorthwindHost { internal class ProductServiceHost { static ServiceHost serviceHost = null; public ProductServiceHost() { } internal static void Start() { if (serviceHost != null) { serviceHost.Close(); } //Create a ServiceHost for the ProductService type //and provide base address. serviceHost =new ServiceHost(typeof(ProductService)); //Open the ServiceHostBase to create listeners //and start listening for messages. serviceHost.Open(); } internal static void Stop() { if (serviceHost != null) { serviceHost.Close(); serviceHost = null; } } } } -
Add a new windows service class to NorthwindHost by right clicking on the project ->
Add -> New Item -> Select Windows Service from template -> name it as ServiceHostsRight click on newly created ServiceHosts.cs and select view code. ServiceHosts.cs
is inherited by ServiceBase. Override the OnStart and OnStop methods to start and
stop ProductServiceHost.namespace NorthwindHost { public partial class ServiceHosts : ServiceBase { public ServiceHosts() { InitializeComponent(); ServiceName = "Northwind Services"; } protected override void OnStart(string[] args) { ProductServiceHost.Start(); } protected override void OnStop() { ProductServiceHost.Stop(); } } } -
Run ServiceHosts
Open Program.cs from NorthwindHost windows service application and run the ServiceHosts.
namespace NorthwindHost { static class Program { static void Main() { ServiceBase[] ServicesToRun; ServicesToRun = new ServiceBase[] { new ServiceHosts() }; ServiceBase.Run(ServicesToRun); } } } -
Add Installer
Add Installer class to NorthwindHost windows service application by right click
on NorthwindHost -> select Add -> New Item -> select Installer.cs from Visual C#
templates.Name the newly created Installer.cs as NorthwindInstaller.cs
Right click NorthwindInstaller from solution explorer and select view code.
Add a reference to System.ServiceProcess and add below code to the NorthwindInstaller
constructor.namespace NorthwindHost { [RunInstaller(true)] public partial class ProjectInstaller : System.Configuration.Install.Installer { private ServiceProcessInstaller process; private ServiceInstaller service; public ProjectInstaller() { process = new ServiceProcessInstaller(); process.Account = ServiceAccount.LocalSystem; service = new ServiceInstaller(); service.StartType = ServiceStartMode.Automatic; service.ServiceName = "Northwind Servces"; service.Description = "Northwind Servces"; Installers.Add(process); Installers.Add(service); } } } -
Config settings
Copy <system.serviceModel> settings from your NorthwindServices WCF service
and paste it in NorthwindHost windows service’s app.config file under <configuration>
tag.With this, your service is ready to install.
-
Northwind WCF service to Windows services
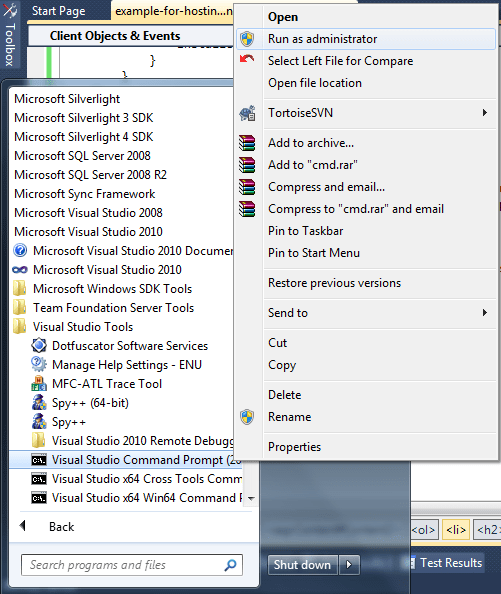
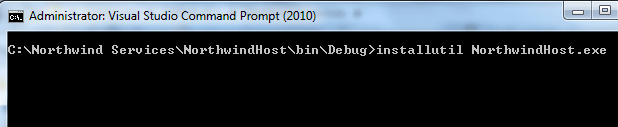
Click on Windows Start button -> Right click on Visual Studio Command Prompt 2010
-> Run as Administrator
Use a CD command till your debug/release folder of NorthwindHosts Windows Service application
and execute InstallUtil NorthwindHost.exe
-
Start Northwind windows Service
Go to Services by clicking Windows Start button -> Run -> Enter
Services.msc
. In the Windows services application locate Northwind Services and start
the service by right clicking it.If any error comes while starting service check the errors in the windows event log.
Now your service is ready to consume.
Source Code on Github
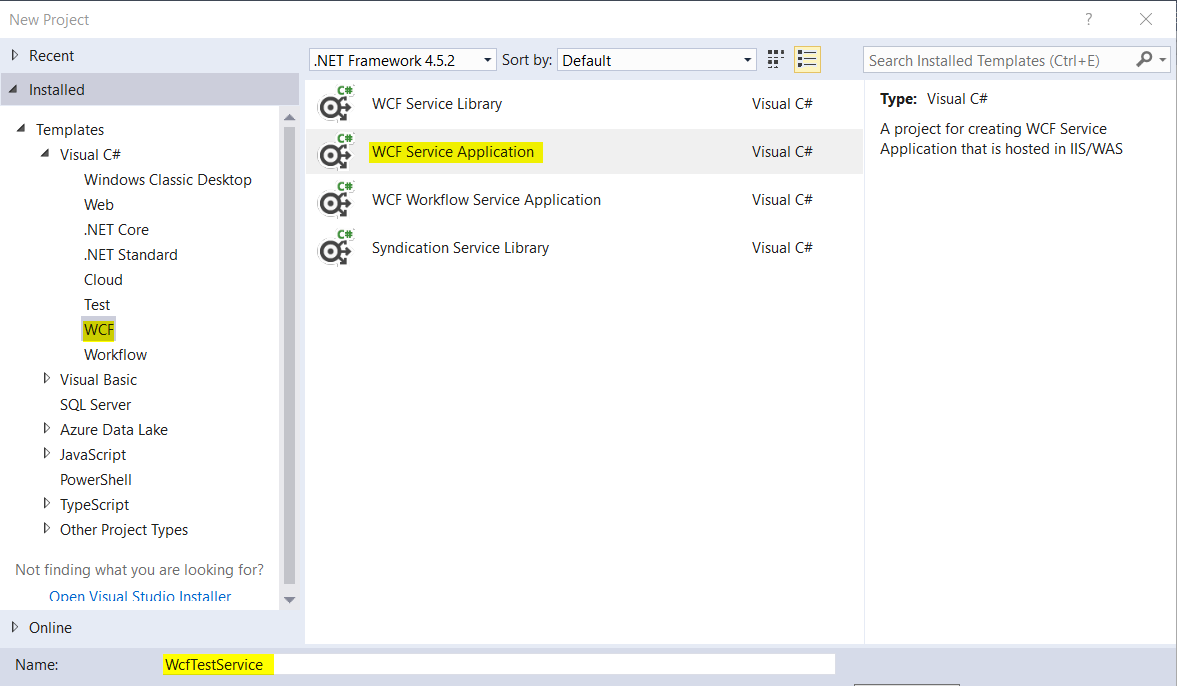
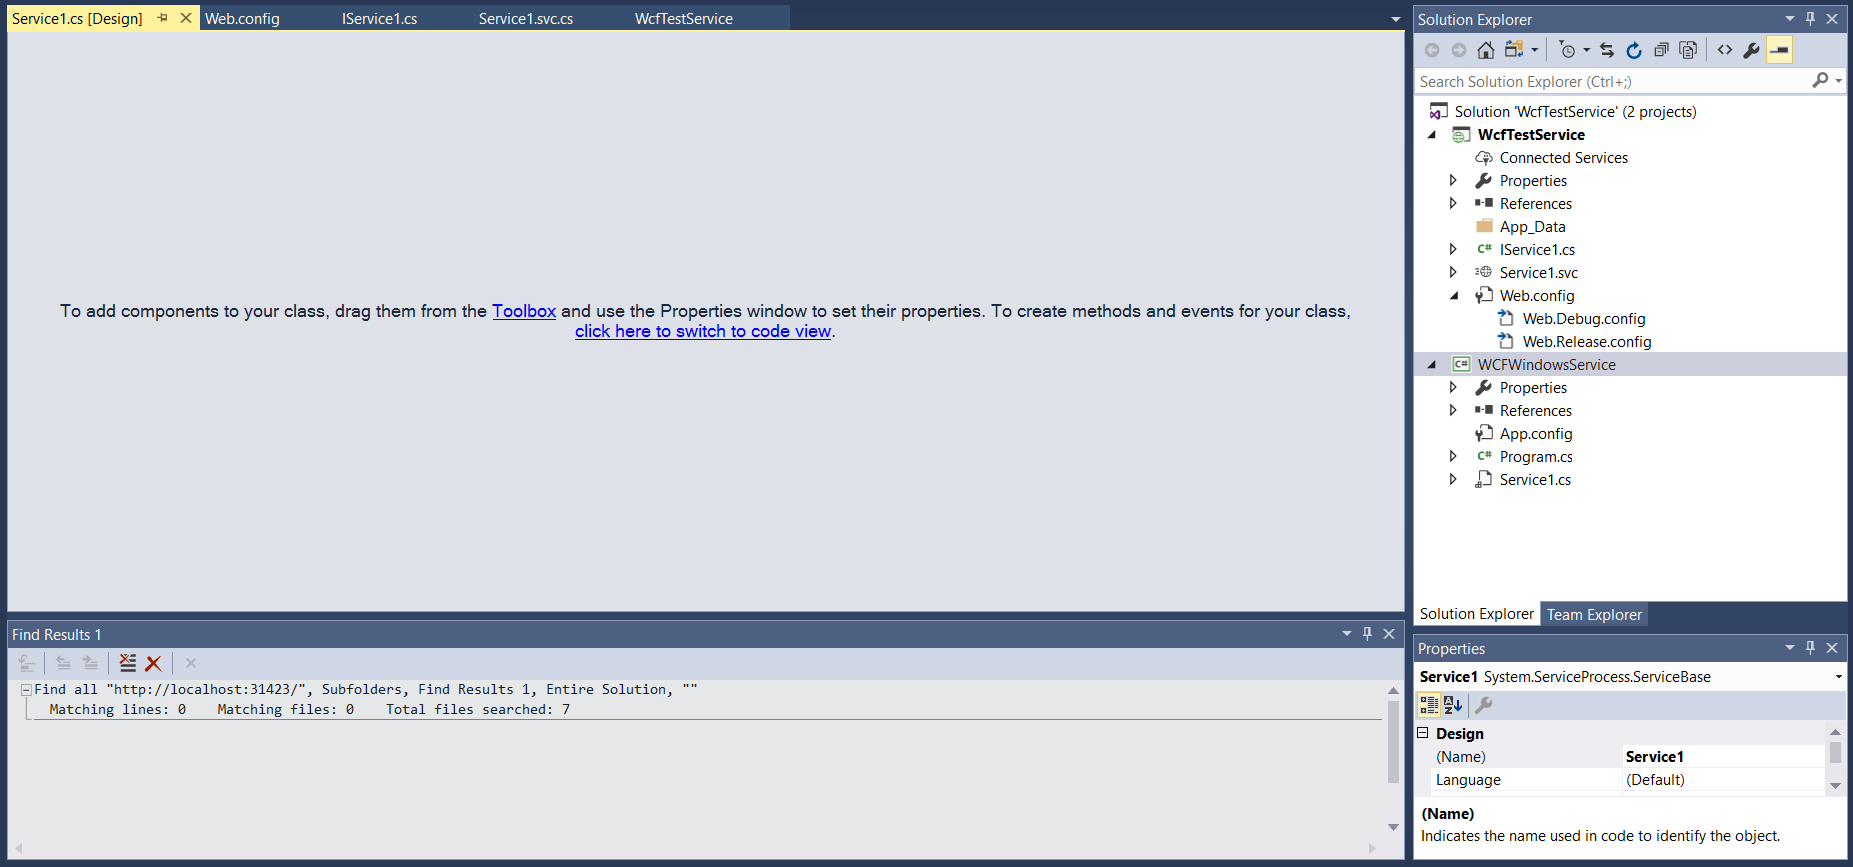
Here we will create a WCF web service hosted as a windows service. We will go through step by step how to do this.
First, create a new WCF Service Application:
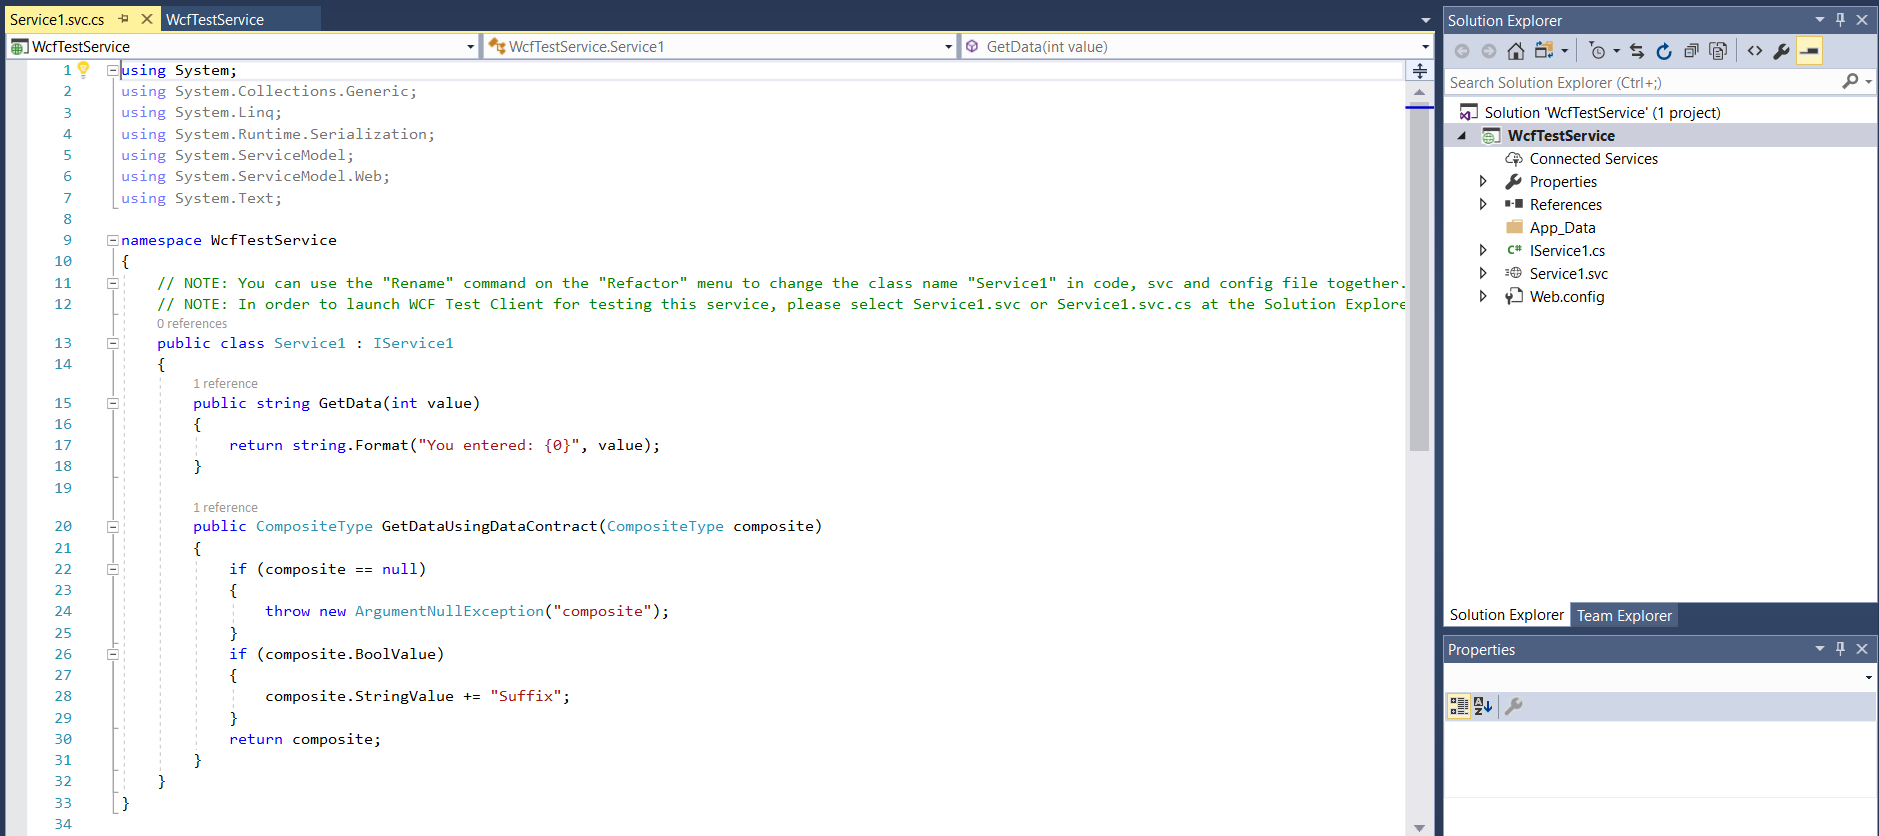
This will create the project:
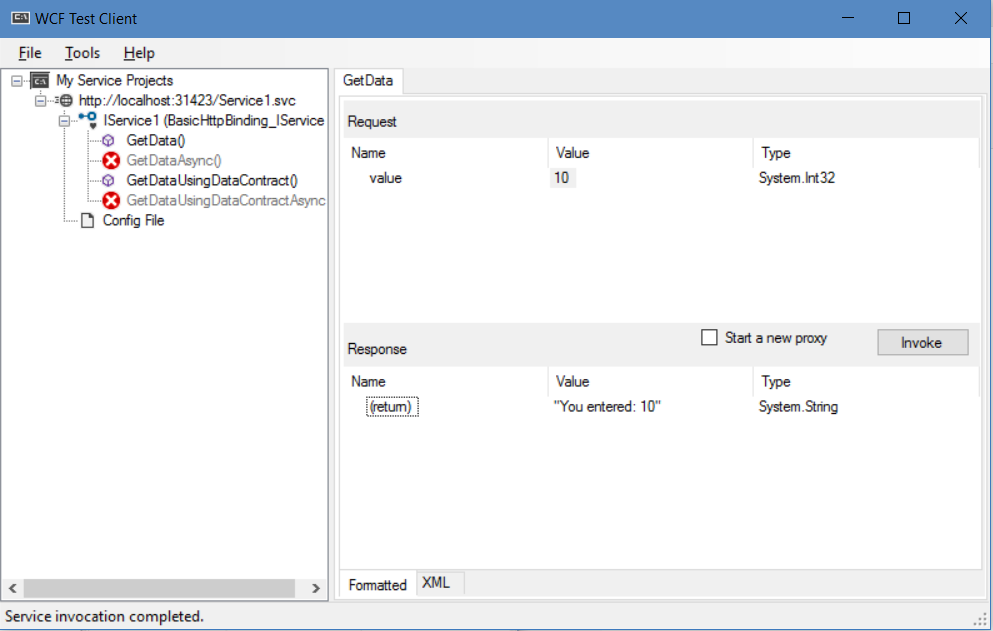
If we select the Service1.svc page and press F5 to run this, it will open the WCF Test Client. From here, we can select the GetData() method and enter a value. Invoking the method will then return the result, e.g. “You entered: 10”:
Notice the components of a WCF service. There is:
- The service contract. This is in the IService1.cs file and contains:
- ServiceContract. This is used to define what the Operations are
- OperationContract(s)
- DataContract. This is used to define data that will be sent back and forth
- Data Member(s)
- ServiceContract. This is used to define what the Operations are
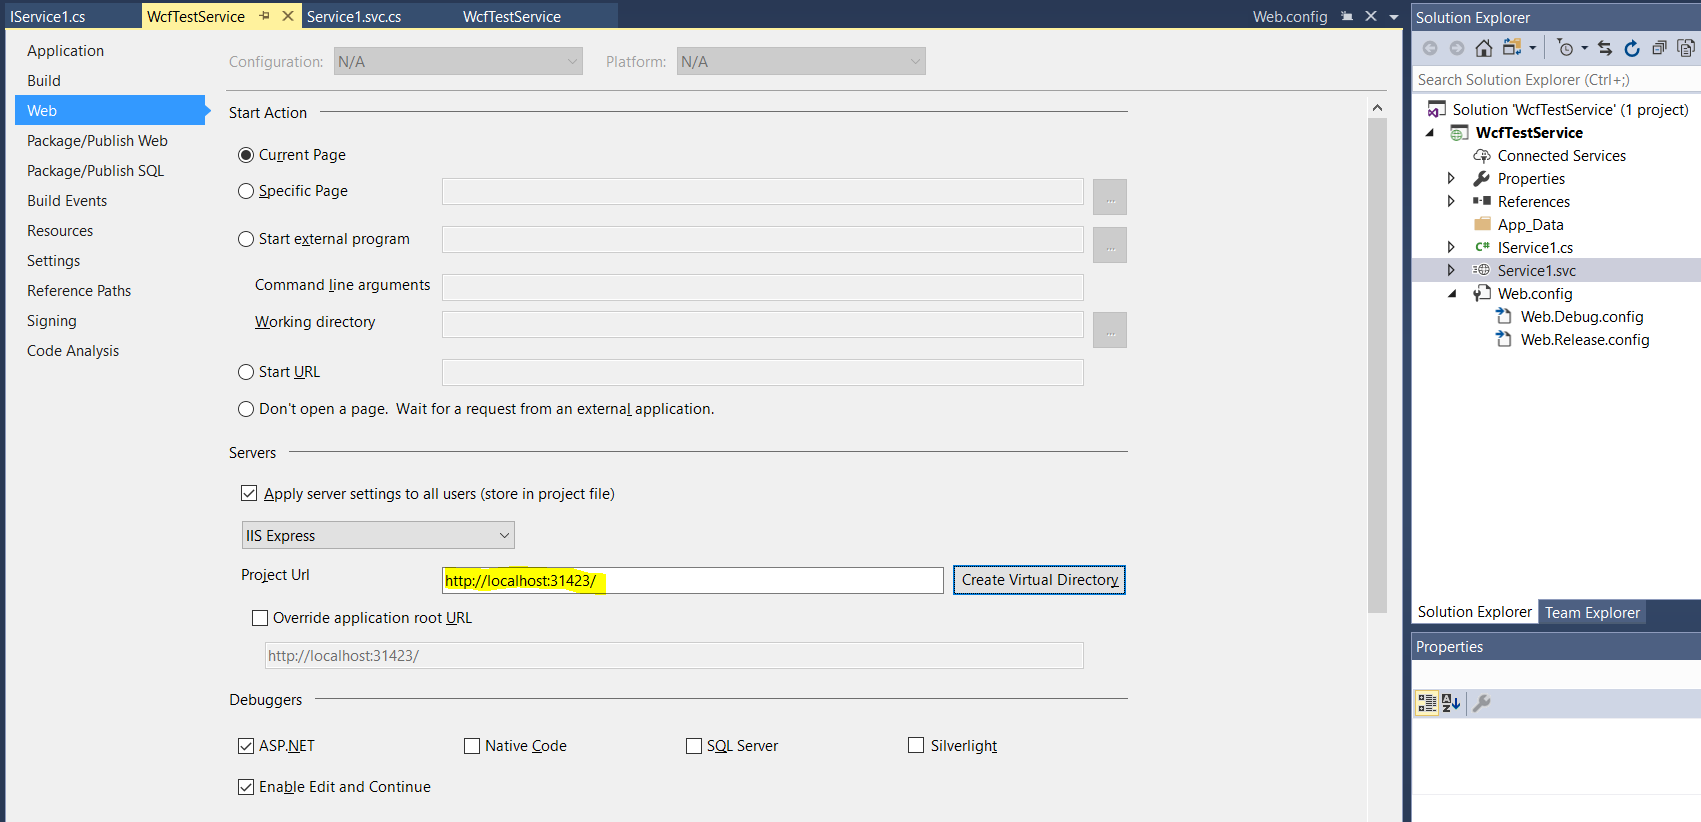
Notice when in F5, the service is running and we can hit the URL of the service:

Stopping debugging prevents us from accessing that endpoint:
The endpoint settings can be found in the project properties:
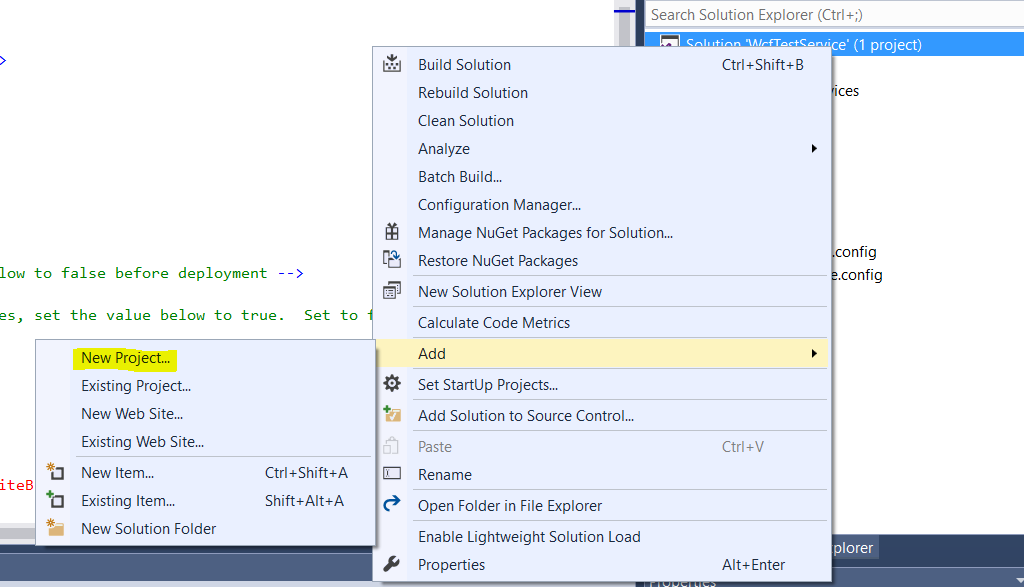
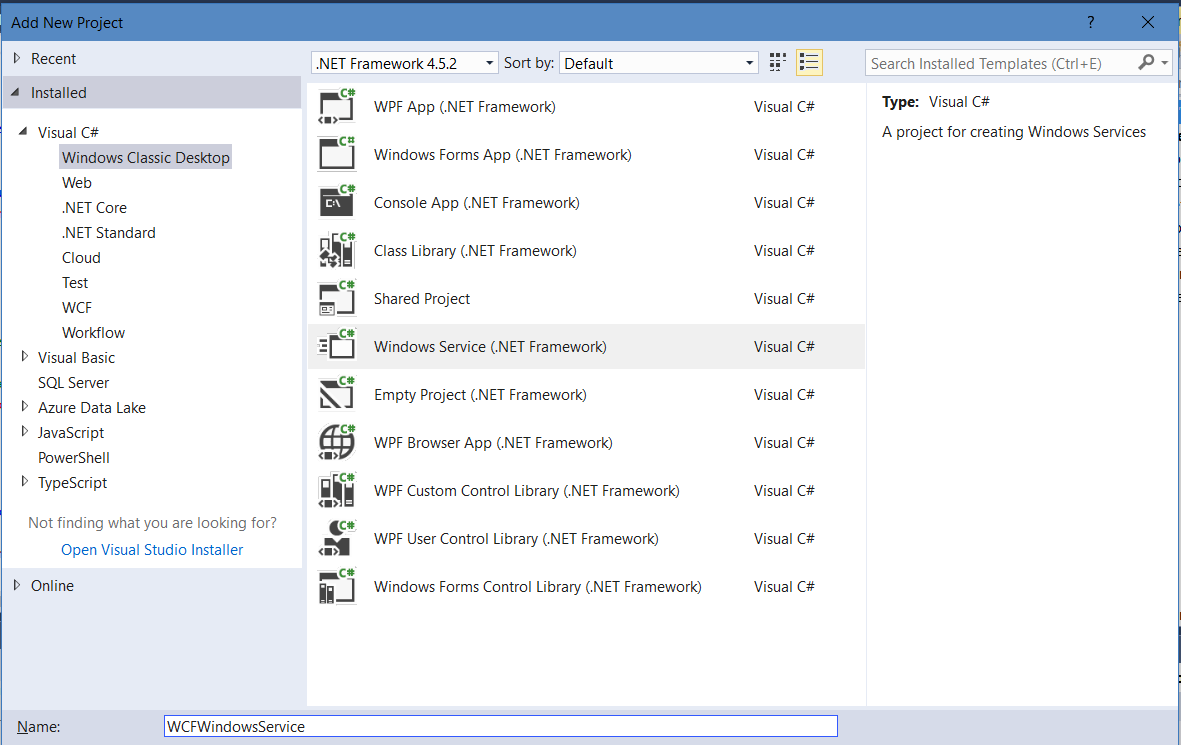
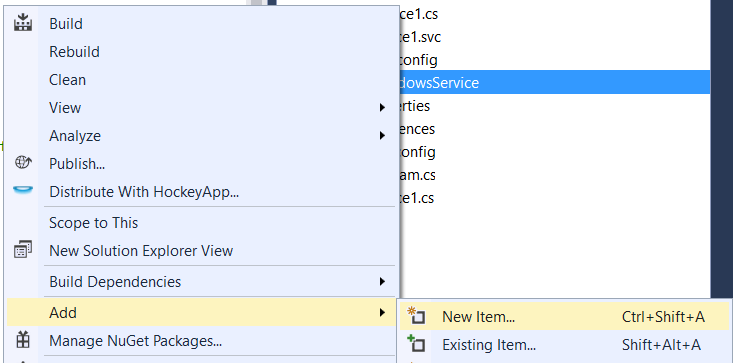
Now, right click the solution and click Add->New Project. We will add a Windows Service to host our new service:
Select Windows Service:
This will open the solution:
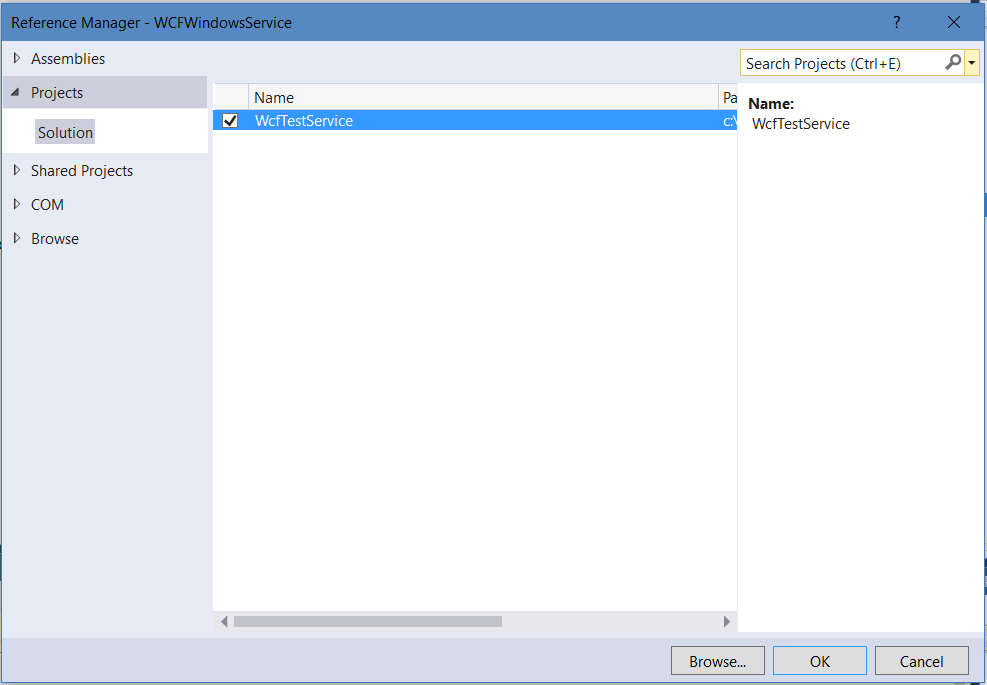
Click to add a new reference:
Select the reference of the project we just created:
Now in the windows service, add a new reference to the System.ServiceModel dll:
Add the following code. You will need to add:
- using System.ServiceModel;
- using System.ServiceModel.Description;
To the OnStart method we are adding code to add a URI to our service. We will use the same URI as before.
using System;
using System.Collections.Generic;
using System.ComponentModel;
using System.Data;
using System.Diagnostics;
using System.Linq;
using System.ServiceProcess;
using System.Text;
using System.Threading.Tasks;
using System.ServiceModel;
using System.ServiceModel.Description;
using WcfTestService;

namespace WCFWindowsService
{
    public partial class Service1 : ServiceBase
    {
        ServiceHost s = null;

        public Service1()
        {
            InitializeComponent();
        }

        protected override void OnStart(string[] args)
        {
            if (s != null)
            {
                s.Close();
            }
            Uri httpUrl = new Uri("http://localhost:31423/Service1.svc");
            s = new ServiceHost(typeof(WcfTestService.Service1), httpUrl);
            s.AddServiceEndpoint(typeof(WcfTestService.IService1), new WSHttpBinding(), "");
            ServiceMetadataBehavior smb = new ServiceMetadataBehavior();
            smb.HttpGetEnabled = true;
            s.Description.Behaviors.Add(smb);
            s.Open();
        }

        protected override void OnStop()
        { if (s != null)
          {
             s.Close();
             s = null;
          }
        }
    }
}
We now need to add the installer class:
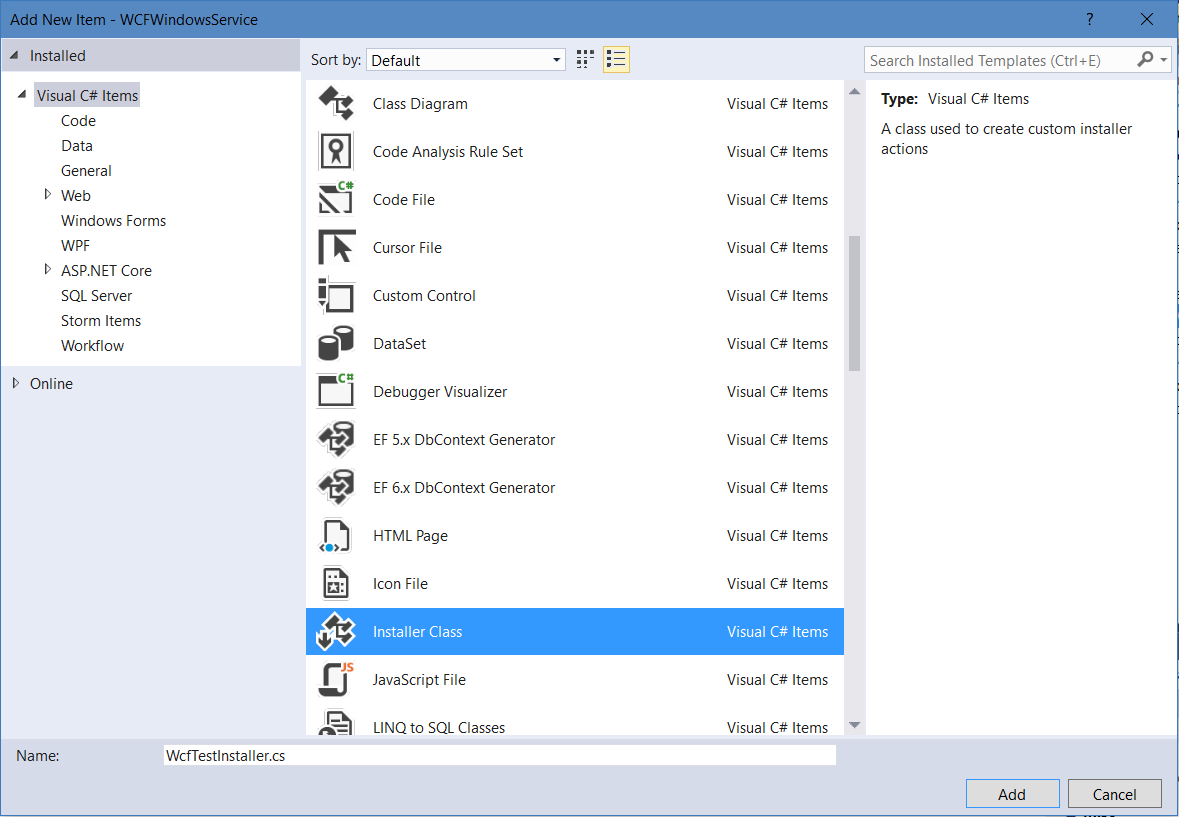
Now, add the code for the installer. Add:
- using System.ServiceProcess
Add code to the WcfTestInstaller. Here we will name the windows service and set the account for it to run under:
using System;
using System.Collections;
using System.Collections.Generic;
using System.ComponentModel;
using System.Configuration.Install;
using System.Linq;
using System.Threading.Tasks;
using System.ServiceProcess;

namespace WCFWindowsService
{
    [RunInstaller(true)]
    public partial class WcfTestInstaller : System.Configuration.Install.Installer
    {
        public WcfTestInstaller()
        {
            //InitializeComponent();

            ServiceProcessInstaller process = new ServiceProcessInstaller();
            process.Account = ServiceAccount.NetworkService;
            ServiceInstaller service = new ServiceInstaller();
            service.ServiceName = "WcfTestWindowsService";
            service.DisplayName = "WcfTestWindowsService";
            service.Description = "WcfTestWindowsService.";
            service.StartType = ServiceStartMode.Automatic;

            Installers.Add(process);
            Installers.Add(service);
        }
    }
}
Compile the service. This creates the following files in our bin/debug directory:
We can now install our service.
InstallUtil.exe is installed in this location:

Run a command prompt and run the command:
InstallUtil.exe WCFWindowsService.exe
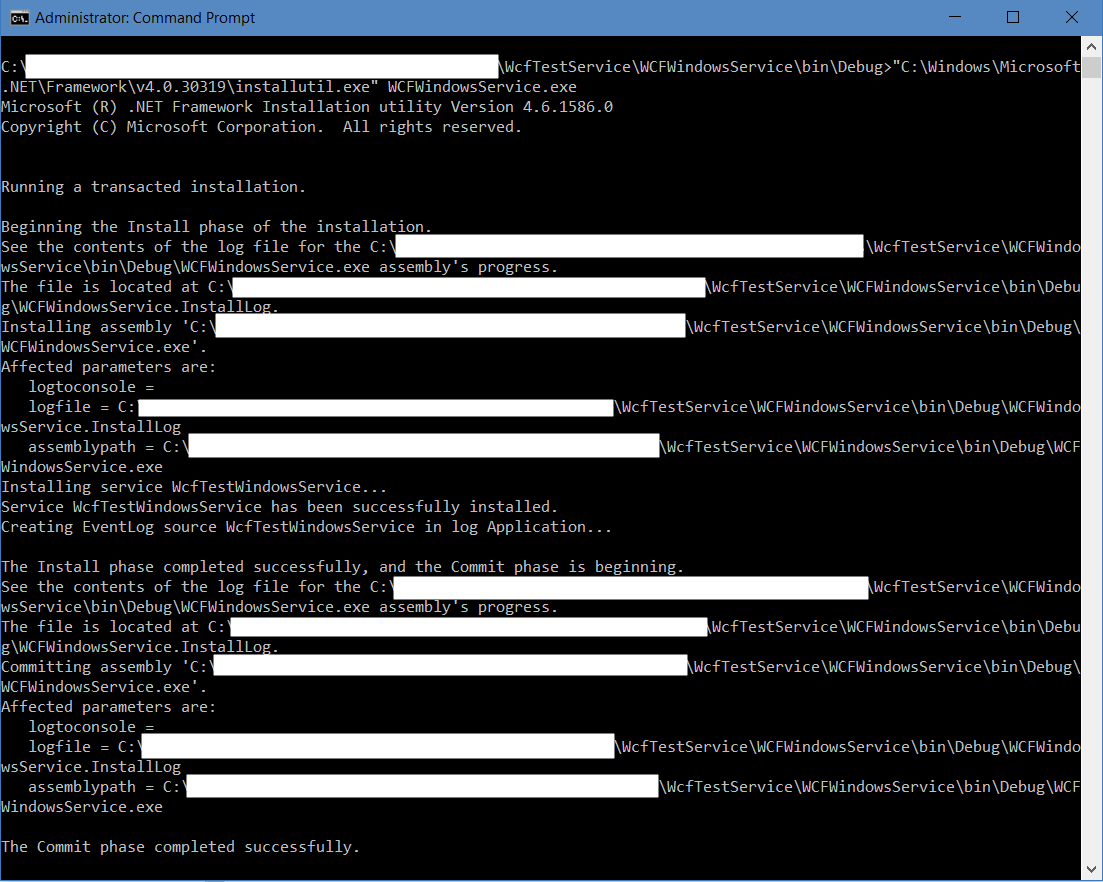
You will now see the service in Windows Services:

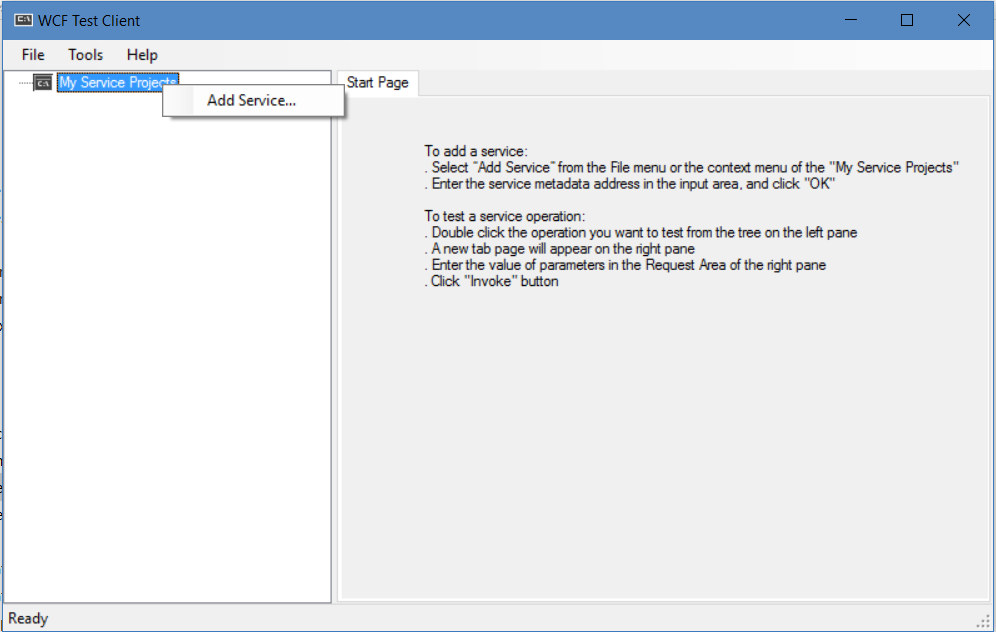
Let’s now try calling the service through the WCF Test Client that we used above. This is located in my environment at: C:\Program Files (x86)\Microsoft Visual Studio 14.0\Common7\IDE
Right click to add a service:
Enter the endpoint URL:
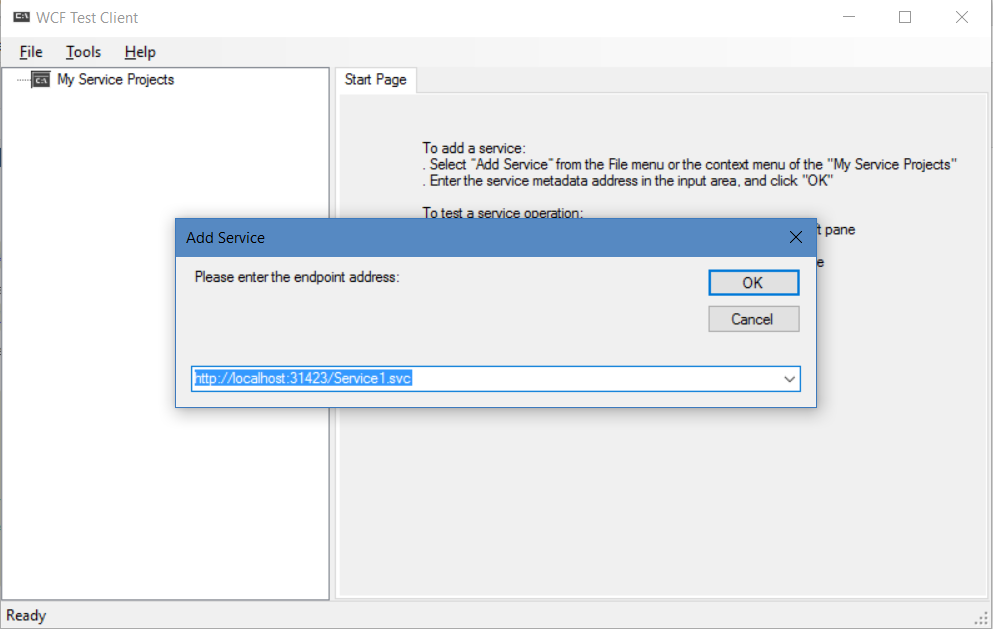
The end point will be displayed. We can enter a value and get a result:
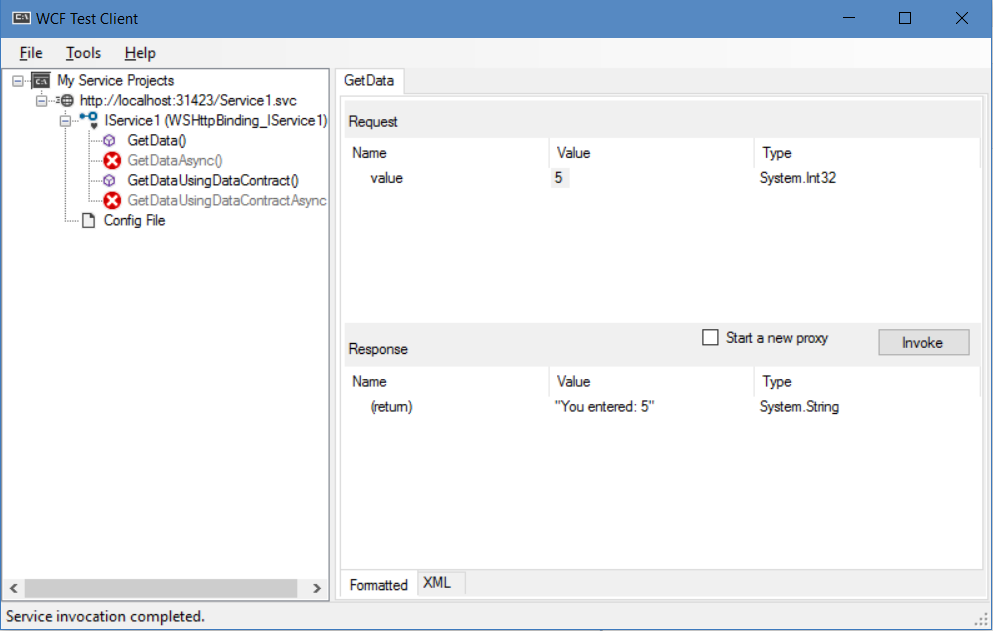
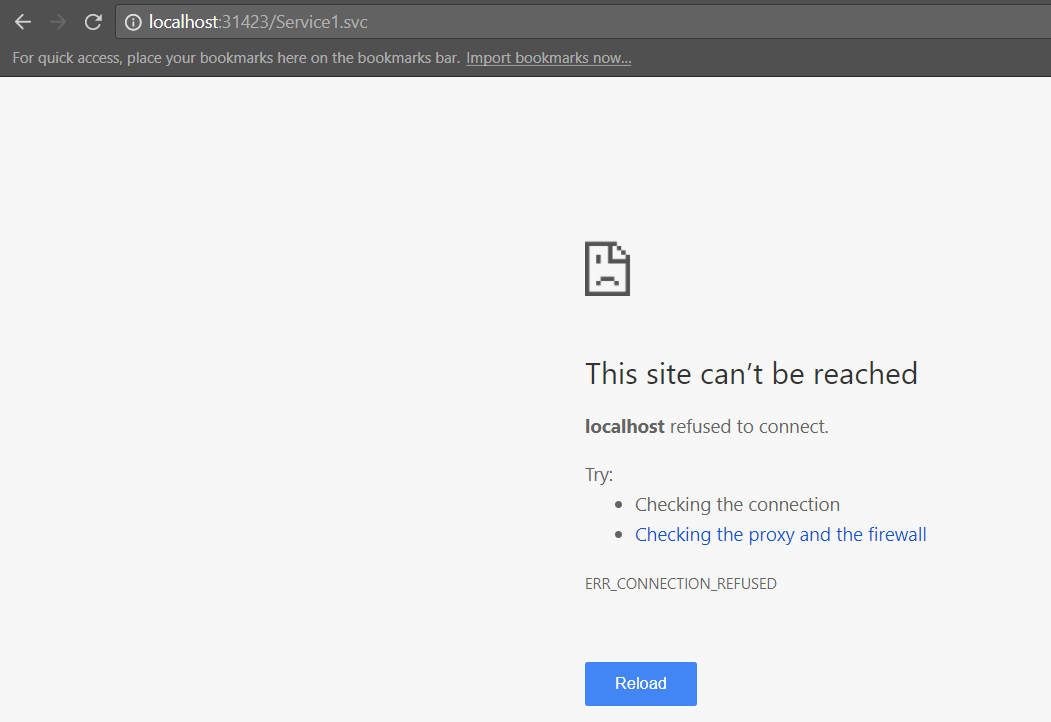
Now stop the service running in Windows. Try invoking the service again, and you will get this message:
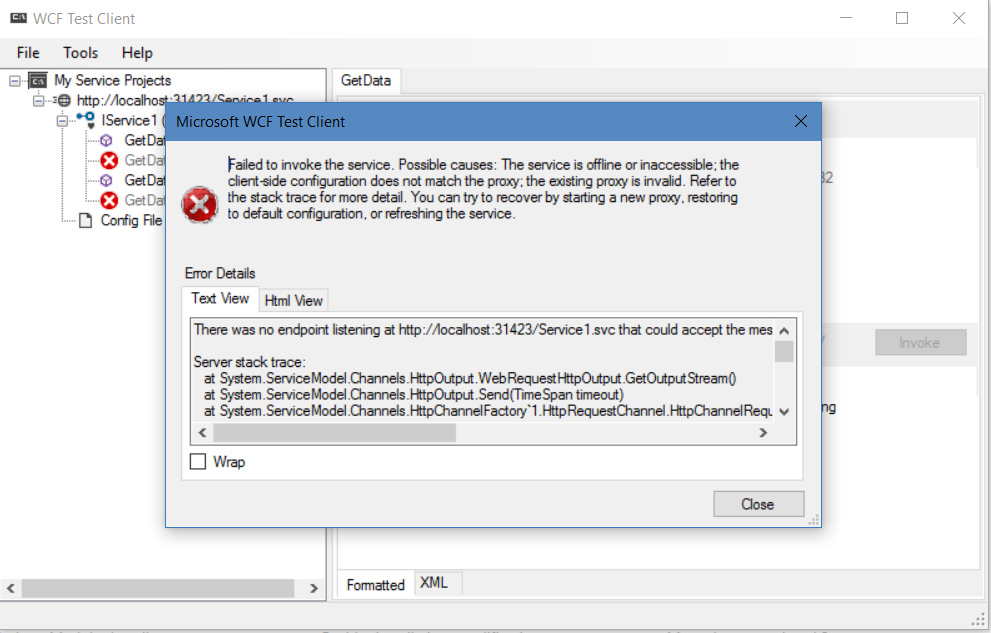
THANKS FOR READING. BEFORE YOU LEAVE, I NEED YOUR HELP.
I AM SPENDING MORE TIME THESE DAYS CREATING YOUTUBE VIDEOS TO HELP PEOPLE LEARN THE MICROSOFT POWER PLATFORM.
IF YOU WOULD LIKE TO SEE HOW I BUILD APPS, OR FIND SOMETHING USEFUL READING MY BLOG, I WOULD REALLY APPRECIATE YOU SUBSCRIBING TO MY YOUTUBE CHANNEL.
THANK YOU, AND LET’S KEEP LEARNING TOGETHER.
CARL
https://www.youtube.com/carldesouza
When building Windows services we often need a way to communicate with them. The natural way to communicate to service is to send signals to it. But this is very limited communication. Usually we need more powerful communication mechanisms with services. In this posting I will show you how to use service-hosted WCF web service to communicate with Windows service.
Create Windows service

Suppose you have Windows service created and service class is named as MyWindowsService. This is new service and all we have is default code that Visual Studio generates.
Create WCF service
Add reference to System.ServiceModel assembly to Windows service project and add new interface called IMyService. This interface defines our service contracts.
[ServiceContract]
public interface IMyService
{
[OperationContract]
string SayHello(int value);
}
We keep this service simple so it is easy for you to follow the code. Now let’s add service implementation:
[ServiceBehavior(InstanceContextMode=InstanceContextMode.Single)]
public class MyService : IMyService
{
public string SayHello(int value)
{
return string.Format(«Hello, : {0}», value);
}
}
With ServiceBehavior attribute we say that we need only one instance of WCF service to serve all requests. Usually this is more than enough for us.
Hosting WCF service in Windows Service
Now it’s time to host our WCF service and make it available in Windows service. Here is the code in my Windows service:
public partial class MyWindowsService : ServiceBase
{
private ServiceHost _host;
private MyService _server;
public MyWindowsService()
{
InitializeComponent();
}
protected override void OnStart(string[] args)
{
_server = new MyService();
_host = new ServiceHost(_server);
_host.Open();
}
protected override void OnStop()
{
_host.Close();
}
}
Our Windows service now hosts our WCF service. WCF service will be available when Windows service is started and it is taken down when Windows service stops.
Configuring WCF service
To make WCF service usable we need to configure it. Add app.config file to your Windows service project and paste the following XML there:
<system.serviceModel>
<serviceHostingEnvironment aspNetCompatibilityEnabled=«true« />
<services>
<service name=«MyWindowsService.MyService« behaviorConfiguration=«def«>
<host>
<baseAddresses>
<add baseAddress=«http://localhost:8732/MyService/«/>
</baseAddresses>
</host>
<endpoint address=«» binding=«wsHttpBinding« contract=«MyWindowsService.IMyService«>
</endpoint>
<endpoint address=«mex« binding=«mexHttpBinding« contract=«IMetadataExchange«/>
</service>
</services>
<behaviors>
<serviceBehaviors>
<behavior name=«def«>
<serviceMetadata httpGetEnabled=«True«/>
<serviceDebug includeExceptionDetailInFaults=«True«/>
</behavior>
</serviceBehaviors>
</behaviors>
</system.serviceModel>
Now you are ready to test your service. Install Windows service and start it. Open your browser and open the following address: http://localhost:8732/MyService/ You should see your WCF service page now.
Conclusion
WCF is not only web applications fun. You can use WCF also as self-hosted service. Windows services that lack good communication possibilities can be saved by using WCF self-hosted service as it is the best way to talk to service. We can also revert the context and say that Windows service is good host for our WCF service.